Well, we recently took on the biggest nursery project to date and we lived to tell the tale. This post is a bit of a two-fer, since it not only details how to stain any wooden or veneered piece of furniture but also touches on how to paint anything that’s wood or veneer since we did a two-toned treatment on a dresser that we hunted down on the cheap.
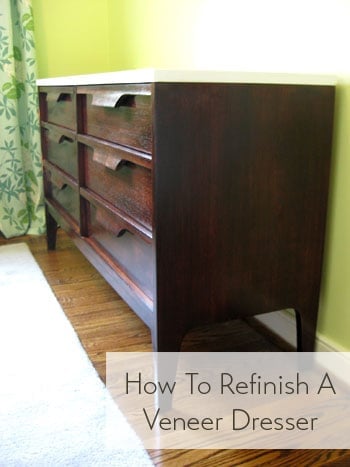
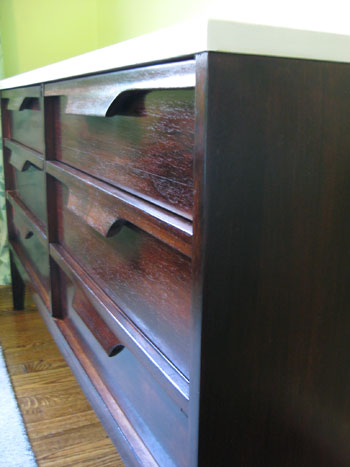
That’s right, we stained our “new” six drawer dresser with a deep rich brown tone and painted the top a crisp and glossy white color. Here’s how it all went down.
First we had to search for something to add tons of storage space to our tiny-closeted nursery, so we measured the wall that we knew we would be dedicating to a nice double dresser and hopped on Craigslist chanting “less than sixty inches” and crossing our fingers. Our hope was to find something that was up on little legs (so it felt airier and less heavy than a legless version) and we also needed it to be deep enough to accommodate a 17″ wide changing pad since part of the dresser top will also be used as a diapering zone. We had a budget of $150 or less in mind, so we hoped to find something that was a few decades old and solidly made (as opposed to something more flimsy from Ikea circa 2005). We also wanted a piece with nice clean lines to work with our crib which is a bit on the modern side, so a super curvy dresser might feel a little out of place. A few days of stalking Craigslist turned up this listing:
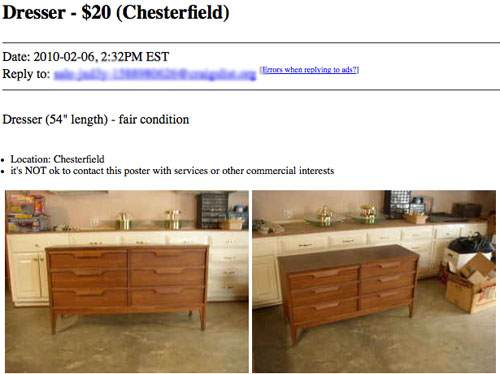
The little legs along with the 54″ length was perfect, plus the clean-lined look of the dresser would work amazingly well with our crib. And did you see that price? Twenty bucks?! Yes please. I said a little prayer to the Craigslist gods and shot off an email right away. Less than three hours later we heard from the dresser’s owner and he said we were first in line if we still wanted it. We just had two more questions: what was the depth of the piece (just to be sure it wasn’t too narrow to accommodate our 17″ changing table pad) and was the dresser made of solid wood (since that’s a lot easier to refinish than something covered in laminate or thin flaking veneer).
The good news was that it was just deep enough for our changing pad. The bad news is that it was veneered (although still extremely solidly made with dovetailed joints, etc). Oh well, it was $20- what did we expect? The verdict: we said we’d love to take a look at it and again found ourselves crossing our fingers (this time in hopes that that the veneer was nice and thick so it could take some sanding and staining). See, the plan had always been to stain the dresser and paint the top a glossy white ever since we got our two toned crib and loved the look. But unlike solid wood, if veneer is too thin it’s pretty hard to sand and restain without going right through it and hitting the plywood underneath during the sanding step.
Luckily when we got there to check out our new Craigslist crush the dresser had amazingly thick veneering (about 1/4th of an inch) which made it easy to determine that we could totally sand it down and restain it without any trouble. Note: to check how thick your veneer is just open a drawer or look at the back of the piece where you’ll hopefully be able to see if it’s paper thin (aka: not-sandable) or thicker than a dime or so (aka: sandable).
Now certain that our dresser hunt was over and this was “IT”, we handed over twenty beans to our nice Craigslist friend and took home our “new” double dresser (thanks to John’s sister’s borrowed SUV- love you Emily!). Then it was time to refinish her. Here she is hanging out on the patio atop a nice big piece of cardboard to catch any stain, paint or primer drips during the muti-phase project:
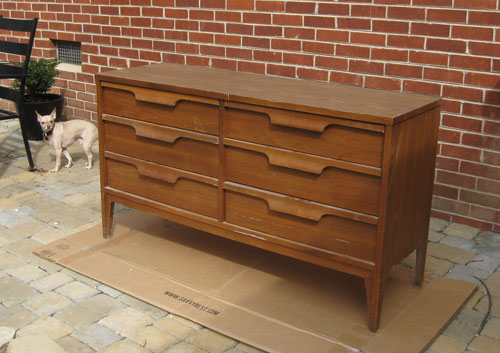
You can see that the veneer is scraped and stained in a few areas and of course the finish isn’t deep and rich like the rest of the wood tones in our house (including the drawer on our new crib in the nursery). Hence the refinishing idea. Oh and it bears mentioning that this little staining & painting tutorial will work for any solid wood items as well as anything that’s veneered as long as the veneering isn’t paper thin. Note: this method is not recommended for any laminate furnishings because that material cannot be successfully stained since it’s not a true layer of wood.
The first thing we did was wipe everything down with a moist rag (both inside the drawers and out) just to remove any spiderwebs, old pen caps & pennies in the drawers, etc. Of course everything was about to get coated in sanding dust again momentarily, but it was a nice “reset” for the dresser and we were able to take things like random paperclips out of the drawers so they didn’t fly around when we got to our big sanding step. Oh and while we wiped things down we came across this label inside the top right drawer:
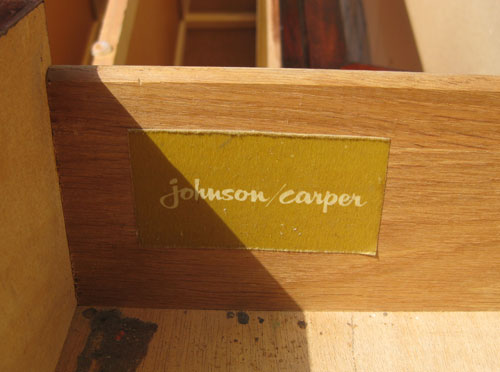
It turns out our twenty beans had scored us an original 50’s or 60’s mid-century dresser. Cool right? We thought so. And that explained why it was so well made and had such nice thick veneering (they just don’t make ’em like they used to). Anyway, the next step was to break out our trusty sander and some extra sandpaper to get to all those crevices that it couldn’t reach by hand. We used 80 grit sandpaper to rough everything up and followed that with another soft sanding with 200 grit paper just to smooth things out. Oh and be sure to always sand WITH the grain of the wood for a nice natural look (nothing screams bad refinishing job like round sander circles that soak up stain and look even more obvious when you’re done).
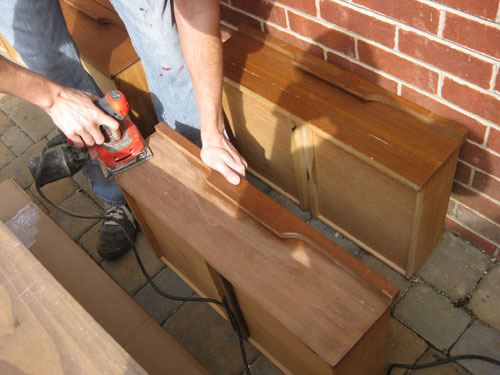
Here’s a shot of our set-up. John got to work sanding the top, sides and front of the dresser along with the flat fronts of the drawers while I was in charge of getting into all the smaller crevices and built-in bentwood drawer pulls where the bulky electric sander couldn’t reach. We also set up a staining station for me to work on drawers on another piece of cardboard nearby (don’t worry, Mrs. Prego wore a mask to avoid inhaling anything nasty).
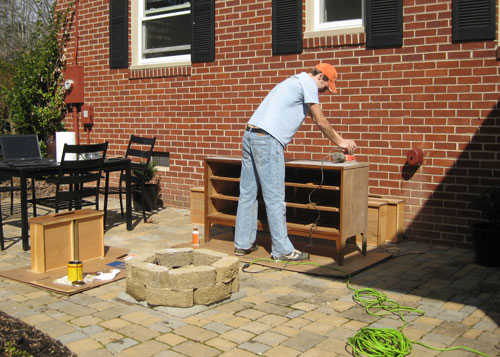
Once things were sanded down with both 80 grit and 200 grit sandpaper (with the grain of the wood) it was time to wipe everything down with a moist rag once again, this time to remove all that sanding dust. Then when things were thoroughly dry (you don’t want to stain a moist recently-wiped down drawer) it was staining time. We picked up a cheap-o synthetic 2″ angled brush (knowing that stain would likely ruin it) along with a pack of rags (which we used to wipe the stain off once we applied it) and a quart of Minwax Wood Finish stain in “Red Mahogany.” Note: we picked our stain color by taking a pretty true-looking photo of the crib drawer with our digital camera and bringing our camera with us to use as a reference while standing there in the stain aisle.
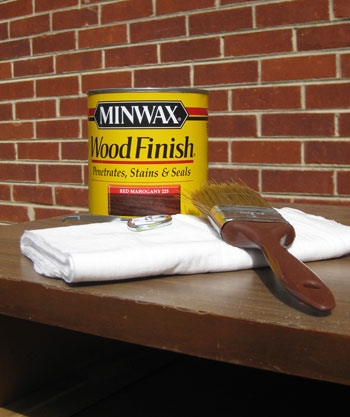
This kind of stain necessitates a coat of poly on top of it to seal everything and add a nice glossy finish but we intentionally opted for it because we knew we could use our eco-friendly Safecoat poly (which is lo-VOC, no-odor and 100% non-toxic… more on that later). We could have chosen to buying a stain with a poly sealer built right in, which is unquestionably the easier approach since it doesn’t call for the extra polying step at the end, but it’s also undeniably more fume-y and chemical-y, especially for something that will live in a nursery.
But it’s definitely worth noting that if you’re looking to take on a staining project and don’t mind the smellier chemicals in the poly-plus-stain-in-one option, just visit your local home improvement store to check out those “shortcut” products (also made by Minwax, although their color palette is a lot more limiting than the ones without poly worked in). We also tend to prefer liquid stain (like the one we chose above) over gel stain because we have more experience working with it, but we’ve heard that gel stain can also be amazing- especially for items that can’t be thoroughly sanded or those on a vertical plane (like wood trim) since the liquid stain can be too runny and messy. So definitely talk to the pros at your local home improvement store or do some preliminary google stain research to pick the right one for the job before you start.
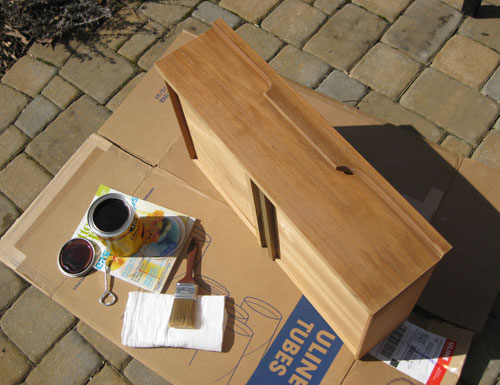
But back to the matter at hand: staining our dresser. After everything was wiped down and dried completely I just used my 2″ brush to apply one thin and even coat of stain WITH the grain of the wood on each surface that I wanted to stain (the fronts of the drawers and the sides and front of the dresser). It went on incredibly smoothly since stain is very watery and the sanded veneer happily soaked it right up. Note: if your wood or veneer isn’t soaking up the stain you probably haven’t sanded it thoroughly enough, so go back and be sure to really sand through the existing poly so the wood underneath can absorb the stain.
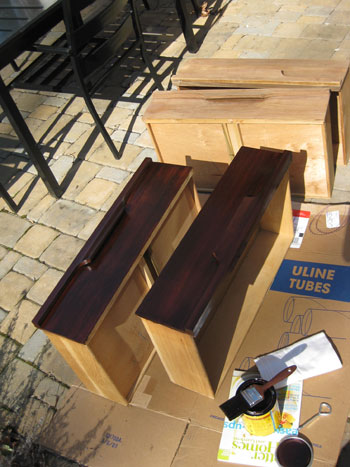
Next we let the thin and even coat of stain sit on every surface that we applied it to for twenty full minutes. We wanted to achieve the richest and deepest absorption possible (which we reasoned would hide the most flaws and leave us with a nice saturated dark tone).
Then after those full twenty minutes we used a clean dry rag to gently rub- again in the direction of the wood- every plane of the dresser that we stained to remove the excess stain. Since we waited so long for ours to soak in we didn’t pull very much stain off at all (our rag was still dark brown but we didn’t see much of a change in tone on the dresser, for which we were extremely grateful). It’s important to remember that you should be gently running the rag along the surface to catch any excess stain but you shouldn’t be applying a lot of pressure (which will result in a streaky and worn down look). Slow and light is the name of the game.
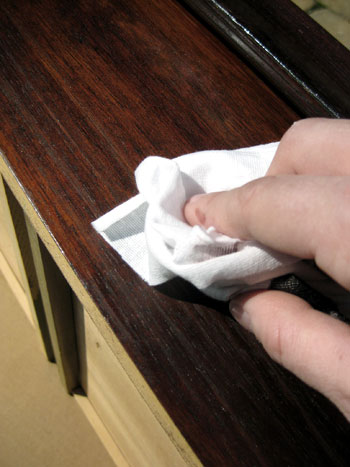
Presto. When you get to this step you have officially stained your item of furniture. In other words, at this point there was a victory dance in progress on our patio. Of course there’s always the option to apply another coat of stain following the same steps outline above (brush on stain, let penetrate for a set amount of minutes, wipe away excess with clean dry rag) if you’d like a deeper or more uniform look. So if you’re left with a piece that is a bit to light or a bit too streaky for your liking we suggest going for a second coat and letting it sit at least 20 to 25 minutes to really soak things up before gently wiping it down again.
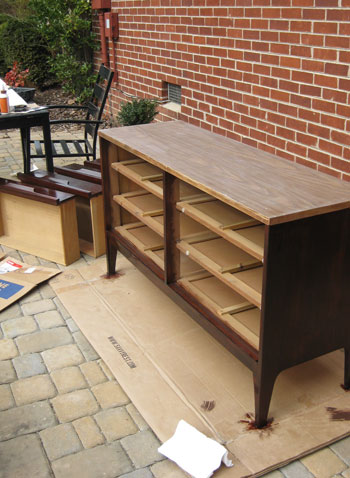
Now on to how we painted the top of the dresser (we’ll get back to polying the stained portion of the piece in a moment). We had already thoroughly sanded the top of the dresser before we began staining so the next step was to apply one thin and even coat of oil-based primer to the top of the dresser with a small foam roller (while being careful not to get any on the recently stained part of the piece). It’s always smart to work out a game plan so you’re not doing a second round of sanding as an afterthought which could result in your stain getting coated with sawdust. And when it came to priming, I was able to use my foam roller to carefully apply primer without getting any on the stained area, but if you don’t have a steady hand you can hold up a rigid piece of cardboard under the lip of the top of the piece to keep primer from getting where you don’t want it.
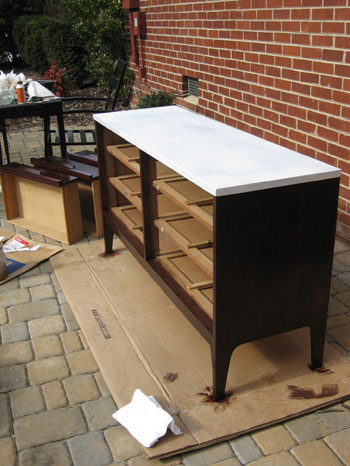
One thin and even coat of oil-based primer should do the trick. The coverage won’t look flawless but it’s there to provide tooth and some nice grip so it’s doing its job as long as everything is coated- even if it looks patchy and thin in some areas while other spots are thicker and less transparent. The reason we suggest oil-based primer over water-based formulas (or primer-&-paint-in-one products) is solely based on personal experience. We’ve attempted to paint furniture with water-based primer and have dealt with bubbling, tackiness, and terrible staining and bleed-through but have never had those problems with the oil-based stuff.
Of course the oil-based formulas are stinky and harder to clean up but it’s worth it to us to do the job right the first time instead of having to do everything over again when something bubbles or bleeds through your water-based coat of primer (which you often don’t see until after your last coat of paint dries- talk about annoying!). And obviously taking precautions like applying the primer in a well ventilated area (we prefer being outside) and even wearing a mask while you work is always recommended. Really, it’s nasty stuff so you want to get ‘er done but be as safe as possible while you’re at it.
The next step was applying three thin and even coats of semi-gloss latex paint with a second small foam roller (remember you can use latex paint over oil-based primer without issue, you just can’t use latex paint over oil-based PAINT since it’ll bubble and separate). We were sure to apply the paint extremely thinly and evenly and not to roll too quickly (which can rile up the paint and cause air bubbles). The white paint that we used is Freshaire’s off-the-rack white semi-gloss paint from Home Depot which is also what we use for all of the trim in our house and many other furniture projects. We love that it’s no-VOC and extremely comparable when it comes to the quality and coverage of other less-eco brands.
Then we just let everything dry for 48 hours (we brought the dresser into the sunroom in case of rain, but kept all the screen doors open for some nice ventilation so the stain and paint were both sure to cure up nice and solidly).
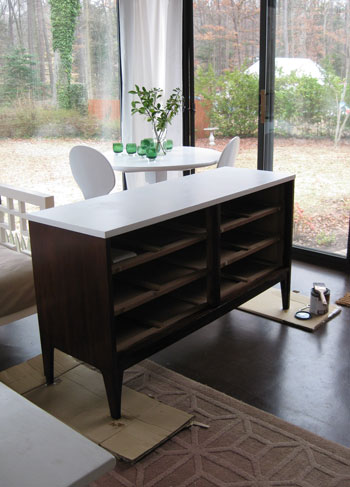
After two full days it was time to coat everything (both the painted top of the dresser and the stained base of the piece) with a nice protective, glossy and totally wipe-able top coat of Safecoat Acrylacq. Of course you can use a cheap and easy to find quart of basic water based polyurethane instead (sold in the same aisle as the Minwax stain) but if you’re not familiar with Safecoat it’s definitely worth checking out. We actually first used it here when we made a bathroom vanity from a night table, and we had most of the quart leftover so we happily used it to seal all that stain and primer/paint for a non-toxic, odor free finished product. Note: we found it at a local green boutique called Ecologic but you might want to google around or even check out greendepot.com to see if you can hunt any down for yourself.
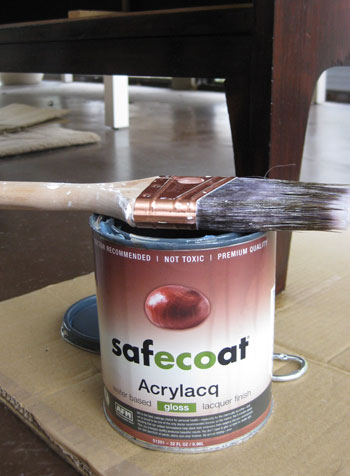
We just applied two thin and even coats of the stuff with a brush (giving it ample drying time in between coats- about five hours or so- to avoid any tackiness or drag marks). You should not get brush strokes if you apply this (or any other water-based poly) very thinly- about as thin as an eggshell or a piece of paper. And you definitely want to brush it on WITH the grain of the wood and gently brush out any bubbles that you see (bubbles can dry and remain forever). The only way you’ll end up with a marred finish or unsightly brush stokes would be if you apply it too thickly or don’t allow an area to thoroughly dry before touching it up again. So gently brush out bubbles as you go and apply very thin even coats, then wait to do a second coat and resist the urge to go over areas that you already did a minute or two before to “clean them up” (because you’ll do more harm than good).
Here are our glorious and glossy drawers drying:
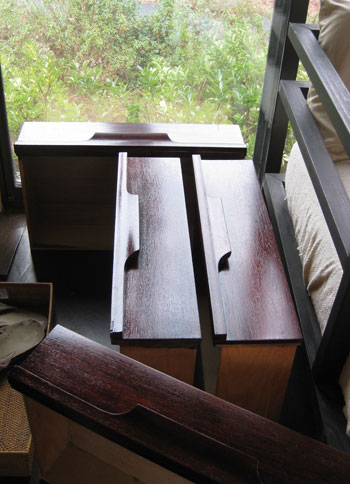
We gave everything three full days to completely cure in our well-ventilated sunroom so by the time we brought the dresser into our nursery over 72 hours later everything was nice and solid so we didn’t have to worry about getting rings on the tabletop if we placed an object on it. Plus everything was 100% odor free and non-toxic thanks to those last coats of Safecoat, so it was nice to walk into the nursery and visit the dresser without smelling it from a mile away. You know how we like to visit our recent projects (we hung out in our recently renovated bathroom for weeks after we finished that big makeover).
So here’s our “after” of a dresser living it up in the nursery:
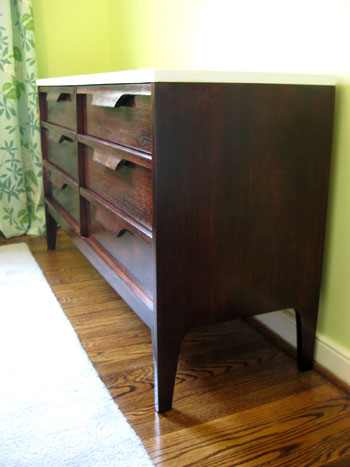
Isn’t the two-tone finish fun? We think it ties in perfectly with our crib, and it sort of has a kitchen island effect (it’s reminiscent of rich dark cabinets with a glossy white countertop). Plus we love that the entire piece is super protected and wipe-able thanks to the Safecoat, so whether the beanette decides to have a digestive explosion while we change her or throw a wood block at the dresser in a fit of rage, we’re pretty sure it’s up for the challenge.
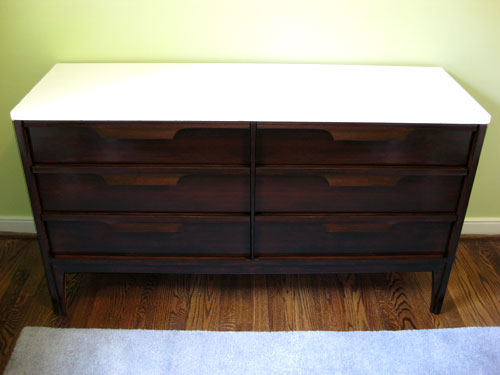
We also love the hardware-free handles since they’re unusual and interesting- and the fact that we get six spacious drawers for storing everything from clothes and diapers to books and toys is really the icing on the cake.

Oh and we know you guys love a budget breakdown, so here you go:
- Dresser: $20 from Craigslist
- Sandpaper: already owned (80 grit and 200 grit)
- Electric Sander: already owned – it’s by Black & Decker from Home Depot for around $50)
- Stain: $7.02 (Minwax Wood Finish stain in “Red Mahogany” from Home Depot)
- Ten cloth rags: $2
- Cheap synthetic brush for stain: $2.49
- Two small foam rollers for primer/paint: already owned
- Oil-based primer: already owned
- Freshaire White Semi-Gloss paint: already owned
- Safecoat: already owned
- TOTAL: $31.51
Not bad right? We totally expected to come in around $175 because our original budget was $150 for a large super-solid double dresser from Craigslist and we knew we’d need some supplies. But our budgetary surplus just means that we have more money leftover for a few other fun nursery projects (we still have art, DIY shelving, a homemade mobile, closet organization and lots more on the agenda). Oh and we actually have a second dresser project to share a little later in the week (lets just say we had the time of our lives lining the drawers so we’ll be back with those details). Stay tuned…
And while we’re on the subject of staining and painting furniture, have you guys taken on any big makeovers of your own? We’d love to hear what you’ve been up to. And since we also owe this dresser makeover to Craigslist for supplying this beauty (we still can’t believe it’s an original 50’s or 60’s dresser) feel free to tell us all about any and all recent Craigslist finds that you guys have snagged. Fun, fun, fun.
Psst: Wanna see our nursery progress from the very beginning? Here’s our painting post, our big shopping spree, our crib hunting rundown, our curtain-making tutorial, and our fun little chair search, our mirror-painting extravaganza, and our DIY faux sheepskin project.
Update: We finally created this Shop Our House page to help you hunt down any furniture/accessories that you see in our house, along with all of our paint colors.

rohitha says
hi sherry,
You helped me out in the past with your useful tips on most of my design dilemmas.This time around i am planning on changing the color of my staircase handrail(just the handrest wooden part)to white to match with my baseboards and moulding.It’s right now oak i guess(the yellow wood you see) with a high gloss on it.But,i am not sure of the procedure,i am thinking its sanding->priming(oilbased) followed by white latex paint.Kindly advise me on the steps involved and what i need to use(primer/paint)etc.Also since I am pregnant,i don’t want to take a chance with all the powerful vapors,so please tell me if there are any alternatives(low /no VOC)or paint that I could use.
thanks,
Rohitha
YoungHouseLove says
Yup, just sand it, oil-based prime it, and latex paint it. Definitely use semi-gloss or high gloss paint so it’s wipeable and durable. As for low or no VOC options, just visit your local home improvement store and ask what they have that’s best for you to use. You just definitely need to use oil-based primer for the most durability and the best results, so if they try to talk you into something water based, we’d suggest grabbing a gas mask instead (or getting a non-pregnant friend to help with that step) since you don’t want to have to redo everything if the water-based primer fails you. Good luck!
xo,
s
rohitha says
oh,i am sending you this link to a staircase handrail(the wood in pic 7 is what i have right now)-in terms of color,grain,and look!
rohitha says
thanks a lot sherry,can’t wait to get started!
Jody Horvath says
I live in a condo (no yard and a patio dominated by our BBQ) and I want to buy and paint a dresser as we have zero bedroom furniture other than our bed.
So here are my questions:
1. If I am painting (not staining) the dresser, should I still sand and prime?
1.a. If so, what is the best way to do this indoors?
2. What is the best way to make sure the paint has full coverage and will last?
3. I am looking to make the dresser an accent piece in a very earthy room (mostly greens, browns and beige). Would going cream (to lighten it up) work? Or should I go for a saturated colour for contrast on the plain walls? http://cdn2.ioffer.com/img/item/119/689/883/BLRL.jpg has most of the colurs, however instead of the white, our bed set has a really deep and mossy green and the dominate color, and there are layers of striped fabrics near the foot of the bed in browns and greens.
YoungHouseLove says
Here’s a detailed post about painting furniture. We would recommend following it to the letter if you want the paint to have full coverage and last. As for the color, it’s all about personal preference. Either cream or a saturated color would look great so you can’t go wrong either way- just do what appeals most to you!
xo,
s
Beverley says
Hi there,
Thanks to your inspiration- we’ve just DIY’d a nursery for our little guy on the way (can’t wait to share pics with you!). In the meantime though I have a little problem- we also refinished a craigslist dresser. It was painted with FreshAir no VOC paint and while I felt so organized and on top of things by putting all the baby clothes in there- everything now has this weird paint/chemical smell. I had lined the drawers and I recently put containers of baking soda in each one but everything still smells. Do you have any suggestions? I washed every article of clothing so carefully in 7th generation and vinegar and I would hate to do it all again? Do you think I should? Any tips for getting that smell out of the drawers and the clothes??
Thanks!!!
Bev
YoungHouseLove says
Hey Beverley,
We’ve also heard that putting coffee beans in a bowl and closing each drawer can draw out the odors, but if all else fails we would wait for a nice hot day and take them outside and place all of the drawers in the sun and wipe them down with vinegar. Let them dry completely outside in the sun (bonus points for keeping them out in the fresh air for a few sunny days to ensure that they’re no longer musty). Hope it helps!
xo,
s
Lauren says
You have inspired another! My husband and I were planning on spending much more on a dresser for our nursery but then I came across your blog. So I stalked craig’s list and found a midcentury dresser (much like yours) for $65, yay! Unfortunately, we have some thinner veneer to work with but we are crossing our fingers. My question to you is how much safecoat did you use on your dresser? I am looking to order it online but flinched when I saw the $64 price tag for a gallon! I guess it is worth it for the non-toxic and odor free quality but could we get away with buying less than a gallon?? *crossing fingers*
YoungHouseLove says
Oh yeah! We only own a quart of it and we’ve done about four projects with it and still have three fourths of a can. The stuff is super thin and it goes a long way. I bet if you ordered a quart you could whip up at least ten or fifteen projects (even big ones like our double dresser) and still have some left! Just remember that thin, even coats are best for a good result (and also good to keep from running out). Good luck!
xo,
s
Anne says
Hi! It is crazy how many people you have inspired, including me! I bought a dresser for $10 off craigslist and just started painting it. Had to do a decent amount of prep work to fill some chips but it is starting to look really good after priming.
My question is… All of the trim work in our house is an off white of sorts and now I am starting to think having a bright white dresser and crib (eventually) in front of all the off white woodwork might look funny. Am I just being crazy?
Love love love your blog and all of your tips and ideas! Thanks!
YoungHouseLove says
The key is to add in a few off white accessories so the two tones look intentional and cohesive (and the trim won’t look like the odd man out). Hope it helps!
xo,
s
Anne says
That does help. Thanks! I’ll have to keep my eyes peeled for some neat accessories.
bekki says
Hey,
Great directions – thanks so much. One question – did you use oil based or water based stain?? I am hoping for water based.
Thanks
YoungHouseLove says
Yup, water based!
xo,
s
Dharma says
OMG! I am right in the middle of resuing the ugliest dresser ever to be got! lol
http://dharmainthefalls.blogspot.com/2010/07/ugliest-dresserever.html
I had planned on white and then repainting my ugly old veneer harvest table top to match but I had exactly the same question as Anne’s above about putty coloured trim and white furniture. You are so smart! Love the idea of the putty/ off-white accessories on the white furniture to tie it all in. You just saved me a lot of worry and aggravation. Thanks doll :)
Kristen says
What a great project! Your blog has motivated me to get to work on some seen-better-days pieces, but I am very much a beginner and have a beginner’s question: If I’m sanding by hand, how do I know when I’ve sanded enough? I’ve removed the glossy finish from a tabletop (no idea what kind of wood), but the surface I’ve reached is not of uniform color, I’m sure as a result of uneven pressure. Does this mean that there is still some sort of coating on the darker areas that needs to be removed? Do I need to keep sanding till the surface is of uniform lightness to achieve an even stain, or, if I’m using a darker shade to stain anyway, am I good to go at this point?
Thank you for the information in your posts — they are really inspiring and helpful!
YoungHouseLove says
Hey Kristen,
Assuming your wood no longer feels glossy anywhere (and has more of a matte & absorptive feeling) then you should be good to go. Sanding by hand never yields perfectly even results but as long as there’s not poly in any spots that darker stain that you’ll be using should be soaked up everywhere and look lovely when you’re done. Good luck!
xo,
s
Ashley says
It looks beautiful! We are in the process of refinishing a craigslist dresser find for our nursery too. :) I sanded it lightly yesterday and my hubby sprayed an oil-based primer on it. Today it’s time for the first coat of paint – and I have 2 questions for you: Do you think it’s better to use a roller or a brush? I noticed in your post on painting the white table for your sunroom that you used a brush but here you used a roller – did one work better than the other? I want to avoid brush strokes at all costs! And question 2 – what is the purpose of the safecoat? Is it just to make the paint finish more durable?
LOVE LOVE LOVE your blog. :)
YoungHouseLove says
If you’re an expert with a brush that can look best but most people will probably get better results with the roller (people who aren’t familiar with using a brush to paint furniture risk ending up with brush strokes). And as for the Safecoat, it’s actually necessary to apply some sort of sealant on stain (unless you buy some with sealant in it, but that’s much higher in VOCs while Safecoat is nontoxic and a lot less stinky). It also made the painted tabletop super wipeable and durable but semi-gloss paint without it would be ok, just not as long lasting, glossy, and easy to wipe down. Hope it helps!
xo,
s
Stacy says
Hi ~ I’m working on my very own 9 drawer dresser re-do and it’s starting to look really great. In the end, I want to line the drawers with some fun paper like you did with this piece. Do you have any good hints on how to do it without the paper bubbling up…I’ve tried matte finish ModPodge applying a thin layer, placing the paper in the drawer and then painting more ModPodge on over that…it likes to wrinkle and bubble. Thank for you advice!
Just love your blog….especially the picks of your sweet baby girl ! ! ! What a cute little chickpea!
YoungHouseLove says
Hmm, we found that thicker paper seems to bubble less. Also once it all dries any small bump and bubbles seem to be “reabsorbed” so they’re barely noticeable. You can also use dots of glue to hold the paper down from below and just Mod Podge the top for a durable finish- or even use fabric instead (which you can affix with spray adhesive). Hope it helps!
xo,
s
Tiffany says
I am trying to tackle a bedroom set right now and Im having some trouble. I have sanded and stripped the furniture but the stain just doesnt soak in. I went and bought the same stain you used and it doesnt even hold a candle to yours. What am I doing wrong? I thought maybe I should sand it more but I have stripped it also…I didn’t think I could really get any better then that. Sigh…any help would be much appreciated. :) Beautiful job on your dresser!
YoungHouseLove says
Hmmm, we’re stumped Tiffany as we’ve never run into that issue ourselves. Your best bet may be taking a portion of one of the pieces (a leg, a drawer, a door) into Lowe’s or Home Depot to see if they can offer any advice. Other than that we’ll cross our fingers for you. Good luck!
-John
Tiffany says
Soooo…sigh of relief!! I figured out my problem. It was the stripper. It was creating almost a barrier so that the stain wasnt sinking in. So I went and got a new sander and followed your process. It was so much easier then stripping and it worked great! The color is turning out beautifully!! One side of a night stand done….5 more pieces to go. LOL Thanks for your help! After all my searching online your tutorial was the most helpful!
YoungHouseLove says
We wondered that since it was the one thing we didn’t do in our process (we like to avoid chemicals when we can). So glad you solved the case and it’s turning out wonderfully!
xo,
s
Tiffany says
Well I just read that strippers contain a wax in them that seals the surface. So if stripping is your only option then it says to use denatured alcohol to clean and 000 steel wool to get the residue off and let it dry overnight. I do have some areas that I will have to strip because there is a lot of detail and I just cant seem to get in there to sand it off. But overall the part I stained looks so pretty. Do you guys have any recommendation on where to buy cheap hardware?? I like the older vintage look but new ones are so expensive. I have seen salvage yards in california that sell them but Im in Jacksonville, Fl and I am having a hard time finding them on the cheap. Thanks again!
YoungHouseLove says
Good to know about strippers Tiffany! As for cheap hardware, we like Home Depot and Lowe’s as well as any little local hardware stores and even places like Anthropologie (they have some good sales) and Hobby Lobby (probably your best option, check here first). Good luck!
xo,
s
Jenn Miller says
I am assuming you all used a oil based stain, right? I didn’t see Red Mahogany in the water based stain. If so, did you have a problem with your poly being water based? I thought oil and water don’t typically mix? Is that not the case with stains and finishers? Any help would be appreciated!
Thanks!
YoungHouseLove says
We actually used a water based stain! Hope it helps.
xo,
s
Jenn Miller says
Thanks for the quick response! Really appreciate it! One more question…did you send before you applied the Safecoat and then in between that various layers of it? Sorry for all the questions. I am refinishing a veneer dresser (thanks to your awesome post) and it’s kind of scary! Ha!
YoungHouseLove says
Nope, we just applied super thin coats so we didn’t need to sand them at all. Good luck!
xo,
s
Kate says
I was just wondering, how is it holding up? I just scored a $5 coffee table on Craigslist that has a lovely bottom but a rather chipped up/stained (thin veneer) top so I’m going to paint it for a two toned look like you guys. Your how to is really wonderful, but I just wondered how your top is holding up after a few months. Is the clear coat still going strong and looking good?
YoungHouseLove says
Still looks as good as the day we did it! Granted Clara isn’t old enough to bang toys against it yet, but it’s holding up really well so far!
xo,
s
Lazy Gardens says
Nice … you could have done it with General Finishes Gel stain, right over the old finish, instead of sanding and staining and varnishing.
Seriously, you really have to try that product. Not available in the bog box places, but it wipes on like velvet. (Minwax gel stain is not nearly as easy to work with)
YoungHouseLove says
Yeah, we’ve definitely tried the Minwax gel stain (and we know what you mean about it being hard to work with). Thanks for the tip- we’ll have to check General Finishes gel stain out!
xo,
s
Tiffany says
Do you have to remove all of the old varnish before you can stain? I’m new to all of this and am trying to redo a garage sale coffe table (for $1! wohoo!). Unfortunately, the previous owners loved their primer and paint (over the thick original varnish). LOVE your blog. My friends and I are hooked!
Tiffany says
Some additional info I forgot to add… The coffee table is solid wood (makes it an even better steal!) I’m using an electric sander with 80 grain and had to use paint stripper (the sander wasn’t cutting it after a few hrs). I’ve think I’ve gotten all of the origional varnish off, but the wood is darker/yellow-ish in some spots and paler in others. It all feels pretty coarse. Should I keep sanding? or call it done? Thanks! :)
YoungHouseLove says
Hey Tiffany,
You just need to get the wood raw enough to soak up stain like a sponge (as opposed to it sitting on top of the varnish, which will look dirty and uneven) so it sounds like you’re there! We’d suggest just giving a thin and even application of stain a go. Then you’ll be able to see how it soaks up (remember more coats will even it out, so go thin and take your time). Good luck!
xo,
s
kris says
HI..I have a large dining room table that must be veneered because it has a woodgrain design around the edges..it has a heavy shiny gloss finish that is scratched….it can’t be took thick because my cat..this is gross…threw up on the top and I didn’t catch it in time…the acid from her stomach actually ate away at the finish down to the veneer…I can see that it’s not a super thick veneer by looking at the edges on the leaf…do I dare lightly sand and dry to varnish or paint it….I have to get that shiny finish off someway….any ideas???? tablecloths are not my thing, especially in a dining room…. FYI…I painted my solid oak kitchen table using your instructions and it is gorgeous!
YoungHouseLove says
It sounds like you don’t have much to loose since the table is damaged and needs to be refinished. We would suggest sanding it down a bit to see if you can get through that finish and going from there (if you can get through it then you can stain it, if you can’t you can use oil-based primer and paint it). Good luck!
xo,
s
lis says
I have an old piano that we just brought up from our basement for our two little ones to start banging on (1 and 3 years old). it looks terrible. It was free to us and has lived through a major house renovation without being covered. Once I get the inch thick layer of dust off how can I revitalize it (lots of scratches)? I saw the comment about general finishes stain gel…what do you think of that? I think trying to sand will be impossible because of all of the intricate patterns in it and rounded edges etc. Thanks!
YoungHouseLove says
It’s definitely worth a try! It sounds like it’s in bad enough shape that you have nothing to lose! Goooood luck!
xo,
s
Mom to be says
What is your suggestion for refinishing a veneer dresser that has been painted? The paint currently on the dresser must not be well suited for veneer as it is chipping off and was applied very thick. The veneer seems thin, and intact beneath the paint, so we were thinking of lightly sanding and repainting. Any tips?
YoungHouseLove says
That’s just what we would recommend! Some gentle sanding should help remove the paint so you’re back down to the veneer, which you can then stain or prime (def. use the oil-based stuff) and repaint. Good luck!
xo,
s
Holly says
Thanks so much for this VERY informative post! I used your tips over the weekend to stain my own mid-century dresser and nightstand and I cannot get OVER how gorgeous everything looks. I used a Minwax two-in-one stain/poly (and you weren’t kidding about the fumes) and I noticed a bit of bubbling/spotting in places. Have you guys had that happen as well? I’m trying to figure out what could have caused that and how to fix it (perhaps another coat?…)
Thanks! :)
YoungHouseLove says
Hmm, we haven’t had that happen, but maybe those areas weren’t sanded as thoroughly? If it couldn’t sink in as well there it might look bubbled or spotted. But it also may be solved with another coat as you mentioned (it’s definitely worth a shot!). Good luck!
xo,
s
Irene says
Hi – I am getting ready to paint a China cabinet for a client and want to do an excellent job. I have been reading your info on painting furniture and wanted to ask if it is OK to go over latex paint with oil based primer? I have painted two of the door fronts and will sand them for a smoother surface before painting again, but was thinking about hitting it with the primer to ensure that the next coat of paint goes on a bit better. I also wanted to know if it is OK when sanding the wood to use the electric sander since it doesn’t go with the grain of the wood. Since I am painting the piece, is the sanding direction really an issue? Any advice, feedback, etc… you can provide is greatly appreciated. Thanks!
YoungHouseLove says
Hey Irene,
Oil-based primer can go over anything (latex or oil-based paint) so it’s the recommended first step no matter what. We don’t suggest using latex paint with primer mixed in because we’ve found it’s often not oil-based primer and we have learned from trial and error that the method outlined on our “Projects” page for painting furniture (you can find it right at the top of that page) is always what works best! As for sanding, since you’re painting it an electric sander is perfect – just keep it moving so it doesn’t carve out one spot more than another. Hope it helps!
xo,
s
Irene says
P.S. I forgot to mention that the latex paint I am using has primer mixed in. Thanks.
Irene says
Thanks for the incredibly quick reply. I am definitely going to get the oil based primer and continue working with the paint that I have. For future projects I will definitely not get the paint with primer in it and stick to the method you have outlined. As for the sanding, I’m glad that you reinforced what I was thinking!
Thank you for your help, it is greatly appreciated!! Can I send you a before and after picture?
Have a great day!
YoungHouseLove says
Absolutely! We love eye candy! Good luck with everything!
xo,
s
Tori T. says
I’m about to start a staining project of my own – thanks for the how-tos!
I did notice though that you used Minwax Wood Finish, but I think that’s actually an oil-based (not water-based) stain. See Minwax’s stain website here: http://www.minwax.com/products/stains/
YoungHouseLove says
Hey Tori T,
They actually come in water based or oil based (each can says which variety it is) but you’re right that our stain is oil-based. The Safecoat sealant that we used is water based and 100% non toxic though (low-VOC too) so it seals in any stinky fumes and keeps it wipeable and protected as well! Hope it helps!
xo,
s
Bella says
Hi,
great project really love the dresser.
It’s probably a little late for that but I think the dresser would look even greater if you painted the handlepieces white too.
Keep the good workg going =)
Bella
Tricia says
So I’m currently painting an old dresser of mine and I used a water-based paint and realized I purchased an oil-based stain. Will this cause any conflicts?
YoungHouseLove says
Hmm, you’re applying the stain over the paint? If so, it may cause some issues with bubbling and peeling. We would recommend using a water based stain instead. Good luck!
xo,
s
Tricia says
That’s what I needed to know! Thanks! :)
Erika says
Oh my goodness! I came across your blog yesterday and I’m obsessed and inspired. I recently refinished a dresser and it did not turn out as it should have. Your tips helped me figure out what I did wrong. Thank you!
P.S. I’m soooo in love with the dresser you refinished for your nursery. It’s fantastic.
YoungHouseLove says
So glad you found us!
xo,
s
Jen says
I’ve applied three thin layers of the Safecoat sealant to the bunk beds that I’m refinishing. Each time, when the sealant hardens, there are bumps in it. I’m guessing that we haven’t wiped it down enough between applications. We’ve had to sand it out — with a very fine sandpaper — and recoat it each time. It’s really frustrating. Any hints for how to apply the Safecoat without getting bumps? And, what do you use to clean your brush when you’re done? I’ve been using a “green” paint thinner and it doesn’t seem to be very effective with the sticky sealant.
Thanks! Love your site!!
YoungHouseLove says
Hey Jen,
Hmm, we haven’t had an issue with bumps since the safecoat goes on super thinly (the consistency is like water). Is it possible you’re using a different Safecoat product? If not maybe yours has thickened or hardened so it’s no longer “good”? Otherwise our guess would be that your piece is a bit bumpy so the shine in the Safecoat is accenting those bumps and making them more obvious when you apply it. As for cleaning our brush, we use regular old water (since it’s water based) and sometimes break out the mineral spirits, but we’ve heard a super green alternative is vegetable oil so we can’t wait to try that. Good luck with everything!
xo,
s
Al says
We have a coffee table and two side tables I inherited from my parents yars ago. This was a very typical “60’s” style, the coffee table being “kidney” shaped and two side tables triagular with rounded corners. I would love to attempt to refinish them. I’m fairly certain they are veneer, thr coffee table having the most significant scratches. How far down can I dand before knowinging I’ve gone too fare .. in other words is ther anyway to know what teh thickness of the veneer is? I’d really like to sand enough to eliminate most of the scratches without removing a significant part of the veneer .. thanks
YoungHouseLove says
Aside from trying to pry off the veneer (which we don’t recommend) there’s not really any way of knowing. We would just recommend sanding things slowly and evenly. Chances are that the veneer is significantly thicker than the scratches so you should be fine. Good luck!
xo,
s
Ashleigh says
Did your drawers stick at all? We’re in the process of refinishing an old dresser from the 50’s for our nursery’s changing table but the drawers don’t slide very smoothly which I imagine will not be fun. Any tips to make them open and close easily? thanks!
YoungHouseLove says
Our didn’t stick, but we’ve heard that you can buy a block of wax and rub it along the drawer bottom and the wood drawer slides so they slick up and slide more easily. Hope it helps!
xo,
s
kathy says
I love the desk you made from a door. So, I went and bought a door and all the trimmings. Now, my next question is…I would like to paint it white, BUT don’t want it to yellow once sealed. I can’t seem to find the Safecoat you recommend. In order not to risk the white yellowing, using the Minwax Poly, would it be a safer bet to choose a color other that white? Maybe an offwhite or a color in beige or even a darker color, so yellowing would not be an issue? I really like and wanted it to be white..but so afraid of completeing the project and watching my white desk turn yellow. Advice/opinions would be so appreciated. Thank you
YoungHouseLove says
As long as you use the exact poly that we recommend in this post (applied thinly and evenly) it should be awesome:
https://www.younghouselove.com/2009/02/how-to-paint-furniture/
xo,
s
Carrie says
I’m currently in the process of refinishing a mid-century sideboard. I’m wondering how you sanded under the lips of the handles on your dresser. I can’t seem to fit my fingers and the sandpaper under mine. Do you have any tricks for those small/skinny places.
Also, there are a couple corners where the wood veneer has chipped. Sanding it hasn’t really evened it out. Any suggestions? Thanks and love your blog!
YoungHouseLove says
Hey Carrie
They sell sanding blocks that can help you get into those hard to reach places, and you can also wrap a piece of sandpaper around something (like a pencil) and use that to get into those lips. Good luck!
xo,
s
Erin says
I’m a new homeowner and YHL devotee as of a few weeks ago. I’ve been taking in all of your great projects and ingenious DIY ideas through the archives.
I thought you guys might get a kick out of knowing that I saw this same dresser refinished in a similar way in a very posh Chicago antique shop for around $1000! Clara is very lucky!
sarah v says
I’m probably a bit late on this thread, but hope you see it anyway:
I’ve been given a few pieces of outdated furniture from my parents and would like to refinishing/painting them. I wasn’t planning on buying a sander (because of budget, and dont want unneeded stuff hanging out in the house), but reading this post it seems like it may be very time consuming and physically exhausting without. The pieces have quite a few adornments (many curves/waves on the table legs and bed post, carvings on drawers of a dresser and buffet).
My questions:
1) have you done a project such as this dresser of yours without your sander? if so…how was it :-/
2) can you even use an electric sander on things like rounded table legs with lots of detail/waves or furniture with carvings?
Appreciate any advice!
Sarah
YoungHouseLove says
We’d actually recommend sanding by hand for those details (a hand sander can flatten them instead of emphasizing the gorgeous details and can’t get into all those little grooves anyway). It’ll take a while but you can do it! We have!
xo,
s
Sarah M. says
Wow, I just found your blog about 3 or so months ago, so there are TONS of old posts for me to read. We have an old 50s-era dresser and desk set that belonged to my grandparents, and we’re just dying to modernize it. I THINK they’re similar to the dresser you guys found, but I had no idea if they’re restainable or paintable. They are the same tone as your dresser, and the tops are either not really wood, or are just covered in some sort of high-gloss finish. I can’t really figure that one out. I did open the drawers to look for signs of veneer, and I think that’s what I found (looks like 3 skinny layers of wood put together..) Also, they have dovetailed joints as well. Thanks for putting this post together, this is JUST what I needed to see!!
Rachel B says
Ok, I am in the middle of refinishing a dresser for my soon-to-arrive baby (due in 9 days – aaah!). Well actually I just started. I am sanding it with the same kind of sander I see John using in the photo above (but with 100 grit paper – Canadian Tire didn’t have 80), but it seems I am not getting through to the bare wood. Does every ounce of finish have to be off if I plan to stain it darker? How long did you spend sanding it? At this rate, I feel like I could be doing this for the next 2 days. Help!
YoungHouseLove says
Hmm, we spent a good amount of time sanding. Maybe three or four hours? It really is important that you remove the gloss and at least some of the stain, but you definitely don’t have to get down to the bare wood because if you’re going darker as long as your wood can absorb the new stain it should look great (any remaining glossiness will block stain absorption). So if you feel the wood and it feels flat and porous as opposed to shiny you’re probably in good shape. And you can always test a small area and see if the stain soaks in. Good luck!
xo,
s
Brianna says
I ABSOLUTELY LOVE THIS! And I have almost this same exact dresser–bought it off Craigslist no less, but for $75 not $20 :-) I want to refinish it like yours. It’s veneer as well and I checked the back of the drawer for thickness like you said, but pls clarify if you mean the most outer layer should be dime width or if you mean the whole thing. Mine looks like it has a few layers in different shades, all about the same width each, but in total, it’s about quarter inch thick. Also, the top of mine looks like yours appears–like a fake picture/image of wood, but ours is very glossy. I want to refinish it the same as the rest–should I follow the same sanding process as you did for the rest of the dresser? Thanks in advance for any tips!
YoungHouseLove says
It sounds like a perfect contender for this exact process. Just sand and then follow the steps in this post from there. Good luck!
xo,
s
abby says
I love this so much! I know you said you can’t do this with a super thin veneer piece…would that be like something from Ikea? Our Craigslist-purchased Ikea Bjursta table is really scuffed on the top and I was thinking of repainting just the top white (its all black now) for a similar effect to your changing table. I’m just not sure if I should sand it first or what…
YoungHouseLove says
We would just rough it up gently with some high grit sandpaper followed by some smoother sandpaper and then go right to the oil-based primer. Good luck!
xo,
s
romaida says
Hi..just wondering what the height of the dresser is. Thanks!
YoungHouseLove says
Hi Romaida,
The height of our dresser is 30 inches.
Best,
John
Erika says
Hi! I’m repainting a dresser. The first time I did it, I used a latex primer which left the dresser tacky. I’m trying it again with an oil based primer. As I’m sanding it, I’ve found that the old paint is peeling off in certain places. Is it imperative to remove all the old paint before I begin repainting? I’ve got it sanded to the point that it’s not peeling but I’m worried it may cause problems. Any advice?
YoungHouseLove says
Yes, we would sand it as thoroughly as possible since the new coat of paint will only be as durable as its base (so if that is peeling off, the new finish will peel off too). Good luck!
xo,
s
Erin says
Since I’ve visited this specific post, like 12 times in the last 2 days, I figured that it was only fair to post a comment. I picked up a $10 thrift store sewing table which I’m planning to repurpose as an entry/side table – this post has been super helpful with the step by step instructions – especially the “sand with the grain” tip! Just finished the sanding stage ( I think – may still go back with fine sandpaper for a smoother finish, but the veneer on my table isn’t as thick as yours was). I’m hoping to move on to the staining stage tomorrow – wish me luck!
YoungHouseLove says
Good luck Erin! And have fun…
xo,
s
Liz says
I picked up a $20.00 Craigslist dresser special! I was inspired by this piece and your white table re-do. I plan to fully re-paint and do a knob change. There is multi-paint coats on there already and the last coat is a semi-gloss or gloss. How much sanding is neccessary before primer? I see Erica’s post from 2 weeks ago, but I am confused if the old peeling paint is hers or original? So, I need this clarified. I am hoping the just rough up the surface and get to work, but I will listen to your advice. If it is to get ALL the paint off, I think I’ll be investing in the $50.00 sander… I hate sanding!
YoungHouseLove says
If you rough up the surface and anything is flaking or peeling you have to sand it until it’s smooth. If you’re able to rough things up and it stays smooth and nothing peels or cracks or gets “disturbed” enough to look chippy or peely you’re probably good to go onto the priming step. Hope it helps!
xo,
s
Erin says
I started to stain a large wooden picutre frame but decided I do not like it….now Im thinkin I want to paint it. It had been finished before with mabey just a clear coat of polyurethane -sp . I sanded it before attempting to stain it is there anything else I would need to do to it before painting it other than sanding it again ?? and what type of paint should I use …..I want it to be black with a semi gloss or satin finish but what kind of paint and should I prime it ??? and if so with what ??
YoungHouseLove says
You’d need to use oil-based primer to block the stain from bleeding through the paint. So primer, then latex paint. No sanding or poly necessary!
xo,
s