Well, we recently took on the biggest nursery project to date and we lived to tell the tale. This post is a bit of a two-fer, since it not only details how to stain any wooden or veneered piece of furniture but also touches on how to paint anything that’s wood or veneer since we did a two-toned treatment on a dresser that we hunted down on the cheap.
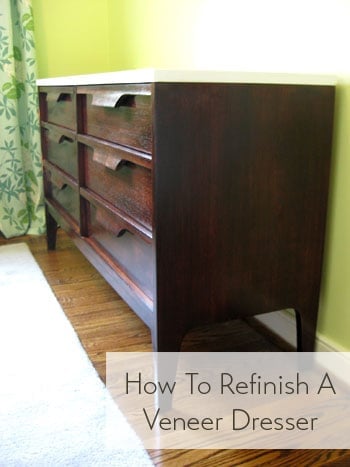
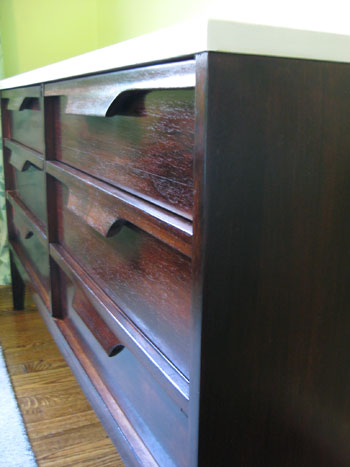
That’s right, we stained our “new” six drawer dresser with a deep rich brown tone and painted the top a crisp and glossy white color. Here’s how it all went down.
First we had to search for something to add tons of storage space to our tiny-closeted nursery, so we measured the wall that we knew we would be dedicating to a nice double dresser and hopped on Craigslist chanting “less than sixty inches” and crossing our fingers. Our hope was to find something that was up on little legs (so it felt airier and less heavy than a legless version) and we also needed it to be deep enough to accommodate a 17″ wide changing pad since part of the dresser top will also be used as a diapering zone. We had a budget of $150 or less in mind, so we hoped to find something that was a few decades old and solidly made (as opposed to something more flimsy from Ikea circa 2005). We also wanted a piece with nice clean lines to work with our crib which is a bit on the modern side, so a super curvy dresser might feel a little out of place. A few days of stalking Craigslist turned up this listing:
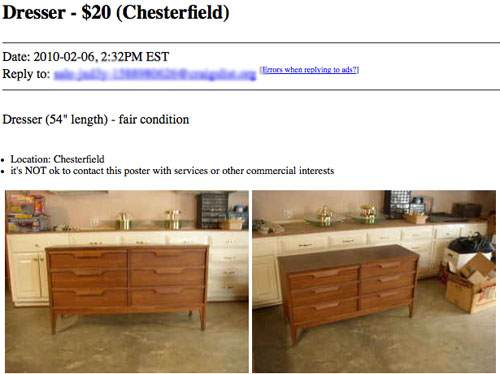
The little legs along with the 54″ length was perfect, plus the clean-lined look of the dresser would work amazingly well with our crib. And did you see that price? Twenty bucks?! Yes please. I said a little prayer to the Craigslist gods and shot off an email right away. Less than three hours later we heard from the dresser’s owner and he said we were first in line if we still wanted it. We just had two more questions: what was the depth of the piece (just to be sure it wasn’t too narrow to accommodate our 17″ changing table pad) and was the dresser made of solid wood (since that’s a lot easier to refinish than something covered in laminate or thin flaking veneer).
The good news was that it was just deep enough for our changing pad. The bad news is that it was veneered (although still extremely solidly made with dovetailed joints, etc). Oh well, it was $20- what did we expect? The verdict: we said we’d love to take a look at it and again found ourselves crossing our fingers (this time in hopes that that the veneer was nice and thick so it could take some sanding and staining). See, the plan had always been to stain the dresser and paint the top a glossy white ever since we got our two toned crib and loved the look. But unlike solid wood, if veneer is too thin it’s pretty hard to sand and restain without going right through it and hitting the plywood underneath during the sanding step.
Luckily when we got there to check out our new Craigslist crush the dresser had amazingly thick veneering (about 1/4th of an inch) which made it easy to determine that we could totally sand it down and restain it without any trouble. Note: to check how thick your veneer is just open a drawer or look at the back of the piece where you’ll hopefully be able to see if it’s paper thin (aka: not-sandable) or thicker than a dime or so (aka: sandable).
Now certain that our dresser hunt was over and this was “IT”, we handed over twenty beans to our nice Craigslist friend and took home our “new” double dresser (thanks to John’s sister’s borrowed SUV- love you Emily!). Then it was time to refinish her. Here she is hanging out on the patio atop a nice big piece of cardboard to catch any stain, paint or primer drips during the muti-phase project:
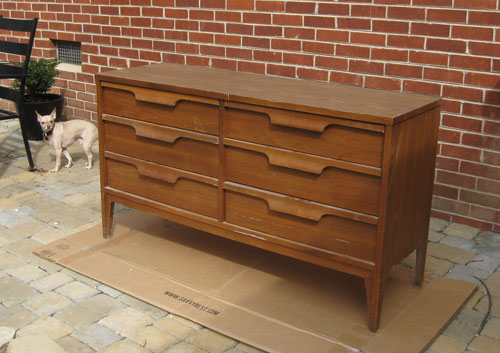
You can see that the veneer is scraped and stained in a few areas and of course the finish isn’t deep and rich like the rest of the wood tones in our house (including the drawer on our new crib in the nursery). Hence the refinishing idea. Oh and it bears mentioning that this little staining & painting tutorial will work for any solid wood items as well as anything that’s veneered as long as the veneering isn’t paper thin. Note: this method is not recommended for any laminate furnishings because that material cannot be successfully stained since it’s not a true layer of wood.
The first thing we did was wipe everything down with a moist rag (both inside the drawers and out) just to remove any spiderwebs, old pen caps & pennies in the drawers, etc. Of course everything was about to get coated in sanding dust again momentarily, but it was a nice “reset” for the dresser and we were able to take things like random paperclips out of the drawers so they didn’t fly around when we got to our big sanding step. Oh and while we wiped things down we came across this label inside the top right drawer:
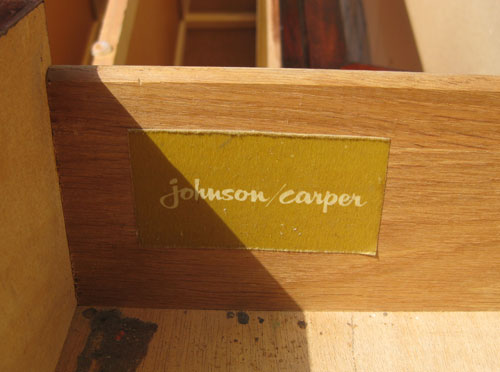
It turns out our twenty beans had scored us an original 50’s or 60’s mid-century dresser. Cool right? We thought so. And that explained why it was so well made and had such nice thick veneering (they just don’t make ’em like they used to). Anyway, the next step was to break out our trusty sander and some extra sandpaper to get to all those crevices that it couldn’t reach by hand. We used 80 grit sandpaper to rough everything up and followed that with another soft sanding with 200 grit paper just to smooth things out. Oh and be sure to always sand WITH the grain of the wood for a nice natural look (nothing screams bad refinishing job like round sander circles that soak up stain and look even more obvious when you’re done).
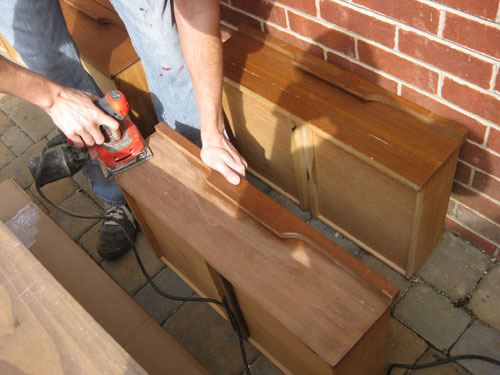
Here’s a shot of our set-up. John got to work sanding the top, sides and front of the dresser along with the flat fronts of the drawers while I was in charge of getting into all the smaller crevices and built-in bentwood drawer pulls where the bulky electric sander couldn’t reach. We also set up a staining station for me to work on drawers on another piece of cardboard nearby (don’t worry, Mrs. Prego wore a mask to avoid inhaling anything nasty).
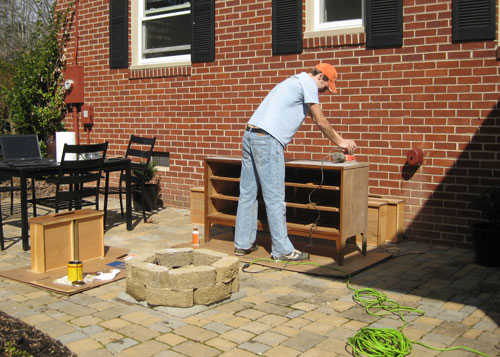
Once things were sanded down with both 80 grit and 200 grit sandpaper (with the grain of the wood) it was time to wipe everything down with a moist rag once again, this time to remove all that sanding dust. Then when things were thoroughly dry (you don’t want to stain a moist recently-wiped down drawer) it was staining time. We picked up a cheap-o synthetic 2″ angled brush (knowing that stain would likely ruin it) along with a pack of rags (which we used to wipe the stain off once we applied it) and a quart of Minwax Wood Finish stain in “Red Mahogany.” Note: we picked our stain color by taking a pretty true-looking photo of the crib drawer with our digital camera and bringing our camera with us to use as a reference while standing there in the stain aisle.
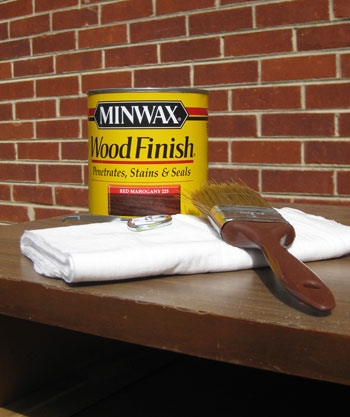
This kind of stain necessitates a coat of poly on top of it to seal everything and add a nice glossy finish but we intentionally opted for it because we knew we could use our eco-friendly Safecoat poly (which is lo-VOC, no-odor and 100% non-toxic… more on that later). We could have chosen to buying a stain with a poly sealer built right in, which is unquestionably the easier approach since it doesn’t call for the extra polying step at the end, but it’s also undeniably more fume-y and chemical-y, especially for something that will live in a nursery.
But it’s definitely worth noting that if you’re looking to take on a staining project and don’t mind the smellier chemicals in the poly-plus-stain-in-one option, just visit your local home improvement store to check out those “shortcut” products (also made by Minwax, although their color palette is a lot more limiting than the ones without poly worked in). We also tend to prefer liquid stain (like the one we chose above) over gel stain because we have more experience working with it, but we’ve heard that gel stain can also be amazing- especially for items that can’t be thoroughly sanded or those on a vertical plane (like wood trim) since the liquid stain can be too runny and messy. So definitely talk to the pros at your local home improvement store or do some preliminary google stain research to pick the right one for the job before you start.
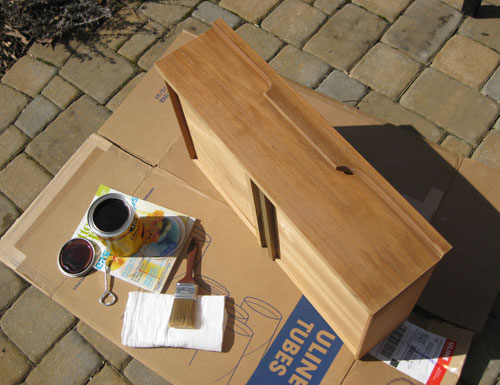
But back to the matter at hand: staining our dresser. After everything was wiped down and dried completely I just used my 2″ brush to apply one thin and even coat of stain WITH the grain of the wood on each surface that I wanted to stain (the fronts of the drawers and the sides and front of the dresser). It went on incredibly smoothly since stain is very watery and the sanded veneer happily soaked it right up. Note: if your wood or veneer isn’t soaking up the stain you probably haven’t sanded it thoroughly enough, so go back and be sure to really sand through the existing poly so the wood underneath can absorb the stain.
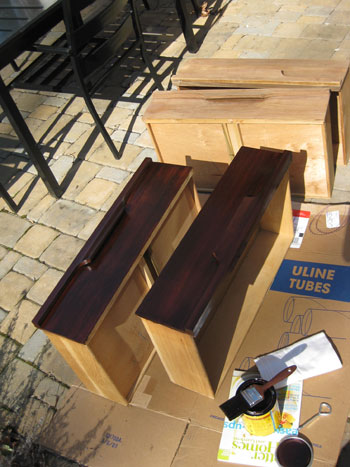
Next we let the thin and even coat of stain sit on every surface that we applied it to for twenty full minutes. We wanted to achieve the richest and deepest absorption possible (which we reasoned would hide the most flaws and leave us with a nice saturated dark tone).
Then after those full twenty minutes we used a clean dry rag to gently rub- again in the direction of the wood- every plane of the dresser that we stained to remove the excess stain. Since we waited so long for ours to soak in we didn’t pull very much stain off at all (our rag was still dark brown but we didn’t see much of a change in tone on the dresser, for which we were extremely grateful). It’s important to remember that you should be gently running the rag along the surface to catch any excess stain but you shouldn’t be applying a lot of pressure (which will result in a streaky and worn down look). Slow and light is the name of the game.
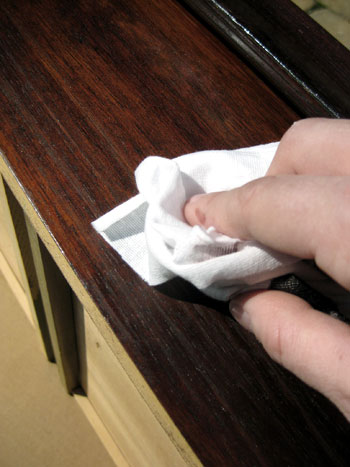
Presto. When you get to this step you have officially stained your item of furniture. In other words, at this point there was a victory dance in progress on our patio. Of course there’s always the option to apply another coat of stain following the same steps outline above (brush on stain, let penetrate for a set amount of minutes, wipe away excess with clean dry rag) if you’d like a deeper or more uniform look. So if you’re left with a piece that is a bit to light or a bit too streaky for your liking we suggest going for a second coat and letting it sit at least 20 to 25 minutes to really soak things up before gently wiping it down again.
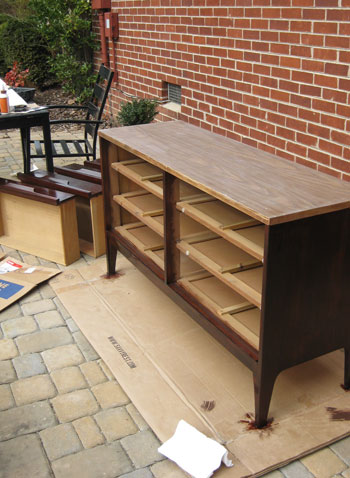
Now on to how we painted the top of the dresser (we’ll get back to polying the stained portion of the piece in a moment). We had already thoroughly sanded the top of the dresser before we began staining so the next step was to apply one thin and even coat of oil-based primer to the top of the dresser with a small foam roller (while being careful not to get any on the recently stained part of the piece). It’s always smart to work out a game plan so you’re not doing a second round of sanding as an afterthought which could result in your stain getting coated with sawdust. And when it came to priming, I was able to use my foam roller to carefully apply primer without getting any on the stained area, but if you don’t have a steady hand you can hold up a rigid piece of cardboard under the lip of the top of the piece to keep primer from getting where you don’t want it.
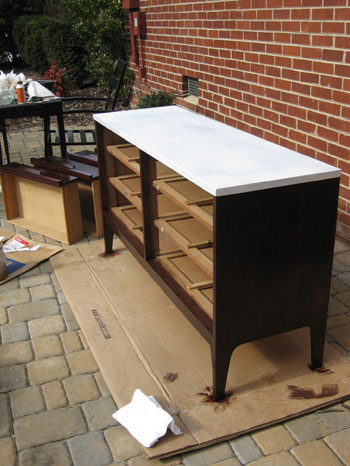
One thin and even coat of oil-based primer should do the trick. The coverage won’t look flawless but it’s there to provide tooth and some nice grip so it’s doing its job as long as everything is coated- even if it looks patchy and thin in some areas while other spots are thicker and less transparent. The reason we suggest oil-based primer over water-based formulas (or primer-&-paint-in-one products) is solely based on personal experience. We’ve attempted to paint furniture with water-based primer and have dealt with bubbling, tackiness, and terrible staining and bleed-through but have never had those problems with the oil-based stuff.
Of course the oil-based formulas are stinky and harder to clean up but it’s worth it to us to do the job right the first time instead of having to do everything over again when something bubbles or bleeds through your water-based coat of primer (which you often don’t see until after your last coat of paint dries- talk about annoying!). And obviously taking precautions like applying the primer in a well ventilated area (we prefer being outside) and even wearing a mask while you work is always recommended. Really, it’s nasty stuff so you want to get ‘er done but be as safe as possible while you’re at it.
The next step was applying three thin and even coats of semi-gloss latex paint with a second small foam roller (remember you can use latex paint over oil-based primer without issue, you just can’t use latex paint over oil-based PAINT since it’ll bubble and separate). We were sure to apply the paint extremely thinly and evenly and not to roll too quickly (which can rile up the paint and cause air bubbles). The white paint that we used is Freshaire’s off-the-rack white semi-gloss paint from Home Depot which is also what we use for all of the trim in our house and many other furniture projects. We love that it’s no-VOC and extremely comparable when it comes to the quality and coverage of other less-eco brands.
Then we just let everything dry for 48 hours (we brought the dresser into the sunroom in case of rain, but kept all the screen doors open for some nice ventilation so the stain and paint were both sure to cure up nice and solidly).
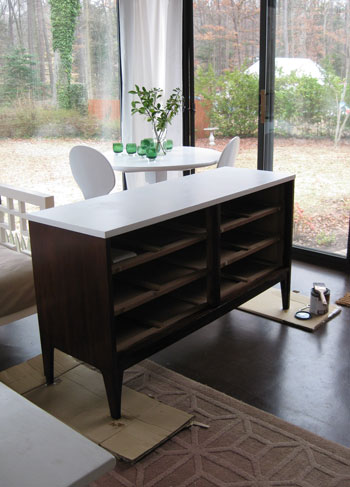
After two full days it was time to coat everything (both the painted top of the dresser and the stained base of the piece) with a nice protective, glossy and totally wipe-able top coat of Safecoat Acrylacq. Of course you can use a cheap and easy to find quart of basic water based polyurethane instead (sold in the same aisle as the Minwax stain) but if you’re not familiar with Safecoat it’s definitely worth checking out. We actually first used it here when we made a bathroom vanity from a night table, and we had most of the quart leftover so we happily used it to seal all that stain and primer/paint for a non-toxic, odor free finished product. Note: we found it at a local green boutique called Ecologic but you might want to google around or even check out greendepot.com to see if you can hunt any down for yourself.
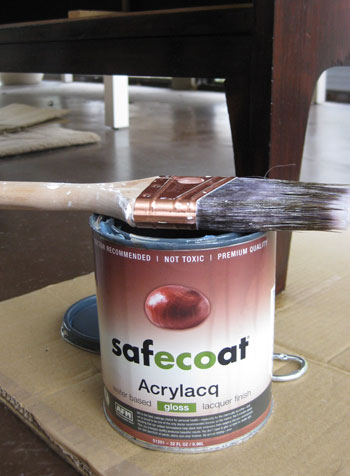
We just applied two thin and even coats of the stuff with a brush (giving it ample drying time in between coats- about five hours or so- to avoid any tackiness or drag marks). You should not get brush strokes if you apply this (or any other water-based poly) very thinly- about as thin as an eggshell or a piece of paper. And you definitely want to brush it on WITH the grain of the wood and gently brush out any bubbles that you see (bubbles can dry and remain forever). The only way you’ll end up with a marred finish or unsightly brush stokes would be if you apply it too thickly or don’t allow an area to thoroughly dry before touching it up again. So gently brush out bubbles as you go and apply very thin even coats, then wait to do a second coat and resist the urge to go over areas that you already did a minute or two before to “clean them up” (because you’ll do more harm than good).
Here are our glorious and glossy drawers drying:
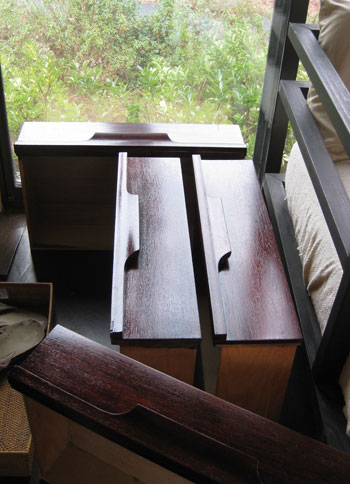
We gave everything three full days to completely cure in our well-ventilated sunroom so by the time we brought the dresser into our nursery over 72 hours later everything was nice and solid so we didn’t have to worry about getting rings on the tabletop if we placed an object on it. Plus everything was 100% odor free and non-toxic thanks to those last coats of Safecoat, so it was nice to walk into the nursery and visit the dresser without smelling it from a mile away. You know how we like to visit our recent projects (we hung out in our recently renovated bathroom for weeks after we finished that big makeover).
So here’s our “after” of a dresser living it up in the nursery:
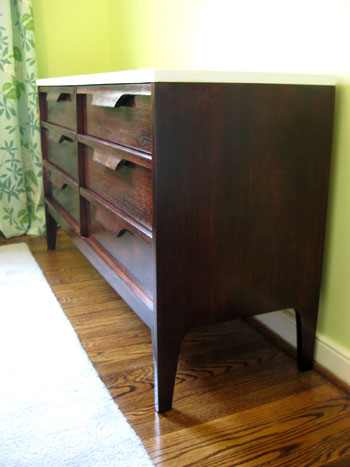
Isn’t the two-tone finish fun? We think it ties in perfectly with our crib, and it sort of has a kitchen island effect (it’s reminiscent of rich dark cabinets with a glossy white countertop). Plus we love that the entire piece is super protected and wipe-able thanks to the Safecoat, so whether the beanette decides to have a digestive explosion while we change her or throw a wood block at the dresser in a fit of rage, we’re pretty sure it’s up for the challenge.
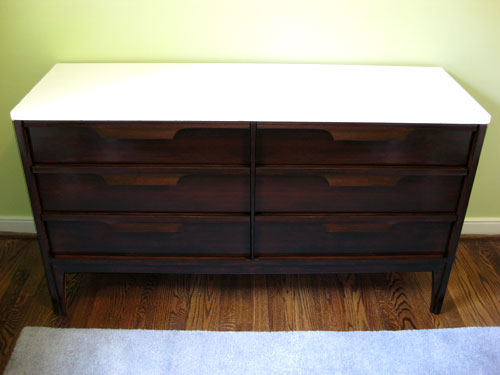
We also love the hardware-free handles since they’re unusual and interesting- and the fact that we get six spacious drawers for storing everything from clothes and diapers to books and toys is really the icing on the cake.

Oh and we know you guys love a budget breakdown, so here you go:
- Dresser: $20 from Craigslist
- Sandpaper: already owned (80 grit and 200 grit)
- Electric Sander: already owned – it’s by Black & Decker from Home Depot for around $50)
- Stain: $7.02 (Minwax Wood Finish stain in “Red Mahogany” from Home Depot)
- Ten cloth rags: $2
- Cheap synthetic brush for stain: $2.49
- Two small foam rollers for primer/paint: already owned
- Oil-based primer: already owned
- Freshaire White Semi-Gloss paint: already owned
- Safecoat: already owned
- TOTAL: $31.51
Not bad right? We totally expected to come in around $175 because our original budget was $150 for a large super-solid double dresser from Craigslist and we knew we’d need some supplies. But our budgetary surplus just means that we have more money leftover for a few other fun nursery projects (we still have art, DIY shelving, a homemade mobile, closet organization and lots more on the agenda). Oh and we actually have a second dresser project to share a little later in the week (lets just say we had the time of our lives lining the drawers so we’ll be back with those details). Stay tuned…
And while we’re on the subject of staining and painting furniture, have you guys taken on any big makeovers of your own? We’d love to hear what you’ve been up to. And since we also owe this dresser makeover to Craigslist for supplying this beauty (we still can’t believe it’s an original 50’s or 60’s dresser) feel free to tell us all about any and all recent Craigslist finds that you guys have snagged. Fun, fun, fun.
Psst: Wanna see our nursery progress from the very beginning? Here’s our painting post, our big shopping spree, our crib hunting rundown, our curtain-making tutorial, and our fun little chair search, our mirror-painting extravaganza, and our DIY faux sheepskin project.
Update: We finally created this Shop Our House page to help you hunt down any furniture/accessories that you see in our house, along with all of our paint colors.

Amanda says
You guys did an awesome job! But I do have a question…is it impossible to paint cheap laminate furniture? (like the kind from target for example)if not how would you suggest going about it?..i have fallen in love with your page and have been truly inspired by you two!
YoungHouseLove says
I would recommend checking out a Benjamin Moore paint store (the folks who work their have lots of info and cutting edge products) to see if they have special primer/paint for the job! Hope it helps!
xo,
s
Jenny says
I recently sanded a table top and got lots of swirl marks. Did you have this problem? If not, how do you prevent it?
YoungHouseLove says
Maybe you were using too low of a grit of sandpaper? If you use something higher grit it’s usually less rough and might not leave the same scuff marks. Maybe try something 200 grit? You also might want to sand it by hand in the direction of the wood instead of using any sort of hand sander if you keep getting those marks. Hope it helps!
xo,
s
Sarah says
Have you ever had the issue of your stain turning out too dark or having a weird coloring? I sanded/stained some old tables using the same color stain you used here. Now the top of one of my tables has a purple tinge to it from certain angles. What might have caused this? Any fixes you’d recommend? Thanks!
YoungHouseLove says
Hmm, a purple tinge sounds like the sealer. If you put too much on or didn’t use one of the brands we recommended sometimes it can get tinted purple or yellow. I would try sanding just the sealer off and resealing (or restaining and resealing if you need to after sanding things). Hope it helps!
xo,
s
Steve says
Your new dresser looks great.I absolutely love the color.We are trying to refinish a cabinet using the same procedure that you have followed,
could you tell me whether this sander is good enough
Mouse Detail Sander MS800B (black and decker) ?
We are just starting into home projects and so would like to know whether this is a good sander for such refinishing purposes.Thanks for your blog and helping readers like me inspired to do home projects.
YoungHouseLove says
Oh yes, that should be great! Good luck!
xo,
s
Steve says
Thanks for a very quick reply!!
YoungHouseLove says
Sure- good luck with everything!
xo,
s
Kim says
How did you dispose of the rags that you used to wipe off the stain? I understand that if they are diposed of incorrectly that can potentially spontaneously combust.
YoungHouseLove says
We always bring anything coated in truly terribly things (aka: stuff you’d never want poisoning a landfill) to our local dump/recycling center, which has a special spot for anything combustible. Hope it helps!
xo,
s
Chrissy says
Love your blog…I can get lost in it all day!
Quick question-when you stain poplar wood, do you seal it with a wood conditioner to prevent blotching? I am new to DIY projects and any of your expertise would be greatly appreciated.
YoungHouseLove says
Oh yes, when you stain any type of wood you generally want to seal it after you follow the directions on the can.
xo,
s
Dee says
John and Sherry , you have a wonderful blog and thanks to you that Im hooked to DIY . I have never ever held a glue gun or any tool for that matter :) All I can do is whip up delectable vegetarian dishes … I have a question before I progress to DIY my dresser ,unfortunately it has a veneer coating and I can see that its flaky and coming off here and there , It looks good construction wise and dont want to craigslist it , I doubt I can use a sander on it like you did for yours ? Can I still go ahead and paint it , by sanding it with paper , is it worth the effort or is it better to swap it with another find on craigslist ? Same with the table top.. Your suggestions would be really appreciated . Thank you for writing such a wonderful blog , keep it going !
YoungHouseLove says
Hmm, if it’s just a little flaky I would sand it with something high grit (ex: 200 grit sandpaper) just a little to see if it smooths things out. Essentially, you want any surface to be smooth before you prime/paint it because holes or dings or flakes will be more obvious after something is painted (people think primer and paint will hide them but they can actually accentuate them) so if you can get it pretty smooth with sandpaper (doesn’t have to be perfect, but pretty good) I would go for it! If you just can’t get it smooth at all, I would swap it with something else. Good luck!
xo,
s
Dee says
You know what sherry , I got it all wrong yesterday when I asked you this question , apparently its a particle board dress ( pretty heavy ) with a lacquer finish which is chipping off .. but the table is veneered . I am still learning . Thanks a ton for your prompt answer :) Love ya guys !!!
John says
Great job guys, you inspired me to try this for out new son. Everything went perfect from the perfect Craigslist score to painting, until it was Safecoat Acrylacq time. I applies two thin layers with a brush and it definitely turned my dresser yellow! Yellow as yellow can be! Any tips, what did I do wrong? Don’t know if I have the time to resand and repeat, but I have other white nursery projects planned and want to get a better finish result.
YoungHouseLove says
Oh no! I would be sure to apply it really thinly (a dripping wet brush is a bad thing, you just want to sort of glaze it on really lightly). You said you did thin layers so I don’t really have a guess unless you did it in super hot or cold weather (you typically want to follow the temp recommendations). We have used it for years and it never gets close to yellow (sometimes it has a purple-ish cast when it’s wet but dries clear). So sorry it turned on ya!
xo,
s
Kimberly says
Did you notice a change in the color of your stain after applying the sealer? Miniwax says not to use polycrylic water-based sealer on top of red mahogany stain. I bought an oil based sealer but am nervous to use it and am wondering if another water based sealer would cause a color change.
YoungHouseLove says
Weird! I have never noticed anything but maybe try it in an inconspicuous spot to be sure?
xo,
s
keisha says
I’m pretty sure I’ve just fallen in love with your blog. :-) This week had me doing my first DIY tabletop refinishing (I’m guessing veneer? One of those cheap sets with pedestal table and armless windsor-back chairs) with disastrous results. Sanding over the polycrylic with a 180 grit (which was labeled as an “in between coats” grit) left me with little stain-free patches all over that wouldn’t absorb new stain. Back to the drawing board!!
Question: Was there a reason you chose Minwax’s wood finish over their regular oil-based wood stain? I’ve never used stain before, so when I opened up my can of Cabot’s oil-based wood stain (chose that brand purely because the shade was closest to what we wanted), it was thick and milky, which surprised me. I honestly don’t know if it would handle a rubdown well after 20 minutes.
YoungHouseLove says
I had luck with the stuff we used before so we went for it! It’s also less toxic, so it’s a good choice for a kid’s room (or any room to breathe easier). Hope it helps!
xo,
s
Dawn Hudson says
I just recently found a great deal on craigslist. I found a pottery barn table for 200. Though the top has a couple of white spots on it so I would like to refinish it. How do I tell on the table if it’s sandable or not. I can’t tell if it’s solid wood or veneer, and if veneer how thick it is. Thanks for your time. [email protected] I am sure I will forget to check back for your answer I am forgetful like that…..I have 4 kids, is that a great excuse. :)
YoungHouseLove says
I would just sand it shallowly (just a bit) and make sure you don’t oversand, that should work no matter what it is.
xo
s
Britt @ Honest to Goodness Living says
Random question – but about how long did it take you guys to get this beast sanded down? Found a similar dresser on CL and considering buying it – but trying to prepare myself for how long of a project it would be… :)
YoungHouseLove says
Hmm, maybe an hour? Two tops? It wasn’t too bad. You just want to rough it up so it takes the stain, but you don’t have to get down to bare wood or anything.
xo
s
Erin says
Wow, what an amazing job! I found you on pinterest. I was looking for some clear and concise instructions to refinish my own dresser and this is a huge help. Thank you.
YoungHouseLove says
Aw you’re welcome Erin!
xo
s
Suzanne says
How tall is this dresser? I ask because we have a very similar one and when I saw your post – I was like “yes! that is exactlay what I want to do with ours” But ours is only 30.5″ tall and I worry it is too low for a changing table (typically 36″ tall).
YoungHouseLove says
Ours is 30″ tall but with the changing pad on top it’s 34.5″, which seems to work for us. John’s six feet tall (I’m 5’2″) and we’ve both been using it for over 2.5 years without complaint! I think if changing diapers too hours maybe we’d notice but it’s just a minute or two here and there so it’s not bad :)
xo
s
kelly says
Hi – how did you attach the changing table pad itself securely to the dresser?
Thanks, Kelly
YoungHouseLove says
The pad came with snaps that you attach to the back of the dresser and has straps from the pad that attach to the snaps. Hope it helps!
xo
s
Sarah Rachel says
I will be needing some new furniture for our new home that hopefully we will transfer by end of this year. But the old ones will also be brought but needs to be furnished or repainted.
Cynthia says
I’d like to take this on … I have a bureau and nightstand (Craigslist and antique store), but they’re both painted. They’re both nice solid wood underneath. Do you think I should take on the paint removal process, via sanding (I’m not excited about chemical strippers and I’m not sure whether it’s latex or oil paint … my guess is that they’re one of each), or should I just break down and repaint the pieces a nice dark brown? It kills me to waste the nice solid wood!
YoungHouseLove says
I think if it kills you you might not ever be happy if you paint them. There are some green/biodegradable strippers (check out the one by Next at Home Depot).
xo,
s
Bruce Johnson says
Great refinishing job, you guys! And great idea about taking a nice digital photo of the piece to the store so you can match your color.
-Bruce
Ashleigh says
This project inspired my nursery dresser project for the weekend. Mid-century dresser from auction: $45, supplies to paint and stain: $37. The only difference is that I only stained the drawer fronts. Everything else is painted white. And that’s only because I didn’t want to take the whole thing outside to work on it (just the drawers). Can’t wait to see it all finished!
Jo says
Nice job! About how many hours of labor did it take? And how much time from start to finish including drying between steps?
YoungHouseLove says
Hmm, it was so long ago I can’t really offer more than a guess, but maybe a few hours between drying steps (poly was applied the day after staining and painting, both of which were done a few coats in one day) for a total of two days on and off spent on it. Maybe 4 active hours on it one day and 2 the next?
xo
s
Jenny says
I have a general refinishing question: a few other “how-to” sites that I’ve looked at recommend stripping with a chemical stripper and then sanding. Any thoughts on that? I have an old, fairly glossy finished dresser that I’d like to stain a lighter color, and I’m wondering if this would require stripping then sanding, or if I could just sand. Thank you!!
YoungHouseLove says
We just generally like to avoid chemicals when we can, so just sanding and then using a liquid deglosser (they sell green varieties that are biodegradable at places like Home Depot) does the trick for us. Hope it helps!
xo
s
Rosemary says
You mention sanding with 80 grit and then 200 grit paper. Did you not use anything in between? I wondered if that quick jump in grit strength was because it is a veneer so you didn’t want to sand too much. I am refinishing a veneer table and worry about sanding through the veneer. I had thought to just start with a higher grit (180?) but your approach was quite different and seems to have worked really well. What a beautiful result!
YoungHouseLove says
Oh yes, you might be able to do the whole sanding job just with 180 grit, we just roughed it up with lower grit and then smoothed it out with high grit, but the key is not to get too deep with veneer!
xo
s
Carrie says
So pretty! I have a similar dresser that i have been wanting to do something with. Question… When you did the inital sand it looks from your picture that you did not sand the original stain completely out. Does the dark stain that you are applying over top allow you to do this? Or did you sand the stain completely out and my eyes are just playing tricks on me?
YoungHouseLove says
You’re correct, we didn’t sand it all the way out, we just broke through the poly layer to get to raw wood so the darker stain could soak in right over the other color. Hope it helps!
xo
s
lauren says
looks awesome! how do you tell the difference between wood veneer and laminate? i just bought a great dresser i want to refinish for a nursery but not sure whether it can be stained…
YoungHouseLove says
Usually if you pull open a drawer or look on the side of the top or side you can see what looks like a thin layer of wood – which is veneer. If it’s more like a 2 x 4″ (dense, no thin covering) it’s usually solid wood. Hope it helps!
xo
s
Keren says
Hi guys! Love your recent post about keepin’ the blog smallish :) Question for you…I am buying a painted desk from craigslist and want to strip the ugly green paint and stain the natural wood a nice color similar to the nursery dresser. Do you recommend that I manually sand or use a paint stripper since I want to stain the furniture? If paint stripper is the best way to go do you have one that you recommend for use with wood furniture.
Congrats on the bambino!
YoungHouseLove says
I would use a hand sander (one that plugs in) to see how far down you can get. It might work, or you might need a stripper (those are messy, so trying to skip it first might save you a step if you can, but if you can’t you can always try that next). I’d just check out the ones at Home Depot (we haven’t found one by name that we love, but try to get ones that are eco if they have them).
xo
s
Montse says
I am Montse Barcelona, Catalonia, Spain, I like your blog has variety of issues that make it enjoyable for decoration, DIY ….. It is tender and familiar.
I’m still a couple of months ago I have a blog called: lacasadelgatblanc.wordpress.com
I congratulate you.
Ellen A says
Hi!
I love your post about refinishing the dresser. We have painted one for our nursery and I was looking for something safe to seal in all the possible toxins. I had never heard of safecoat, sounds like a great product. Just curious, we live in St.Louis as well, so I googled the store you purchased from and the website would not show up. Do you know if it has since closed? If so, do you know anywhere else in stl that sells it? If not, I can purchase online. Just thought I’d check. Thank you so much! Great blog :)
YoungHouseLove says
Oh yes, it has closed but you can order it online! I just google SafeCoat Acrylacq to see who sells it (many online vendors will). It’s expensive for a big container but it lasts forever (we use ours for dozens of projects over the years!).
xo
s
Ellen says
Thank you!
Anna says
Your project is Beautiful!! DId you or have you run into any chipping veneer? I am in the process of sanding down a dresser and some of the veneer is flaking off at the edges. I am smoothing edges as to prevent further chipping. Do you recommend a filler I could use that will absorb stain in the end? Also I would like to fill the previous drawer pull holes..it looks as if this dresser has been redone before and they have several holes where there were pulls. Any advice is appreciated. Thank you for your help.
YoungHouseLove says
Oh no, that sounds rough! We have never fixed chipping veneer. Maybe try googling around for tips on that? Some filler takes stain better than others (and blends more instead of sticking out) so I’d try to get some in a close color to the wood you’re using. Good luck!
xo
s
corrin says
What can you use as a finisher to not make it look so glossy? I like more of the rustic no gloss look when its first stained but applied poly to mine. Im not happy with the glossiness, do you know what I can finish it with to stray away from the glossiness? thanks
YoungHouseLove says
They sell satin sealers like Safecoat Acrylacq, so maybe try that?
xo
s