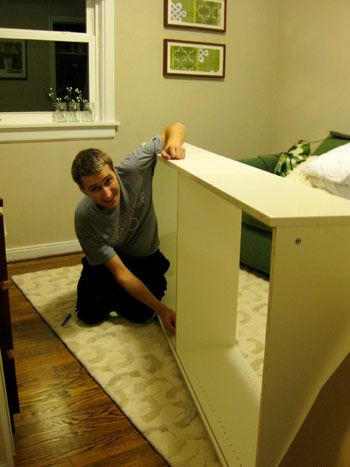
We mentioned a few times that we wanted to get a bookcase for the office/guest room/playroom since they’re so great for storing things, displaying things, and adding some architecture and height. We thought a bit about placement and quickly realized that the area to the left of the uncentered window on the far wall of the room would be the best place for a bookcase, so we headed off to Ikea with the measurements of that wall on a little scrap of paper in my purse. And in a few short hours we found ourselves assembling our $69 Billy bookcase:
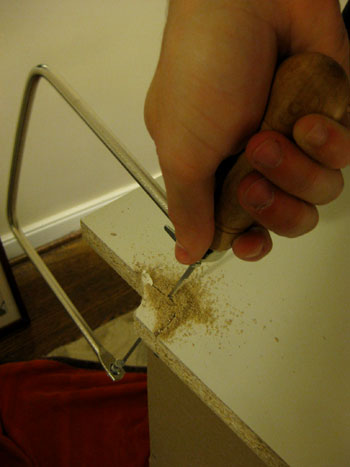
We actually checked out a few other Ikea options (like the Expedit and the Lack bookcase) but the measurements of that wall seemed perfect for the width and height of good ol’ Billy (and the $69 price tag wasn’t to shabby either). Plus whenever we snag something affordable we don’t feel too bad taking the time to tweak it a little. So when we realized that it wouldn’t sit flush against our wall thanks to the baseboard and shoe molding we grabbed a small coping saw and chiseled out the perfect shape.
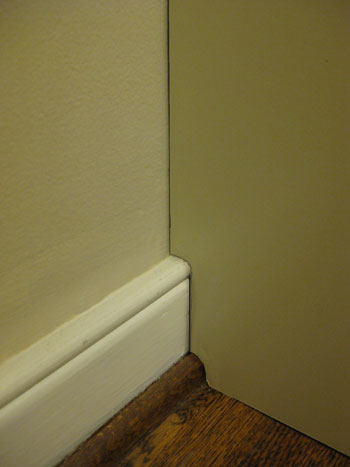
About ten minutes of sawing left us with this nicely customized setup. Flush bookcase = happy dance.
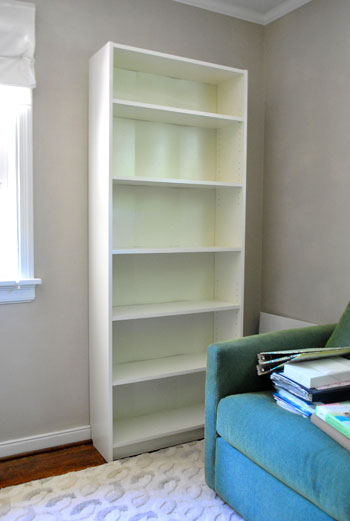
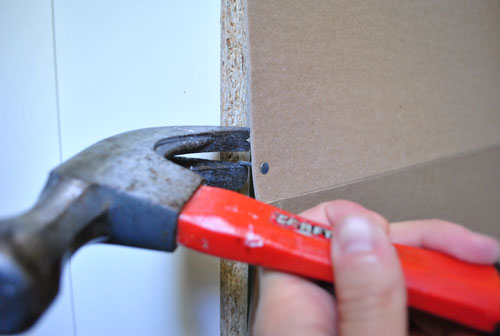
And when we stepped back and surveyed the full scene we loved how the bookcase added some much-needed balance to the entire wall. The height that it introduced on the right side of the wall really worked with the height of the window to the left. And the fact that it tucked right in next to our sleeper sofa without feeling crowded (thanks to the modest footprint of the bookcase) was the icing on the cake. But there was something that totally rubbed us the wrong way about Billy. The thin cardboard-ish back panel was folded into thirds in the flat-packed box, so when we unfolded it and secured it to the back of the bookcase with small finish nails it still had some telltale creases and looked a bit shoddy to boot. Cripes.
So we decided to take a moment to brainstorm a few possible solutions. We decided we could grab some foam core and cut it to the size of the six rectangular openings in the back of the bookcase and slip it back there (to obscure the view of the creased back). Heck we could even paint, wallpaper, or cover the foam core with fabric for a nice little customized look. But that seemed like a lot of foam core and a fair amount of work. Then came our second idea. What if we removed the back of the bookcase altogether and painted the wall behind it for the same effect? So off came the back:
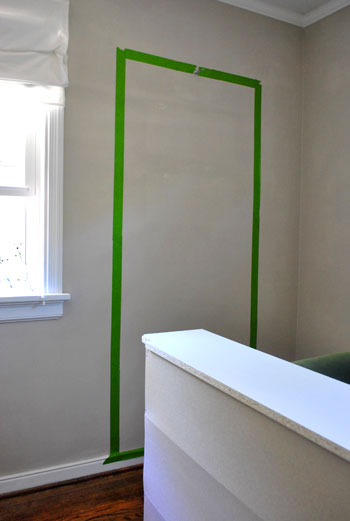
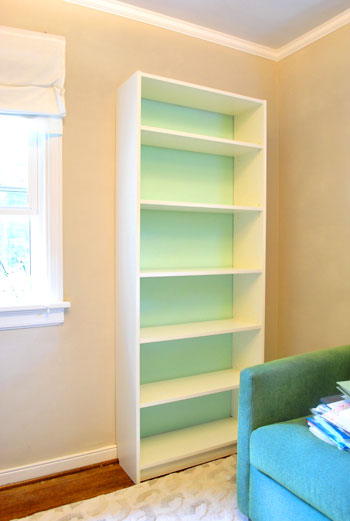
Then we realized that we could apply a quick and dirty tape rectangle around the wall (with the bookcase still in place) so we knew where to apply our background color. After we stuck up some Frog Tape and removed the bookcase, here’s what we were left with:
We opted to go with Mythic’s Adanna Aire, which was paint that we had leftover from the nursery ceiling. Gotta love a soft aqua tone that’s 100% free. Plus it worked really well with our blue-green sleeper sofa. Then we just slid the bookcase back into place in front of the painted portion of the wall.
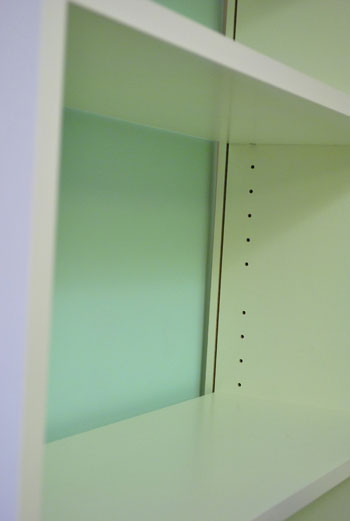
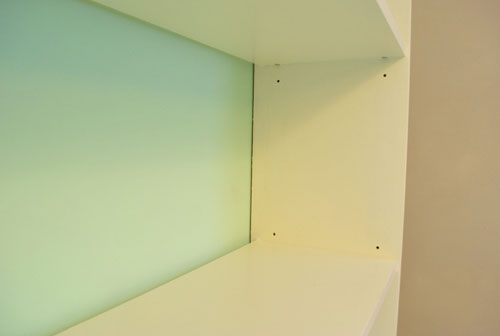
But we had a second eyesore to solve. Removing the back panel left a dark crevice in the back of the bookcase that we could definitely do without. And all the holes for moving the shelves around didn’t exactly look high end either.
So we broke out some white caulk and filled them in. We opted to leave one hole above and below each shelf (in case we wanted to shift things slightly to accommodate something a smidge taller or shorter) but we loved the look of six unformly spaced shelves, so we knew we’d never use the other holes to create extra tall or short ones. And in an oh-happy-day moment, the white Dap window and trim caulk that we used turned out to be nearly identical in color to the bookcase, so it definitely obscured that ridge near the wall along with all those extra holes:
We did notice that deciding to lose that back did slightly compromise the bookcase’s sturdy-factor. By no means was it super rickety, but it didn’t feel quite as reinforced as it was with that panel in place – even though it was basically just a folded sheet of cardboard.
Happily, after anchoring it to the wall at the top it added back a bit more of the structural integrity, but for even more dependable sturdiness and kid-safety we would highly recommend adding some metal L-brackets for more structure (which can be painted white so they virtually disappear). We definitely plan to take that reinforcement project on soon when we do other kid-safe things like anchor the TV in the den and a few other bookcases around the house.
When it came to loading up the bookcase, we aimed for equal parts function and form. Since the room would have to work as an office and a guest room, we didn’t want it to feel like it was all business, but we also didn’t want to sacrifice practicality in the name of guest ambiance. So we actually whipped out a pad and a pen to jot down everything that we wanted to store (to be sure that we got the function in there before moving on to the form):
- office supplies like envelopes, tape, scissors, a stapler, notepads, etc
- extra printer paper and cardstock
- paint decks galore (since we refer to them while blogging, they were too far away in the den ottoman where we used to store them)
- books & binders
- a clock (I feed Clara every few hours on the sofa in here, so I knew that would come in handy)
- a few of Clara’s favorite stories and toys (since one of us plays with her while the other tends to the blog)
- treats for Burger (can’t forget about our other baby)
- a few decorative items to keep it from feeling too office-focused when we have overnight visitors
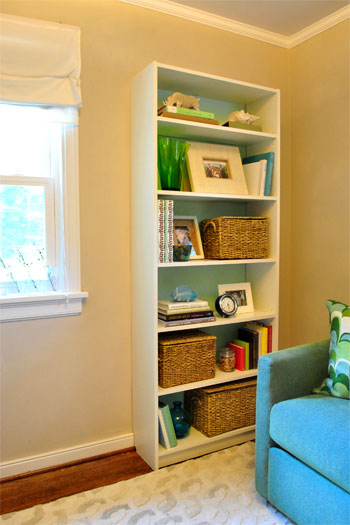
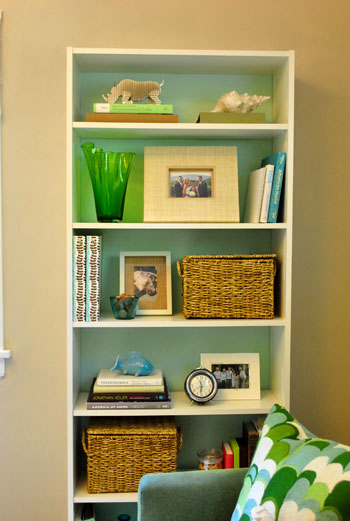
And here’s what we ended up with:
The baskets (from Michael’s for 50% off) easily housed things that we’d rather keep out of view (office supplies, extra paper for the printer, Clara’s books and toys, and a slew of paint decks) while everything from books and binders to a glass container of treats for Burger got premium placement on the shelves. We even had a small clock sitting around and a few decorative vases, frames, and other accessories on hand to keep it from feeling too industrial and office focused so our friends and family feel right at home when they spend the night.
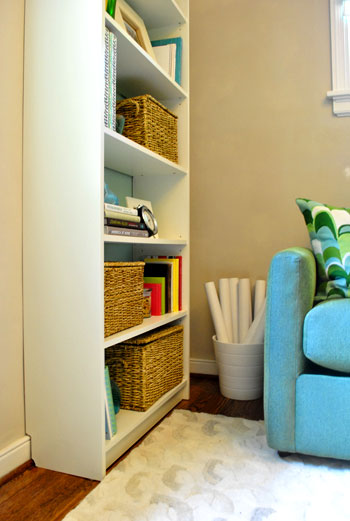
Of course we still have a bunch of files and other paperwork that we’re planning to store over on the desk side of the room (stay tuned for those details) but we love the balance, practicality, and visual interest that a simple $69 bookcase (along with some free paint that we already had on hand) added to the space. Oh and we even had room to squeeze a white planter that we already had (from Ikea) into the corner to hold some mailing tubes (which we use to ship shop stuff). Hooray for even more storage space.
So that’s the latest office update. What have you guys been up to this week? Any bookcase makeovers going on at your house? Any basket-buying going on to add concealed storage somewhere else in your casa? Do tell.
Psst- Wanna follow the entire office/guest bedroom/playroom makeover? Click here for the intro post, here to read about the big sleeper sofa hunt, here for the DIY desk play-by-play, and here for the homemade light fixture project.

Sarah says
I love the bookshelf and especially the paint as a backdrop. Just a thought…It could really look custom with a little trim around the edge where the bookshelf meets the wall. But who has time for that when you have baby clara and baby burger to play with!
YoungHouseLove says
Great suggestion Sarah! We love the idea of beefing it up with trim and even crown molding on the top someday…
xo,
s
Yuliya says
This is why you guys are amazing…I would have seen the problems but not known how to fix them, then I would have sat in the corner and cried. I am planning two bookcase overhauls for my very first ever DIY home improvement projects, one is the Expedit bookcase which I plan to upgrade by finally doing something to the back, any tips would be appreciated!
PS finding time for home improvement is a little tough with a sixteen week old, really don’t know how you two do it, you are absolutely amazing and inspirational. (done gushing)
YoungHouseLove says
Hey Yuliya,
As for the back of your Expedit, you could use grasscloth wallpaper, fabric, or even wrapping paper to jazz it up. And of course there’s always paint. A bright shot of color on the wall behind your Expedit could look amazing. Hope it helps!
xo,
s
Gina says
I love this post! I found your blog about two months ago from a list of “favorite blogs” on Studio222’s blog. Yours has become a daily fix for me. I recently signed on my first apartment and I’m so excited to put my decorating ideas to use. Your beautifully customized home is an inspiration.
Amy G says
Love, love, love!
Kate says
Your bookshelf looks lovely! I wish our office could look that nice, but our bookcases are not so nice. We have two, one on each side of the window, one for me and one for my husband. Mine is stuffed completely full with boxes of papers, old text books, photo albums, and tons of books, my husband’s is stuffed full of tons of random books and tons (and tons) of boxes for computer games. I try to keep mine neat and tidy with a few decorative pieces in front of the stacks of books, but they’re still a complete mess.
Allison says
You two are just endlessly clever! Looks great!!
Melissa says
Great work as always guys! I am a sucker for a great built-in! You may want to reconsider the L-brackets. I’m pretty convinced my own little crawler/climber could take down pretty much anything not anchored to the wall – better safe than sorry, right? :)
http://houseography.blogspot.com/2010/05/built-in-bookshelves.html
YoungHouseLove says
Hey Melissa,
It’s actually already anchored to the wall! We just meant that more L-brackets could be used to reinforce the shelves (although once we anchored it to the wall and loaded it up with books and baskets it really seems 100% sturdy). Hope it helps!
xo,
s
Alicia says
I love the new bookcase. You did a great job of filling it in. I have a couple of those Michael’s baskets that we keep on the bottom shelf of our hutch that houses board games, decks of cards, etc. They come in handy and are a nice natural addition to the house.
Letty says
Ooooh I’m really liking the glimpes of the pillow on your sleeper sofa and the white rug– I can’t wait to hear more about them and see the finished product! I love office makeovers– I think mostly because I live through others’ organization, dreaming of one day when I’ll be like that :)
Tracy says
I have been working on the baby room at my house! The paint has gone up this week and a next week will be assembly of furniture. I can’t wait to give a big reveal when we are finally done. Oh, and my husband built our dining room table this week too. I just finished putting on the second coat of paint. We will be buying chairs from IKEA this weekend. After looking for months I could not find a price that I was happy with so we just built the table ourselves. You got to love summer projects and being teachers!
Christine says
Wow. There is something about a beautifully styled bookshelf that just makes me so happy! I love it.
Alexis says
You two are geniuses, who never cease to amaze me. I’ve had cheap-o bookcases and it would have never occurred to be to ditch the backing and just paint the wall behind it. Caulking all those extra holes? Yeah, I couldn’t have thought of that. And if would have though about sawing out a little on the back so that the bookcase would sit flush to the wall, I would have been pleased as punch, since that was my least favorite thing about it. Thanks for all the ideas!
Usha says
Wow – this looks FABULOUS! I love the thought & innovation you put into all the little details…..that’s what makes your decor looks so clean & seamless. Wanted to share one tip that I recently found out about. Particleboard (& most IKEA furniture is particleboard) can be a source of indoor air pollution since it emits formaldehyde. One way to reduce that especially when you buy new furniture is to seal the exposed particleboard edges. AFM safecoat makes a product called “safe seal” or “hard seal” (i forget which) meant for that. We recently redid our master bedroom closet with IKEA PAX and we sealed everything with this BEFORE we assembled it, let it air out overnight & put it up the next day. Just gives us additional peace of mind!
YoungHouseLove says
Great tip Usha! We might just have to tackle that! We love Safecoat products so we’ll be sure to keep an eye out for SafeSeal!
xo,
s
LauraC says
Love it!!! Bookshelves are such a great way to add storage because of their height! The one in our office needs help. I worked on it last summer to “beautify” it, but I’m still not happy with it.
Question: We have a nice tall bookcase in our daughter’s room and we keep all her toys wrangled in boxes and baskets. However, she has 3-4 wooden puzzles that are too large for the boxes, but if I put them in the larger baskets, all the pieces would fall out and get “lost” in the bottom. Any ideas, suggestions? I’m sure Clara will be getting some of those cute (shapes, color, alphabet, etc) wooden puzzles someday too, if she hasn’t already been given them. What will you do? Thanks for any help, and want to add keep up your great work on your awesome blog!
YoungHouseLove says
Clara actually has some wooden blocks and another wooden animal puzzle and they both came in pretty fabric bags to keep them corralled. Would there be a way that you could get fabric bags or use some other sort of bag to keep them together and then store them all in a larger basket? Hope it helps!
xo,
s
Caradi says
Love the makeover! You guys are such an inspiration.
Rebecca says
What are your thoughts on shoe moulding? Do you think they are part of the trim and should match the base or should they match the floor? This is my burning question.
Jenny says
Hey, how did you figure out the outline of the moldings to cut away from the bookcase? It seems silly, but measuring the height of it a few inches off the wall seems error-prone, but your cut-out matches exactly. Do you have a sneaky trick? Thanks!
YoungHouseLove says
Jenny- Good question. It was a bit of trial and error. We just studied the edge and held up a ruler to see how high and deep the shoe and the molding were and just rounded off the corners. Someone actually mentioned a tool that will help you get a much more exact result without the guessing (just scroll back through the comments for that info). Hope it helps!
Rebecca- We actually like our shoe molding as it is (it matches the floor) but we’ve heard that others love it painted white like the baseboard so it looks beefier. We think you can’t really go wrong either way as long as it looks clean (no stain on the baseboards or paint on the floor). Hope it helps!
xo,
s
Sophie says
I’m jealous that the two of you can create such gorgeous shelving arrangments! Mine looks like a two year old did it.
Kerry says
We have the Billy bookcase in medium-brown in our living room, and love it. We were actually just at Ikea yesterday debating another one to flank the other side of our couch – we’re both big readers and my husband is getting his masters degree, so we’re running out of room on the one we have pretty quickly!
Mary Ann says
I actually have two bookcases similar to that leftover from my single days (read: lower income days) that are hanging out in our guest room/ craft room. What a great idea! I hate to get rid of them because they’re so functional, but they could really use a sprucing up like this. Thanks!
DemMom says
I recently started clearing out and organizing a huge closet/storage space that is connected to my home office. Shelves were in order, but I didn’t want to spend much $ (since they’re in a closet and not usually seen by visitors). Craig’s List is full of those MDF or particle board shelves, even the ones from IKEA (which I can’t imagine are any different from other MDF shelves). I saw A LOT of listings for Billy shelves. I found 3 (not IKEA, but basically the same thing), which are all in fine shape – I didn’t care what colors I ended up with, but other than that they’d be fine for displayed storage. Anyway, 2 Billy-like shelves plus one nine cube shelf (found new at Target for $40), all for $60 and the farthest I had to drive was Church Hill.
LauraC says
Good idea! Thanks so much Sherry!
hi-d says
Looks great! Wow…you’d never know that you painted the wall. :)
Misty says
genius!!!!
Anna S. says
Is anyone else wondering what that empty corner of the den looks like now that the desk/office has found a new home? Not to rush you folks at Casa Petersik, but I think it would be interesting to have a post about your plans for that area of the house? I’m curious what you have up your sleeve next! :o)
YoungHouseLove says
Hey Anna,
We actually are planning to keep that desk area in the den. It’s a great spot to write letters and even to sit down with the laptop on the weekend to look up a movie or read a few favorite blogs (that area will come in handy for more casual computer use as opposed to the real hours that we’ll put in slaving away in the office across the house during the week). We also think that down the line it’ll be a great drawing desk for Clara (and eventually a handy homework spot as well). And since it’s right in the common area where we hang out it’ll be nice to have her so close to the kitchen, dining area, den, and sunroom (instead of tucked back into the more private area of the house away from us as we prepare dinner or decompress on the sofa).
xo,
s
sara says
genius. just genius. i love it. i want to copy it and i probably will. :) this project seems very simple and easy to do. i love the colors too!
Miki says
Love the bookshelf makeover! Quick question: When you go to IKEA, do you make a day out of it and go with multiple items in mind that you would like to buy? I find that I don’t even think about going since the nearest one is several hours away (and I know it’s not close to where you live either). With a baby who doesn’t enjoy the car…it takes too much planning!
YoungHouseLove says
Hey Miki,
We typically just breeze through Ikea for an hour or two to pick up what we need (since it’s 2 hours away, but thankfully very close to John’s parents house). So whenever we visit them for the weekend we just slide through Ikea on the back-end. Hope it helps!
xo,
s
Sarah says
Hi YHL!
I similarly had the trifold dilemma Billy bookcase dilemma. The backing does keep the bookcase square which is important for its integrity. I used a spray on adhesive to cover the back with some leftover spring green wallpaper to mask the folds. Best part is, the paper is removable, so you can change it as often as you like!
YoungHouseLove says
Sarah- Great idea! We did find that by anchoring it to the wall and adding some weight (the books and baskets did the trick) we achieved a super sturdy result without the backing. But your wallpaper suggestion also sounds amazing!
Beatrice- You’re funny! We used to refer people to the post for info that they missed, but we found that it’s just as easy to quickly cut and paste the answer to their question. We totally acknowledge that we can be long winded so we don’t mind when people don’t take the time to read every word!
xo,
s
Beatrice says
I think you are amazingly nice. Yes, you do have great readers/bloggers, but when somebody asks a questions that makes it obvious they didn’t read the post? I think you could say “Thanks sweetie, but we did mention that in the post, go check.” or something like that. Don’t want your readers to get all lazy on you!! hahaha
Jennifer says
I have a Billy bookcase purchased in 2004 or so, and the back panel is one solid piece. I can’t believe they make them folded in three now! What are they thinking? I’m not impressed with Ikea on this one.
Well done, you made the best of a cheap bookcase. But I would be a bit nervous to do what you did, since it leaves no room for slight changes in the future. Especially with the painted rectangle on the wall. And I wonder if the bookcase will start to gradually lean to the side over time without the back panel holding it straight. Maybe you should put in a couple of L-brackets just to be sure.
The finished project looks lovely, as always!
YoungHouseLove says
Hey Jennifer,
We found that anchoring it to the wall (which is done from the top of the bookcase) keeps it firmly in place on the wall in front of the painted rectangle for now, but of course we’ll add those L-brackets if need be down the line. We also paint walls all the time, so painting over that blue rectangle would only be a 20 minute project for us (which is definitely faster than it would have taken us to paint a bunch of foam core pieces after cutting them to fit the backs of each shelf) so we actually view our paint approach as a shortcut- at least for us. Hope it helps!
xo,
s
Maggie Rose says
It looks great! We have a very similar set-up in our guestroom/office, but our room is a little smaller than yours I think (I know, it’s tiny!). We also took the back off our shelf but since our walls are painted a light blue we like that color peeking through. I love the baskets you have – our shelf is pretty packed but I think I could weed out a few things and then store some of the other unsightlies in baskets. Our staplers, craft supplies, extra envelopes, etc are in those white cardboard IKEA boxes (the smaller size). They are STUFFED though so probably need to weed those too!
TellaLuca says
Looks GREAT!!! Question for you guys, I’m an avid reader and have books galore. Some paperback, some hardcover, all different colors and sizes. What can I do to make my bookcase(s) look better?? Should I “store” some of my books in boxes so as not to clutter the bookcase??
YoungHouseLove says
Absolutely! Popping any less than lovely books into baskets is a great way to store them out of sight and streamline and declutter any bookcase. Hope it helps!
xo,
s
Mary Lou says
Your bookshelf looks lovely! My friend’s dad just built her three great bookshelves so she gave me her old mismatched bookshelves. And today I ma going to paint them Sherwin Williams “Cote D’Azur” It’s a very pretty turquoise color!
_meganORSI__ says
*blink.BLINK* o_0
I’m amazed. I would have never though to just paint the wall behind it – and it LOOKS AMAZING!
I’ll definitely keep this easy trick in mind!
THANKS! :-)
Constance says
Wow! Wonderful — how were you able to measure prior to sawing the bookcase to site flush to the wall? Was that perfect cut the result of measurement + a good eye or did you start sawing small and keep shaving it off?
Sophie says
Lovely!
Just out of curiosity – where do you keep the rest of your books? Do you have a dedicated area for your books or are they scattered throughout the house? I’m actually getting a bookcase delivered this week, and I was researching book display ideas. I think the best one I’ve heard so far is from Brooke at Velvet & Linen. She puts brown shipping tape on the binds of the book and writes the title with a white marker. All your books become this beautiful neutral color! And so much easier than wrapping…
Cassi says
I am seriously obsessivley jealous of your organization skills and eye for style. My house is such a disaster and I still have WHITE walls (yuck!) Your blog is such an inspiration!
Christine says
Maybe it is just me or maybe it is the lighting but the bookshelf appears to be painted in the close up photo of where the bookshelf meets the shoe kick. The third photo down. Did you paint it too and that is just a post waiting to happen?
YoungHouseLove says
Christine – I guess it does look painted in that picture! But alas, it’s just the lighting (and the fact that it was taken in shadow, with our old camera, at night) that made it looks so greige. But we swear we’ve left the bookcase itself the same color Ikea made it.
Sophie – We don’t own that many books in general because we tend to do the library thing rather than buy them, so we generally only buy books that are attractive enough to display. So most of those are scattered throughout the house (if you look at our house tour, you’ll find small groupings in just about every room). We love to buy hardcovers and remove the paper cover to expose the colorful binding below. But we do have a shelf in the office closet for the books that we love that don’t quite make the cut to be displayed for all to see. And since we love a pretty book, that trick from Velvet & Linen sounds perfect and easy.
Hope that helps!
-John
Annalea says
Can I just say that this post has Ikea Hacker written all over it? You guys should send them a link, because this is a great idea. :o)
Thanks!
Nicole says
We just did a bookcase makeover! I was tired of my post-college garage sale bookcase and thanks to a recent trip to IKEA, now have a sleek, new bookcase in our front room (EXPEDIT series). We have found that the fabric ITSO storage bins from Target fit perfectly into the cubbies. We can easily stack two in each cubby and their handles provide easy access. I feel like I have a grown up front room now!
Andrea P says
Hey YHL!
Love the latest office update!
Just a quick question regarding removing the soft cover off a pretty hardcover book….do you keep them? If so where? Not sure what to do with mine…
Thanks!
PS – I know you probably have a ton of cool posts on your to do list…but i would love to see a post on how to style a large bookshelf like this…maybe showing different options? I LOVED your post when you showed your old west elm parsons desks 4 different ways!
YoungHouseLove says
Hey Andrea,
Nope, those covers go right into the trash. We don’t like keeping extra stuff around (probably from our days in NYC when we didn’t have an inch or storage space to spare). And as for a bookcase styling post, how about this one: https://www.younghouselove.com/2009/03/how-to-style-a-bookcase/
Hope it helps!
xo,
s
Jennifer says
I love this idea! We just put up new bookshelves in our playroom and I’m really excited to try this idea out.
Danielle says
Why didn’t you just paint the back of the bookshelf??? I have the same bookshelves and I reversed the white side and painted the cardboard surface, so the paint would adhere and it looks great. It has a wee bit of texture, but looks fab.
I am so happy to have found this blog…you and your husband are adorable and I love that people can relate. Thanks!
YoungHouseLove says
Hey Danielle,
Since the back of the bookcase back came folded into thirds, it had unsightly creases in the cardboard that we didn’t like (we even tried reversing it but we couldn’t get rid of them). Hope it helps!
xo,
s
Sonya says
Thanks for your answer to Sophie’s question above… I was also going to ask how you store your less attractive books or paperbacks. I’d love to see your storage solutions for that. This post is inspiring for me, because I’ve had that same exact Billy bookcase for years but it’s always stuffed top to bottom with masses of books (my hubby’s history books, paperbacks and my collection of decorating books) and I have longed for it to look like yours for the longest time. The main challenge is
LeeAnn says
Love the bookcase and especially how you styled it! But I’m REALLY loving the gorgeous pillows on your couch… source?
Thanks in advance:)
YoungHouseLove says
Hey LeeAnn,
The colorful one is an old find from West Elm (the store here in Richmond was closing so we got it on clearance!) and the smaller tone on tone pillow is from Crate & Barrel a while back. Perhaps you can hunt for them on ebay? Good luck!
xo,
s
nicole says
I never would have thought to paint the wall behind the bookcase, I’m always painting the cardboard back and it looks shoddy. I can’t wait to try this out!
Laura @ youngDCliving says
I’m so impressed by the last-minute bookshelf changes to get it to flush against the wall! How exactly did you measure the angles to make it so exact?
Also, I was just wondering, if done over again, would you have bought the bookcase? Or would you have rather bought a slightly more expensive item and not had to deal with all the changes. Of course, the uniqueness adds all the charm. But I still feel like it can be a hard call sometimes…
Love how you placed all the hardbacks! I just recently wrote a blog post myself about rearranging books by color. It was a lot of fun.
YoungHouseLove says
Hey Laura,
It was a bit of trial and error. We just studied the edge and held up a ruler to see how high and deep the shoe and the molding were and just rounded off the corners. Someone actually mentioned a tool that will help you get a much more exact result without the guessing (just scroll back through the comments for that info). Hope it helps!
Oh and as for if we’d buy the bookcase again, heck yeah! We love making tweaks to inexpensive finds to make them work for our house (and our wallet).
xo,
s
katee says
I love your office redo and am going to use some ideas to redo my office space. I love the bookshelf idea…
cris says
Looks great! I have done something similiar with our Target bookcases – except we installed painted beadboard paneling into the slot instead of painting the wall. It looks great and very “built-in custom”.
Also, those Billy bookcases are so durable! I had one for years in LA and sold it to a friend when I moved. They were worried about it holding up during their move so I offered them their money back if it didn’t make it. Needless to say, not only did it move beautifully but they still have it 6 years later!
Charlene @ Sweetchic says
Something so simple, and looks SO fabulous! You guys are really my design HEROES!! I love that shade of green, and especially love your placement of books/baskets/knick knacks. Perfect! I have the same Billy Book shelf in my office, but I have SO. MUCH. STUFF! I could never pare it down, hence it could never look as pretty. *sigh*