We’ve never been more all over the place than we have been lately (Clara’s room, the master bath, the kitchen, the sunroom veranda) and we can’t believe it has been around a month and a half since we last mentioned our staircase. Several of you have been eager to hear about the new runner that we ordered, and we’ve been eager to tell you all about it (it was back-ordered and arrived a little behind schedule, but it’s finally here). But the last vestiges of the old carpet in this house were standing in our new runner’s way…
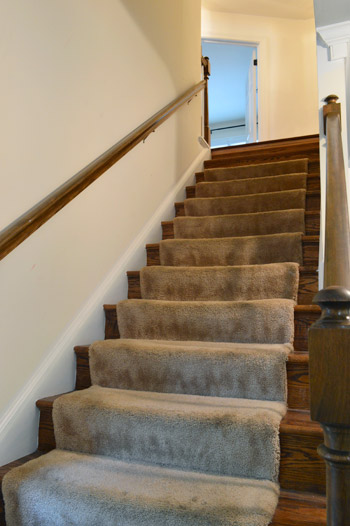
When we finally removed the carpet from our master bath, the stairs became the sole remaining carpet location – even though we had ripped it off the top step in order to install the hardwoods back in May. But between avoiding the tedium of the task and worrying about a small dog and a small human navigating those slick uncarpeted steps, we’ve just been living with this lovely situation for the last five months.
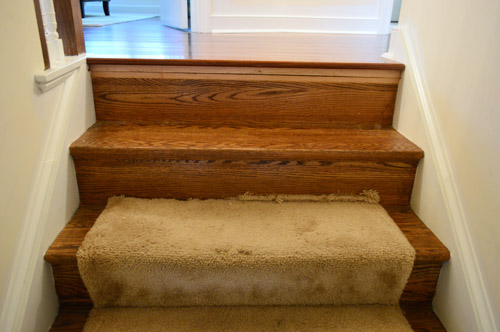
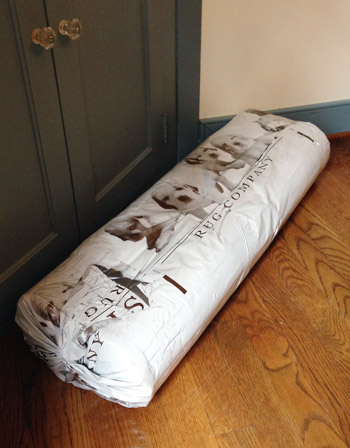
But with our new runner just glaring at us from within its packaging for the last several weeks, we decided to start chipping away at the eyesore once again. You know, for the sake of the puppies.
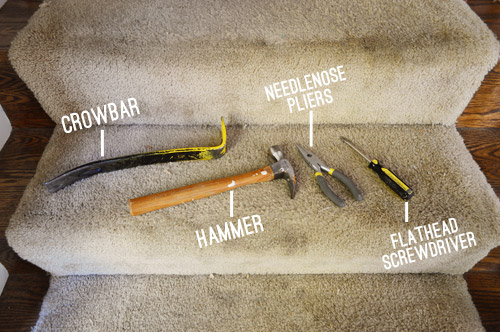
The task really wasn’t that hard. It was just boring and meticulous. Here were our weapons of choice, basically all serving the purpose of prying things up (carpet, tack strips, staples) at varying levels of detail and care (crowbar for yanking up carpet, pliers for delicately twisting stuck staples out).
Once the crowbar helped me loosen a corner or two of the carpet, it was fairly easy to just yank it up by hand. Well, by gloved hand since the carpet was rife with staples and other sharp objects determined to pincushion me to death.
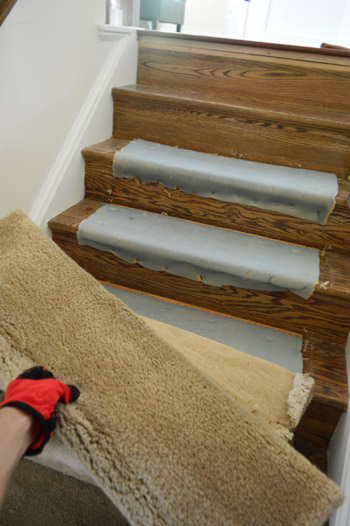
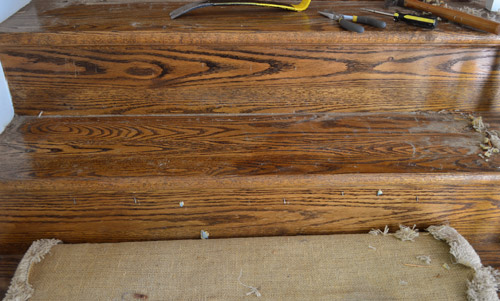
It’s what lurked beneath the carpet that was the true joy (italics = heavy sarcasm) of this project. Sure, the blue foam padding was quick to tear up… but the staples. OH THE STAPLES.
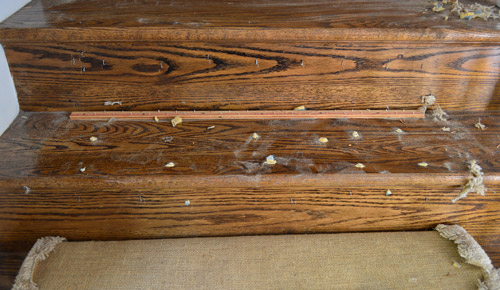
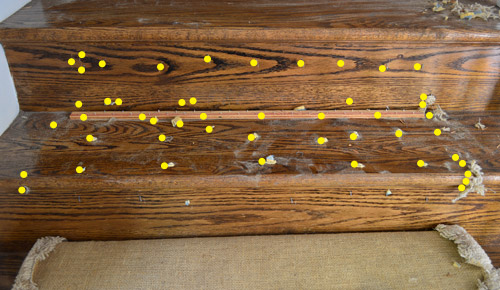
You can’t even really tell in these pictures just how many staples there were. So I decided to mark them (along with the nails holding down the tack strip) with yellow dots. I’ll save you from counting. There are 49. Multiply that by 12 steps and it’s nearly 600 things that Sherry and I had the pleasure of prying up.
Most of them weren’t that hard. We could just stick a flathead screwdriver under and pop them up. Usually only one side came lose from the wood, so we’d have to go back and pluck it out completely with the pliers. But some got stuck. Some broke. And at least one or two made us mutter some not-Clara-approved words under our breath as we went.
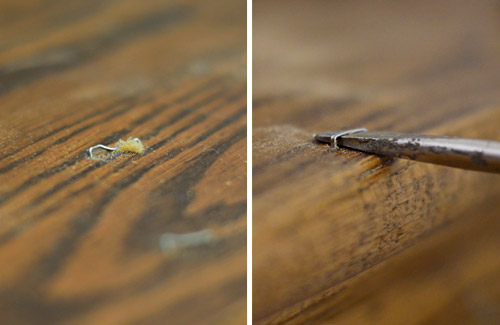
Slowly and steadily, we stripped each step clean of its metal and moved on to the next one.
We worked on it over the course of three days on and off, so Sherry would steal a few hours here and there and then tag team me and I’d go back in. All told it was probably around seven hours in total. And if we were to play you a montage of the process, it would basically just be a bunch of Burger cameos. I’m not sure if working on the stairs just made us notice all the times he goes and up down on a normal day, or if he increased his usual number of trips just to satisfy his curiosity about what the heck we were doing. Yes, that’s him doing some stretching in the middle of the staircase.
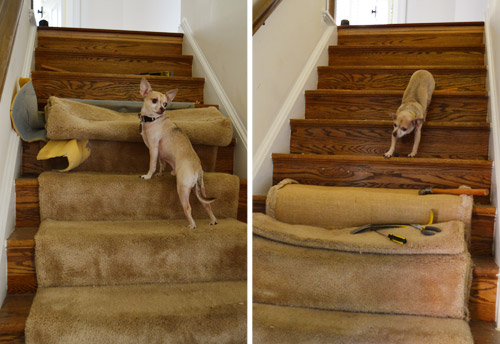
I’m mostly convinced he just wanted to be near us (there was one point where Sherry was leaning forward, full of concentration, and got some Burger tongue to the nose). I also had a particularly hilarious run-in with him when he was sitting on the carpet that I was about to rip up.
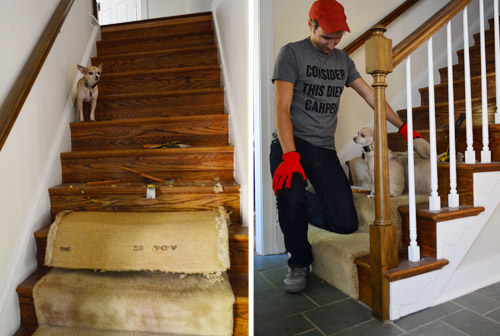
Here we are, at the end of our montage, with a completely carpet-less staircase and (more importantly) and completely carpet-less house. So one of Sherry’s before-I-have-this-baby goals has officially been met. And she’s pretty jazzed about it. Just don’t mention staple removal to her. There will be grumbling.
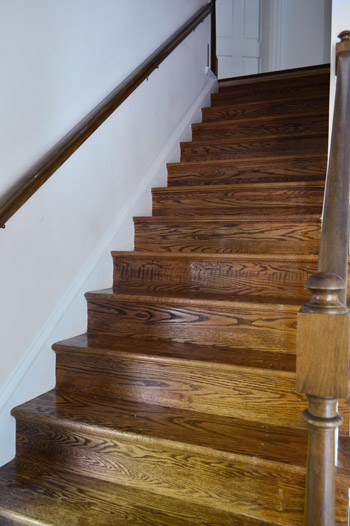
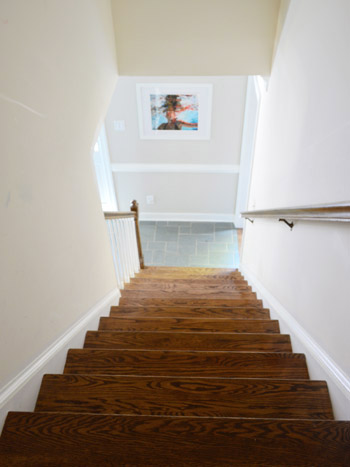
The wood left behind is in good, but not flawless condition. It’s not very scratched up, which is a relief considering all of the pointy tools we had near it, but there are some little more-noticeable staple holes in a few spots (these two steps on the bottom of the photo above are the worst, so we wonder if they used a different tool or re-stapled them here for some reason).
We still plan to paint the stair risers white – but not the treads (like this) – so that should help to hide most of the tiny holes (we can putty them before we paint). For the tread holes, the new runner should cover most of them and we’re hoping to do the same thing we did to fix up our downstairs floors before installing the runner, which should fill/hide some other slight imperfections. Note: we’re not planning to change the color of the stair treads since they flow into the upstairs flooring, which we chose to be a very close match.
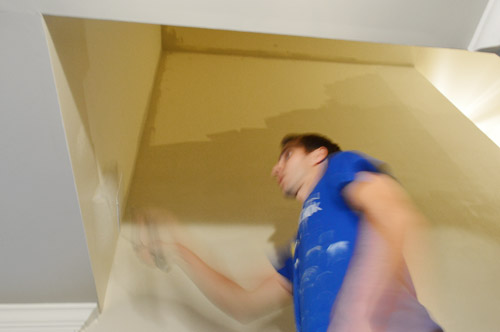
One other step that we had to tackle before runner-time was painting the walls and the ceiling leading up the stairs, since we didn’t want to do that after installing the runner and risk dripping paint on it. But we’re glad to report that we knocked that out too! We thought it would be fast and easy (it’s not too much actual ground to cover) but the fact that it involved balancing on a ladder with a giant roller pole did add a few levels of difficulty (it was about 16 feet high in some points) – which is why this terrible picture is the only one we managed to capture of the process.
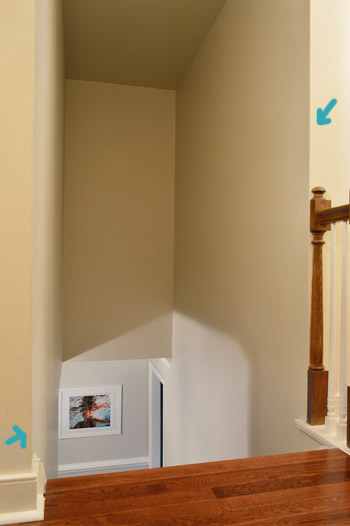
I also used our tape-the-paint-brush-to-the-pole method (detailed here) to get into those upper corners. All told, that was about another 3 hours of work, but it’s really nice to have it done. As planned, we used the same Edgecomb Gray color that we used in our foyer (we chose that knowing we’d use it up the stairs and in the upstairs hallway too). You can see where we stopped painting by the arrows along those two edges. We just wanted to do enough so we wouldn’t worry about dripping on the new stair runner, but tackling the entire hall means buying another gallon.
Hopefully early week will be the full runner reveal, assuming we can get those risers painted and dry in time! But the good news is that in the meantime both Clara and Burger have had no trouble on the carpet-less stairs. They’re not really slick at all (maybe from years of being lightly worn under a carpet?) so we’ve mostly put that worry to bed. But we’re still excited to add the new runner, just to be safe and to soften the blow if ever do lose our footing.
Is anyone else removing old carpeting and plucking every last staple out by hand? Does it make you rue the day that staples were invented? Yeah, me too.

Barbara says
I sort of enjoyed removing the staples from my stairs. It was one of the few projects that went as planned and it was easy.
Instead of adding a running once the old carpet was removed, I painted the stairs, including painting on a faux runner and stenciled a pattern on the borders. I applied at least coats of polyurethane, and it held up really well until I moved 15 years later.
P.S. I’m not much of a DIY’er, I stick with the really easy projects.
YoungHouseLove says
Sounds really charming Barbara!
xo
s
Bridgett says
I’m curious as to whether you’d ever consider painting the treads on your steps? We went through this same process (I feel your boring pain!) about a year ago. I did strip and re-stain the treads but they are still looking a little rough (lots of whole patched here too). I was thinking of painting the treads black and then putting a runner up the steps.
I’d love to hear your thoughts (or from those who have done that) on painting the treads.
YoungHouseLove says
I have seen that look amazing! I think if they’re too rough to look good in their wood form, either puttying then and restaining them or painting them is bound to be a better solution than living with them when they’re all beat up, so I say go for it!
xo
s
j says
I grew up with bare wood steps and they weren’t slick at all, ever. I’m curious how the runner would look but I don’t think I could ever do that, I don’t vacuum enough and I’m getting hives just thinking of the crud collecting around the edges!
Laurie says
Clearly, Burger was supervising and he takes his role seriously. It looks like he did a really good job!
I have had jobs like that with a gazillion staples and, even worse, there is a ton of work but it doesn’t always give you a big, dramatic, result which you deserve after the back-breaking work.
Caulking is that for me. It never ends but you can’t point at anything tangible as a reason for all my belly-aching about being sore.
YoungHouseLove says
Haha, it’s so true! We did John’s Granny’s bathroom and about ten tubes of caulk just disappeared into that tiny space!
xo
s
Kristen says
Okay, Sherry – My mind is totally in the gutter. Your comment is one word away from being a very amusing “that’s what he/she said” joke. Hahaha. I’m terrible..
YoungHouseLove says
Bah! Totally unintentional TWSS opportunity!
xo
s
Erin says
I know recently you mentioned that you were working on your photography skills, so I will just say great shallow depth of field on the up close staple photos! Bonus points if you shot without a tripod. ;)
YoungHouseLove says
Thanks Erin! That took about 50 pictures to get right!
xo
s
Amy says
I would love any advice/tips you have on painting your staircase yourselves?!
YoungHouseLove says
When we do that part (paint the risers) we’ll blog all about it! Sanding, deglossing, primer, and paint should do the trick! And I’d use a brush since it’s easier to control.
xo
s
DD Lizzy says
When we took up the 47 layers of flooring under the carpet (!) in our kitchen, we ultimately reached the final layer of tar paper (vintage 1930) that had been tacked down with a nail every half-inch or so on the seams. Of course the tar paper just tore around the nails, so getting them out was a task that made us harken back to the time when we didn’t use mommy-swears.
YoungHouseLove says
Haha!
xo
s
Sarah J. says
we have come to the conclusion that our basement carpet will need to be ripped out and replaced in the next year, as the glue is failing and it’s all peeling up in shreds (ew). i’m mixed emotions as i will be glad to see the grass green shag go (even though my boys love to “farm” the carpet with their tractors) but i’m kinda bummed as i hoped it would make it a couple more years until we had enough saved to finish the whole space nicely. oh, well. at least we don’t have staples to pull! just lots and lots of glue… :/
YoungHouseLove says
Oh man, good luck Sarah!
xo
s
Melanie P says
Do you have any old blog posts (or pictures) of how you set the ladder up for painting the high parts of the stairwell? I’m repainting my entire house and my next step is the stairwell (which I’ve been avoiding!), I would love a few helpful hints!
YoungHouseLove says
So sorry, we were so bad about taking photos of that part (it was really complicated with the pole and the ladder in there, so we were trying not to do anything dangerous with the camera in the mix). I would just visit Home Depot and check out their telescoping ladders. That’s what we have (it allows you to make one side shorter so it can sit and be stable on stairs). The extra long roller rod (and with the brush taped to it) did most of the height work, so John wasn’t more than about 8 feet off the ground at the highest point (so reaching his long arms over his head + the 8 foot pole made up for the difference from the ladder to the ceiling. Hope it helps!
xo
s
Sally G. says
It’s good to be reminded that even pro DIYers such as yourselves have to do some time-intensive, tedious things every now and then. I’m running into a few roadblocks getting things put together in our new (first ever!) house, so whenever I get stuck I just think to myself “it’s not just me!”
On a happier note, have you guys seen this? http://www.anthropologie.com/anthro/product/home-room/27210285.jsp?cm_sp=Grid-_-27210285-_-Regular_14 You’re clearly famous if Anthro is using your book in their staging :-)
YoungHouseLove says
Ahhh! Isn’t that crazy?! Every time I see it I think my heart stops beating for a second. It’s such a crazy surprise!
xo
s
Anela @ All This Time says
Perhaps Burger was worried he’d skid down the bare stairs. Don’t worry lil guy, mom and dad have ya covered! ;) Can’t wait to see the reveal!
Krissy says
My parents’ stairs are the same color, and after they ripped out the ancient carpeting, they painted them like you’re planning to. It looks excellent!
Also, in terms of safety, a lot of people I know have had more trouble falling on carpeted stairs than wooden. The good thing is that carpet cushions the fall, I guess.
YoungHouseLove says
Yeah, we thought when we moved in that the carpeting might make us slip, but after 5 months nobody has fallen (knock on wood) and we actually feel more comfortable with it now (just in case Clara does fall, it won’t be banging on wood stairs the whole way down). I think the grippiness of the carpeting has something to do with it as well, so we’re excited that the new runner will be more grippy than the smooth plush carpeting we just pulled up (hopefully that’ll add to the traction-factor too). Will keep you posted!
xo
s
April says
Did you take off the handrail when you painted or painted around it?
YoungHouseLove says
That baby ended up coming down in the end (we worked around it for some of the job and then said “dude, let’s just take it down”).
xo
s
Melissa@TheChicDream says
What a tease! I have been looking forward to seeing your finished staircase. I can’t wait to see her all dolled up!
YoungHouseLove says
Haha, you and me both!
xo
s
Sarah says
Our house was stapletown when we first got it. Mostly in the trim around windows?! They had plastic stapled over the windows instead of curtains…lol. So its far easier to replace said trim than to putty 374 holes per square foot of trim and it actually not look weird afterwards. Killing.my.soul. I’m DYING to see your stair runner!
YoungHouseLove says
Oh my gosh, that sounds like a nightmare! So sorry Sarah.
xo
s
sophie says
Hah – carpet staples is precisely why we haven’t done the second set of stairs in our split level – we are still, three years later, recovering from the hell of our first set of stairs! So, so, so much work!!!!
looks much better, though. Hope you’re enjoying it.
Kelly says
The staple free stairs look great! I can’t wait to see the runner. We did a lot of carpet removal when we first moved into our house. I was seven months preggo crouched over my big belly removing staple after staple. But I couldn’t stop! Tedious, yet so very satisfying. O, random question…I love John’s “Consider This Diem Carped” shirt. It made me giggle. Did you buy it somewhere or make it?
YoungHouseLove says
Isn’t that funny?! His sister got him a gift card to Fab.com and he used it to grab a few t-shirts (one of them being that one). Makes me laugh every time. There’s nothing like carpeing the diem with some staple removal…
xo
s
Annie says
I totally thought that shirt said “consider this diet carpet” :)
KC says
I had to paint my staircase walls this year, but wanted the ceiling to be white. Instead of the paintbrush on a stick trick, I leaned the bottom of the ladder against one step and the top of the ladder against the facing high up wall (like in this video, except minus the plank of wood part! http://www.youtube.com/watch?v=NcdHc7lZjlE). It worked really well and I was able to climb to the top of the ladder and cut in just fine.
YoungHouseLove says
Woah! That’s a pro move right there KC!
xo
s
Melinda says
Glad you are getting your “before baby arrival” list done! Can’t wait to see the runner installed. I’m seriously loving the pinterest inspiration too!
http://poshpurpost.blogspot.com
Emily of Gingham and Steel says
OMG, this is bringing back horrid flashbacks to when I was in high school. My mom purchased this fixer-upper and made a series of poor life decisions at the same time, so we four kids ended up being construction crew for about six months, and we liberated SO much hardwood from carpet. SO MANY STAPLES! My fingers bruised and bled for days. It is comforting to notice that we apparently used the same tools you did (screwdriver and pliers), though – guess there’s no getting around a miserable task. Is there no other way for carpet to be installed to save future homeowners from the pain?!
YoungHouseLove says
I know, right?! Someone needs to invent a simple one-step runner removal method. Like the easy button. Haha!
xo
s
katie {deranchification} says
Looking good – can’t wait to see it once y’all get the risers painted and the runner installed! I helped my parents pull up the carpet on the stairs at their house when I was in college, and I remember what a pain it was to get all those staples out!!
Michelle says
The stairs look pretty good with the runners gone. :) I can’t wait to see the new runner. :) We replaced just the living carpet last summer and had to pull those darn staples out from the pad underneath. What a pain. We need to tackle the stairs in our house too. I can imagine how many more staples there are in there. Kudos to getting the stairwell painted. We hate tackling ours (and our little 2 story foyer). Like you said, long poles, ladders etc. doesn’t make it fun.
Ashley says
What does John’s shirt say? Lol!!
YoungHouseLove says
Here’s a better shot of it: https://www.facebook.com/photo.php?fbid=10151624875760882&set=pb.106687025881.-2207520000.1383753278.&type=3&theater
Makes me laugh every time!
xo
s
Ashley says
I figured it out! Diem carped! Hahaha! SO fitting- Plucked! ;) I thought maybe he made a cool shirt about the carpet!
YoungHouseLove says
Hilarious! I wish he would make a project themed shirt for each project… although that might be a colossal waste of time. Ha!
xo
s
Elizabeth Whitby says
We moved into a house a year ago. And they had an indoor/outdoor cat, who had fleas. Upstairs was carpeted with Berber carpet. Which was in super good conditions other than a few stains. But it was such a good/tight carpet, we couldn’t get the fleas to stop. So I broke down, bought new carpet. Lowes wanted like $1000 to rip up the carpet and $400 to remove it. I told them no thanks, we’ll take care of it ourselves. HA! Those flipping staples! Husband got all the carpet up. I went over the (mostly beautiful hardwood) with the vacuum, then just went down the line with a flat head and painters bucket. I’m glad we did it, and saved money. But jeez my feet and knees hurt!
YoungHouseLove says
Oh man, that sounds like such a big job! So sad that those fleas ruined the berber!
xo
s
ShellyinAZ says
You guys are on a roll! Especially considering 25% of your family is pregnant!! ;)
YoungHouseLove says
Haha, thanks Shelly! I’m feeling more prego by the day, but I think nesting might be kicking in! I’m trying to do as much as I can before I’m giant and tired every minute.
xo
s
Jessie S says
Looks fab!! Can’t wait to see the end result with the runner! My parents have uncarpeted stairs in their house (with white painted risers – looks so much airier that way!) and none of us ever really had a problem with falling. I took the occasional slip-while-holding-my-breath-grasping-for-the-railing on a few stairs while in socks, but nothing terrible!
YoungHouseLove says
So glad! We have found them pretty simple so far too, I think I just had more peace of mind when they were cushioned so I can’t wait to get the new runner down.
xo
s
Maria says
I have had 2 sets of wood stairs with no runner in my house for the last 9 years, and have yet to have any human or dog accidents – maybe we’re just lucky! Of course now that I write this out I’m sure I’ll fall and break a leg tomorrow!
In my last house I had wood treads with painted risers and was constantly painting over scuff marks on the white risers… Hopefully the carpet runner will save you from that fate!
YoungHouseLove says
Haha, I feel the same way (about jinxing myself) when I say that we haven’t had any falls on the carpeted runner! I think stairs can make you fall whether they’re bare or carpeted, so it’s all about picking a way to go and then saying things like “hold on to the railing Clara!” 100 times a day. Haha!
xo
s
Julie says
Well done! Yes, we recently replaced carpet in our new house with hardwoods. And, oh the staples! I echo your frustrations. Just when you think you got them all, you find more. It was TEDIOUS!
Leslie says
I’m curious why you waited to paint until after you pulled up the old carpet – wouldn’t that have protected the wood from drips and added some traction?
YoungHouseLove says
Good question! We were going to leave it there to catch drips but then we thought it through and realized:
1) The rubber grip pads on the bottom of the ladder would be more stable on wood than old loose carpeting
2) When we yanked the carpeting off of that top stair, we actually messed up the paint on the wall from our jeans/bodies rubbing against it while tugging (there was this hilarious blue wall smear) so we didn’t want to ruin our freshly painted walls the same way
3) We’re no strangers to painting over wood floors (drips can easily be wiped up or even popped off with a fingernail if they dry before you catch them) so we just worried more about painting over the new runner (cloth + paint drops = not as easy)
xo
s
Jessica Anderson says
I cant wait to see what you guys do with the walls in the stairway. We have the same tall walls with no lighting since we moved in 5 years ago. I have a couple things hung, but cant figure out how to make it look good without cluttering it, if that makes sense. I need some YHL inspiration!
Kelly says
When we moved into our house we tore up 700 sf of carpet & linoleum that all had a layer of Masonite between them and the original hardwood floors. We’ve been living in our construction zone for a year now and are STILL finding staples & nails that we missed when pulling all that garbage up!
YoungHouseLove says
Holy cow, you deserve some sort of DIY medal for that!
xo
s
Bri says
I look forward to reading your blog every day! I have dreams of renovating a house of my own, but for now I am practicing on thrift store furniture in my tiny apartment. Your blog posts are so full of personality and honesty – I love how you show the difficult steps between the before and the amazing after.
YoungHouseLove says
Thanks so much Bri!
-John
Jessica M says
My husband and I were inspired by your first post about the stair refresh, so we are in the process of tearing up our builder carpeting (our house is only 1.5 years old!) and replacing all the treads and risers with oak. It was nasty “builder-grade, we are going to cover this with carpet” plywood, 2×4 combo that was ugly and not salvageable like we had hoped. But, the new treads will look really nice, and weren’t as pricey as we thought. However, we aren’t doing the steps down to the basement just yet (we have a completely open staircase going up and down – 28 steps in total!). Can’t wait to see the install of your runner, we got a Dash & Albert one as well from RugStudio.com. it is going to look awesome. :)
sarolabelle says
I thought you said in the foyer post comments in January that you were thinking some sort of blue on the ceiling. Did you decide the paint the foyer ceiling Edgecomb Gray too?
YoungHouseLove says
We actually mentioned blue on the ceiling in the sunroom (and maybe the living room once we coffer those ceilings) but a darker shade of the Edgecomb Gray for the ceiling in the foyer (one more square up on the color swatch). I know it sounds depressing to go darker, but just a little for drama intrigued us :)
xo
s
sarolabelle says
Sorry – meant to say July! I think a darker ceiling would balance the blue floors nicely!
YoungHouseLove says
Aw thanks!
xo
s
Melanie says
We’ve been really debating a runner on our wooden stairs, and while doing research I read somewhere that you’re more likely to fall down carpeted stairs (especially when wearing socks, surprisingly), but more likely to be injured if you fall down wooden stairs. I think that has lead me to being pro-runner, but I just realized the other day that we have another issue. Our stairs are the same width from the top to about the middle, and then they gradually widen as they approach the floor. I have no idea how I never noticed that they do this, but now I don’t know how to approach a runner. Any ideas? I assume I’ll have to have one made. Ugh.
YoungHouseLove says
That actually makes perfect sense about the falling with a runner vs. without! I have heard stories of people slipping on either one (bare wood or carpeting) so I think it just happens on all surfaces. Stairs can be mean! Haha! As for the widening issue you have, I would just try taping off where a runner might go (try centering it at the bottom of the stairs where they’re widest and just tape up the stairs at that same width) to see how it looks. I think it could still be really pretty! Our bottom six stairs are a little wider than the rest, but we hope a centered runner will still work well (the old one seemed to look ok that way, except that it was old, haha).
xo
s
Melanie says
Great idea! I will spend my weekend taping my stairs. Thanks so much!
YoungHouseLove says
Good luck!
xo
s
Ashley says
We did this on the central staircase in a 1950s Cape Cod we lived in in NJ and it was a huge headache (but not as bad as removing the congoleum (sp? – super-thick foamy 80s graphic linoleum hiding original tile)). BUT I did end up falling all the way down those steep, narrow stairs. I was wearing sandals with a tiny heel but lost my balance on the second stair from the top. I’m lucky I didn’t break my neck. We’ve been keeping all shoes downstairs since the great fall of 2008.
YoungHouseLove says
Oh my gosh, I’m so glad you’re ok!
xo
s
Nikki Kelly says
Oh staples! They are the worst. I just removed the last of them from our stairs last weekend. Which also marked the last of the carpet above grade (our basement still has carpet, but we plan on keeping it that way). Now I just need to get to staining the new oak treads I picked up yesterday!!!
Nikki Kelly
http://www.theambitiousprocrastinator.com/2013/11/stair-update-risers-cut-and-treads.html
Wendie says
Oh what a job this is!! We ripped out our carpet on our stairs a few years ago. The original plan was to paint the risers white & and stain the treads to match the railings. The treads were not in the greatest shape, but at the time we didn’t have the money to replace them. We lived with our stairs like that for awhile, but I wasn’t totally happy with it. In the end we ended up painting all the stained wood (treads & railings) black leaving the risers white. Our stairs are open (a wall on one side only) and lead to a catwalk that overlooks the foyer & family room. The black looks great now & the dinged up treads don’t stand out as much. I like the look of stairs without carpet or a runner, but my poor dog was having a difficult time walking down the stairs without falling. So we found some individual carpet treads on clearance at home depot in the perfect color. It still gives the illusion to naked stairs, but is now safe for our dog and the humans than run down the stairs.
YoungHouseLove says
That’s so sweet!
xo
s
Erika K says
Yeah for getting through pain in the butt projects! It looks great and the paint freshens up the stairway.
When we moved into our home, the stairs were not carpeted. We debated getting a runner because we thought it might be safer but decided against it after living with it for a year. We’ve never had any accidents or slips which was my fear with having bare woods stairs.
Erika K says
Oh, and Burger is just adorable. He is very cat-like. I love it.
YoungHouseLove says
So glad!
xo
s
Marla says
I just finished replacing the vinyl in our laundry closet with tile. I was really dreading getting out the tile saw again, but as it turns out, I cut all the tile in about an hour. What I didn’t plan for was three hours of removing staples after the particle board was removed. I tried a variety of tools and found the needle nose pliers were easiest for me. Seven hours? I feel your pain.
YoungHouseLove says
Oh my gosh, isn’t that funny when one thing you dread ends up being the easy part and then out of nowhere this other job materializes?
xo
s
Francesca says
I can’t wait to see the final project! The Burger cameos are killing me, I love that guy!
Tracey says
Looking good guys! Your runner purchase is what inspired my stair renovation! Thanks to you and ‘Pinterest’ I had the motivation to de-rug our stairs as well! Our pint size pup is afraid to walk on them so she didn’t get any photo ops this weekend. After removing all pointy objects on first 10 stairs, I concluded the carpet guys was like, I’ll just add a few extra so the future homeowner will regret ever ripping up his hard work!! I also thought to write to the ‘national carpet installers union’ and submit a request to ban the use of multiple tack strips pieces per stair! What were they thinking? With first coat of black finally dry (36 hrs) I continue my quest for the new and improved stair well in Seattle!
YoungHouseLove says
OH my gosh I know what you mean! About halfway down the stairs you start thinking “ok, was all of this ATTACHING OF THINGS really necessary?!”
xo
s
Lauren says
Cool story, bro…
Kristen says
John looks absolutely terrified in the one picture of painting the high areas! haha. Also made me curious – what is your method for painting those areas of a stairwell? Just thinking about putting a ladder anywhere near stairs makes me think of how long it will take to get to an ER hahaha!
YoungHouseLove says
A telescoping ladder = the key! It allows you to shorten one side of it so that can sit on a higher stair and be stable while the longer other side sits on a lower stair. We got ours at Home Depot a few years ago and use it all the time (you can leave it even too, and use it on flat surfaces, and even fold it out completely to be one of those extra tall ladders for cleaning gutters).
xo
s
Nancy - Chairs with Charactrer says
I remove staples a lot because I do upholstery. I used the flathead staple remove method in the past; however, the angle is can cause your hand to cramp up or staples to split/break more easily.
I use this one, but I’m sure there are others on the market.
http://www.amazon.com/Upholstery-Hardware-Lifter-Staple-Remover/dp/B008EUDBI6/ref=sr_1_7?s=hi&ie=UTF8&qid=1383754715&sr=1-7&keywords=staple+remover
It has really made staple removing easier.
Nancy
Chairs with Character
http://chairswithcharacter.com
YoungHouseLove says
Love that tip Nancy! Thanks so much for sharing it!
xo
s
Amy says
We bought a house in early September and started tearing out carpet immediately. Not a fun task, at all. The staples on the stairs are the worst! We are still in the reno process but it seems like every time I use the stairs, I spot another errant staple that we missed. They all have to go before we refinish the floors and treads, but fortuntely(or unfortunately, depending on how you look at it!) that’s a little ways down the road- a month or two at least, so we’ll have more time to find what we missed!
Amy says
*fortunately*…I hate when I do that!! :)
YoungHouseLove says
Oh man, I feel your pain Amy!
xo
s
Sara says
I saw you mentioned that you’d do the same cleaning/refinishing treatment on those wood stairs that you did on the downstairs hardwood. I was wondering how that has held up over the months you’ve been in the new house. We just bought our first house and the first floor hardwood could use something like that, but wanted to hear if you were still satisfied with that method?
YoungHouseLove says
Five months later and it’s still great! No issues with chipping or clouding or anything. Hope it helps!
xo
s
Heather says
I’m someone who has wood treads and white risers, but I will tell you that I gasped at how beautiful your staircase was without the rug and then got a lost puppy dog look on my face for a second at the thought of painting them at all. It’s a pretty look with the white too, but goodness – those are some attractive stairs in my eyes. Though, I dream of a farmhouse with a large oak staircase…sooooo…there’s that. Ours are painted in our house because it we used a different wood for the risers and a hardwood oak staircase would have been money money moonneey MOONNNEEYY.
YoungHouseLove says
Aw, thanks Heather! We wanted to wait until the last step (when the runners came, after we painted the walls, etc) to be sure about painting those risers, but we think it’ll be nice with the runner and we love the natural wood tone for the treads as a contrast to them.
xo
s
heather says
Oh, no reason to explain your decision. :) That’s the best part of design, it’s so subjective! <3 Plus, we have white risers in our house too. I like 'em. I like 'em a lot.
YoungHouseLove says
Aw, thanks H :)
xo
s
Marianne in Mo. says
I feel your pain! Our old house was fully carpeted, made me crazy for years! We finally started in the bedrooms, ripping out and replacing with good laminate. Eventually the whole house was done, including the tile in the kitchen (another fun job)! I had to get used to sound echos with the laminate, but worth all the effort! Then 5 years later, we sold the house and moved on. Now we have carpet AGAIN, because it’s cheap when building new, and can’t wait for it to get trashy so we can replace it. No hardwood though,I don’t think. We’re leaning toward laminate with a rough sawn look. In my dreams, I would have reclaimed random width pine!
As for the stair painting, hubs’ uncle built a kind of upside-down stair type box, and would put that on the stairs when painting, etc. It created a big platform for him, where he could safely put a ladder. I always thought it was genious! It covered maybe 5-6 steps, so he could do the high spots all at once.
YoungHouseLove says
Mmm, reclaimed random width pine sounds so dreamy! I hope you have it someday and send me pics. And the stair box contraption = genius.
xo
s
heather says
Get a napkin ladies, you’re going to drool.
http://www.baba.com/
YoungHouseLove says
Oh my gosh, so much drool. Everywhere. Drool bath.
xo
s
Kerry says
When did you paint those spindles?
Could I have missed that day?
How could I? I thought there would have been fireworks emerging from my laptop … !!!
Either way — nicely done. Your whole home is looking lovelier by the moment.
YoungHouseLove says
Haha, you’re so sweet Kerry! Here’s that post for ya: https://www.younghouselove.com/2013/09/stairs-a-novelty-to-ranch-owners-everywhere/
xo
s
Kerry says
Shoot! I DID miss it. But WOWZA — what a difference some white makes. It makes the dark wood of the banister look awesome. Very “colonial” — like the houses I grew up in. Lovin’ it!
YoungHouseLove says
Aw thanks Kerry!
xo
s