This is it. The big wall-opening week (aka: w.o.w). So… woot! The first order of business is to share a few details that we’ve been asked about a bunch:
-
- how we went about picking a contractor
- how we’ve dealt with permits
- how we planned out the exact spot for the opening (would hate to knock everything down, only to wish we had shifted it a little to the left or the right)
First, here’s why we need a contractor: we love DIY as much as the next guy, but there are some things that we’re happy to leave to the pros, especially when it comes to the structural integrity of our house. We’re no strangers to demo-ing out a small non-load-bearing wall (like we did to create the laundry nook in our first house)…
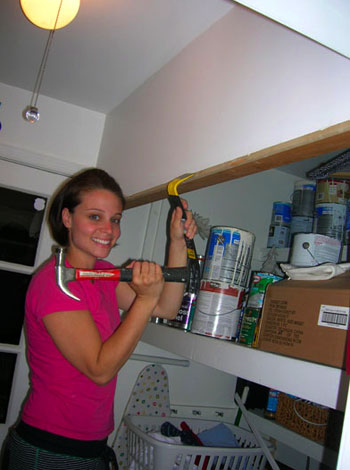
… but an 8 foot opening in the heart of the house which needs to be reinforced with a heavy-duty perfectly-placed header is definitely something we were happy to do with the help of an expert. You know, since “decades of experience” beats “DIY blogger of four years” when it comes to let’s-not-break-the-house (more on how we choose what to do and what to hire out here).
So we set off to find the right person for the job by:
- asking friends or family members if they had any recommendations (we even put out a call on Facebook to ask locals if they had a contractor they used and loved)
- visiting their websites to learn a little more about the ten or so people we had on our short list
- weeding ’em down to our four favorite prospects (based on the info on their websites and the specific recommendations that we got)
- calling all four of our potential contractors to request an in-person estimate
In some miraculous home improvement blue-moon, they all came out and gave us a quote within a few days. We explained that we’d be getting multiple estimates (so no one assumed the job was theirs & so folks would hopefully give us their most competitive price). All of the estimates were for removing an 8 foot section of wall between the dining room & kitchen, installing a support beam above the doorway, adding additional support under the floor, reframing the doorway and threshold, building a short knee-wall for the kitchen peninsula, patching/adding drywall, and installing a door jamb & trim on both sides of the opening.
Here’s where our four bids came in:
- Contractor #1: Nearly $4,000
- Contractor #2: Around $3,200
- Contractor #3: $650-$1,000 (depending on the cost of materials)
- Contractor #4: $700 if we did our own drywall, jambs, & trim ($950 if we didn’t)
Is that crazy or what? And they’re all licensed and insured Class A contractors with decades of experience, so it’s not like any of them would do a bad job. They were all very nice too. We believe the first two contractors are used to doing much more major work (ex: additions in the 100K range), so it might make sense of their bids when you think about the giant undertakings that they’re used to tackling. The first contractor actually included a port-o-potty rental and a dumpster fee as two of his line items (as homeowners who’ve had walls opened in our first house, we knew that doorway debris could be hauled in the back of a truck and that folks could use our bathroom to their heart’s content).
Even before the bids came in, we felt the most comfortable with Contractor #3 (he does work for Habitat For Humanity on the side and is a father-son team, which is always awesome) and Contractor #4 (he’s actually a friend of a friend – John was even a groomsman with him in a mutual friend’s wedding – and he has 30+ years of experience).

So although we loved Contractor #3, the opportunity to work with someone that we already knew (who had been doing this stuff since before we were born) was the deciding factor. Plus the other half of Contractor #4’s team is a girl who is about my age, and you have no idea how much that thrills me (more than it should). So contractor #4 was our pick. Not to mention that he was willing to allow us to do the easier non-structural stuff (drywall/jamb/trim) ourselves – which we love – to save some loot. And let me tell you, $700 sounds like the perfect number after our first estimate came back at 3K over that.
We’ll share more contractor info as we go, but now onto the whole permit thing. We fully believed that we needed a permit for this job from day one. And since a permit is only around $150, we were ready to bring our drawing down to the office and pay our fee (they award same-day permits here, which is really convenient). But before heading down, I decided to give ’em a call since all four contractors believed that if we talked to a “plan reviewer” and explained a few things we’d be told that we didn’t need one.
So I called and was passed along to a nice plan reviewer named Jay and explained things. It’s too much to get into, but it helped that our house is a one-story ranch (so the load on that wall was just partial and not a full second story of weight) and the fact that there used to be a doorway there about three decades ago helped as well (since it was already partially enforced). The verdict from Jay The Plan Reviewer: we didn’t need a permit after all. So we’re glad we called to save that money and time. These things differ by location though, so be sure to check with your local municipalities to learn about the rules in your area.
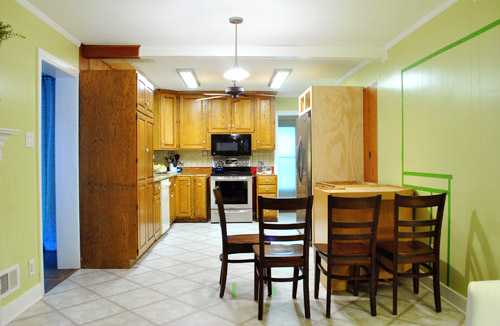
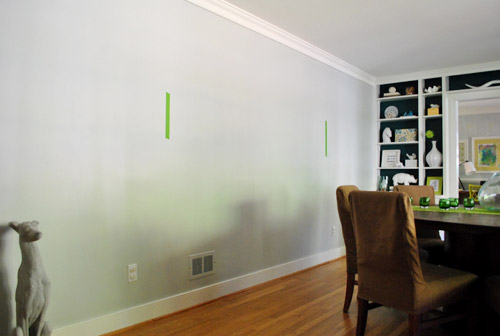
As for how we planned the exact opening’s placement, we knew we needed to build in our fridge and relocate an existing 36″ cabinet (which used to live where the stove now sits) in order to begin finalizing the peninsula placement to pin down our opening. And when we found a corner cabinet at the ReStore we were finally able to judge exactly how everything would sit against that wall so we could decide exactly where to place the opening.
We’re still looking for an 18″ cabinet to jut into the room to finish off the peninsula, but since the corner cabinet was the most important part of the puzzle (in order to pin down where we wanted the opening to be) we just taped off where the 18″ cabinet would end on the floor to picture things further and even brought in four chairs to help envision the seating area that will be created when we get that giant 3′ x 5′ counter installed (it’ll have a 12″ overhang on the two sides where you see chairs).
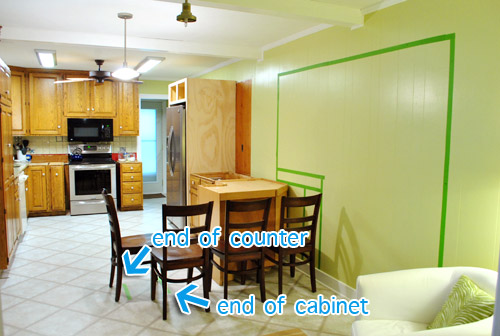
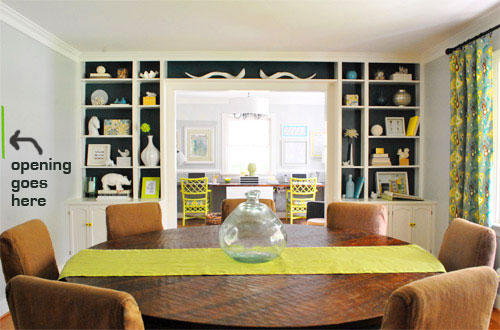
Then we just made sure that we had ample walking room beyond the stools and peninsula that will live on one side of the opening (we’ll have about 4′ of walking space) and decided to line up the other side of the opening with the beginning of the peninsula (things lining up = looks intentional and balanced, as opposed to an afterthought). This will allow the entire 8′ opening to line up almost perfectly with the giant picture window in the dining room, which really should make the newly added doorway look like it has always been there (again, things lining up = looks intentional).
Oh and a few folks were wondering why we were opting for a half-wall instead of just doing a huge doorway with some sort of cabinetry on the back side of the peninsula that’s accessible from the dining room, but we think a half-wall is the best choice for us because:
- we didn’t want the peninsula to look like an afterthought (like it was placed in the middle of a doorway without much planning)
- we thought the half-wall would ground the peninsula, so it would feel solid and supported (instead of more like it’s floating between two rooms)
- we already have four base cabinets in the dining room thanks to the existing built-ins (so we don’t need additional cabinetry/storage)
- because of those existing built-ins, we thought an open bookcase, cabinet, or other form of built-in located less than three feet from the giant wall of existing built-ins would be a bit much
- our threshold would be a lot more seamless (if the half-wall weren’t there, there’d be an awkward strip of cork flooring between the peninsula cabinet and the dining room floor)
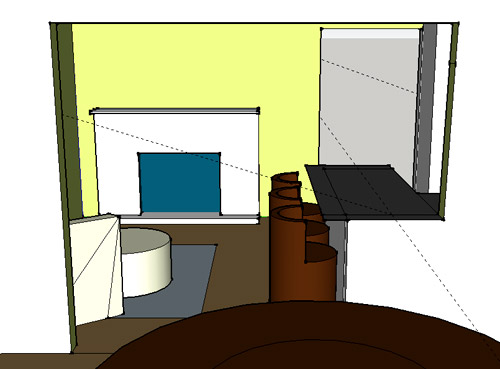
Oh and here’s the google sketch-up of the view through our future doorway according to our little tape job…
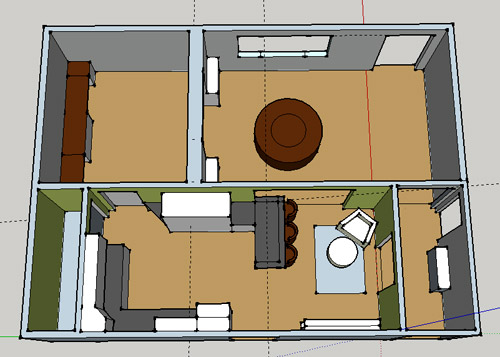
… and the full floor plan sketch to jog your memory of the top view (much more on that here):
So that’s where we are. Enough words. Bring on the demo pics. If all goes as planned, we’ll be sharing those within 48 hours. Anything major on your to-do list this week? Do anything fun this weekend? Tell $herdog all about it.
Psst- The groomsman pic in this post was taken by David Abel.

zana says
lolz…at first i thought john took pics with all da contractors who gave estimates….i was like tats neat & funny…then i read the other half of the ‘openin soon’ =)
zana says
mee too am excited to see da new look of da kitchen!!!!
Kayla says
Can’t wait to see how it goes! We took out the drywall on the wall between the kitchen and living room. Now we’re getting ready to add the support beams.
Kim says
Can’t wait to see the big demo! I’m so excited for you guys – it’s gonna look incredible!
And yes, we got a lot done this weekend including painting a craiglist desk white for my 7 yr. old daughter, painting our kitchen chairs red and ORBing our door handles and locks – WOOHOO!!! Our back door and front screen door had those peeling brass handles and locks – ewww. I had wanted to try the ORB for so long and finally got to it. My husband was pleasantly surprised at the result and WE LOVE IT!!! Sherry – I can totally understand the addiction! When I called the paint “ORB” – my husband said I have completely drunk the koolaid – haha! But he agreed – ORB does wonders. Thanks so much! (And yes, I had to put the can down before I started ORBing everything in sight :)
YoungHouseLove says
Haha- love it! Can’t believe how productive you were in one weekend. Wow!
xo,
s
Kim says
Actually – that was in just one day! Can you believe it! We had everything separated in areas on our driveway and we’re going back and forth spraying each thing – go on to the next thing while one piece dried a few minutes. We were out there for hours but doing a lot. It helped that my hubby was helping too :)
YoungHouseLove says
Now that’s amazing.
xo,
s
Kim says
Well, thank you Sherry! That means a lot coming from you :)
Sarah says
Oh I’m with you on the quotes range. When we had the quotes in for our renos they ranged from $80K to $160K. Huh!!??
As it was it ended up costing around, ummmm…. $200K….. go figure….. but worth EVERY cent. Never mind that we now live in rice and toast. Just grateful we love it so much as we can’t afford to go anywhere anymore…. hah hah!!
Moni says
Shopping around for a contractor is absolutely the best thing to do! I’m glad you talked about that. We redid our back yard earlier last year and did the same, its crazy how much they all vary.
Hilary says
Whoa! Great price!! Can’t wait to see it!
Rachel says
I’m not sure if you’ve addressed this in another post, but in your google drawings you’re showing an armchair in front of the fireplace, and not a smaller kitchen table.
Are you intending to use your large dining room table every evening for dinner with just your immediate family?
Are you going to be using that peninsula for everyday dinners?
YoungHouseLove says
We’re thinking we’ll use the peninsula for most casual meals since there will actually be four chairs and the round table for family meals with more than just the four of us. We figure another table in the kitchen is waaaaay too overkill (when ya can sit at the dining table or the peninsula for a meal).
xo,
s
jessica says
we are moving our two boys in to share a room and are trying to build our first desk and shelving similar to yours with an old set of doors and habitat cabinet. Too bad ours wasn’t six dollars, but our doors where only $6 each. Hope to post pics soon. Hate how slow paint dries… I’m anxious to get the shelves on the wall.
YoungHouseLove says
Such a deal!
xo,
s
sarah says
Ohhh, can you imagine how wonderful it would be to have a cozy holiday dinner in the living room with a fire blazing just beyond?? That’s going to be so great! (But maybe with that big window and no thermal curtain over the entire thing, that dining room is going to get pretty cold in the winter months…? Have you considered that?)
If the contractor does a good job would you consider approaching him about making the fireplace double-sided?
Love the updates, thank you guys so much!
YoungHouseLove says
Yes! We’re definitely planning to see if our contractor can help us double side the fireplace someday if all goes well! As for the dining room getting cold, we moved here last Dec so we have spent a winter here already and the house has central heat/air so it stayed nice and toasty throughout! It’s a double paned window and we have curtains we can draw as well (not thermal, but pretty thick).
xo,
s
Whitney says
I am so excited to see how it all turns out I feel as if I live there too!
I watched my friend run a half marathon, yup, watched. This girl only runs if being chased! (Or if there’s a big sale on some fabulous housewares!)
Becky says
I’m living vicariously through you on this wall demo…we had plans to do one in our old house but we found out we’d be moving before beginning the project. It’s going to be so great having your dining room and kitchen open into one another!! I think you will find you use your dining room more because of it.
Good luck!
http://www.preparingforpeanut.com
Sunita says
Not even on your continent or your part of the globe and there is no chance in hell I will ever have the liberty to do anything similar with my 1000 sqft area but still extremely excited about your kitchen makeover. The first thing I look up as soon as I am awake is an update on your blog. Hubby doesn’t understand my fixation for your blog. But I am so smitten.
YoungHouseLove says
Aw thanks Sunita! We’re excited too. And it’s even more exciting to hear that someone on another continent is all giddy with me! Haha.
xo,
s
Erin says
Hi guys! Love your site! In your tutorials, I couldn’t find a simple painting a wall one. I’m a “noob” when it comes to this. I would love to paint some walls in my apartment, but have no idea where to start. any tips would be great!!!
YoungHouseLove says
Here’s that post for ya: https://www.younghouselove.com/2010/09/email-answer-how-to-paint-a-room-yhl-style/
Good luck!
xo,
s
Jennifer says
Sherry I have to say I love the short hair from the back in the day pic! Very cute but it does make you look like you are about 19,lol Cant wait to see pics of the demo!
Lauren says
I’m so excited for you guys! What an undertaking!
Husband and I were just discussing opening the wall between our living room and dining room, but after learning that the wall is load bearing, and a header would have to be installed, we decided to nix the plans. So, we’ll live viacriously through you guys! :)
Bethany says
$herdawwwg~ good luck this week, yo!! I am painting a spare bedroom! whoot!
YoungHouseLove says
Haha- thanks! Good luck right back atcha!
xo,
s
Jenna says
Oh my goodness, this will make your whole house feel so OPEN! I’m sure Clara will love running circles through it once she’s big enough! Good luck!
Janice says
Older post, but I spent the weekend moving out of my parent’s house to my own place and have only recently gotten internet access back (and stopped hurting from hauling stuff up to a 3rd floor apartment).
Shauna says
Having read this, and feeling somewhat inspired, I guess my question is how did you know it was a load bearing wall?
YoungHouseLove says
It was fairly easy in a single-story ranch home like ours because it ran right through the middle of the house – almost directly under the peak of the house. Also, it is parallel to the flooring (which indicates perpendicular to the floor joists underneath). But the contractors confirmed it for us when they came to price the job.
-JOhn
Emily Kelly says
What program or website did you use to create the virtual layout? Thanks!
YoungHouseLove says
That was google sketchup (it’s free!). Hope it helps!
xo,
s
Jessika says
I just wanted to say thank you for this post. I read it when you first posted, and filed away (mentally) your bid success. Little did I know I would need it just barely a month later! We want to put an outlet in our garage to assist in converting the space to a pottery studio (you need a special outlet for the kiln). The first folks? SKY HIGH (Yes, for an OUTLET). Going to others: Saved well over 60% off the first bid. I gave ya a special shout-out, all the way from Oregon (to all the 5 folks– and that’s mostly my husband’s family– who read my blog, but still). THANK YOU!!!! http://oregonkaisers.blogspot.com/2011/12/studio-go.html Photos to come of the FUN project!
YoungHouseLove says
Aw so glad! Good luck with everything!
xo,
s
keller says
Hi!
This may have already been addressed above but I didn’t see it…
My husband and I found a cute 4 sided brick house we want to buy. It was built in 1954 ish….
We want to take down walls but the walls are all painted with lead based paint. We got an estimate that it would cost around $12,000 for removal (using a professional remediation company). We are asking the seller to go down on the price for this reason. Anyway. I am wondering…is it worth it? Does it actually remedy the problem? We have a two year old and another on the way. I don’t want to get into a mess we don’t need right now.
Just curious your thoughts/experiences with these companies.
Obviously we will do our homework on the company if we decide to go forward.
Thanks so much! Would love to know your thoughts
YoungHouseLove says
Yikes! That’s tough! You can usually find contractors who are Lead Paint Certified and they might be able to give you more reasonable estimates (and still follow all safety protocol) instead of going with a lead paint specialist if that’s who quoted you that price. Hope it helps!
xo,
s
Malissa says
Kitchen looks awesome…just wondering if you feel like you have enough space for the 3 stools with 5 ft at the counter. I’d love to build an island for 3 but not sure if we have the space
YoungHouseLove says
Oh yeah, we’re finding it plenty comfortable!
-John
Michelle Avitable says
Sherry – we are looking to widening two doorways in our rental property.
Do you mind recommending your contractor?
Thanks!
YoungHouseLove says
His name is Steve Struder, but he usually does big projects like building additions (John was in a wedding with him, which is why he agreed to help us with a small opening project, haha). So sorry, anyone have a recommendation for Michelle?
xo
s
Karinny says
Hi,
We just bought a 1974 house in Chesterfield and I want to knock down the wall separating the dining room and kitchen.
1. Where do I need to call to see if I need a permit?
2. Can I have your contractor’s information?
3. Do you know where is the best place to get the granite?
Thanks
YoungHouseLove says
1. I would check out your county’s website and go to the building/permits section for a number to call or a printout to read for more info.
2. He only goes commercial work now (not people’s homes anymore). So sorry!
3. I would bet it would vary depending on the date (some places run specials and have remnant pieces that are priced nice and low) so I’d just get a few estimates and compare them. Good luck!
xo
s
Mohanraj says
Great work on the remodeling! I have to say, I LOVE YOUR DINING ROOM! It looks so warm and cozy because of the woven chair and the pillows on it. And great work with that 8 feet opening. It looks way better with a half wall rather than a cabinet. Great choice of colour combo, white and then splashes of bold colours in the room from curtains, the dining table etc. The office looks great too. Though not what I would have 100% opt for as I may have different needs, I believe it suits your needs (if not you wouldn’t have it that way! Duh…). But still, dig the dining room! So cozy looking.
Mohanraj says
Hey Sherry & John. It’s me again. Just out of curiosity, did u make the pillows set on the chairs at the dining table? If so, how? I like it very much. Good choice of changing the old set of chairs for the new one.
YoungHouseLove says
Thanks so much! I didn’t make four of those six pillows, they were just cushions I already had around the house and tossed out there (I love the mixed and matched look). Those four are from HomeGoods and two of them are actually made from napkins from Crate & Barrel (here’s that post for ya). Hope it helps!
xo
s