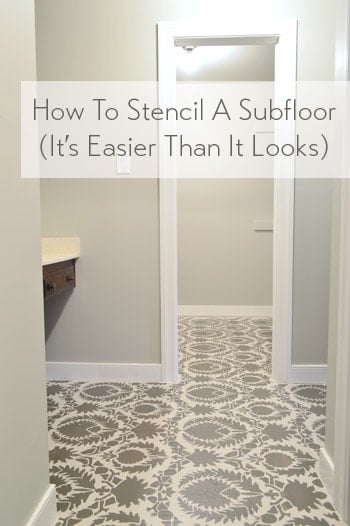
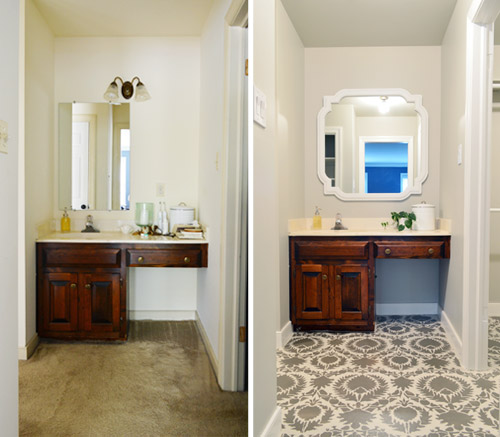
We did it! We stenciled our bathroom and closet floor and it looks awesome. So worth the effort. And so much better than the carpet that was there before.
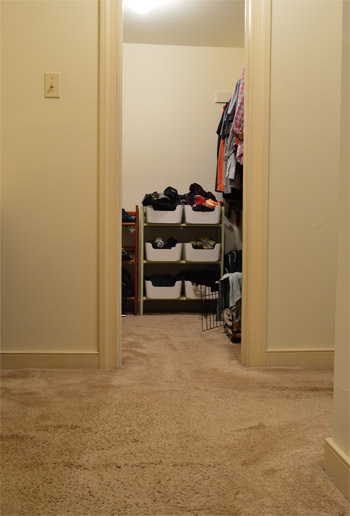
Remember when the floor in our closet and vanity area looked like this?
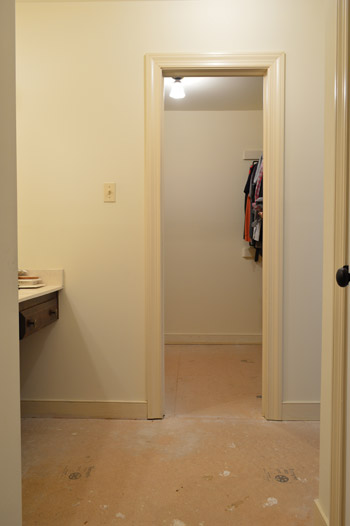
And then we ripped up the carpet to reveal the subfloor and they looked like this?
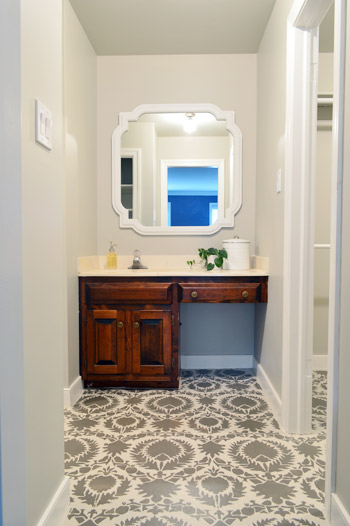
Well, five hours and $24 later, it looks like this!
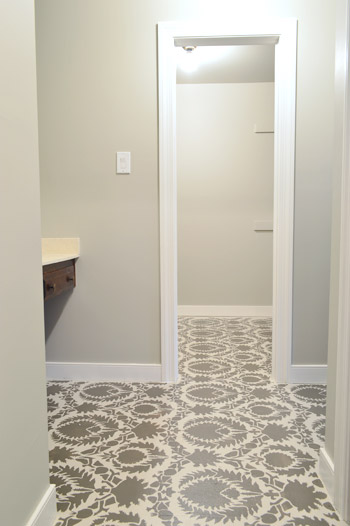
Our actual bathroom has tile (where the shower/tub/toilet are), but this is a separate vanity area along with an adjoining closet – which both had old carpet that we couldn’t live with for one more day. So we yanked it up and decided to have some fun with the subfloor until we’re ready for a full scale renovation down the line (eventually we’d love to knock down the wall that divides the vanity from the rest of the bathroom and retile/renovate them so they’re one big spacious bathroom).
We briefly debated peel and stick floor tiles or buying a large seagrass rug and cutting it to lay it wall-to-wall in both spaces for this interim step, but we decided that a stenciled and sealed floor (possibly with a few area rugs) will serve us well in the short term without being a whole lot of money/effort that we’ll later end up undoing.
And since our future tiling plans will require us to rip this stuff up and put backer board in its place anyway (you can’t tile over particle board since it’s not a secure base) there’s no harm in slapping some paint on it in the meantime.
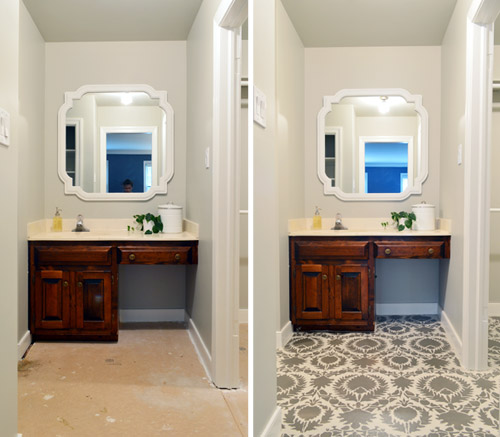
My favorite thing about temporary (and affordable!) afternoon updates like this are that you can have a little fun and do something a little bolder than you might do if you were selecting something more permanent (like tiling a floor that you’ll have to live with for a few decades). Oh and don’t mind that vanity, we’re going to either stain it a deep ebony or charcoal tone or paint it a subdued dark color, so it should fit in a lot better with the rest of the tones in the space.
But let’s rewind a little bit (back to when the floors looked like this) and tell you about the process and some of the things we learned along the way.
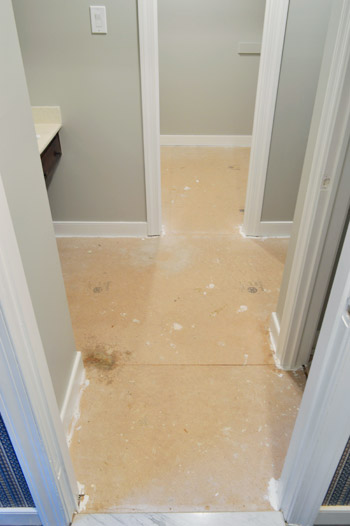
To prep our subfloor, which is particle board (a very smooth and almost chalky surface) we used wood filler to make the seams between the different particle boards sheets less obvious. There were only three so it went pretty fast. Once dry, we sanded them down. It wasn’t perfect, but it was better.
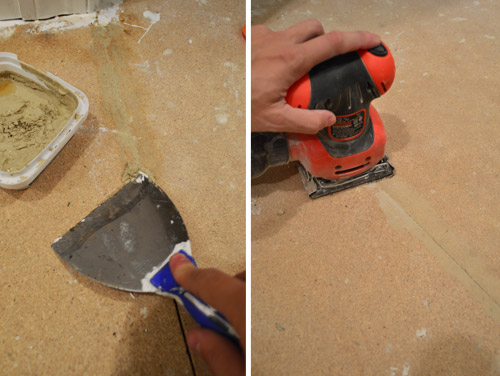
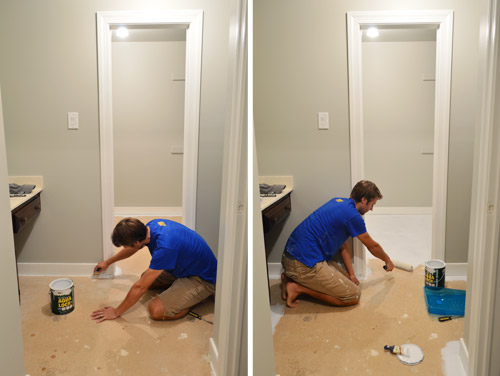
Then we primed it all with Aqualock water based primer (it was low-VOC but not no-VOC so John got that step done while I was outside playing with Clara). The purpose of the primer was to help the paint grab on for the long haul and block any stains/bleed-through that might occur from painting over such a porous surface like particle board.
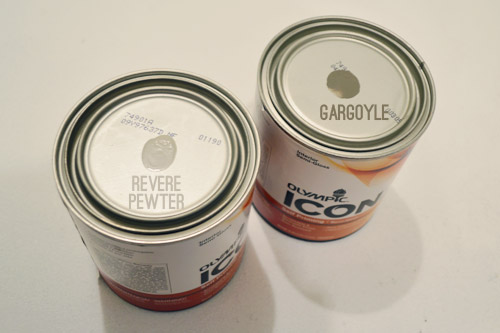
For paint, we grabbed two $12 quarts of semi-gloss paint in the new no-VOC Olympic Icon line, matched to two Benjamin Moore colors: Revere Pewter for our base (same as the wall) and Gargoyle (for the darker stencil pattern). For the last few years we’ve mostly stuck with Benjamin Moore paints, but for temporary upgrades it’s nice to save a little money since we’ll be ripping out this floor in a few years and tiling anyway. We didn’t use an outdoor porch and floor paint (as you usually would in this scenario) because they’re all pretty fumey (usually oil-based) we wanted something no-VOC (this one’s for you, fetus) – but we think the combination of a good primer, some semi-gloss paint, and a nice thick coat of sealer will keep them in good shape for the next few years. We’ll definitely report back with photos over time to share how the floor wears.
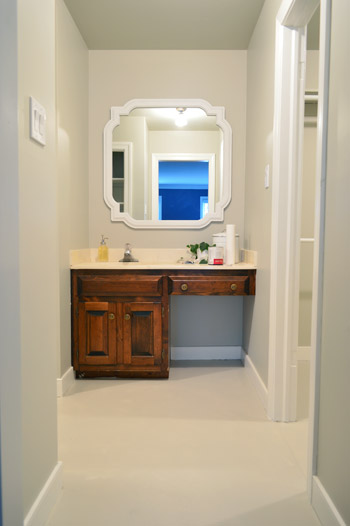
With the primer dry, we could apply two coats of the base color. Since this was a no-VOC step, I could cut in while John rolled the rest (we just had to be mindful to paint ourselves out of the space). You can see from the picture below that the color matched Revere Pewter on the floor didn’t really turn out to match the real RP color on the walls as we planned (that’s always the risk that you take when you color match one brand to another), but it was still in the same color family, so we didn’t mind. We’re going for some pretty high contrast interest on the floor, but we thought it would stay sophisticated if we kept the palette sort of subdued (especially with a bold navy-ish tone in the bedroom along with a colorful rug/headboard/pillows/etc) so we were just glad they didn’t clash and still felt like they went together, even if they didn’t match perfectly.
Stenciling the floor is SO MUCH EASIER if you have two people on hand to tag team it. I did the office stencil project alone for the most part, and it took forever and I used a method I’d never use again (more on that in a minute) but this time around we both tackled it and it was a much simpler task. Oh and stenciling a floor is even easier than stenciling a wall since you’re not fighting gravity (a few pieces of painter’s tape hold it in place and then you can roll it without worrying it’ll slip down the wall like it might on a vertical surface).
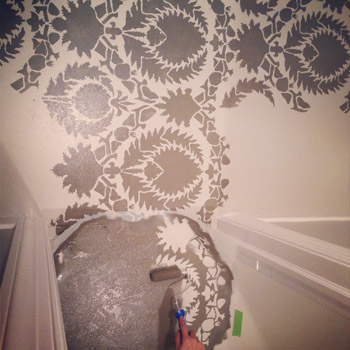
If you’d like to see the rolling in action – with a few live-action tips in the mix – we made this video while applying another stencil to the wall for a book project back in 2011.
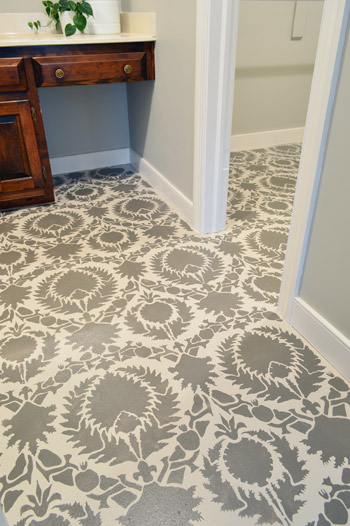
Since you usually want your pattern centered in the room, we started our first stencil to be right in the middle of the vanity. Here you can see what a single repeat of the pattern looks like. It’s the Suzani Silk Road stencil from Royal Design Studios. It’s $49, but we had actually ordered it back in 2011 to use for our book (but that project ended up getting cut), so we just had it sitting under the bed in our guest room for a few years, waiting to be used.
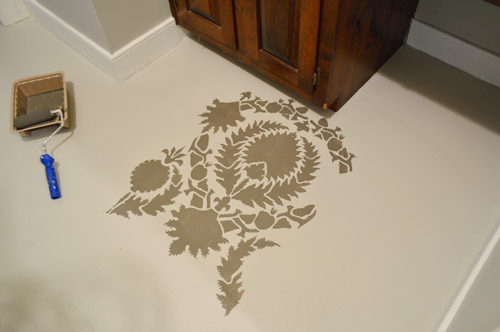
But back to that much easier stenciling method that I mentioned before. We learned back when we were shooting that wall-stenciling project for our book that applying a small amount of paint with a foam roller (not too much, or it’ll get gummy/bleedy) results in just as clean of a line as dabbing everything on by hand, which I did when I stenciled the office, and ended up with claw hands and lost 14 hours of my life. This entire thing only took us 5 hours and was SO MUCH EASIER thanks to a small foam roller with a nice thin application of paint. Hallelujah!
Once again, when using a large stencil like this, it’s so much easier with two people. Each stencil has registration marks around the outside that you line up with the previous stencil so you know where to place it, and if you have someone on hand to help you line up the registration marks and slowly lower it down onto the floor (especially when they’re large) you should have a lot less of an issue with smudging, which can happen if you place it and then slide it around to match the registration marks instead of using four hands to slowly lower it into the right place off the bat (one hand for each corner just seems to work best).
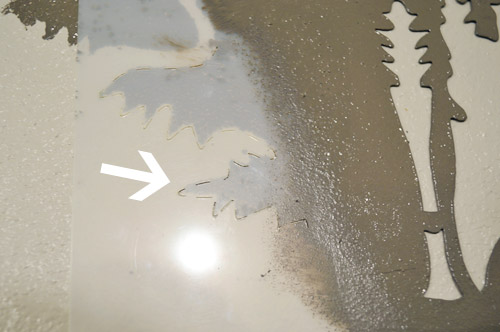
This room’s biggest challenge was that so many walls and corners meant lots of partial stencils, which meant lots of stencil bending (it’s made from flexible plastic that bends, but doesn’t crease, easily) and smooshing the roller into tight spots. We kept some spare cardboard handy (i.e. cereal boxes) to protect the wall from getting paint on it when we had to bend the stencil and it would have rested against the baseboard/wall. Between each placement of the stencil, John also held it up with two fingers with the back facing me and I used a folded paper towel to dab off any excess paint on the back so that the next time we placed it no leftover paint was lingering on the back (this can result in sort of a ghosted double outline, so the quick wipe down between each placement really seems worth the time).
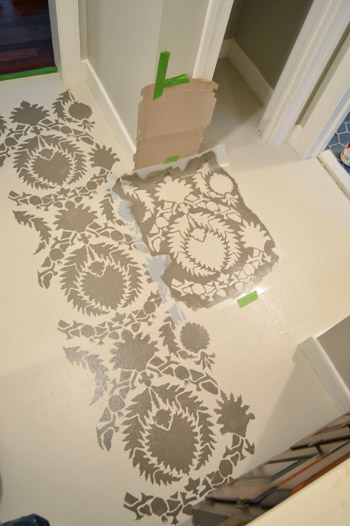
When doing a floor you also have to consider your exit route. In a typical square space this is pretty easy to figure out, but there was no logical way for us to both keep an exit clear and be sure we were keeping our pattern straight/centered (we wanted to start in the middle of the vanity and work out from there, so we couldn’t start in the corner of the closet and stencil our way out because things wouldn’t have been centered on the vanity). For that reason, we decided up front that it would be easiest to paint across two days in smaller installments. We did as much as we could easily access the first day, then let those areas dry so we could stand on them to complete some remaining spots. Picture it sort of like a checkerboard… you can do a row, leave a row clear, and do as much of the other row that attaches to something else you have already done as you can – and then walk out using the clear row. The next day, just go back and fill in those missing areas when the surrounding rows are dry so you can stand on them.
After all of the stenciling was done, I used a small craft brush to get into the spots that needed some filling in. Initially I thought I’d touch up the entire perimeter by hand with paint to make it look flush to the wall (the rolling left about a 1/2″ gap)…
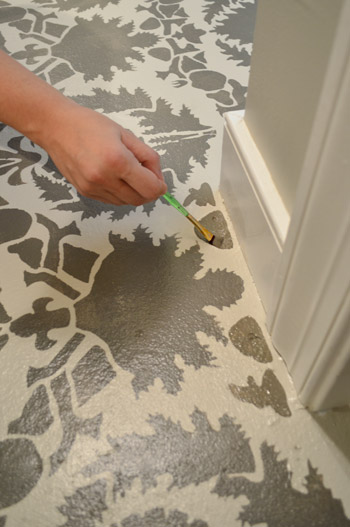
… but after stepping back we realized the small gap was so consistent around the room that it almost looked like an intentional border. So rather than risk making it look worse with my by-hand touch ups, we opted to keep it that way. You can see the slight border around the baseboard in the bottom right of this picture:

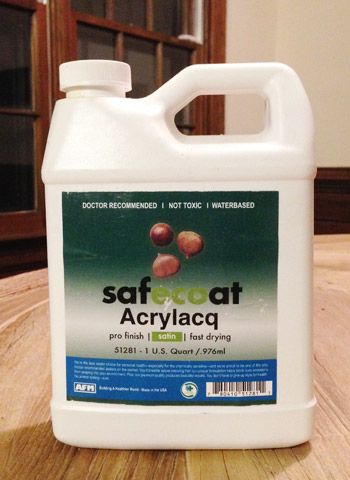
As our final sealing step, we plan to use SafeCoat Acrylacq (a non-toxic poly that we have loved since my pregnancy with Clara) to seal it to give it even more added protection. So we hope to get that done and report back on how it goes as well as finishing up a few more things in there.
So far even unsealed it has been holding up well for the last few days, and we’re SO much happier to see it when we walk in there to get dressed than we were to stand on that old carpet. And of course we’re psyched to watch our list dwindle down to just two bullets in here (which means I get to do a budget breakdown soon – yeah boyyyy).
remove the carpetpaint and hang a larger window-like mirror(more on both of those steps here)paint the trimpaint the walls and ceilingreplace all of the outlets/light switches(more on all three of those steps here)stencil the floors- seal the floors and add some better storage solutions to the closet
- paint or stain the vanity, add new hardware to it, and add some built-in shelves to make the empty space under the counter on the right side more functional
Is anyone else stenciling the walls? How about a ceiling or a floor? Or furniture? Do you use a small foam roller or the claw method that I outlined here (for the love of wrist sustainability, USE A ROLLER!).
Psst- Wanna know where we got something in our house? Just click on this button:


Manda Wolf says
Wow! That is super pretty! You guys did a wonderful job on that.
Brittany says
Oh wow guys! that looks awesome! I’ll admit I was a little skeptical about it when y’all were first talking about it but I LOVE IT! Seriously considering a stenciling project now!
Shannon says
Looks SO awesome! Nice job!
Anele @ Success Along the Weigh says
Stenciling takes a patience I just do not possess. I’ll leave that up to you guys. ;)
Catherine says
One word – brilliant!!
Angie says
This looks so freaking amazing. I don’t think I’ve ever loved something you guys have done so much.
Suzanne says
I really like this! What a fun look– as you said you can be more bold with interim projects.
Lindsay says
When I scrolled to that first finished pic my jaw literally dropped! LOVE LOVE LOVE! The color is amazinggggggg!
Will you come do this at my house? :)
YoungHouseLove says
Be right over!
xo
s
Audrey says
That floor just looks GORGEOUS!!! we had mostly wall to wall carpet, but I HATE CARPET!! so after ripping it all up myself… I just bought some peel and stick tiles, which actually looked a lot better. but i’ve only managed the living room and most of the hall way. I wish we had subfloor instead of a slab, because your floor just looks beautiful!!!
YoungHouseLove says
This would totally work on slab! We painted the concrete floor of our sunroom in our first house and really liked it!
xo
s
Emily E says
I’ll also attest that it is possible to paint a slab. I was completely stumped about how to deal with the floor in our laundry area. It was sloped towards a drain in the floor, so tile was out of the question, and it looked awful because of some peeling laminate. We ripped up the laminate, cleaned the floor, and painted the floor with some porch paint. It looks awesome now and it’s a cinch to clean!
Soffia says
I LOVE it!!! Looks amazing!
Congrats! :)
Erin {Home Everyday} says
I absolutely love it! I am already brainstorming where to do this in our home. It looks fantastic!!
April says
I cannot believe how good this came out… nice job!
Robin says
What a fun project! The color is so bold. I wonder with 2 very differently spaced sinks do you use both? His/hers or the primary and backup perhaps?!
YoungHouseLove says
We both tend to always use this one, although I wonder if once we do a Phase 1 in the actual bathroom (where the tub/toilet is) if we’ll use that one. It has a tiny mirror so we can’t really see more than our noses in it. Haha!
xo
s
Christina P (NS) says
Looks amazing, I have been looking for a temporary solution for our kitchen until we do a major redo – I think I may have found it!
As always, thanks for the inspiration!
Julia @ Chris Loves Julia says
This turned out so fun and interesting! I actually really like the wood-tone of the vanity, too. Gives it some warmth.
YoungHouseLove says
Thanks Julia! I think it looks nicer in the pics than real life (it’s a little gnawed on around the bottom) but we’re definitely considering re-staining over painting it. I agree that some wood grain might break up all the painted areas for some nice diversity/warmth, although that would be less fun for me since John would have to do it all while I hide somewhere and try not to inhale- haha!
xo
s
Sarah H says
I’m glad I’m not the only one who likes the wood tone! Though I imagine if I lived downstairs in your house most of the day I would be completely over it by the time I went upstairs to bed. And we just got done stain matching the woodwork in our 90 year old house (14 coats!) where we opened up the wall between the dining room and kitchen. I don’t wish that on you.
YoungHouseLove says
OH MY GOSH, what a job!
xo
s
Mia B says
We are in the midst of selections for our DIY flooring project (1500 sf of Elastilon and unfinished engineered oak), and have found a no-VOC stain & finish one coat product we are considering. I am going to order some sample colors today and they are pretty inexpensive. It’s very matte finish, so don’t know if you’ll like that look, but it might be an option that’s fetus-approved! Looks like the sample bottle covers 9 sf so you may only need a sample if you want to do your vanity. It’s called Rubio Monocoat. I’m also considering another product called Pallman’s Magic Oil but I think it is only low-VOC, but also much less toxic than a traditional stain. Good luck! And the stencil looks awesome!
YoungHouseLove says
Thanks so much for the tip Mia! Never heard of it but I’ll definitely check it out!
xo
s
Lauren says
I agree! I actually really like the warmth of the wood. Some new hardware and it would look awesome :)
Annie says
We used the clear Rubio Monocoat on our new butcher block kitchen counters and love it! It’s a very matte finish (just looks like wood, no shine) and seems to protect very well. It smells kind of like a strong, weird vegetable oil. It’s not too bad, but definitely has an odor. As a fellow due-in-April DIY’er, I didn’t worry about having it in the house.
And the wood looks gorgeous–try to keep it!! An ebony stain would be beautiful.
YoungHouseLove says
Thanks Annie!
xo
s
katie {deranchification} says
The stenciled floor looks awesome!! I’ve been dying to stencil something at our place but haven’t been able to decide on which stencil since there are so many great ones out there now! Now you’ve got me thinking about it again :)
Amy J. says
I. Freaking. Love. It.
Brit [House Updated] says
Your feet must be so much happier to stand on your freshly painted floor rather than that old yucko carpet! I sure know my eyes are happier seeing it. Nice work!
Ashleigh says
OMG I love it. It looks really great. I’m not sure I would have the patience to get it looking so good.
Well done xox
jen says
Looks so great!! Such a great way to make it beautiful while you plan for the next step!
Emiles says
LOVE IT! You’re totally right about “just for now” updates. I spray painted our lime faux marble countertops to look like black stone and slapped a happy green color on the walls of our kitchen. So much better than the pink everywhere and lime green counters.
For some reason, I’m totally digging the vanity as-is now with all the other gray. Really looks nice, which I wouldn’t have said pre-floor stencil.
Amy J. says
Do you think a dark color on the vanity will help to subdue the cream sink, or will accessories a la the powder room be the way to go?
YoungHouseLove says
I think both could help, since they seemed to both temper the same colored sink in the powder room, so I’m hoping to go a little of column A and a little of column B. Haha!
xo
s
Wendy @ New Moms Talk says
We’re not stenciling anything yet, but I am considering stenciling clam shells. We have an abundance of them as it’s clamming season here, and I envision a few of them in shadow boxes in our girl’s room. When they’re opened up they look like butterflies, so I’d like to stencil or butterfly patterns on them.
Oh, and here’s a look at what clamming is like at sunset-
http://www.newmomstalk.com/2013/10/17/sunset-clamming-washington/
Absolutely gorgeous!
Lindze says
Wow! Nice transformation! I’m loving the color direction of this space too. :)
Julie Kohler says
The floor looks so beautiful! The only irony is that the more beautiful the space looks, the uglier the vanity appears… Doing my best to disregard, but I do look forward to seeing it spruced up, as well!
YoungHouseLove says
Haha! It’s that famous home improvement issue: improve one thing, and something next to it looks even worse by comparison…
xo
s
Sarah says
WOW… that looks awesome. Something I’d never have the patience for… lol. But very nice!
Amanda says
I was thinking about stenciling our kitchen floor. :) I love when y’all do a tutorial on something I’ve been thinking about! Do you have any trick for choosing scale of pattern in a space? Our kitchen floor isn’t very big, but it’s open concept to the living room/dining room.
YoungHouseLove says
I usually just hold out until I love something. We had seen a bunch of stencils (forgot about this one under the bed for a while) and had also debated thick stripes, thin stripes, etc – but nothing really grabbed us. When we remembered this one from under the bed we laid it down on the floor and said “yesss!!” – and even though it’s a small space and this is a large scale pattern we just liked it enough to try it out. Hope that helps!
xo
s
Laura @ Rather Square says
What a great Phase 1 improvement! And I actually like the slight difference in the Revere Pewters between the wall and the floor. It looks intentional and really adds some interest.
YoungHouseLove says
Thanks Laura!
xo
s
Heidi says
I love that you filled the gaps with wood filler – but will you let us know if those crack? I’m wondering how flexible that will be when you walk on it…
YoungHouseLove says
Will do! I think it might depend on what type of subfloor you have (ex: plywood could have more flex than particle board or vice versa) but so far we’ve walked on them a bunch of times for a few days since filling them and they haven’t cracked a bit. I also wonder how they’ll do in the change of seasons, so I’ll be sure to post updates. I did read an awesome floor stenciling post from someone who commented with a link after we shared our photoshopped version in the last bathroom post, and she had hers for 8 months and said they were holding up well (she patched the areas between her subfloor but said in her case she probably wouldn’t do that again since her gaps were so slight and she had a lot more of them so they took her a lot of time). She was working with plywood too so there might be other differences. Here’s her post if it helps!
xo
s
Lisa says
I am thinking that your subfloor may be MDF (medium density fiberboard). It is a type of particle board, but smoother than what most people think of when they hear “particle board”. Less expensive particle board is made with larger wood chips than MDF; it is rougher and does not accept paint as well. MDF is very smooth and takes paint beautifully!
YoungHouseLove says
I think you’re right!
xo
s
Walnut says
I ripped up carpet in a bedroom this weekend and I couldn’t imagine keeping the subfloor as is. How does the stenciled floor feel on your feet? The subfloor in the bedroom just feels…off.
Also, what method works to clean a floor like this? I imagine you’d want to be careful about getting too much water on it, however, would a swiffer style mop glide over the subfloor?
YoungHouseLove says
I would guess your subfloor is plywood, which is a lot less smooth (it’s almost like a bunch of wood chips glued together). Since ours is so smooth (it was almost dusty/chalky feeling) some paint made it really nice underfoot. But I’ve heard if it’s plywood you might need to sand it smooth for a while (it can be a much larger project to get that to feel nice and flat). Good luck!
xo
s
Tania says
So weird, we are at the same exact place as you all. We will definitely be doing a full scale bathroom renovation in a few months, but we have disgusting carpet in our bathroom right now (blahhh). I didn’t consider painting the particle board. Can I ask how it feels to walk on? I’d be concerned that I would forget a nail or a staple, or get a splinter or something. Is it smooth? Thanks!
YoungHouseLove says
Ours is really smooth, but our subfloor is particle board (many homes have plywood which can be rougher). I’d peek under your carpet to try to see what you’re dealing with. Good luck Tania!
xo
s
Tasha says
This looks so cool! I’m glad you mentioned that the subfloor will be replaced moving forward, as I wondered about being able to work/apply over the paint.
Robin says
I love a well placed graphic statement and those floors are a really nice touch! Where did you buy the SafeCoat Acrylacq? … since I’m here in Richmond it would be great to know if some other store is selling it since the “eco friendly” store down by VCU has closed and that’s the only place I ever found it locally. As always, thanks. Robin
YoungHouseLove says
We have to order it online through amazon.com (we used to get it at a place called EcoLogic but they closed).
xo
s
Cary says
Very nice, but curious what you have for a lighting source since the mirror is covering the old one.
YoungHouseLove says
There’s a ceiling light too centered in the room with the vanity as well as the closet (we’re hoping to update those and post about that someday…)
xo
s
robyns says
that is so freakin pretty! It looks like awesome tile that Genevieve Gorder would use in a bathroom for millions of dollars!
Lindz says
Reverie Pewter alert! (or was that intentional?) Love the floor stencil. We have nails that are shimmying their way up through our builder basic bathroom linoleum and I’m starting to wonder if it might be fun to pull up the linoleum… fix the wiggly nails… and stencil. Hmmmmmmm.
YoungHouseLove says
BAhahahahaha! Totally unintentional. I’m telling you, my brain won’t stop doing that. Off to fix it!
xo
s
Stephanies says
Wowza!!! This is probably the best makeover of the house so far. (other than painting that blue trim). I wish I had a floor to stencil now!
Tarynkay says
I actually really like the contrast of the wood vanity with all of the grey- it’s a nice wood tone. I know how much you guys like to paint things, but I think that if you paint or stain it to blend in with the space, it’s going to blend too much into a bland grey mush.
YoungHouseLove says
Yeah, the only issue is that the sinktop looks so yellow next to the orangey wood in real life, and by going a deeper tone with it downstairs in the half bath (where we have the same sinktop) it really neutralized it and made it almost look white/gray instead of so yellowed and old. We’ll have to see where we end up! Hopefully there’s a happy medium…
xo
s
Katie O says
I’m digging the patterned floor with the more subdued color on the walls. It’s really fun! This weekend I bought electrical conduit and plumbing fixtures to make a DIY curtain rod. I think that was popular on blogs a few years ago, but I’m late to the game. I’m also painting drop cloths for curtains – again, just a few years late jumping on that train. No time like the present!
Marissa says
Looks great you guys!!
Tracey Bradshaw says
Love it – I have a few Royal Design Studio stencils that are ear marked for future furniture makeovers. I love that you used the darker shade on top – so much more depth than if you’d gone the other way round.
PS – did you know you wrote ‘Reverie’ in the section where you talk about it not quite color matching the BM shade – made me lol thinking back to your earlier post :-)
YoungHouseLove says
Haha, someone else just mentioned that to me. My brain just won’t let go of that extra i!
xo
s
Molly says
That floor is AWESOME. I love it. Please come re-do our master bedroom…
Sarah says
I love how the floors turned out! And I’m actually loving the warm tone of the wood next to all the grays in there. But that’s just my personal aesthetic. It’s really coming together!
Emily says
Oh my goodness- this looks amazing. I know I have something somewhere at my house that needs stenciling- wanna come over?? haha
Carla says
Wow! I actually gasped out loud when I saw this! I don’t think I’d have the patience to do this myself, though….
Emily says
Oh my goodness- this looks amazing. I know I have something somewhere at my house that needs stenciling- wanna come over? But seriously, nice work you two! I love that you made a temporary solution so pretty!!
Kristen says
I was a little skeptical of painting the sub floors but it turned out AMAZING (love the stencil you went with)! Plus, the wood tone of the vanity works really really well with the colors :)
Alicia Llanas says
a-m-a-z-i-n-g!
Leslie says
Just out of curiosity, did you do a transition piece from your wood flooring and the tile flooring down to the subfloor? I’m just imagining regularly stubbed toes walking from one space to the next.
YoungHouseLove says
We don’t have any yet, but so far there haven’t been any stubbed toes (and I’m the prego girl who goes to the bathroom two times a night in the dark). I think for polish it would be nice to plop something down just for this interim step though. Will keep you posted!
xo
s
Paula w says
Looks terrific! I hate carpet too, now I want a stencil project! (But it’ll have to be a wall. Time to shop for stencils). Thanks for the ideas and instruction!