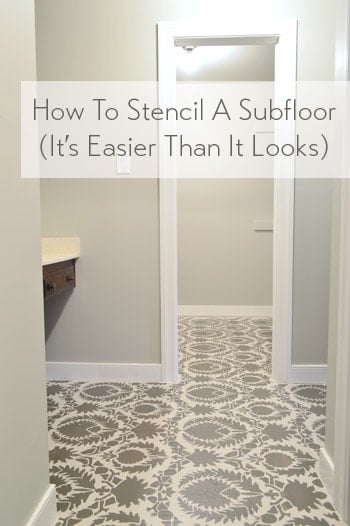
We did it! We stenciled our bathroom and closet floor and it looks awesome. So worth the effort. And so much better than the carpet that was there before.
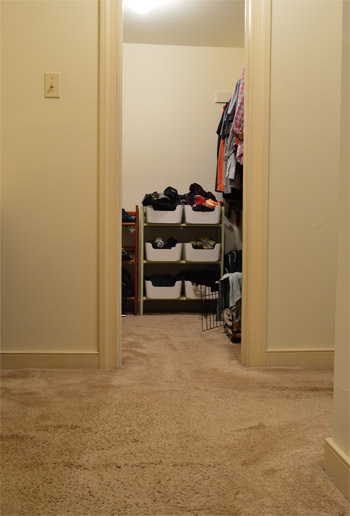
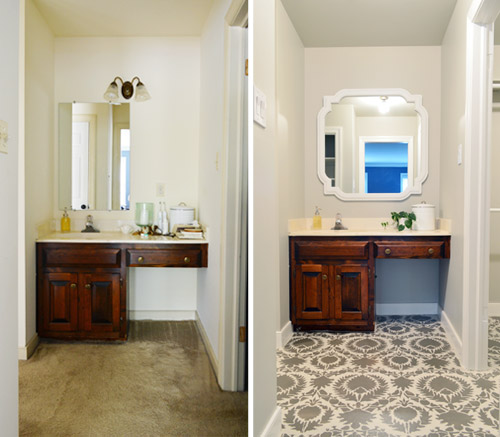
Remember when the floor in our closet and vanity area looked like this?
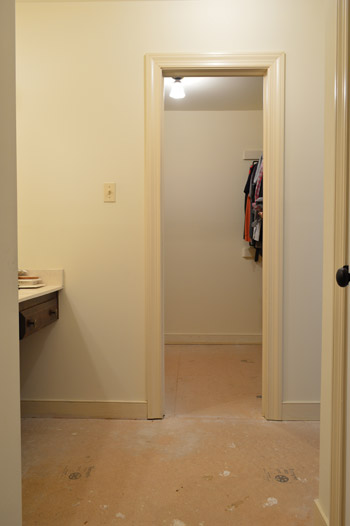
And then we ripped up the carpet to reveal the subfloor and they looked like this?
Well, five hours and $24 later, it looks like this!
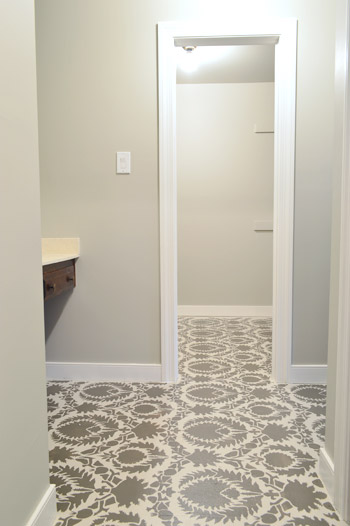
Our actual bathroom has tile (where the shower/tub/toilet are), but this is a separate vanity area along with an adjoining closet – which both had old carpet that we couldn’t live with for one more day. So we yanked it up and decided to have some fun with the subfloor until we’re ready for a full scale renovation down the line (eventually we’d love to knock down the wall that divides the vanity from the rest of the bathroom and retile/renovate them so they’re one big spacious bathroom).
We briefly debated peel and stick floor tiles or buying a large seagrass rug and cutting it to lay it wall-to-wall in both spaces for this interim step, but we decided that a stenciled and sealed floor (possibly with a few area rugs) will serve us well in the short term without being a whole lot of money/effort that we’ll later end up undoing.
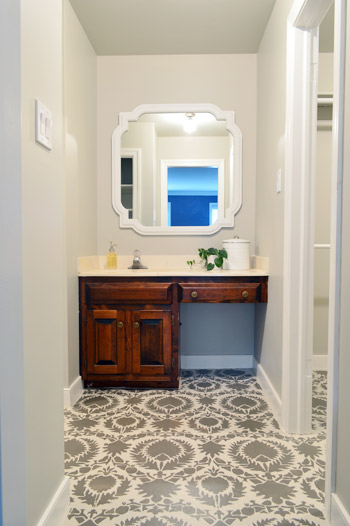
And since our future tiling plans will require us to rip this stuff up and put backer board in its place anyway (you can’t tile over particle board since it’s not a secure base) there’s no harm in slapping some paint on it in the meantime.
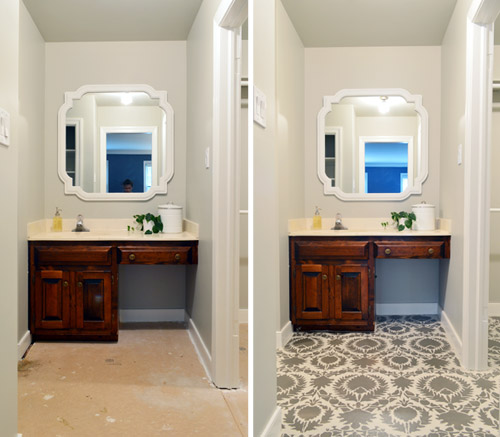
My favorite thing about temporary (and affordable!) afternoon updates like this are that you can have a little fun and do something a little bolder than you might do if you were selecting something more permanent (like tiling a floor that you’ll have to live with for a few decades). Oh and don’t mind that vanity, we’re going to either stain it a deep ebony or charcoal tone or paint it a subdued dark color, so it should fit in a lot better with the rest of the tones in the space.
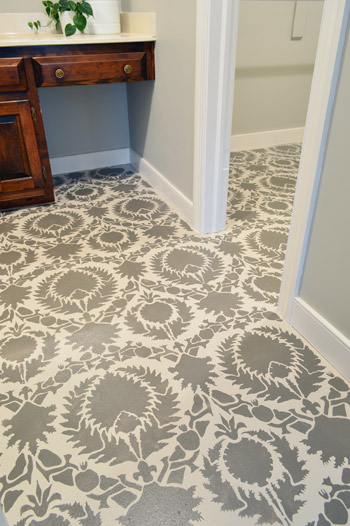
But let’s rewind a little bit (back to when the floors looked like this) and tell you about the process and some of the things we learned along the way.
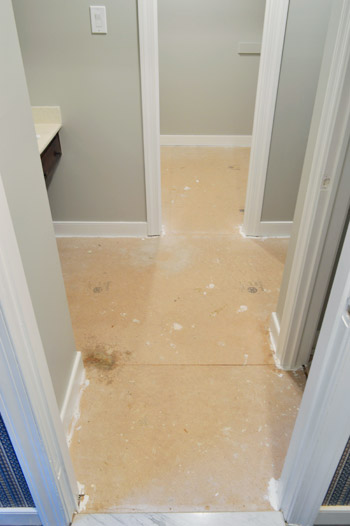
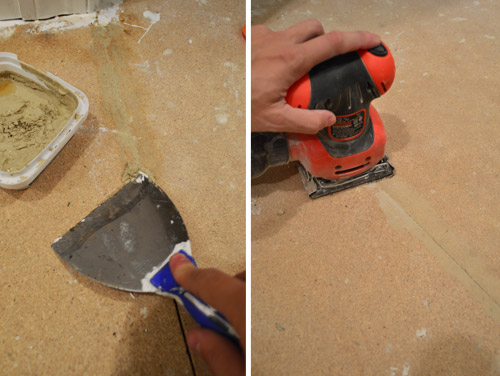
To prep our subfloor, which is particle board (a very smooth and almost chalky surface) we used wood filler to make the seams between the different particle boards sheets less obvious. There were only three so it went pretty fast. Once dry, we sanded them down. It wasn’t perfect, but it was better.
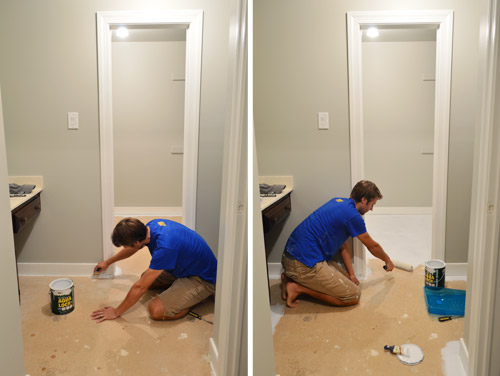
Then we primed it all with Aqualock water based primer (it was low-VOC but not no-VOC so John got that step done while I was outside playing with Clara). The purpose of the primer was to help the paint grab on for the long haul and block any stains/bleed-through that might occur from painting over such a porous surface like particle board.
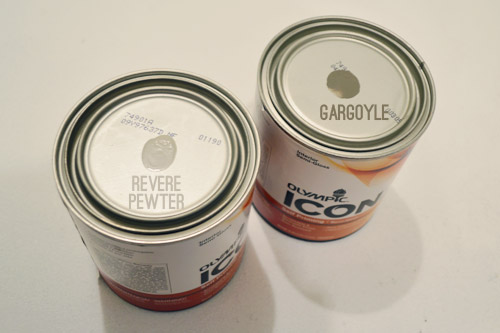
For paint, we grabbed two $12 quarts of semi-gloss paint in the new no-VOC Olympic Icon line, matched to two Benjamin Moore colors: Revere Pewter for our base (same as the wall) and Gargoyle (for the darker stencil pattern). For the last few years we’ve mostly stuck with Benjamin Moore paints, but for temporary upgrades it’s nice to save a little money since we’ll be ripping out this floor in a few years and tiling anyway. We didn’t use an outdoor porch and floor paint (as you usually would in this scenario) because they’re all pretty fumey (usually oil-based) we wanted something no-VOC (this one’s for you, fetus) – but we think the combination of a good primer, some semi-gloss paint, and a nice thick coat of sealer will keep them in good shape for the next few years. We’ll definitely report back with photos over time to share how the floor wears.
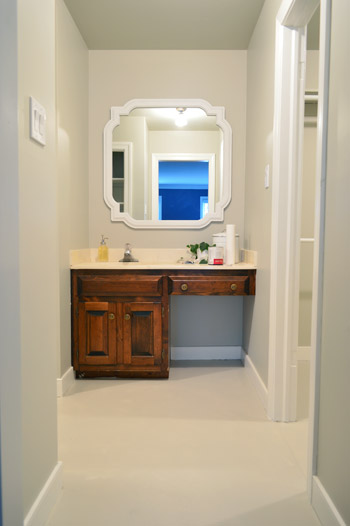
With the primer dry, we could apply two coats of the base color. Since this was a no-VOC step, I could cut in while John rolled the rest (we just had to be mindful to paint ourselves out of the space). You can see from the picture below that the color matched Revere Pewter on the floor didn’t really turn out to match the real RP color on the walls as we planned (that’s always the risk that you take when you color match one brand to another), but it was still in the same color family, so we didn’t mind. We’re going for some pretty high contrast interest on the floor, but we thought it would stay sophisticated if we kept the palette sort of subdued (especially with a bold navy-ish tone in the bedroom along with a colorful rug/headboard/pillows/etc) so we were just glad they didn’t clash and still felt like they went together, even if they didn’t match perfectly.
Stenciling the floor is SO MUCH EASIER if you have two people on hand to tag team it. I did the office stencil project alone for the most part, and it took forever and I used a method I’d never use again (more on that in a minute) but this time around we both tackled it and it was a much simpler task. Oh and stenciling a floor is even easier than stenciling a wall since you’re not fighting gravity (a few pieces of painter’s tape hold it in place and then you can roll it without worrying it’ll slip down the wall like it might on a vertical surface).
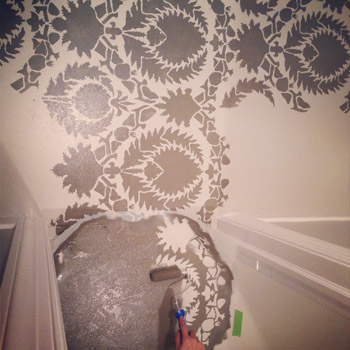
If you’d like to see the rolling in action – with a few live-action tips in the mix – we made this video while applying another stencil to the wall for a book project back in 2011.
Since you usually want your pattern centered in the room, we started our first stencil to be right in the middle of the vanity. Here you can see what a single repeat of the pattern looks like. It’s the Suzani Silk Road stencil from Royal Design Studios. It’s $49, but we had actually ordered it back in 2011 to use for our book (but that project ended up getting cut), so we just had it sitting under the bed in our guest room for a few years, waiting to be used.
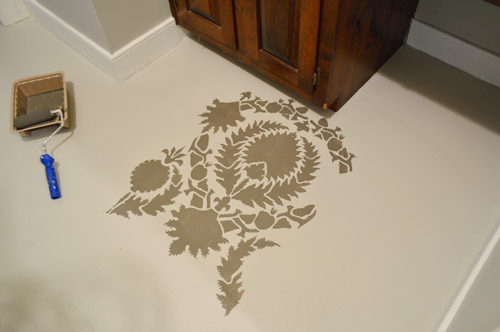
But back to that much easier stenciling method that I mentioned before. We learned back when we were shooting that wall-stenciling project for our book that applying a small amount of paint with a foam roller (not too much, or it’ll get gummy/bleedy) results in just as clean of a line as dabbing everything on by hand, which I did when I stenciled the office, and ended up with claw hands and lost 14 hours of my life. This entire thing only took us 5 hours and was SO MUCH EASIER thanks to a small foam roller with a nice thin application of paint. Hallelujah!
Once again, when using a large stencil like this, it’s so much easier with two people. Each stencil has registration marks around the outside that you line up with the previous stencil so you know where to place it, and if you have someone on hand to help you line up the registration marks and slowly lower it down onto the floor (especially when they’re large) you should have a lot less of an issue with smudging, which can happen if you place it and then slide it around to match the registration marks instead of using four hands to slowly lower it into the right place off the bat (one hand for each corner just seems to work best).
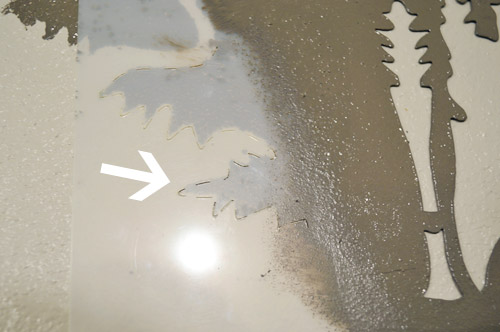
This room’s biggest challenge was that so many walls and corners meant lots of partial stencils, which meant lots of stencil bending (it’s made from flexible plastic that bends, but doesn’t crease, easily) and smooshing the roller into tight spots. We kept some spare cardboard handy (i.e. cereal boxes) to protect the wall from getting paint on it when we had to bend the stencil and it would have rested against the baseboard/wall. Between each placement of the stencil, John also held it up with two fingers with the back facing me and I used a folded paper towel to dab off any excess paint on the back so that the next time we placed it no leftover paint was lingering on the back (this can result in sort of a ghosted double outline, so the quick wipe down between each placement really seems worth the time).
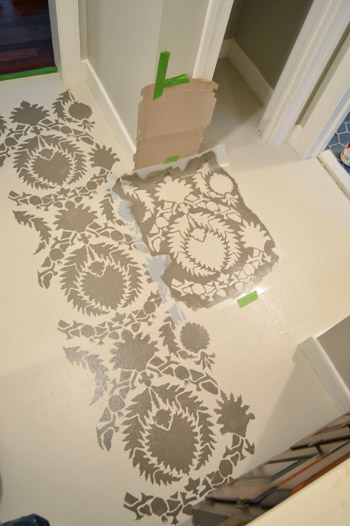
When doing a floor you also have to consider your exit route. In a typical square space this is pretty easy to figure out, but there was no logical way for us to both keep an exit clear and be sure we were keeping our pattern straight/centered (we wanted to start in the middle of the vanity and work out from there, so we couldn’t start in the corner of the closet and stencil our way out because things wouldn’t have been centered on the vanity). For that reason, we decided up front that it would be easiest to paint across two days in smaller installments. We did as much as we could easily access the first day, then let those areas dry so we could stand on them to complete some remaining spots. Picture it sort of like a checkerboard… you can do a row, leave a row clear, and do as much of the other row that attaches to something else you have already done as you can – and then walk out using the clear row. The next day, just go back and fill in those missing areas when the surrounding rows are dry so you can stand on them.
After all of the stenciling was done, I used a small craft brush to get into the spots that needed some filling in. Initially I thought I’d touch up the entire perimeter by hand with paint to make it look flush to the wall (the rolling left about a 1/2″ gap)…
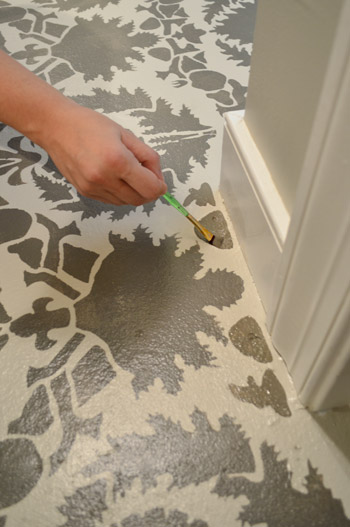
… but after stepping back we realized the small gap was so consistent around the room that it almost looked like an intentional border. So rather than risk making it look worse with my by-hand touch ups, we opted to keep it that way. You can see the slight border around the baseboard in the bottom right of this picture:

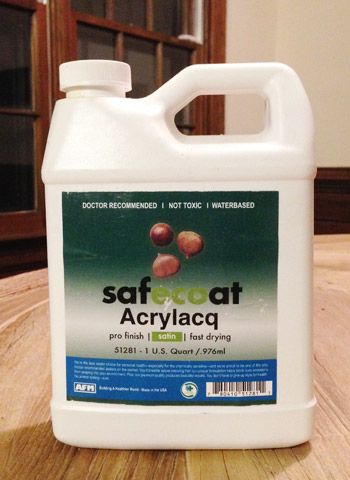
As our final sealing step, we plan to use SafeCoat Acrylacq (a non-toxic poly that we have loved since my pregnancy with Clara) to seal it to give it even more added protection. So we hope to get that done and report back on how it goes as well as finishing up a few more things in there.
So far even unsealed it has been holding up well for the last few days, and we’re SO much happier to see it when we walk in there to get dressed than we were to stand on that old carpet. And of course we’re psyched to watch our list dwindle down to just two bullets in here (which means I get to do a budget breakdown soon – yeah boyyyy).
remove the carpetpaint and hang a larger window-like mirror(more on both of those steps here)paint the trimpaint the walls and ceilingreplace all of the outlets/light switches(more on all three of those steps here)stencil the floors- seal the floors and add some better storage solutions to the closet
- paint or stain the vanity, add new hardware to it, and add some built-in shelves to make the empty space under the counter on the right side more functional
Is anyone else stenciling the walls? How about a ceiling or a floor? Or furniture? Do you use a small foam roller or the claw method that I outlined here (for the love of wrist sustainability, USE A ROLLER!).
Psst- Wanna know where we got something in our house? Just click on this button:


Amy says
So pretty! You will have a tough time ever ripping that floor up to replace it with something else.
Melissa@TheChicDream says
It looks AMAZING!!! Love it. I’m going to be stenciling my half bathroom and I’m so scared. I’ll definitely watch your video to get some pointers. Thanks for another great project!
Guylaine Côté says
Wow!
PATIENCE!!!!!!!!!!!!!!!!!!!!
Sarah C. says
I love how the floors turned out! And I’m actually loving the warm tone of the wood next to all the grays in there. But that’s just my personal aesthetic. Great ideas for the short term projects we all have!
Maggie Budiono says
I wasn’t sure about the pattern, but when I saw the 3rd photos, it looks amazing!!! How did you choose which pattern to use/buy, since there are lots and lots of beautiful pattern available?
Xoxo from Indonesia
YoungHouseLove says
We actually had this stencil already leftover from a book project that got cut before we could do it, but we did consider other options (other stencils, doing taped off stripes, etc). I think in the end we just liked this pattern with the idea of tone on tone colors (we both thought this pattern would be too much with bright colors going on, but were sold after we thought about it with two neutral tones). I always just say to hold out and find something you really like and then pull the trigger.
xo
s
Patricia says
My sis and I stencilled our huge bathroom in a faux stone pattern. Originally I painted the room sky blue … but that turned out to be a whole lotta blue. So we added stone walls part way up the walls (the stencil)then free handed some weeds growing out of the cracks and stamped ivy falling down the walls as well. Makes me feel like I’m back in Greece again, wandering thru a ruin.
We did the dab technique since we were only painting the lines of the stone walls (I’d previously sponged in the basic faux wall color).
Your work looks fantastic!
Geertrude says
Wow, that looks wonderful! I don’t think I’ll be stenciling anything soon though, I’m sure I’d make a big mess of it. I’ll practice my “normal” painting (walls, trim) first, I make a mess of that too, though I am getting better at it ;-)
danielle says
Wow! That is gorgeous!
Gretchen@BoxyColonial says
We’re planning to do the exact same thing…ripping up nasty bathroom carpeting and painting/probably stenciling the subfloor (we have tile already by the tub and toilet, too, although it’s not a separate room like yours), so I’m excited that you guys went first so I can learn from your experience :). I guess sometimes letting “I can’t stand that carpet for one more day” turn into a year pays off ;)
betty (the sweaty betty) says
absolutely LOVE THIS! the room looks so mucchhhhh better now! cant wait to see the final vanity look!
Megan Poletti says
I never would’ve thought that I would like stencils, but this adds some nice contrast and interest without being too patterny. Somehow you can focus on other items in the room, like the mirror, instead of just being drawn to the pattern of the stencil. I don’t know if that made any sense, but consider me converted!
MJ says
The floor looks amazing! Love it!
Sarah says
Love it! Seriously, I think you should keep it like this. Don’t replace it with tile – everyone has tile!
Ginny @ Goofy Monkeys says
It looks so great!!
Great “for now” solution!
Danielle says
WOW! I’m not always a fan of stencils, but this looks absolutely amazing. Great job! Plus I love how it perks up the are – so fun!
Marlena says
Looks terrific! I am wondering – why not consider a new vanity? Maybe another custom-built one like the first bathroom, or a floating vanity to create more room/fresh space feel?
YoungHouseLove says
Since we’ll eventually be gutting the bathroom and extending it to this space (which will allow for a double sink) we just didn’t want to replace this vanity and then gut it later and replace it again, so we like working with what we have whenever we can during these little Phase 1 updates.
xo
s
Megan @ Rappsody in Rooms says
Wow! It looks amazing! I will be sad to see that floor leave when you do a full reno. It’s so cool looking! You don’t see stenciled floors in homes much. Love this update!
Stephanie says
Looks amazing!
Erica says
WOAH! This looks AMAZING! Any chance you might entertain the idea of keeping the stenciled floors permanently?
YoungHouseLove says
I think we still love the idea of a bigger bathroom with a nice double sink instead of a smaller chopped up space without much light, so for now the plan is to enjoy the stencil for the next year or two until the big reno (and take lots of pics of it to remember it by). Who knows though, our tile choice could be influenced by it!
xo
s
Joanna says
Where did you find that huge, beautiful, framed mirror? I’m looking for something similar. Thanks for your ideas & inspiration!
YoungHouseLove says
Thanks Joanna! It’s from HomeGoods (I painted it white since the color and rustic distressing wasn’t our style).
xo
s
Jamie says
I recently found your blog, and I have to say I am LOVING it. We live in Virginia Beach (if I remember correctly, I think it said you’re in Richmond?), and our houses are almost identical! Ours is definitely in need of modernization and we’re working on that now, but your blog is giving me a lot of ideas!
YoungHouseLove says
Thanks Jamie! Yes, we’re over in in RVA. Practically neighbors. Haha!
xo
s
Lindsay says
This looks amazing! I love it!
Danielle Purtle says
I LOVE this. Trying to think of something I can stencil now! I noticed the countertops looks a bit more of a creamy color especially with all the pretty white and grey. Do you think once you paint the vanity it will bother you? Do you have plans for it?
YoungHouseLove says
Actually after we painted the vanity in the half bathroom (as well as adding accessories/art, which we can’t wait to do in here) it really negated that same yellow tint, so we hope we can nautralize it as we go!
xo
s
Jan says
Looks great! Just out of curiousity, where do you put your clothes hamper/basket? I’m wondering if the open spot under the vanity was meant for that. Or for a chair if you would sit to do makeup, which was the original purpose of a vanity table (as well as how it got its name). Those giant freestanding lighted makeup mirrors were all the rage in the ’60s and ’70s.
YoungHouseLove says
It’s tucked away in the closet, but we did think about it for under the sink. I think in the end some shelves for towels down there makes us happier than bringing the hamper into the vanity area, but who knows where we’ll end up!
xo
s
Addie says
I was skeptical, but this looks awesome! Good job, guys!
(Sherry– there is still no “i” in Revere ;) )
YoungHouseLove says
Haha, tell that to my brain. All fixed.
xo
s
Stephanie @ Simply Swider says
Love this idea! We have a really similar bathroom that we are planning on gutting down the road, but like you we are looking to make some cosmetic upgrades in the meantime. Thanks for the inspiration!
Katy says
Seriously, my jaw just dropped!! Stunning.
Lynne says
I LOVE it!!
Laurie says
I LOVE it! I’m surprised how much I love it but that large graphic print in those pretty, neutral colors is awesome! I’m so glad you tried this out so we can all see how it looks. I can’t wait to see how it holds up.
Do you guys take your shoes off in the house? I’m thinking that would improve the longevity of this.
YoungHouseLove says
Yup, they’re off at the door.
xo
s
Connie says
I’ll bet Royal Design Studios sells out of that stencil today! The floor looks awesome!
Chantel says
I LOVE this! I love the colors and I think it’s fantastic! I’ve been following your blog for a while now and every post makes me “OHHH and AHH”. Thank you! (Actually, you’ve inspired me to start my own and track all the things I do around our condo and some of my baking. We’re looking to buy a home outside of the city soon and I can’t wait to track all the little projects as we make the home into our own)
Can’t wait to see what you do with your closet. I have a walk-in closet that looks like the same kind of beautiful mess yours does, so I’m hoping to pick up some pointers with the reno! :)
YoungHouseLove says
Thanks so much Chantel! And happy blogging!
xo
s
lounytoon says
Wow, amazing transformation. Really adds a nice touch.
Love the mirror too, where did you score that find?
YoungHouseLove says
Thanks! It was from HomeGoods (I painted it white since it had sort of a gold distressed finish).
xo
s
Alicia says
This looks awesome! The phase one update is a keeper I think :)
Ashley@AttemptsAtDomestication says
This looks super fun! I really love it and the stencil you chose!
Abby J. says
I love it!! The contrast looks great and it adds so much interest. Now I just need to find somewhere to do this at my house!
Abby J.
Miki says
Looks Great! I stenciled my daughter’s wall with an all-over stencil, and used the foam roller and temporary spray adhesive. I also grabbed my hair dryer to quickly dry the paint (which was so fast since the paint layer was super thin)..this way I could line it up and keep moving quickly.
YoungHouseLove says
Smart!
xo
s
Erin @ The Impatient Gardener says
I’m not usually one for temporary upgrades. I can’t explain why … I just rarely go down that road. But I absolutely love this. It looks so fun and it doesn’t seem “temporary” at all. I can’t believe you guys cranked it out so fast. You are project-doing machines!
Christy Niebaum says
When I first saw this stenciled floor, it reminded me of “Wayne’s World” whenever Wayne sees Cassandra and “Dream Weaver” starts playing in his head. So, that’s the long way of saying “I love it!”
YoungHouseLove says
Haha! Thanks Christy!
xo
s
christina @ homemade ocean says
This might be my favorite project EVER!
I love everything, the stencil you chose, the colors, EVERYTHING :)
And I especially love know that you and Katie B. are reunited and can’t wait to hear about it slash see all those cute belly photos!!!!
YoungHouseLove says
Aw thanks Christina! Alas, she’s already gone. It was the fastest visit ever, but we loved having them!
xo
s
Ida says
Love this! It looks amazing! Great idea for a quick makeover!
Kirsten Brusse says
I LOVE this! Have you guys ever tried to paint a linoleum floor? I am wondering, if I could paint my ugly black and white checkered linoleum floor like this? Thanks your your help – I absolutely love your blog and you have inspired me so much.
YoungHouseLove says
Plastic/vinyl/linoleum floors have a lot more of a slick surface so it seems to be harder to get paint to adhere, but I’ve heard it can be done (check out Pinterest for some tutorials). I still worry about things like dog paws or chairs sliding back and forth ruining it. Perhaps if your kitchen isn’t an eat-in one and you don’t have a dog (and take your shoes off at the door) it could work? Has anyone else painted a linoleum/vinyl kitchen floor with luck?
xo
s
Stephanie says
There’s a great tutorial for painting linoleum floors over on View Along the Way: http://www.viewalongtheway.com/2013/01/how-to-paint-vinyl-or-laminate-flooring/ Seriously, between these two posts I wish I had laminate or subfloor to paint!
ErinY says
Here’s another similar one from My Old Country House:
http://myoldcountryhouse.com/painted-vinyl-kitchen-floor/
YoungHouseLove says
Love that too! Her blog is so much fun!
xo
s
Kristy Swain says
Wow, that looks awesome! I love how a dilemma can end up forcing a more bold outcome. Love the pattern and colors that you chose!!
Marcia says
That looks so good! Do you worry about about excess water ruining the particleboard? Or does the primer and sealer keep it from being a problem?
YoungHouseLove says
Yup, primer and sealer keep it protected, and this isn’t the floor in the room with the toilet/tub/shower (it’s just a vanity area in a separate room) so it seems like it should hold up. We figure it if had carpeting (which is by no means a waterproof material) for 30 years and did well, it should be nice with the primer/poly/sealer solution as well.
xo
s
Lisa E says
Absolutely fabulous!
sue says
This looks fabulous! I am on the verge of tearing up all of our carpet on the main floor of our ranch house. There is hardwood underneath, but parts of it are in terrible condition. Have you ever stenciled hardwood? Would it be basically the same process as what you did?
YoungHouseLove says
Yes! I’ve seen people paint hardwoods and we even house crashed a woman named Katie who stenciled hers and they were awesome (she was in Domino magazine for them!). I think you just have to sand down the sealer so it’s ready for primer/paint (not too glossy).
xo
s
Michelle @ A Healthy Mrs says
Looks great! A perfect short term solution!
Karen says
[Bowing to The Great Petersiks]…
My mouth is agape, and I got nothing to say. Well, ok, I do have to say that it’s friggin AH-may-zing!!!!!! I hope you keep it, and god forbid ever do a gut-job!!
Stuh-ning.
Sam M. | Atkinson Drive says
This is fabulous! I love a good, affordable weekend room update!
Angie K says
Looks so awesome! It’s on my bucket list to someday paint a subfloor with some high contrast stencil, or a painted rug or something!
I am obsessed with Annie Sloan’s Graphite color. It’s a soft pewter color and makes a very smooth, matte, color if you don’t distress it. I recently painted my oak vanity with it and I can’t help but think it would look great in your bathroom too! Especially if the vanity is also temporary…would give a taste of Annie Sloan paints! (of course, they don’t fit your frugal style….they fit my “hate to prep” style :)
Aria says
This turned out great! We are looking at doing this in a couple rooms in our house where we can’t agree on a wood floor and don’t want to spend that much anyway. We may get to do this soon!