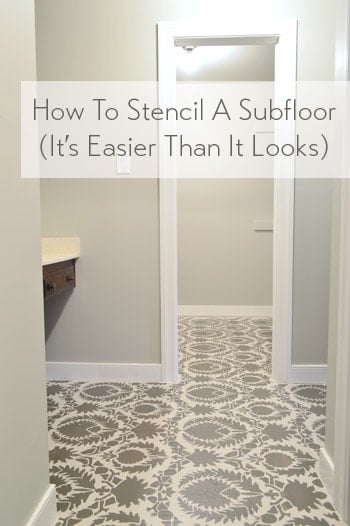
We did it! We stenciled our bathroom and closet floor and it looks awesome. So worth the effort. And so much better than the carpet that was there before.
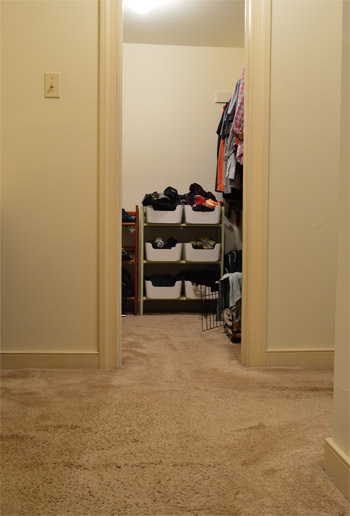
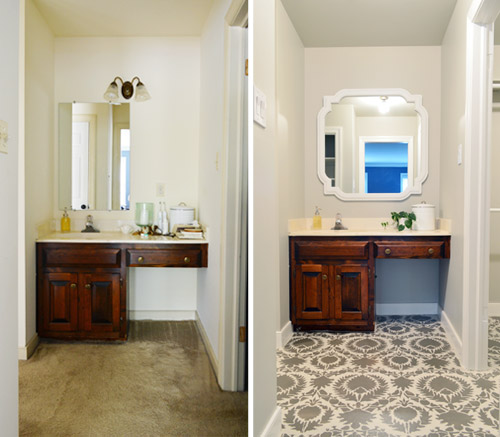
Remember when the floor in our closet and vanity area looked like this?
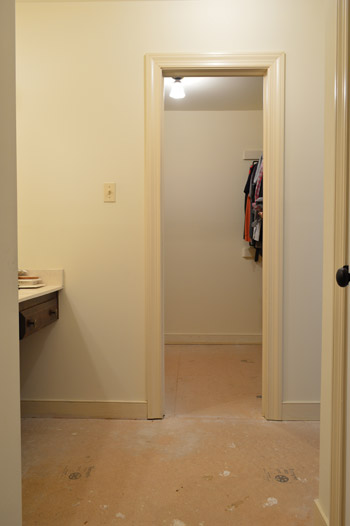
And then we ripped up the carpet to reveal the subfloor and they looked like this?
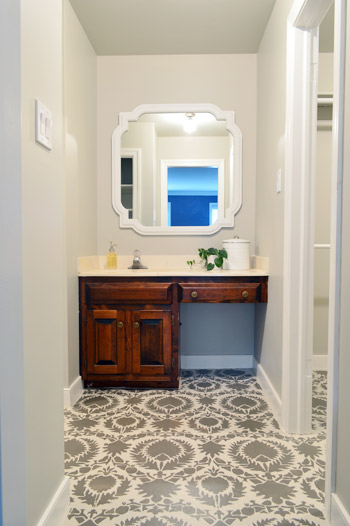
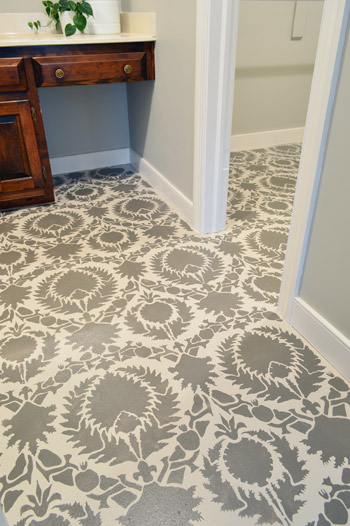
Well, five hours and $24 later, it looks like this!
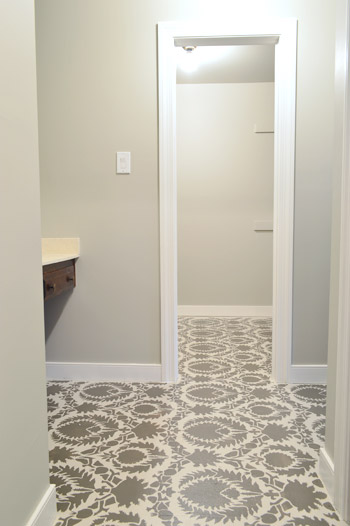
Our actual bathroom has tile (where the shower/tub/toilet are), but this is a separate vanity area along with an adjoining closet – which both had old carpet that we couldn’t live with for one more day. So we yanked it up and decided to have some fun with the subfloor until we’re ready for a full scale renovation down the line (eventually we’d love to knock down the wall that divides the vanity from the rest of the bathroom and retile/renovate them so they’re one big spacious bathroom).
We briefly debated peel and stick floor tiles or buying a large seagrass rug and cutting it to lay it wall-to-wall in both spaces for this interim step, but we decided that a stenciled and sealed floor (possibly with a few area rugs) will serve us well in the short term without being a whole lot of money/effort that we’ll later end up undoing.
And since our future tiling plans will require us to rip this stuff up and put backer board in its place anyway (you can’t tile over particle board since it’s not a secure base) there’s no harm in slapping some paint on it in the meantime.
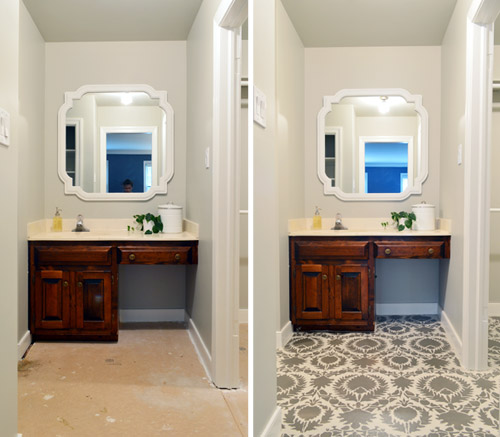
My favorite thing about temporary (and affordable!) afternoon updates like this are that you can have a little fun and do something a little bolder than you might do if you were selecting something more permanent (like tiling a floor that you’ll have to live with for a few decades). Oh and don’t mind that vanity, we’re going to either stain it a deep ebony or charcoal tone or paint it a subdued dark color, so it should fit in a lot better with the rest of the tones in the space.
But let’s rewind a little bit (back to when the floors looked like this) and tell you about the process and some of the things we learned along the way.
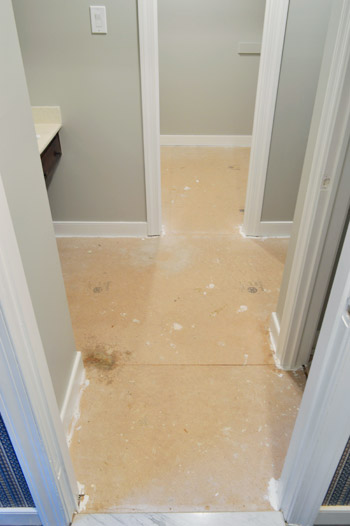
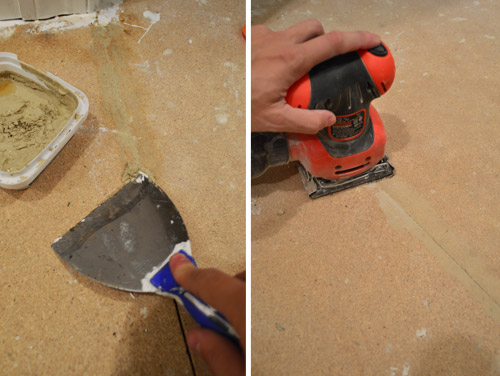
To prep our subfloor, which is particle board (a very smooth and almost chalky surface) we used wood filler to make the seams between the different particle boards sheets less obvious. There were only three so it went pretty fast. Once dry, we sanded them down. It wasn’t perfect, but it was better.
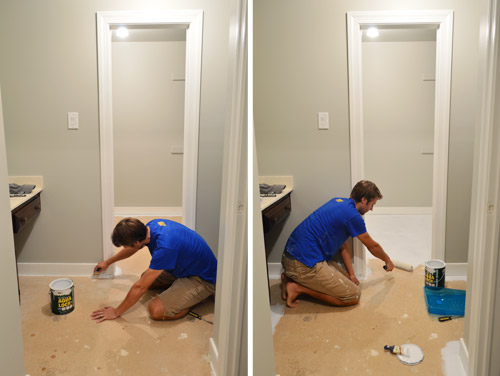
Then we primed it all with Aqualock water based primer (it was low-VOC but not no-VOC so John got that step done while I was outside playing with Clara). The purpose of the primer was to help the paint grab on for the long haul and block any stains/bleed-through that might occur from painting over such a porous surface like particle board.
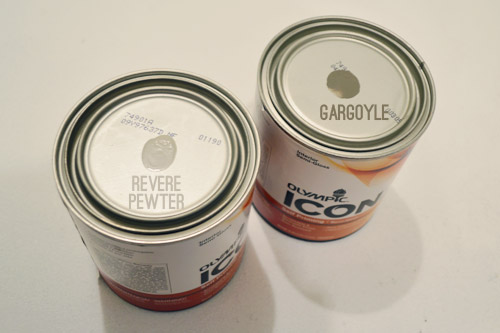
For paint, we grabbed two $12 quarts of semi-gloss paint in the new no-VOC Olympic Icon line, matched to two Benjamin Moore colors: Revere Pewter for our base (same as the wall) and Gargoyle (for the darker stencil pattern). For the last few years we’ve mostly stuck with Benjamin Moore paints, but for temporary upgrades it’s nice to save a little money since we’ll be ripping out this floor in a few years and tiling anyway. We didn’t use an outdoor porch and floor paint (as you usually would in this scenario) because they’re all pretty fumey (usually oil-based) we wanted something no-VOC (this one’s for you, fetus) – but we think the combination of a good primer, some semi-gloss paint, and a nice thick coat of sealer will keep them in good shape for the next few years. We’ll definitely report back with photos over time to share how the floor wears.
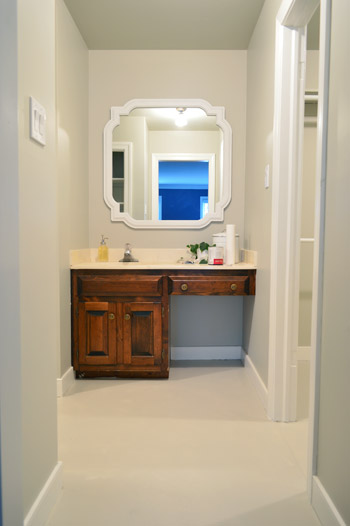
With the primer dry, we could apply two coats of the base color. Since this was a no-VOC step, I could cut in while John rolled the rest (we just had to be mindful to paint ourselves out of the space). You can see from the picture below that the color matched Revere Pewter on the floor didn’t really turn out to match the real RP color on the walls as we planned (that’s always the risk that you take when you color match one brand to another), but it was still in the same color family, so we didn’t mind. We’re going for some pretty high contrast interest on the floor, but we thought it would stay sophisticated if we kept the palette sort of subdued (especially with a bold navy-ish tone in the bedroom along with a colorful rug/headboard/pillows/etc) so we were just glad they didn’t clash and still felt like they went together, even if they didn’t match perfectly.
Stenciling the floor is SO MUCH EASIER if you have two people on hand to tag team it. I did the office stencil project alone for the most part, and it took forever and I used a method I’d never use again (more on that in a minute) but this time around we both tackled it and it was a much simpler task. Oh and stenciling a floor is even easier than stenciling a wall since you’re not fighting gravity (a few pieces of painter’s tape hold it in place and then you can roll it without worrying it’ll slip down the wall like it might on a vertical surface).
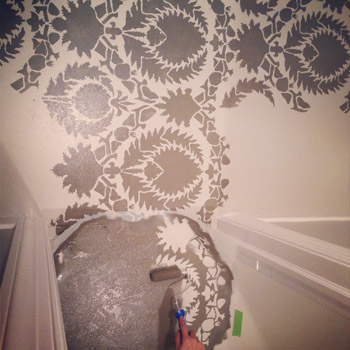
If you’d like to see the rolling in action – with a few live-action tips in the mix – we made this video while applying another stencil to the wall for a book project back in 2011.
Since you usually want your pattern centered in the room, we started our first stencil to be right in the middle of the vanity. Here you can see what a single repeat of the pattern looks like. It’s the Suzani Silk Road stencil from Royal Design Studios. It’s $49, but we had actually ordered it back in 2011 to use for our book (but that project ended up getting cut), so we just had it sitting under the bed in our guest room for a few years, waiting to be used.
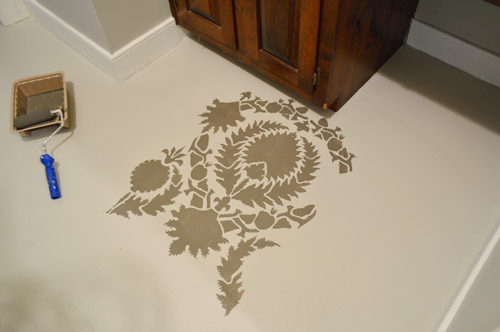
But back to that much easier stenciling method that I mentioned before. We learned back when we were shooting that wall-stenciling project for our book that applying a small amount of paint with a foam roller (not too much, or it’ll get gummy/bleedy) results in just as clean of a line as dabbing everything on by hand, which I did when I stenciled the office, and ended up with claw hands and lost 14 hours of my life. This entire thing only took us 5 hours and was SO MUCH EASIER thanks to a small foam roller with a nice thin application of paint. Hallelujah!
Once again, when using a large stencil like this, it’s so much easier with two people. Each stencil has registration marks around the outside that you line up with the previous stencil so you know where to place it, and if you have someone on hand to help you line up the registration marks and slowly lower it down onto the floor (especially when they’re large) you should have a lot less of an issue with smudging, which can happen if you place it and then slide it around to match the registration marks instead of using four hands to slowly lower it into the right place off the bat (one hand for each corner just seems to work best).
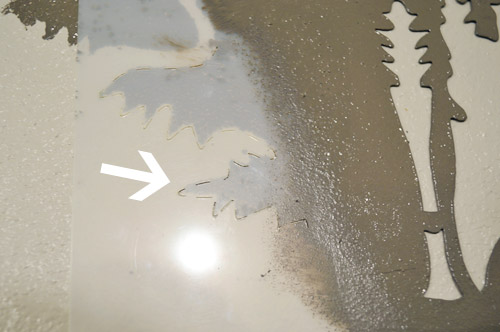
This room’s biggest challenge was that so many walls and corners meant lots of partial stencils, which meant lots of stencil bending (it’s made from flexible plastic that bends, but doesn’t crease, easily) and smooshing the roller into tight spots. We kept some spare cardboard handy (i.e. cereal boxes) to protect the wall from getting paint on it when we had to bend the stencil and it would have rested against the baseboard/wall. Between each placement of the stencil, John also held it up with two fingers with the back facing me and I used a folded paper towel to dab off any excess paint on the back so that the next time we placed it no leftover paint was lingering on the back (this can result in sort of a ghosted double outline, so the quick wipe down between each placement really seems worth the time).
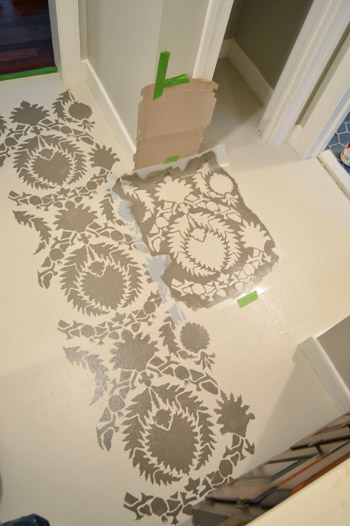
When doing a floor you also have to consider your exit route. In a typical square space this is pretty easy to figure out, but there was no logical way for us to both keep an exit clear and be sure we were keeping our pattern straight/centered (we wanted to start in the middle of the vanity and work out from there, so we couldn’t start in the corner of the closet and stencil our way out because things wouldn’t have been centered on the vanity). For that reason, we decided up front that it would be easiest to paint across two days in smaller installments. We did as much as we could easily access the first day, then let those areas dry so we could stand on them to complete some remaining spots. Picture it sort of like a checkerboard… you can do a row, leave a row clear, and do as much of the other row that attaches to something else you have already done as you can – and then walk out using the clear row. The next day, just go back and fill in those missing areas when the surrounding rows are dry so you can stand on them.
After all of the stenciling was done, I used a small craft brush to get into the spots that needed some filling in. Initially I thought I’d touch up the entire perimeter by hand with paint to make it look flush to the wall (the rolling left about a 1/2″ gap)…
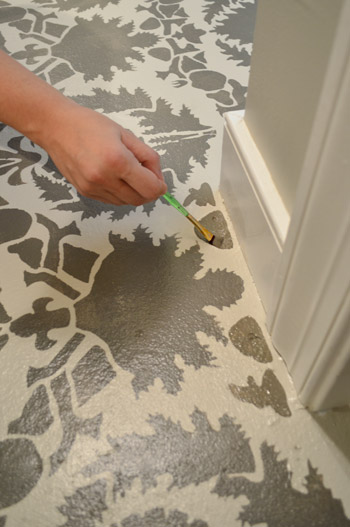
… but after stepping back we realized the small gap was so consistent around the room that it almost looked like an intentional border. So rather than risk making it look worse with my by-hand touch ups, we opted to keep it that way. You can see the slight border around the baseboard in the bottom right of this picture:

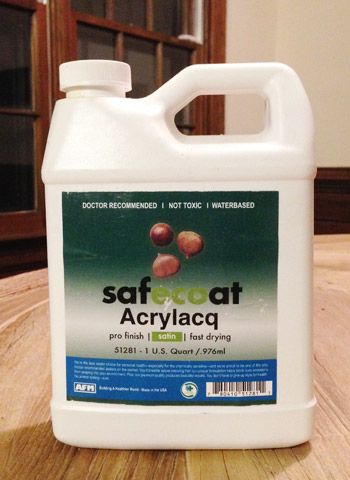
As our final sealing step, we plan to use SafeCoat Acrylacq (a non-toxic poly that we have loved since my pregnancy with Clara) to seal it to give it even more added protection. So we hope to get that done and report back on how it goes as well as finishing up a few more things in there.
So far even unsealed it has been holding up well for the last few days, and we’re SO much happier to see it when we walk in there to get dressed than we were to stand on that old carpet. And of course we’re psyched to watch our list dwindle down to just two bullets in here (which means I get to do a budget breakdown soon – yeah boyyyy).
remove the carpetpaint and hang a larger window-like mirror(more on both of those steps here)paint the trimpaint the walls and ceilingreplace all of the outlets/light switches(more on all three of those steps here)stencil the floors- seal the floors and add some better storage solutions to the closet
- paint or stain the vanity, add new hardware to it, and add some built-in shelves to make the empty space under the counter on the right side more functional
Is anyone else stenciling the walls? How about a ceiling or a floor? Or furniture? Do you use a small foam roller or the claw method that I outlined here (for the love of wrist sustainability, USE A ROLLER!).
Psst- Wanna know where we got something in our house? Just click on this button:


Elizabeth L-A says
This looks incredible!! What a difference — it totally glams up the space :) beautiful job!
Barbara says
You will never find a floor that beautiful anywhere, unless you buy very expensive tile. That is gorgeous and I would never change it!!!
Jennifer Williams says
I really really like this! Just makes everything a little nicer and with such little effort, it is perfect for the in between stage of improvements!
Janelle @ Two Cups of Happy says
The match-up lines on the stencil are so useful!
For the vanity, since you want to go dark, I think a deep plum-gray would add richness to the space. Something like BM’s pinch of spice or super nova from your colour picks.
YoungHouseLove says
Sounds pretty!
xo
s
Megan says
I am just loving your last few posts! You guys are really kicking it up :) I like that you may be considering going with stain over painting the vanity. I feel like maybe with all of the (awesome) paint going on around it, the wood tones would balance things out.
I wish I had the courage to do stenciling. I just feel like I would ruin it somehow!
Dawn Nowak says
Can you show the transition between your bedroom floor and this?
YoungHouseLove says
Sure! We were waiting to take wider shots until the bedroom’s cleaned up (it’s full of displaced stuff from the closet since we still have to seal things in there). Soon I hope! There’s a slight step down but so far no stubbed toes, although we could grab a wood transition piece at HD or Lowe’s to make it more polished if it bugs us over time.
xo
s
Kyle says
OH MY GAWWWWD this is AMAZING! My favorite update so far.
I would totally keep it like this.
Holly Marie says
Ahhhhhhh it looks SOOOOOOOOOOOOOOOOOOOOOOOOO good!!
Lori says
Wow! This is FABULOUS! I am so doing this in my laundry room. Thanks for inspiring me!
Krista says
I was going to paint the sub floor in my kitchen as a quick fix before a party in twoo weeks but I had decided it was too much work.
Well, your post has officially motivated me to just do it already! I am not going to stencil to save time (specially since I am a solo diy warrior), but I may try to rigup a stamp and do a simple pattern like this, but less high contrast. If I can figure out what to use…
http://hollygagneinteriordesign.wordpress.com/tag/floor-paint/
Hopefully you get that sealing post up before the weekend so I can get some tips fromt that!!
YoungHouseLove says
Good luck Krista! I hope we have that up soon, it takes 3 coats and drying time between them so it might be tight.
xo
s
Kris B says
Now that is way cool!
Amy Robbins says
I love this, not just for a quick inexpensive fix, but for long term!
sara wutzke says
That is so amazing! I’m glad you’ll get it for a few years because I don’t think I’d want to rip it out in 4-6 months. I love it!
Kelli Fox says
Man that looks good!
Gwen, The Makerista says
This looks so great! I think it’s really unexpected and fresh, yet the pattern is classic. I really love the look…great job you two!
Karen says
You didn’t tell us if YOU guys like it?!?
YoungHouseLove says
Haha, we LOVE it! We’re so happy when we walk in there instead of frowning when we see the old carpet. I thought I worked that in at the end. Sorry if I didn’t!
xo
s
Bonnie @ The Pin Junkie says
Gorgeous! I love everything from the grey walls to the white trim and that stencil is fantastic! I know this stenciled floor is supposed to be a short term fix, but it’s so pretty! I can’t imagine you getting rid of it!
Julie F. says
Looks amazing!
Molly says
The first thing I said after I scrolled down was… SHUT UP! This looks so awesome guys!! Makes me want to go stencil something!
Tiara says
We have old carpet in the living room that we haven’t replaced yet because we’re waiting to remove a wall. Do you think something like this would work in a high traffic area like a living room?? And would we be able to lay hard wood over it when we’re ready?
YoungHouseLove says
I’m not sure, but I think so! Someone else shared a link to her awesome stenciled floor and reported that after 8 months it still looked awesome! Here’s her post for ya: http://www.lovelyetc.com/2012/08/painted-plywood-floors-update-good-bad/
xo
s
Ruthy T. (@DiscoveryStreet) says
i don’t know why stenciling is so intimidating to me….this looks absolutely phenomenal! I wouldn’t change it!
Kelli says
This looks amazing! I love it! Now I’m brainstorming where I could possibly do this in my house :)
Sarah Woods says
My basement is UGLY and DARK and SCARY! I want to do a little spruce up since I don’t think we will finish it in the time we live there. I’m totally going to stencil the floor! That looks awesome! Thanks :)
Crystal says
I love it!! It looks awesome! Great job John & Sherry :)
Jessica LouAllen says
Have you guys considered painting your sink? This product is an epoxy paint made for frequently wet areas like sinks and tubs. I think this white oils look great with a dark vanity.
http://m.homedepot.com/p/Homax-Tough-as-Tile-One-Part-Brush-On-White-2106/202061380?cm_mmc=shopping-_-googleads-_-pla-_-202061380&skwcid&kwd=&ci_sku=202061380&ci_kw=&ci_gpa=pla&ci_src=298346236
YoungHouseLove says
Alas, those kits are too full of VOCs for this prego momma, but it’s a great alternative for someone without a tiny human baking!
xo
s
Sara says
I love this SO MUCH. We have a laundry room floor that’s concrete slab – going now to check out your post on painting your concrete floors in your old basement!
Gabbi @ Retro Ranch Reno says
Holy cow, I’m in LOVE with this!!!! I wish I had it in the budget to purchase that stencil because I’ve wanted to change up my hallway stencil for months now, and that pattern would be gorgeous! Ahhhh, time to save up, I guess.
Great job! :)
Bria says
Aaahhhhhh! ::flailing hands:: I love it! So amazing and what a huge difference it makes! It even makes the wood vanity look antique-y instead of tired (it may just be that way in the picture, though. I’ll definitely be keeping this idea in my brain bank for when we finally own our own home…
Kirsten says
Ohmygosh you guys are incredible! This looks gorgeous!! I love it and am amazed…:) You make it look so easy, as usual, but just coming up with the idea in the first place shows how talented you are!
:)K.
BeccaK says
Ever consider a bright yellow for your vanity? I wonder if it might make the yellowish top near the sink look “intentional” instead of “just waiting for a redo”? Just a thought!
YoungHouseLove says
Hmm, I’m not sure if that’s too much since the walls of the bedroom are a pretty bold blue color, but we can always hold a paint chip up and see!
xo
s
Kirsten says
Ohmygosh you guys are incredible! This looks gorgeous!! I love it and am amazed… :) You make it look so easy as usual, but just coming up with the idea in the first place shows how talented you are!
:)K.
sarah says
i vote that somewhere in your house is a forever keeper stenciled floor. love it.
Amanda says
OMG!! That looks amazing! If subfloors looked like this, no one would bother with anything else! I love how you guys can make the ordinary look fantastically high-end!
Monica says
This looks positively gorgeous!!!! It makes me want to tackle removing the old asbestos-laden flooring in my kitchen and then stencil the wooden floors. Just gorgeous!
RobinD says
Wow, your little Beauty Nook has come a long way. That is what my husband calls our similar vanity. We had the same problem with wrinkled carpet, so we had them shampooed and stretched and it worked great, which was a good solution to put the house up for sale. And in that little cubby area, I have had a mini-fridge! Ha! Your updates & plans are far more stylish :)
http://tllg.net/Axgw
YoungHouseLove says
So smart to save the carpet that way!
xo
s
Meredith says
Looks awesome! I love all the taupey greys that you have going on in this house. Crazy that the color matched Revere Pewter is SO different from the walls (but it def. still works!). I’ve seen that color mentioned all over Pinterest and I’m really liking it, need to figure out where to use it in my house!
Quick question, how did you guys decide which direction to lay the stencil? To me it looks like the “movement” of the pattern is going from the vanity back towards the bedroom door. In person do you notice that when you’re standing at the bedroom door looking into the vanity? Looking at the pics it’s almost like water flowing backwards… like entering the room you would be a salmon flowing upstream. Does that make any sense? Haha
P.S. I’m so jealous of your big closet, but where are all your clothes?!
YoungHouseLove says
That’s funny! We think it looks like it’s going towards the vanity in person, so that’s how we decided on placement. We wanted it to look like it was drawing your eye to the vanity from that doorway.
xo
s
V@Sproutshouse says
Really really love this look! Definitely worth the 5 hours of work time. You never know this look might be a keeper rather than an interim one!! xox
Jaime says
I don’t care for this, and I bet it looks better in pictures than in person. I liked the plain painted floor. But I always love the ideas and effort behind everything you guys do!
Sunny says
SO GLAM. It’s borderline Kardashian, which is fabulous.
YoungHouseLove says
Haha!
xo
s
Dizee says
OMG! Love it!
I am going to be sad when you move into Phase 2.
Leslie says
Beautiful job!
Aislinn Mueller says
Amazing! Love it. Such a spectacular difference.
Yami says
This looks so awesome! I just started my own blog and you guys are such an inspiration! Love reading all about your projects!
Steph says
This looks SO cool and is making me really want to stencil something. Maybe first I should pick paint colors for my walls. :)
You should totally save and frame a piece of it if there is anyway you can when you do the full reno as sort of a nod to your Phase 1 room.
Amanda says
I actually really like it with the wood (in the pictures at least!) I know you have more touch-ups you want to do, but I think the wood really warms up the space with the neutral/grey accents surrounding it! Looks amazing and would look good no matter what you do to the cabinets!
Amy says
Really pretty! I love the experimentation with something (probably) temporary! Are there any quick/inexpensive ways to change the countertop color?
YoungHouseLove says
They sell kits to paint it but they’re too fumey for a pregnant lady, unfortunately.
xo
s
Wendy says
I must say when you talked about stenciling the floor I didn’t think that sounded good but WOW. I love how this turned out.
Emily | Sparkle Meets Pop says
Oh em cheese you guys!! I love love love it! You’re making me want to bust out a stencil, especially now that we know about the roller trick. :)
Karen says
… light charcoal on the cabinet, and a sweet painted white chair to tuck in with pretty perfumes, makeup, etc. on the counter. LOVE. I’ll be over here in my lil fantasy world.
Brittney Saffell says
Looks AWESOME!