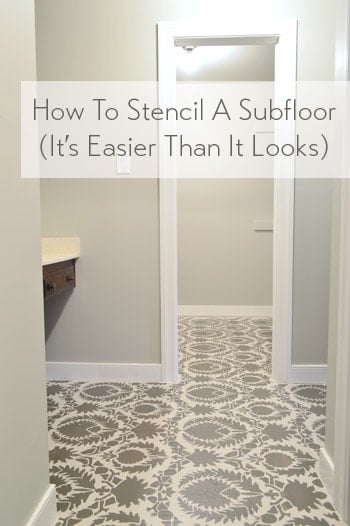
We did it! We stenciled our bathroom and closet floor and it looks awesome. So worth the effort. And so much better than the carpet that was there before.
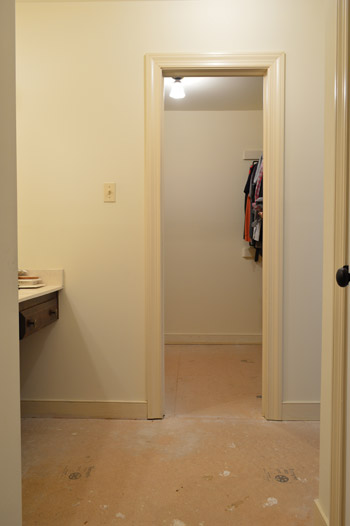
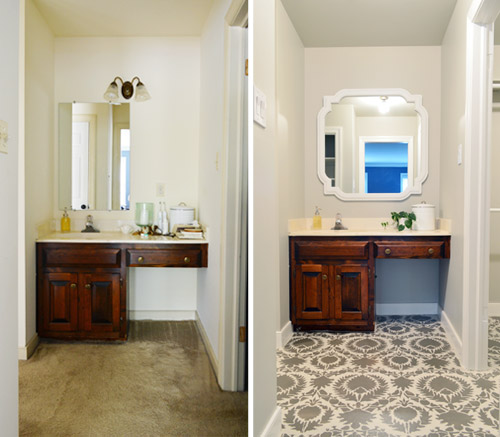
Remember when the floor in our closet and vanity area looked like this?
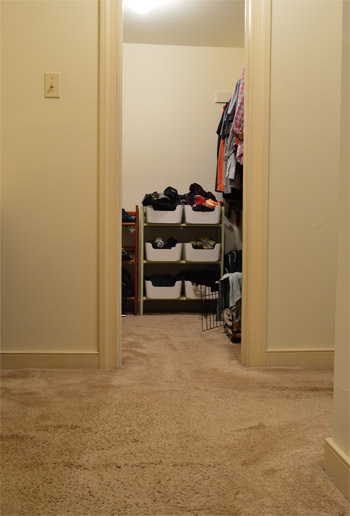
And then we ripped up the carpet to reveal the subfloor and they looked like this?
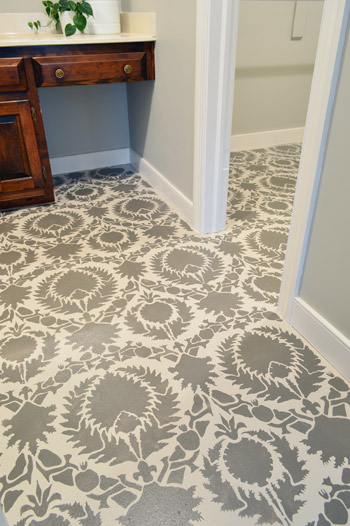
Well, five hours and $24 later, it looks like this!
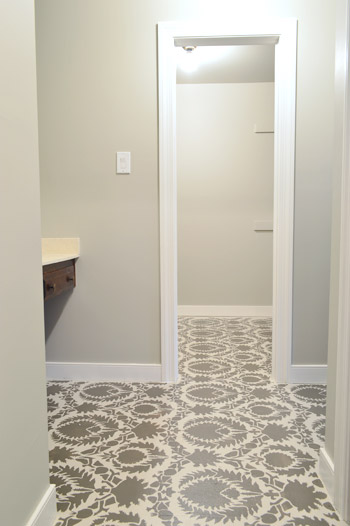
Our actual bathroom has tile (where the shower/tub/toilet are), but this is a separate vanity area along with an adjoining closet – which both had old carpet that we couldn’t live with for one more day. So we yanked it up and decided to have some fun with the subfloor until we’re ready for a full scale renovation down the line (eventually we’d love to knock down the wall that divides the vanity from the rest of the bathroom and retile/renovate them so they’re one big spacious bathroom).
We briefly debated peel and stick floor tiles or buying a large seagrass rug and cutting it to lay it wall-to-wall in both spaces for this interim step, but we decided that a stenciled and sealed floor (possibly with a few area rugs) will serve us well in the short term without being a whole lot of money/effort that we’ll later end up undoing.
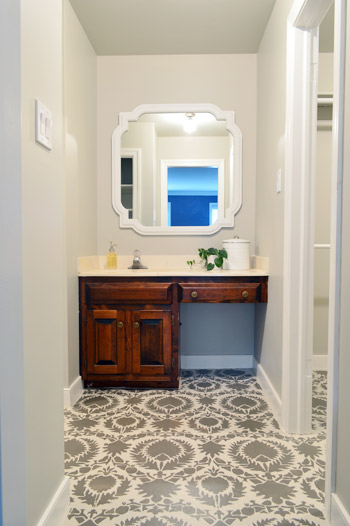
And since our future tiling plans will require us to rip this stuff up and put backer board in its place anyway (you can’t tile over particle board since it’s not a secure base) there’s no harm in slapping some paint on it in the meantime.
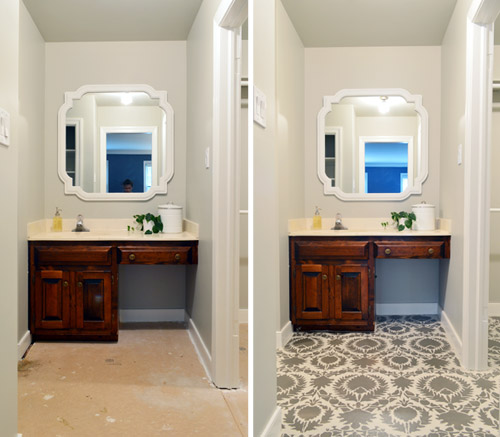
My favorite thing about temporary (and affordable!) afternoon updates like this are that you can have a little fun and do something a little bolder than you might do if you were selecting something more permanent (like tiling a floor that you’ll have to live with for a few decades). Oh and don’t mind that vanity, we’re going to either stain it a deep ebony or charcoal tone or paint it a subdued dark color, so it should fit in a lot better with the rest of the tones in the space.
But let’s rewind a little bit (back to when the floors looked like this) and tell you about the process and some of the things we learned along the way.
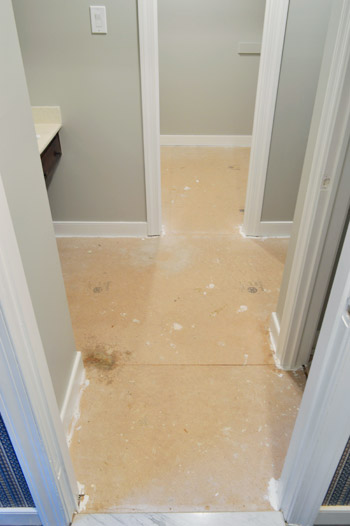
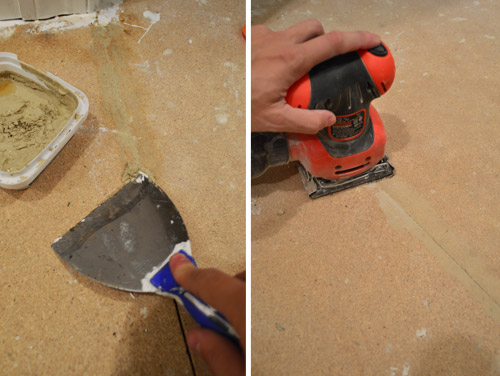
To prep our subfloor, which is particle board (a very smooth and almost chalky surface) we used wood filler to make the seams between the different particle boards sheets less obvious. There were only three so it went pretty fast. Once dry, we sanded them down. It wasn’t perfect, but it was better.
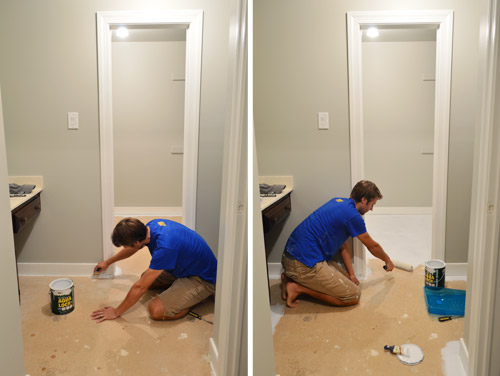
Then we primed it all with Aqualock water based primer (it was low-VOC but not no-VOC so John got that step done while I was outside playing with Clara). The purpose of the primer was to help the paint grab on for the long haul and block any stains/bleed-through that might occur from painting over such a porous surface like particle board.
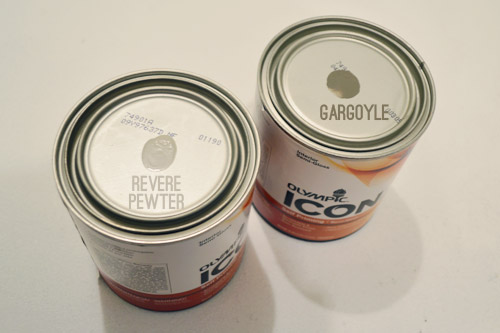
For paint, we grabbed two $12 quarts of semi-gloss paint in the new no-VOC Olympic Icon line, matched to two Benjamin Moore colors: Revere Pewter for our base (same as the wall) and Gargoyle (for the darker stencil pattern). For the last few years we’ve mostly stuck with Benjamin Moore paints, but for temporary upgrades it’s nice to save a little money since we’ll be ripping out this floor in a few years and tiling anyway. We didn’t use an outdoor porch and floor paint (as you usually would in this scenario) because they’re all pretty fumey (usually oil-based) we wanted something no-VOC (this one’s for you, fetus) – but we think the combination of a good primer, some semi-gloss paint, and a nice thick coat of sealer will keep them in good shape for the next few years. We’ll definitely report back with photos over time to share how the floor wears.
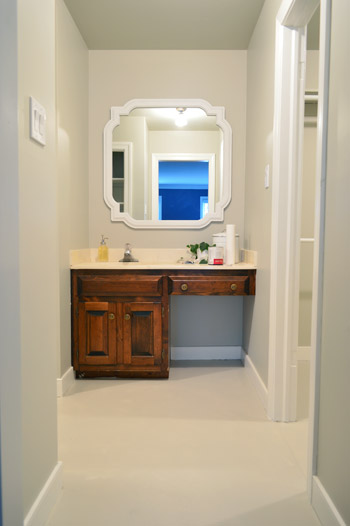
With the primer dry, we could apply two coats of the base color. Since this was a no-VOC step, I could cut in while John rolled the rest (we just had to be mindful to paint ourselves out of the space). You can see from the picture below that the color matched Revere Pewter on the floor didn’t really turn out to match the real RP color on the walls as we planned (that’s always the risk that you take when you color match one brand to another), but it was still in the same color family, so we didn’t mind. We’re going for some pretty high contrast interest on the floor, but we thought it would stay sophisticated if we kept the palette sort of subdued (especially with a bold navy-ish tone in the bedroom along with a colorful rug/headboard/pillows/etc) so we were just glad they didn’t clash and still felt like they went together, even if they didn’t match perfectly.
Stenciling the floor is SO MUCH EASIER if you have two people on hand to tag team it. I did the office stencil project alone for the most part, and it took forever and I used a method I’d never use again (more on that in a minute) but this time around we both tackled it and it was a much simpler task. Oh and stenciling a floor is even easier than stenciling a wall since you’re not fighting gravity (a few pieces of painter’s tape hold it in place and then you can roll it without worrying it’ll slip down the wall like it might on a vertical surface).
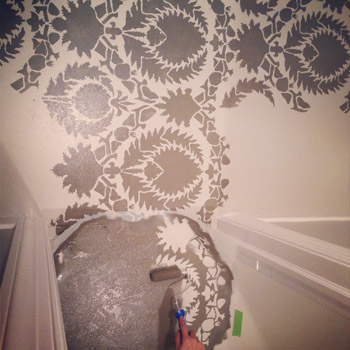
If you’d like to see the rolling in action – with a few live-action tips in the mix – we made this video while applying another stencil to the wall for a book project back in 2011.
Since you usually want your pattern centered in the room, we started our first stencil to be right in the middle of the vanity. Here you can see what a single repeat of the pattern looks like. It’s the Suzani Silk Road stencil from Royal Design Studios. It’s $49, but we had actually ordered it back in 2011 to use for our book (but that project ended up getting cut), so we just had it sitting under the bed in our guest room for a few years, waiting to be used.
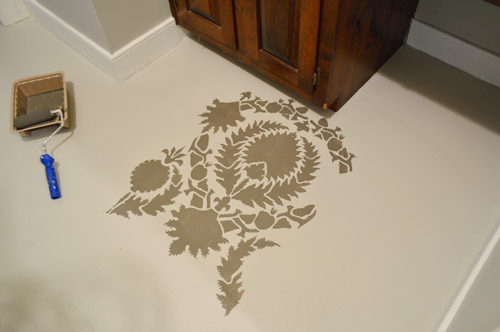
But back to that much easier stenciling method that I mentioned before. We learned back when we were shooting that wall-stenciling project for our book that applying a small amount of paint with a foam roller (not too much, or it’ll get gummy/bleedy) results in just as clean of a line as dabbing everything on by hand, which I did when I stenciled the office, and ended up with claw hands and lost 14 hours of my life. This entire thing only took us 5 hours and was SO MUCH EASIER thanks to a small foam roller with a nice thin application of paint. Hallelujah!
Once again, when using a large stencil like this, it’s so much easier with two people. Each stencil has registration marks around the outside that you line up with the previous stencil so you know where to place it, and if you have someone on hand to help you line up the registration marks and slowly lower it down onto the floor (especially when they’re large) you should have a lot less of an issue with smudging, which can happen if you place it and then slide it around to match the registration marks instead of using four hands to slowly lower it into the right place off the bat (one hand for each corner just seems to work best).
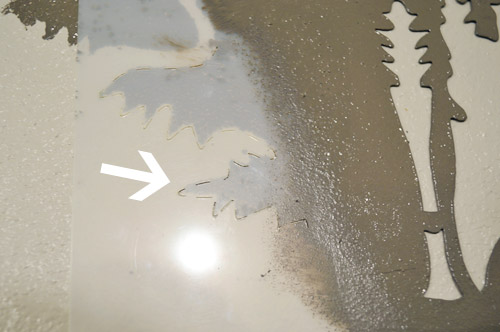
This room’s biggest challenge was that so many walls and corners meant lots of partial stencils, which meant lots of stencil bending (it’s made from flexible plastic that bends, but doesn’t crease, easily) and smooshing the roller into tight spots. We kept some spare cardboard handy (i.e. cereal boxes) to protect the wall from getting paint on it when we had to bend the stencil and it would have rested against the baseboard/wall. Between each placement of the stencil, John also held it up with two fingers with the back facing me and I used a folded paper towel to dab off any excess paint on the back so that the next time we placed it no leftover paint was lingering on the back (this can result in sort of a ghosted double outline, so the quick wipe down between each placement really seems worth the time).
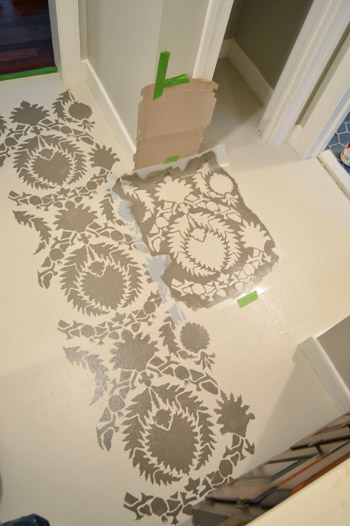
When doing a floor you also have to consider your exit route. In a typical square space this is pretty easy to figure out, but there was no logical way for us to both keep an exit clear and be sure we were keeping our pattern straight/centered (we wanted to start in the middle of the vanity and work out from there, so we couldn’t start in the corner of the closet and stencil our way out because things wouldn’t have been centered on the vanity). For that reason, we decided up front that it would be easiest to paint across two days in smaller installments. We did as much as we could easily access the first day, then let those areas dry so we could stand on them to complete some remaining spots. Picture it sort of like a checkerboard… you can do a row, leave a row clear, and do as much of the other row that attaches to something else you have already done as you can – and then walk out using the clear row. The next day, just go back and fill in those missing areas when the surrounding rows are dry so you can stand on them.
After all of the stenciling was done, I used a small craft brush to get into the spots that needed some filling in. Initially I thought I’d touch up the entire perimeter by hand with paint to make it look flush to the wall (the rolling left about a 1/2″ gap)…
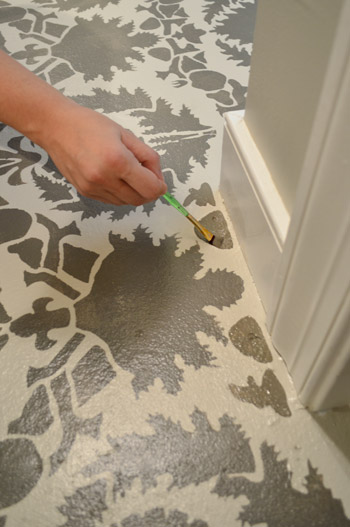
… but after stepping back we realized the small gap was so consistent around the room that it almost looked like an intentional border. So rather than risk making it look worse with my by-hand touch ups, we opted to keep it that way. You can see the slight border around the baseboard in the bottom right of this picture:

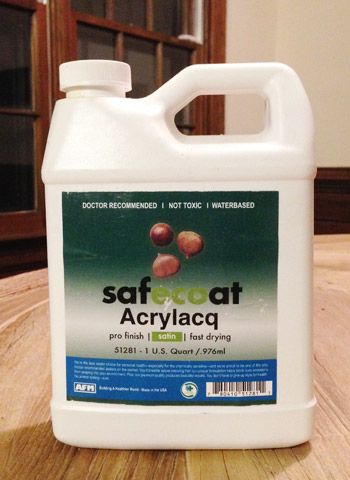
As our final sealing step, we plan to use SafeCoat Acrylacq (a non-toxic poly that we have loved since my pregnancy with Clara) to seal it to give it even more added protection. So we hope to get that done and report back on how it goes as well as finishing up a few more things in there.
So far even unsealed it has been holding up well for the last few days, and we’re SO much happier to see it when we walk in there to get dressed than we were to stand on that old carpet. And of course we’re psyched to watch our list dwindle down to just two bullets in here (which means I get to do a budget breakdown soon – yeah boyyyy).
remove the carpetpaint and hang a larger window-like mirror(more on both of those steps here)paint the trimpaint the walls and ceilingreplace all of the outlets/light switches(more on all three of those steps here)stencil the floors- seal the floors and add some better storage solutions to the closet
- paint or stain the vanity, add new hardware to it, and add some built-in shelves to make the empty space under the counter on the right side more functional
Is anyone else stenciling the walls? How about a ceiling or a floor? Or furniture? Do you use a small foam roller or the claw method that I outlined here (for the love of wrist sustainability, USE A ROLLER!).
Psst- Wanna know where we got something in our house? Just click on this button:


Gretchen says
This is ridiculously cool – you guys are amazing!
ashley @ sunnysideshlee.com says
I kind of like the color of the vanity with the room – it brings a warmth to that space and with a green plant or something, could really bring an added “homey-vibe.” I’d change up the hardware, though.
What color are you hoping to go with for the vanity?
YoungHouseLove says
Something less orange to make the sink read less yellow. Maybe a charcoal or ebony stain?
xo
s
Debbie says
So stinkin’ cute you are not going to want to EVER cover that floor with something else!
Alyssa says
Wow!! I LOVE it, it may be a “for the time being” project, but I love it for the long run too:)
Julie G. says
Love. Love. Love. I meant to comment last week when you addressed these temporary projects and this just proves the point! My husband always wants to know why I want to put “lipstick on a pig” when we know we will make a change in a couple of years. When something is an eyesore, not investing a little time and $$ into getting it to a point where you love it for now is a snaity saver for sure. Otherwise, you are constantly obsessing over a project that not only cant be done but contributes to not loving your space. For me perosnally that is mentally draining. Additionally, there have been many projects that we took on too soon and then have done over because our taste has completely changed. If we had waited and let things evolve we probably would have saved ourselves a lot of $$ and time in the end.
Julie G. says
“sanity”
Krista says
hmmm seems my first post failed… Sorry if this is a duplicate.
I have been debating doing this in my porch/kitchen as a quick fix beforea party next week, but put it off because I didn’t have enough time.
Well, you guys have officially motivated me. I’m going to skip the stencil to save time, but depending on how it goes I may rig up a stamp of sorts to do a circle pattern… A needle point loop? Top of a paint can? Not sure what I will use yet. Maybe some stripes of varying width would be nice.
Anyways, thanks for the motivation!!!
YoungHouseLove says
That sounds really cool! Good luck!
xo
s
Shauna says
While this is a really cool floor update, I was really hoping for a tile update for the covered porch! Tomorrow perhaps? Pretty please? :)
YoungHouseLove says
Still haven’t been able to grout! We’re dying to finish that but it rains every few days and we need four consecutive dry days. Boo!
xo
s
Karina says
This looks awesome!!
Samara says
OMG! This is perfection! And now I’m trying to figure out what room I can rip the carpeting out of so I can do this:)
Crystal says
Love and love some more! Sherry if blogging doesn’t work on you can be a professional stencil-er.
Brittany says
SWOON!!!!!!!!! Must find a floor to stencil…
Abby @ Just a Girl and Her Blog says
Such a stunning transformation! I love the idea of a beautiful temporary fix like this until you’re ready to do what you really want. Great stencil choice too! Thanks so much for sharing, you guys!
~Abby =)
Gin says
Wow! I wish had your vision!! Love it! And yes….just did a tone on tone stencil in my dining room, inspired by your old office wall! I used the small foam roller too. I also rolled off the paint a few times onto some paper towel so the coat of paint was very thin. So no claw hands :-). As a first timer it still took me about 22 hours over 2 weekends to do….but it was worth it. I vowed never to have wallpaper again after removing it in the several houses we’ve owned…..so when I tire of this (or the next people that live here want to change it) …just need to paint over it. Thanks for yet another great idea!
GreenInOC says
Love – Love – Love! It looks SO awesome!! I wonder if it will be hard to get rid of when you decide to move forward with a permanent floor (if it were mine, that temporary solution would be my permanent one!)?!
Abbey says
I didn’t read through all six pages of comments to see if someone asked this but do you guys like having a throw rug at the base of your sink to keep your feet warm? I think you mentioned it once (or maybe that was the seagrass?) and now that your stencil turned out so pretty it seems like a shame to put a throw rug down on some of it but cold bathroom floor in the morning is awful! Curious if you plan to do anything about that?
YoungHouseLove says
Once it’s all sealed I might try a faux sheepskin down there just to see (we had one in our last house’s vanity nook too) and just see what we think.
xo
s
Lesley says
Okay, I was sooo amazed at how much the sneak peak of the finished floor looked like your, maybe we’ll do this design for the stencil. You have had the stencil in hiding for 2 years… makes a lot more sense now.
I LOOOOVE the way it turned out. We are just looking to buy a new house, and now I kind of hope there will be a floor I can paint!
PS – Didn’t get the bedroom painted this weekend like I hoped, we did make a massive list of what needs to be done to list the house though. It’s a big one! Thankfully in the very early throes of this process, we won’t be listing until spring.
Paula M. says
EXCELLENT tip about the small foam roller! Great to know that works. And you’re right: the little border definitely looks intentional.
Great job!
I still haven’t done any stenciling myself (see-sawing about whether to use it on bathroom walls, as one idea) but have been in love with the Royal Design line of stencils since first seeing them on My Marrakesh; here’s a link to a stenciled floor on that blog:
http://moroccanmaryam.typepad.com/my_marrakesh/2009/01/royal-design-studio-lace-and-a-tale-of-skylars-room.html
YoungHouseLove says
Gorgeous!!!
xo
s
Andre says
WOW, this floor is awesome! I didn’t even know that something like this could be done! I am very impressed! Thanks for creating such a fun home improvement site!
Kristin says
Definitely one of my favorite projects yet! Amazing!
Lynn @ Our Useful Hands says
Umm a few points…whoa to the amount of comments for the last post on Claras’ twinkle lights post and Blossom Joey “WHOA!” to the stencil project. That looks so great! I can’t wait to see how it looks after it’s sealed. I think I should put this on our bullet list for one of our haven’t-been-touched rooms since we’ve moved in. That room has a cement floor. We can just roll some stenciling right over that right?
My best, Lynn
YoungHouseLove says
Yes, it would be great on cement! We painted the concrete slab in the sunroom of our first house and it was really easy.
xo
s
Kari says
Love how this turned out! Did you use any caulk or wood filler between the wall trim and the floor, or was the gap from carpet removal minimal?
YoungHouseLove says
There actually wasn’t a gap at all there (the carpet was held down with tack strips that we removed, but the particle board goes right under the baseboards).
xo
s
jackie says
This look amazing! It’s my favorite project you guys have done so far.
Cara says
That is beautiful. I wouldn’t want to tile the bathroom.
Dominique Paolini says
This looks incredible. And like it cost a whole lot more that $24…
Erika says
LOVE, LOVE, LOVE it!!!! Cannot wait to see what paint you end up using on the vanity!
Kristi says
BEAUTIFUL!!!!!! I love you two and everything you do. Here’s to hoping your post is contagious…. showing my hubby now. XO
amyks says
Wowsa!!!That looks so amazing, love, love, love it!
Marissa says
That looks awesome! How is it to walk on?
YoungHouseLove says
So much better! It was chalky before we painted but now it’s nice and smooth (feels a lot like a painted concrete slab, like we had in our first house’s sunroom).
xo
s
Dee says
Absolutely IN LOVE with it!
Michelle McCormick says
I was too lazy to pick out different colors for each room in our house, so a few months ago I said screw it and painted our entire house Revere Pewter. Like every square inch. And I’ll tell you, it looks like a completely different color on every wall. So weird.
YoungHouseLove says
So funny! It’s a color chameleon for sure!
xo
s
Diana says
Win for YHL! Love the floor.
carli says
LOOOOOOOVE this!! What a great solution for the interim. I’m sure it’s such a treat to see something like this vs. the old, grimy carpet. Way to go you two :)
Maureen says
I want to paint floors like you guys! :) I have never thought about doing that before.
Amber says
Love it, you guys are amazing!! Now get to that vanity ;) and take a nap
Amy Beam says
Wow! That looks incredible. I am in awe that is just painted subfloor. Great work (and lots of it 5 hours later)
Momcat says
Gosh, that floor looks TREMENDOUS!!! I would love to paint a floor in my house, but it’s open concept & ALL sealed hardwood with no logical stopping points. I’ll just have to be content to drool over yours…. sigh….
Sarah says
Guh – I hate you guys! I’ve been half-heartedly stenciling our half bath for so long and it doesn’t look nearly as good as what you did in 5 hours! I’m GOING to finish it on Wednesday!
Here is a link to what I have so far:
http://thewilsonbuzz.com/half-bath-part-3-stenciling/
YoungHouseLove says
Are you kidding?! That looks so good! I love that you didn’t even peel the stencil off. HILARIOUS. Also, let’s be friends.
xo
s
Monica says
Love it-it is really a great interim solution – but please consider painting the vanity the same color as the walls, trim or the color you used on the stencil! I think it needs to blend in with the rest of the space, not stand out!
YoungHouseLove says
Definitely something to consider! We just want to be sure the top doesn’t end up looking more yellow (a dark tone on the vanity really neutralized the same yellow-ish counter in the half bathroom) so we’ll have to see if lighter colors make the yellow more or less apparent when we hold up those swatches.
xo
s
Deborah Nowland says
I literally gasped when I saw the first photo of your beautiful new floors! Fantastic!
VickiP says
Love! I stenciled our bathroom floor when I was pregnant with my second as well! Same thought, wasn’t ready for tile, but needed a prettier subfloor. Well, that baby is now two and the stencil is going strong! Funny how an “interim fix” can be so fab that you aren’t in a hurry for the long term solution!
Mary Catherine says
This looks FABULOUS!!! I would keep this in favor of tile! You guys do such a great job.
Bailey says
This is the kind of before/after that makes me say “WOW” out loud!! I love the grey tones and the white contrast. Just beautiful!!
Bailey
http://akabailey.blogspot.com
Kent W says
I did something similar to my upstairs, but saved a little of the money you spent on paint. I took all of the partially used paint cans that I’ve acquired over the years and mixed them all in a 5 gal. bucket. It produced a turkey poop green that was similar to the carpet in my grandmother’s house. NOW all we have to do is if find a good color to match it for the stencil – Thanks younghouselove!
YoungHouseLove says
Haha!
xo
s
Megan @ The Brick Bungalow says
Love it! It’s such a fun impact while you save up your pennies for the bigger remodel! I wish my future remodels were in a decent enough shape to do that with… mine require busting tiles and seeing broken linoleum on top of particle board on top of possibly original hardwood floors. And that’s just in the kitchen, the bathroom is a different story (or identical, I haven’t broken those tiles yet!).
Kellie says
Love it!!!!!
Rachael says
Does it look as good in real life? Because it looks FANTASTIC on here!
YoungHouseLove says
Thanks Rachael! I think it looks better in real life. One of the hardest things about blogging is that photos rarely do things justice like seeing them in person. So come on over! Haha!
xo
s
rachel says
wow, love it!! i am trying to convince my husband that we should paint our subfloor…this is amazing and should definitely help my argument! his main concern is that it will feel “chilly.” what do you think about that? are you finding it to be cold at all?
YoungHouseLove says
It’s definitely colder than carpet but not as cold as tile or concrete. We don’t mind it since we have many tiled spaces and it’s warmer than that. Hope it helps!
xo
s
Chhavy says
Nice work! I’m also painting a plywood floor too (white). I’ve primed it with stain block primer (2coats) and it’s still bleeding through. So frustrating. I plan on using BM’s epoxy modified floor paint. I hope it covers well. The sales guy said I wouldn’t need to seal it. But given that it’s a floral design studio I’d like to protect it as much as I can. Does the safe coat acrylaq work well and is it super slippery when wet?
YoungHouseLove says
If you use true porch and floor paint I would not seal it since it comes with a sealer built in and is not meant to have a top coat. Hope it helps!
xo
s
[email protected] says
Looks amazing!!
Kerri says
That looks amazing! I really don’t think I would have the patience to do it as cleanly as you have.