After 330 days of living in darkness, we can fiiiinally see daylight in our kitchen. And it’s nothing short of ahhhhhmazing.
This whole process took Licensed Contractor Steve and Right Hand Woman Tara almost seven hours of work (more on why we needed them, how we found them, and permit stuff here). Meanwhile John, Clara, and Burger hunkered down at his sister’s house to avoid the chaos and I stayed home to answer questions, offer up snacks/drinks, spy, drool, and live vicariously through them. They were amazing and we couldn’t be happier with the admittedly-still-very-raw but super-exciting-in-that-we-might-not-sleep-tonight result!
Here’s how it all went down. Literally. Of course this is completely over-simplified (and obviously isn’t a try-this-at-home tutorial since even we left it to the pros). First Steve and Supergirl Tara (can you tell I’m obsessed that our contractor’s right hand lady was a lady) used a power saw to precisely cut the full doorway opening into the paneling on the kitchen side of the room. First surprise: there’s not drywall or plaster behind the paneling- just studs. Good thing we decided to just paint it a while back (instead of tearing it down to hopefully find drywall/plaster behind it!).
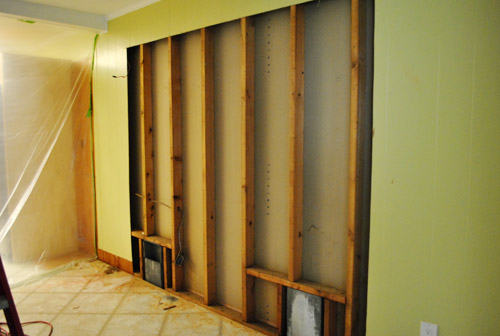
This is also when we got a better view of what the electrical wire in the wall was doing, so luckily we had our guy on call so he could head over to take care of it while the wall was open.
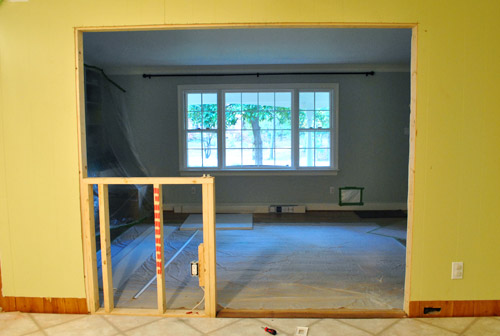
Next Steve and Tara cut the drywall on the other side (which was actually two layers of drywall, doubled up) and busted her open. Light came streaming in, and from behind the curtain I pretty much lost my mind. In a good (but probably awkward and borderline creepy) way.
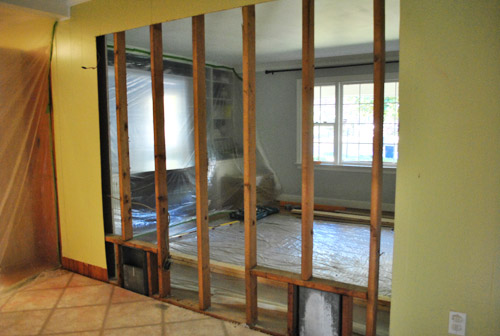
We already detailed what’s going on with those vents, but for anyone just tuning in: we had an hvac pro come out and ensure that losing those vents wouldn’t compromise our system. Then with his blessing John went under the crawl space and disconnected and capped ‘em (so the vents you see aren’t connected to anything anymore). We actually did that in our first house for our kitchen remodel as well.
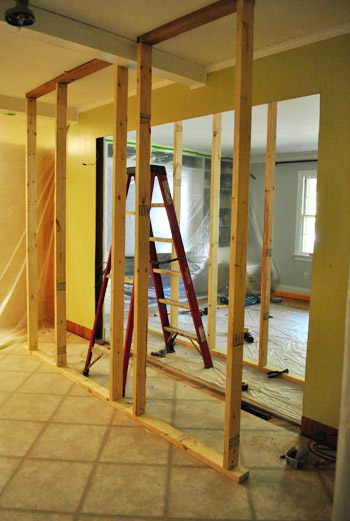
Next Steve and Tara framed up two dummy walls for added support as they did their work on the header to reinforce the new opening (both from above and below in the crawl space).
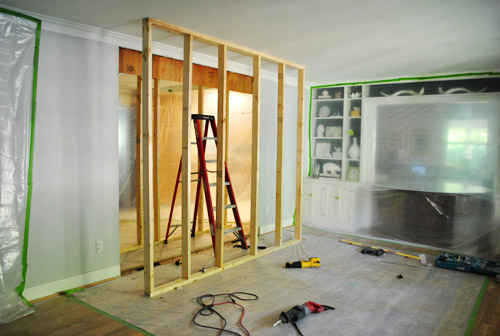
It was kind of funny peering through all those planks of wood to see green grass, leaves, sunlight and all that other good stuff we never used to enjoy from the kitchen.
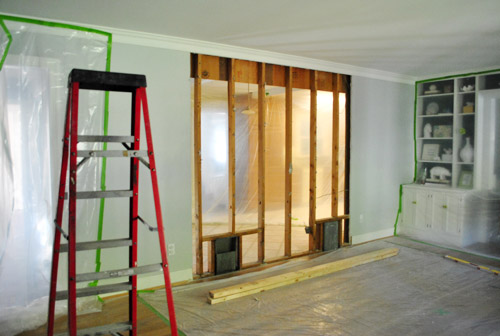
You can see the huge wooden header (and the drywall that we’ll need to patch above the doorway from this angle). The reason they worked on the header from this side? Drywall is much easier to patch for a seamless look than hacked up wood paneling. Yup, Steve and Tara = smartie pants peeps. Lastly they built in the half-wall for our peninsula to rest against and called it a day. Here’s what everything looks like as they’re pulling out of the driveway:
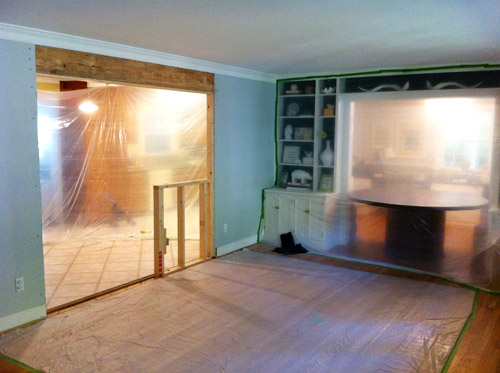
Behold: my favorite view ever. The magnolia out front is like a giant canopy with light streaming in all around it. Feels like some sort of tropical paradise complete with a tree-umbrella. Yes, I’m delirious with joy – but you have to understand why. There’s light in my formerly dark and cavernous kitchen!
Oh and see the electrical outlet reinstalled near the right side of the half-wall? We figure that will come in handy for anyone using laptops at the peninsula (most of the half-wall will be blocked by the peninsula once it’s installed, but since there will be a 12″ countertop overhang, a foot of wall space will show (which makes for a perfect outlet location).
When John got home we started laughing because we firmly believe it’s the first time that our fireplace has ever felt the delicious warmth of the sun streaming in on it. Might need to get him some sunscreen. Of course things still look a bit rough around the edges, but Steve and Tara’s work here is officially done (so I wrote out their $700 check as they went on their merry way). Now it’s up to us to:
- drywall, mud, and sand the half-wall and the area above the door on the dining side where the header work was done
- add a door jamb, a wooden ledge over the half-wall, and trim
- prime and paint the walls, jamb, baseboard, and trim
But we can see it. When we stare long enough and squint hard enough we can picture it all coming together. Can you see it? Two or three pendants hanging over the peninsula, a giant chandelier over the big dining room table, painted cabinets and shiny stainless appliances, rich mocha cork on the floor, a cozy armchair or chaise in front of the fire. It’s all there when we fire up the ol’ imagination. Let’s stare one more time, shall we?
Of course the half-wall looks odd without the peninsula behind it so we can’t wait for that to come together. We’ll keep you posted as we finish things off around the opening (we’re already working on drywall, so here’s hoping we have that update for ya tomorrow). And just to refresh your memory, here’s a before shot taken from a similar angle on move-in day last December:
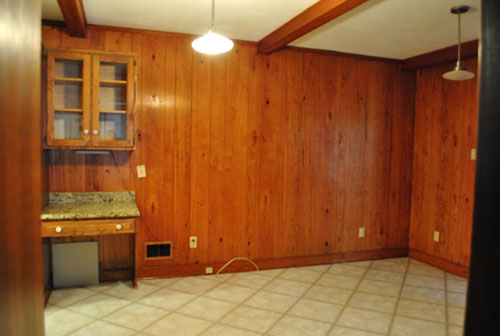
Is that crazy or what?
As a reminder, our goal is to complete this kitchen overhaul over the next few months. Maybe by sometime in January? It’s still going to take quite a while to remove (and craigslist) the old counters, get our new counters installed, find or make matching doors for the new cabinetry that we added to create the peninsula, prime and paint all of the cabinets, tile the full-wall backsplash, build-out/install a range hood, hang open shelving, lay the cork flooring ourselves, etc. Yup, there’s lots to keep us busy, but you know we love a challenge. And most of all we love liiiight, glorious liiight. Oh happy day.

dj sherry says
wow, looks great! the original picture makes my head hurt, its so dark and cramped. looking forward to the next pictures…
Sarah says
Wow, it looks great! We took down a wall about that size a year ago, which also separated our kitchen from dining room, and the difference is AMAZING!!!! The kitchen will feel so much lighter and more refreshing when you’re done, which I am sure I don’t need to tell you. Just enjoy! We were not smart enough to tape off all the shelves and accessories in the surrounding rooms though, and what a dusty mess! :)
GreenInOC says
WOWZA fer shure!!
I’m curious why you wouldn’t do the floors first so that everything under the yet to build peninsula would be seamless (not actually seams but just as in the expression!)?
I get that you might not want to for fear of banging them up necessarily during the other construction but wouldn’t it be easier to lay with nothing to cut around?
YoungHouseLove says
When you’re keeping base cabinetry that’s already installed (as we are on two sides of the room) you want to do the floor after all other cabinets are added so everything is on the same level (and some aren’t sitting up on the floors while others have the floor cut around it. Thanks to toe-kicks and baseboards it should all look seamless after we’re done – so no one would be able to tell by looking whether we did the cork before placing the peninsula or after!
xo,
s
GreenInOC says
Oh wait, I have another question…
How did they reinforce the floor? I’m guessing in the crawl space they added some wooden support? How did they reinforce it from above the crawl space?
Curious minds want to know (and perhaps ask irritating questions!).
YoungHouseLove says
I couldn’t tell ya! Haha. I know the header is a super thick piece of wood with steel somehow sandwiched and it’s resting on a few “king and jack studs” on each side of the opening (no idea what those are) and the studs that go down the wall outside the opening are reinforced from the crawl space with wood beams down there (so the weight is distributed down there without putting too much stress on one beam or post). Totally over my head though. Maybe try googling around for how to install a header for more details?
xo,
s
ashlee@238windsor.com says
sherry,
i’ve got a stupid question. and by stupid, i mean i’ve probably asked ten times and i just don’t remember.
how do you guys decide which order to do things? i absolutely LOVE how you just sort of wing it and do things however you please. but is there any order to it? like, hey, tomorrow, let’s cut down the wall! or is there a systematic plan that you follow?
ashlee
xo
YoungHouseLove says
We try to write a big masterlist about what we have to do (without it being in any sort of order) and then we try to go through all the items on the list and see which one makes sense to go next. It’s comforting to know that there are probably a million ways to get to the end goal you want (there’s not usually one precise order that must be followed) so whether we build in the new microwave or hood first, we’re ok either way. Of course some things must be done before others (old granite has to be removed before corian can go in, for example) so we just try to glance at the masterlist and make sure we’re not doing anything crazy out of order. But too much staring at that long list can be overwhelming, so we just choose one thing to focus on next and go one project at a time.
xo,
s
ashlee@238windsor.com says
does your masterlist consist of EVERYTHING in your house? like, paint siding! make artwork for office! or do you go room by room until a room is donezo?
YoungHouseLove says
We have one masterlist that’s very general about each room (ex: hang art on all walls of office, renovate kitchen with new floors, painted, cabinets, and new backsplash/lighting). Then there’s a more detailed list for more involved projects to break them down further (like a big list for how we approached the patio, and now a big list about specific kitchen steps). Hope it helps!
xo,
s
ashlee@238windsor.com says
definitely helps! thanks so much. i think my husband gets a little fed up because we don’t have any ‘direction’ so i’m going to explain this approach to him and see if i can get him on board. i have the EXACT idea for my kitchen for example..but he just sees the overall picture, rather than the baby steps.
ashlee@238windsor.com says
ps, i know you guys are really big on the gallery wall thing, i wanted to show you the water colour paintings i bought for our (future) gallery wall.
http://238windsor.blogspot.com/2011/11/watercolours.html
YoungHouseLove says
Gorgeous!
xp,
s
Chelsea & Kyle says
So impressive! Just with that wall coming down, what a huge difference, I can tell why you are so excited! Keep the awesomeness coming!
Regan @ RenovatingRothenbergers says
I couldn’t wait to come home from work tonight & check to see your progress. It looks awesome!! It’s going to be amazing when it’s all finished – I can so picture it!! :)
Elizabeth says
LOVE IT!
Ashley M says
Looks awesome guys! The anticipation was killing me haha! I was totally checking the blog obsessively today because I couldn’t wait for the reveal to see “the light” can’t wait to see it as things progress.
Staci says
I knew it would look great but I guess I never wrapped my brain around how good the front window would look from the kitchen! Can’t wait till you get the fabulous ikat curtains (that I’m totally jealous of) back up–they’re going to have a color party with the grellow kitchen that I would LOVE to join! Haha!
Beth says
wow, that looks amazing! smart move with the outlet in the half-wall. those are usually the ideas you get after it’s built – bravo!
Katie says
Oh my!!! I love living vicariously through your house renovation! It seriously looks AH-MAZING!! Can’t wait to see what’s next!
toni from says
Congrats. It already looks amazing.
Tara says
Can I get a Whoot-Whoot?? Pure awesomeness!
Hayley M. says
I am WAY too excited about getting to “see” light in your kitchen. I was beaming as I read the post.
Am I a superfan or just sad? Your call. haha
YoungHouseLove says
I think you’re awesome. Haha. Final answer.
xo,
s
Emma says
Wow! What a difference taking out the wall made! It was obviously going to let more light into the kitchen, but the light that is flooding through is AMAZING! There’s nothing like natural light to give a room a whole different feel.
I don’t comment often, but wanted to let you know that I have enjoyed reading your blog for over a year now and am loving the new layout of the site (I know, old news now!)
Emma
YoungHouseLove says
Aw thanks Emma! So glad to hear it.
xo,
s
Rhiannon says
Wow! Such a huge difference! It looks awesome!
Tiffany says
Um, you guys are ahhhhhmazing! Looks great. I admire your willingness to tackle such projects – wow.
candace @ thecandace.com says
Hooray! It looks awesome – I can’t wait to see how it all comes together!
Bethany says
One of the things I love most about your blog is how you guys see the possibility in things. Sure the house could have just stayed the way it was, it was a lovely kitchen. But you all saw how to make it magnificent!! Can’t wait to follow the ongoing progress. You find the possibility all throughout the house- from a plain hallway turned gallery to ‘orb’ed ikea couch legs! So inspiring!
Justin says
It’s looking great (duh).
Have you guys put chairs around the half-wall (I think it’s called a knee-wall) and pretended that you are living in future-land where everything is already finished? That’s what I’d be doing. Pretending to have coffee at the knee-wall…don’t threaten me with a good time!
Are you guys the type that will stare at the finished product like it is your long lost child up until the very second you go to bed? Maybe I’m just weird, but I use brushing my teeth before bed as an excuse to walk around my house and stare at what I’ve accomplished….lol
Maybe I shouldn’t comment this late…I’m feeling a little delirious. And a little embarrassed that I started my day off reading this blog, and ended it by leaving a comment. What can I say? You are both addicting:)
YoungHouseLove says
Yes! I totally do that. Before we go to bed I sneak into Clara’s room and stare at her every night and then I walk around and stare at a few things that we’ve done recently (so the wall opening is going to get stared at forever- haha).
xo,
s
Dusa says
LOL…I’m gonna have to try the ‘toothbrushing walkaround’.
Kari says
What did Clara and Burger think when they saw this? They must be incredibly confused by everything going on over there by now!
YoungHouseLove says
They’re so excited! Well, Clara just wants to play with the plastic sheeting and Burger is suspicious about everything (acting very shy these days). I think once the sheeting comes down (after drywall) they’ll sniff/run around and have loads of fun!
xo,
s
Lisa says
Hahaha, just pictured Clara “sniffing” as she runs around!
MJB says
I’m still not on board the knee wall train, but thanks to the view to the magnolia I may have bought a ticket. Whoo wooo. (train whistle)
Melissa says
…um…the view is definetly ahhmazzinngg!! holy holy!! I’m doing a happy dance!! luv luv luv the transformation!!
Sounds like you guys still have quite a bit of work to do in the kitchen- what a fun project though!
Jen F says
PS. I think your post about getting muliple bids is SOOO true, and great advice. We have used different contractors and handymen for different projects…and prices really vary. For example, were considering painting all of our kitchen cabinets ourselves, thinking it would cost at least $1000 to get them painted….then we got a bid from our new favorite handyman for $400….well, since we were both working full time, it was TOTALLY worth it to us and WAY less than we were expecting…total kitchen transformation in days!
Kelly says
Awesome!!!
Sandy says
Man oh man! It is going to be awesome when it is all finished! What a huge improvement!
Sarah says
I can totally see it when I squint! Looks like it’s going to be a major bonus feature to an already gorgeous house :)
I’ve been reading through your archives lately… is this now year number 5 that you’ve had some sort of huge project on over Christmas?! You guys have an addiction! Best of luck for wrapping the project up. Can’t wait to see it in all its glory.
Btw, you two are such an inspiration to us – I channel your energy and enthusiasm when tackling a house project! It’s very motivational to think “come on, John and Sherry would have this done already”!
S xx
YoungHouseLove says
Yes! What’s wrong with us? Hahah. For some reason we get antsy when it gets colder or something and turn our attention to some big inside project (or to moving- haha).
xo,
s
Bea says
at laaaaassst, Etta James style.
And ‘delirious with joy’? why, you should be! I am.
Good luck!
Ami says
That looks SO amazing!! Such a great and wonderful decision!! I totally approve!! :D (yes I’m sure you stay up at night worrying about my approval lol.)
Jamie says
I can’t believe that only cost you $700.
It looks awesome!!
Kate says
Oh my! What a difference already! Can’t wait to see more!
Stacey says
Is it weird that I was so super-excited about YOUR kitchen reno I rushed into work extra-early to read your latest post?!
Dusa says
Licensed Contractor Steve and Supa-girl Tara did an awesomely fantastico job!
Ana Silva says
I was so excited over this. I literally made a noise from excitement. It’s looking so amazing! I cannot wait to see it all come together. Yay! I was so excited to read your post. It was one of the first things I did this morning. Keep up the good work.
Amanda says
Amazing! I’ve totally just pictured you guys running back through the opening doing a happy dance…’cause that may or may not be what I wanted to do when I saw this post, haha! Can’t wait to see everything come together!
laura says
Love it! When we bought this house, I wasn’t sure about the openness of it (downstairs is basically one big open space) since they opened up a wall between the family room and living room. Now I can’t imagine it different. The light is the best…and your pictures show it so dramatically. Enjoy living in the light!
Devon @ Green House, Good Life says
Now you really need to do something about those porch scallops…. : )
Paula says
What a difference!! Changes the look of both rooms so dramatically!! YAY to sunlight in the kitchen!!
Tracey says
I’m sorry if someone already asked this, but I didn’t have time to read through all 300+ comments… Wood to shore up that entryway? Really? I’ve never seen it done that way! My sister did the same in her house (a ranch) and they had to use a steel beam. That’s what we’ve always heard. Is that just one method or by state do you think? Just wondering…
YoungHouseLove says
There’s actually a steel beam sandwiched between two pieces of wood (which go on the outside so the drywall and paneling can be attached to them more easily)! I guess the sandwiched thing is a fairly standard thing, but a steel beam alone can work too (that’s what was used to widen a brick doorway in our last house).
xo,
s
debbie c says
I can feel your excitement and joy as I read! I have goosebumps, how exciting!!! Isn’t sunlight the best? Love!
amber says
I can totally see where you’re going with this – now you’ve got me thinking I need to open up MY kitchen. Damn yous!
Susan (Between Naps on the Porch) says
Soooo awesome! Freeeeedom! :)
Kelly says
This makes me drool. I have seriously been wanting to take down the big ugly wall between our dining room and family room for the past 6 years (when we built the house). I’ll be sharing your post with my husband. Maybe I can motivate him to see things more “openly”.
Your new open space looks great. What a huge improvement. You are going to love it!
Sally says
Love it! Already looks wonderful!
Meg Smith says
Love it guys! Isn’t it wonderful how outside brings such cheer! Such a God thing!
Stefanie D. says
i opened up several walls in our older home…but now..
guess what….i kinda wish some of them were back up!! sometimes get tired of all the openess…i always told my son he would inherit our house and he said “good..i will put all the walls back up”! crazy..there’s always something
El says
Looks great! I’m with you one the view from the kitchen now out the front yard. Will be very nice to have the connection with the dining room too.
Lindsay says
Looks amazing! Those big changes actually taking place are the best. And I know what you mean about being delirious with joy after seeing a wall come down–haha. Love your vision, what a great way to open everything up and make it all feel cohesive! Looking forward to more!
Darlene W. says
Looks great! I was wondering why you are leaving the paneling in the kitchen? Wouldnt you rather have drywall? I have never been around painted paneling so was just wondering…Thanks!
YoungHouseLove says
We had painted paneling in our last house (the den) and it was really cozy. It’s just like drywall except it has those subtle vertical grooves so it adds a tiny bit of vertical texture that we actually have come to love! It’s definitely one of those personal preference things, but we didn’t think it was worth the money and time to rip it all out (which would mean removing cabinets that we’re keeping, along with the fireplace mantel, etc) to replace it all!
xo,
s