As several of you noticed in Monday’s party recap, our patio area boasted another feature on Saturday (beyond more balloons and little kids than you can count). Yep, there’s a new 6′ privacy fence going on back there. When did it get installed? In the sliver of days between completing the patio and hosting the party. But time was so tight that I didn’t get to blog about it until after the bean’s shindig (aka: today).
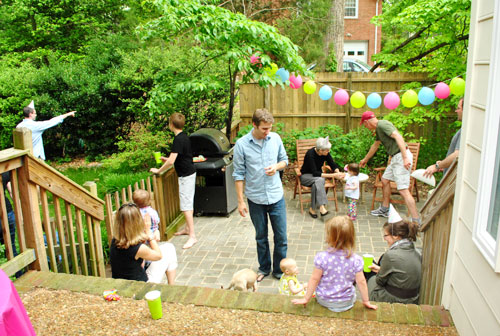
Here’s how it all went down up. Throughout my patio-ing, Sherry regularly reminded that me she wanted to beef up the fence situation between us and the neighbor before Clara’s birthday party. Her goal was to prevent this big blue car that was always parked next door from becoming the backdrop to all of our party photos.
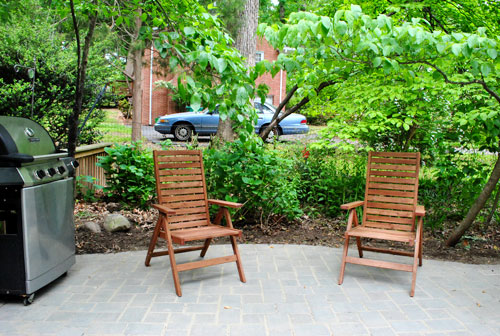
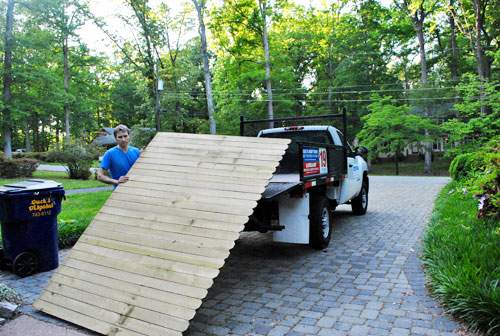
Though I agreed with her motive, my patio-ravaged muscles didn’t appreciate her timing and my mouth decided to say things like “you’re crazy,” “no way!” and “are you kidding me???” (yes, I’m a bit of a grump when sore, tired, and stressed). So for those wondering what the heck we argue over, getting to this whole fence project was one of those things that we didn’t exactly see eye to eye on. Of course Sherry got her way in the end though. When the patio project wrapped up with three days to spare, I begrudgingly rented a Lowe’s truck on Tuesday night and hauled home my supplies which amounted to four 8ft-long-and-6ft-tall fence panels, five 8ft-tall fence posts, and some other miscellaneous items.
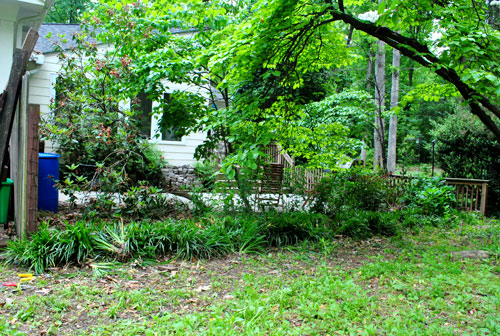
The plan was to replace the current fence – a 4ft-ish wire mesh fence held up by a combo of wood posts and a single steel rod – with something taller (6 feet, to be exact) and, of course, less see-through.
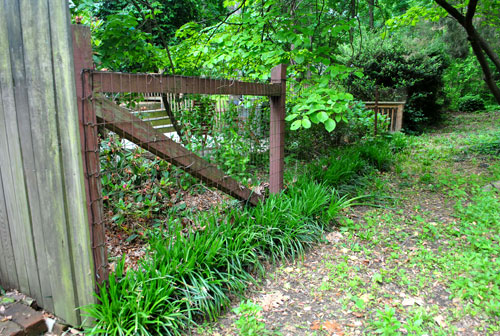
First, that old fence had to come down. Luckily my wire cutters were sharp and both the wood and that steel post were pretty rotted, so I was able to strip them out quickly:
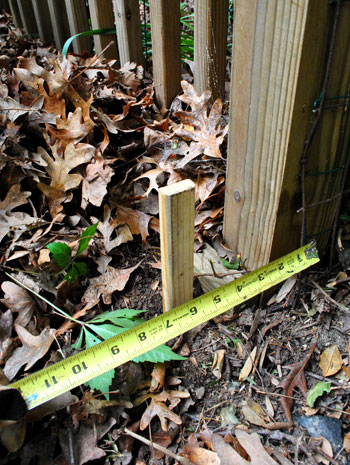
Next up was measuring and marking the spots for my posts. Using these ever-helpful Lowe’s videos that I keep finding on youtube, I knew placing my posts accurately would be extremely important (they’ve gotta be exactly 8 feet apart, or else my pre-made panels wouldn’t line up right). So first I roughly marked all of my holes with wood stakes, so that before I dug each of the holes I could triple-check my measurements (and then check them again before placing my post).
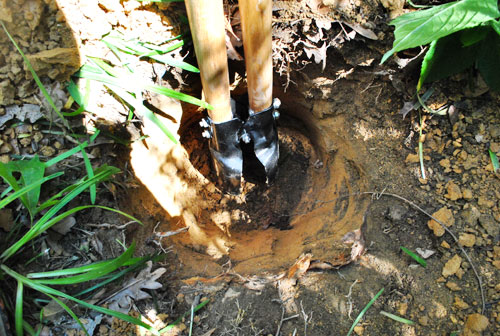
Next was the sucky part: digging. I had myself a hole digger and all, but it still made my already-sore body even more miserable. And you better believe I let Sherry know it. I’m that kind of hubby when she gets her way. Anyway, I had heard from a few folks that I should set my post 24 inches deep. But as I approached about 20 inches, the thick clay earth officially had me beat (and had me thinking weird things like “how do all of those sorority girls in horror movies manage to dig graves to hide bodies?”). So I cheated a smidge and just power-sawed my posts a few inches shorter so they’d stick no more than 6 feet out of the ground. Post-hole-depth purists, feel free to wag your fingers at me (thankfully in the end everything is still extremely solid and those last few inches of depth didn’t seem to compromise a thing thanks to our dense clay soil and my next step which involves concrete).
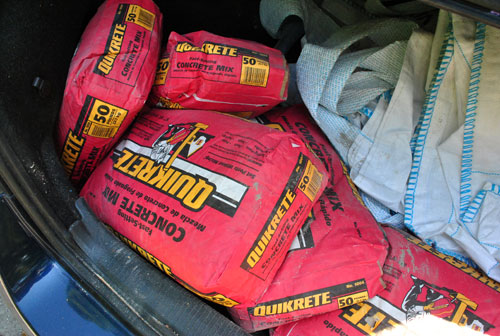
My post holes got an inch or two of gravel on the bottom (supposedly for drainage), followed by my post which was then surrounded by a couple of bags of Quikrete (the no-mix stuff that sets when you just-add-water). Oh and here’s a tip about that stuff. Obviously you don’t want it to get rained on in the bags before you use it (or it’ll set into giant rectangles of useless concrete). So I kept it in the trunk since I worried that our carport was still too moist/clammy for it and I knew it would be rain-free in there. It actually stormed in the 24 hours between getting it home and using it so I was definitely glad that I did the trunk thing.
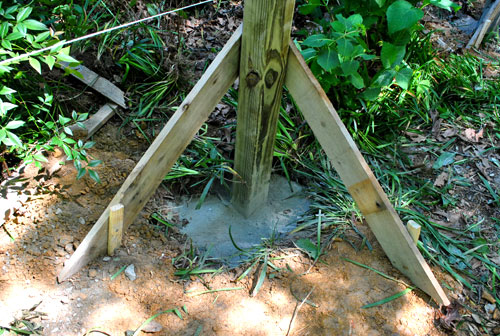
But back to my fence posts. I rigged up some makeshift supports out of scrap wood to keep the post from shifting, though I think the concrete (both dry and eventually wet) did most of the work.
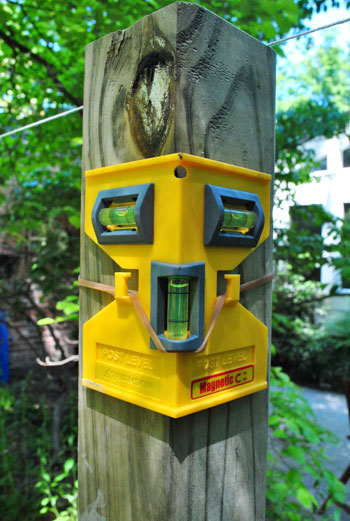
The true hero of the day was my post level, which is pretty much the only way I could ensure that each post wasn’t leaning too far forward, backward, or slanting to the side. So I highly recommend grabbing one of these babies if you’re ever tackling a fence project.
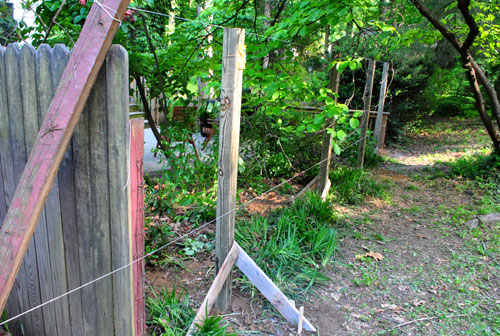
Second to the level were these couple of strings that I tied up – one to mark the front edge of my fence (to be sure that I’d set my posts in a straight line) and another to represent the top of my posts (to make sure everything was set at the same depth).
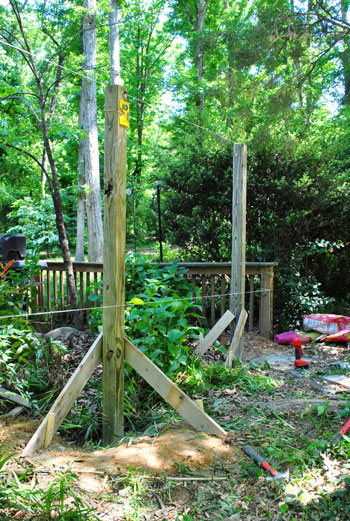
I won’t pretend it wasn’t a hard Wednesday afternoon, but eventually I did get all four posts placed (and realized that I didn’t need the fifth, thanks to one leftover from the old fence). And once all of my Quikrete was watered, dried, set, and covered with dirt, I decided to call it a day – just to be sure things were solid before putting any weight on them.
Thursday wasn’t all that complicated by comparison. Sure, the panels were a bit unwieldy but one by one I carried them into place and drove a few wood screws into them to keep them from going anywhere. I had to do a bit of digging and leveling to counteract the slight slope of the land, but – as you can see – I managed to keep a smile on my face. This is the point where Sherry stopped feeling as bad for me and starting saying things like “See how much of a difference it makes?!” and “Aren’t you glad we’re getting this done?!” and I had to admit I agreed with her. I hate when that happens. But some projects just feel pretty darn good in the home stretch and immediately make a dramatic difference – and this was definitely one of them.
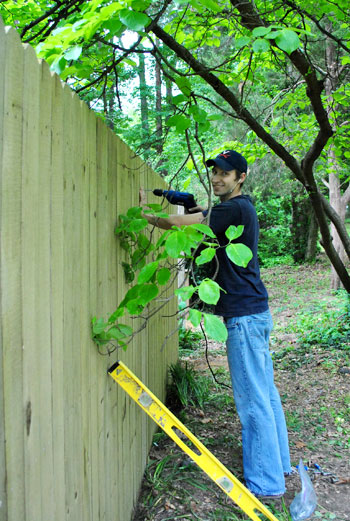
The stars must’ve aligned for me that day because, more importantly, my fence panels aligned PERFECTLY – including the one that I had to cut down to fit (the space was 27 feet long, so I needed three full 8-foot panels and about 3-feet of the fourth). Cutting them involved taking a handsaw to the three horizontal rails, which drained the last few ounces of energy I had left in me. This is my tired face:
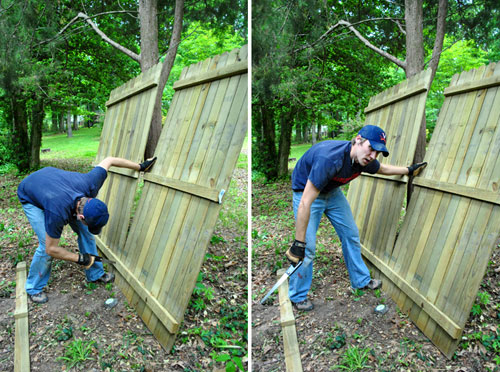
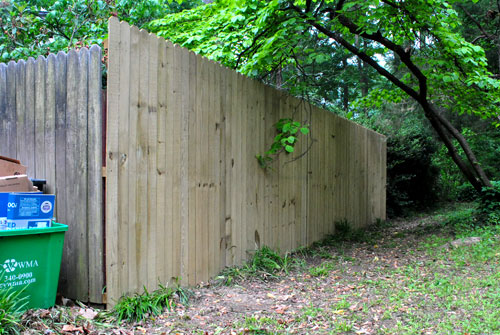
But here’s what I was left with – a virtually seamless, twenty seven foot stretch of privacy-rich fencing… done just in time for me to focus on Clara’s party on Saturday (which was about 48 hours away at that point).
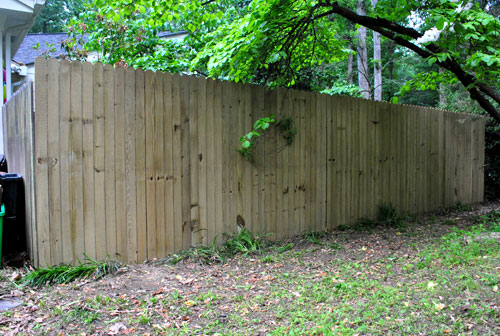
We’ll stain the fence eventually – along with the existing panel in front of it – so it looks a bit more finished. As you probably guessed, we chose this new fence style to match that existing panel that was behind our recycling bin (but wanted the full 6′ height to gain as much privacy as possible from nextdoor (since their land slants up so we needed all the height we could get). Someday we might upgrade the shorter existing panel in the front to match the height of the side panels, but for now it doesn’t look too noticeable since there are a ton of plantings right in front of that shorter panel that make it really hard to see from the street anyway.
Oh and do you see that tiny sliver of space where the fences meet? A small 1 x 1 x 6″ piece of wood should conceal it perfectly whenever we have a chance to grab it (did I mention time was tight thanks to the impending party?).
I’m notoriously bad at keeping receipts, so this is my best guess at a budget breakdown based on my credit card statement:
- Quikrete concrete mix (8 bags): $30
- Lowe’s truck rental: $19
- Fence panels (4) and posts (4): $171
- Post level: $5
- Hole digger: borrowed from my sister
- Screws, stakes, line level, rope and screws: already owned
- TOTAL: $225 (for a 27-foot long, 6-foot tall fence)*
* Our actual total was really more like $213 because we purchased all of the above at Lowe’s and used our Lowe’s card which gives you 5% off every purchase (just like a Target credit card). Woot.
** This post isn’t an ad for Lowe’s, we just happened to find their youtube video helpful and then bought our stuff there – but we’re not in cahoots with them or anything.
I know we may have been able to tackle this project for less if I built the fence slat by slat, but in light of the tight wife-imposed timeline (and my tired arse) those prebuilt panels were a lifesaver. And they weren’t even that costly, considering all the time and effort they saved ($39 for each 8 ft long by 6 ft tall panel). As for Clara’s party this weekend, the freshly installed fence did its job: no big blue car playing camera hog in the background.
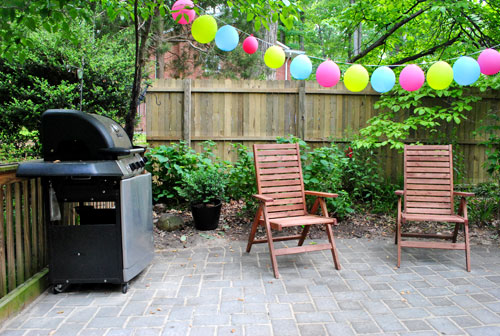
Ah, what a difference a fence can make:

As for me, my body has finally recovered from my two manual-labor-filled weeks. But that doesn’t mean I’m looking to take on any heavy lifting anytime soon. Sherry, I hope you’re reading this.

Katie Farrin says
Love how the patio looked decorated for the beautiful bean’s party! Clara is such a doll and the party was great! Loving the new fence too!
Kristen @ Popcorn on the Stove says
“How do all of those sorority girls in horror movies manage to dig graves to hide bodies?” cracked me up!
The fence looks great, John! I don’t know how you managed to get this done AFTER building the patio and BEFORE Clara’s party. It’s amazing!
Andi says
I have to be honest, it is comforting to know that I am not the only mom who likes to cover all the details before a party… My husband has had to power wash the house, clean windows, hang pictures, and install things because I was concerned about photos and such. Good job John!
Rebecca @ the lil house that could says
Holy productive week(s)! It does look 100x better though. Now go take a nap :)
Sara says
Ditto to that!
Ann Marie says
I’ll third that! :-) You did an AMAZING job!
Van says
The new fence really adds to the privacy department…
again, good job done really fast…
SingleMama says
Completely impressed with your fence building skills…I could use a fence as well, but it would be easiest if you guys could just swing on over and put it up for me…I will make cookies for you as payment.
Erica M says
John, you ROCK! It is nice to hear you are can get into crabby husband mode when the heavy manual labor falls to you, (you know, just so we remember you two are not perfect!) but my husband would never be convinced to take on something so big!
So impressed with your attention to detail – care to measure everything so well, both with the fence and patio, great job!
Cassie says
It looks great John!! Ha, a little boost of confidence for ya, my Dad calls his post hole digger his PHD. lol. He’s always like, “today when I was using my PHD (get it, like degree).” Makes him sound so sophiscated.
YoungHouseLove says
Hahahaah, I love it. Off to tell John that he has to make the same joke every day to make me giggle.
xo,
s
Cait @ Hernando House says
Haha! Too funny!
Mandy says
John, you are a rockstar!!! I’m hoping that our fence building adventure here shortly will be just as easy…
Adriane Wacker@FortheLoveofPainting says
Good for you guys…my gosh two big projects back to back, way to go! It is really amazing though that one little fence makes it that much more private!
Melody says
great! now you guys can sunbathe naked. haha.
seriously though, i could use some husband-wrangling tips from sherry. there’s no way i could’ve gotten my husband to do that!
YoungHouseLove says
I did immediately say “now I can breastfeed on the patio!” Too much information? I thought so.
xo,
s
Britt says
Hah, Sherry that reminds me, I was wondering if you were planning to wean Clara now that she is a year old. I hope I’m not being too nosy. My baby’s almost 10 months and is quickly losing interest – can’t wait to wean!
Oh yeah – the fence looks great too. Haha. Way to go, John!
YoungHouseLove says
She might never wean! The girl wants it every three hours on the hour. Literally she’ll come up to me and nuzzle in for some. I figure it’s still something she likes and I don’t mind it and it’s good for her so I’m not going to try to wean her. I’m just gonna follow her cues and see how long she’s interested. We are starting milk now that she’s one as well, so perhaps she’ll slowly phase me out that way?
xo,
s
Laura says
i wish there were a “like” button for your reply, sherry!
YoungHouseLove says
Haha, I can’t help it. I’m a chronic over-sharer.
xo,
s
Kana says
When I was a baby apparently I did not want to give up breast milk for the longest time and I actually started nibbling which really hurt my mom… In the end, she duct taped her boobs so that when I nuzzled, there was nothing there. But I still didn’t give up!! so she duct taped and drew a scary face on it and I finally cried and never wanted breast milk ever again. Sad, but true story.
YoungHouseLove says
Oh my gosh that’s quite the story! I’m hoping Clara will never nibble and eventually outgrow nursing! I do love it though, so I’m not in a huge rush. It’s nice slow-the-heck-down-and-snuggle time. Haha.
xo,
s
Keri Beth says
Good for you Sherry! I nursed my older son until he was two, and then when I finally replaced his bedtime nursing sessions with bedtime stories, he never complained.
YoungHouseLove says
Thanks for the tip! Clara loves reading so maybe we’ll try that out in a little while.
xo,
s
Marci says
I breastfed my first until she was 2-1/2…. didn’t think she would ever give it up but I was soooo done by that point so finally I offered her a trip to DD for munchkins in place of the milk since she only nursed in the morning and she agreed. Then after a couple days we moved to play-doh since this didn’t seem like the healthiest of options. I’m still nursing my 2nd who is almost 2. No weaning in sight for her either although its just in the evening and in the mornings although I admit that now that I have an iphone, I appreciate the “down time” to surf the internet or play angry birds while she’s perfectly content nursing :-)
Nadia says
I breastfed my daughter until she was about 18 months old and she was the same way…she loved it! She wasn’t super happy about weaning, but I was ready and our pediatrician said it was pretty much time since she was needing it to fall asleep and with teeth and all, it could have become an issue. I still sometimes miss that closeness. Weird though that now to fall asleep she needs to literally put her hand in my shirt…weird? Tmi??
YoungHouseLove says
Haha that’s so funny! Ironically Clara never falls asleep on me (sometimes John but usually on no one and only when she’s in her crib). I’m sort of sad that I don’t get to hold a sleeping bean but I guess it’s a good sign that she falls asleep on her own in her room every night. Who knows what’ll happen when we wean her someday though!
xo,
s
Donna Huebsch says
Whoa-a-a, a post level – I want one, and we’ve not even building a fence :o) The privacy fence looks great – way to hang in there, John!
Amy L. says
Wow! Well done. You’ve set yourself up to do the pre-party impossible though. Just wait until Sherry tells you she needs 4 child sized picnic tables next year the week of the party. (Yes, I did ask, and yes, my fabulous husband delivered!)
YoungHouseLove says
Wow- your hubby is an ox!!!
xo,
s
Megan says
I’m going to have to try that one myself!
kyla says
Can I ask what the material is on the upper patio?
YoungHouseLove says
I think it’s called “composite” – it’s basically concrete with small polished pebbles stuck into it before it dried (so they’re fixed in place). Not amazing, but not too terrible either.
xo,
s
Monica says
OMG… I’ve been dying to ask the same thing!! I saw it in a few picuters while you guys were putting in the stone patio and thought, oh I bet they’ll sweep and clean everything so nicely for the party..
and then I say it in all the party pictures! That’s when I had to find out what it was, it’s been driving me crazy to know what it was!
I have issues! :)
Allison says
Good work, John! It immediately makes the whole patio way cozier.
Jess says
Did you guys get a permit for this? My neighborhood has incredibly strict rules for fences, and going over 6′ without a city permit gets you major fines…
YoungHouseLove says
In our area you need a permit for an over-8-foot fence (so we were good to go without one since ours was only 6′ high). Whew.
xo,
s
Libby says
That was my question too. Also, what about property lines? Did you just follow the lines of the old fence? Where I live you would have to have someone come out and figure out the exact property lines and who owns the trees, etc.
YoungHouseLove says
Yup, since there was already an old wood and metal staked fence on the property line, we just stuck with that as a guide!
xo,
heather @ at home with h says
I was going to ask about the permit as well. Here you also have to have your neighbor’s approval before installing a privacy fence.
birdie blue says
love the fence. it’s absolutely perfect. i’m picturing it covered in boston ivy or climbing hydrangea.
the party was seriously adorable, but even more adorable is little miss clara.
xo
~molly
Born And Raised RVA says
A toast to the John of all trades! The fence completely transforms the feel of the patio area. The Big Blue (Ox) Car really detracted from the beauty of the patio you so painstakingly worked on. I just have one question: I understand wanting to match up with the already existing fence. If you plan on replacing that portion anyway, why didn’t you hang the new section so that you could enjoy the finished side of the fence rather than the back side? I guess I am not entirely sure what the “norm” is for fence form.
YoungHouseLove says
We fought over that point too! In the end John googled around and everyone said that the good side of the fence should face out- especially when it faces the street (which the panel in the front does) so from behind it would look weird to have the posts showing from that panel facing the street but then see the front of the added portion of fencing, so we opted to go with “the standard” which means the finished part of the fence faces out (so we see posts from all vantage points while being on the patio- which makes for a nice consistent and balanced look). John actually got his way! Haha. In the end I agreed that it looked odd when we tried to face the new part in towards the patio. It just looked like a mistake.
xo,
s
Dina says
Ahhh, I’m so glad you asked that question! I’ve been dying to ask the same thing ever since the party post (two whole days!), since we’re planning on putting up similar fencing around our back patio before the summer (fingers crossed), and my initial reaction was that the fence posts should be on the outside-side. When I read this post though, I also realized that another benefit to having the fence posts on the inside-side is that you can hang decorative and/or useful items like lanterns on them, right?
Débora says
you can later buy the plasma timber and nail inside.
Megan says
You don’t want the finished side facing in, if you do anyone that wants to get into your yard can climb right in using the posts if they are facing out.
Evan says
In our area it’s actually mandated by code that you have to face the good side of the fence toward the neighbors/street and have the posts facing your own yard.
Jen @ The Decor Scene says
I know in NY, especialy if you have a pool in your yard, the nice side has to face out from your yard. From my understanding it’s because it’s a lot easier to climb this sort of fence if the ugly side is out. Then someone can easily get into you yard by climbing the fence. Don’t want kids fence hopping into your yard, especially if you have a pool. We are also supposed to have alarms on all gates so you know if someone comes into your yard. All safety if you have a pool in NY.
YoungHouseLove says
Oooohhhh that makes so much sense.
xo,
s
erika m says
Actually, in our area, you are forbidden to have the “ugly” side face out, you must have the nice side face your neighbor, or your street or whatever. They will make you tear down or flip it if you don’t
YoungHouseLove says
Wow- that’s hardcore!
xo,
s
*Michelle says
I guess it really depends on your area. I know that post-Katrina is when people starting find out that around there, if the pretty side faced you, its your responsibility!
Lara says
Growing up, we had a 6 ft. privacy fence–“ugly” side in–and my 3 siblings & I were always climbing it. We considered it an accomplishment to make it around the perimeter without touching the ground. Ah, memories.
Your new patio/fence area looks great, by the way.
Devon @ Green House, Good Life says
For anyone who needs to take out cemented-in fence posts, my husband and I are in the process of replacing our old chain-link fence with wood and found a nifty trick for pulling the posts straight out of the ground. It still astounds me that this works, but it does!
YoungHouseLove says
Woah- that’s so cool!
xo,
s
Julia @ Chris loves Julia says
Born and Raised RVA-
Thanks for posting how to do this! We inherited a HUGE dog kennel that is cemented in when we purchased our home last month. We have no plans of ever using it and just want it gone. This is gonna come in handy!! Thanks again.
Chris Loves Julia
Amanda @ Our Humble A{Bowe}d says
The fence looks great. Definitely a step up! Are you going to use a dark or light stain? We used an opaque white stain for our fence last year and it definitely holds up better than paint. You can read more about it here: http://ourhumbleabowed.wordpress.com/2010/09/21/just-like-tom-sawyer/
YoungHouseLove says
We’re not sure what we’ll end up with- maybe a dark stain? But your opaque white stain looks so charming!
xo,
s
Amanda says
I like the colour that it is. It looks great with the greenery and the patio! Maybe just add a sealant to it?
YoungHouseLove says
Yeah I go back and forth on loving it this color too – since it ties into the fence that’s already there on the side of the patio. Clear sealant is definitely an option!
xo,
s
Blair says
The fence looks great! Are you guys going to paint it or stain it? Privacy is always nice in the back yard, I hate that I can’t fence mine in!
~Blair
YoungHouseLove says
Yeah we’re planning to stain it eventually (we’ve heard that most people usually let them “acclimate” before they do that to prevent peeling/other bad results since wood can contract and expand outside).
xo,
s
Kathryn says
John, you’re amazing!
Emily Kidd says
this post could not have come at a better time. my husband and i were prepping our yard last for our fence to be installed this weekend. I was seriously coming on here to comment and see if yall had done anything like that before! so funny…now i know we can knock this out!
kim b says
Glad to see you are considerate people and put the nice side of the fence on the neighbor’s side. My neighbor didn’t and didn’t even ask about replacing the fence on the property line. We went away one weekend and came back to a new fence ugly side towards us. And we even get along with the neighbor; I really think that they just never thought about it. But then they complained when my son kicks his soccer ball at the fence and pushes the nails out. Sorry didn’t mean to vent. Your fence looks really nice. An idea I did was I picked up some “old” wood windows (screens) took the screens out and hung them on the fence put window boxes below them and grew climbing vine plants up the window frames. Give my garden a shabby chic feel.
Born And Raised RVA says
An interesting side note to kim b.’s comment…At my last house I went halvesies with the next door neighbor on the section of the privacy fence that seperated our properties. (The one that was there was age-worn and ready to be replaced.) I selected the replacement fence. I went with something that worked with what was on the other side of the property (which resembled John and Sherry’s low, open fence to the left of their patio facing the new fence), and since he was doing all of the work he picked the finished side to face his yard.
leah says
I want to know what Sherry does to get John to work when he doesn’t want to. There must be a trick! The fence is impressive! Looks amazing.
YoungHouseLove says
Haha, I just nag nag nag. And say things like “come on, if we’re going to put it up a week after the party, why don’t we work hard to get it up before the party instead – so that blue car isn’t in five hundred party photos for years to come!!” I wore him down I guess. Haha. Although I think a lot of it was just luck with the patio project ending in time to tack the fence onto the end (if he was still laying pavers on Thursday or Friday my fence dream would have been a bust).
xo,
s
Stephanie says
You’re so lucky that nagging actually WORKS lol! The more I nag, the more stubborn he becomes until we both give up, go to our corners and quietly resent each other.
Corinne says
Wow, John, you’re awesome for accomplishing both of those big projects in sucha a short time! I love the look of the patio with the fence. It seems more “done” and finished. Kudos to you for putting the “nice” side of the fence out towards your neighbors too!
Lauren says
Do all Lowes cards give you 5% back? If so, woo hoo, we just got one recently. Not sure how I missed this. I also got a Target card recently as well. Not big on store cards, but since we pay them off each month and shop there NONSTOP it seemed like a no brainer!
YoungHouseLove says
Yup I think it’s a nationwide policy! At least at our store there was just one small sign in the nursery that said that- but sure enough if you check your receipt after using it every time there’s a little 5% off line- just like at Target.
xo,
s
Meagan says
You can also get a Target debit card now that links up to your checking account, if you aren’t into credit cards. And you still get the 5% off. Its exactly the same as using your regular debit card but with a discount. Awesome.
YoungHouseLove says
Who knew? Great tip!
xo,
s
Tamisha says
Good job on the fence, John. I feel your pain. I built our fence in 4 days, but I built it slat by slat and it fenced in our entire yard.
One question though, why did you decide to put the fence “face-side-out”? Since it faces the neighbors, you see the “wrong” side all the time. Any particular reason you chose to do it this way?
Tamisha says
Sorry for the double question. When I posted it, no comments had been approved yet!
YoungHouseLove says
No worries- glad you found the answer!
xo,
s
Kristin ~ Bien Living Design says
What a difference – you did a great job on the fence! & to the commenter asking about which way it should face, with it facing this way you can string cafe lights or something similar from the horizontal supports for instant ambiance at night :)
Kristin ~ Bien Living Design says
Also wanted to add that I like that side better anyway – more depth & dimension than just a flat panel :)
YoungHouseLove says
Yeah isn’t that funny? I thought it would look so much like “the back” but it really just looks architectural and balanced with those posts spaced out so nicely.
xo,
s
YoungHouseLove says
Ooh I love that idea! I honestly thought the posts would look stupid but it just looked wrong the other way and I like the structure they add. The fact that I can use them fro cafe lights is the icing on the cake!
xo,
s
Jess says
Sorry – another question. Did you talk to your neighbors at all before putting up a fence? If you can’t tell I’m in the process of wrangling with both my city and my neighbors to put up a fence and finding it’s a bit more complicated than simply erecting something on my own property. Just wanted to see if you touched base with them to make sure they were happy with the fence going up.
YoungHouseLove says
We’re really friendly with our neighbors over there, so they were watching the whole patio process and knew we had plans to put up a 6′ privacy fence at the end. Their house is on the market so they liked that idea too (because privacy between our house and theirs would probably be a perk for any potential buyer as well). After the fence went up they told us it looked really professional – so we’re glad they liked it!
xo,
s
Elizabeth says
Weren’t you basically just replacing an existing fence?
YoungHouseLove says
Yeah, but since it was a very low wire one, it was definitely an upgrade for both of us to go with 6′ wood. We just didn’t want them to think “we want to block your ugly faces” or anything- because it sooo wasn’t like that! They understood perfectly that we just wanted to make the new patio feel more cozy and intimate – and I think they just like that it’s not a cheap-o wire fence anymore. Haha.
xo,
s
Christy says
How did you explain to your neighbors that you wanted to build a fence? We’d like to upgrade from the low chain-link fence to a wood privacy fence, but I’m worried that our neighbors will think we’re rude… Any thoughts?
YoungHouseLove says
We got to be really friendly with those neighbors (they’re selling so they would stop by to clean their yard and see our patio progress) so we told them we planned to put up a privacy fence as our last step. They were all for it since it was an upgrade for their house too and they thought new buyers would appreciate it. After it was done they told John how great it looks, which was an awesome relief. So maybe just talk to your neighbors because they’ll hopefully be all for it (and grateful you’re planning to do the work).
xo,
s
mribaro says
John, I am amazed – and you did all that on granola bars and water! Sherry, you got him for cheap :)
YoungHouseLove says
Haha I know right?!
xo,
s
danielle says
seriously Sherry – how do you do it? I can’t get my husband to hang pictures and shelves on the wall for me. I suck :)
YoungHouseLove says
Haha, I think I just got lucky to marry a man with three sisters. He’s used to getting worn down by the girls. Haha.
xo,
s
Paige says
Seriously. My husband has brothers and I can hardly get him to put his plate in the dishwasher.
danielle says
AHA! i married the only child :)
YoungHouseLove says
It all makes sense!
xo,
s
Monica F says
I am a BIG fan of privacy fences. It makes it such an intimate space now. I had our chain link fence replaced with a privacy fence and now I feel like I have my own secret garden. =)
Beth @ bethcooks says
YAY! So glad you had a pleasant experience with Quikrete (I actually work for them, and I’m in charge of all Lowe’s accounts). I was shocked this morning to see our bags in your post! Love it!
Great job on the fence AND the patio. We are laying pavers at our house, and it is really draining. I wish we were done like you!
Rachael says
You people be crazy! Everything looks amazing, and you both deserve a break. I’m getting tired just reading about these projects. ;)
Susan says
John, the energizer bunny has nothing on you! I am in awe! Fence looks great!
Michelle Kersey says
Looks great!!! Congrats on a job well done!
Future Mama says
Love it! Sherry, I could really use some tips on how to be persuasive with a hubby, ha! Speaking of, I recently completed a design project (yesterday, actually) inspired by y’all that my husband was less than thrilled with (in your defense, when I showed him what y’all had done he told me if I had done EXACTLY what you made, he would have liked it, ha!)
If you, or ANY of you YHL fans get a chance to check it out, I would love your thoughts on what I should do next with this project! Thanks!! http://expectingablessing.blogspot.com/2011/05/words-of-wisdom-wednesdays-you-are-my.html
YoungHouseLove says
That’s so cuuute! I love it.
xo,
s
Mike at The Big Stick says
When we bought our house last year we had an open backyard that we then had closed in with a similar privacy fence. I spent a few months debating how to stain it. When warm weather arrived we decided to go with a clear water-proofing wash from Behr that would bring out the natural color in the pine boards. It was a big project with over 3,000 square feet of fence to cover. We choise the Behr project because it could be sprayed on and then ‘back-brushed’.
Long story short, the spray-on technique isn’t as attractive. We quickly switched to doing it by hand. It’s a real aggravation on the inside (re: where the vertical posts are) because of all the nooks and crannies but worth the time. On the outside you can use a roller and it’s a breeze. We are very happy with the results and after 6 months and a wet winter the fence still looks great.
YoungHouseLove says
Love the info! Thanks Mike!
xo,
s
Sheryl J says
It made all the difference! Looks great!
Anna @ Take the Side Street says
I think it looks fabulous, and quite professional. Way to go John, my fav part was the “Sherry, I hope you’re reading this” at the end. Priceless! :)
Erin N. says
It looks amazing, and you make it sound pretty easy (not physically, but theoretically.) Our fence is getting a little wobbly, and I see some post-digging in our near future, and you’ve made me feel a little better about it. Thanks!
Ever - The red house by the lake says
Amazing! You did a great job and I can just imagine how it must have felt like to finally be done.
Just curious though, and please do not take this the wrong way, but how come Sherry could not do some of the hard labor? I love your blog but it really seems like you are quite conservative when it comes to who-does-what, like John doing all the “masculine” stuff and Sherry all the painting and decorating stuff. It’s totally up to you, of course, and I suppose that Clara still requires Sherry for feeding (I haven’t been reading for that long so I do not know what it was like before she arrived), but I started thinking about it a couple of posts back and it got me to like the blog a bit less, because I think it is so inspiring when couples really share all kinds of work.
No offense in any way, it’s just a thought/question.
YoungHouseLove says
Remember when I demo’d the sink backsplash while John played with the baby? Or how I knocked out the shelves in the living room next to the fireplace and went crazy on this bathroom towel bar? I also stuck it to the giant magnolia in the front yard with a saw. I love demo & good old fashioned hard work! We just have a little one now, so sometimes I have to nurse her and it makes sense for me to watch/feed her while daddy gets ‘er done. And sometimes John watches the bean and I get to have some fun. We definitely don’t divide tasks by “gender” but by who wants to tackle it. I nagged John to do the fence because he expressed an interest in being the one to do it (just on a slightly longer timeline, haha). And I couldn’t wait to work on the patio (I set about 50% of the pavers myself while John did the cuts for around the edge). We love working together whenever the bean naps. Ideally we’d each work on everything together like the console table or the frame wall or the patio pavers but with a baby in the mix it’s not always possible. We usually fight over who gets to do which projects while the other one gets Clara-duty if she’s awake. Luckily she’s lots of fun, so neither of us is really the loser in that situation. Haha.
xo,
s
heather @ at home with h says
Sherry, are you really comparing prying up some trim, knocking down some chintzy shelves and cutting some branches to digging out a patio, installing the patio and installing a fence? ;) ha ha…had to tease.
YoungHouseLove says
Dude, I love getting nice and sweaty using things like prybars and saws! I’m no girly girl. Remember, I routinely sport a pony tail. Haha. My point is that I definitely do more than painting & decorating. I love demo. And I laid those pavers with John for the patio. They were heavy but it was a blast. John did 99% of the prep work (sucka), but I got in on that heavy lifting at the end once the baby was sleeping. You should see my guns now. Hah.
Remember I’m the gal who demo’d that giant floor to ceiling divider in our first house’s living room (and surprised John by having it out at the curb when he got home from work). And I ripped out a wall for the laundry nook while John looked on nervously. So I definitely don’t sit around and wait for a man. Haha.
xo,
s
Stephanie says
I’m on month 7 of breastfeeding our first baby, and I have to say… isn’t that on par with putting up fences and making a patio? Haha. Seriously, it’s HARD WORK! I think you guys are a great team, and the way you handle tasks and divvy up work is great. My husband stays home with our son and I work, and it was a great challenge for us both to be home together when I was on maternity leave. I admire you guys for doing that day in, day out. Kudos to you for the HARD WORK you do!
YoungHouseLove says
Haha- I love bfing. But yes, it’s a lot of work every three hours for over a year! But I do love snuggling that gal.
xo,
s
Kelsey says
Sherry, you’re awesome. Good for you for being a good sport AND tackling some of the tough stuff yourself. Plus as a nursing mommy, I love that you’re not shy about talking about breastfeeding like the natural, normal thing it is. You go, girl!
Ever - The red house by the lake says
Good!
It really wasn’t meant as criticism or to say that taking care of a baby is not hard work. I just got the feeling that Sherry wanted the fence, but John had to do it, and that was why I asked.
I guess it was also because lately John’s been writing most of the “demo/build”-posts.
You are both doing a great work and I love following you. And I agree with you, Sherry, tearing down things are really fun! ;-)
megan e says
I thought the same question. I like power tools and getting my hands dirty, but the muscle power exerted by my husband is far greater compared to me! We helped some friends install a fence and my husband made me use a post hole digger, just so I would understand how much work it really is! I think he dug 4 holes in the time I dug one. It was a no-brainer that he was just built better for that type of labor.
Kelli says
I am soooo jealous he was able to knock this out in a couple of days. We’ve been working on replacing our privacy fence for over a month now (weekends only). Of course, we had tons of concrete footings to pull out and new concrete to cut. We know our PHD really well. Hopefully this weekend we can finally finish it. We’ve been making our own panels (since I was picky and didn’t want it to look like everyone else’s privacy fence). I’m just floored by how fast he knocked this out! Go John!
thecounselor mom says
Wow, that is amazing! You did all of that so fast and a lot of work!! Good job!
Deb D. says
I had no idea you could buy them in panels. Knowing this, I actually may be able to get my husband to help me put in our new house’s back yard (just three more weeks until we’re Jersey-bound from Atlanta) to hide our soon-to-be neighbor’s giant orange TRACTOR. (I’d take the big blue car over it any day) This ‘Hoo salutes you on a job well done, John!
beth in dc says
Fabulous difference! I was once told by a professional carpenter/fencebuilder that’s it’s a good idea to wait to stain new fences–maybe even a whole season?–to let the fresh wood completely dry out. Have you heard that?
YoungHouseLove says
Yes- I’ve heard that! In fact no one I know stains theirs right away for that reason (to allow it to acclimate) so we’re definitely going to do that with ours.
xo,
s
Kristi @ Addicted 2 Decorating says
Wha….??? You used PRE-made panels? That’s cheating!!! lol…totally kidding. I can’t believe how much you got done on that patio/fence in such a short time. You totally knocked it out of the park. It looks amazing!
Jennifer says
Looks great! We just bought a house and it has tall fences like this and we are taking them down, haha. We will replace them with shorter (4′) picket fencing. But there is no ugly blue car parked on the other side of ours. :-) Our fences all face in, so I guess they are backwards? I would rather look at a finished side though.
Reenie says
WOW!!! Y’all continue to amaze me. John….you the man!!! Woot!!! Looks great, and I think the extra $$ to get the panels would have been worth it to me rather than to do one slat at a time =)