We started 2008 with a home improvement bang like no other.
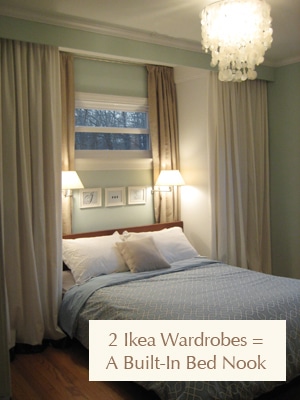
We were up at 8:20 am and on the road to Ikea by 9. What would motivate two sleep-deprived twenty-somethings to get up that early on our last day off? How about the thought of gaining not one, but two more bedroom closets?! That’s right, we finally decided that one tiny closet in the master bedroom (which forced John to keep all his clothes in the guest bedroom) was not enough. So on New Years Day we (fittingly) resolved to do something about it.
Here’s the New Years Day play by play:
8:20 am- Up and at em’.
9:00 am- Hit the road for Ikea.
11:00 am- Arrive. Hightail it to the closet department.
12:30 pm- Leave $460 poorer with two giant wardrobes to flank the bed (plus tons of interior fittings).
2:00 pm- Arrive home. Rest.
2:05 pm- Enough sitting around. The wardrobes aren’t going to put themselves together.
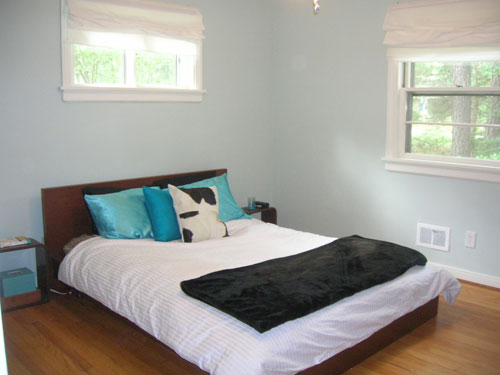
2:06 pm- Forget to shoot a “before” photo, but here’s an old pic for reference:
2:15 pm- Move out the side tables and get out the dreaded allen wrench.
3:50 pm- One wardrobe frame done, one to go.
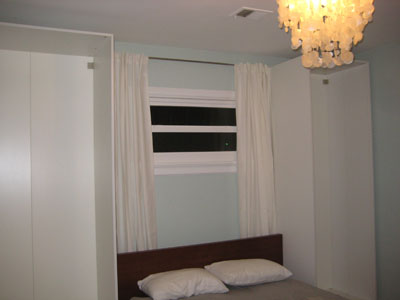
4:30 pm- Build second wardrobe frame. Re-hang curtains on back wall in an attempt to enlarge that tiny window
4:35 pm- Enjoy a victory bowl of cereal after shooting this “during” photo.
\
5:25 pm- Quick trip to Lowe’s to get long screws to anchor the behemoths to the wall, which annoyingly Ikea didn’t provide.
6:15 pm- Install six glorious shelves and a hanging bar in Sherry’s wardrobe.
7:30 pm- Install three drawers and a hanging bar in John’s wardrobe (two shelves were also meant to be added, but we realized we bought the wrong size- d’oh)
8:30 pm- Burger King run. We can’t survive on cereal and home improvement endorphins alone.
9:30 pm- Finally get all of our clothes, shoes, bags, and belts into our two fantastic wonderful beautiful new closets (the guest bedroom closet is now empty- amazing).
10:00 pm- Hang matching white curtains on both wardrobes. Step back and HATE them (we thought it would look soft and elegant- it wound up looking like a cheap Trading Spaces project).
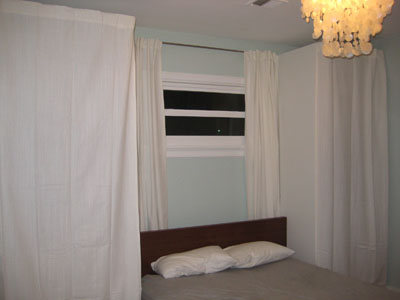
10:05 pm- Realize we both like it infinitely more with the curtains pushed to the side (they look more like fancy built ins, and not like a cheapo bookcase swathed in fabric).
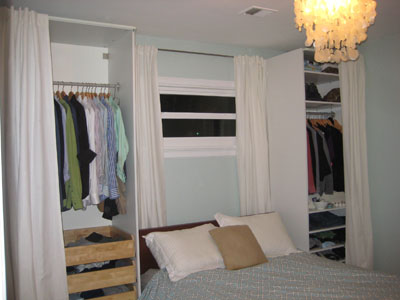
The next few days were full of progress. We ran to Home Depot and grabbed 7 inch molding to add to the tops of the wardrobes so that they appear more flush to the ceiling (bridging that 4″ gap that used to be painfully obvious on top of each wardrobe). Our next stop was Linens N’ Things where we picked up a few heavy curtain panels in rich chocolate brown. Back home we extended the wardrobes to the ceiling with the molding, hung the new brown panels around the window, and rehung the curtains in front of each wardrobe flush with the ceiling. Here’s what it all looks like now that we’ve bridged the gap. The wardrobes were definitely looking better with the gap bridged, but we weren’t so crazy about the dark chocolate curtains.
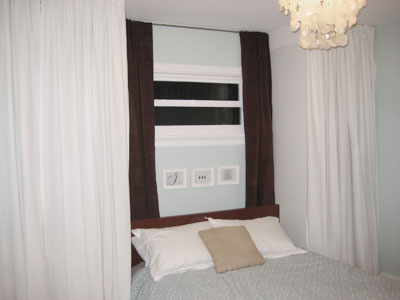
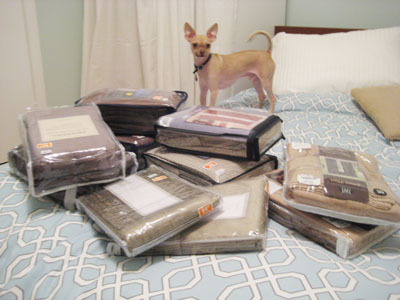
So we returned ’em and went on a curtain shopping spree. In fact you wouldn’t believe us if we told you how much money we spent. But we’re going to tell you anyway- close to $500. Yeesh. That’s a lotta loot. But we realized we needed lots of different curtain choices to make a final decision, so we got oodles of options (from Bed Bath & Beyond, Linens N’ Things, and Target) and then took them home for a little curtain fashion show (don’t worry, we returned every pair except for our favorites).
Here’s Burger sniffing out the competition:
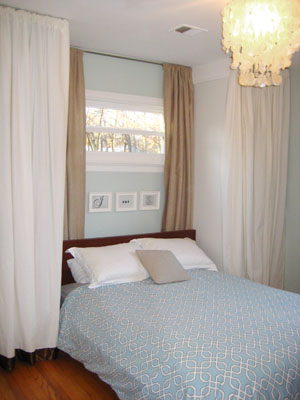
Although we had many (many) curtain panels to choose from, there was immediately a clear winner. The gorgeous khaki chenille-esque curtains with the subtle crosshatched pattern for a little added texture from Bed Bath & Beyond. Bellisimo.
As our curtain crisis came to a close, then came the exciting hunt for plug-in swing-arm lamps for above the bed. Ok, maybe “exciting” isn’t the right word, but I tend to get a little thrill when I can check any project off my list.
After striking out at several places including Lowe’s (no swing-arms), Restoration Hardware (too pricey) we had just about given up on Richmond’s lighting stock. Luckily, we ended up visiting my parents in Northern Virginia and stumbled upon a Lamp Factory Outlet.
There, amongst endless rows of table lamps and chandeliers, we found the perfect option: two brushed nickel, plug-in, swing-arm lamps for only $40 a piece. About $200 dollars cheaper than most of the other options we saw. We snagged ‘em (the last two in stock!) and as of last night they’re officially swinging from our bedroom wall. We couldn’t be happier with the dramatic result:
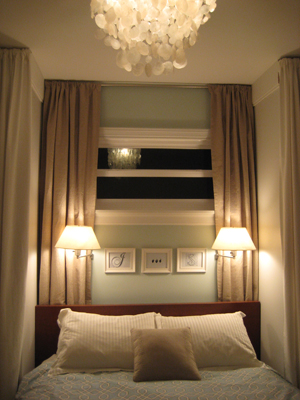
The room definitely looks more finished and hotel-ish, so we can’t wait to curl up with a good book and order some room service. Ok, wishful thinking.
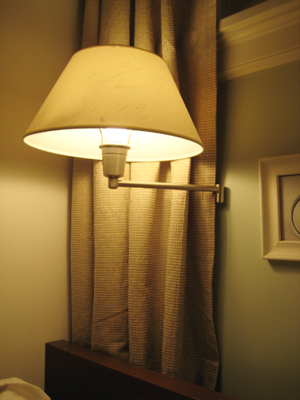
Here’s a close-up. You can see how we tucked the base behind the curtain and angled the lamp arm around the edge for a more polished look.
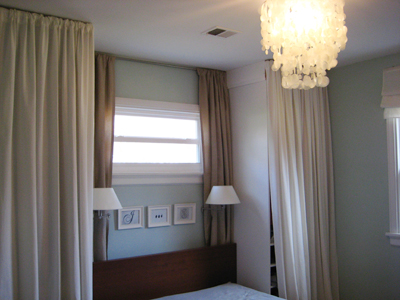
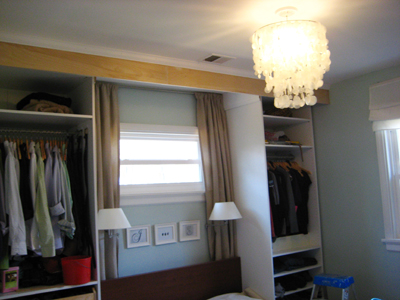
But alas, this project wasn’t quite finished. Instead of having two refrigerator sized boxes on either side of the bed, we wanted them to look more finished. So we decided to mount a wide piece of wood to the ceiling that would hang in front of both wardrobes and serve as a header (to make the bed feel like it’s tucked into a built-in nook). I know that sounds confusing, so I’ll just let a few pictures do the talking.
Here’s a photo of the wardrobes before the header:
And here’s a during shot:
Now I’ll ask for a drum roll. After painting the header and re-hanging the curtains, the eight inch plank of wood makes a major difference. And the crown molding is the icing on the cake. Here’s a detail shot so you can get up close and personal with our new master bedroom built-in:

And here’s a shot of the full monty:
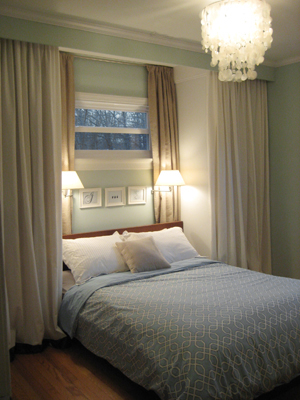
Now laying in bed truly feels like you’re tucked into a cozy little nook instead of squeezed between two large, unrelated pieces of furniture. The whole layout looks a lot more deliberate, which is exactly what we were going for.
So that’s the story of two people trying to turn a 12 by 13 foot room into something special. Fifty year old houses don’t have giant master suites with monster closets and attached bathrooms, so you gotta do what you can to make a tiny room (that looks just like the other bedrooms) appear special. So what do you think? Mission accomplished?
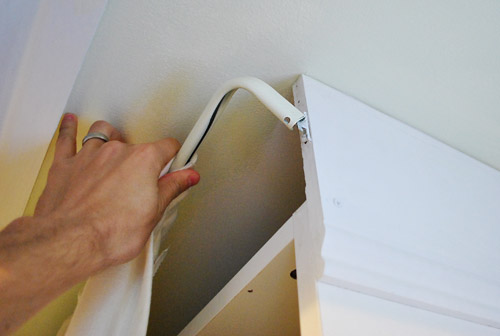
***UPDATE: Since a lot of people have requested them, we snapped some photos of how the curtain rod is attached behind the header on the ceiling. You can see below how it’s a cheap-o curtain rod that sits on a bracket we attached to the piece of molding bridging the gap between the wardrobe and ceiling. We had to hang it down a couple of inches from the ceiling so there was enough room to lift the rod off (you can see the two holes above the bracket proving we learned this the hard way!).

Kelly says
I love reading your blog and came across this post and i have a question…
I LOVE your chandelier and i like how in the pictures it looks like its attached to a pre existing ceiling light. Is it? All of the chandeliers i seem to find on websites i usually shop from have cords and their own bulb. I would love one similar to yours that attaches like a dining room chandelier… any advice on where i can look?
YoungHouseLove says
Our chandelier was from West Elm. It was a plug in fixture but we cut the cord to expose the internal wires so it could be hardwired. Hope it helps!
xo,
s
Amanda says
Like countless others, I stumbled across your site accidently and I love it! Quick question: Did you have the handy man install the crown molding? If not, any advice on getting the cuts measurements dialed in?
p.s. I love that you guys are still getting feedback on this project over 3 years later.
Thanks for all the fabulous step by steps!
Amanda
YoungHouseLove says
We did have a handyman install this crown, so unfortunately can’t give any first hand advice. The crown was my Christmas present from Sherry one year.
-John
lindsey says
you guys had me VERY nervous at the first with-curtains shot (10pm). but i’m blown away by how classy and chic and polished this looks! such a peaceful and elegant room.
Sofia says
I love this!
I was looking around for bedroom inspiration on Pinterest and honestly feel like I don’t even have to keep looking.
This is awesome. We were looking for something that made the room cozier and not so echo-y, and we also need more storage space.
Thank you!
Jamie S. says
Thanks for this post! My husband and I just bought an older home that needed a large-scale remodel and have been working on it for a few months now. Your blog has been so helpful along the way! Our master bedroom is huge, but the closet is TINY. We had just about decided to build some additional closet space when I came across this post. It is the PERFECT solution to our problem! Instead of framing the bed, though, we are going to build the 2 wardrobes around a large chest of drawers. THANKS SO MUCH for a fabulous idea that will save us a ton of money in comparison to actually building another closet!
YoungHouseLove says
Aw, so glad! Good luck and have fun!
xo,
s
Johanna says
I know this is a very old post (and you don’t even live here anymore?), but I LOVE the transformation and how you posted step-by-step how you changed your minds and/or added stuff to get it from functional (just the PAX with the curtains to beautiful (swapping out the curtains, adding the header). Sometimes before/afters can be intimidating (I wonder how ppl could have “seen” the transformation in their mind’s eye before beginning). This post makes it seem much more doable. I might try to do something similar (or maybe even replicate what you did, if you don’t mind) when I move into a house this summer – will let you know how it goes!
P.S. I especially love how the white curtains hide so much storage in a way that doesn’t make it obvious that you’re hiding lots of stuff
Lauren says
I absolutely love this! this is amazing and looks great. I have had my shoes in self storage for months now as I have moves into a significantly smaller flat. I don’t mind losing some space but I hate when wardrobes look too big for the room or out of place. Inspired!
YoungHouseLove says
Aw thanks Lauren! So glad!
xo,
s
Sheena says
Hi, I love love love this and have been returning to your site for almost a year now. I even took some ideas from your anniversary party for mine last October. Anyway, my husband and I are considering doing this bedroom look but I have a question. We have one large dresser and one medium sized one which I think may look out of place if we put in the built-ins. Do you have any dressers in the remaining areas of the bedroom or are the built-ins and the bed the only furniture in the room? Is your room fairly small over all or is it rectangular with more room on the side that is not photographed? Thanks.
YoungHouseLove says
Yes, the other side of the room had a dresser (across from the bed) pretty much int the center of that wall with a chair in the corner (left as you face it) and the door to the room was on the right (as you face it). It was a really small room (around 12 x 12′). Hope it helps!
xo,
s
Amy says
Hi! I love your blog! My husband and I moved into our house in April. It was built in 1954 and we have the same problem with small bedrooms and little closet space. I’m sorry if this question has already been asked (I didn’t have time to read through all the previous questions), but where do you put things such as your alarm clock or books (we like to read in bed) since you don’t technically have a bedside table? We are thinking about trying something similar in our bedroom, but not having a space for my alarm clock right next to my bed would drive me crazy I think.
YoungHouseLove says
We just use cell phones as our clocks/alarm clocks, and tucking them into the shelves in our wardrobes were easy to reach from bed. Our hands just slipped behind the curtains to grab them in the morning.
xo,
s
Vicki Lee says
Love it! I just got a house with almost exactly the same layout for the master bedroom and was wondering what to do for closet space – thank you for giving me some inspiration!
Becca says
I just love your blog! My boyfriend and I are moving into our first apartment together. It’s an older apartment in DC with awesome hardwood floors and lots of charm. The only downside..small closets! I couldn’t be more excited to decorate and your blog has provided tons of inspiration! We’re thinking about covering the top part with diy window treatments like this since we can’t mount anything: http://blog.effortless-style.com/2010/09/diy-custom-looking-window-treatments/
Do you by chance have any links you can provide with this same set up. Always like to see more pics. Thanks for sharing all your creativity :)
YoungHouseLove says
I love that idea! I don’t know of any links off the top of my head but maybe try searching houzz.com, google images, and pinterest.com. Hope it helps and good luck!
xo,
s
Aly says
Beautiful and brilliant! Very impressive =)
Gen says
Wow! Love it! It looks like a couple of the hotels I’ve stayed in.
Found your blog via….yeah, don’t remember, but have been (and still am) working my way through the archives to present day. :-)
YoungHouseLove says
Aw thanks for reading Gen!
xo,
s
Melissa says
Where is your duvet cover from? I love it!!
YoungHouseLove says
That’s from West Elm a while back. Maybe try ebay?
xo
s
Ashley says
Omg! I absolutely LOVE it!!!
Becca says
Hi! I love all of your ideas! I would like to copy your color scheme – could you tell me the colors/style names for the curtains and how many panels of each you have here and paint color please?
YoungHouseLove says
Oh man the curtains are from Ikea but I forget the name. The walls are Glidden’s Gentle Tide. Hope it helps.
xo,
s
Becca says
ok… last question – this one is from my husband… how did you hang the header? You guys are awesome!
YoungHouseLove says
Just some screws into a few ceiling studs/joists. Hope it helps!
xo,
s
Carrie says
Maybe I’m doing something wrong, but only the first and last pictures are showing up for me. Since this is an older post, are they gone forever? Or can you make them reappear? :) Just thought I would ask. Thanks!
YoungHouseLove says
Oh no, that’s so odd. Anyone else having this issue? We refreshed it on our end and could see them all. Anyone else? Maybe try using another browser?
xo
s
Laura says
It’s 2012 and this post was published back in 2008. I just found it on Pinterest and began reading with growing excitement. It is PERFECT for my guest room which doesn’t have a closet! See, your ideas are timeless. Thanks for ideas, details and inspiration!!
YoungHouseLove says
Aw thanks so much Laura! Good luck with everything!
xo
s
Kiersten says
Hi John and Sherry,
We just moved into a 60s rambler with similarly small bedrooms. We want to put the head of our bed under our window and build shelving of some sort on either side of the bed/ window. Is there any chance you have the dimensions of the wall you built your wardrobes on AND the size and placement of the window on said wall? I’m hoping it will help me visualize how this will all end up in our house.
Thanks!
YoungHouseLove says
So sorry we no longer live in that house so we can’t measure for you!
xo,
s
Bevin says
I’m a modern architect, so I don’t normally go for traditional looking architectural and interior design solutions.
But this was a clever, “synergistic” solution that provided storage, that saved space, and created a look, all in one fell swoop.
Solving multiple problems simultaneously with a single feature is the essence of good design. It’s the way nature solves problems.
Good job!
YoungHouseLove says
Aw thanks Bevin!
xo
s
ericka says
This is such a great idea!!! I was wondering how much it all cost…Thanks for all the inspiration, ya’ll are awesome :)
Jennifer says
What did you do with this when you sold your house? Did the wardrobes/header convey with the house? Did you take it all down?
I desperately would like to do this in our home, but I’m uncertain how it would affect the resale if we decided to leave it in the house when we (eventually) list it for sale.
YoungHouseLove says
Oh yes, it conveyed! And our house sold within two weeks of being on the market!
xo
s
Jody says
I came to your site tonight to just pin some pictures of your 2nd house for future design inspiration. I’m in love with gray. I decided to look through your 1st house again and your master bedroom caught my eye. My house is 110 years old. For some reason, my bedroom is the only one without a closet. I bought the IKEA wardrobe several years ago as my solution. The only problem was that they did not have the curtain & line in stock. Well, I drove 2 hours to get there so we got the wardrobe but never got the curtain & line because of IKEA’s shipping prices. I really like what you guys did. My room is a little larger so I would actually have some room to play around with for possible side tables. However, my ceilings are larger than yours. Probably about 1 1/2 feet taller and my window is taller than the wardrobe by about 6 inches. I think this is called a conundrum. :)
YoungHouseLove says
Oh man, maybe try JCPenney? They have a lot of rod and curtain options! Good luck Jody!
xo
s
Stacie says
Hello!
I have been wanting to do this project for 3 years now, and the time has finally come. Hope you’re not too sick of answering questions about it. I have looked and looked at the curtain rod installation and my one question is how to attach the rod to the wall side of the closet. I understand that the side closest to the bed is installed by attaching it to your molding. Is the molding also on the wall side as well? We will also have two different size wardrobes, so I want to make sure that I cover that gap between the Pax and the wall. Could I install them on the back of the header maybe? THANKS from a long time follower:)
YoungHouseLove says
Oh yes, the side of the molding would work, or the back of the header! Good luck!
xo
s
Liz@bloem says
Hi S&J
I’ve looked around for something so a)pretty up our bedroom b)add more cupboard space (TWO in our ENTIRE HOUSE…)and then I came upon this post…LOVED it…I mean, I drooled about it for the entire 3 months I’ve saved up to do it. So, a weekend ago, I dragged BF from bed at 7am, picked up bro-in-law, went to the local hardware store…yes, sadly no Ikea in SA, and we built those from scratch. It’s still a work in progress (I am trying to upload a pic, but no luck so far…need some help on the wall behind the bed) but it’s such a b i g (read HUGE) improvement, so basically…thanks so much for the inspiration!
YoungHouseLove says
That’s amazing!!! And as for uploading a pic, you can put it on a free photo site like Flickr (mark it as public) and share the link here so I can see it! Or just upload it to our Facebook page. So excited for you!
xo
s
Suzie says
Fantastic job you’ve done! hoping you will not mind another question. do you think this would work if one of the wardrobes butts up to a door frame? the entrance door to my bedroom is aligned on one end of the wall my bed occupies. Thanks and Happy 2014!
YoungHouseLove says
Hmm, I think it could work, so I’d give it a try or tape it out (or use cardboard to simulate it) and see what you think! Good luck!
xo
s
Julia says
Hi guys! Love you!
I would like to do this project, as we also live in an old home with out any closet space. Our ‘master’ looks like it is a little smaller than yours was here. (We don’t have any extra space at the foot of the bed where you have the mirror and chair.) We just have two night stands ‘perfectly positioned’ in between a king bed. Would you still recommend this project?
YoungHouseLove says
I bet it would still be great, and gain you a lot of storage!
xo
s
Jolene says
We just bought our wordrobes this weekend from ikea And set them up! Excited for the next steps
Glenda Ponroy says
Absolutely love what you have done to your bedroom. I live I. A 300 + year old house that had no cupboards or wardrobes in it when we moved in. Your solution is wonderful. Funny that your DH has more space than you do!
Just one gripe: I find the American habit of saying “laying” as in “laying in bed” so irritating. What you mean to say is “lying in bed” Chickens lay, people lie. Sorry, but it really sets my teeth on edge…….
Glenda Ponroy says
Meant to say “I live in a 300 + year-old house…..”
YoungHouseLove says
Thanks Glenda!
xo
s