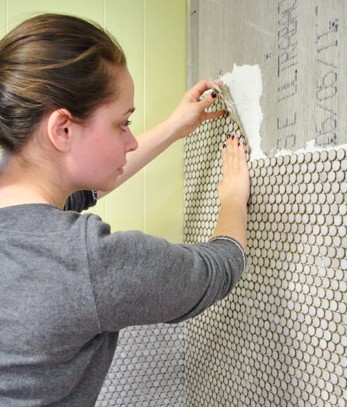
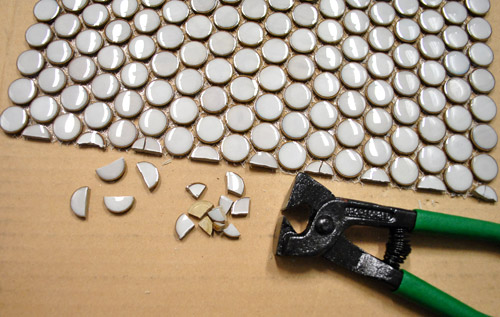
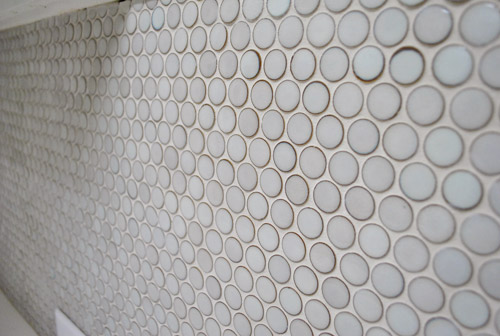
Let’s talk about grout, because with our penny rounds finally all installed, grout was next on the agenda. It has a way of taking things from in-progress to looks-completely-finished-oh-thank-goodness. Observe: So here’s how we got there. First I have a little “materials shot” for ya: Bucket of clean water Putty knife & another bucket to mix grout in Paper towels because, well, grout is messy Sanded grout (from The Tile Shop, $19 with discount) – ours is the Mobe Pearl color Rubber float (from Home Depot, $2) Flexible Grout Admixture (from The Tile Shop, $17 with discount) – this reduces grout shrinking and cracking Sponge. Woot! Oh and we used leftover rosin paper from Home
The Real $herdog
One of my favorite things about blogging is keeping it real. Even around the new year when the whole “be the perfect person/wife/family” voices can kick in, I try to fight the good fight and remember that authentic = awesome. And perfect = most likely impossible. So if our house is a mess I’ll make a video to prove it (without even putting my bra away first). If we don’t know how the heck to tackle a project, we’ll admit it (like this). If we fail miserably at an undertaking, we’ll blog alllll about it (like this and this, just to name a few). We actually love being a DIY diary that’s literally about the
Cutting Curtain Panels To Make More Curtains
Remember when we cut four curtain panels that we loved from Ikea (which were sadly discontinued) right down the middle to make eight of them for our living room? Well, here’s that story, but to refresh your memory, here are a few pics: We loved the added height, texture, and pattern that they brought to the room, but I always wondered if layering some breezy sheers in there someday might make my curtain-loving heart sing. You know, so they’d be fuller and airier and sort of layered and soft looking. So I lived without ’em for a while but kept my eye out for some cheap fabric or sheers that I thought might do the
Fab Freebie: Tool’s In Session
***This giveaway is no longer accepting entries – see who won below!*** And the random winner of lots of goodies from Liquid-Plumr is… Maria (who is actually applying for her PhD in global health diplomacy right now – a self declared “nerdfest”). Congrats! Raise your hand if you’d like a $150 gift card to Home Depot and a 145-piece tool set? Okay, hands down. We can’t see you anyways. But one of you is going to score those supplies along with two of Liquid-Plumr’s latest clog-busting products. It’s all part of their Tool School, which puts Toolbelt Diva Norma Vally behind the teacher’s desk and includes how-to videos like the one below. Enroll now and
How To Install Penny Tile
We did it. We tiled the entire back wall of our kitchen in a counter-to-ceiling backsplash move that we like to call Project Crazy, and we lived to tell the tale. We still have to grout, add a big ol’ industrial range hood and chunky open shelves (those will just be screwed right through the tile with a special drill bit) but when we squint we can almost picture it… As for the top seam where the tile meets the ceiling, there’s crown molding that runs around the entire room (although we removed some of it on the window wall) so we’ll be adding that back around the whole room so the top of the
Rearranging The Nursery
Last weekend I rearranged Clara’s nursery. Again. And I owe you guys the details (a few of you even noticed things had moved around here and requested an update), so whoop, here it is. Let’s dive right into the moving madness. Heck, free use-what-you-have rearranging isn’t that bad, is it? No heavy breathing required. From you, at least (I did my fair share of creepy mouth breathing while pushing things around). It actually was only a few simple switches, but the room still looked tore up from the floor up for a little while: As usual, Clara was in there “helping Mommy dec-rate.” Decorate only has two syllables according to the bean. I love that
How To Print Kid Drawings On Fabric
Okay, okay – so we’re taking a breather from our usual kitchen-related reader redesigns to share a super cool project on a smaller scale. Well, if you call a project that involves 120 hand-drawn monsters a “small” undertaking. Now I’ve got your curiosity piqued, eh? I’ll let Jen explain: My son Daniel is a prolific artist and I wanted to showcase some of his sketches and decided that I would do so on a duvet cover. He designs his own Pokemon, complete wtih names, types, and evolutions and he chose those for the project. Here are his design sheets: I photographed each chosen design. Then in Photoshop I erased all extra marks around the edge,
Painting And Reupholstering A Stool
This is another post that John wanted me to name Stool Boom (here’s why John likes that name). Anyway, a while back I redid a stool that wasn’t ours. It just showed up in the mail and I spruced it up. More on the mysterious mail thing in a minute. First here’s how I got ‘er done. This is a terrible before shot, but picture an old beat up periwinkle blue stool with nails and holes and a rotting wood top: The first thing I did was get all the old nails out with the back of a hammer: Then I primed it and painted it a rich navy color (I just grabbed a $3 test
Tips For Adding A Penny Tile Backsplash
Monday’s backsplash post kinda dove straight into the middle of the project, so we thought while we were back to share our progress we should rewind a smidge to explain a bit more about the process for anyone else out there who wants to tackle something similar. First we had to prep the room. So everything came off the counters. Then down went the rosin paper (from Home Depot). It was recommended by our counter installation guy when we mentioned we were doing a backsplash. It’s basically like brown construction paper, but with an added moisture barrier that keeps any thinset drips from seeping through. We covered each of the counters with cardboard (for extra
Making Burlap Fabric Mats For Frames
Since lots of folks have asked for close up photos and more of an explanation about our little art switcheroo above the sofa, here it is. It’s such an easy project that anyone can do (probably for under $5 if you have the frames and some small photos or prints that you love (images from greeting cards or postcards could even work). So we figured we’d share the goods while we work on our backsplash (those goods will be up tomorrow am!). Our frames above the sofa started out with colorful paper in them ($5 worth of craft paper from Michael’s to be exact). That added some fun oomph for a while, but the beauty
Fab Freebie: Boxing Match
*** This giveaway is no longer accepting entries – see who won below! *** Random.org has done it again and crowned an oh-so-randomly selected winner. That lucky person is… Doris Johnson (who can’t contain her love for her puppy, Finn. She even included a link to his picture!). Congrat Doris… and Finn! It’s no secret that storage boxes and trays are pretty much our jam when it comes to organizing. And this week someone will be taking home the motherlode thanks to Rubbermaid’s new Bento series. Beyond just being pretty chic looking, the boxes have flexible dividers inside that pop out if you need to corral smaller items within and the trays – and also
How To Cut Penny Tile
Oh man, backsplash-ing is 50% scary and 50% suuuuuper excitiiiiiiiiinnnnnggg! Sorry, got carried away there. Maybe it’s 90% super exciting and 10% eeeks. Anyway, we began wrestling with it a few days ago and it’s taking a bit longer than expected (we spent nearly three hours just figuring out how to cut it, prepping our work space, and mixing up thinset before ever getting started). But by the end of the day (after Clara had gone to bed) we had accomplished this: Isn’t it awesome? Well, at least the beginning of awesome. I keep doing awkward things like stroking it and saying “oh yeah” and then blushing and backing away slowly. There’s plenty about the
- « Previous Page
- 1
- …
- 119
- 120
- 121
- 122
- 123
- …
- 240
- Next Page »