The weather hasn’t been perfect for photos and our landscaping isn’t looking it’s finest at the moment, but I’M SO FREAKING EXCITED ABOUT OUR PAINTED BRICK HOUSE that I can’t wait any longer to share pictures! I am unable to even. And I’m a 36 year old suburban mom, so that’s saying something.
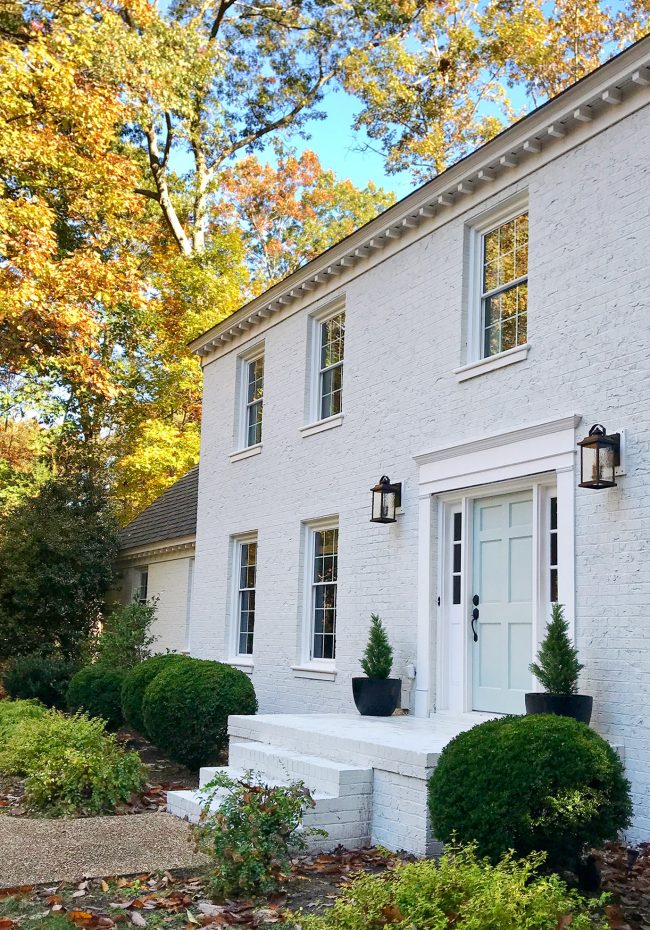
Today we’re giving all the details about painting our brick house white:
- Why we painted our brick house
- What type of paint we used
- How we picked the perfect white color
- The process of painting a brick house
- How much this project cost
Our house is so heartbreakingly beautiful I literally would not be surprised if it started glimmering in the sun like Edward the vampire from Twilight. GO WITH ME HERE, THIS POST IS GONNA HAVE A LOT OF CAPS LOCK. You have been warned.
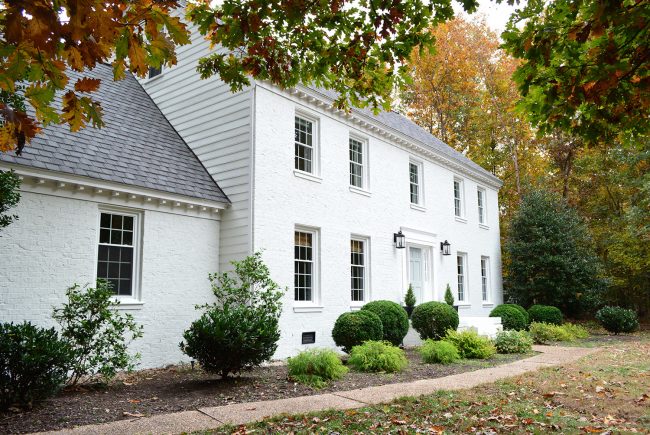
And I’ll try to go easy on the exclamation points. No promises, though!!!!!!!!!!
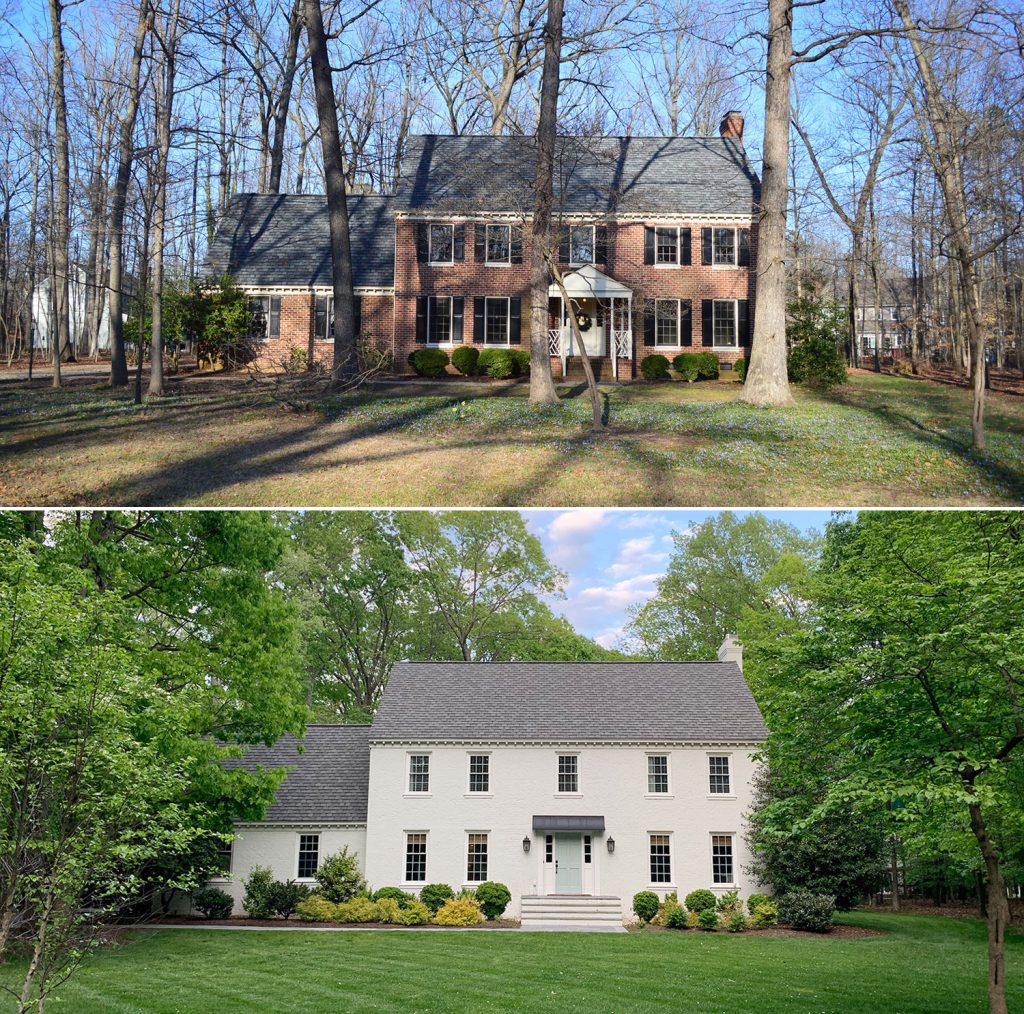
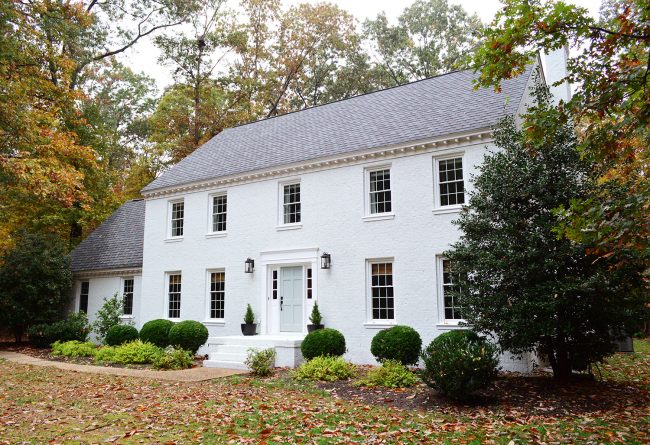
Painted Brick House Before & Afters
We’ve got plenty of before & after photos in this post, but you can also see updated pictures (and video!). They show our new front walkway and portico as well.
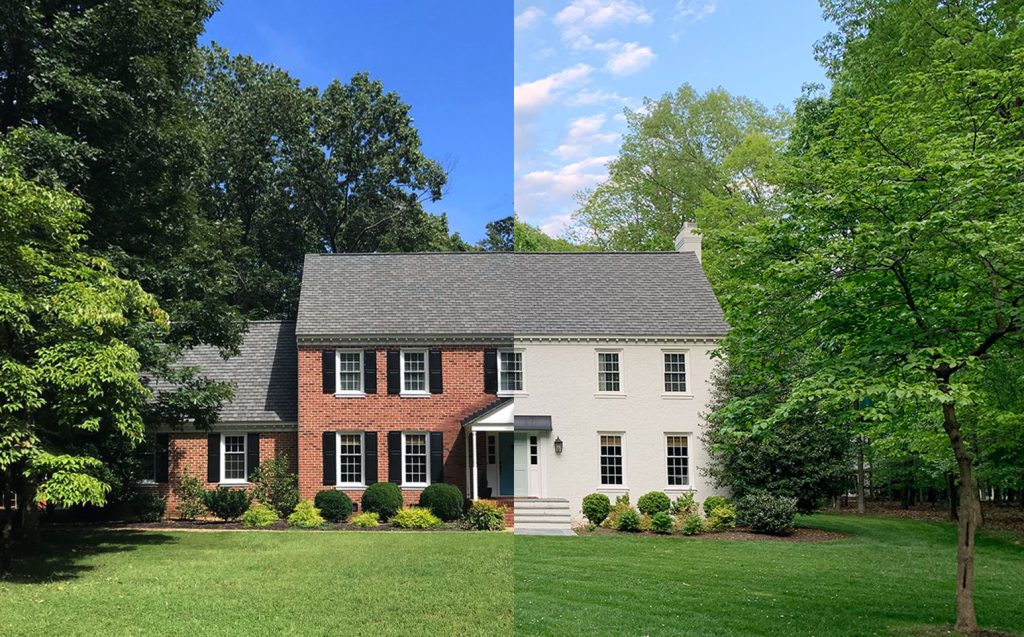
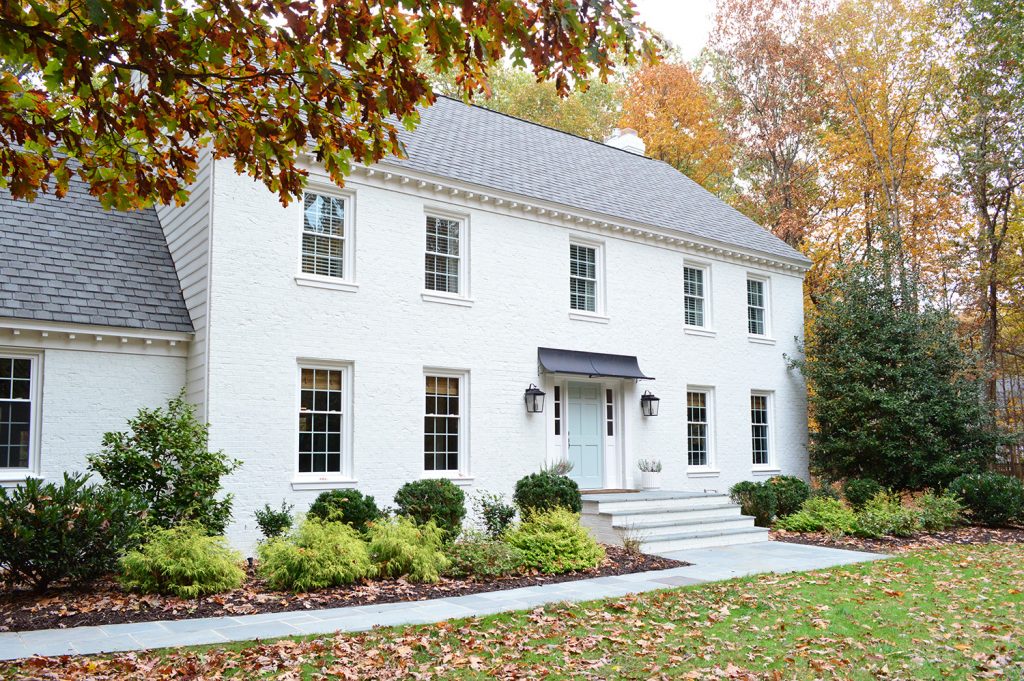
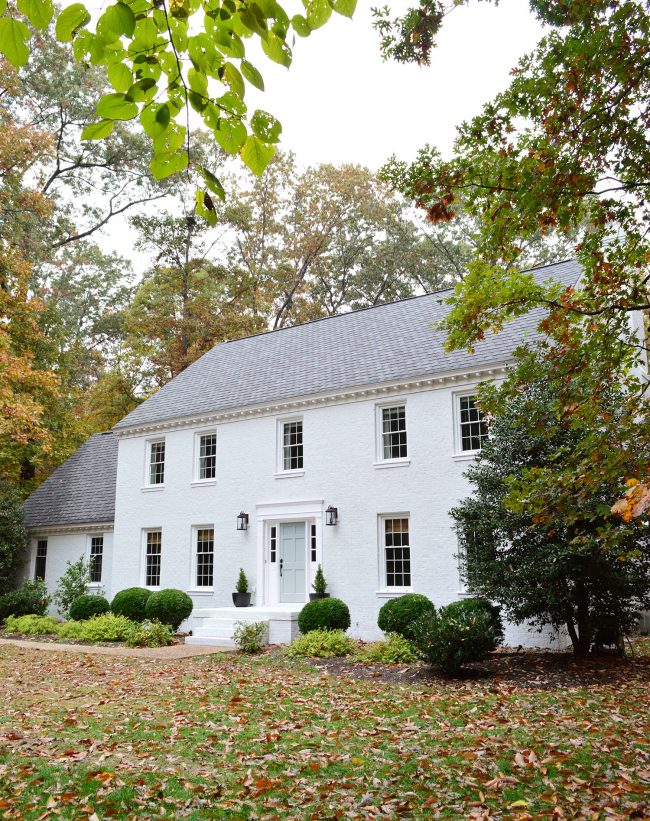
The “before photo” above shows our house after we had made several improvements to the exterior and yard. The change is more dramatic when you compare our painted brick to how the house looked when we first bought it, as you can see below.
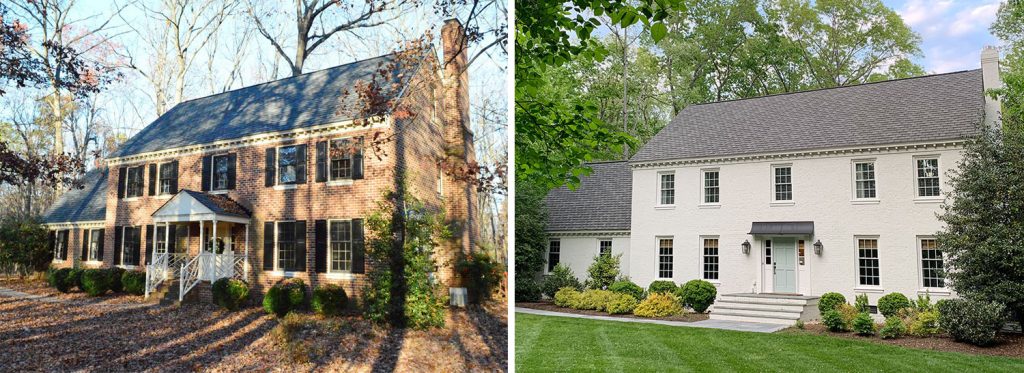
We love how updated and modernized it looks, not to mention the house gets a lot more light thanks to removing the old porch.
Again, you can see more photos and a video tour of our exterior in this post – or keep scrolling to learn more about the process of painting our brick house.
Why Paint Our Brick House?
The short answer is that we wanted to. This is our third brick house and I’ve daydreamed about painting ALL of them at some point. So this is basically a 12+ year fantasy that has finally been realized. John has been interested in the idea, but he is so dang practical. So his concerns about maintenance or it showing green mildew and stuff like that have always convinced him that it was a bad idea. But after discussing it on our podcast this summer, a lot of our listeners soothed our fears (we heard from dozens of people who have lived in a painted brick house for 10+ years with zero brick maintenance) and then we found a product that gave us the confidence to go full steam ahead. More on that in a minute.
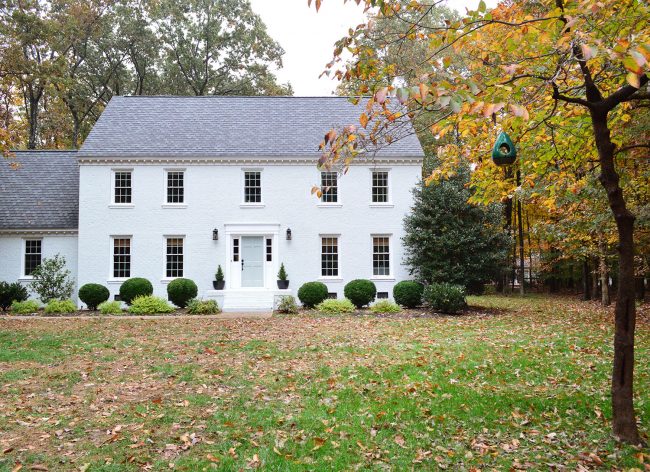
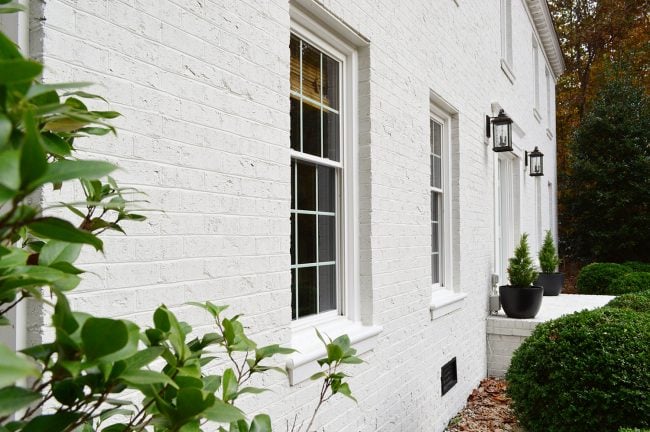
This house, of all of our brick houses, felt like it was the perfect candidate for a painted exterior. We’ve always loved how stately it feels from the curb, and the way it’s situated at the end of the street and framed by large trees just felt like it was poised for greatness. It was also built in the early 80’s, so it wasn’t lovely historic brick that we’d be painting over… just maroon-ish craggy brick with beige uneven mortar. So we had a lot fewer qualms about painting that – as long as it wouldn’t end up being this super annoying thing we had to maintain. Here’s a more detailed shot of our brick so you can see what I mean about the craggy texture and the maroon coloring.
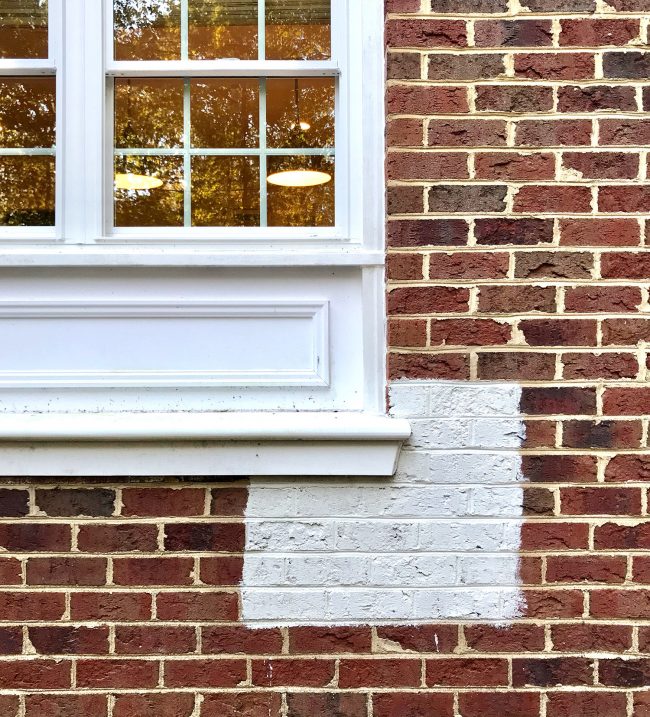
See how the white painted test swatch immediately feels less ragged looking and all of that uneven beige mortar is neutralized? As soon as we saw that test swatch we were like: YES. THIS NEEDS TO HAPPEN.
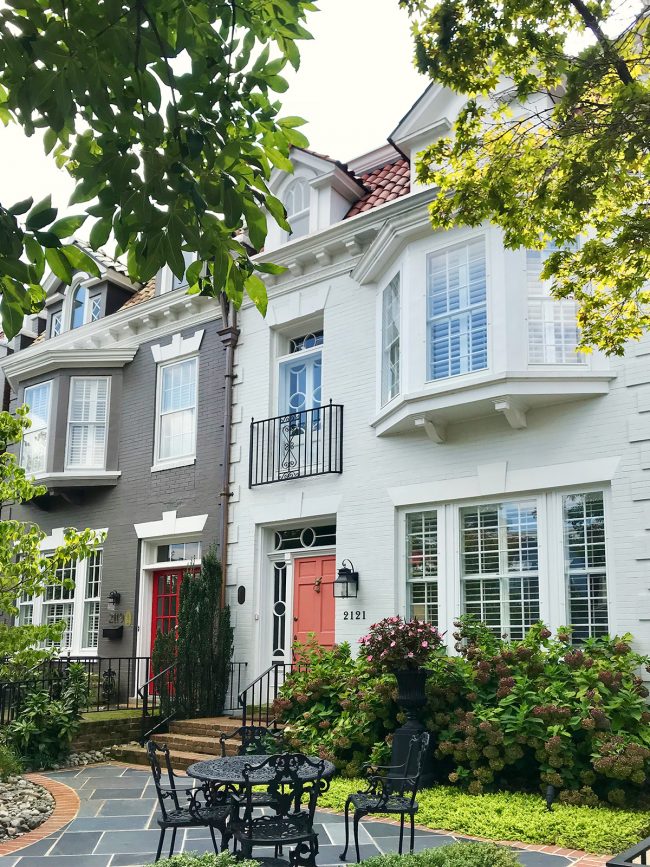
And the good news is that we are not town pariahs for this choice. Ha! Richmond actually has TONS of painted brick houses that are 100+ years old, especially in the more historic areas closer to downtown (like The Fan and The Museum District in Richmond City). So it’s not like all of the “real” gracious and historic homes here are unpainted brick. It’s actually a super normal thing to have painted brick, even in the protected historic areas.
Our neighborhood also has some of these newer 70’s/80’s brick houses that have been painted – but none of them are on our street. In fact, 5 of the 6 houses closest to ours are all unpainted brick (the 6th is siding)… so that also made us feel like painting ours was a great way to break up all the dark brick that’s clustered on this end of the street and add some nice variety.
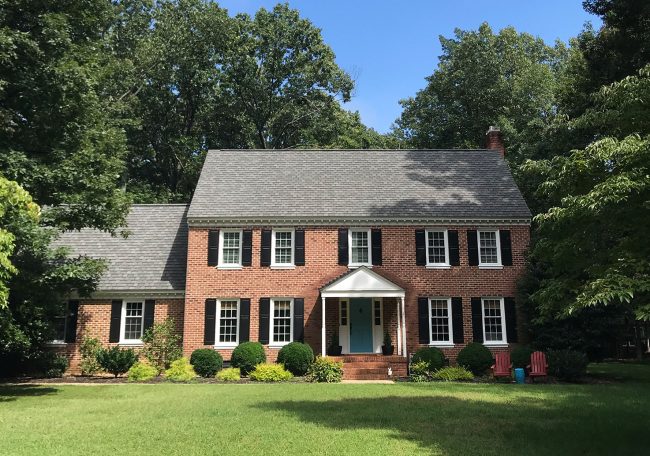
That photo above is the most recent “before” that we have. John took it back in September, but A LOT has happened over the last five years to get us to that point. The photo below is what the house looked like when we first laid eyes on it. Well, “squinted at it through the shadows” is a more accurate description:
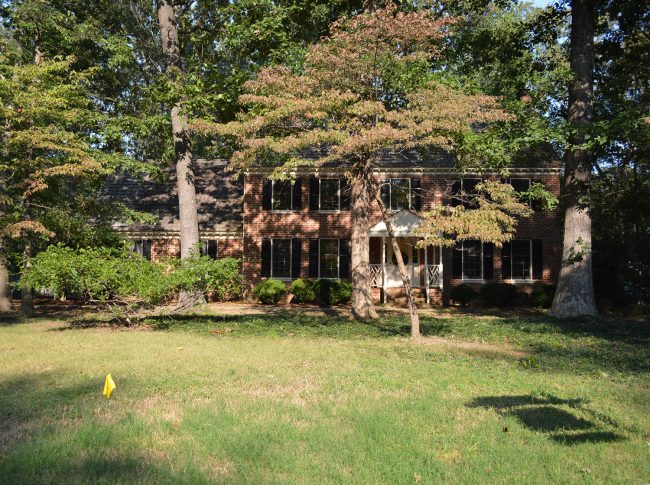
In addition to clearing some trees in the front (both for aesthetic reasons and to solve/prevent some of the moisture & rot issues the house had when we bought it) we also got a new roof, had the exterior trim & siding painted, painted the front door and garage doors, graded & seeded the entire yard, replaced the windows, added landscape lighting, and took various stabs at landscaping. And that’s just what we did to the front!
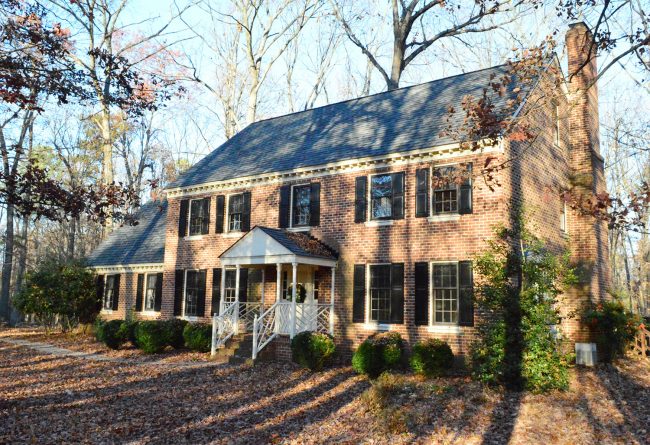
So as dramatic as the painting transformation was last week – it took a while to get to the point where painting our brick would pay off like it did thanks to all of that stuff that also came before it.
And even though our backyard is still in progress, the difference back there is almost more shocking in some ways.
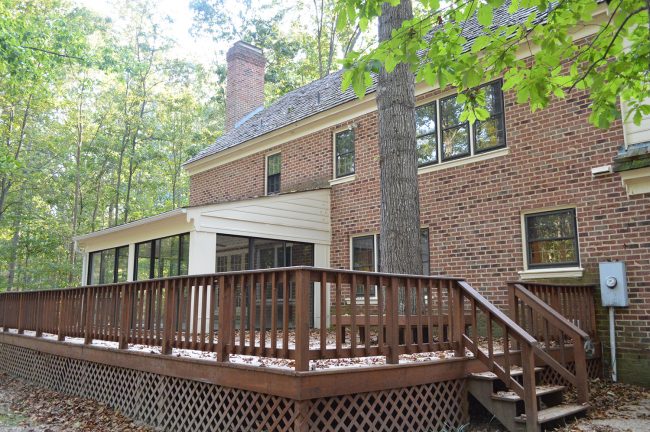
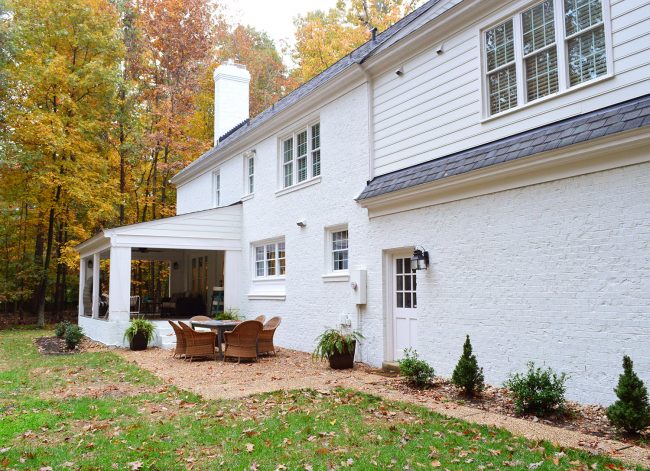
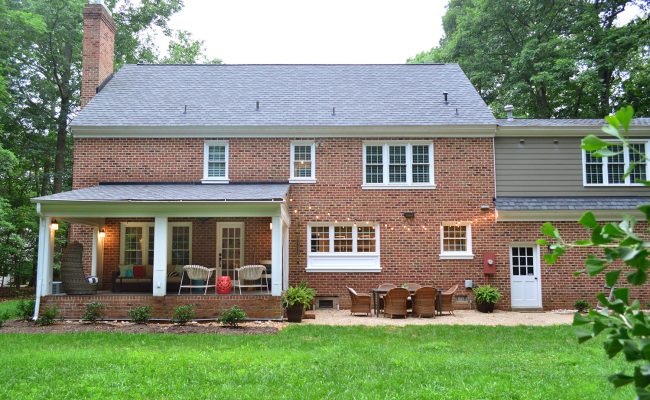
In addition to new roof, new windows, and fresh paint – we also removed the rotting deck (ugh it was so much maintenance, and it blocked us off from the yard in an annoying way) and added the gravel patio, which is just temporary (we’d love a stone patio down the line) . We also opened up the musty carpeted sunroom to make it a covered porch with a nice cross-breeze and two fans overhead. This “in progress” photo from last year as the deck was coming down is the best photo we could find from the same angle:
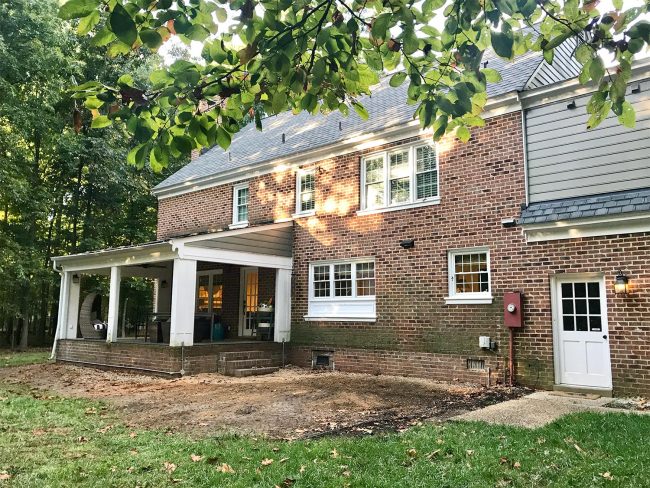
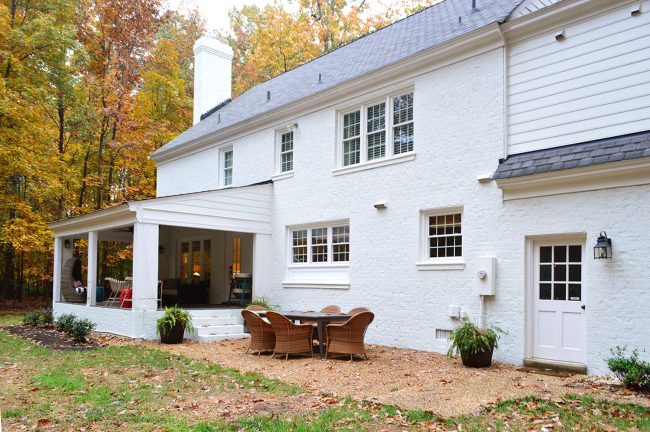
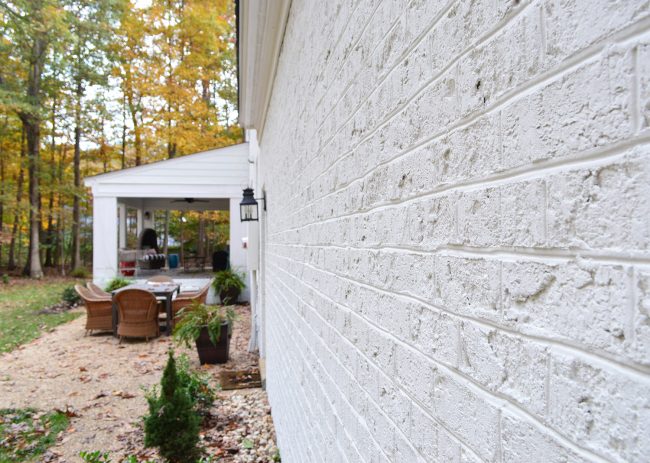
And now it looks like this! I could SQUEAL WITH GLEE FOR HOURS about how the white paint helped to unify all of the different surfaces (like the big section of siding above the garage, the large meter box on the back, and even the various stove vents and dryer vents). I never realized how choppy and busy the back of the house looked before – so this photo is like a breath of fresh air. I still have so many plans for back here, but this one big paint update feels like we’ve come such a long way! Future plans: along with longing for a stone patio where the pea gravel is eventually – we’d love big window boxes under the windows above that area to unify them since that one has super chunky molding where we raised the window during our kitchen remodel. I’m also going to paint the two doors along the back of the house the same color as the new front door I think. The list goes on…
What Brick Paint We Used
I could look at before & afters all day (there are more of those at the end!) but we wanted to answer your burning questions. First and foremost, the paint we used is a product called Masonry Flat Paint by a company called Romabio and we can’t recommend it highly enough. None of this post is sponsored or anything (we paid for the paint, the labor, all of it!) so I’m just gonna say that up front because I’m about to rave about this paint and it might just sound like an infomercial. It is THAT GOOD. So here we go.
My research (and a lot of you) kept pointing me in the direction of Romabio’s Masonry Flat Paint and we can totally see why. The main thing is that it’s a MINERAL paint that’s made specifically for brick, stone, stucco, etc – and not a traditional LATEX paint. Latex paints seal brick which can trap moisture and cause damage, but this mineral paint lets the brick breath like it needs to. It’s essentially more like a stain (hooray for durability and better performance!) but it has an opaque painted looking finish, which is the look we wanted.
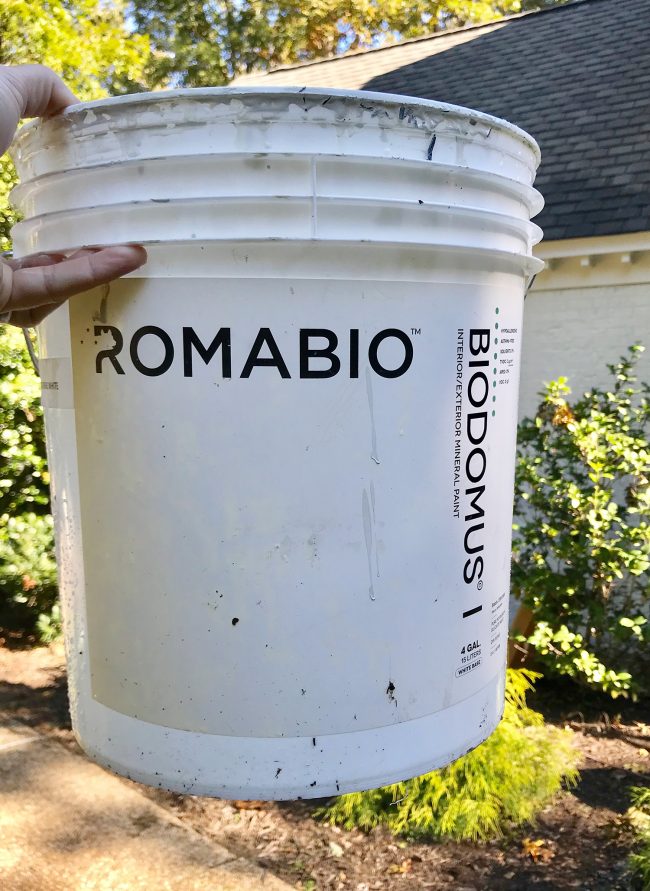
It has a ton of other cool things that make it amazing for this type of application and these factors all helped give us (aka: John The Skeptic) the confidence to move forward with the project:
- The high pH in Romabio’s Masonry Flat Paint makes it alkaline, which makes it naturally mold-resistant, meaning we should get LESS of that green haze have little to no mold and mildew issues that John has been pressure-washing off of the house each year.
- It CAN be pressure-washed, although the painter advised us to use low pressure – just like you would on any other painted surface
- It has a 20-year warranty, meaning we shouldn’t have to repaint for at least a couple of decades (!!) – word on the street is that it often lasts for 30+ years which amazes us to no end
- The reason it has such an insanely long warranty (and is guaranteed to never chip or peel) is because it’s just as breathable as brick. Our painter said “it’s literally like painting brick with brick.” Isn’t that crazy and so cool?!
- All of their products are sold concentrated & are completely non-toxic (by contrast, traditional acrylic paints have water already in them, but to increase their shelf life, they have to add more chemicals to stabilize them).
- And – here’s my new favorite feature – it has a FLAT FINISH, which is SO RIDICULOUSLY LUXE LOOKING. I’m about to start calling my house Chateau Sherry or Villa Blanca like a freaking housewife you guys. THAT IS MY LIFE NOW.
I didn’t really appreciate that last feature until it started to go up, but I think the fact that it’s super matte (instead of glossy/shiny) is what helps give it that historic looking high-end feel, like something straight outta Europe. Do I live in France now? Should I create a two story bookcase a la Belle in Beauty & The Beast? Should John start a beret collection? Maybe. The funny thing is that we worried that painting our house would make it look newer and less historic and classic, but I’m telling you this flat soft white paint makes it feel SO MUCH MORE HISTORIC AND CLASSIC to us! It’s kind of insane.
What White Paint Color We Chose
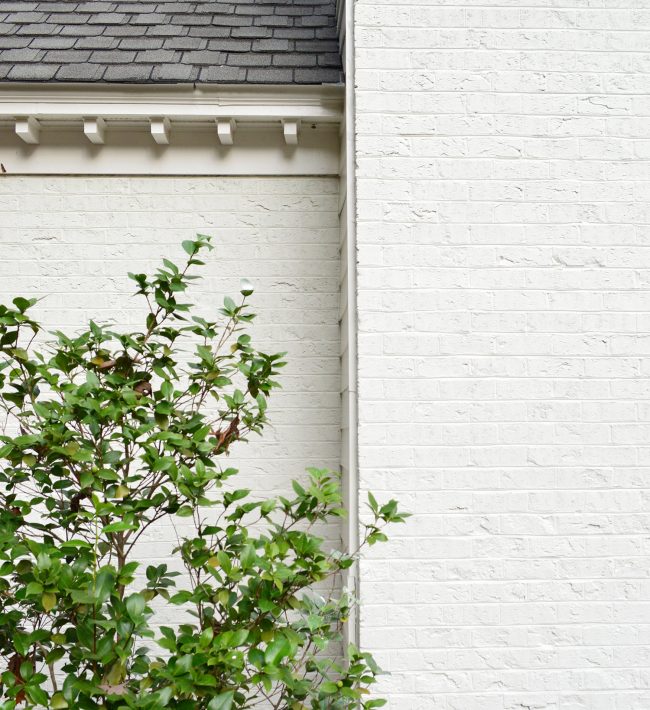
Romabio’s Masonry Flat paint does come in a small set of existing colors, but they can also color match it to any color you want by Benjamin Moore or Sherwin Williams – which is what we did. Just like any color-matching that happens across paint brands, it’s not 100% exact, so you DEFINITELY want to order some test pots before committing to an entire house. We knew we wanted something that read as a pure but soft white (not too beige or gray – and not too blinding and stark or cool) and we also wanted it to work with our existing white trim since all of our new windows have vinyl wrapped sills that wouldn’t be getting repainted.
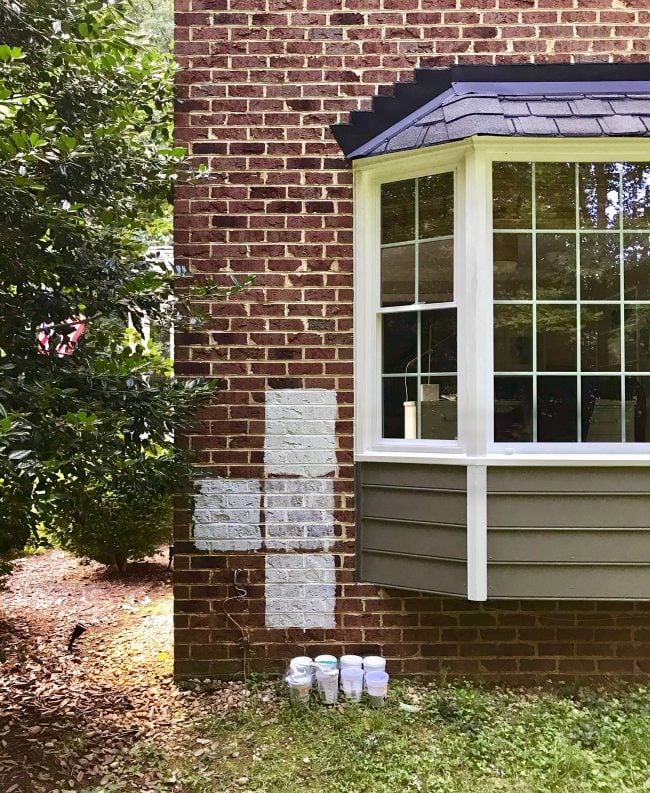
We researched by Googling / Pinteresting a bunch of white exterior colors, consulting with some friends with white houses, and looking up experts’ favorite white paint colors. After some narrowing, we got masonry paint test pots that were color-matched to these four colors: Sherwin William’s Moderne White (top right), Benjamin Moore’s Swiss Coffee (middle right), Sherwin William’s Alabaster (bottom right) and Benjamin Moore’s Stonington Gray (that’s that left swatch).
Our winner ended up being right at the top: Moderne White by Sherwin Williams.
It’s a bit warmer/muddier than a stark white, so we knew it’d look great and not be too blinding – and we tested it in a few other spots right next to the window trim to make sure they looked good together. I had the goal not to settle until I found something that truly felt like a soft warm white color, and it’s such a great one. Couldn’t be happier with how it turned out. This photo is probably the most accurate to the true color in person.
UPDATE: To get the most similar result to the color on our house, ask the folks at Romabio for their Masonry Flat Paint in the color “Richmond White” – which is the exact formula that’s on our house (if you attempt to color match the same thing we attempted to color match, there’s often a margin for error – so using “Richmond White” ensures that you’ll get the same formula that is actually on our house). Oh and you can even get it on Amazon (it’s temporarily out of stock but should be back soon).
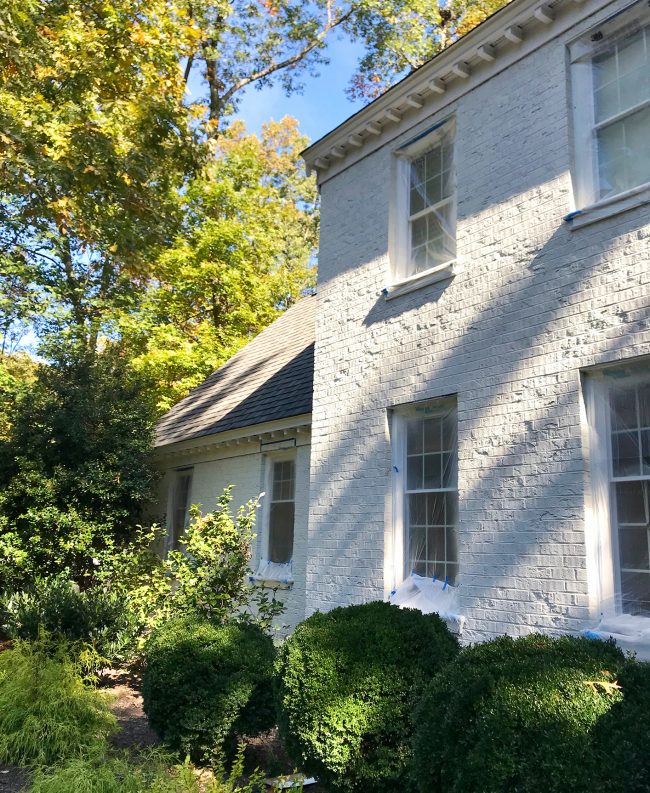
Or maybe this one:

How To Paint Your Brick House
As you know, we hired out this project but that does not mean you can’t DIY yours – especially if you live in a one story house! The paint itself is pretty straightforward to apply, but our challenge was the size of our house – specifically the height. We have a two story home with a full third floor attic and a chimney that extends almost another full story beyond that, so it took a 45′ lift to reach a lot of the brick. We also thought it would be prudent to have a pro apply ours so we could study exactly how it was done and tell all of you guys the right way to do it so you’d have long-lasting results and nobody would have a peeling or bubbling house after all that work (can you imagine?!). And the good news is that it isn’t even that complicated. YOU CAN TOTALLY DIY THIS – especially if you’ve got a less-tall home or are doing a smaller brick project. Completely doable.
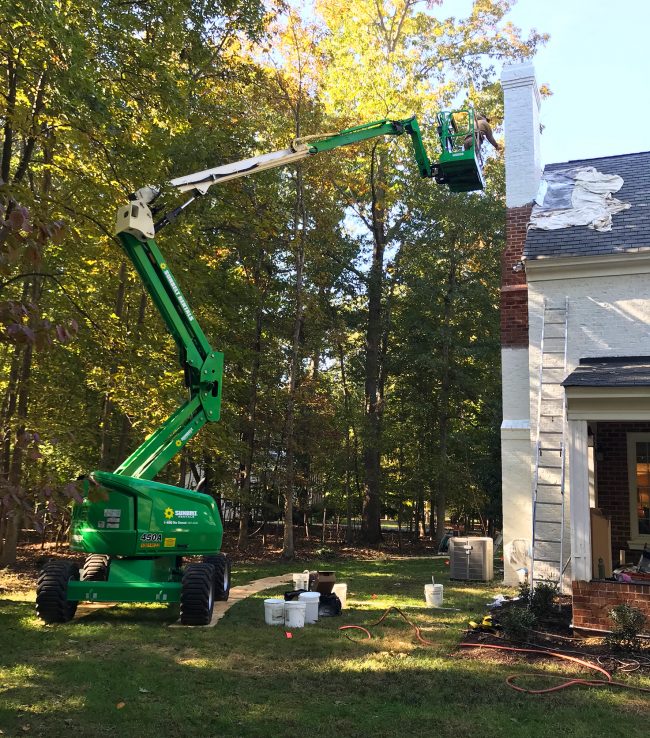
As for how we found our pro painter if you’re looking to hire it out, when we bought our Romabio Masonry Flat Paint (you can buy it directly from Amazon (it’s currently out of stock but it should be back soon), one of their retail locations, or call 678-905-3700 to buy it from them), we asked who they thought would be a good person to hire to apply it, and they tossed out a guy named Lance with experience with the product who is based in Kentucky just as a suggestion. Even though they said any local painter should be able to follow directions and apply the product correctly without much issue, when we heard about this painting specialist who had experience with Romabio’s masonry paint already, we thought it sounded like a good idea to learn from him and make sure our paint went on correctly so we have that awesome warranty to lean on and we don’t worry about teaching you guys the wrong way to apply it or some other NIGHTMARE like that. Cut to us all waking up after two weeks and our houses are all purple or something. And Lance was great! Here he is below, just doing his thang and making all of my dreams come true (you can follow him on IG here).
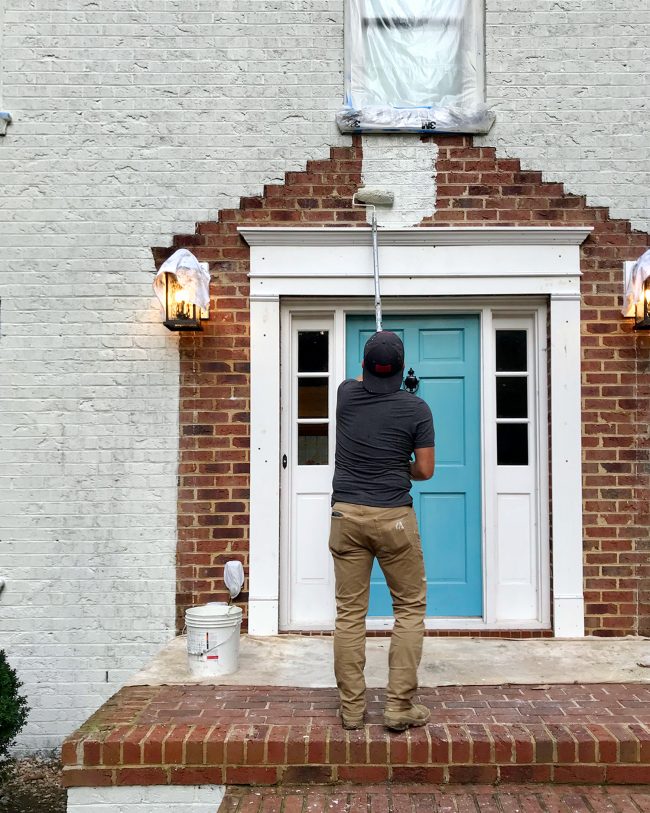
Lance was so sweet to travel to do our painting job since the folks who sell Romabio’s masonry paint recommended him, but he mainly travels all over the US for his antique limewash applications (using this other product called Classico – you can see those finishes and more on his IG account). So if that’s a look you’d like, he can definitely help you out. Oh and he’s working on a video about how to D.I.Y the same process that he used on our house – just for anyone who wants to see it in more detail. Isn’t that nice?! So we’ll update this post with that once it’s complete. But in the meantime, we’ll break down the basic steps for applying the masonry flat product:
1. Prep Your House
Like any paint job, you’ll make your life easier if you take time to prep first. For our project it included steps like:
- Moving outdoor furniture and decor out of the way
- Removing shutters and shutter hardware
- Taping and covering all of the windows, lights, etc.
- Pressure washing any grimy areas
Note on that last part that you don’t need to pressure wash every inch of your brick before painting it. Lance recommended going over any areas that seemed to have dirt or mildew build-up, but other than that you can apply the paint directly without further prep. Aka, no primer either!
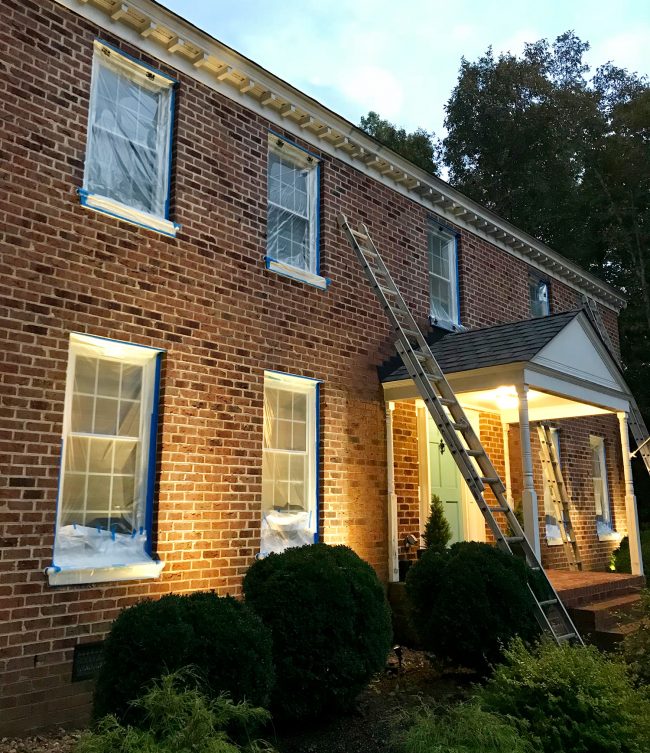
They also did not tape off or cover surrounding areas like landscaping or roofing. They just tossed down canvas drop cloths as they went and held up small pieces of cardboard to act as spray shields whenever they got close to an area that needed protecting as they went.
2. Mix, Spray, and Backroll Your First Coat
I say “mix” first because Romabio’s masonry flat paint needs to be diluted slightly with water (remember, they send it concentrated so it’s less expensive to ship and completely non-toxic). You can read the exact dilution measurement on the package, but roughly speaking it comes in a 4-gallon bucket and you dilute it to become a standard 5 gallons.
The product can be applied with a roller, but Lance recommends spraying it – especially if your brick is craggy. It would take more work to get full coverage into every nook and cranny with a roller, but as long as you’ve got a high-nap roller (like 1 1/4″) it can be done. But again, spraying is MUCH faster. I mean, for reference, it took a crew of three people two full days to spray the first coat on our house. Just imagine if they had been rolling it all. It could have easily taken three times longer. NOTE: They wet down the brick before spraying or rolling – it just helps the product penetrate and soak in – remember it’s more like a stain than a paint. So you’ll want to get all of your brick wet before applying it as you work your way around the house.
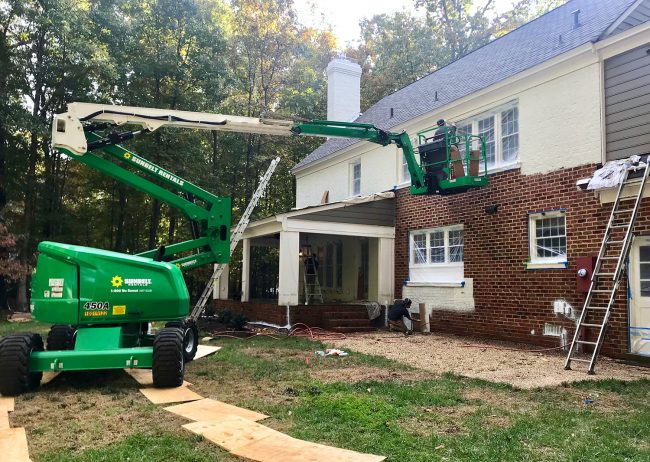
It’s also helpful to backroll your first coat, which means going over the first coat that you have sprayed on with a roller full of more paint, to really smush that extra paint in and even out the coverage. Lance said it’s not necessary, but it makes the second coat much faster to be this thorough from the start. Note: if you aren’t spraying, just rolling two coats on should do the trick.
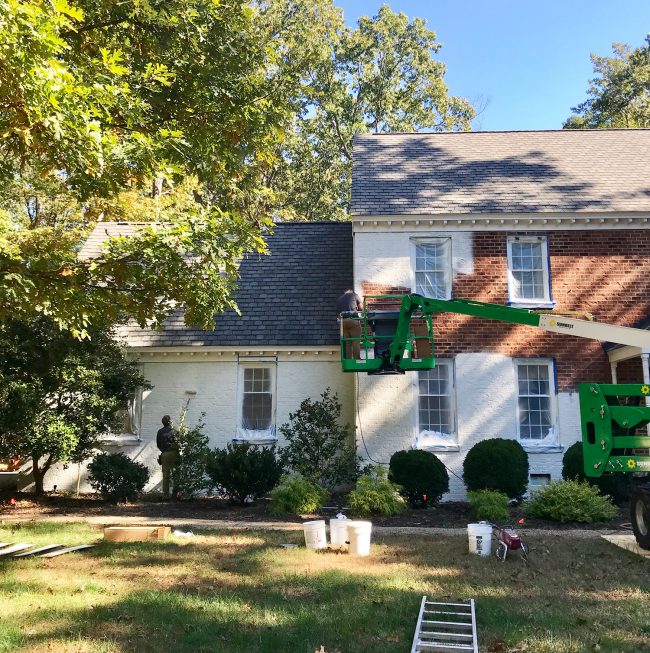
In the photo below you can see the guy in the lift (Jeremy) spraying and the guy on the ground (Josh) rolling an area that has already been sprayed.
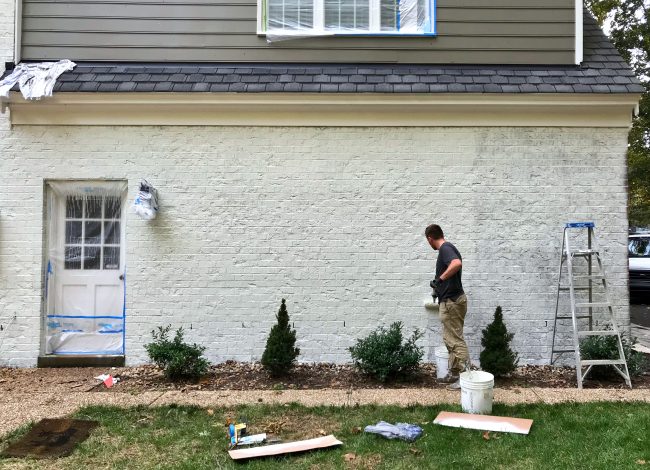
And this photo below of Josh backrolling the garage really shows the difference between just the first spray coat (far right) and how that backrolled area looks a lot more solid and filled in.
3. Caulk Gaps
After the first coat dried, the crew went around and filled any large crags in the brick with caulk. This isn’t absolutely necessary, but even when we painted our brick fireplace inside several years ago we found that it helped to eliminate any deep shadows or dark spots with some caulk. They just used regular indoor/outdoor paintable caulk, so it’s not hard to do – just a little tedious.
4. Spray Your Second Coat
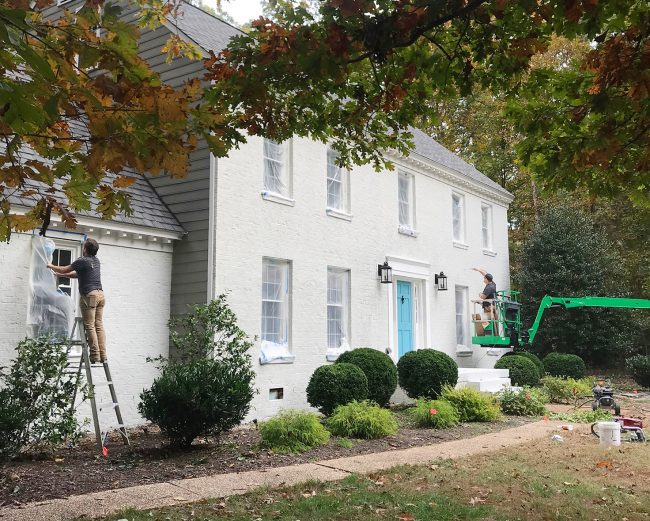
Since they were so thorough on their first coat, and since Romabio’s masonry paint has pretty great coverage, the second coat was able to be sprayed in a single day without any backrolling. That still would’ve taken us like ten days, so it was pretty great to have pros on the job.
5. Paint Any Non-Brick Areas
In addition to the little bit of siding that we have on one side of our house and around the back, we also had random things like our metal electrical meter, the wood door to our crawlspace, and a half dozen other non-brick areas around our house. This special mineral-based paint is meant for masonry (it works on brick, stone, natural stucco with no primer, but can also be applied to other surfaces like hardie board with BioGrip Micro primer), so be sure to prep and paint those other materials with the proper paint. Lance recommended Benjamin Moore’s Low-Lustre finish for our hardboard siding so it’d match the matte look of the bricks and it worked out really nicely.
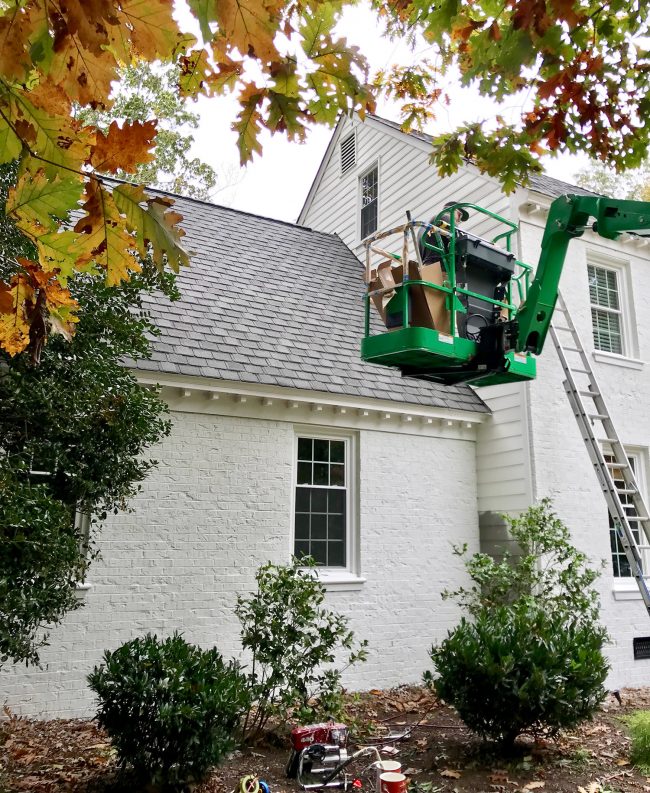
They were able to get great coverage in one coat of spraying our siding (without priming) but we did prime some other elements – like our meter box and dryer vents – with this all-purpose spray primer.
6. Clean Up and Put Things Back
John The Fact-Checker Of This Post always likes to point out cleanup in any project because it’s so easy to forget that it takes time and energy. You know, removing tape and tarps, putting furniture back, and rehanging shutters if you want to have those back up. Speaking of which – we are NOT planning to rehang our shutters. We were surprised by how much we liked the look of the house without them, and a ton of the painted historic homes that we love most downtown don’t have them either (along with about 1/3 of our own neighborhood) so it just feels good to let the painted brick breathe. We had originally planned to buy new operable shutters like the duplex – but we’re happy to save ourselves the expense and the labor of doing that since we like this look so much.
That’s pretty much it when it comes to the DIY steps for an undertaking like this! Lance made a quick video that shows the process very briefly but he’s planning to create a much more detailed one soon, so we’ll link that how-to video once it’s ready so you can see it in action (in case you want to DIY it – or even just to show your pro if you decide to hire it out). And if you have any questions about the paint, the folks who sell Rombio’s Masonry Flat Paint are really responsive and helpful. The guy who created it is named Michael and he is SUPER PASSIONATE about it. He and his wife Leslie run the company, and you know we like a husband and wife team ;)
How Long Did It Take?
Every project and house is different, but I thought it’d be helpful to give you a sense of how long it took for this to happen at our house. It all occurred over the course of five days, but really it was four when you exclude travel.
- Day 1: Travel and prep (shutters down, windows taped, start of pressure-washing)
- Day 2: Brick on front & chimney side of house get first coat
- Day 3: Brick on the back & garage side of house get first coat (also portico demo/rebuilding, but more on that later)
- Day 4: Brick on the whole house gets a second coat
- Day 5: Siding painted, clean-up, and travel
And again, this was with a professional crew of three painters working from about 8am to 6pm straight every day (except travel days). Lance said typically they’d use scaffolding instead of a lift, but the lift was easier to rent and made them faster. So if your crew uses scaffolding it might add extra time.
How Much Did It Cost?
We haven’t received final invoices yet, but Lance said he typically prices a house of our size around $4,500 – $5,000 in labor. Our labor line item in his estimate was exactly $4,500 (and there might be a travel fee associated with someone coming a long way to do your work – but obviously that changes based on how far they’re coming, where they’re staying, how many people they bring, etc). We paid for the paint separately, and our job took 7 four-gallon buckets of masonry paint complete (although he said our brick was especially thirsty so yours might not need as much, even if it’s the same size!) which cost around $1,700 in materials. And when we add in about $200 in siding paint that we purchased ourselves and provided for Lance, our material cost was around $1,900. So the painting portion of this makeover, again by our best guess without invoices being here yet, is about $6,400 total.
Obviously, every project is different and there are lots of factors and circumstances that can affect cost. There are definitely regional price differences too (we asked two of our friends who painted brick houses on the west coast that were smaller than ours and both of them said it was around 10K, which was a lot more than our cost for this project). So just note that this price might be higher or lower than yours, depending on where you live. We went into it fearing it would be closer to 10K, so we were pleasantly surprised, although $6,400 isn’t exactly pennies.
Update: all of the invoices are now in, and the final total was $7,500. If it’s helpful, Lance said clients should expect to pay $1.50-$2.50 per square foot (depending on your area) to have their brick painted with Romabio’s Masonry Flat Paint by a good pro painter (who will apply it the right way so it’s warrantied & so it lasts). Labor & materials are included in that per-square-foot price, so you wouldn’t have to buy the paint like we did. Lance also noted that this masonry paint technically requires less labor & materials compared to traditional latex & acrylic coating since covers with only 2 coat process (remember how well it covered in one coat?) verses a possible 3 coat process with traditional latex or acrylic paint. That means the price difference between using Romabio’s Masonry Paint and brands like Sherwin Williams or Benjamin Moore is usually pretty negligible.
I said “the painting portion of this makeover was $6,400” because thanks to a spontaneous porch makeover we also had a few hours of work from our electrician and about a half a day of work from Sean the Contractor, but we’re still waiting on those invoices. And speaking of the porch makeover…
What’s Next?
We plan to get into this story in more detail on next week’s podcast since it’s quite the rollercoaster (and this post is already long enough) but if you followed along on Instagram last week, you know that in the midst of the painting madness we decided to tackle the porch makeover AT THE SAME TIME. I can’t stress enough that this was NOT the plan going into the week, but I woke up with a wild hair on Tuesday morning and just couldn’t shake the feeling that we should rip the portico off right. that. second.
A few frantic calls to Sean later, and I had somehow convinced him to come to Richmond that afternoon, spend the night at his girlfriend’s house (it helps that she lives in Richmond), and come over bright and early the next day and help us remove the portico (J and I debated doing that ourselves but it was extremely heavy and we worried we’d crack the brick steps or shatter some facade bricks if we tried to muscle it down without help). So less than 24 hours later, by 8:30 am on Wednesday morning, the portico was down, and we were hard at work rebuilding the new surround with Sean…
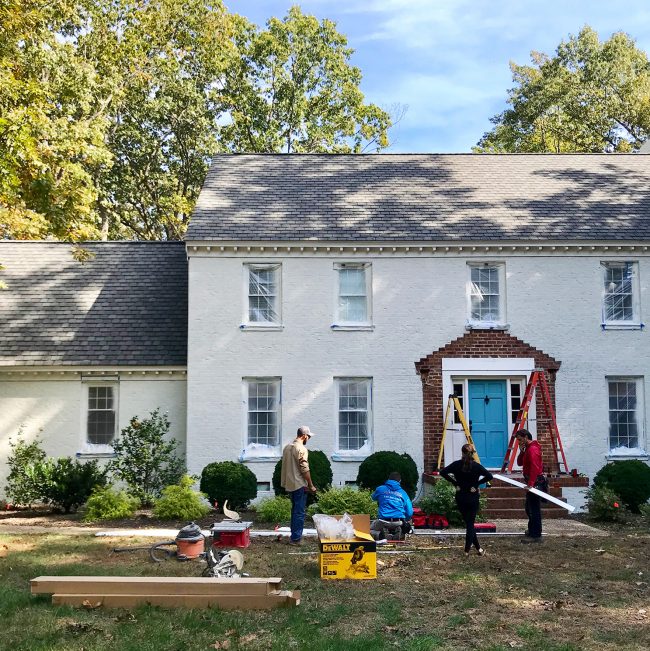
…which led to a frantic call to our electricians who came and helped us wire up two big 22″ lanterns (that we bought right off the shelves that morning) to cover the two holes in the brick that had been revealed when we removed the portico. You might remember that Halloween was last Wednesday, so it was some sort of Trick Or Treating miracle to have working porch lights and a fully reconstructed door frame that we completed literally minutes before the first little costumed kid ran up our walkway.
Like, this was Tuesday evening:
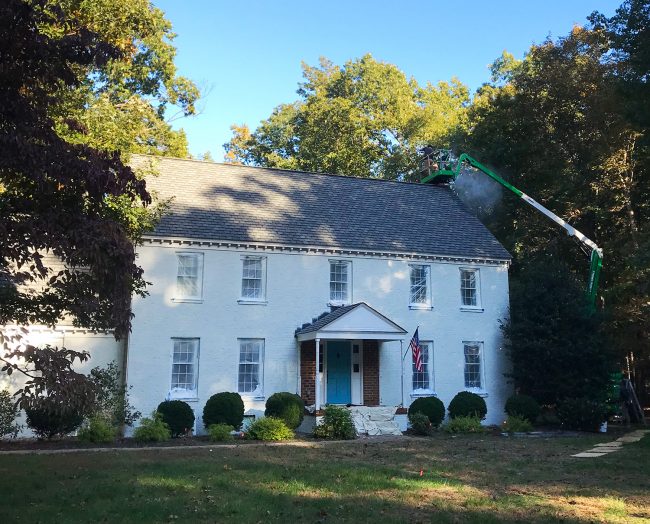
… and this was 24 hours later:
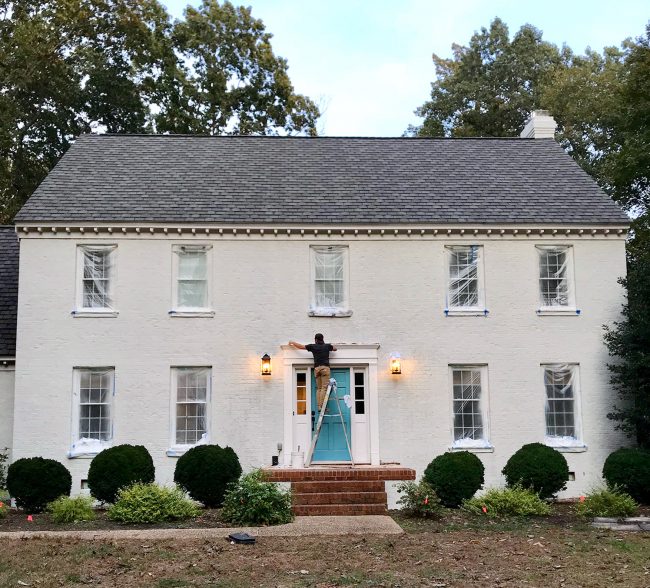
Our original plan was to rebuild the portico with new chunkier columns, but we’re both really loving the look without a portico – and the door surround that we threw together in about four hours is actually pretty darn good (still needs to be painted white – it’s just primed and caulked but the weather isn’t cooperating). So we’re planning to leave it like this for the time being. The new door color helped a lot too. It’s Benjamin Moore’s Tranquility in a super high gloss finish. They have a new-ish paint line called Grand Entrances, and it’s made especially for front doors that you want to have a mirror-like shine. Tip: sand the heck outta your door so it’s smooth before applying this, because it’ll super amplify any flaw. If you do that, it looks like a million bucks! We love how ours came out!
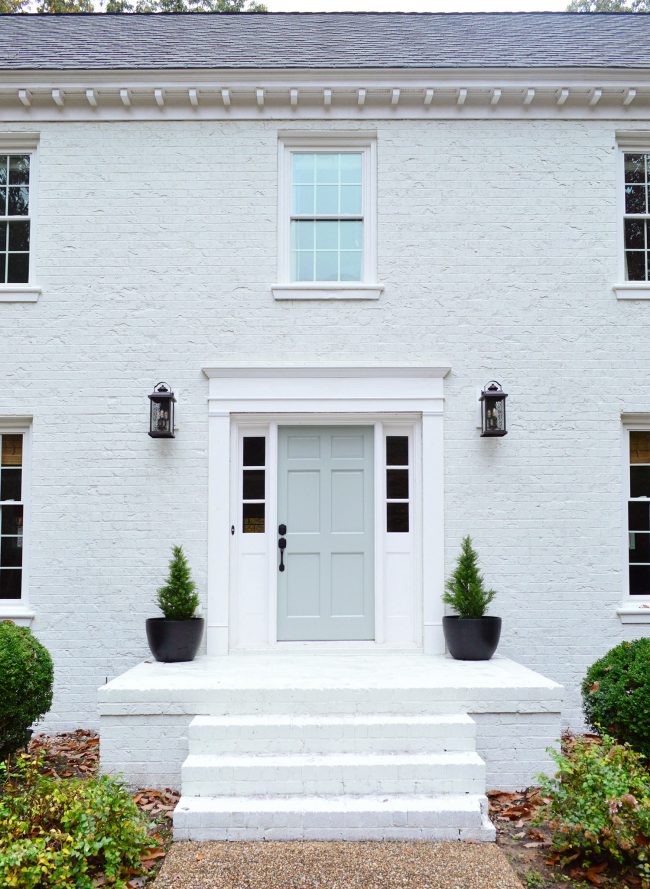
A bunch of houses in our neighborhood have front stoops without an overhang, and packages get left in plastic bags so they don’t get wet, and we enter and exit exclusively through the garage, so I’m not sure we’ll even miss the portico. There was also a pretty amazing bonus to our foyer from taking down that huge overhang: so much more light shines in through our sidelights now! We keep thinking someone left the light on in there! It has definitely come a long way since we first bought the house:
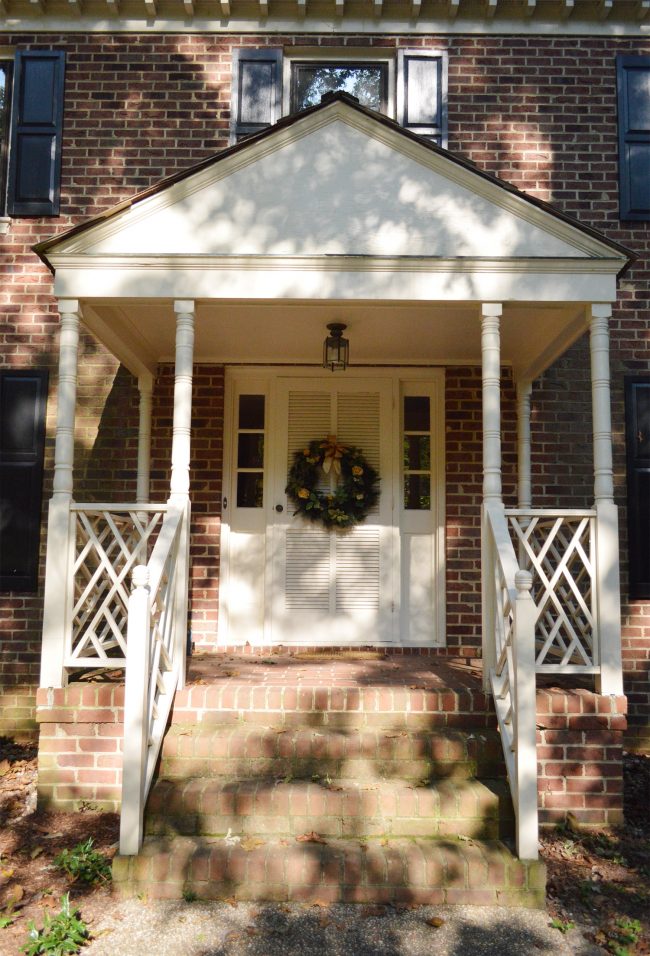
Oh but one more “gotta do that” on our ever expanding to-do list (if you give a mouse a cookie… or if you paint your house white…) is to redo the porch floor with some pretty outdoor-friendly tile, much like we did on the back porch. At first we debated leaving the steps unpainted but the dark beige mortar clashed so badly with the brick house, so we knew we needed a new plan. This masonry paint isn’t a porch & floor paint, so it’s not really meant to be walked on and we agreed with Lance’s recommendation to go ahead and paint it so the house didn’t have a big clashing brick tongue in the front, but none of us expect it to hold up longterm.

Our plan is to tile it with something similar to our back porch or maybe even add slate. This photo of Reese Witherspoon showed up in my Instagram feed over the weekend and, well, GOALS. See her painted brick house with those awesome stone steps? Also goals: that dog.
And of course my head is spinning with all sorts of thoughts about our landscaping. The white has really made all of our bushes “pop” and I spent a good hour on Friday trimming and shaving them to try to make the best of what we have, but I feel like I need taller plants on the porch, something big to anchor the left side of the house, and – I dunno – I know our boxwoods are very “English garden” but they’ve never been my favorite because they remind me of those big cement balls in front of Target…
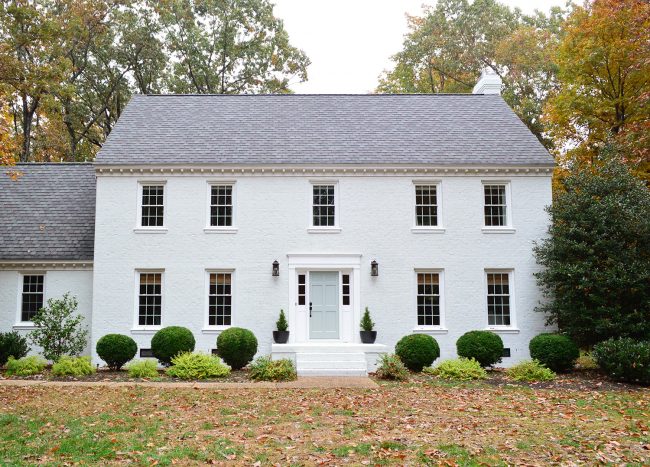
I’m also somewhat obsessed with the idea of replacing that window over the front door (that’s our son’s room) with a larger window so the house feels more balanced and doesn’t have those two blank spaces on either side. This house’s middle window is what I’m thinking about – and it would fit in our son’s room and let in more light, so that might be something we do down the line too.
Oh, and we killed around 75% of our yard (intentionally) after it got overrun with crabgrass this summer, which is why it’s all brown. So hopefully we can reseed and reclaim some green in the spring. At least the fall colors are helping it blend in! Same goes for the back – the grass needs to grow back in, we need to finish that patio (maybe slate like the front steps?), John has to rehang our garden lights, and at some point we need to paint the back doors Tranquility too… and then paint the shed to match the house. The list is long.
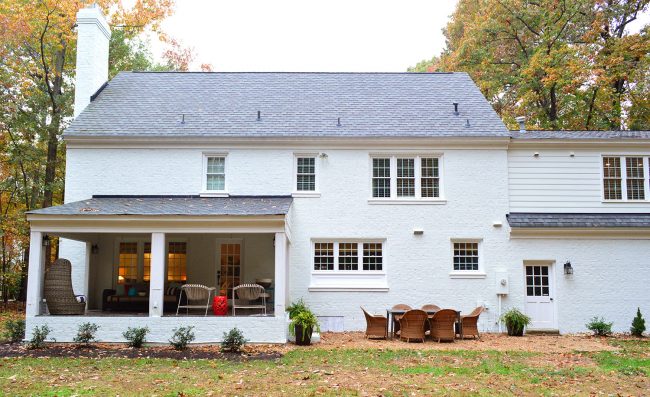
But again, we’re trying to just enjoy the amazing progress we’ve had and not get overwhelmed by the tasks that this one very exciting update has added to our to-do list. But wait, have I mentioned that I dream about adding a window to the top left side of our house for balance and to let more light into our bathroom/closet? Always scheming… ha!
In summary: I really can’t emphasize enough how happy we are with this change. I caught John outside gazing at the house like a goon the other day and I FREAKING TEARED UP WHEN I PULLED INTO THE DRIVEWAY. I know. It sounds crazy. But the house is just so beautiful it’s what I imagine it feels like if you get the final rose on the Bachelor and actually love that person and they actually love you back and your relationship actually works and you both feel understood and fulfilled. My house has undergone a pretty extreme makeover, and I love it for all the right reasons. AND CAN YOU EVEN IMAGINE HOW GOOD IT’S GOING TO LOOK WITH SNOW ALL OVER IT THIS WINTER?! AGHHHHHHHHH.
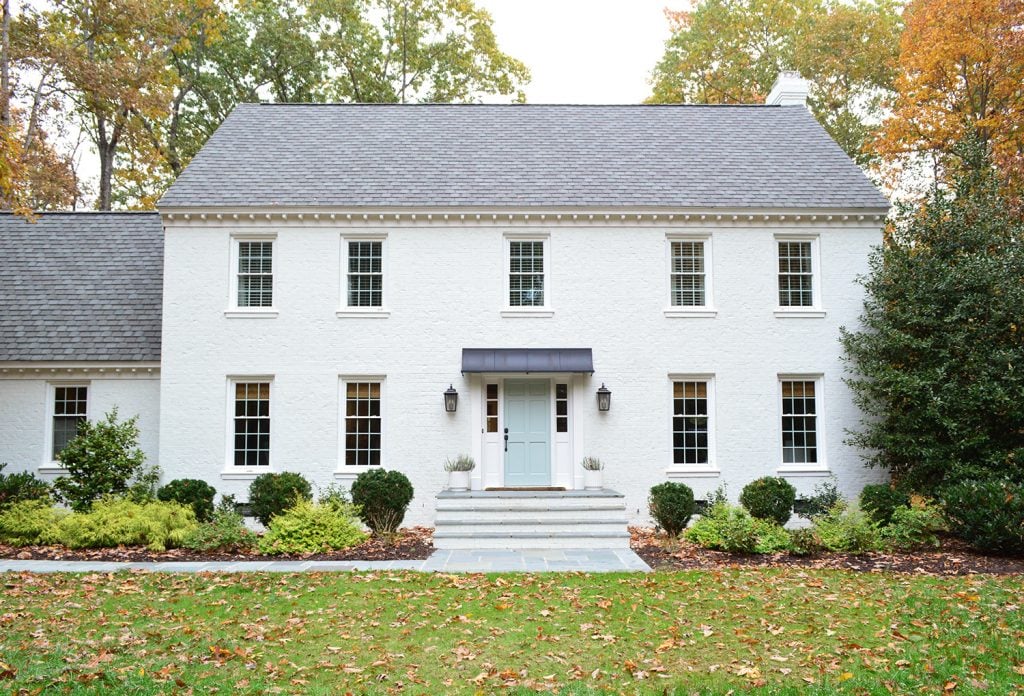
We talked about some of our nerves on this week’s podcast and John has been anxious about making such a permanent decision for months, so it’s that much more of a GIANT RELIEF to both be so over the moon with the result. Our neighbors love it. Our family loves it. Even a teacher in the preschool carpool line last week said “I saw your house all painted and I’m in LOVE.”
Me too, carpool line friend, me too.
*This post contains affiliate links*
