And now, for the dang paneling update. Hold on to your hats ladies and gents. This post = wild ride.
As you probably know, we’re no strangers to priming and painting paneling. Sure we could remove the paneling, but it would mean removing and rehanging all the cabinets since they’re hung in front of it – and revealing goodness knows how many scary issues behind it (they’re old plaster walls so that just felt like a big ol’ can o’ worms). And we could attempt to drywall over it (but it would mean drywalling around the existing cabinets and a lot more expense/trouble than just painting it). So we decided early on that we’d once again say yes to painted paneling – just like we did in our former den (which ended up being our favorite room in the house) when it (slowly over the course of 4.5 years) went from this…
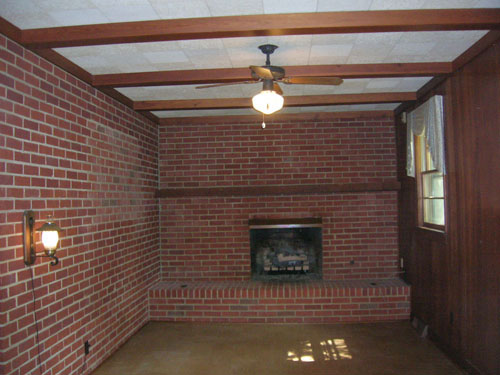
… to this:
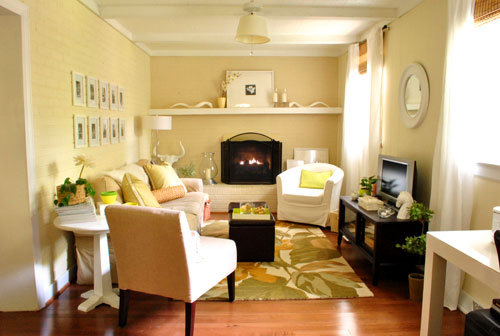
We never regretted the whole painted paneling choice – I guess it’s just like painted brick to us (we don’t mind the grooves that remain after it’s painted since they just add charming and subtle texture). But folks have caulked or puttied those grooves to hide ’em, so you can always do that (or rip it the heck out) if it’s not your thing.
But this time there was a slight variation to the painted paneling process since the last time we tackled it. That variation: the time that it took to get ‘er done. Last time it took us an afternoon (more on that here). So we went into this whole priming and painting thing with high hopes that it would be a quick little project. Yessiree, an afternoon spent completing the paneling would have been awesome (as would seeing a unicorn on our front lawn or finding out that Burger laid golden eggs). Spoiler alert: that didn’t happen.
The time difference was all because we decided to attempt to prime and paint our paneling the no slash low VOC way this time. Just because we like the idea of avoiding as many harmful fumes as we can since we work so regularly with paint and caulk and primer (especially now that we have a baby around). We knew this choice wasn’t a short cut. Heck, it would crack our margin for error right open (since oil-based stainblocking primer is the only professionally recommended way to guard against nasty yellow-orange wood-bleed, which can ooze through as you prime and paint). But we thought it was a risk worth taking in the name of family health. And it was in the end… it just took a while to get there. So here’s how it all went down.
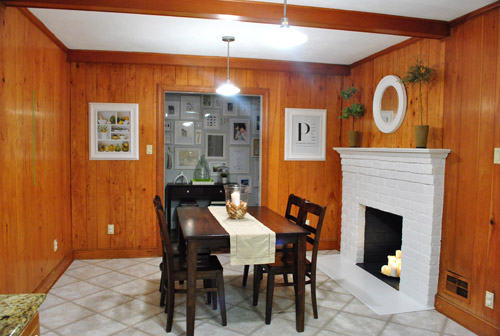
First, here’s what our kitchen looked like before we embarked on our little priming adventure:
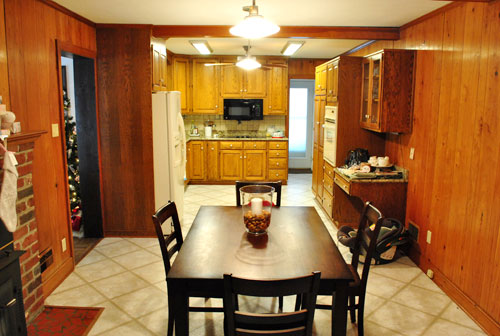
And here’s an old shot of the kitchen from the other direction just for reference (it was actually taken a while back, before we removed the wood stove and painted the fireplace):
Step 1: We wiped down the paneling, beams, and trim with a moist cloth. Some people use TSP for their wipe-down, but we didn’t (didn’t use it last time we painted the den paneling either – but it’s not a bad idea, especially if your paneling feels especially greasy). We also didn’t sand at all (didn’t last time either) but you can if your paneling is especially tough, splintery, or super glossy & shellacked.
Step 2: We removed the vent covers and outlet covers since we decided that we’d be replacing them all (they were bisque and we wanted fresh white).
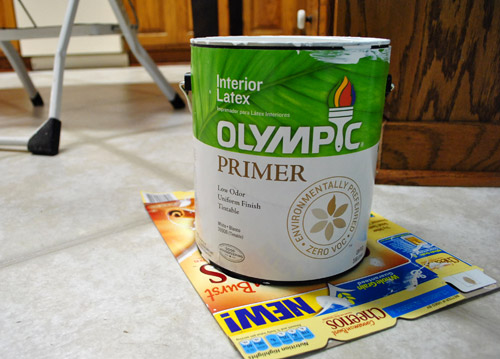
Step 3: We spent about three hours applying a coat of primer to the trim, beams, and paneled walls with Olympic No-VOC primer.
After our first coat it looked like this (about fifteen minutes in we knew we were in trouble):
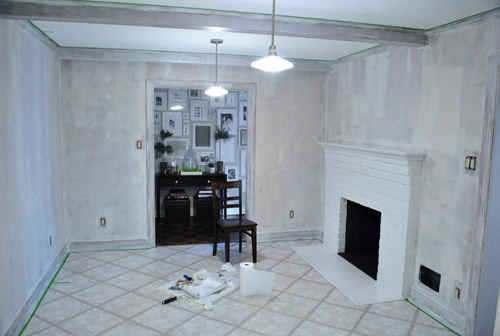
Primer never needs to be super consistent and perfect looking (it often looks uneven and rough but still totally does the job) but we experienced almost immediate bleed-through in a number of spots (when the orangey-brown stain of the wood seeps through the primer and threatens to ruin your paint job). Not good.
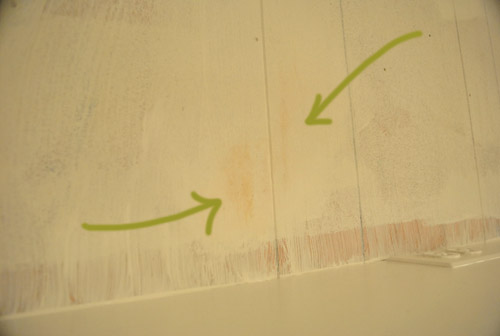
Step 4: We waited for that to dry a bit and tried a second coat of the same primer in certain obviously-bleeding spots, hoping it would block more nasty orange seepage. Nope. It did not.
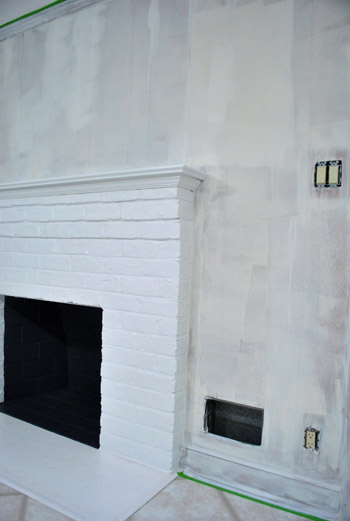
Step 5: We noticed that we had a can of Behr Primer + Paint (in white semi-gloss) in the basement from a previous project (which is low-VOC and nice and thick) so everything got a coat of that (yup, the trim, beams, and paneling got another full coat).
We still had bleed through. Not much, but in certain places it was definitely still there. And it was maddening.
Step 6: We went to Home Depot and found Kilz Clean Start No-VOC primer. It said “stainblocker” right on the label so we gave it a shot on everything (yup, another full coat of a third type of primer went up on the trim, beams, and walls).
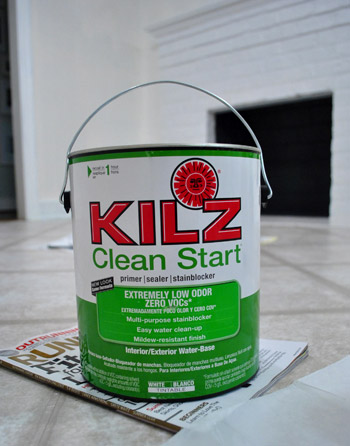
It worked. Angels sang and two white-haired Petersiks rejoiced in the privacy of their freshly primed (finally) kitchen.
Step 7: We painted just the trim and beams with our Behr Primer + Paint (in white semi-gloss) since leaving things primed but not painted for the long term can lead to a nasty and grungy hard-to-wipe-down mess (it’s a dust and dirt magnet since primer is intentionally sticky for paint adhesion). Happily the Behr stuff had great coverage over that last coat of Kilz and looked glossy and amazing. A sight for sore eyes (and arms).
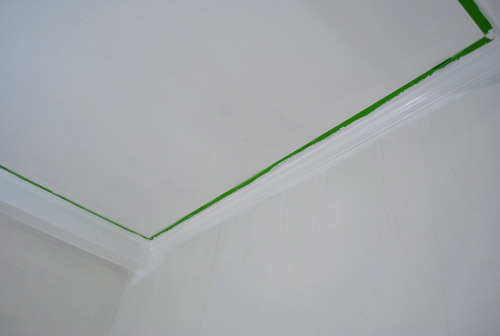
Step 8: We removed all the painter’s tape while the last coat of paint was still fresh for the cleanest lines possible (waiting for everything to dry can cause the paint to peel when you remove the tape). In cases when it was stuck to the primer/paint, we used an exacto knife to carefully slice it along the line of the tape so the primer/paint wouldn’t get pulled off with it.
We’re usually happy to avoid painters tape when we can (I rely a lot on this little miracle short handled brush instead) but since I’m short and I’m the resident cutter-inner/edger, I don’t have as much control up on a stool. So taping around the ceiling trim (and in this case tossing down a quick frame of tape around the baseboards) helped me go faster while I was happy to freehand around the door frames and fireplace.
About 48 hours after the beginning of our priming adventure, it finally looked like this. The trim looks whiter because it’s topped with that semi-gloss Behr paint and not just a flat finish white primer (which was more creamy and less snow-white-ish in color). Now we just have to paint those walls.
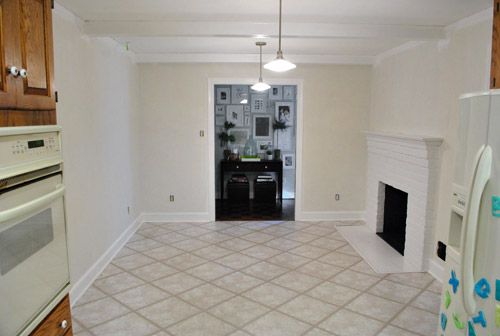
We’re not sure if the Kilz No-VOC primer worked because it was the best choice for the job or because it was layered with the other methods beneath it (perhaps on its own you’d need two or even three coats of it to get full bleed-blockage) but we definitely would recommend 2-3 coats of Kilz Clean Start No-VOC primer followed by two thin and even coats of latex paint if you’re planning to paint your paneling without messing with fumey VOCs. Fingers crossed that’ll work for ya. Otherwise one coat of oil-based stainblocking primer followed by two thin and even coats of latex paint should do the trick (find more step by step instructions on that method here).
It probably won’t take you an afternoon if you go low/no VOC (it took us two days with some babysitting help from John’s parents just to complete the priming stage). And we’re not gonna lie. It was not fun. But it was worth it as soon as we got through to the other side. You know, when we finally crossed that rainbow bridge from bleed-ville to clean-white-walls… hallelujah. It should be mentioned that in very rare cases bleed can come through weeks or even months later (which would make us want to stick paintbrushes in our eyes). Thankfully we painted the wood trim in the living room using the same no-VOC method (four coats of Olympic Premium Paint instead of with an oil-based stainblocking primer) five months ago and nothing has since seeped through. And because the baseboard and trim in the kitchen is the same exact wood, all signs point to: this should work. Of course we’ll tell you if something supremely annoying happens though.
So if somebody would be so kind as to do a nap-time dance for Clara, we’d really appreciate it. So far swinging her stuffed giraffe back and forth and saying “you are getting sleeeepy” isn’t quite doing the trick. Well it’s making us sleepy, but we’re not the target. Has anyone else tried to paint paneling without VOCs? Or been forced to apply four coats of paint or primer for any reason at all? Sucks right? Let’s commiserate.
Psst- Read more about the whole Phase 1 kitchen plan here.

Katharine says
We used to have a yellow-green living room in our old house and it was SUCH a happy color. I just loved looking at it.
Thanks for sharing the process! I didn’t know there was a no-VOC KILZ! When we moved into our present house, a previous owner had painted all the trim BLACK. I’m sure there’s a way to do that and have it look sophisticated, but it’s not our style. AT ALL. And in this case, it didn’t look sophisticated, it looked dirty. So we painted it white, but it took three coats of KILZ and two coats of paint on every square inch. We got SOOOO tired of painting the trim. Later we met the previous owner and he was nice, but we both wanted to throw things at him when we found out he was the one with the brilliant idea for black trim.
Jessica says
LOVE the color you are using….I follow your pinterest boards and that was the kitchen you pinned that I hoped you were using as inspiration!!! It’s going to be absolutely beautiful!!! When we buy a house we are going with that color as well….it’s pinned on my pinterest account too….can’t wait to see the final results. It will be worth the hard work you put into it. Someday you will laugh about the last few days of work. :-)
Meaghan says
So nice and very inspiring, and I think the green will suit the rest of your home perfectly! My partner and I are moving into a new condo next summer. It is currently being built, so I won’t need to tackle any renos, but I hope to someday be able to tackly some of the projects you guys have. You have definitely provided me with lovely decorating and DIY ideas though! Good luck with the rest of your kitchen!
Sara @ Russet Street Reno says
In my opinion, bring on the VOCs! It’s not like you paint everyday, and once it’s dry all paint is the same. Glad you finally got the result you were looking for! I think that color will look fab in there.
erika m says
already the differenc is phenomenal…keep your chins up…its gonna be amazing! NAP TIME DANCE COMMENCES
Robin @ our semi organic life says
We adopoted your ‘can do’ spirit and decided to paint a bookcase last weekend. We obviously didn’t plan much. We just went for it. It was laminate and we didn’t prime (uh oh) just went for 3 coats of paint. Not sure what kind it was. Now it’s all peeling off if we place item on the shelves. What can we do? I hate to start over but not sure how to fix it. Sand it? Re prime then re paint?
YoungHouseLove says
I would sand it all until it’s smooth and then use a thin layer of oil-based primer (or the Kilz primer I mentioned in the post) followed by a few thin and even coats of latex paint. Maybe try applying things with a foam roller so they’re smooth and thinly applied?
xo,
s
Robin @ our semi organic life says
Yes I think we’ll have to do that. I’ll probably only do the shelves themselves rather than the whole thing. This is why rookies find themselves do projects twice!
YoungHouseLove says
Live and learn! We definitely made our fair share of epic mistakes (they still happen, haha).
xo,
s
Chris says
I painted wood paneling about 3 years ago with latex primer, and no bleed. And it’s a weird “hairy” paneling that has serious texture. It was a loooong, grueling 5 DAY process, but oh-so-worth it. The impact on a room is just shocking.
Lisa says
Kilz is good stuff. I have an artist friend who swears by it…next time you need to prime something iffy, start with that. I’ve used it for a variety of projects, and it has always worked well.
amelia says
wow, what a project! looks great so far, and i love the inspiration kitchen!
when we were remodeling our current home, the entire main living space was a deep orangey-red. (shudder.) it took us 4 coats of gray tinted kilz, and then 2 coats of paint on every wall to cover that deep red. (thats 6 coats if you are keeping count!) also, we have a huge vaulted ceiling, so the walls were very high in many places, requiring scaffolding!
if i never see another paintbrush in my life it will be too soon… :)
Gail Donnelly says
Wow. You guys are such an inspiration! We didn’t have paneling but tons of “wall art” from our three and the previous three children who lived here. We used the same Olympic paint you used and had to do 4 coats. PIB (pain in the behind)
For our next room we bit the bullet and went with the Natura line (zero VOC) from Benjamin Moore. We could have gotten away with one coat, but did 2 to shore up edges. It was $45 a gallon since we went through 2 gallons of the Olympic (@ $18) – it was a financial wash.
Great job, like I said – you are an inspiration!
Laura says
The difference is already dramatic. The room seems bigger, the floor looks whiter & it looks so clean.
I assume you are going to cut the hole into the dining room before you paint? Can’t wait to see that project. We want to widen out the closet door in our bedroom, and I am dreading cutting into the existing wall!!!
YoungHouseLove says
We actually learned we’ll need a permit for that opening (and a pro’s help, since it’s a load bearing wall) so we decided to paint in the meantime (we painted a paneled wall in our last house that we later opened up, so it’s not too big of a deal).
xo,
s
Mandy says
That’s the same picture I used as inspiration for my short-term kitchen (until I can save up for the big reno). I painted the cabinets white, and tried to find a good green apple color for the walls. It might be because of the strange light in my kitchen, but I painted it 3 times to no avail! A color that looks gorgeous and perfect most of the day turns to easter egg green at sunset. So I will be very excited to see what color you end up going with!
BTW congrats on powering through and getting the primer finished!!!
melissa says
Kilz is the best. I haven’t used the eco stuff yet, but I plan on looking for it next time I need it. We got a giant 5-gallon bucket of it when we were preparing to sell our last house (which included painting a ton of basement paneling). We didn’t use all of the giant bucket – so we planned on taking it to he new house, but on moving day disaster struck, and we ended up with primer all over our treadmill…
Donna Huebsch says
Wow – I know it was a major pain in the butt, BUT this is looking fabulous!
I can definitely commiserate with the paint and re-paint thing…years ago I foolishly decided to refinish an old pine table. After sanding the stained finish off the top, I painted it white and painstakingly sponged a design on the top. It took hours. Then hubby proceeded to apply several coats of varnish – on what was to be the last coat, it began to lift and peel up EVERYWHERE…yes, we had applied a water-based varnish over the oil-based paint (or was it the other way around – anyway, it was just wrong!). We had to sand the whole thing off. OY. I threw a tablecloth over it and waited a whole year before tackling it again, this time with all water-based products.
Rachel Tatem says
AHHH! That sounds like it was infuriating! I’m sorry. It looks nice and white now. My parents bought a house built in the late 60’s early 70’s and it had paneling everywhere, so I get your problem personally! You have made a panel ridden home look great!
Stephanie says
Wow, it already looks a million times better and brighter. :) And I love the inspiration photo. That’s really fresh and pretty. It’s a little like our living room color, although I’d categorize ours as a yellowy green as opposed to a greeny yellow.
Can’t wait to see the results!
YoungHouseLove says
Yup, you’re right. More yellow than green I think. But it’s close. Haha.
xo,
s
Lo says
Wow! I really admire your commitment to using the low VOC! It seems like paneling is back in and you don’t wanna deal w/ more plaster walls (those happen to be the bane of MY existence) so I think you guys made a great choice, can’t wait to see the finished result!
Katie says
It already looks better with just the white- the grellow will be ah-mazing!
I followed your other wood paneling tutorial to help my parents take their paneling from 60s horror movie to bright and cheery with BM’s Windham Cream. We used the Kilz and everything worked out great, although their paneling was much lighter in color than yours.
katie says
Looks great! I can’t wait to see the paint color and white cabinets. Are you keeping the existing countertops?
I had to put 4 coats of red paint on our steel front door last summer (9 months pregnant in the hot blazing sun!!) and it still needs more coats but with a new baby and remodeling everything else it hasn’t gotten much attention since. But we’re putting our house up for sale in 2 weeks so it’s gonna get another coat very, very soon! Thanks for the inspirational post.
YoungHouseLove says
Yup, we’re planning to keep the counters at least for Phase 1 and probably for the long haul as well. They’re in good shape so it seems wasteful to ditch them – at least right away.
xo,
s
Molly says
We live in a house that my husband’s grandparents purchased in the 1950s. Too bad for us, he smoked like a chimney. Once he passed away and the house became ours, KILZ was (and still is) our best friend as the first step in a painting project. It works wonders on smoke-stained formerly white ceilings, including our bathroom ceiling that was straight-up yellow. We’ve got a wood-paneled porch that we plan on painting, so good to hear it worked for you guys! We’ll be following in your footsteps shortly :-)
Melody says
I actually kind of like the look of painted paneling. In moderation of course. When my husband and I first moved into our house, we had knotty pine paneling in the dining room. We had to fill in all of the knots, and it took for-EV-er!
Kristin @ Ogo's Love Nest says
Hours and hours of painting can take its toll. It turned out great though.
I think your kitchen is going to be charming!
Kate says
You could just do what the previous owners of our home did. Skip the primer and paint it flaming red. Then you can’t see the bleed through!
YoungHouseLove says
Haha- always another option!
xo,
s
Sarah says
I suffered similar agony in our 4’x7′ walk-in pantry. The ceiling was stained with something…unknown, and after 8 coats of 4 different products it was finally covered. Small surface, but painting 9ft overhead in July heat with no A/C in a compact room with a pendant light fixture with an ever-so subtle, skin-piercing finial, um, it was less than fun. My eyeballs nearly fell to the back of my skull, my head constantly bent backwards, riddled with an array of primers.
But on an up note, we, too, painted it a crips yellow-green. The smallest room in the house with the covered, unmentionable ceiling stains became my absolute favorite place to be. And not just because it held the refrigerator with hidden chocolates.
Sheela says
Wow, that’s definitely a lot of work. Here are a couple of tips I’ve discovered along the way through my years of painting. First, a good cleaning agent for walls that doesn’t require rinsing and doesn’t leave a residue is POWDERED Dirtex. You usually have to go to a paint store (like Sherwin Williams) to buy this. I think it’s less than $4 for a box that will last you a while. It works great on floors too! And cleaning walls can definitely lead to a better, longer lasting paint job.
Second, an awesome, non-toxic paint is Mythic. I’ve used it to paint furniture and contractors used it on two of my ceilings (I bought it for them to use, and they really liked it). The paint has no smell, no VOCs, etc. It is definitely expensive, but the coverage is very good. (Better than other regular latex paints that I have used.) And despite being no VOC and non-toxic, the paint is very thick, goes on well, and isn’t thin with poor hide like other no VOC paints. You’d have to find a Mythic dealer in your area, but I’m sure Richmond must have a few.
So there’s my 2 cents (or 5, since this is a long comment). Hope it helps! And by the way, the kitchen already looks so much better, and I love your future color for it. My kitchen is currently a deeper green (guacamole), but I’ve been thinking of re-painting it a more green/yellow color, similar to what you’re choosing!
Sheela says
Mythic also makes primer that’s thick and has good coverage, so that could help you too.
YoungHouseLove says
Oh yeah- forgot about Mythic! Good to know.
xo,
s
YoungHouseLove says
Oh yeah we love Mythic (used it in Clara’s first nursery). Totally forgot about them!
xo,
s
Brandy says
I had to paint paneling in my family room. Was a chore for sure. I had to deep clean all the walls first (Old owners had 4 large dogs, licking the walls, and they were covered in old dog fur and greasy) When I washed them I used a mix of hot water, dish soap, bleach and a big scrubber sponge. Took hours to wash 2 walls. I don’t know if the bleach did something to seal the wood, or keep it from bleeding, but I used the primer I had on hand (Kilz latex) 2 coats because I was scared of a bleed through. Now, the primer sat on the walls 3 weeks before I could paint it (I have 3 kids, 1, 3, and 7) Bit when I did paint it Almond Wisp by Bher satin, it hasn’t had a problem in the 6 months I have lived here, looks fresh and even still. Also did the ‘wood’ beams that turned out to be 1970’s plastic the same way, but used gloss white for them.
Anywhoo, your looks awesome as always! Love your inspiration room!
Sarah H. says
Did you paint the wood beams white too? Or are they just primed for color? What’s going to happen with the ceiling color? Looks great already – can’t wait to see the finished product!!
YoungHouseLove says
Oh yeah we painted those too (we did the trim, baseboards, and beams).
xo,
s
Laura Beth says
Good morning! I’m so impressed with yall’s constant persistence :) We too moved into a home where the kitchen needed some TLC. The funny thing is that your inspiration picture was EXACTLY the same as mine! I actually just did a reveal post of our kitchen, if you want to check it out on my little blog. Our walls ended up being a little less yellow & a little more green…but we painted the cabinets & installed darker granite for a similar look :)
http://astepinthejourney.blogspot.com/2011/06/house-to-home-serieskitchendining-room.html
YoungHouseLove says
So pretty! What a difference.
xo,
s
Kate says
I completely sympathize with the multiple coats of paint. Last fall I decided that I wanted to have my living room and dining room to have the same color scheme – and that involved a deep red accent paint color (below the chair rail in the dining room, accent wall in the living room). It looks great now but each room required 4 coats of paint (not including primer) before getting there. By the time I was done I needed to take a serious break before painting anything else.
Julia @ Chris loves Julia says
My new red front door just took 11 coats of paint–but I didn’t use a tinted primer. Lesson. LEARNED. Can’t wait to see how that grellow looks, ’cause I’m officially inspired.
Chris Loves Julia
jenn says
i have a feeling the second you paint the paneling you will want to paint the cabinets no matter how much you despise painting after. grello and orangey cabinets will look so barfy (yes its an adjective) you will bust out that can of white paint sooner than later.
Mindy says
The power of paint never ceases to amaze me. It’s like makin’ the bed. Or mowin’ the lawn. It makes such a big difference.
That picture looks nearly identical to the green I have in my kitchen and I love, love, love it. In 10 years, it’s the only room in the house that has never changed colors. It’s perfection. I say go for it GI Joe.
Alyson says
Amazing! The difference is unreal. It looks like a totally new kitchen!!
I actually painted my pine panneling about 2 years ago. I used kilz and one solid coat did the trick. I painted the walls a warm, light grey with white simi-gloss trim and love it!
Super excited to see the green paint go up!!
whitney says
So much work! But it looks great!
Just found your blog from ohdeedo, love it!
Wondering what the yellow is from the top pictures of your “former den”. I am looking for a yellow for my basement family room. Having a hard time finding something calming and not too yellow. Thanks!
YoungHouseLove says
So glad you found us! That’s Wishes from Glidden (it was discontinued but still in the computer so they can look it up).
xo,
s
DanielleR says
About 2 months ago I repainted our living room while my husband was at work on a Saturday … took me 6 hours and 2 coats of a really thick hiding valspar primer to cover the deep dark red that I “had to have” a few years back, and then another 2 thick coats of valspar paint + primer on a different day which took about 5 hours. So far so good and the room looks transformed now that I have a neutral tan color going but wow was that a pain. And that was not low voc but a huge undertaking anyway … reds are evil lol.
Hanna says
It looks amazing — so different already. In the picture the white color makes the light fixtures pop out (they look great!) and even makes the floor look brighter!
I also love how the round mirror migrated from the old panelled wall to the new panelled wall. :) Hopefully it can instruct your new wall on how painted panelling should behave (no more bleed through)!
Katie says
I recently painted the wood paneling in my dining room (using Kilz oil-based primer first), then my huge living room with Olympic No VOC primer – which worked GREAT for me. I liked how it went on better and definitely had no smell. One coat of primer and two coats of paint were all it needed! But we don’t have the knotty pine paneling, we have the cheap-o (faux) panel boards. Maybe that makes a difference?
I am already loving the brigter room! I can’t wait for the rest of the kitchen – I’m planing on painting my cabinets soon too. You’ll be my inspiriation, I’m sure :)
Christie says
I love the result already! Can’t wait to see it all finished. :-)
My husband and I bought an older home and there was paneling on two of the walls. We decided to paint instead of taking it down and finding who knows what. Now, I absolutlely love the cottagey feel of the wide panel planks painted a lovely creamy white called Roman Column. It is my favorite project that we have done thus far.
Oh, speaking of projects. I have almost finished my gallery wall that was inspired by yours! I’m loving it already and I haven’t even gotten all of the pictures up yet. I’ll have to send you a photo when I’m done. :-)
YoungHouseLove says
Sweet! I’d love to see it!
xo,
s
Jaz says
Way to go for hanging tough with the no/low VOC paints!
We primed and painted 40 year old yellowed drywall in our garage using two coats of the low VOC KILZ followed by two coats of acrylic latex zero VOC (Sherwin Williams) with good results although it did take that many coats for complete coverage. …that was after full coverage drywall texturing, too.
It may take a little extra elbow grease, but for us the end result – no noxious, smelly fumes – of using low/no VOC materials are so worth it! Thanks for your tutorial. :-)
mribaro says
Hah! I guessed right the color would be apple(ish) green! :) I guess it’s from over-reading your blog :)
This morning I was giving the outside panelling around the windows and doors a protective coat (cherry wood stain) and was thinking of you. I had no idea you’d have such a harsh time with it. Hooray, victory! Painting it green should be a breeze now.
pattilouwho says
I totally feel your pain. We have pine paneling in the room off our kitchen (it’s currently the playroom but will some day be something different once the kid units are grown up.)When we moved in, we used to call that room the cigar bar because not only are the walls wood paneling, but so is the ceiling. Dark city! (not the movie)…anyway. We used 3 coats of primer and 2 coats of paint and the problem I’m having now (about a year later) is that the paint on the trim is chipping. I’m thinking we should have lightly sanded or something to avoid this. So, alas, my wood paneling woes are not over. But, at least it looks fresh and airy instead of the scene of those posters with the dogs playing poker.
beth says
I used that Kilt fresh start to cover over moldings in our house that were never painted (70 yrs) it works really well
Stephanie says
Wow I thought I was the only one who went through this. Last August I painted my paneling using tips from your “How To” from the Den and the first kitchen at your old house. Well when I ran into the weird spots I was stumped! After 2 coast of primer and still having random greasy spots I sanded and coated again. And again. And again. And again. They are finally gone or I gave up. I still know where the spots are because I spent some much time infront of them praying /casting them out of my home. But they aren’t visiable to normal people.
Melanie says
We used Kilz to “kill” the dark purple walls in our master bedroom and bathroom… It took two coats! However, we have plaster walls with fine little cracks and flaws in it, which the Kilz seems to magnify!!! Our dining room is probably the worst room in the house for these imperfections, as we actually removed all of the old paint (it actually came off with the old wallpaper, revealing super smooth bare plaster). I figured some paint would fill in the tiny, minute little imperfections in the wall – they really looked like no big deal, and they were seriously all over the room! After priming and painting, I realized that the little cracks seemed to be magnified! So when we moved on to the hallway, we tried Zinsser Bullseye, Low Odour, and that worked amazingly!! It seems to be less watery than the Kilz, and instead of magnifying the imperfections in the walls, it completely covered them!!! So our hallway and spare bedrooms are beautiful and flawless!! We might have to redo the dining room and living room!
Laura says
I can’t wait to see the finished product! I’ve also been dying over that picture on Pinterest (follow me at Laura Cesare!)I tried painting my kitchen a similar color recently but it’s a bit neon (Lettuce Alone by Valspar)what color are you guys going with? I’m in desperate need of a repaint (eek!)and green’s are so hard to choose!
YoungHouseLove says
We’re wavering between a few colors but we’ll share “the one” when we make our final pick!
xo,
s
Erin says
I love your color choice! I painted our kitchen Benjamin Moore’s jalapeno pepper to go with our white cabinets and we absolutely love it.
fd says
wow what a great difference already. i love the inspiration kitchen and i love how you have persisted despite the setbacks rather than collapsing in a heap of frustration and getting out some beer like we would at home.
quick question, can you explain again why it was necessary to straight away paint some parts but not others? thanks.
YoungHouseLove says
Even though the white Kilz primer was great for blocking bleed, primer is always meant to be followed by paint (so it’s “finished” and glossy as opposed to tacky and paint-ready). So that’s why we painted the trim and beams, just to complete all the white in the room (we could have left them a little while, but not for the long haul even though they’re white since they’re not “finished” with paint, so they’d be dust magnets thanks to the stick foundation-like properties of primer). As for the walls, they need to be painted too, so we hope to tackle that soon. Hope that makes sense!
xo,
s
fd says
thanks, that makes total sense! i’m now joining the others in our collective claranaptimedanceroutine :-)
Carrie Hamilton says
What a difference!! And I love the kitchen picture with the green walls! =)
Jen says
We had knotty pine panelling on all the walls in our family room. I was super nervous about painting it but really we did just fine. We wanted to go low-VOC as well so we used one coat of that same KILZ latex primer to start with but after a drying we still saw some bleed through on/around the knots. Then we cheated. We got a can of the spray oil based KILZ primer and hit each bleeding spot with a quick shot of it. It worked like a DREAM. And I didn’t feel too bad because we used so little, only maybe half the can for a pretty big room. We just finished up with 2 coats of no-VOC paint. No bleed through’s yet and its been about a year.
Elizabeth says
My husband and I bought a house that had not been painted since the house was built in 1965. With that came dark paneling on all the walls in the den and some in the kitchen. Not to mention the dark wood cabinets and all the doors in the house. We put 1 good coat of kilz primer and then painted the den walls a light shade of blue gray and the cabinets and doors white. No bleed through yet and it’s been about 2 years! Your kitchen is looking so great…its amazing what an impact a can of paint can make. Keep up the good work!