And now, for the dang paneling update. Hold on to your hats ladies and gents. This post = wild ride.
As you probably know, we’re no strangers to priming and painting paneling. Sure we could remove the paneling, but it would mean removing and rehanging all the cabinets since they’re hung in front of it – and revealing goodness knows how many scary issues behind it (they’re old plaster walls so that just felt like a big ol’ can o’ worms). And we could attempt to drywall over it (but it would mean drywalling around the existing cabinets and a lot more expense/trouble than just painting it). So we decided early on that we’d once again say yes to painted paneling – just like we did in our former den (which ended up being our favorite room in the house) when it (slowly over the course of 4.5 years) went from this…
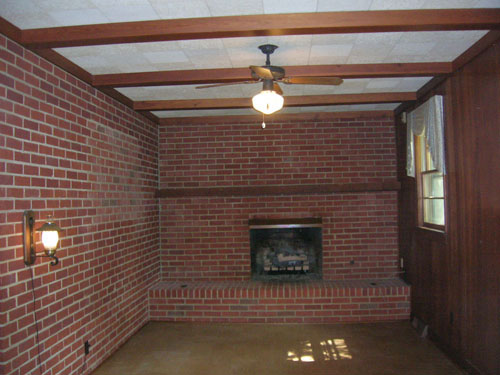
… to this:
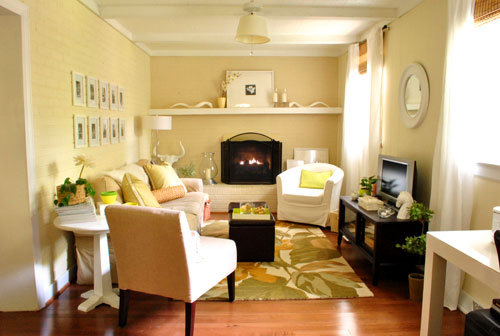
We never regretted the whole painted paneling choice – I guess it’s just like painted brick to us (we don’t mind the grooves that remain after it’s painted since they just add charming and subtle texture). But folks have caulked or puttied those grooves to hide ’em, so you can always do that (or rip it the heck out) if it’s not your thing.
But this time there was a slight variation to the painted paneling process since the last time we tackled it. That variation: the time that it took to get ‘er done. Last time it took us an afternoon (more on that here). So we went into this whole priming and painting thing with high hopes that it would be a quick little project. Yessiree, an afternoon spent completing the paneling would have been awesome (as would seeing a unicorn on our front lawn or finding out that Burger laid golden eggs). Spoiler alert: that didn’t happen.
The time difference was all because we decided to attempt to prime and paint our paneling the no slash low VOC way this time. Just because we like the idea of avoiding as many harmful fumes as we can since we work so regularly with paint and caulk and primer (especially now that we have a baby around). We knew this choice wasn’t a short cut. Heck, it would crack our margin for error right open (since oil-based stainblocking primer is the only professionally recommended way to guard against nasty yellow-orange wood-bleed, which can ooze through as you prime and paint). But we thought it was a risk worth taking in the name of family health. And it was in the end… it just took a while to get there. So here’s how it all went down.
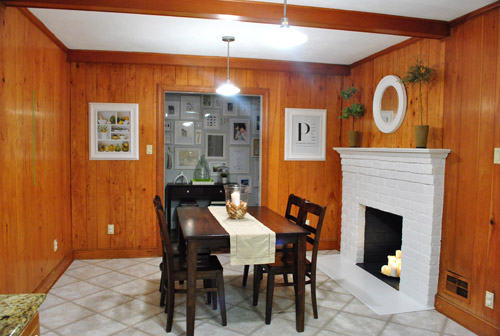
First, here’s what our kitchen looked like before we embarked on our little priming adventure:
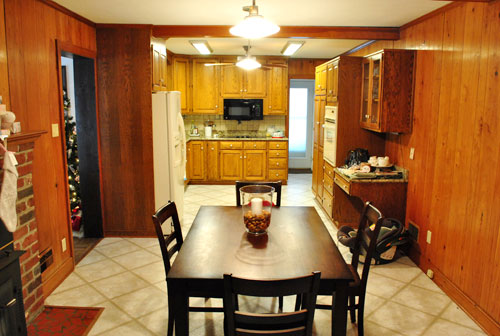
And here’s an old shot of the kitchen from the other direction just for reference (it was actually taken a while back, before we removed the wood stove and painted the fireplace):
Step 1: We wiped down the paneling, beams, and trim with a moist cloth. Some people use TSP for their wipe-down, but we didn’t (didn’t use it last time we painted the den paneling either – but it’s not a bad idea, especially if your paneling feels especially greasy). We also didn’t sand at all (didn’t last time either) but you can if your paneling is especially tough, splintery, or super glossy & shellacked.
Step 2: We removed the vent covers and outlet covers since we decided that we’d be replacing them all (they were bisque and we wanted fresh white).
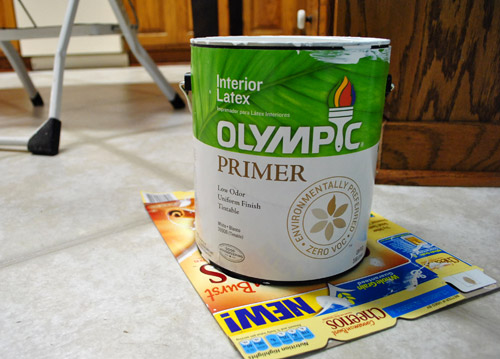
Step 3: We spent about three hours applying a coat of primer to the trim, beams, and paneled walls with Olympic No-VOC primer.
After our first coat it looked like this (about fifteen minutes in we knew we were in trouble):
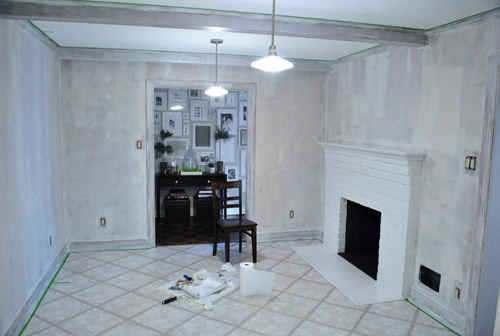
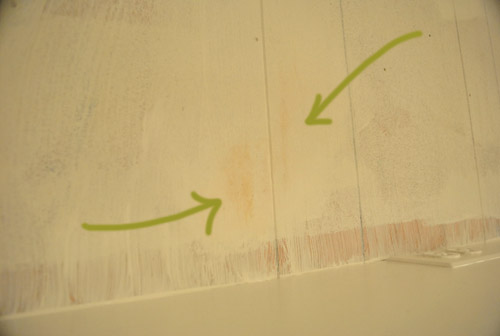
Primer never needs to be super consistent and perfect looking (it often looks uneven and rough but still totally does the job) but we experienced almost immediate bleed-through in a number of spots (when the orangey-brown stain of the wood seeps through the primer and threatens to ruin your paint job). Not good.
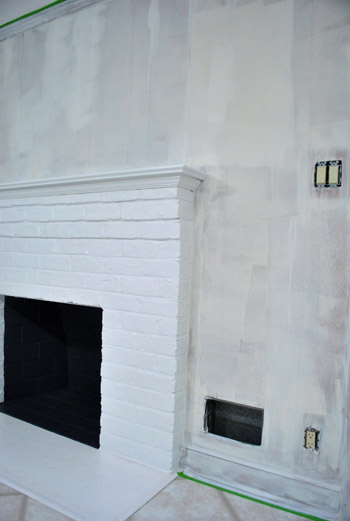
Step 4: We waited for that to dry a bit and tried a second coat of the same primer in certain obviously-bleeding spots, hoping it would block more nasty orange seepage. Nope. It did not.
Step 5: We noticed that we had a can of Behr Primer + Paint (in white semi-gloss) in the basement from a previous project (which is low-VOC and nice and thick) so everything got a coat of that (yup, the trim, beams, and paneling got another full coat).
We still had bleed through. Not much, but in certain places it was definitely still there. And it was maddening.
Step 6: We went to Home Depot and found Kilz Clean Start No-VOC primer. It said “stainblocker” right on the label so we gave it a shot on everything (yup, another full coat of a third type of primer went up on the trim, beams, and walls).
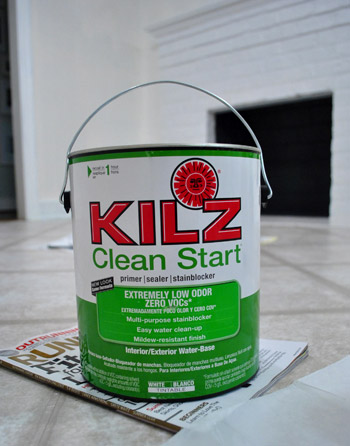
It worked. Angels sang and two white-haired Petersiks rejoiced in the privacy of their freshly primed (finally) kitchen.
Step 7: We painted just the trim and beams with our Behr Primer + Paint (in white semi-gloss) since leaving things primed but not painted for the long term can lead to a nasty and grungy hard-to-wipe-down mess (it’s a dust and dirt magnet since primer is intentionally sticky for paint adhesion). Happily the Behr stuff had great coverage over that last coat of Kilz and looked glossy and amazing. A sight for sore eyes (and arms).
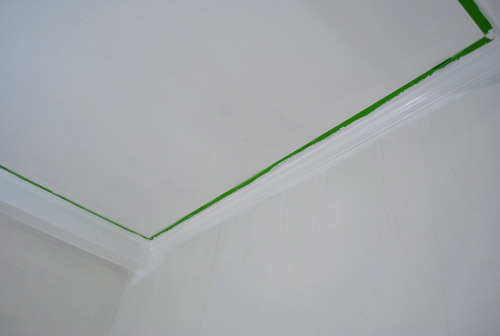
Step 8: We removed all the painter’s tape while the last coat of paint was still fresh for the cleanest lines possible (waiting for everything to dry can cause the paint to peel when you remove the tape). In cases when it was stuck to the primer/paint, we used an exacto knife to carefully slice it along the line of the tape so the primer/paint wouldn’t get pulled off with it.
We’re usually happy to avoid painters tape when we can (I rely a lot on this little miracle short handled brush instead) but since I’m short and I’m the resident cutter-inner/edger, I don’t have as much control up on a stool. So taping around the ceiling trim (and in this case tossing down a quick frame of tape around the baseboards) helped me go faster while I was happy to freehand around the door frames and fireplace.
About 48 hours after the beginning of our priming adventure, it finally looked like this. The trim looks whiter because it’s topped with that semi-gloss Behr paint and not just a flat finish white primer (which was more creamy and less snow-white-ish in color). Now we just have to paint those walls.
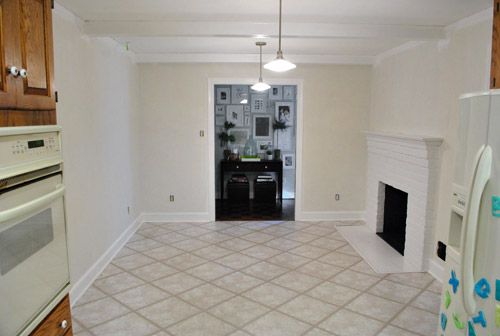
We’re not sure if the Kilz No-VOC primer worked because it was the best choice for the job or because it was layered with the other methods beneath it (perhaps on its own you’d need two or even three coats of it to get full bleed-blockage) but we definitely would recommend 2-3 coats of Kilz Clean Start No-VOC primer followed by two thin and even coats of latex paint if you’re planning to paint your paneling without messing with fumey VOCs. Fingers crossed that’ll work for ya. Otherwise one coat of oil-based stainblocking primer followed by two thin and even coats of latex paint should do the trick (find more step by step instructions on that method here).
It probably won’t take you an afternoon if you go low/no VOC (it took us two days with some babysitting help from John’s parents just to complete the priming stage). And we’re not gonna lie. It was not fun. But it was worth it as soon as we got through to the other side. You know, when we finally crossed that rainbow bridge from bleed-ville to clean-white-walls… hallelujah. It should be mentioned that in very rare cases bleed can come through weeks or even months later (which would make us want to stick paintbrushes in our eyes). Thankfully we painted the wood trim in the living room using the same no-VOC method (four coats of Olympic Premium Paint instead of with an oil-based stainblocking primer) five months ago and nothing has since seeped through. And because the baseboard and trim in the kitchen is the same exact wood, all signs point to: this should work. Of course we’ll tell you if something supremely annoying happens though.
So if somebody would be so kind as to do a nap-time dance for Clara, we’d really appreciate it. So far swinging her stuffed giraffe back and forth and saying “you are getting sleeeepy” isn’t quite doing the trick. Well it’s making us sleepy, but we’re not the target. Has anyone else tried to paint paneling without VOCs? Or been forced to apply four coats of paint or primer for any reason at all? Sucks right? Let’s commiserate.
Psst- Read more about the whole Phase 1 kitchen plan here.

Katie says
Wow, it looks better already! I love your inspiration room. Our kitchen has bright green walls with white cabinets, and it is definitely my favorite room in the house!
Jen A says
Ahhhhhhhhhhh ….
I feel better already.
:o)
hannah says
oh, so nice. yep, annoying to do that many coats but it looks GREAT. I was actually a little anxious after the last post about how you were starting, seriously, I LOVE to paint and remodel and have that lovely result that makes it all worth it. my “thing” is putting the outlet covers back on- I always get mad if my husband puts them back up- he now saves them for me- it’s that final step that makes it feel “done”! if I wasn’t states away (and actually knew you guys and wasn’t six months exhausted pregnant) I would have stopped over to help paint!
Kelly @ cornerofmain.wordpress.com says
Looks better already!
I LOVE that inspiration pic. I found the same exact green kitchen about 6 months ago and have been patiently waiting to replicate it in our own kitchen; lol…great minds think alike! I can’t wait to see your finished room =)
Marie says
I know EXACTLY how you feel! My husband and I bought a house built in ’55 and the ceilings were wood boards that had been PAINTED with super dark stain! We did 2 or 3 coats of primer and a coat of paint…it was such a pain getting into all of the spaces between the boards, and beams. Of course it was all worth it, and the white ceilings made such an improvement to the house! all those coats will be worth it!
p.s. Your den is AMAZING!!!! I want one just like it now!
Andrea says
Oh goodness. I hope to heck yall have better luck with the durability of the Kilz than we did. I spent ALL DAY Friday painting, and used that Kilz on a window seat and a door, followed by two coats of paint… Saturday morning, it peeled off. In chunks. So we spent the day scraping the rest off. In any case, yalls kitchen looks amazing and SO much brighter! Excited to see the final color.
YoungHouseLove says
Oh no! It was probably oil paint your were going over (latex based Kilz or paint over oil-based paint can cause cracking and peeling). Hope it helps!
xo,
s
Beatrice says
Same experience. Now, if I don’t know for certain the origin of paint, I use the oilbase primer. Stinks, but not as bad as peeling in chunks stinks.
Adriane@fortheloveofpainting says
I love it…What a complete transformation so far! Can’t wait to see more!
Melo says
Great work, Youngsters! Looks great already!
A related question: Do you guys have a painting sountrack?
YoungHouseLove says
We usually just listen to Pandora radio while we go. Or put all of our songs on shuffle. Gotta keep it from getting too predictable. Haha.
xo,
s
Krysta @ Domestic for Dummies says
I’ll come babysit Clara if you two need a break! It turned out amazing. I know it was a lot of work but totally the best transformation so far! I love the color you have chosen for the kitchen… it will look so fab with white cabinets! Great job!
johnna says
PLEASE remember the color post you had years back that said what it means when certain rooms are painted specific colors…it said more couples fight in yellow kitchens!!!!
xo
YoungHouseLove says
But greeny-yellow isn’t yellow right? And green was a great color found in nature that made rooms feel calm and inviting I think. We’re sold!
xo,
s
Johnna says
you’re right…sorry…i wasn’t TRYING to be debbie downer for you guys! the kitchen looks AMAZING!!!! you guys are super! i can’t wait to see the finished product!!!
xo
YoungHouseLove says
Haha- no worries! We hope our new color choice doesn’t make us bicker more but we’ll have to spill the details if we suddenly find ourselves at each other’s throats.
xo,
s
Natalie says
Looks FABULOUS! If you haven’t picked a grellow yet…I wanted to recommend Benjamin Moore Castleton Mist (The # is HC-1). My Mom used it in a bathroom (with white trim); gorgeous. I used it in an office in my last place (with dark wood trim); awesome. It’s a great color that changes with the light. I don’t have a spot for it in my current house, but I sure wish I did!
YoungHouseLove says
Thanks for the tip!!
xo,
s
Elizabeth says
In that last picture, the cabinet eyeballs look like they are checking out the end result. LOL
Heather @ Side of Sneakers says
This makes me really excited because I have that same kitchen pinned on my pinterest! I love green kitchens and I can’t wait to see what you do with yours!
Rach says
I bought my first place(!) last June and the previous homeowners had painted a very heavy primary yellow. I thought no problem, paint with primer baby! I was so wrong. I kept testing colors and the colors just weren’t showing true. I pulled an outlet cover off and found bright red behind the yellow. I told this to my friendly Home Depot paint guy and he told me I’d have to cover the walls in a gray primer first, then at least two coats of paint with primer to cover everything. I took this news like any rational person would… I started CRYING in the middle of Home Depot! I was just overwhelmed with how much work I knew it would be for my lovely friends and myself. My best friend who was with me, took over and I calmed down but she’ll never let me live that one down! We primed and painted and I love it! It all worked out in the end as it always does but dang it was a lot of work, and you know just slightly embarrassing!
YoungHouseLove says
Oh man. I know how overwhelming it can be when you’re just getting started. Glad you survived!
xo,
s
Caryn says
Ooh! Love your inspiration photo! Can’t wait to see how it all comes together in your style.
Funnily enough, I just got a BHG email with DIY Ideas and it featured you two and your old house! Cool to see and read your quick recaps on the house projects. Good luck with the painting in the new kitchen!
Londen says
Oh, I have been waiting for your guys to start priming the kitchen. It’s amazing what a few coats of primer can do already, it looks So Good! Good luck with the nap today…fresh air playing always wears my little one out. She is five now and doesn’t nap anymore but a quick bedtime is always nice:)
Necole says
I love how something as simple as paint can change the whole look of a room. I am excited to see how your kitchen comes together.
Heather W says
Love, Love, Love the color you have chosen and can’t wait to see it. I am just curious is it similiar to the “dune grass” color you did in your first house? I loved that too. Can you tell that is one of my all time fave colors???? It’s hard to tell in pics, I know you want to reveal later but I was just curious if they were of the same tone or color.
YoungHouseLove says
We actually considered Dune Grass but it was more subtle and khaki-ish (we still love that color but wanted it to be brighter and super happy in there).
xo,
s
Courtney says
It already looks a million times better with just primer on the walls!
I can’t wait to see how the kitchen progresses!!
Erica M says
Wow so happy to see that green choice! As soon as I moved into my home, the kitchen cabinets were painted Linen White and the walls, a beautiful Benjamin Moore Pale Avocado. I’ve never been so in love with and confident about a paint color in my life, and my husband hates it! LOL I am just glad for some affirmation in my color choices!
Shannon R says
I love it! As for that yellow-green paint color, I painted that shade in my bedroom and it’s perfect. The color I used was Laura Ashley Sage from Lowe’s (but color matched to Home Depot paint). Since then, the Martha Stewart brand has come out with a similar color. I had a heck of a time finding a green paint that wasn’t blue or gray or chartreuse, so I thought I’d pass that along. You guys are paint color pros though and probably already figured that part out…
YoungHouseLove says
Thanks for the tip!
xo,
s
Jill says
Can’t wait to see it finished! Looks great already. Amazing what painting paneling can accomplish. When we painted our fireplace, we had serious bleed-through and issues with it absorbing the paint (despite TSP and multiple washes). I believe it ended up being 3 coats of KILZ and 2 coats of latex paint. I had to basically paint the mortar by smushing an old paint brush into it. My arms didn’t function for about 2 weeks.
Rebekah says
Well – it looks great so far! I love your pinterest photo inspiration. We started our lower level 70’s redo last summer and just finished last week with full time jobs and a toddler it took that long! The longest by far was the painting. We sanded the large space – every inch of it. We applied kilz latex primer (I think the one to hide the darker colored walls but not sure). We sand everything before we paint it. I’m a product of old school. 2 coats on top of the Kilz did the trick. Good Luck – I think it will look beautiful! (ps we have the same method as you. Husband rolls and I edge freehand!)
Kelly says
incredible transformation just with the primer. room looks taller, wider and so much bigger. can’t wait for the final reveal!
Ashley says
I totally feel your paint..er pain! We had to prime our paneling three times and our ceiling beams 6 times before it stopped bleeding through…but it has been over a year and it still looks great! I can’t wait to see you kitchen when it is done, I know it is going to be amazing!!
Jana says
Just a note to say how much I love your blog! Been following for maybe a year & I just keep on loving it even more. You are both so funny & I love your style! Keep up the good work!!!!! Oh and yes….love the painted walls!
Caroline says
Ooh, this brings back bad memories. I moved into a friend’s apartment and she had a penchant for bright walls and contrasting colour trim. So the hall boasted yellow walls with glossy red baseboards/dado/cornicing, while the livingroom had cornflower blue walls with woodwork in both turquoise and hot pink. It was…. insane. When she moved out of the country I painted all the woodwork glorious white. I thought I’d never cover that red (there may have been tears before bedtime), but it was worth it in the end!
Meredith says
Y’all might already know this, but it looks like Crate and Barrel have something simialar to “Sue the Napkin” on sale (exept they aren’t napkins, they’re placemats) for 2.95
http://www.crateandbarrel.com/outlet/50–70-off/mateo-placemat/s646698
YoungHouseLove says
Love it!
xo,
s
Courtney says
I commend you on your decision. Our first home had paneling throughout, and one full wall of brick and we painted it all. I think in doing so you are retaining the character of the house. Some day, in 40 years, people are going to be looking for those kinds of things. I think it’s beautiful!
Page says
I’m just wondering if you took time to paint color samples on the kitchen walls like you did in the living room. I’ve done that in my master bath, and it’s such a GREAT idea! Thank you. Colors look entirely different on the wall than they do in the can or even on a sample board.
YoungHouseLove says
We think we have a winner without painting little test spots but if we start rolling and second guess ourselves we’ll definitely go for test pots of paint.
xo,
s
Joy Franks says
We bought an older sailboat that needed a cabin re-do. My husband bought a bunch of Kilz for all the walls and it sure did the trick. He swears by it now. Your kitchen will look great!
Elizabeth @DIY Theory says
I love your blog because we seem to be on the same schedule of hassle projects at the same time :-) We started remodeling our bathroom last weekend (just going to be a quick paint job, spruce up the trim, and put in a new vanity…we made the nasty discovery that under the paint, there was some poorly covered up, non-primed, wall paper — bubbles, seams, etc under the layer of paint. Our quick face lift has escalated quickly from there. http://diytheory.wordpress.com/2011/06/20/fore/
Glad you got the primer to cover, it looks better already!! Can’t wait to see the rest!
Lori @ Richmond, BABY! says
Knowing nothing about panel painting I would have said your first coat looked good, ha! Thanks for tackling these projects for us home improvement newbies. If our next house has paneling, we’ll know just what to do! Can’t wait to see the paint color- it sounds perfect for tying all the room colors together.
LARY says
Wow! It looks great guys! Love the inspiration kitchen! Good luck and hope that Clara is napping right now :)
Sari says
We painted paneling in our basement. It was a dark taupe color and we painted it white with Pittsburgh Penguins colored stripes! We did not prime. HUGE mistake. It took 4 coats of white paint. The hardest part was getting in between the grooves. I ended up having to go back with a small brush and paint individually each groove. It took days!
Renee says
WOW! What a transformation guys! So glad you stuck to your guns and continued with the Low/NO VOC method. I think I would have given up after that 1st coat and gone the traditional route. It’s amazing how much more fresh and clean the kitchen looks with this partial make-over, and I’m certain your fingers were itching to get painting a million times in your self imposed 6 month waiting period.
Like all your devoted followers I can’t wait to see where you take it next. The Grellow is awesomesauce! I think I can picture some wide plank barnwood flooring in there too, whatd’ya think?
YoungHouseLove says
Oh man that would be awesome. We were psyched to find original hardwoods under at last part of the kitchen, so we’ll have to see how it all pans out.
xo,
s
heyruthie says
i recently painted paneling in my basement, and although i didn’t go no-VOC, i knew i didn’t want to do oil-based. my first wall was primed with Sherwin-Williamson high-adehesion primer. no dice. big bleed through on all coats. my second wall i primed with benjamin Moore (expensive!) basic primer, and i had NO bleed through with just one coat. hurrah!
although not no-VOC, most Ben Moore paint is very low-VOC, so for those parents who are weighing the benefits of days on end and layer upon layer of “no-VOC” primer, vs. one afternoon and only one layer of low-VOC (maybe less exposure to “junk” in the air in the end??) I’d rec the Ben Moore basic. there’s something to be said for shipping the Bean off to Grandma’s while the first layer dries, and then quickly painting right over with no-VOC paint right away–getting the job done faster seems to lower the general toxicity of the home in its own way too. at least that’s my theory! LOL!
Teresa (Our Corner House) says
We tried the low-VOC route with our living room trim and ended up frustrated at the paint counter. We switched it up to the plain-old oil-based paint and it, of course, worked wonders. Didn’t know about this KILZ product, though! That’s exciting!!!
-Teresa
beth ware says
Looks great. It will be a warm space.
Off topic…but still on the kitchen…I am painting my dining room table (garage sale find 5+ years ago) with chaulkboard on top. I have two school age girls. I have a large vintage glass square “vase” that I have filled with dustless chaulk (Blicks). I cannot wait to see the doodles, homework and poetry that is all over the table. I think the same look would work in your kitchen. Also I know you are obessed with chaulk painting as I am. I am been considering this ideas for well over a year.
YoungHouseLove says
Love it. Sounds like so much fun.
xo,
s
Jedi Mama says
I love watching the progress on your house unveiled through the wonderment known as the World Wide Web! My husband and I built our house ourselves, which sounds great in theory, but then…there comes a point when YOU ARE ALMOST DONE, and you lose momentum. So…two years later…we still don’t have doorknobs on the interior doors! Watching the two of you tackle enormous projects all the time makes me think, “Um, yeah. So we could totally put the doorknobs on ten interior doors. We could, in fact, probably get that done before dinnertime rolls around!”
Carole says
I just got finished painting my kitchen that had paneling. We used tinted primer and it worked so well! It only took one coat and covered everything perfectly. After one coat of primer, we painted. Maybe you could try that on your next project.
Heidi says
Wow what a huge difference, I have been trying to persuade my mom to paint her paneling for a few years now. Maybe if I offer to do the work and show her this post it will change her mind! :)
Roshni says
Really sorry that it took so much effort but when I saw the final pic, I was like, Oh Thank God, it already looks sooo much better and open and airy!! Love the color you’ve chosen as well….ready to slap it on?!!? ;)
YoungHouseLove says
Yes. So ready. Stay tuned.
xo,
s
KLL says
I painted — tried to paint — my bed white, which was shellacked to within an inch of its life. I sanded the bejeezus out of it and primed it and painted, and painted, and painted, and painted…and it’s still bleeding through. 15 months later, still bleeding. It looks like tiedye. I’m considering painting the entire thing again in a chocolatey brown…but honestly, the idea of putting brush to bed again kind of makes me twitch. I feel your pain.
Lauren says
Wow! What an adventure! But I must say that even with just the primer your kitchen looks so much more inviting, modern, and happy :) Yay for no more dark paneling!
Carrisa says
I just painted my huge living room with wall to wall wood paneling. I used one coat of regular Kilz. I am ashamed to admit, that’s all I used. There was lots of bleed through, but I assumed that was normal. And given the size of the room and the amount of time it was taking, I did not feel like priming any more. This meant two coats of paint on the wall and three coats of white on the trim. I think it came out looking pretty good though. You can see pics here:
http://andsosheblogs.com/tulsa/
YoungHouseLove says
Looks awesome!
xo,
s
Kyley at Painting Pony says
you know a unicorn on the front lawn is not so far fetched….considering today is Unicorn Appreciation Day! :)
http://www.ammothedachshund.com/2011/06/29/unicorn-appreciation-day/
P.S. your kitchen is coming along great! I’m sure it’s worth it in the end.
YoungHouseLove says
Haha- hilarious!
xo,
s
Ashley says
Oh that’s going to look so great! Already, if I were to walk in, I’d take a deep breath in thru my nose and let out a big “Ahhhh”… that’s how it makes me feel.
I wish my husband and I were more on the same page as far as what things we like and don’t. Do you two generally agree and/or like the same things?
My husband is an architect – so he feels he’s awesome.
Fine, but I’m awesome too. And I’d venture to say I have even more awesome ideas. I just do. He just knows why they won’t work.
I still think I’m awesomer tho.
YoungHouseLove says
We definitely disagree all the time , but we have an agreement that we don’t do/buy anything until we’re both on board. That way we don’t hold any grudges and we both love all aspects of our house. One way to convince each other of ideas or projects is to find inspiration images to sell the idea to each other (sometimes it’s hard to visualize without them).
xo,
s
Jennifer says
We recently color matched Martha Stewart’s Chinchilla in the Behr low VOC paint+primer and I was shocked that it took 3 coats to cover. It probably could have used four, but we were really DONE at 3. We were trying to cover a wall the color of your guest room. That paint does not cover as well as the old prime then paint method. I will go back to that in the future!
Meagan says
I’ve been a long time reader and have never made a comment, but this was too funny to pass up.
Looking at your projects page and noticing the below made me smirk
Quote – Painting Wood Paneling (It’s Easy)
Care to change that title? ;o)
Love your blog xx
YoungHouseLove says
Correction: painting wood paneling with oil-based primer is easy. Haha.
xo,
s