And now, for the dang paneling update. Hold on to your hats ladies and gents. This post = wild ride.
As you probably know, we’re no strangers to priming and painting paneling. Sure we could remove the paneling, but it would mean removing and rehanging all the cabinets since they’re hung in front of it – and revealing goodness knows how many scary issues behind it (they’re old plaster walls so that just felt like a big ol’ can o’ worms). And we could attempt to drywall over it (but it would mean drywalling around the existing cabinets and a lot more expense/trouble than just painting it). So we decided early on that we’d once again say yes to painted paneling – just like we did in our former den (which ended up being our favorite room in the house) when it (slowly over the course of 4.5 years) went from this…
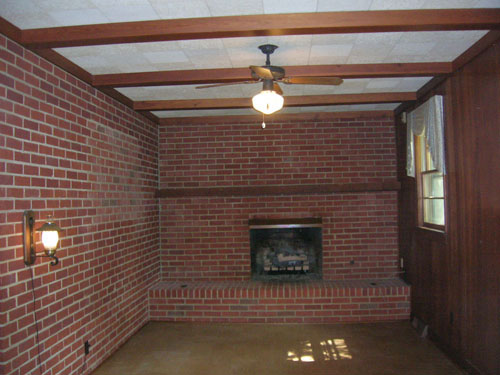
… to this:
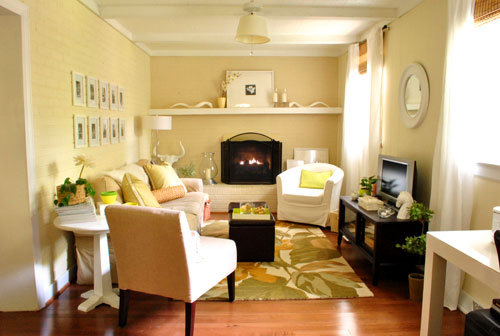
We never regretted the whole painted paneling choice – I guess it’s just like painted brick to us (we don’t mind the grooves that remain after it’s painted since they just add charming and subtle texture). But folks have caulked or puttied those grooves to hide ’em, so you can always do that (or rip it the heck out) if it’s not your thing.
But this time there was a slight variation to the painted paneling process since the last time we tackled it. That variation: the time that it took to get ‘er done. Last time it took us an afternoon (more on that here). So we went into this whole priming and painting thing with high hopes that it would be a quick little project. Yessiree, an afternoon spent completing the paneling would have been awesome (as would seeing a unicorn on our front lawn or finding out that Burger laid golden eggs). Spoiler alert: that didn’t happen.
The time difference was all because we decided to attempt to prime and paint our paneling the no slash low VOC way this time. Just because we like the idea of avoiding as many harmful fumes as we can since we work so regularly with paint and caulk and primer (especially now that we have a baby around). We knew this choice wasn’t a short cut. Heck, it would crack our margin for error right open (since oil-based stainblocking primer is the only professionally recommended way to guard against nasty yellow-orange wood-bleed, which can ooze through as you prime and paint). But we thought it was a risk worth taking in the name of family health. And it was in the end… it just took a while to get there. So here’s how it all went down.
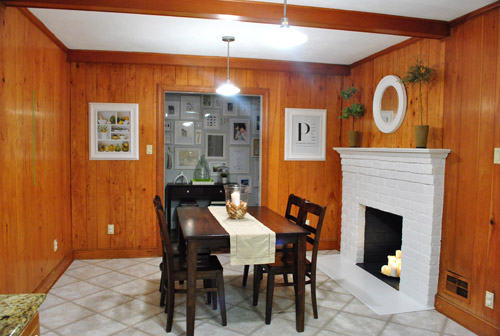
First, here’s what our kitchen looked like before we embarked on our little priming adventure:
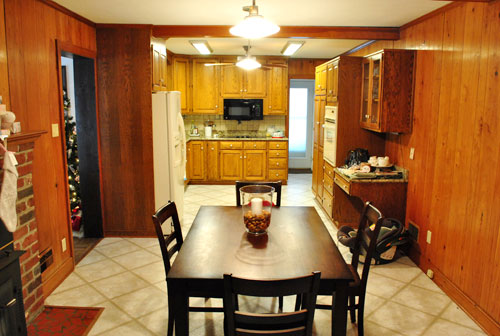
And here’s an old shot of the kitchen from the other direction just for reference (it was actually taken a while back, before we removed the wood stove and painted the fireplace):
Step 1: We wiped down the paneling, beams, and trim with a moist cloth. Some people use TSP for their wipe-down, but we didn’t (didn’t use it last time we painted the den paneling either – but it’s not a bad idea, especially if your paneling feels especially greasy). We also didn’t sand at all (didn’t last time either) but you can if your paneling is especially tough, splintery, or super glossy & shellacked.
Step 2: We removed the vent covers and outlet covers since we decided that we’d be replacing them all (they were bisque and we wanted fresh white).
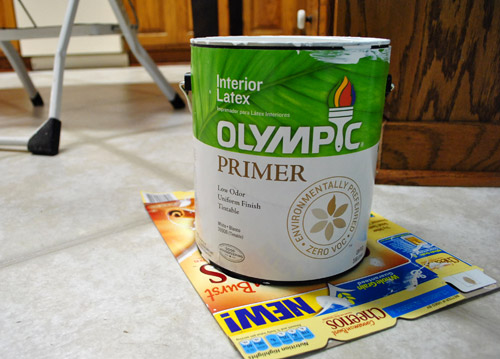
Step 3: We spent about three hours applying a coat of primer to the trim, beams, and paneled walls with Olympic No-VOC primer.
After our first coat it looked like this (about fifteen minutes in we knew we were in trouble):
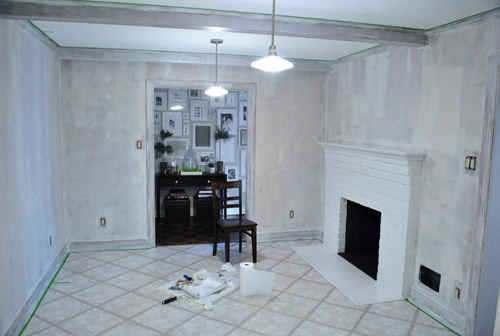
Primer never needs to be super consistent and perfect looking (it often looks uneven and rough but still totally does the job) but we experienced almost immediate bleed-through in a number of spots (when the orangey-brown stain of the wood seeps through the primer and threatens to ruin your paint job). Not good.
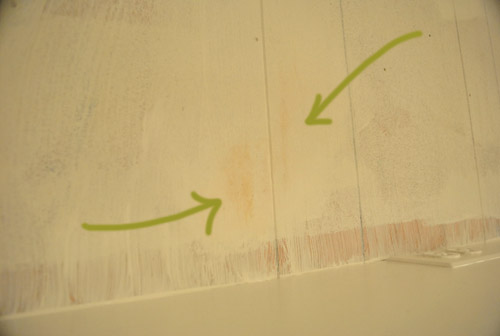
Step 4: We waited for that to dry a bit and tried a second coat of the same primer in certain obviously-bleeding spots, hoping it would block more nasty orange seepage. Nope. It did not.
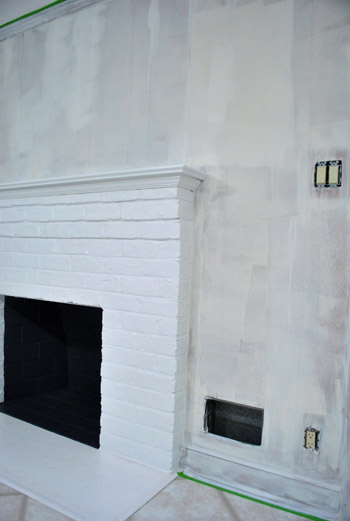
Step 5: We noticed that we had a can of Behr Primer + Paint (in white semi-gloss) in the basement from a previous project (which is low-VOC and nice and thick) so everything got a coat of that (yup, the trim, beams, and paneling got another full coat).
We still had bleed through. Not much, but in certain places it was definitely still there. And it was maddening.
Step 6: We went to Home Depot and found Kilz Clean Start No-VOC primer. It said “stainblocker” right on the label so we gave it a shot on everything (yup, another full coat of a third type of primer went up on the trim, beams, and walls).
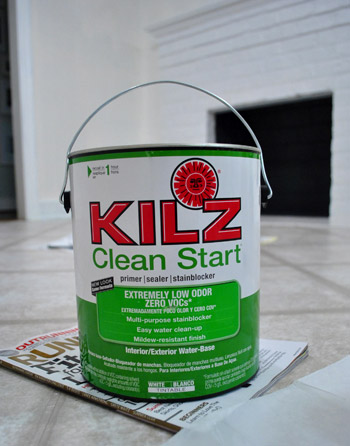
It worked. Angels sang and two white-haired Petersiks rejoiced in the privacy of their freshly primed (finally) kitchen.
Step 7: We painted just the trim and beams with our Behr Primer + Paint (in white semi-gloss) since leaving things primed but not painted for the long term can lead to a nasty and grungy hard-to-wipe-down mess (it’s a dust and dirt magnet since primer is intentionally sticky for paint adhesion). Happily the Behr stuff had great coverage over that last coat of Kilz and looked glossy and amazing. A sight for sore eyes (and arms).
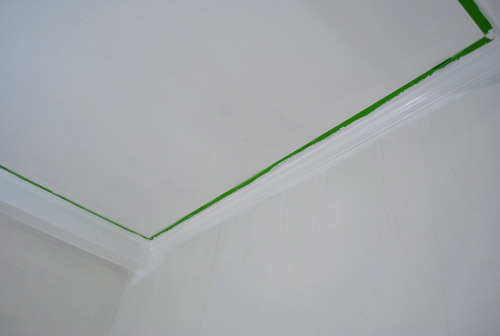
Step 8: We removed all the painter’s tape while the last coat of paint was still fresh for the cleanest lines possible (waiting for everything to dry can cause the paint to peel when you remove the tape). In cases when it was stuck to the primer/paint, we used an exacto knife to carefully slice it along the line of the tape so the primer/paint wouldn’t get pulled off with it.
We’re usually happy to avoid painters tape when we can (I rely a lot on this little miracle short handled brush instead) but since I’m short and I’m the resident cutter-inner/edger, I don’t have as much control up on a stool. So taping around the ceiling trim (and in this case tossing down a quick frame of tape around the baseboards) helped me go faster while I was happy to freehand around the door frames and fireplace.
About 48 hours after the beginning of our priming adventure, it finally looked like this. The trim looks whiter because it’s topped with that semi-gloss Behr paint and not just a flat finish white primer (which was more creamy and less snow-white-ish in color). Now we just have to paint those walls.
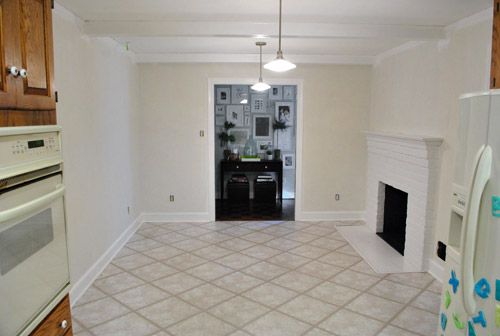
We’re not sure if the Kilz No-VOC primer worked because it was the best choice for the job or because it was layered with the other methods beneath it (perhaps on its own you’d need two or even three coats of it to get full bleed-blockage) but we definitely would recommend 2-3 coats of Kilz Clean Start No-VOC primer followed by two thin and even coats of latex paint if you’re planning to paint your paneling without messing with fumey VOCs. Fingers crossed that’ll work for ya. Otherwise one coat of oil-based stainblocking primer followed by two thin and even coats of latex paint should do the trick (find more step by step instructions on that method here).
It probably won’t take you an afternoon if you go low/no VOC (it took us two days with some babysitting help from John’s parents just to complete the priming stage). And we’re not gonna lie. It was not fun. But it was worth it as soon as we got through to the other side. You know, when we finally crossed that rainbow bridge from bleed-ville to clean-white-walls… hallelujah. It should be mentioned that in very rare cases bleed can come through weeks or even months later (which would make us want to stick paintbrushes in our eyes). Thankfully we painted the wood trim in the living room using the same no-VOC method (four coats of Olympic Premium Paint instead of with an oil-based stainblocking primer) five months ago and nothing has since seeped through. And because the baseboard and trim in the kitchen is the same exact wood, all signs point to: this should work. Of course we’ll tell you if something supremely annoying happens though.
So if somebody would be so kind as to do a nap-time dance for Clara, we’d really appreciate it. So far swinging her stuffed giraffe back and forth and saying “you are getting sleeeepy” isn’t quite doing the trick. Well it’s making us sleepy, but we’re not the target. Has anyone else tried to paint paneling without VOCs? Or been forced to apply four coats of paint or primer for any reason at all? Sucks right? Let’s commiserate.
Psst- Read more about the whole Phase 1 kitchen plan here.

Maggie says
I painted my downstairs half-bath a few years ago and being new to painting my own house (it’s my first house) I didn’t know I needed to prime. The walls were white/cream. what could go wrong? I was going with a deep, rich red, it shoulder cover no problem… HA! Yeah well, the bathroom was a creamy color was done in (I think) a gloss finish, not just semi-gloss… and the paints just wouldn’t stick. Coat after coat, the white kept showing through. I think I might have done 5 coats to get it done, in a small cramped space, little ventilation, and with Valspar latex paint in a semi-gloss, that was not low or no-VOC (it was before I knew no-VOC paint even existed or why it’s important). I didn’t feel so good. At least it looks good now!
Julie says
Wow! What a transformation already! Can’t wait to see how it all turns out!
Suzanne says
I think you may be scaring some people from ever painting! lol
One thing – would you mind adding a note that says that the primer coat usually looks bad and streaky, and that’s ok?
That might help some noobies who need and want to paint their paneling too.
YoungHouseLove says
But of course- off to add that note (it’s in the original furniture painting and paneling post I think). Always good to work it in again though! Thanks.
xo,
s
Jodi says
It looks great! It is amazing what a coat of white paint can do! I can’t wait to see the wall color. Our guest bedroom is a fun bright green that looks great with all our white furniture and a white fireplace (in the bedroom…so fun!). It is Ben Moore’s Jalapeno Pepper. We hired someone to paint (we were wimpy plus with kids and dogs and a house that needed EVERY surface including ceilings painted we were overwhelmed…we took off for vacation and arrived home to a beautifully painted house) and she was scared to do it but now it is her favorite room in our house!
Good luck!
Beth C says
It looks so much better just with the primer. I don’t how you lived with that paneling for as long as you did!
andrea melberg thompson says
Any chance you have done any research or investigation of ‘Chalk Paint’? I do NOT believe it is low VOC, but I am hearing a lot about it and wondered if you had any thought or insite, expecially as you move to your cabinets. I think the brand is Annie Sloane?
Thanks if you have any insite. Either way, thank you for doing the job you do and inspiring and helping all of us out.
YoungHouseLove says
Not sure about the VOC levels. Maybe check their site or the can (I believe they have to list those things).
xo,
s
Mandie says
Your inspiration picture is from Southern living a few years back. I know, I saved it too. :) We just re modeled our kitchen and we love it. All but the green walls. :)
GOod luck painting. It looks better already!!
Diana says
What can you do if you get bleed through down the road? Do you prime and paint over what you have already done or do you have it sand it/strip it off and start over?
YoungHouseLove says
You could reprime and repaint again (stripping and sanding should only be necessary if it peels and bubbles, which should happen right away).
xo,
s
Jane says
LOVE IT!!!! Do you have any idea what the color of the kitchen is? I’ve been trying to find that exact color for my kitchen. It looks so fun, fresh and cheery….all of which I need in a kitchen where I don’t enjoy cooking. Also, what did you use to paint the interior of the fireplace? Is it a fireproof paint? Ours is all soot stained from the previous owners and I’d like it all black like yours. thanks!
YoungHouseLove says
We have no idea of the exact color but a lot of sweet commenters have offered up paint suggestions in the comment area of this post that they believe are similar, so that might be a nice starting point? Good luck! As for the fireplace paint info, we linked to that post within this one (which has all the details about that). Or you can use this shortcut link: https://www.younghouselove.com/2011/06/fireplace-happenings/
xo,
s
Suzanne says
Do you ever do a custom color – like matching Clara’s birthday dress for example? Or a color in the curtains?
YoungHouseLove says
We’ve done color scanning to match non-paint-swatch things like an article of clothing when it comes to painting furnishings but not walls. Yet. But it would be fun!
xo,
s
heather says
Oh vey. I totally understand. I used BIN to cover the knots in the wall before I painted them (ours are actual wood boards on the wall, not your typical paneling…hits head against keyboard *askldjfaskldjfsd*). So ok, BIN is oil based. Then I picked up a water based primer for the rest of the walls. *idiot*. That means that the primer soaks into the walls…and the BIN sticks out like crazy. Awesome. So we’re looking at two coats of BIN on each of the 7000 knots per square foot, plus two coats of primer, plus two coats of paint plus lots and lots of thankfulness that we’re eventually ripping this entire room out all together. If I don’t rip all my hair out first.
heather says
Oh, and I love how your kitchen looks now! WAHOO!
Erin says
I have been following your blog for a while and looking forward to seeing what you’d do in the kitchen. Excited to see the finished product: looks great so far.
My question is have you (or anyone else reading) tried the low VOC latex primer method with painting furniture? I know formerly you’ve mentioned using oil-based primers on furniture and then latex paint over that. Just curious ’cause I have some furniture to paint and no really well-ventilated area to paint it in. (The furniture is mid-century wood laminate, which I’ve painted successfully before using the oil-based primer method.)
Thanks for your help and inspiration. Good luck with the rest of the paint job.
YoungHouseLove says
I haven’t tackled anything like that yet. It’s a tough call because with furniture you can paint it outside and even leave it out in the garage or sunroom or porch to dry and “cure” for a while (the majority of off-gassing happens right in the beginning when wet paint is drying, and putting it out in the sun can speed up the off-gassing process) so that makes oil-based paint a bit less scary for me when it can be applied outside and allowed to cure for a while. That being said I would definitely be tempted to find some sort of no or low VOC alternative (although I’m not 100% sure what that would be). I’ll keep you posted if I tackle it!
xo,
s
Briel K. says
Lookin’ good so far! Can’t wait to see the wall color you end up with.
Ana says
I am amazed to see how much bigger your kitchen looks now!
Sofie says
This made me flash back to when I had to paint my brother’s bathroom 5 times to get it looking right. Your kitchen looks much better than his bathroom did afterwards, though. Must be all of your experience, ha ha.
Monica says
Lets see…MULTIPLE coats of primer and paint? YUP. Nailed that one. Though my reason wasn’t the same as most of what I’ve been reading. I purchased a home where the previous owner LOVED RL River Rock paint. BUT, they failed to following the application method properly, so the walls ended up with the texture of sandpaper. No joke. You had to be careful to not accidentaly brush bare skin against them. UNFORTUNATELY, they also refinished the hardwood floors JUST before I bought the place. So, I thought it best not to try sanding the finish off the wall. I figured I could prime and paint it out. Well, 4 coats of heavy duty primer (first coat being the primer recommended by RL for covering the stuff with) and 2 coats of paint later and I’m still left with walls with bad pores. Not something you generally see on lovely 100 year old plaster walls. Oh well…maybe just a couple of coats more.
Melissa says
Painting the paneling in my house was the most horrific thing I’ve ever done-and we tore out our kitchen before we moved in! I didn’t use low VOC but I did use oil based primer. It was a nightmare because the wood in our den is super textured – kind of splintered, so after using a roller, I had to go back and smash the paintbrush into every crevice the paint didn’t reach into. Normally I can paint a room in an afternoon, so I was NOT prepared for the 3 weeks it took me to apply 3-4 coats of primer & paint to the walls!
Searching for painting wood paneling techniques is how I originally found your website, and I’ve been enjoying it ever since :)
Chrystal says
We just bought a ranch last fall and set out to paint several thousand feet of trim…windows, crown molding, a whole room of paneling. We tried the paint/primer in one first (I was 5 months prego and couldn’t use the primer). The helpful lady at Home Depot said “Sure, just a light sanding and you won’t need a primer, just use the paint/primer combo”. After hoouuuurrrsss spent on a huge picture window trim, crown molding in the living area, another window….several coats and several days later there was the bleed through. So we got the regular Kilz primer and my mom primed her little backside off. Bless her. After that it took two coats of primer and two of Behr paint to do the trick. Good thing we are planning to stay here!! It was a ton of work. Thankfully we were not living in the hosue during the renovations/updates so the smell wasnt as much of a concern.
Erin says
Love it! Love it! Your inspiration pic is the exact one I found in blogland a year ago and have been holding as our future kitchen inspiration ever since. My problem is that I have oak trim and flat hollow core doors everywhere> I want the crisp look of white trim, but it’s a LOT of trim to paint and I don’t know what to do about doors- painted flat hollow core doors aren’t my fav look- seems like only paneled look good white but springing for replacing all the doors to 6-panel isn’t happening anytime soon… oh I often ask myself WWYHLD (what would YHL do??) :)
YoungHouseLove says
We painted all of the wood trim and flat hollow doors in our last house! It wasn’t fast but we loved the much crisper and more updated look!
xo,
s
mribaro says
Here’s how you can add some style to your flat doors (cheaply) by making them look like multi-paneled doors:
http://littlegreennotebook.blogspot.com/2011/06/b-n-n-s.html
I hope it helps.
YoungHouseLove says
Oh yeah I love that project!
xo,
s
eRin says
Ugh. We had our floors sanded and stained before we moved in and then we personally painted every wall and kitchen cabinet in our house at least 5 times (5!), including Killz, color primer, and color!!! I haven’t touched a paint brush since we finished but I think I’m almost recovered enough that I might paint again in my life. Maybe.
We used 2-3 coats of Killz on all our walls and the cabinets, I think it worked great. The first owners smoked long ago and the Killz really helped to seal that up, but we did have some nasty wood (and nicotine?) seepage on one overhead beam. Gross.
Your kitchen looks glorious though! Even only partly finished, it’s already a big improvement!
Lance says
I didn’t see this asked in the comments, so hope it’s not repeated (I wish I could see all comments at once, instead of having to scroll through 8 pages? And searching would be nice? ha)
From your description of the project and the photos, it looks like the gaps/joints between each panel were untouched. Do you do that for a reason? Do you keep it for character, or do you not want to have to fill in that gap to make it appear to be a solid, smooth wall? You don’t see it much in the photos so maybe in the space you don’t even really notice it? All of my walls are textured and I have a huge wall in the living room that’s paneled in wood. I was thinking of maybe filling the seams of the panels with something, priming the panels, then texturing the wall so I wouldn’t have to tear it down and put new drywall up.
Thoughts on seams vs no seams, and if you wanted to cover them up to apply texture to the wall how you might go about it?
Looks great so far, amazing seeing the difference with the color change along with the white fireplace!
YoungHouseLove says
If you check out the first few paragraphs we mention that some people prefer to caulk or spackle the paneling while we don’t mind the subtle texture and character of those vertical grooves (it’s like painted brick to us – we actually like the look). It’s definitely one of those personal preference things though.
xo,
s
Courtney says
I just found your blog (I live under a rock!) and I am obsessed. :) My husband and I are in the middle of our first home renovation, so I’m sure I’ll be coming here often. Can’t wait to see how the kitchen progresses! We just primed and painted beadboard paneling in ours…much smaller space, but still no fun!
Lance says
Sorry I missed the paragraph about the seams, my apologies. Thanks for pointing me in the right direction.
YoungHouseLove says
No worries at all! We tend to ramble. Haha.
xo,
s
cj says
http://www.homedepot.com/buy/paint/primers/glidden/5-gallon-gripper-primer-61900.html
ever tried using this?? it is the absolute best primer to use on wood. no sanding needed and 1 coat usually does the job. adheres great! painted all the brown wood stained trim and kitchen cabinets with it. its nice and thick so you dont run into the problem of several coats because most primer absorb too much.
YoungHouseLove says
Never tried it- we’ll have to check it out!
xo,
s
Ali says
Serious props for doing a ton of coats – I don’t have the patience (and I have 3 kids and just don’t have that much time!)! I have to say that even with our oil-based primer and a good coat of latex, we had bleed-through a few weeks into it. So we had to do a second coat a little bit later. So I can only imagine how much the latex bled through!
Looks so much lighter and brighter, though. And I love the inspiration pic! That’s what our kitchen looks like right now except our walls are “guacamole” by Olympic Premium and the backs of the cabinets are “secret passage” gray. Enjoy your kitchen transformation!
Mary says
Yup, I put two coats of killz primer on our family room walls…then two coats of paint…fun fun fun!
Caryn says
Maybe this will make you feel better about multiple coats of paint. To update our half bath, I had to remove wallpaper that the previous homeowners had lazily painted over. Then I had to spackle and sand the gouges in the wall, not too bad. THEN we decided to paint the half bath hot pink, and thinking that I was so smart I bought the primer/topcoat in one paint from Behr. FOUR coats of hot pink later…..I was done. But honestly it really could use another coat.
We redid everything – new tile floor, new toilet, ripped out a vanity sink and replaced it with a pedestal sink, ripped out 70’s can lights and put in sconces. It has taken us months! We are almost done, after one more coat of paint. ;)
Katrina says
Really looking great! Amazing how fresh and clean it looks now. SO jealous of your progress verses my progress in my own home now. I have to paint my cabinets and I am dreading it!! Great painting tips though! THANKS
Janie says
just saw these placemats on HUGE sale which i think match Sue the napkin:
http://www.crateandbarrel.com/outlet/50–70-off/mateo-placemat/s646698
YoungHouseLove says
Off to check them out!
xo,
s
Irene says
We have real pine, tongue and groove… we aren’t going to bother going non-oil based. Heck, even then, we know we’ll have to repaint every 5-6 years (DH’s great aunt has the same exact stuff in her house, she has to repaint because the knots bleed through)
Jess says
Love the progress you’re making and it’s good to know I am not the only one who has house projects that require more work than originally anticipated. My hubby and I bought a house last year and and are working to replace all the trim work in the house (long story) but a year later we are finally ready to install the baseboards (finished window/door casing and painted white) only to realize how uneven the slate tiles in our entryway, 3 bathrooms, and kitchen are. We’ve constantly stubbed toes/stepped on high points but loved the look and were in no major hurry to replace (knew we would at some point in the kitchen- not exactly kid friendly) UNTIL we went to install baseboards over the tile and realized it was impossible to get a flush good looking fit!!! So we decided on Saturday we’d rip out at least the entryway and see how it goes- rented a demo hammer from home depot and craigslisted the slate tiles and are installing the new backerboard and tiles this weekend!! We’re looking forward to having 1 less slate tiled room but can’t believe how long it’s taking us to put all new trim.
anyways sorry for the long story- just happy not to be alone in this diy difficulties!! As for paint color- you should check out SW wheat grass. It’s sort of limey, but not quite. We really like it in our kitchen.
YoungHouseLove says
Thanks for all the paint color suggestions guys! You’re the best.
xo,
s
Angie K says
UGGGHH…I went through painting paneling last year. It was not 70s paneling, but the tongue & grove paneling that is installed in individual panels. I used Kilz Latex first & within minutes saw the stains bleeding through, so I slapped on a second coat & almost cried when it did the same thing. A friend (also a contractor) advised me the Kilz Latex was fine to get the paint to stick to the wood (since I didn’t sand), but that I would have to go with original Kilz. She was absolutely right…worked like a charm, but stinky & I’m pretty sure I floated around the room painting it on at times.
Mandie says
Reading again tonight for the second time- it just looks great! I can’t wait for it all to come together!
Anna says
Looking great so far! I think it’s kind of funny how much people in the States despise panelling, and often try to rip it out. In North Queensland, Australia all the traditional homes were built with walls floor-to-ceiling in painted timber panelling (we call it tongue and groove).
I actually do design work for a builder which builds replicas of the traditional homes, and lots of people pay extra to put timber panelling in (it is painted of course). It’s much more durable than plasterboard and it adds character so I think you made the right decision keeping it!
My own old house is full of tongue and groove from the bedrooms to the living rooms, from floor to our 3 metre ceilings! It’s not a lot of fun to paint but it looks great in the end.
And I always suggest a 3-in-1 sealer, primer, undercoat for timber panelling to stop the bleeding – glad you sorted it out in the end!
YoungHouseLove says
Oh yeah I agree! I love the character and texture it adds when it’s painted! A friend of mine tried to tear hers out and it was such a nightmare! Our old den with painted paneling was soooo cozy. I miss that room sometimes :(
xo,
s
Britta says
I hear you on the desire for longer naps! Many days were spent soothing myself to sleep but the little guy was wide awake after all my effort. Our little guy, Kilen, is now 17 months old and is an absolute angel going down for naps (typically 2 hrs, but sometimes 3 or rarely 4). I didn’t think it could happen, and watched in frustration as our friend’s then 16 month angel would wave night-night and crawl upstairs to his crib. But as soon as Kilen hit a certain development age or calendar age, it is now awesome!
The best thing I can do to wear him out is to take him swimming in the morning. We usually get a 3-4 hr nap out of that deal. Try it! :)
Love your blog, and am very excited to see the final color in the kitchen.
hillary says
We have had really good luck with Kilz so knock on wood paneling that yours holds up too! The dining area is looking ah-mazing. And I approve of your grellow paint color choice. We painted my daughter’s nursery that color before she was born, and it was the happiest room in the house! It was like springtime in there all the time, and was both fresh and warm…just what you’d want in a kitchen.
Jan C. says
After 11 years of living with a dark, paneled room straight from the 70s, we finally painted our paneling. Even using a VOC-laden primer, it took 2 coats and lots of time to get the job done. Then we painted it the color of . . . well, the exact color of the solid portion of your blog here, as a matter of fact. Glossy white trim on the beams and moldings, and it looks delicious with our parquet floor!
Nicole says
Love it already! Looks like a completely different kitchen! Unrelated question but does Clara still take 2 naps a day? I remember my daughter nixed the morning one around a year old.
YoungHouseLove says
We get about a half hour one in the afternoon if we’re lucky- but the morning one is her biggie (two hours or so, which is great for “project time”).
xo,
s
Erin says
I love the green color that you’re shooting for in the kitchen! Just wanted to say that I painted an apartment kitchen a yellow toned apple green color (darker than yours). After it was freshly painted and still none of the furniture/appliances moved back in I was thinking, ‘Omg, this is so green! What did we do?!’ But after moving the furniture/appliances back in I LOVED it! While we lived there sometimes I would just sit and admire my lovely green kitchen :) So, even if it seems a bit much to you, give it a chance to be balanced out by your furniture! Best of luck!
YoungHouseLove says
Great tip! It definitely helps when you bring in all the art/furnishings/accessories to “temper” something bold!
xo,
s
Christy says
As soon as you said you were painting the paneling I knew where this was going. My basement was finished in some truly horrific paneling. Combining the dark walls with the tiny basement windows meant that every time I walked into that room, I felt like I had died and was in a coffin. In an effort to lighten the room, I chose a nice crisp white paint and set to work with low VOC primer. I’m convinced that the paneling is actually sentient and was just drinking the primer right off of my roller. I’m currently working up the nerve (re: patience) to paint my one paneled wall in the living room. I’ll definitely be trying the Kilz first. Thanks for the tip!
Nadine says
Martha Stewart Beach Sand is a great color similar to what you are describing. I have it in my kitchen and its by far my favorite color in the whole house!
YoungHouseLove says
Thanks so much for the tip!!
xo,
s
Allyn says
Bahahaha… I have a great mental image of Clara just grinning up at you while you wave the giraffe.
YoungHouseLove says
Yup, that’s pretty much what happens.
xo,
s
Erin says
Hi guys! I feel your pain (kinda) about two years ago I took two weeks and painted ALL of the trim in our house white (it was “honey oak”. Yeah, I never liked Pooh bear, or his honey…so it had to go)…I did a TON of research and talked to every painter I know to find out the best primer to use and THANK GOD it all went on easily and looks awesome!! Sorry you had such a rough time, but its SO worth it in the end…by the end of my two week adventure, I got bronchitis (which, I guess I deserved from huffing fumes for two weeks…)
T. Ruth says
Back in 2006 I purchased a home that had been the residence of smokers for about 28 years. The walls were generously discolored with stains from the smoke (nicotine and tar–I believe). I did not go with low VOC. I went the whole way with Kilz oil based for two coats throughout the main floor. Then I went back over everything with 2 coats of paint. Neither the walls nor the trim ever bled through (though the 2 doors that I attempted to paint without Kilz primer were a disaster).
I have yet to attempt the black walnut paneling in the basement. One day…
Tara Floyd says
Love that color. Looks pretty dead on to our kitchen color (WHEATGRASS) Sherwin Williams.
Tiffany hall says
That does not look fun at all but so worth the hard work. Your kitchen is what I have been waiting to see the transformation of the most. Seriously, It was like watching the season finale of vampire Diaries.
JoyfulT says
My husband is a pastor, and our current parsonage has wood paneling in the living room. We went the low/no VOC route two years ago when we painted, and it took two coats of Kilz latex primer (maybe three? I know we had to buy another gallon, but our paneling was ridiculously dry) and two coats of Dutch Boy’s Illusive Spirit to cover it. Two years later there’s no bleed through whatsoever.
Cherie says
I pinned the same inspiration pic for my kitchen! I can’t wait to see how yours turns out…and get the details on your paint color choice so I can copy :)
Natalie says
We painted our paneling and I am like you, I like the added texture. We used oil based and we didn’t get bleed through but we still have chipping around high traffic areas (where we put the baby gate up).
On a side note: I was watching Candice Olsen today and there was sue the napkin on a pillow and some drapery fabric that looked oh-so-similar to you dining room beauties. Great minds!
Sarah says
You’re so much better than me! I would have called that low VOC paint a bad name and then ran out and got oil based! I’m so glad that Kilz worked for you because I just bought some from Walmart that I plan to use to cover up the neon green color in my husband’s man cave to go to a more subdued Carolina blue. Hopefully it works as well as yours did!
EngineerMom says
It’s not paint, but we decided to use water-based poly when we refinished our oak floors (discovered under ugly blue carpeting!). Oil-based takes longer to dry between coats, and you have to wear a mask while applying, plus it will eventually yellow over time. I loved the natural color variation in our wood, and wanted that crystal-clear finish you get with water-based, plus it would be much easier on the lungs!
It took 7 coats. Sanding lightly in between each coat. Yeah. Did I mention it was just DH and I, and we were doing 700sqft of flooring?
YoungHouseLove says
Holy cow that sounds intense! But it’s so good to hear that you had success with the water-based stuff! We’re planning to refinish with something water-based and eco-friendly someday too (we had suuuch stinky floors for nearly a year when we refinished with oil-based poly in the last house)!
xo,
s