And now, for the dang paneling update. Hold on to your hats ladies and gents. This post = wild ride.
As you probably know, we’re no strangers to priming and painting paneling. Sure we could remove the paneling, but it would mean removing and rehanging all the cabinets since they’re hung in front of it – and revealing goodness knows how many scary issues behind it (they’re old plaster walls so that just felt like a big ol’ can o’ worms). And we could attempt to drywall over it (but it would mean drywalling around the existing cabinets and a lot more expense/trouble than just painting it). So we decided early on that we’d once again say yes to painted paneling – just like we did in our former den (which ended up being our favorite room in the house) when it (slowly over the course of 4.5 years) went from this…
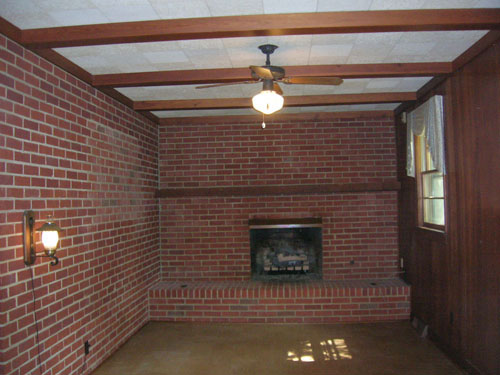
… to this:
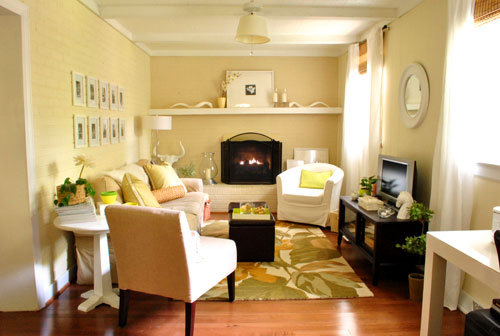
We never regretted the whole painted paneling choice – I guess it’s just like painted brick to us (we don’t mind the grooves that remain after it’s painted since they just add charming and subtle texture). But folks have caulked or puttied those grooves to hide ’em, so you can always do that (or rip it the heck out) if it’s not your thing.
But this time there was a slight variation to the painted paneling process since the last time we tackled it. That variation: the time that it took to get ‘er done. Last time it took us an afternoon (more on that here). So we went into this whole priming and painting thing with high hopes that it would be a quick little project. Yessiree, an afternoon spent completing the paneling would have been awesome (as would seeing a unicorn on our front lawn or finding out that Burger laid golden eggs). Spoiler alert: that didn’t happen.
The time difference was all because we decided to attempt to prime and paint our paneling the no slash low VOC way this time. Just because we like the idea of avoiding as many harmful fumes as we can since we work so regularly with paint and caulk and primer (especially now that we have a baby around). We knew this choice wasn’t a short cut. Heck, it would crack our margin for error right open (since oil-based stainblocking primer is the only professionally recommended way to guard against nasty yellow-orange wood-bleed, which can ooze through as you prime and paint). But we thought it was a risk worth taking in the name of family health. And it was in the end… it just took a while to get there. So here’s how it all went down.
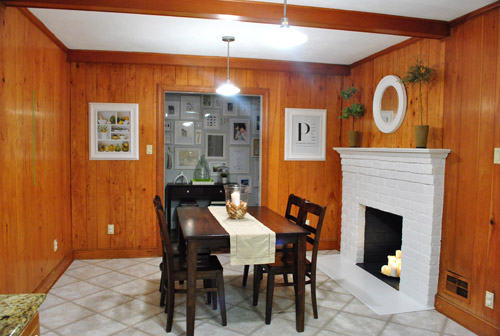
First, here’s what our kitchen looked like before we embarked on our little priming adventure:
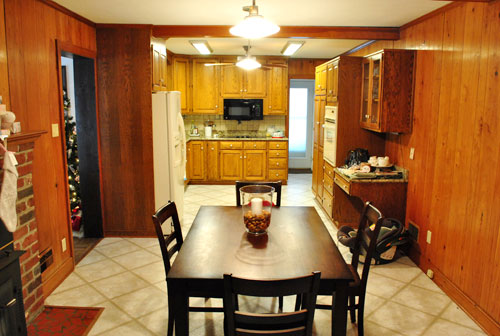
And here’s an old shot of the kitchen from the other direction just for reference (it was actually taken a while back, before we removed the wood stove and painted the fireplace):
Step 1: We wiped down the paneling, beams, and trim with a moist cloth. Some people use TSP for their wipe-down, but we didn’t (didn’t use it last time we painted the den paneling either – but it’s not a bad idea, especially if your paneling feels especially greasy). We also didn’t sand at all (didn’t last time either) but you can if your paneling is especially tough, splintery, or super glossy & shellacked.
Step 2: We removed the vent covers and outlet covers since we decided that we’d be replacing them all (they were bisque and we wanted fresh white).
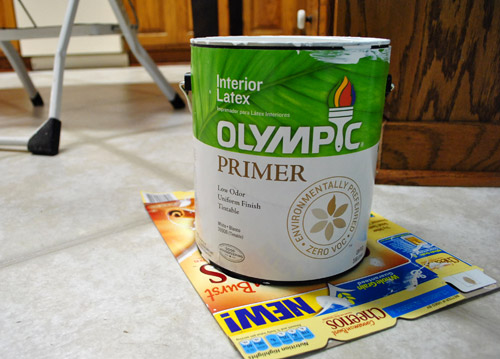
Step 3: We spent about three hours applying a coat of primer to the trim, beams, and paneled walls with Olympic No-VOC primer.
After our first coat it looked like this (about fifteen minutes in we knew we were in trouble):
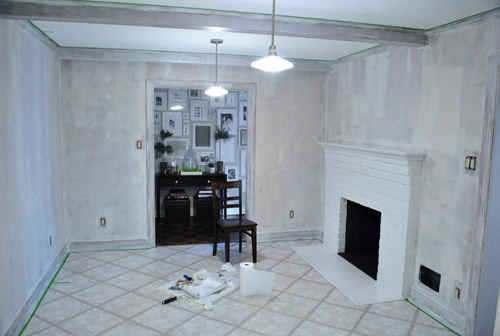
Primer never needs to be super consistent and perfect looking (it often looks uneven and rough but still totally does the job) but we experienced almost immediate bleed-through in a number of spots (when the orangey-brown stain of the wood seeps through the primer and threatens to ruin your paint job). Not good.
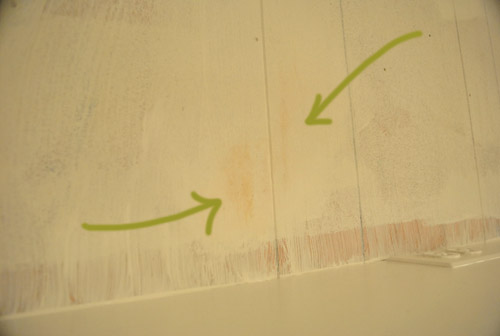
Step 4: We waited for that to dry a bit and tried a second coat of the same primer in certain obviously-bleeding spots, hoping it would block more nasty orange seepage. Nope. It did not.
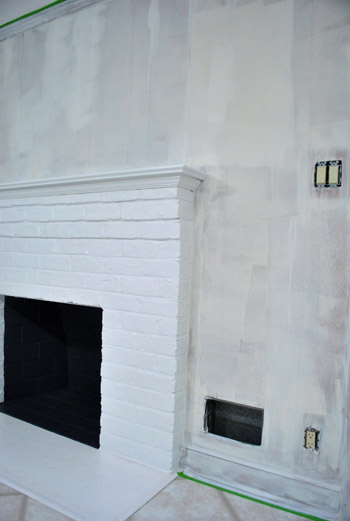
Step 5: We noticed that we had a can of Behr Primer + Paint (in white semi-gloss) in the basement from a previous project (which is low-VOC and nice and thick) so everything got a coat of that (yup, the trim, beams, and paneling got another full coat).
We still had bleed through. Not much, but in certain places it was definitely still there. And it was maddening.
Step 6: We went to Home Depot and found Kilz Clean Start No-VOC primer. It said “stainblocker” right on the label so we gave it a shot on everything (yup, another full coat of a third type of primer went up on the trim, beams, and walls).
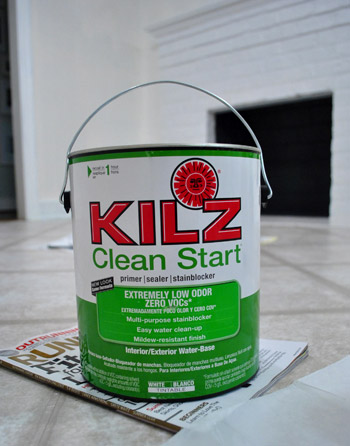
It worked. Angels sang and two white-haired Petersiks rejoiced in the privacy of their freshly primed (finally) kitchen.
Step 7: We painted just the trim and beams with our Behr Primer + Paint (in white semi-gloss) since leaving things primed but not painted for the long term can lead to a nasty and grungy hard-to-wipe-down mess (it’s a dust and dirt magnet since primer is intentionally sticky for paint adhesion). Happily the Behr stuff had great coverage over that last coat of Kilz and looked glossy and amazing. A sight for sore eyes (and arms).
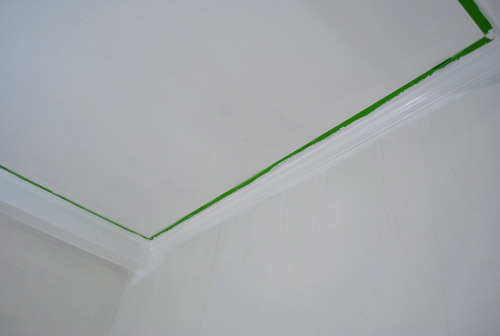
Step 8: We removed all the painter’s tape while the last coat of paint was still fresh for the cleanest lines possible (waiting for everything to dry can cause the paint to peel when you remove the tape). In cases when it was stuck to the primer/paint, we used an exacto knife to carefully slice it along the line of the tape so the primer/paint wouldn’t get pulled off with it.
We’re usually happy to avoid painters tape when we can (I rely a lot on this little miracle short handled brush instead) but since I’m short and I’m the resident cutter-inner/edger, I don’t have as much control up on a stool. So taping around the ceiling trim (and in this case tossing down a quick frame of tape around the baseboards) helped me go faster while I was happy to freehand around the door frames and fireplace.
About 48 hours after the beginning of our priming adventure, it finally looked like this. The trim looks whiter because it’s topped with that semi-gloss Behr paint and not just a flat finish white primer (which was more creamy and less snow-white-ish in color). Now we just have to paint those walls.
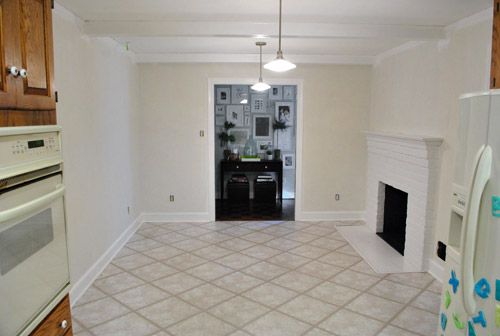
We’re not sure if the Kilz No-VOC primer worked because it was the best choice for the job or because it was layered with the other methods beneath it (perhaps on its own you’d need two or even three coats of it to get full bleed-blockage) but we definitely would recommend 2-3 coats of Kilz Clean Start No-VOC primer followed by two thin and even coats of latex paint if you’re planning to paint your paneling without messing with fumey VOCs. Fingers crossed that’ll work for ya. Otherwise one coat of oil-based stainblocking primer followed by two thin and even coats of latex paint should do the trick (find more step by step instructions on that method here).
It probably won’t take you an afternoon if you go low/no VOC (it took us two days with some babysitting help from John’s parents just to complete the priming stage). And we’re not gonna lie. It was not fun. But it was worth it as soon as we got through to the other side. You know, when we finally crossed that rainbow bridge from bleed-ville to clean-white-walls… hallelujah. It should be mentioned that in very rare cases bleed can come through weeks or even months later (which would make us want to stick paintbrushes in our eyes). Thankfully we painted the wood trim in the living room using the same no-VOC method (four coats of Olympic Premium Paint instead of with an oil-based stainblocking primer) five months ago and nothing has since seeped through. And because the baseboard and trim in the kitchen is the same exact wood, all signs point to: this should work. Of course we’ll tell you if something supremely annoying happens though.
So if somebody would be so kind as to do a nap-time dance for Clara, we’d really appreciate it. So far swinging her stuffed giraffe back and forth and saying “you are getting sleeeepy” isn’t quite doing the trick. Well it’s making us sleepy, but we’re not the target. Has anyone else tried to paint paneling without VOCs? Or been forced to apply four coats of paint or primer for any reason at all? Sucks right? Let’s commiserate.
Psst- Read more about the whole Phase 1 kitchen plan here.

Holly says
Well, we are going to be painting the paneling in our basement very soon so I’ll let you know how it goes. We actually have the Zinser lined up to use as primer – I think it’s along the same line as Kilz. You should’ve known with the name Kilz that it would have done the job! HA! Good luck with the rest of the project.
Julie M. says
First off, love the comments link at the end of a long and awesome post. Second, I’ve painted paneling and used Zinsser primer. That stuff is amazing, and not a smelly as the Kilz. Though I just did a google search and saw that they have a ZERO VOC primer now. Good to know, because we have a basement that with paneling that needs to be painted next. Here’s the sunroom. http://i17.photobucket.com/albums/b83/magnolia8/House/107_0759.jpg
YoungHouseLove says
Wahoo! Thanks for the tip!
xo,
s
Lena says
LOVE that that kitchen with the gyellow color is your inspiration! I found that picture back in mid-april while googling images of white cabinets (http://rootandblossom.com/2011/04/13/making-over-the-house-we-dont-quite-own/) and fell in love! However, we wound up going with a gray/blue to pull blue colors from our granite but still fun seeing that someone else got attached to it! :)
I Adore Home Decor says
I absolutely hate paneling too…lol
Amelia R. says
The Kilz primer is the only stuff I use anymore. The zero-VOC kind doesn’t stink too bad, and it covers nearly everything in one or two coats. It’s thick!
Kristen says
It looks so great. Seriously – amazing. Beware though, the primer can continue to bleed through months later. Our paneled porch is a glorious white, but several months after its heavily primed and sealed self was painted, orange circles started showing up again. We’re giving it time to make sure it’s done before busting out the extension ladders, but it kind of isn’t so cute. Keep that primer on hand – you may need it again!
Now, if only I can get the courage to paint the brick fireplace out there…
YoungHouseLove says
Thanks Kristen! We mentioned that at the bottom of the post (thankfully we painted the wood trim in our living room the same way and 5 months later it hasn’t bled yet so we hope we have the same luck in the kitchen). Fingers crossed…
xo,
s
Pamela says
Hi Sherry,
I recently took a paint fan deck to Lowe’s so they could color-match my selection in Olympic no-VOC paint. The paint guy couldn’t find the color in the computer (older fan deck not related to any paint brand – just sort of a “universal” color deck, I guess). When he said he couldn’t formulate the color since no computer reference existed, I asked if he could just scan the tiny color sample from the fan deck. He agreed, but said he couldn’t guarantee the color result. Being the rebel that I am, his words didn’t faze me, because that color was going to be mine regardless of his lack of encouragement. Ha. Result: the color was dead-on & my walls look fabulous! So, perhaps you could print out your kitchen inspiration photo & have Lowe’s scan the gorgeous green color to get a nice match for y’all.
YoungHouseLove says
So glad! One tip is to ask them to scan it and tell you the “percentage of accuracy” (they get something that pops up on the screen and says something like “99% match” which can help when it comes to confidence)!
xo,
s
Amanda says
Can totally commiserate! Just bought and moved into our first home- it had easter egg colored walls throughout that took 3 coats to finally cover. Walls and ceilings(what kind of lunatic paints ceilings to match? And buys carpet of the same fluorescent colors?)! We also used the Premier no VOC primer and paint and are very happy with the results
Jenn W-M says
The school I work in just used a ton of the low VOC Kilz. It worked GREAT! We were also happy that the high school mission trip helpers were able to do most of the work and without the stinky fumes!
I wish they had this 17 years ago when I was trying to paint my first house. The bathroom was Hunter Green – ugh.
Beautiful color choice in the kitchen.
Condo Blues says
I swear by Kilz. It covers anything and everything. I’m so glad Kilz came out with a no VOC version that works just like regular reeking Kilz.
Adam says
I’m now a stickler for oil based primers, but I can understand your desire to use zero-VOC products. The white walls already make the room look so much larger! Your inspiration photo is great, I love how the insides of the uppers are painted to highlight the white stoneware.
LaVerna DuBois says
I’m just curious, where did you stop? Did you do all the kitchen walls too or just the dining room? (and I don’t mean that in the ‘you JUST did the dining room, you lazy bums get up and do the darn kitchen for pete’s sake’ kinda way.) I had dark panelling in my last house and spackled, wallpapered and painted. It was an absolute nightmare, but totally worth it in the end. I felt like I was living a scene out of Ground Hog Day, after day, after day…
YoungHouseLove says
We did all of the walls, trim, and beams in the kitchen. We figured just getting it all done at once made the most sense. So glad that’s behind us!
xo,
s
Cici says
We’ve used Kilz to prime our panelling in the kitchen. I think it was the painters (us) not the primer, but we’ve experienced some chips along the way 2 years later, but no bleeding through. Can’t wait to see the green and white kitchen. We’re working on painting the cabinets soon, too!
Mrs. VJ says
Love love love the new look. And can I just tell you that I sighed a huge sigh of relief when I opened up your post today…so light, bright, and airy…and sooooooooo inspiring. Keep the paneling posts coming!
Susan (Between Naps on the Porch) says
Hi Guys,
Just wanted to add that I always use Kilz since that’s what the paint store and the Home Depot guys at my local store always recommend. I usually use the low odor kind and open the windows with a fan going. It dries so quickly, the odor isn’t usually much of an issue. I don’t like using oil base because if you get it on your fingers, it’s a pain to get off, but it really works great. They (Home Depot guys) also recommend Kilz for priming walls after wall paper removal. Apparently, if you leave any glue residue behind, which is easy to do, it will stop that from bleeding through and ruining your paint job. Can’t wait to see your kitchen all painted. It’s look great just with the primer!
Susan
Laura says
It looks great!! We aren’t painting over paneling, but we did spend the weekend scraping wallpaper off of our kitchen walls! There was lovely lime green primer under it. We primed white over it and thought we were OK. Today we painted it yellow and somehow the yellow has a slightly green tinge to it. Hopefully another coat of yellow will get rid of all green. More to come on our DIY kitchen remodel on the cheap at http://www.lamaworks.blogspot.com
Brittany Fleming says
Y’all are so inspiring! Keep up the good work and I’ll keep tuning in everyday! So excited about the book by the way! AND love the grellow color choice! Perfect!
Kristin (Australia) says
Wow looks fab already! I love your inspiration pic, I think your kitchen is gonna look great that colour… I suddenly see where you were going with the green parsons chairs around the dining table too – they look beautiful in that photo…. but I love your patterned curtains in the dining room, and the more natural slipcovers suit that so much better, they’re perfect for your room (oops – I’m gushing!)
Ahem… great job ;)
YoungHouseLove says
Aw thanks! I still swoon over photos with green chairs in them, but you’re right about the curtains in the dining room (they’re my ultimate crush, so I’m glad it all worked out that way).
xo,
s
Par says
So airy – what a difference a coat (or maybe several) of paint makes!!! Love it – please please paint the cabinets next!!!
Bethany says
oh you guys, when I read this, my wrists involuntarily started throbbing from memories of panel-priming-induced carpal tunnel! our vaca place was full of the old 70’s style panneling and I primed and painted ’em all. What a chore! But painted panneling is just so cute, and I really think it is worth the effort! Way to go! here is the link to my results
http://prospectlove.wordpress.com/2011/05/12/cottage-befores-and-afters/
Also, HUGE shout out to you guys for the paint color advice, AND the “hang em high and wide!” (I never decorate now without that bit of advice!)
Now go pour Clara a tall milk and yourselves a tall beer and enjoy!
YoungHouseLove says
Woah- what a difference!
xo,
s
annabelvita says
Hey! I just followed the link trail of that green kitchen to try and find out what the weird lower corner cupboard is… the closest I could find to an original source was this one: http://www.myhomeideas.com/room-galleries/green-kitchens-00415000070949/crisp-green-kitchen-00400000050788/ which says the photo is by Laurey W Glenn, but I reckon that’s not quite the original original source but at least it has the photographer’s name? I just thought I’d share in case you like to keep your sources as well sourced as possible.
YoungHouseLove says
Thanks so much! I’ll add that info to the post!
xo,
s
Britt@knewlywifed says
Love! We had the same problem with stained paneling, too. We ended up testing a spot, and then just washing the walls. Our kitchen was about 100 years old and had some serious grease spots!
Mel says
I love the look you’re going for! Can’t wait to see the green on the walls. It is all tying in together so nicely.
April Bryan says
Our entire living room is paneling walls. When we moved in they were still white and one wall had been painted peach (horribly painted too). We decided to paint our paneling a nice gray color (DoveTail from Sherwin Williams). We did not really need primer because they were already white, but I will tell you the paneling absorbed our paint in alot, so we had to do several coats, which was not fun!!!! Exhausting. But we love it now =)
Jackie says
Why don’t you just take the paneling down?
YoungHouseLove says
You can read about that at the beginning of this post: https://www.younghouselove.com/2011/06/paneling-the-bane-of-our-existence/
xo,
s
Jess G says
You are better people than I. Personally, this girl would have surrendered after coat 2, I think. I can’t wait to see the end result!
Kimberly says
I was almost giddy to see that you used the same inspiration picture I did a while back when redoing the kitchen in my apartment. I went with blue walls, but I love the black countertop with white cabinets. It’s crisp, modern and fun!
Amy Dash says
I can’t help but smile at the green slipcoverd chairs in the inspiration photo! I love the mocha coloured ones that you made though :]
molly says
I used Kilz No VOC to prime over a navy blue closet, and it took me three coats plus touch up. I’m thinking it worked so well for you because of all of the other steps you took.
You kids are doing great work, and the kitchen looks fabulous. Thanks for your constant inspiration, and entertainment!
Angie says
Your room looks outstanding! I love the color you chose! I am currently in the process of painting the dreaded wood paneling that is also the bane of my existence. Lucky for me it covers the front entry…and the living room…and the adjacent dining room. I actually started with Kilz based on the recommendation of the Home Depot paint department and had not a one bleed through issue. I followed that with Behr paint with primer (velvet sky) just to be on the extra cautious side and it worked like a charm. Cheers to toning down wood paneling and brightening things up!
Erin @ The Great Indoors says
Glad you finally suckered some free babysitting out of John’s parents! :-) I loved the post from a few weeks ago (right around the time they moved) when you probably said free babysitting 50 times.
Erin @ The Great Indoors says
and by the way, LOVE the transformation so far! I know it’ll look even more awesome once you finish the rest of Phases 1 and 2.
Amanda says
Love the paint color. How do I talk my MR. into painting the paneling in our den, he love his 70’s man cave paneling. Plus I just saw the write up you’all got over at Ohdeeeoh.
http://www.ohdeedoh.com/ohdeedoh/big-blog-family/meet-sherry-john-petersik-of-young-house-love-big-blog-family-150186
YoungHouseLove says
Isn’t that so nice of them? We’re totally blushing. As for talking to the Mr, maybe try showing him photos to demonstrate how rooms with painted paneling can look great (sometimes it’s hard to picture things without visuals to help you along). Good luck!
xo,
s
Kristy says
Do you think I could have a grellow baby’s room, with a Red feature chair?
I already have an amazing 1950’s re-upholstered Sleepy Hollow chair (in Red) which I intend to use as a breastfeeding chair – but I’m sooooo drawn to greens atm – and seeing your panelling paint grellow – I’m starting to wonder if I should take a risk? Don’t want it to look like Christmas all year round…
YoungHouseLove says
Oh yes! I think it sounds awesome and fun!
xo,
s
Terri says
I’m so happy you guys posted this. We were told that we would need to use a shellac based primer to get the best results and no bleed thru. Like you guys, we went rogue and used a low-voc primer. Two coats of primer, two coats of paint and a year later, the walls still look great! Although, now that my son is a preschooler it’s a lot more difficult to get things like this done, so enjoy nap time while you’ve got it. Now I’m off to make curtains!
Congratulations on a beautiful transformation, and thanks for the tips!
Ashley says
Hmmm…no experience with no VOC primer, but I can’t get my baby to sleep either :(
Maya says
Looks great! But we can commiserate… We painted our paneling with Kilz Odorless oil-based, stainblocking primer (hoping to get the least scary oil-based primer we could). (And… I just found out that Home Depot no longer carries it – take away from that what you will!) Three coats later (yes, 3 – of oil-based primer!), there was still some bleed-through in certain places, so we covered those spots with another coat or two of Benjamin Moore Eco-Spec primer. Then we painted with Benjamin Moore Natura (no-VOC) paint over the primer (in some cases 3 – 4 coats). Insane! Our lovely contractor is as baffled by this as we are. But the house feels like a new place. From dark and depressing to bright and happy. I never want to paint paneling again, though. EVER.
Claire @ Claire K Creations says
Wow what a difference it made though! I love the grellow in that pic. Just a little coincidence that they have a similar dining table/chair ensemble as you guys in the background.
Our table is actually an old door and the ends are raw. The other day I decided to tackle them with some leftover paint. I did one end and it looked great so to the other end I went. By the time I’d finished the other end the first was timber-raw again and the paint had soaked in… I can’t imagine that on a whole room scale.
Kellie says
We had the same experience (on plaster) with the Olympic primer. :(
Our dining room is a similar shade of green and we love it. It reminds me of the color of a leaf when the sun hits it…wonderful for those winter months.
I cannot figure out what kind of curtains to use with the green though. Any suggestions…hint, hint?
YoungHouseLove says
Maybe fresh white ones? Or something softer like linen or mocha or sand with a fun woven texture? Good luck!
xo,
s
wordygirl says
LOVE IT! My kitchen is also bright green and it’s just so fun and fresh and cheerful. Mine is a bit more chartreuse than yours. (It’s Martha Stewart’s Sultana color matched to Behr) It was white and charcol grey when we moved it (what where they thinking!!) It opens up the space beautifully!
Tracy In Attalla says
Love,Love, Love the transformation so far. I am so inspired by the before and after pictures. The rooms you have redone look like something from a southern living magazine. Please continue to post you progress. They give me great ideas for my own home. Congrats on the new Home. I know you will make it a place where anyone who enters is instantly at home.
Kat French says
Wow! This is such a testimony to the power of paint and color! I can not believe that merely painting the walls and beam could transform a room so much. Well done!
Erica says
I am so excited to see that Kilz now has a no VOC primer! The walls in my house were so filthy when I bought the place that we had to scrub them before primering and painting. I used regular Kilz on every single surface (11 1/2 gallons!) and almost 2 years later, I have noticed no bleed through at all! Seeing this just made my day! I hope you have the same luck I had!
kristen f davis says
lordy!!! that blows! i HATE bleed through. glad that hurdle’s over! can’t wait to see the white cabinetry!
Hollie Herington says
I’m going to buy primer and paint today for my wood paneling. Can you recommend a brand you like the best. I was thinking about trying Dutch Boy paint. Let me know what you think. THANKS!!
YoungHouseLove says
Kilz is definitely our favorite primer. And a for paint, we have heard amazing things about Benjamin Moore.
xo,
s
Tara says
Another painting question I’m hoping you guys can help with: Any reason why you didnt just use the 4 coats of no VOC paint for the trim & beams in your kitchen..like you did for the family room? Also in today’s post you mention using Benjamin Moore’s Decorators White for the color of your office cabinets…..would that white work for baseboard trim in your opinion – or would it read too white/bright? Thanks a ton in advance!
YoungHouseLove says
Oh yeah Decorators White = perfection for trim, cabinets, baseboards, built-ins, etc. It’s just a great clean white color. As for the no-VOC paint we already had, we heard so many great things about the Advance paint (which is an alkyd and also self-leveling, which our basic Olympic no-VOC paint isn’t) so we couldn’t wait to try it!
xo,
s
Allison says
Hi guys,
I didn’t get through all nine pages of posts, but was wondering if anywhere you mention what types of brushes, rollers, etc. were used? When I painted paneling in our house (following your previous den instructions!), I used a tiny little paintbrush to first fill the grooves then used a roller over the whole surface. This took some time, let me tell you! Your recommendations? (We have a whole den of our own with paneling to eventually paint! Thanks and keep up the good work.
YoungHouseLove says
I just use the same short handled angled 2″ brush that I always use to paint trim and cut in for the grooves and the areas around the trim and John used a flat surface roller (one of those high quality Purdy ones from Depot).
xo,
s
BT says
All of your comments have been helpful and I loved the pictures of the finished
projects. i am getting ready to paint the paneling walls in our den which also has a brick fireplace. Had not thought about painting the brick surround as we have a wood burning insert which is so warm in the winter. i haven’t been
convinced yet that an electric gas log will be warm enough. Also, what about when the power goes off because of outage. Can’t wait to see how the new painted walls turn out – antique white.
YoungHouseLove says
Good luck!
xo,
s
Ashley says
What color is that green/yellow? I’m in love with it!
YoungHouseLove says
It’s Sesame by Benjamin Moore.
xo,
s
Ellen McErlane says
I would like to do my kitchen….But need to know if you ever have sales…..I ONLY shop on sale …..Which of the two major hardwares stores carry ???? Many thanks,Ellen
YoungHouseLove says
You can try to get coupons for primer and paint online from the manufacturers or like them on Facebook sometimes for sales! Hope it helps!
xo,
s
Myrna says
Your kitchen looks amazing…and I totally feel your pain. Our entire house is paneling and we spent a whole summer tackling the “paint the paneling project.” Definitely not my favorite project (getting paint into all those grooves is NOT groovy!) Our first paint-through was to paint the entire house white (closet interiors are still white cause I really despise painting inside closets!) Then gradually we have added various colors to various rooms. It’s an amazing transformation and I can barely remember what it originally looked like. Our current dilemma is that we had some damage around a window and need to replace the paneling. It is impossible to find anything to match the current grooves, so I’m currently trying to decide if I should drywall that one wall or rip some paneling from a closet to use. Of course, the “place your furniture carefully” technique is working quite nicely as well. Anyway…I LOVE your kitchen….what material are your countertops?
YoungHouseLove says
Aw thanks Myrna! Good luck with everything! Our counters were granite (we inherited them from the previous owners) but are now white corain (in Glacier White) and we love them! We craigslisted the old counters so they didn’t go to waste!
xo,
s