This is supposed to be the post where I declare “The floors are DONE… enthusiastic exclamation point!” But instead I’m here to say “The floors are almost done… sheepish period.” But they’re mostly down and they weren’t actually that hard to do! Seriously, anyone can do this.
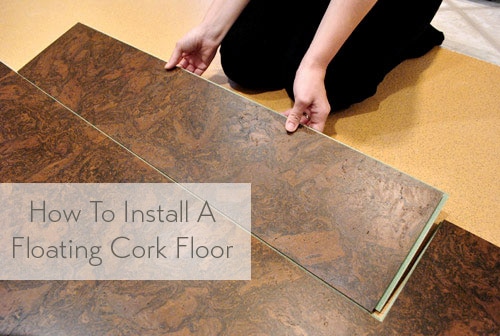
Since we last updated you, they’ve gone from this:
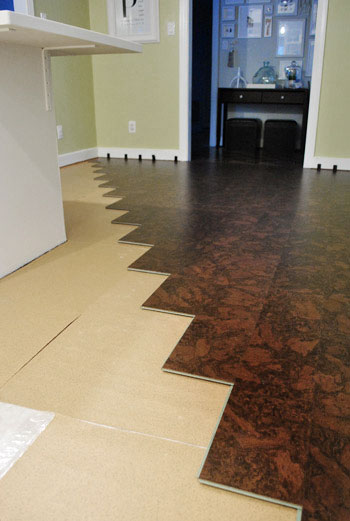
To this:
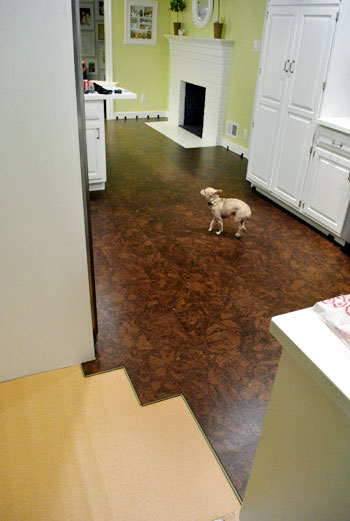
Note: Some of these photos have the cork looking more red/orange than it is in real life. But if you watch the video where we’re installing it (or the one with Clara in it), it’s probably the most true to life (a rich mocha color). We’ll try to take better pics next time!
We thought we could knock out the rest of it in the last few days, but between making all of the cuts to snake around our peninsula/cabinets/doorways and moving appliances out to make way for a few planks of flooring under them (to keep them level without pinning down too much cork), it just took a little longer than we thought. And since this whole blog is in real-time, as much as we wish we could fast forward to the end and share all the glossy after pics (no one wants to call this turkey done more than we do, haha) we just have to keep plugging away and share the pics whenever we get ‘er done. We did stop to take some how-to pics and a video along the way this time though – so we’ve got that to share with you. Shall we begin?
Here’s how the snapping system works on these cork boards. Tongue goes into groove. Boards lay flat together. Everybody’s happy.
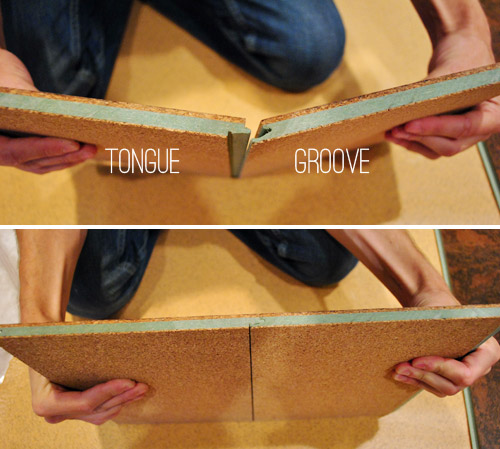
When it came to actually putting a board in place, it went something like we show in the video below. If you can’t watch the video (we don’t want to blow your cover at work) we’ve also included the same information via photos below. Watching the video on mute is probably more explanatory though, just to see things in action.
Okay, so now for the photographic, Burger-cameo-free version of that same info. We first slid the tongue into the groove at a slight angle.
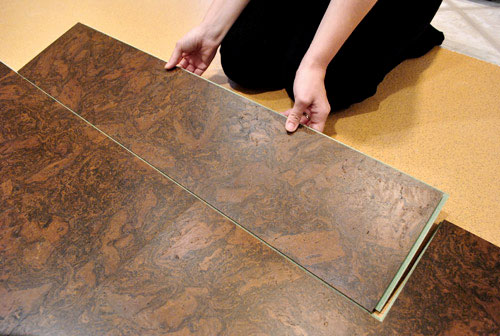
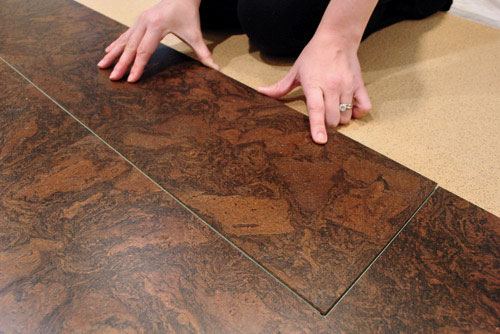
That held it very loosely together so that we could then lay it flat and slide it into the groove on the short end of the board.
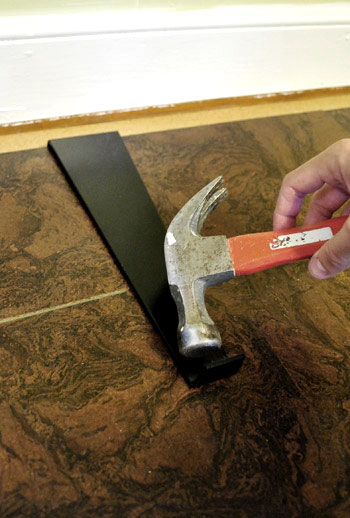
Obviously that isn’t enough to hold the board in place, so out came the hammer and the tapping block (we got the tapping block in a flooring kit from Home Depot mentioned here). The block allows us to give the board a pretty solid wallop (technical term) without hurting the cork (since it takes the brunt of the hit instead of slamming the cork directly).
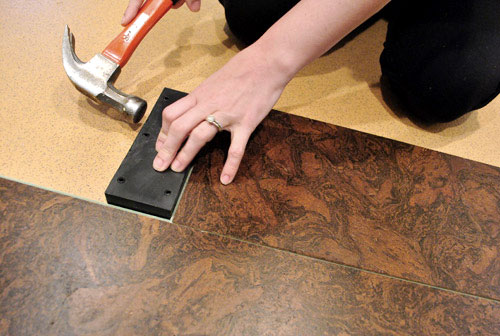
Once we had the short end tapped in enough to make the seam disappear, we did the same on the long side of the board. See that slight seam? After a few taps it was history (you can watch it disappear in the video above).
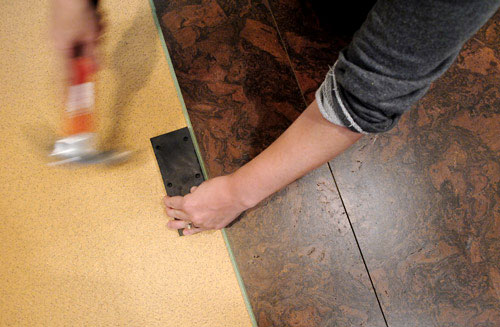
In our experience, when the long side popped into place the board sometimes, well, popped up a little bit on the outside edge. No bueno if your goal is a nice flat floor. So we found that if we put our weight on the board to keep it flat, then hammered it a couple more times it would get the board to lay flat and behave.
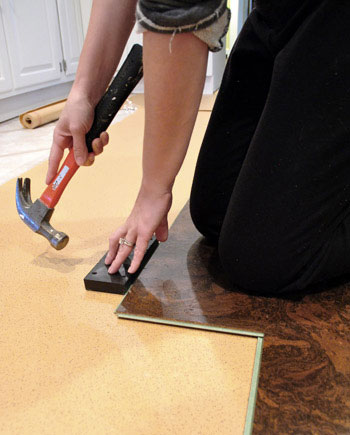
See, it’s behaving.
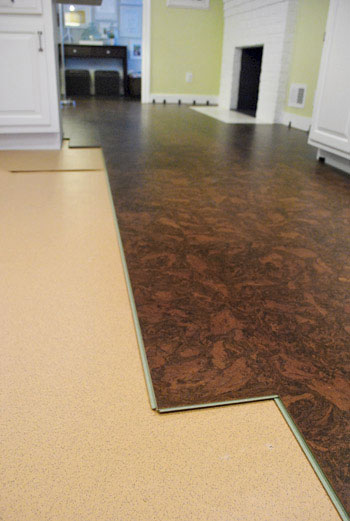
Of course it was a bit different when we got to boards close to the edges because (bummer alert) you don’t have room for your block or hammer.
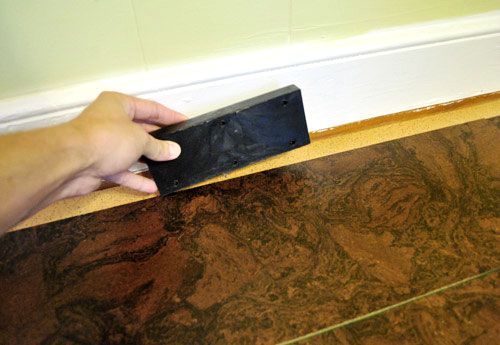
That’s where the pull bar comes in handy (it was also included in the kit from Home Depot along with the tapping block and spacers mentioned here).
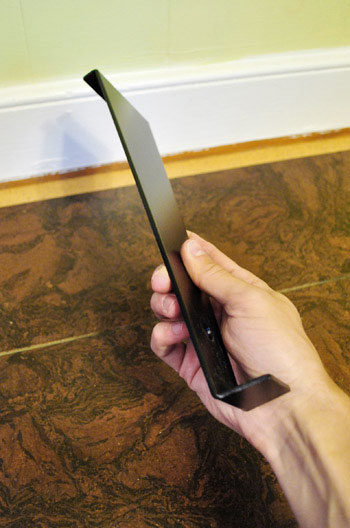
The wide side hooks over the board so that you can tap the other end with your hammer to get that seam to disappear. Oh and see that gap near the baseboard? There’s a recommendation of a 5/16th gap around the perimeter of the room (floating floors need to be able to expand/contract a bit to keep from warping, and the shoe molding will completely cover these slivers of space so they’re undetectable) – so we did have to cut a sliver and stick it in there. But nothing too snug to the wall since we don’t want warping. We used spacers to help us keep our place. More on that here.
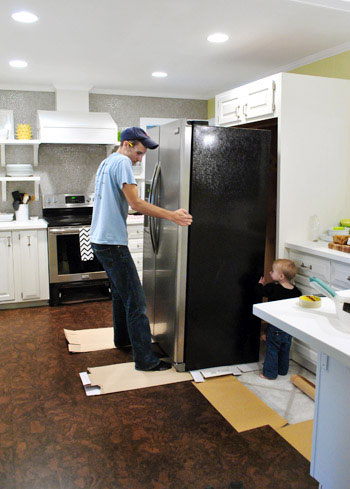
Both techniques weren’t that time consuming, actually. It was the cuts that were a big time suck. Well, that and sliding the appliances out so we could run a few planks of flooring under them to keep them level. And since we got a big groove in our hardwood floors at the old house from sliding the refrigerator out, we were SUPER careful about it. Like two-layers-of-cardboard-over-a-scrap-piece-of-cork careful.
So I’m sorry we don’t have “after” pics for you yet (not that they’d be totally done anyways since we still have to reinstall transitions and shoe molding along with seal all the cork for added durability), but I did try to fake it by taking some pictures from angles where you don’t see the unfinished section in the laundry room. Yep, I’m clever like that.
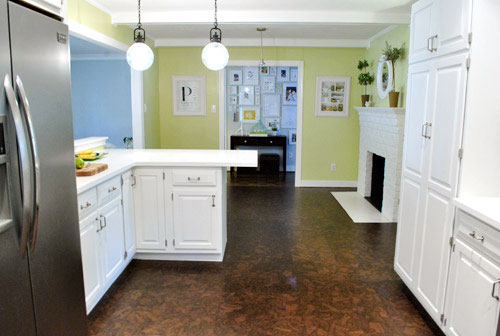
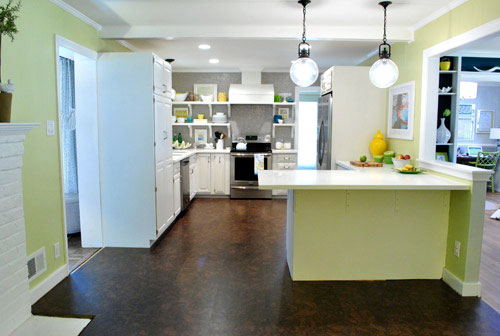
Who knows, maybe we’ll never finish it and just shoot around it for the rest of our time here.
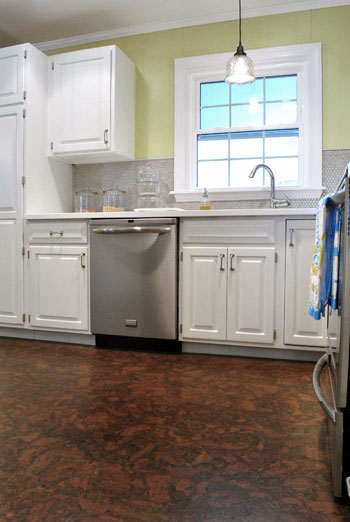
Just kidding. Of course we’ll finish it. Especially since I couldn’t even shoot one cute video of Clara without blowing our cover. Darn you Clara, always being adorable in the most inconvenient places! Note: for some reason every time Clara throws the football on this video the floor appears to makes a crazy loud sound, but in person the floor is really soft and absorptive of sound, so it doesn’t make loud hollow noises when you walk on it or drop things – must just be the sound quality of the Flip camera (it seems to amplify voices to hear them better, so it must have amplified the football sounds too).
Luckily the laundry room should be pretty speedy. Knock on wood…er, cork.
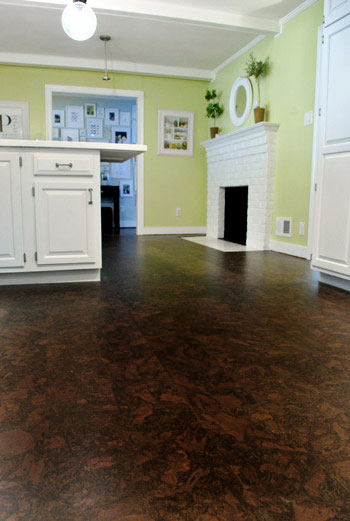
Anyone else in the midst of a project that’s taking longer that expected? Ever laid a cork floor? We have been so happy with it so far (the rich deep color adds so much for the formerly white-on-white room, there are no scratches/dings where Burger runs around from his nails, no dents where we drop things, it’s very soft and easy on the back/knees, and it should be even more durable once we seal it after it’s all in). We’ll definitely keep you posted! Oh and we did learn that if you’re redoing a kitchen from scratch you should install your cabinets first and then add the floating cork floors around them (like we did in this case as well) since a floating floor shouldn’t have big heavy cabinetry resting on it (remember, it needs to be able to expand and contract a bit to keep from warping – more on that here). So we just thought we’d toss that tip out if it was helpful to anyone.

Kelly says
It looks great, better than I expected. Visualizing what things will look like is a real talent, and you guys have it! I would love to get cork floors someday but my 2 dogs are a lot bigger than Burger and they can get a little wild on occasion, so I worry their toenails combined with frequent tracking of mud and wetness on it (we’re in Seattle) would wreak havoc. The floating floor installation seems like a DIYer’s dream, so maybe I can find something that goes down like that. I consult YHL for step-by-step instructions on various things; it’s so helpful to get the real world scoop from other DIYers and not only rely on how-to’s from professionals who often gloss over some of the details because they’re just so used to doing it. Thank you!
YoungHouseLove says
Aw thanks Kelly, you’re sweet!
xo,
s
Rose says
Love it! Cork is my favorite floor of all time. This is the second house we’ve used it-the same brand from Lumber Liquidators. We used Van Gough in our last kitchen and now have Cassett in 3 bedrooms. Wish I could have it in the whole house!
The only advice is to seal under the dishwasher with a few extra thin coats of poly. Water based matte finish is my favorite, similar to the original.
Enjoy!! Cleans like a dream and is barefoot heaven. :)
YoungHouseLove says
Thanks for the tip Rose!!
xo,
s
Saleha says
Ok. So if you had to pick between petting the penny tile or the floor, what would it be?
YoungHouseLove says
Tie! Haha. Cop out answer, but for functional reasons we love the soft rich floor (that un-white-washes the room) and the tile is aesthetically just so much fun!
xo,
s
Sarah says
Hi guys, I’ve hummed and hawed at posting this and I guess I’m just going to go for it. I’m not a fan of the cork floor or the supports on the floating shelves. It just doesn’t work for me. It appears crowded and that 70s look that you were trying to move away from with the original kitchen makes another appearance with the floor.
I normally love what you both do but this…meh. SO sorry I can’t be more supportive but you’ve got a ton of people that are. My best, Sarah
Kristin R says
The floors are looking great!
I think that might be the exact same product we used in our living room in our previous house. We loved it! So warm and comfy underfoot. We was sad to leave it behind when we moved – now we have 105 year old strip hardwood that desperately needs to be replaced :o(
Enjoy!
yael says
i love your videos of clara, but i can’t understand what she’s saying! maybe you guys can think about putting captions underneath. although, decoding it is fun too…
YoungHouseLove says
Haha- we try to repeat things throughout the video to help out! John repeated a lot of them in this video, so I hope that helps!
xo,
s
22209 says
Hi! Thanks so much — I plan on putting cork flooring in my kitchen soon, so was eagerly waiting for this! :) Just to make sure I understand .. the cork extends just past the front feet of each appliance, and then behind that the back feet are on a cork plank but otherwise you can see straight down to underlayment and/or the old tile?
YoungHouseLove says
Yup, that’s how the installer for the manufacturer recommended we proceed!
xo,
s
22209 says
Awesome — thanks!
Rach says
Nice work…but I have to say Clara stole my heart in this post:) I have a 14 month old and I just love watching her walk and talk just like Clara:) She is so precious!
Nicki says
It is looking really nice you guys. I put cork flooring in 3 1/2 years ago into my living room and my massage room. I wanted to eventually do the whole main floor but quickly realized I probably couldn’t afford that anytime soon. I have had good luck with it, as I have animals and there is not much damage from them. The furniture makes little dents under the feet and I have wondered if I could steam those out a little. The biggest bummer I have experienced happened a couple of months ago, where out of the blue my 12 yr old cat decided to dig holes in the flooring. I was left with six holes dug down to the underlayment. He has never damaged furniture or anything before and we found ourselves concocting stories of maybe a raccoon came in the pet door LOL. Anyway I had to cover up the holes for a week with various items, It hurt me so bad to look at them. Then finally I filled them in with wood filler, sanded then stained them and believe me when I say that you have to really look to see where they were. I know of course because of the trauma LOL, but others really have to look. I know it is a floating floor but I would had to have torn many rows out to get to them to exchange.
The other thing (sorry for the long comment) is that I am bummed because I researched and kept reading that if I sealed the floors the warranty would void. Now they are much older and after I see what you two use, I am going to do it. I just wish I had gone ahead and done it at the beginning.
YoungHouseLove says
Aw thanks for the tip about filling those trauma spots Nicki! So glad you could repair them!
xo,
s
Katherine says
Slow and steady wins the race. {and worth the effort to take it slow}
Alison says
Ok I’m picturing the cork flooring like a cork board or cork in a bottle and I’m imagining that if you were to walk on it in heels you would sink right through or poke a hole it it. Does that make sense? I would just be nervous I would poke holes in it with my shoes.
YoungHouseLove says
Haha, it’s actually very hard. It’s sort of like how you might worry bamboo would be soft but that type of flooring is manufactured and pressed extremely firmly so it’s super dense and then sealed to make the surface even more durable. Its comparable to hardwood. Hope it helps!
xo,
s
m @ rambling musings says
Thanks for the detailed instructions! Just making sure I read right: no floating floors under the fridge and dishwasher ’cause that might encourage buckling.
YoungHouseLove says
Yup, it might vary by manufacturers recommendation but ours (long with the installer we know) but said just using flooring to go under the legs of the appliances to keep everything level was the way to go. That way things could flex and there wouldn’t be any warping.
xo,
s
Amanda says
Funny timing – my husband and I just bought our first house and are laying the laminate floor ourselves (same groove and tongue concept) – all 1600 square feet of it. It is taking SO long, so it’s nice to know someone else is going through the same thing!
Michelle says
So many projects taking longer than expected right now. We have a 1930 tudor and the previous owners lovingly updated a funky attic room with beige shag carpet, olive green walls, and a poorly installed kitchen (???) with blue and white speckled tiles. Ick. We started in December and thought we’d be done by mid-January. Heh. Not quite. Black wood floors, beige walls, and converting the recessed lights to pendants wasn’t enough. We also decided to build in some cabinets along the way.
Also on our “get on that already” list:
-Painting the living room wall where our previous owners had hung a TV and then ripped it out of the walls, leaving us to patch things up. Patched, but not yet painted.
-Hanging 75% of our art
-Building pantry shelves
-Replacing kitchen hardware (we installed one drawer pull, does that count as progress?)
-Installing about 300 more square feet of flooring in our upstairs remodel.
Well, now I’m just exhausted.
Janelle says
I really love your blog and have been your cheerleader thru all the projects you’ve worked on to date – but I’m so sad to say this is a huge miss for me. I thought this kitchen was going to blow me away because I adore the combination of dark hardwood floors, white cabinets & stainless steel. But there’s something so odd about this cork flooring together with your penny tile and that yellow paint color. It lost its airiness and magazine cover appeal, which it had right up until you put these floors down.
Maybe a different paint color for the walls? Some white paneling on the back of the peninsula? I know things are still in progress so I have my fingers crossed!! I have a lot of faith in you guys :)
YoungHouseLove says
No worries Janelle! I’m sure not a single choice we made in here (paint color, tile, flooring, art, pendant lights, etc) is the exact same thing everyone else would choose, but that’s the fun of design! It’s so subjective! Many commenters have said the dark floors pulled it all together for them and they much prefer it to the white-washed look it had before (we do as well) but it’s definitely one of those personal preference things!
xo,
s
Jessica S says
The floors are gorgeous! I love the video with Clara; she has the sweetest little voice :)
Sarah says
We put down a floating laminate floor in our basement family room, hallway and bedroom two summers ago. This project took us 4ish months and caused many arguments! It was the worst project ever and we will never ever EVER install a floating floor again (together or pay a professional). We also have a floating laminate floor in our kitchen (that came with the house) and it has not held up well at all. The seams are splitting and it had many chips in it from when I, the clumsy one, have dropped numerous pots, pans and utensils on them. BUT, our 80lb dog never scratched them!
Your cork floors look wonderful. We had considered cork a few years ago, but didn’t find one that worked for us as there were very little color choices back to chose from. I bet sealing your cork floors will prevent a lot of the problems we have experienced with our floating laminate floor.
Georgia says
Looks totally awesome dudes! (sorry ’bout that Bill and Ted throw back). But seriously, it totally brings everything together and looks fantastic.
Johanna says
Love the new floor! Just wondering – how did you decide to go with cork? Hubby & I are probably moving into a house over the summer, and I can’t wait (& am already planning) to renovate, thanks to you guys’ blogspiration.
Oh, on an unrelated note, a friend recently pointed out that pinning / Pinterest may be of questionable legality. While I don’t think anyone will actually get sued over it, I figured I might as well pass along the heads up. See http://www.businessinsider.com/pinterest-copyright-issues-lawyer-2012-2
YoungHouseLove says
We just researched a bunch of options and went with the thing that was our favorite within our budget. We love that it’s eco and relatively easy (although time consuming) to install (no glues or nails needed). Hope it helps!
xo,
s
laxsupermom says
The floors look awesome already! I love the way your cabs pop against the floor. You’ll love the floors in action – they’re so comfortable to stand on for baking marathons.
Ofelia, México City says
The floor looks amazing, so as Clara walking around on tiptoe!
Abby says
Is it just me or did a square-ish pattern in the cork swirl/veins/whatever show up in the pictures (unintentionally)?
Also, I was waiting for a “just a little tapp-ay tapp-ay” Happy Gilmore reference… :)
YoungHouseLove says
AHaha, how could I miss a Happy Gilmore reference? As for the cork, it might just be the pics? In person you can very vaguely see the fact that they’re long planks, but it looks more like one big expanse of brown leather or something most of the time. I think the videos are more true to life than the pics!
xo
s
Teresa @ wherelovemeetslife says
Floors look amazing! Can’t wait to see that shot of your shelves with the flooring :)
I posted a few weeks ago about my plan for the master bedroom… went out and bought a bunch of the supplies the next weekend… and it’s still sitting in my bedroom :( I have done some sanding, spackling, a little paint swatch on the wall… and that’s about it. SO ready to get a roll on this thing. It’s going to be my first real room make-over!!!
Jackie says
Beautiful. the color of the floor makes everything else POP! I wasn’t expecting that. and Clara on her little tippy toes. Precious.
Theresa says
Have you tried a product called Might Movers? They slip under your furniture and it helps to move it around safely.
My daughters moved a fully loaded dresser that way (under supervision since they’re 8 & 9). Just a thought that may help.
YoungHouseLove says
Oh yes, those are awesome! I even think we have some, just didn’t remember to break them out!
xo,
s
Alyssa says
Hello, The cork floors look amazing! I have been waiting to see how they will look when transitioning from the other rooms. See my husband and I have come to a cross roads with our flooring and I would love your take on our situation. Because of the great price and look of gray ceramic plank tiles we decided to install it in our kitchen (as well as downstairs entryway, half bath and laundryroom) and it looks great, but because of the “grain” texture in the tiles my husband no longer wants to install wood flooring in the neighboring rooms (family room, living room, hallway, etc.) and it just breaks my heart since I’ve been looking forward to wood floors. How would you and John approach the transition? and what factors do you take into consideration when you use two different floorings in neighboring rooms? Would you recommend going with carpet instead of wood?
Thanks for all your advice! We’ve already learned so much reading your blog.
YoungHouseLove says
So much of it is personal preference, but we prefer flooring that is consistent throughout a whole floor or even a whole house (our last house was all mocha hardwood and it had a great easy and open flow and never felt chopped up). We plan to eventually refinish all the hardwoods here in our current house in the same dark mocha tone as the cork. Then it’ll hopefully flow and look more seamless even though they’re different materials. Hope it helps!
xo,
s
Erica says
Oh my gosh… forget about the floors for a minute.. that Clara is too cute for words. Her conversation with John about the new floors had me laughing. I swear I heard her say, “construction” at one point. Also, the new floors look great! You make it looks so easy!
Jenna at Homeslice says
Ah well. Life happens! What you guys do have finished looks 100% fabulous.
Jordan says
My husband and I decided to completely refinish all the hardwood floors in our house before we moved in…it took two extra weeks! So much sanding! So much waiting for stain to dry! They turned out great and we saved a ton of $…although that may be a project we refer out next time, lol.
Gina says
Love the cork floors. Wish I had chosen cork a few years ago when I had to pick flooring. The hardwoods make it quite noisy in the basement bedrooms below. Any tips on muffling sound from hardwoods or echo due to high ceilings and open floor plan…anyone?
The video of Clara is so cute. She looks like a ballerina walking on her toes all the time! She’s going to have some well defined calves if she keeps that up! My MIL taught dance many years ago in her basement and my BIL used to watch and walk around on his tip-toes (still does if he’s barefooted). You should see his calves!
YoungHouseLove says
Maybe try area rugs and curtains? Textiles like that can cut down on echo and make rooms feel softer.
xo,
s
michelle@decorandthedog says
You have the funniest little toddler. She kills me. I usually don’t watch videos on blogs but she seriously cracks me up. Her vocabulary is quite impressive!
eileen marie says
Those floors do photograph terribly! I did not care for them…until I watched the Clara video. They look GREAT w/ the white cabinets, which also look awesome painted white -it really plays up the dimension they have!
tracy says
oohhh, love it!
heyruthie says
love it. the cork is just like i imagined it, and it’s awesome. it’s making me want some in a color that would coordinate with my recently refinished natural color 1950’s red oak floors.
now, i’m dying to read a post from y’all entitled, “How We Repainted our Hearth A Rich Mocha Brown.” *wink*
michelle says
wow! we are also in the middle of a flooring project that we can’t seem to get finished. we are laying bamboo (the real deal with nails and all) in our master bedroom. it’s been 3 weeks now and thankfully we have enough done that we can at least sleep in our bed again. the mattress on the floor was way to starting-out-newly-married-poor for my tastes! the hubs sarcoidosis has taken a downswing so he has trouble just functioning for now. i have vowed that i will lay the last 2 rows of flooring plus a little angled area myself this weekend. he can supervise! fingers are crossed!
YoungHouseLove says
Good luck Michelle!
xo,
s
Terri says
I wish I had known earlier about sealing the floors. The previous owner of our home installed laminate floating floor with no sealer. Our dog had an accident and the moisture leaked down into the seam. No there’s a weird bubbled up area on either side. Luckily, an area rug can hide it.
Kelli says
Floors look gorgeous! Gorgeous. Beautiful choice!Good work!
YoungHouseLove says
Aw thanks Kelli!
xo,
s
Evelyn Vincent says
Terrific documentation and explanation of your cork floor project! I appreciate that you brought up the great points as well as the challenges – from tools to small children and solutions :)
You chose the most beautiful cork tiles I have seen, absolutely gorgeous!!!
YoungHouseLove says
Aw thanks Evelyn!
xo,
s
Megan says
We are in the middle of installing new hardwood floors in our entry, kitchen, half-bath, living and dining rooms.(And by we, I mean my husband’s ex-wife and her new husband are installing it, but that’s a story for a different day.) I am close to going crazy!! My house is so dusty and dirty. We had to rip out some awesome pink marbled ceramic tile with brown grout first and that was MESSY. The floors are looking great (as long as I can keep my 2 dogs from scooby-doing it across them). I have pictures on my blog. My new mantra is “I picked distressed flooring for a reason.” Yours are looking great! I love your pops of color in the kitchen and need to do the same in mine. Thanks for the constant inspiration.
Lindsay says
GREAT floors! But I think my favourite part about that whole post is the video of Clara talking and talking and talking. I was laughing out loud for the entire thing!!
YoungHouseLove says
Isn’t she a chatterbox? She’s such a funny kiddo.
xo,
s
Melissa says
Your kitchen is looking amazing!! Love the floor choice
YoungHouseLove says
Thanks Melissa!
xo,
s
Ty Lee says
I had a really sleek birch vintage dresser I snagged for $10 that just needed a nice facelift (aka Refinishing) and I figured it would only take a couple of hours to sand ‘er down and stain ‘er brown (hey, I rhymed!), but I’m now on Day 2 of this project and have only just gotten the 2nd coat of stain on it, and then I had to drag it all in because it’s threatening to rain today (gotta love Seattle!). The weather is always trying to foil my plots! Grrrr!
Well, hopefully it’ll be the color I want by the 3rd coat of staining (it’s a very dark stain, and I haven’t quite gotten the rich color I want yet). Oy, I’ve been working on that thing for 16 hours so far (a long way from the 2-3 hours I had planned!).
YoungHouseLove says
Oh man, I’m sure it’ll all be worth the work in the end though! Good luck!
xo,
s
Amber says
Looks great! We just purchased the same cork to install in our master bedroom. It’s fun to get a sneak peak.
Heidi P. says
Oh my gosh! I just noticed that in the video of Clara, you can *totally* see how glittery and shiny the backsplash is!!! It made me so happy!!! I can’t imagine how much I’d smile to myself walking in to a sparkly kitchen all the time. :D
Sarah says
The floor looks amazing, a huge improvement! I do have one question though: does it bug you to have so many different kinds of floors in your house? I promise this question comes from a good place. I’m asking because we have carpet now but are looking to replace it with hardwood. However… I can not seem to get over the fact though that we’d have 5 different kinds of floors in our house! Is this silly? You guys obviously rock it so I’m super curious to hear your perspective. Also, do you think it would effect resale value at all? Again, the floors and the whole kitchen look absolutely amazing and I’m so glad you guys rewarded all of your hard work with a great vacation. Well deserved =).
YoungHouseLove says
Oh yes, we’re huge fans of flooring that looks seamless (in our first house we had the same dark mocha wood throughout our house) so we plan to eventually refinish the rest of the wood floors in the same rich mocha color as the cork for a more easy and open look. It should really tie things together!
xo,
s
Rick Parikh says
tile me! I can definitely upgrade the shower
Molly says
We’re about to redo our house and are planning on doing cork flooring as well. I haven’t seen any cork that I like as much as yours however. What is the specific brand/color that you used? Where did you get it? The kitchen looks wonderful!
YoungHouseLove says
Ours is called Lisbon Cork in the Porto color through Lumber Liquidators. Hope it helps!
xo,
s
Nancy Carr says
I could really use the tile to be given away. I have three projects to do which are front porch floor, back splash and tile in the bathroom. This would be a blessing to have the tile and supplies. Thank you, God!
Tamara says
Now that you’ve lived with your cork floors for a while, are you still loving them? How is the dark floor for showing dust and things? Do you find you’re constantly sweeping? We need to rip up all the tile in our kitchen after numerous dishwasher leaks and don’t know if we should go dark (which I love) or a medium oak to go with the dining area (not really attached). Just wondering maintenance wise…Thanks!
YoungHouseLove says
Yes, still love them! They don’t show much dust since they have so much movement (we do sweep occasionally, maybe once a week or so?).
xo,
s
Jamie says
Fantastic little tutorial! Thank you!