It’s been a full year in the making, but OUR POOL IS DONE*! Here’s where I imagine someone saying “and the crowd goes wiiiiild” (and the crowd, in this case, is the five members of our household – including Burger shaking a tiny pom-pom). Today we’ve got one HUGE post full of info about the entire process, the budget, and, of course, the finished result. We’re also answering some of the most common questions we got throughout this project.
*Well, mostly done. More on that later
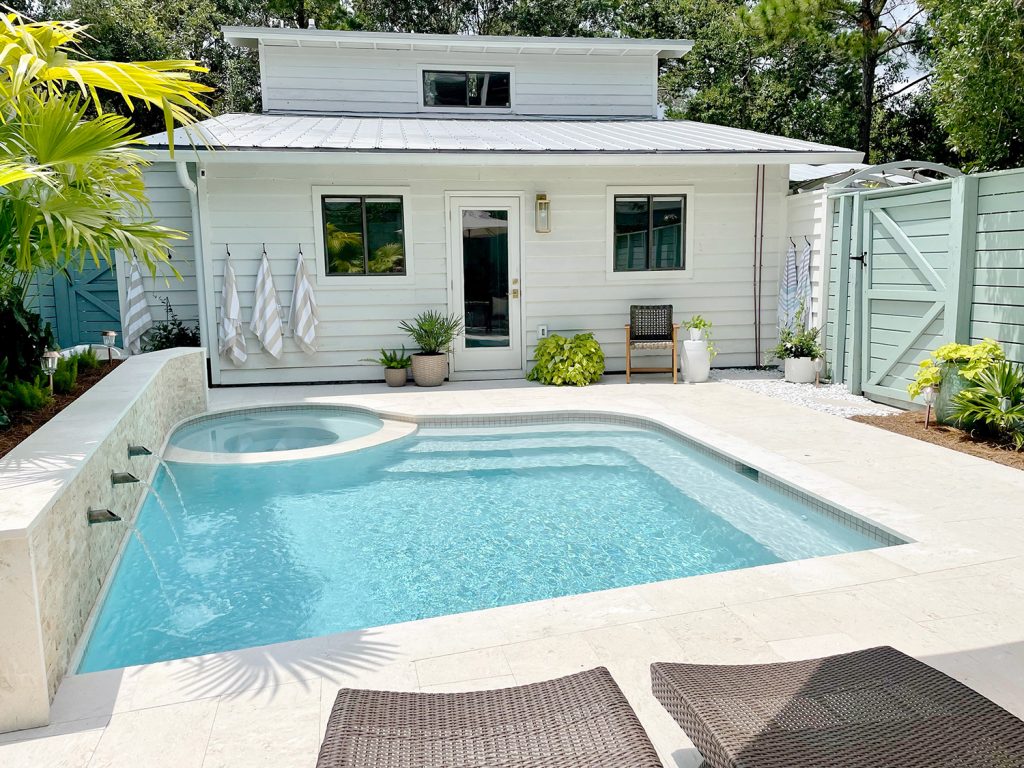
Neither of us have ever lived in a house with a pool or even in an area of the country where residential pools are very common. So this was totally new territory to us, and the luxury of being able to have our very own backyard oasis is not lost on us. We’re incredibly grateful to get to enjoy this space with our family – and one of the key ways we identified it as being something we’d all love and appreciate is that for the last 5 years or so, we’ve been renting houses in Florida for spring break with backyard pools. We even followed that trend with our Costa Rica trip and we LOVED it and spent tons of time floating and swimming and doing all the pool-centric things.
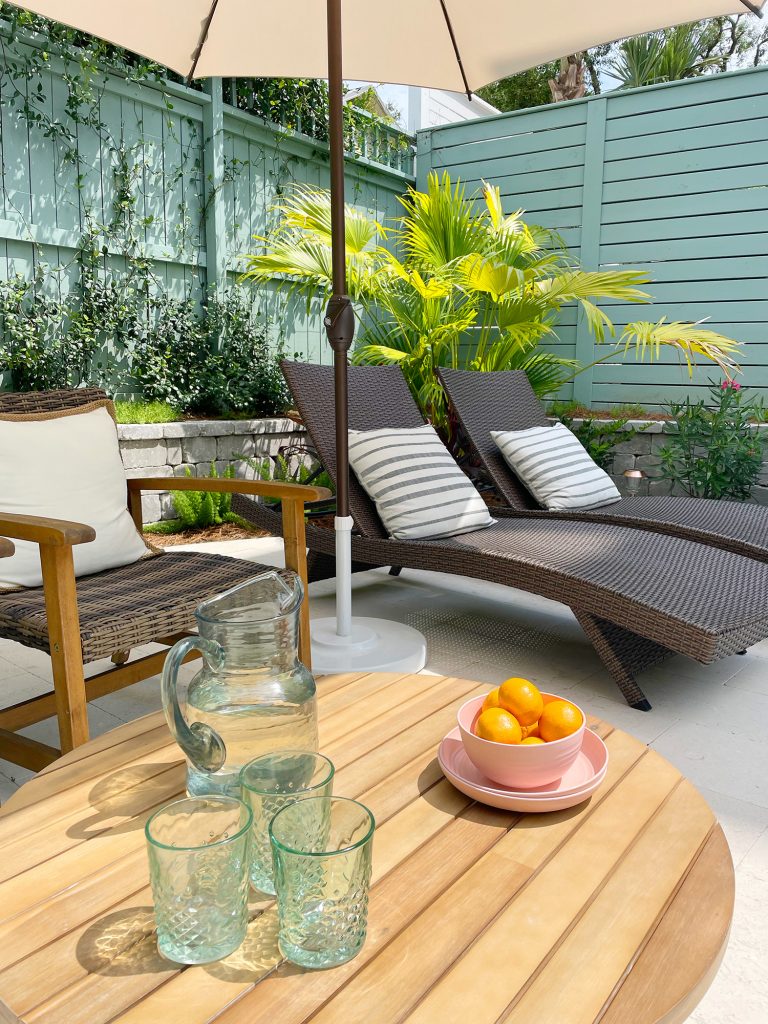
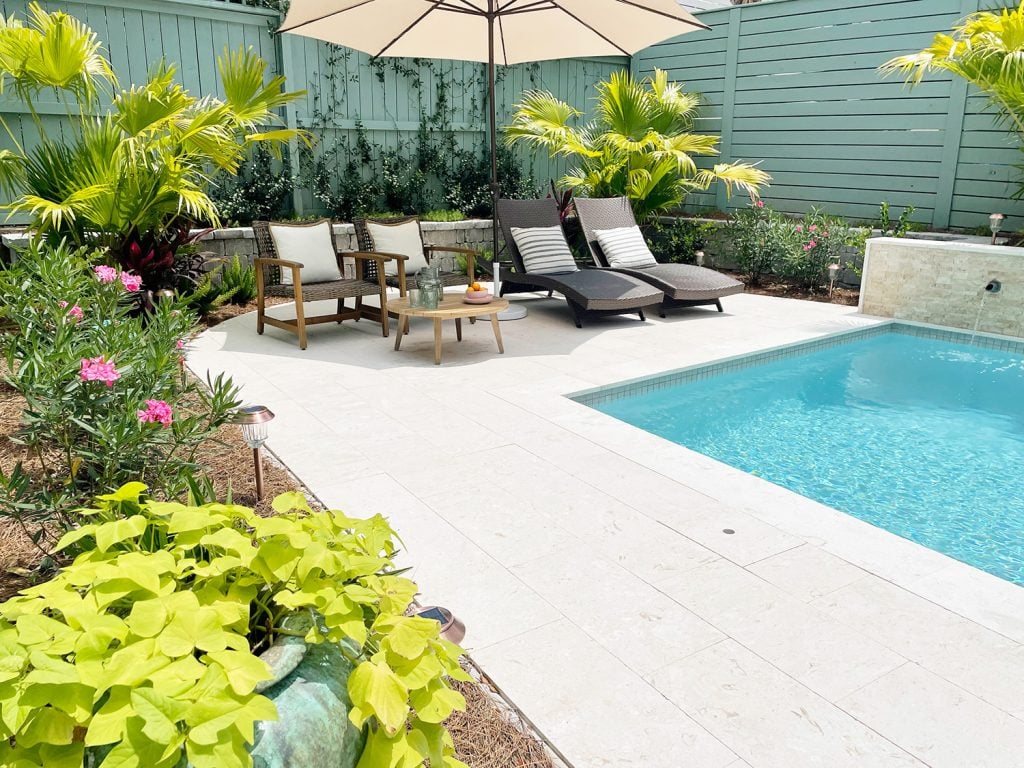
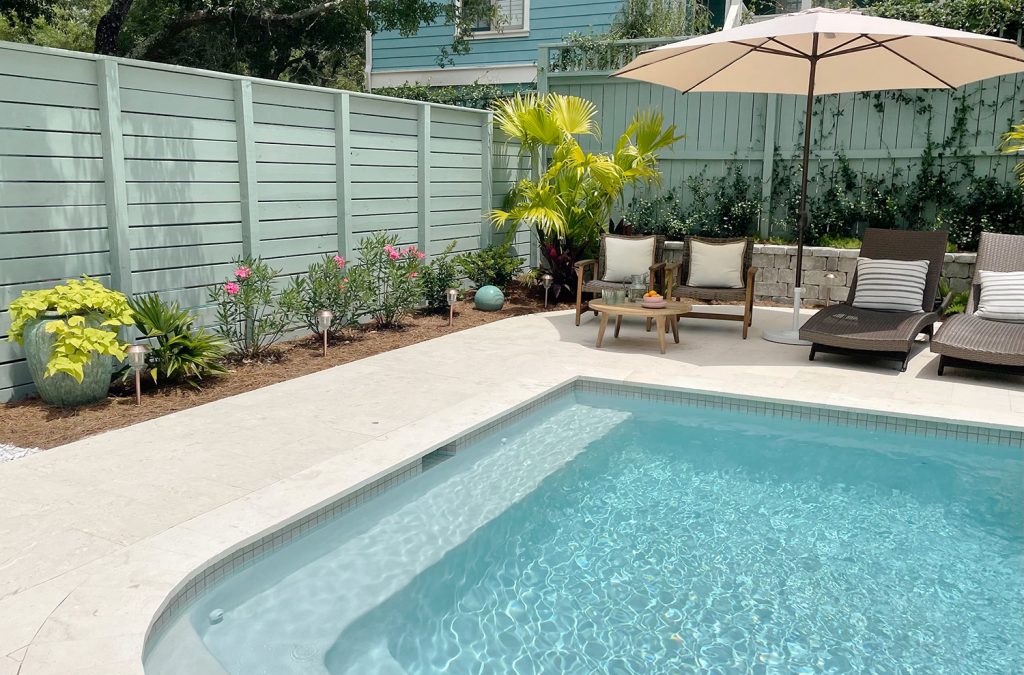
We even noticed that we love to eat meals out by the pool, which has continued to be a theme now that we have one of our own. Picture this table full of pizza or PB&Js or even hot mac & cheese (I know that sounds weird, but the kids scarf it down – even on a warm day). So as cute as that demure little bowl of oranges that Sherry put here for this photo is, this table has already handled quite a few meals (hence Sherry’s favorite purchase: these shatterproof bowls & plates).
If you followed along with our move to Florida last year, you know that having a pool or the space to add one was high on our house-hunting list, just due to those aforementioned spring break trips. Pools are common in our area, but the particular house that we fell for didn’t have one, which kinda felt like a bummer at the time – although not all was lost because the lot was perfect for adding one. The real estate listing even called out that there was “room to add a pool!” or something to that effect. And in retrospect, we’re grateful to have been able to design the exact space we envisioned because we all love what we ended up with (and my dragon wife got her beloved hot tub).
The Before & Afters
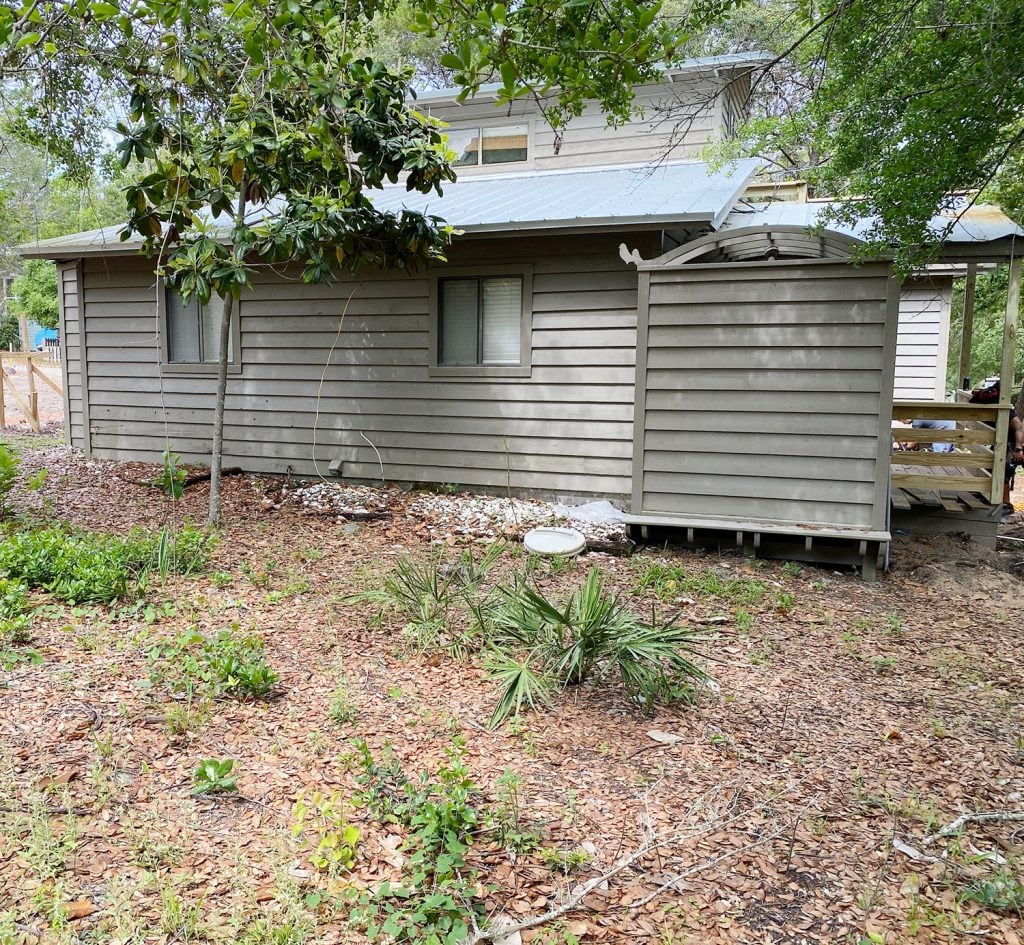
Here’s the space in April of 2020, courtesy of a video that our contractor sent us (hence the graininess). It was so bare and uninteresting – basically just an unused area full of mostly weeds – that we realize in hindsight we don’t have that many before photos of it. It wasn’t much to look at.
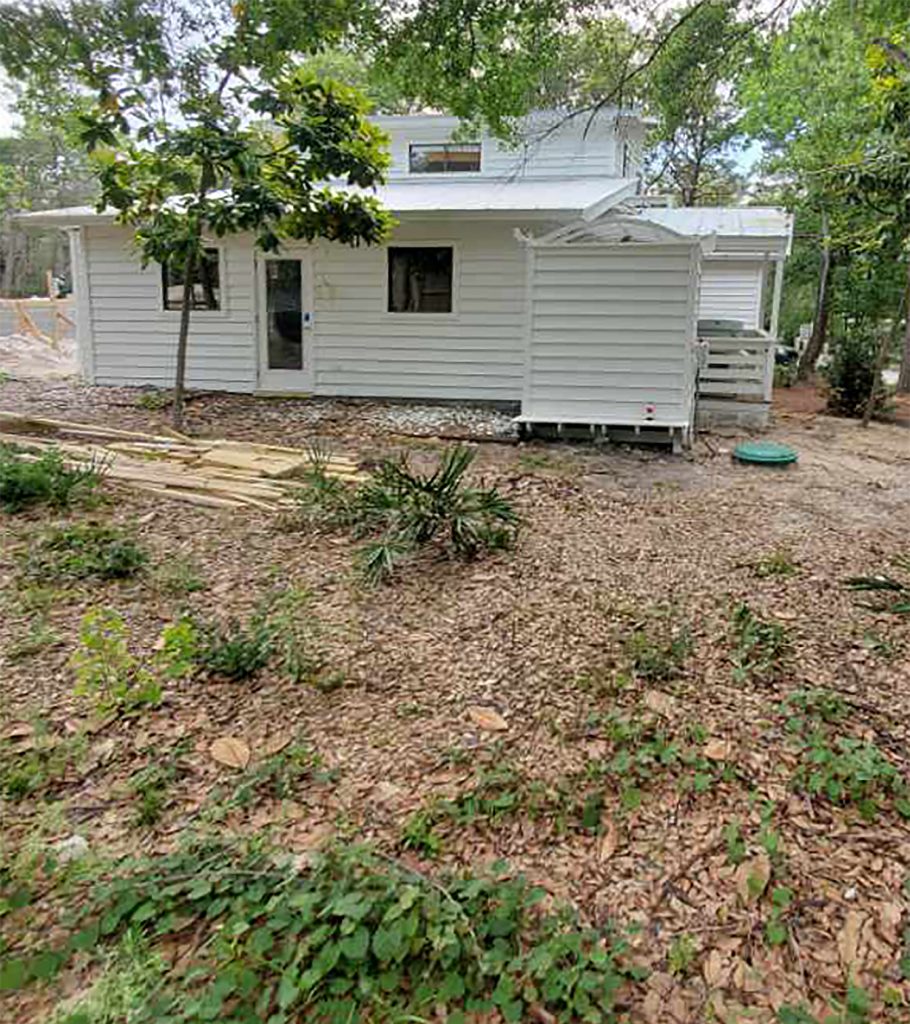
Here’s another photo he sent us about a month before the photo above. This was before the house was painted white and before the interior hallway and pool door was added for direct access to the future pool area. Sadly, you can’t see as much of that beautifully weedy yard in this pic. But don’t worry, I’ve got in another angle three photos down that shows the rest.
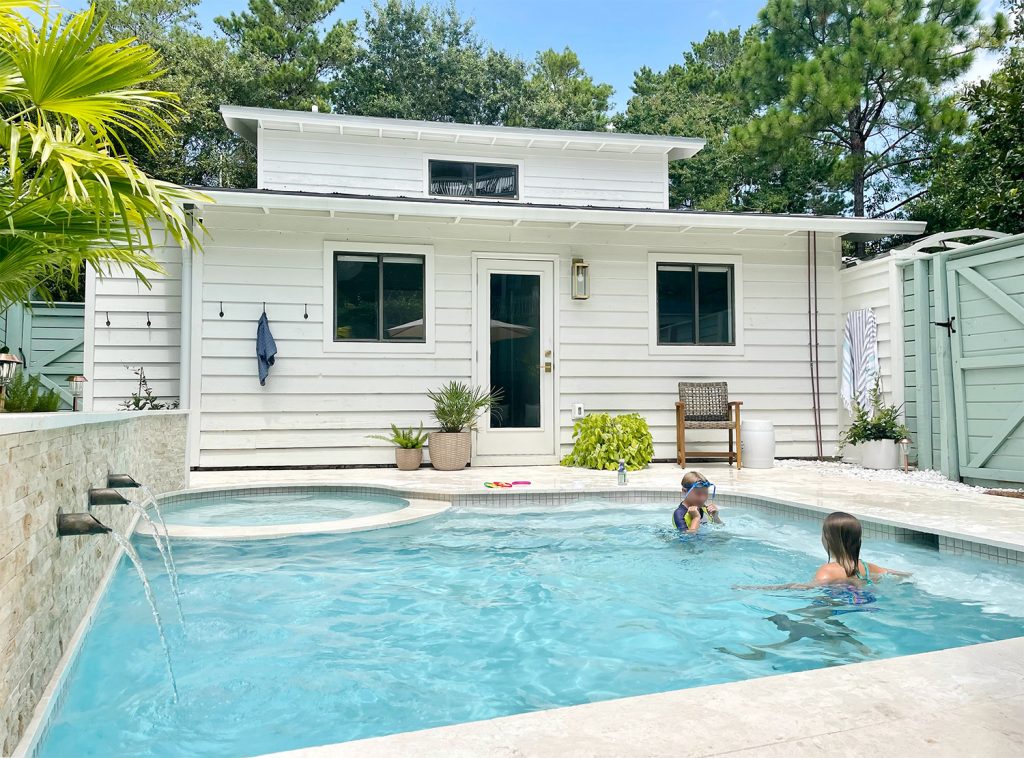
And here’s the AFTER. Goodbye weeds, hello little backyard paradise.
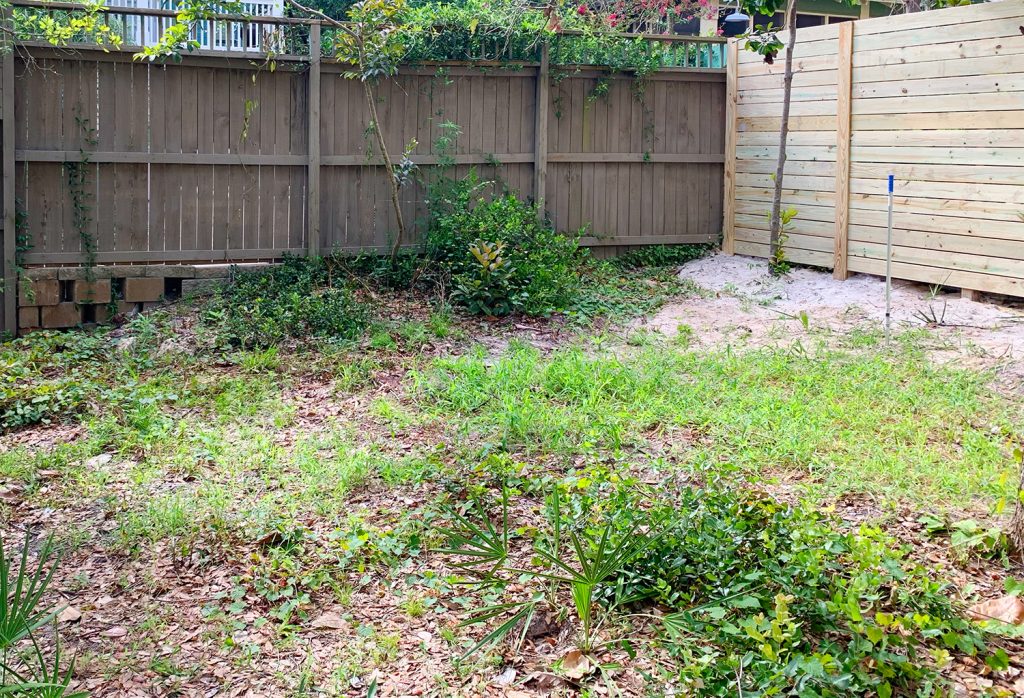
Here’s a before picture looking the other direction, towards the back of our neighbor’s existing fence (that’s the darker brown one) and the new fence that we put up along our property line soon after we moved in (the lighter horizontally planked one). This is before we painted them both a muted green color (SW Halcyon Green) which you see in all of the afters (we got our neighbor’s blessing to paint the back of their fence). I’ll talk more about the fences a little later in the post, but like we said, the yard itself was mostly just weeds upon weeds.
And now it looks like this:
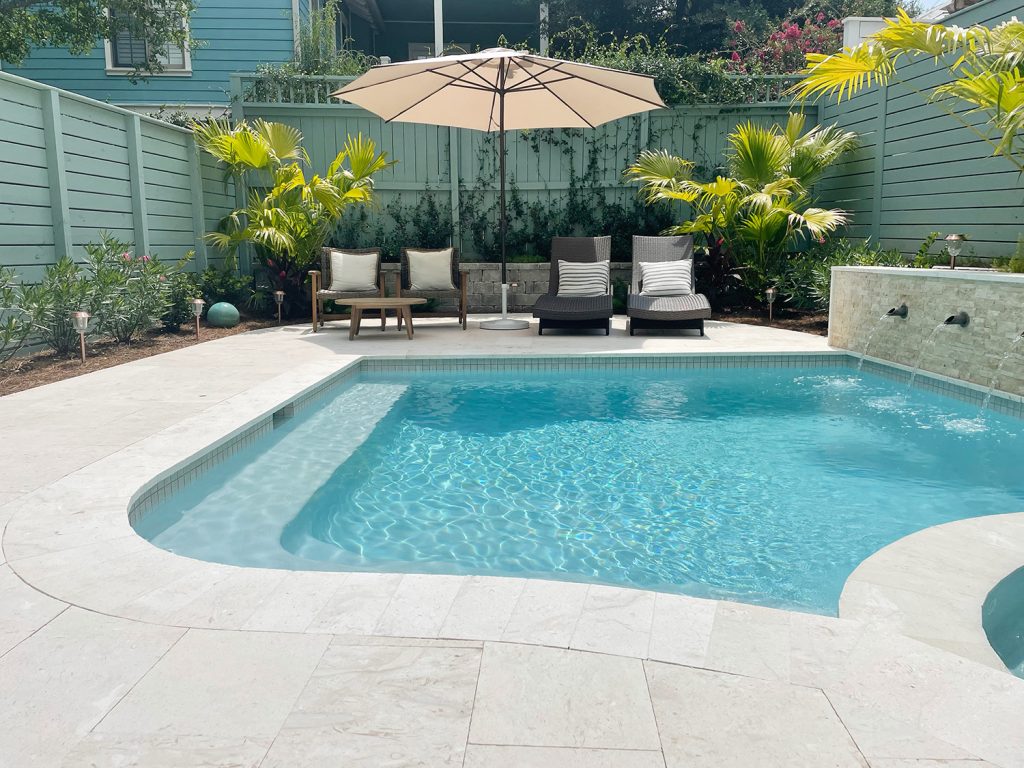
If you pull back a little further and view it straight on, here’s what you see:
To get a better feel of the space, here’s a quick video walkthrough that we took during the daytime and at night. There’s no narration, so if you’re somewhere that you can’t watch it with sound, that’s just fine – but there’s a 2-minute dose of audio zen for you if you can. Also, see if you can spot Burger making a cameo at the very end. It’s extremely subtle.
NOTE: You can also watch the video above here on YouTube.
There’s obviously a lot to take in, and a lot to say about this process, so I’ll do my darndest to cover it all. Who am I if not extremely long-winded?
Planning Our Pool
A big inspiration for our pool was this Balinese-inspired house that we stayed in during our vacation to Costa Rica back in January of 2020. We really liked the entire vibe of this little hideaway of a pool, from the lush greenery to the small white house with a tin roof. And yes, that was definitely some foreshadowing.
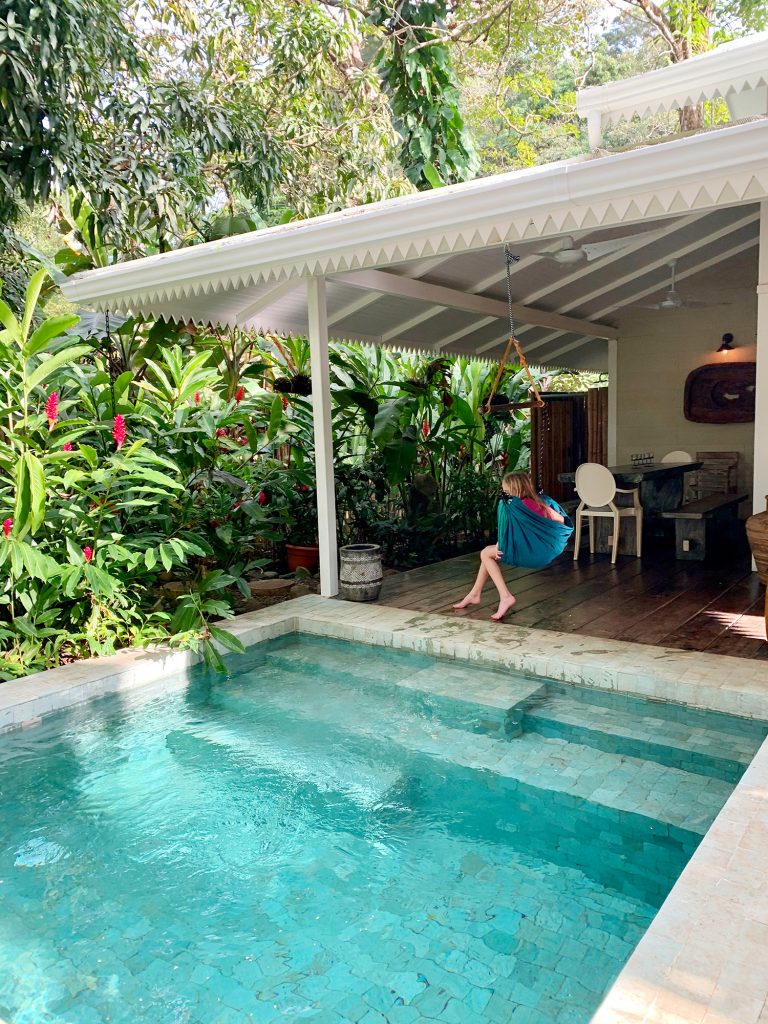
We’ve learned from those various vacations over the years that our family doesn’t need a huge party pool to have a good time, which is nice because most of the lots in our neighborhood – including ours – don’t have room for massive swimming spaces. Many are just smaller hangout pools, which are sometimes called cocktail pools, lap pools, or plunge pools – and of the four pools nearest to our house on the same street, our modestly sized pool is actually the second biggest (thanks mostly to our house being shifted over on our lot, which is why our listing boasted that “room to add a pool” feature).
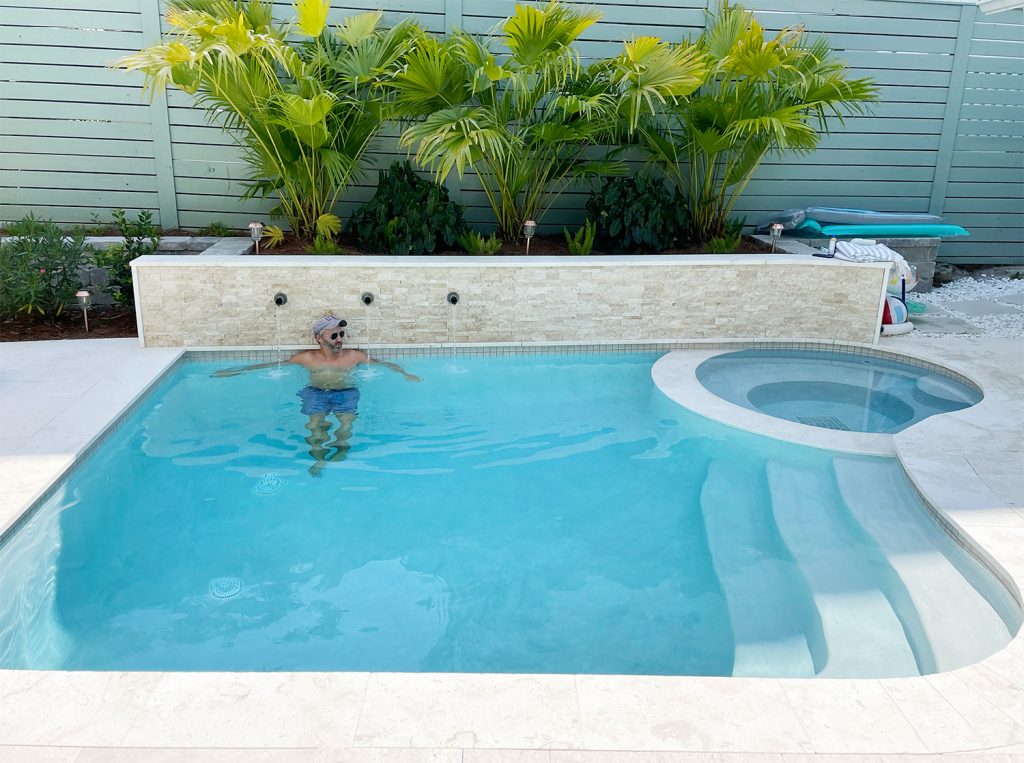
It really is all relative, because in another neighborhood or area our pool could be described as tiny, but at this point I think you know what we don’t really subscribe to the “bigger is better” philosophy. This has been the perfect size for us so far, and trust me, we’ve tested it by having 10 people in it (with floats and balls) and it works great. So while “supersized” wasn’t one of our pool goals, here are the things we did want to gain:
- Enough swimmable area for our kids and a few of their friends to play (which is why we skipped big tanning ledges or sunshelves)
- Room for us to float around, sometimes with friends and cold beverages (we’ve had 6 semi-massive floats in this pool and it was ridiculous and fun)
- A spa/hot tub area (since my hot-water-loving wife misses the jacuzzi we had at our old beach house)
- Something that sounds tranquil and soothing (enter the word “scuppers”, stage left)
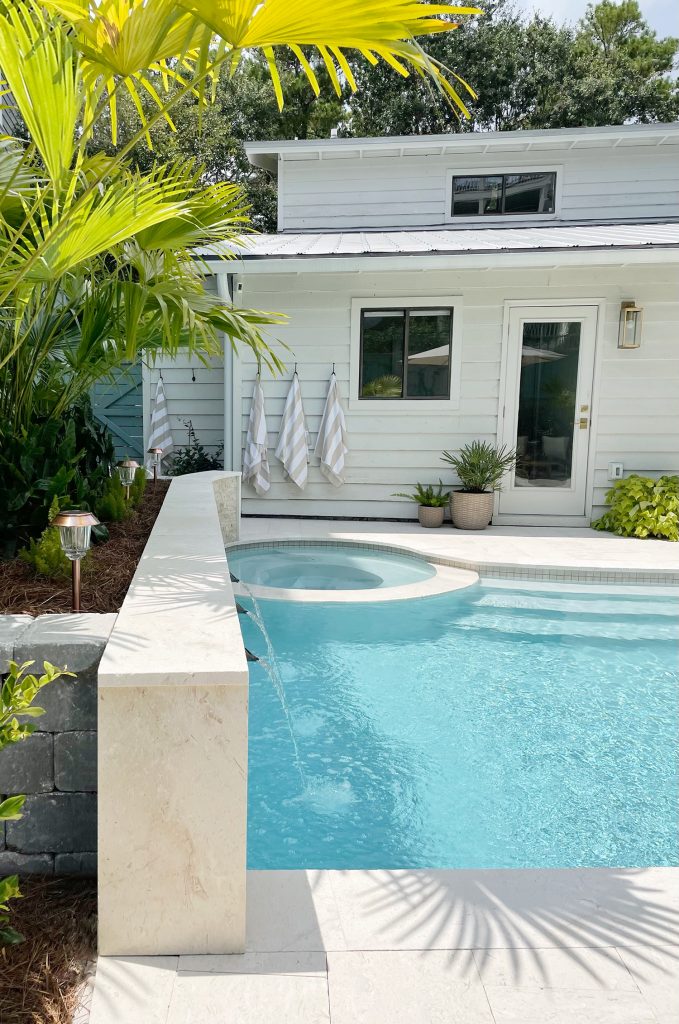
Because our yard wasn’t huge, we enlisted the help of a local landscape architect to help us make the most of our pool design (she knows all the local setback rules and code requirements, so she helped us navigate those parameters). She had previously helped one of our neighbors plan his pool, which is how we got her info – and she ended up suggesting several features that we really appreciate, like the curved edges around both the pool & the patio. She also suggested incorporating a retaining wall into the pool as a fountain element (those three sprayers you see below are called “scuppers” – which conjures up an image of a fisherman on a boat smoking a pipe to me for some reason). Having someone to bounce all of our ideas off of and add in her suggestions was HIGHLY HELPFUL. And she charged by the hour and spent something like 4 or 5 hours on it, so it was not expensive by any means.
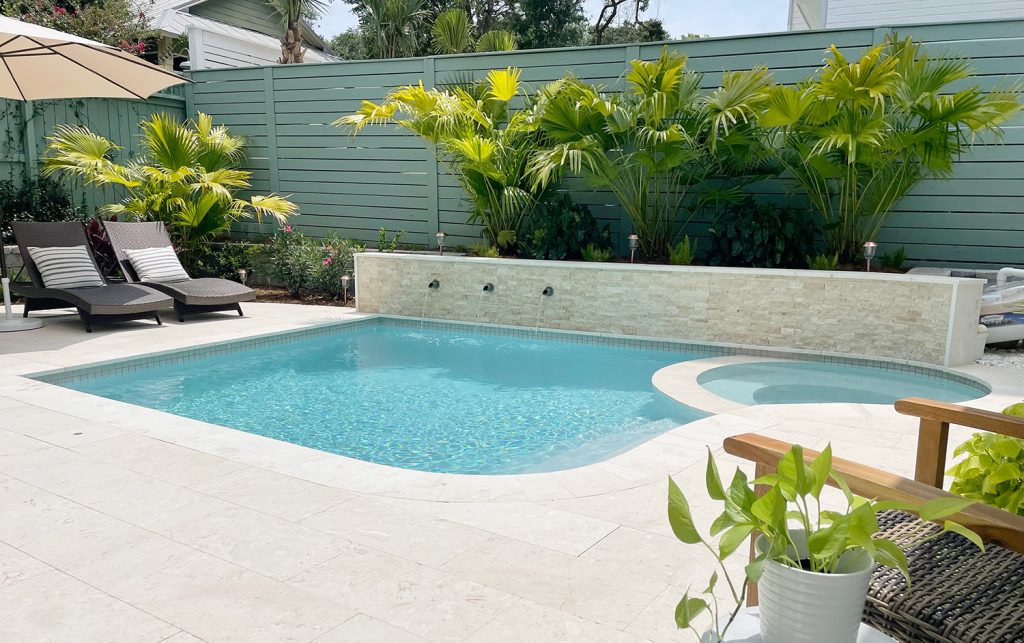
Its exact size is a bit hard to describe because it’s a “freeform” pool with some organic curves, but the longest side is around 20′ long and the widest part in the other direction is about 14′ wide. Again, there are some curves in there, plus an integrated hot tub, so the swimmable area isn’t that exact dimension. But deciding on a layout was just the beginning of getting this project going…
Our Plaster, Pool Tile, And Patio Stone Picks
Most of the pools in our area are made of concrete covered with plaster, which tends to do well in our environment which has extremely sandy soil (there aren’t many fiberglass or vinyl liner pools here), so we got to skip that debate that some homeowners go through. But we did spend A LOT of time considering the color of the plaster that we wanted since it’s the material that establishes the color of your water. Although, as we learned, lots of things affect exactly how your water looks (more on that in a second).
The majority of pools in our area go for a bright blue look, and our pool builder said the three bracketed colors below (Blue Quartz, Cool Blue, and Blue) are his most popular plaster colors. Note: These are all Diamond Brite colors, which is his preferred plaster.
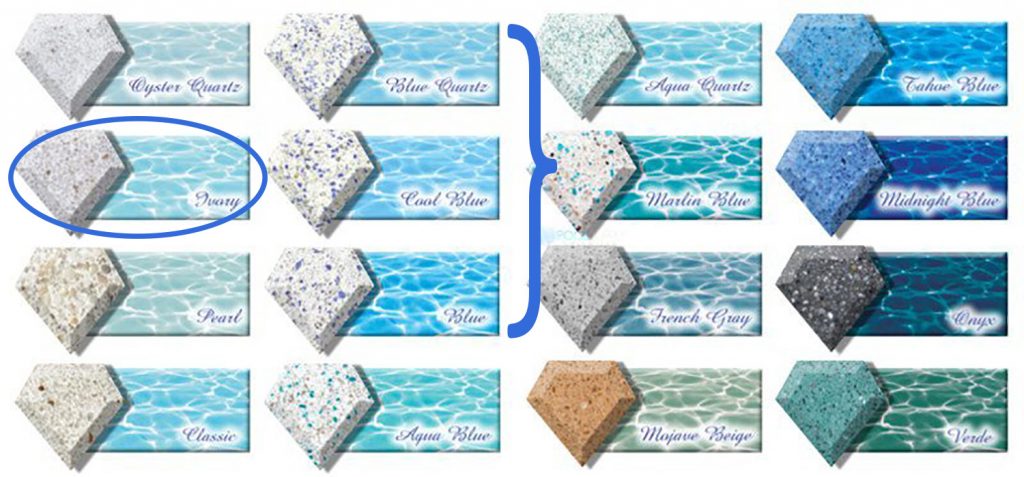
However, we wanted something a little less bright blue that skewed a little lighter and a bit more blue-green, like our inspiration photo of the pool we loved in Costa Rica (that pool was all tile, btw, which isn’t really done with pools of our size because it would be incredibly expensive – hence most people doing plaster with waterline tile like ours in our area). Looking online, our eyes immediately went to sandy-colored options like Pearl and even Mojave Beige, but after seeing some samples in person, we realized they were either darker or more speckled/busy than we had envisioned, which means the entire floor and walls of the pool would look like that. Many of them also didn’t look as good with our tile picks. So…
- Rule #1: Don’t trust the chart online! See them in person because they’re different.
- Rule #2: Bring your tile picks to see how they look with your plaster – and get them all wet to see if they change because they’re all going to be wet all the time
In the end we chose Ivory (circled above) because a) it looked best with our selected tile & stone, b) it would keep the water looking light, and c) that entire column of colors felt more on the green-blue side versus just bright-blue like the column next to it. Obviously the water color gets darker as the water gets deeper, but you can see how bright and unspeckled our plaster looks below:
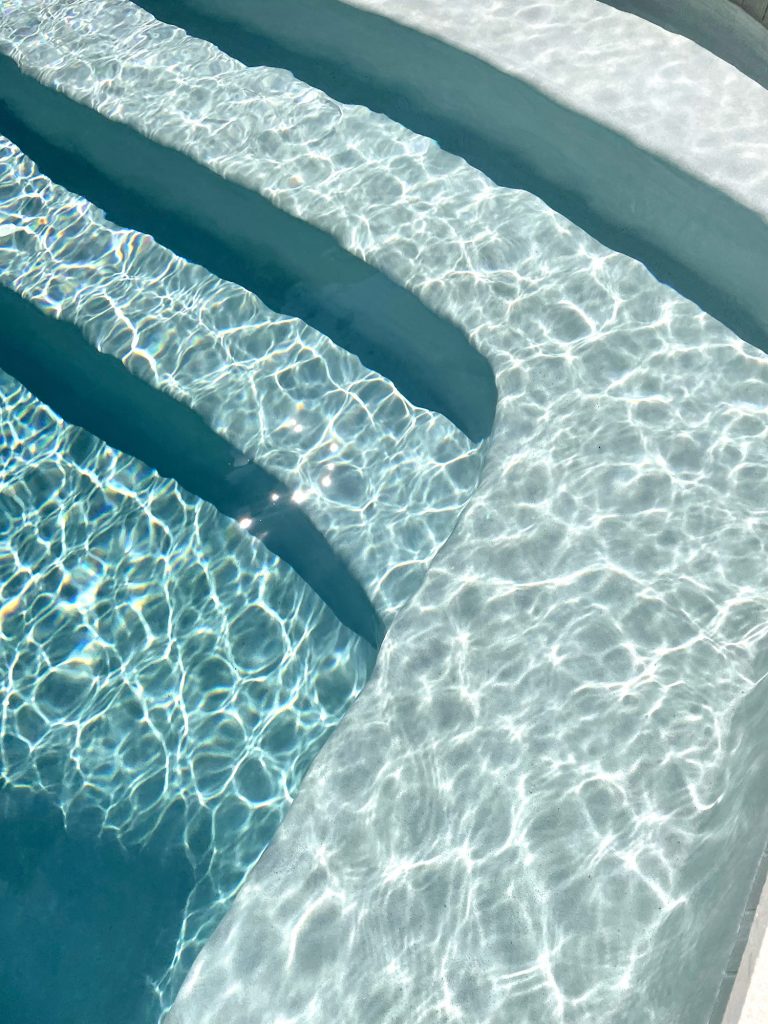
The color of your water is also impacted by your tile, the time of day, cloud cover, and even the landscape it reflects (green trees, blue sky, houses, fences, etc). You’ll probably notice it changes throughout this post – including the photo above vs the one below – and even the spa looks different than the pool if the sun is hitting them differently. It will also probably skew more green as more of our landscaping fills in over time. So, point being, water color is a bit of a moving target. But we really like where we’ve ended up so far.
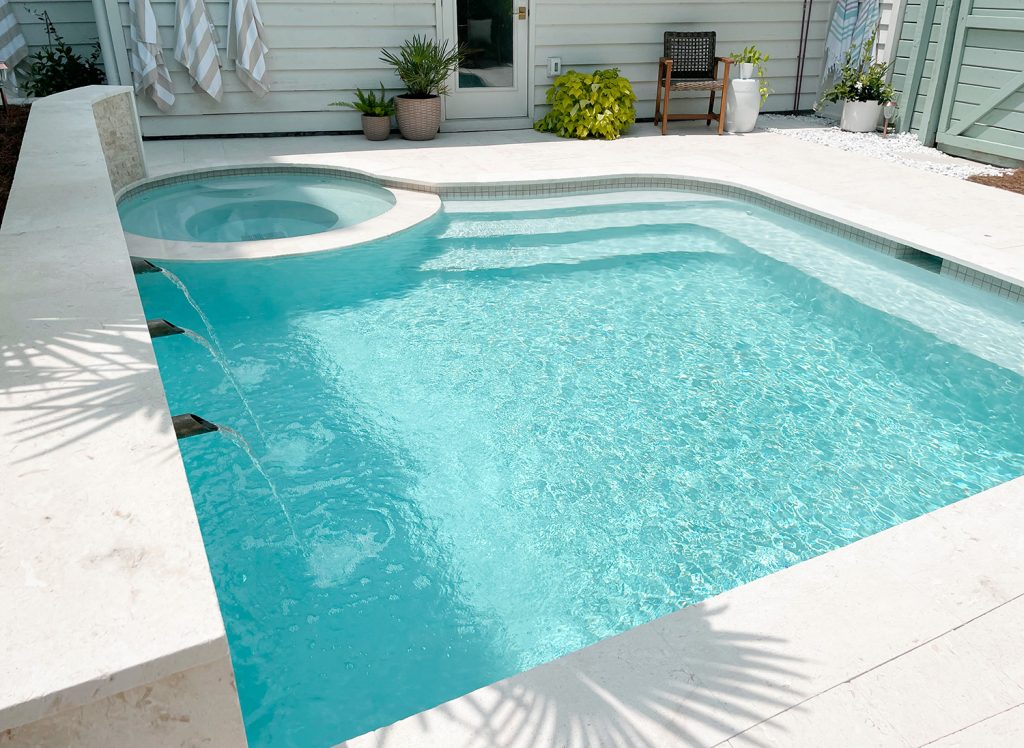
You can also see from the photo above that the plaster color sort of melts into the border tile that runs around the waterline, so it’s not a big harsh line there, which is why we wanted to choose a plaster that wasn’t too speckled or dark (which would have made for more of an obvious and less smooth transition).
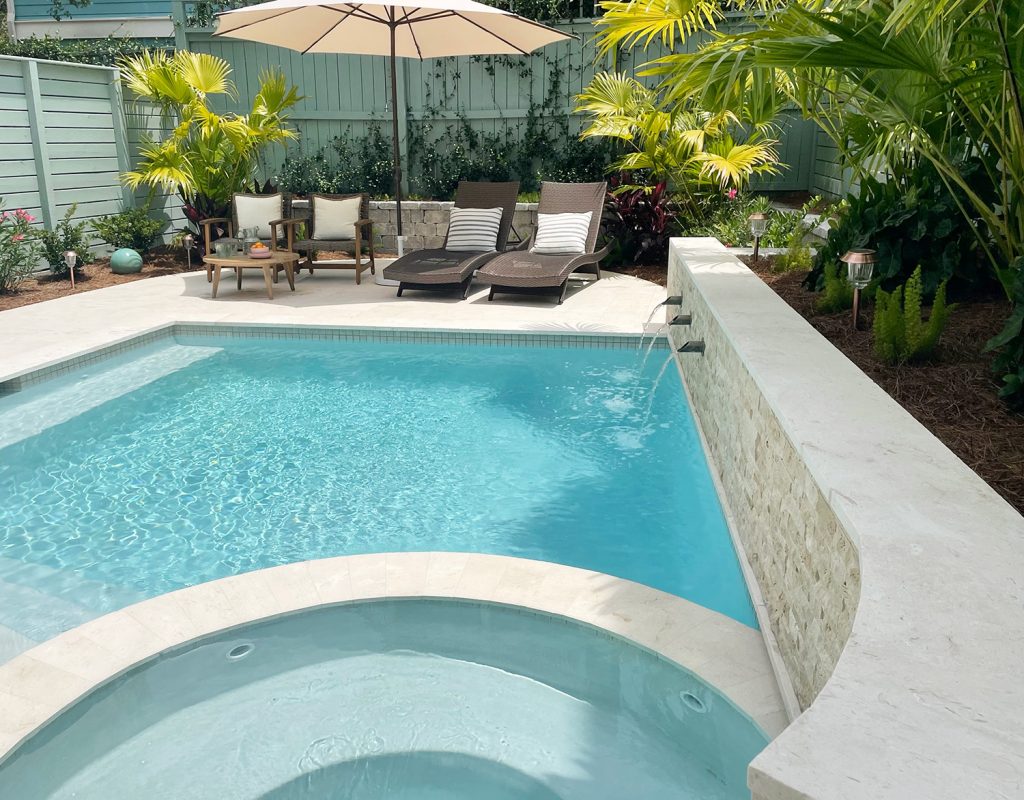
Here’s another shot so you can see how the plaster choice and our waterline tiles tie into the retaining wall stone and the spillover stone on the hot tub (which is also along the top of the retaining wall). And speaking of the water changing colors, see how the hot tub looks lighter and more greeny-blue than the pool in the photo below? It’s the shallower depth in the hot tub (as well as along that ledge on the left side) that does that. It’s actually pretty fun to watch things change with the depth and also with the brightness/time of day.
The second thing most people obsess over is their tile. Some pools have lots of different tiles going on, but we just had two to pick out: our waterline tile and our retaining wall tile.
Waterline tile, as it sounds, goes along the waterline of the pool. This is to keep your water from getting a ring around the edge if/when the water ever gets scummy. Again, we went with something neutral and sand-colored to keep the vibe feeling light, relaxed, and organic. It’s called Stratos Avorio 2×2 Mosaic. We purchased it at a local tile store, so that’s just a random link I dug up. The 2×2″ size was important so it could fit around all of the curves of the pool (big tiles are great for a clean rectangular pool, but curves mean that a smaller tile is easier to maneuver in those areas).
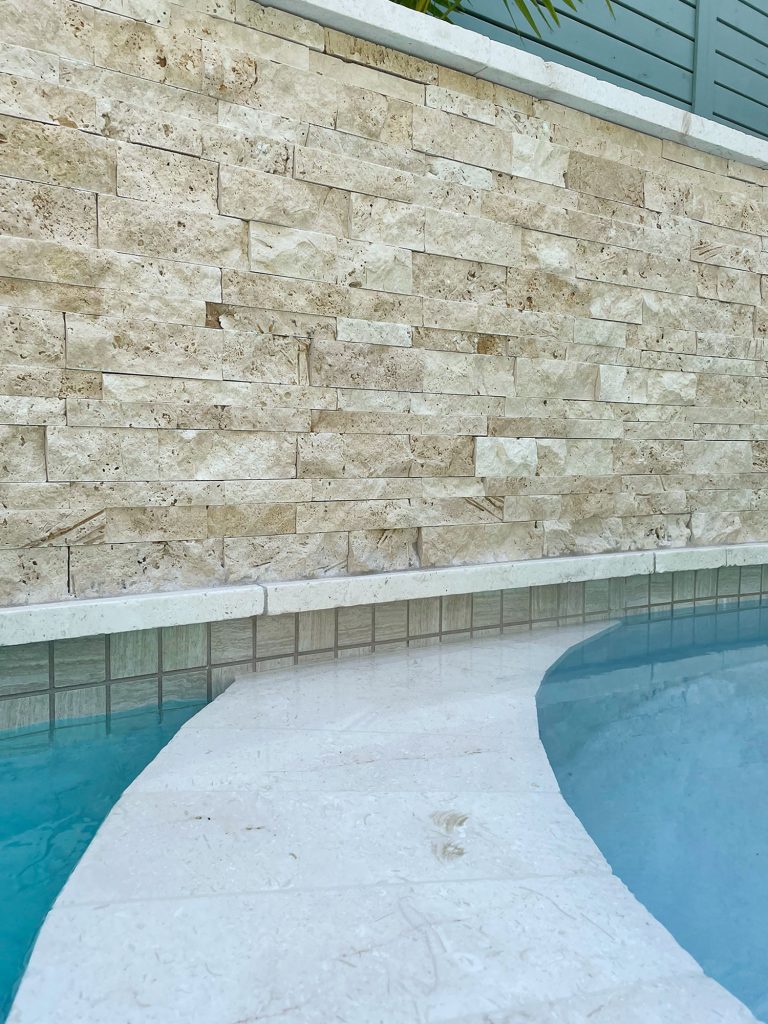
We wanted the wall to also have a natural look to it, so we chose a subtle stacked stone that looks more like a natural rock than some of the colorful glass mosaics that you see in a lot of pools these days. We’ve seen some really fancy pools with them, but we were aiming for a neutral tone-on-tone effect that we hoped would look calming and unified. That way the sparkling water, green fence, and landscaping could add the color. Our retaining wall tile is called Travertine Splitface, and it’s the 7×20″ size (meaning it’s a sheet of irregular sizes, rather than uniform 2×4″ or 1×4″ tiles). Ours is the Ivory color.
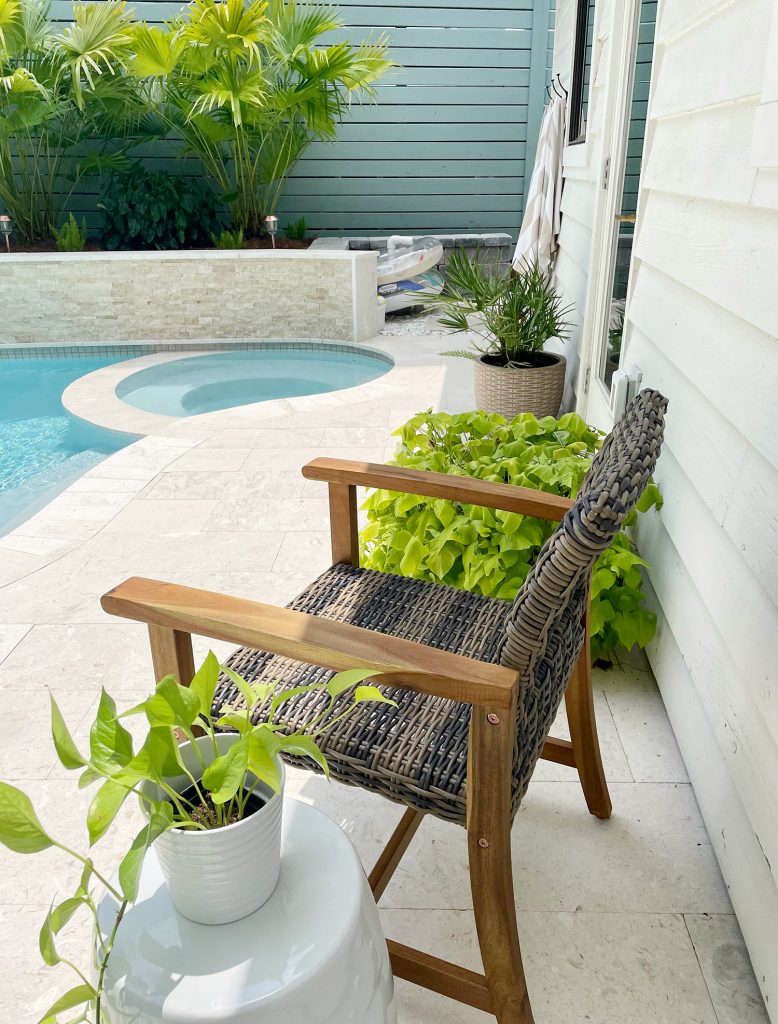
The last major material choice for our pool was the patio material. Some people do a different material for their coping (the border around the pool) and the surrounding patio, but we went with the same 12×24″ travertine throughout. Again, we got this locally but here’s the exact same stuff that we used.
You may have noticed we used the same material on the top of the retaining wall with the fountains and on the curved spillover between the hot tub and the pool. Some people choose different accent materials in those spots, but we were trying to keep it all tone-on-tone and layered. We really like how they look together.
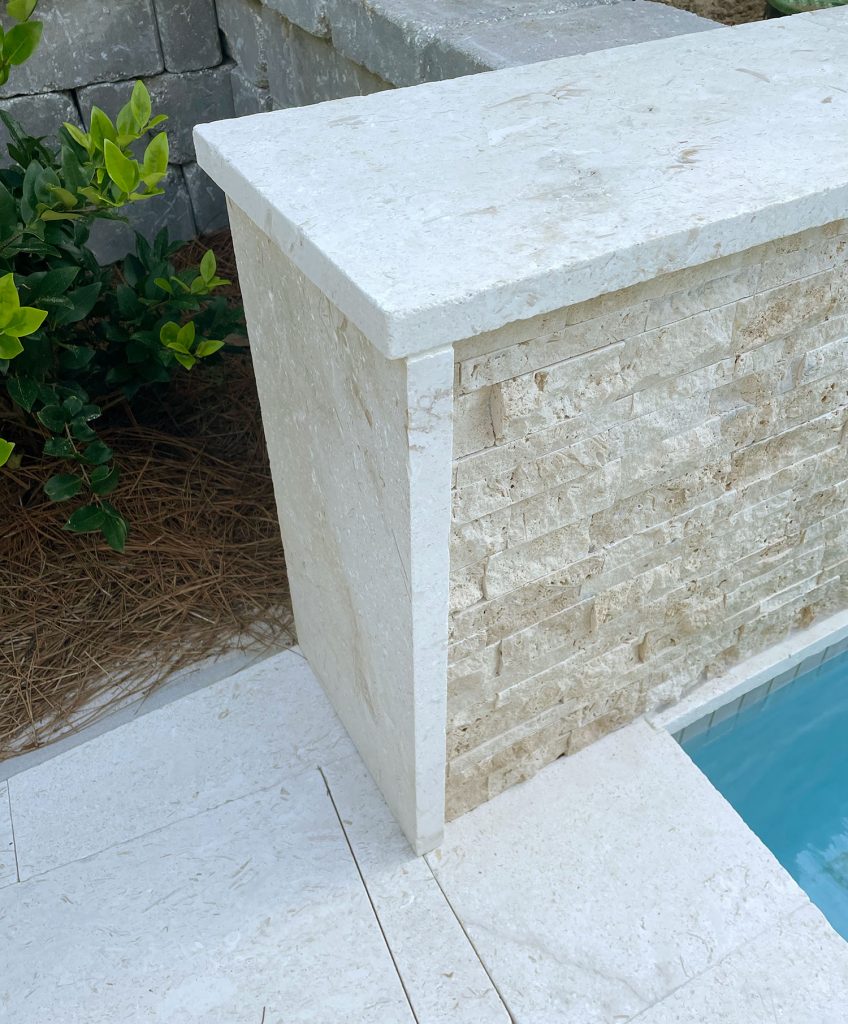
We did seal the patio (and the hot tub spillover and the stone that runs across the top of the retaining wall) after installation, just to be safe, and it has been great. We’re actually planning to do a whole post about that process sometime, because we tried a newer product that has been working really well so far. And it’s useful for lots of different outdoor surfaces beyond a pool patio.
The Pool Building Process & Timeline
I’ve mentioned it has taken us more than a year to get here (and we’re not 100% done – still waiting on some back-ordered spa fittings so our hot tub jets can actually bubble) so we thought it might help someone else out there to share our timeline. Especially with pools being in high demand these days (we heard they were backed up with a year-long waiting list in Richmond, VA! Like a year until you can even dig, and longer than that for completion!).
Lots of interest in pools = many pool builders who are stretched thin, and many materials that are often scarce. Heck there was even a chlorine shortage which led to a salt shortage (because people switched their pools from chlorine to salt when they couldn’t get chlorine and then people couldn’t get salt!). Thankfully it all seems to have calmed down a bit from the shortages that abounded a few months ago, so hopefully anyone embarking on a pool build won’t have as many roadblocks and missing pieces, which could definitely speed up your completion time.
June 2020: Got a quote from a local pool builder, but they only did speckled blue plaster which wouldn’t yield the water color or seamless plaster look we wanted.
July 2020: Consulted a landscape architect to help with pool design and attempt to find another pool builder who would be more flexible about plaster options.
September 2020: Hired a pool builder and submitted our final design for county approval and our building permit.

We were feeling good at this point. Almost like we might actually have a pool before the end of 2020. In fact the pool builder said by December 1st we should be in the pool! Then we hit a HUGE delay thanks to an error with the permit submission via our pool builder (it basically sat pending for months instead of being in line to be reviewed, unbeknownst to anyone). So our story picks up in…
February 2021: Permit finally issued, material selections made, and build finally scheduled.
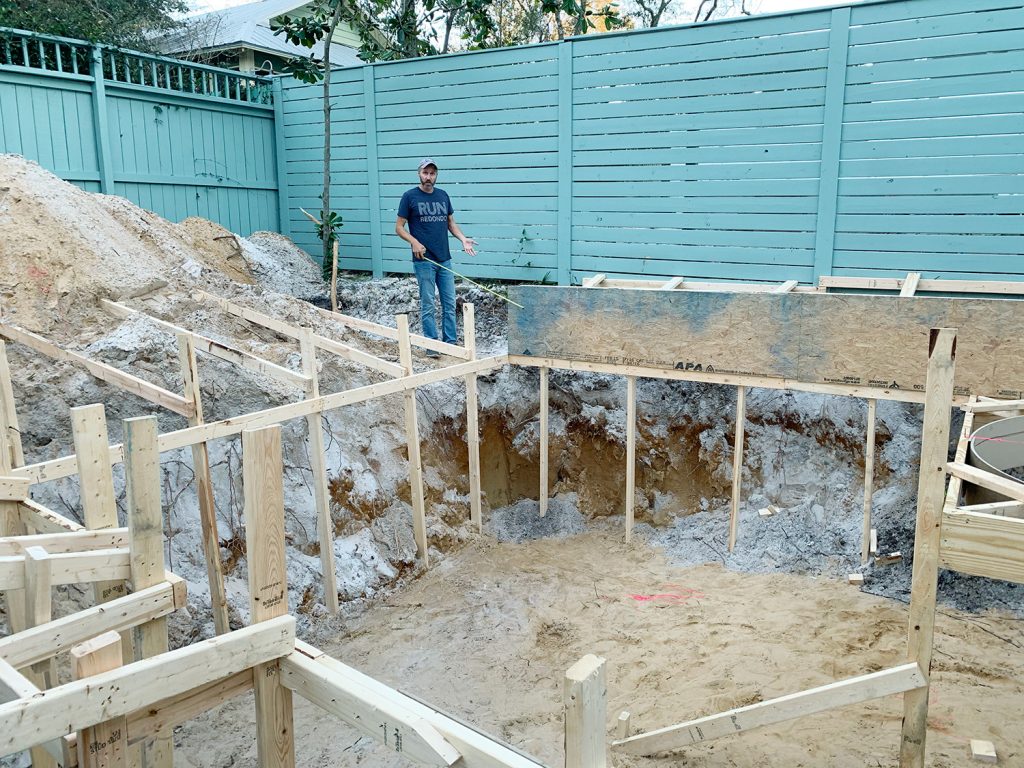
March 2021: The action begins and this is a busy month! First, the pool hole is dug in just a few hours.
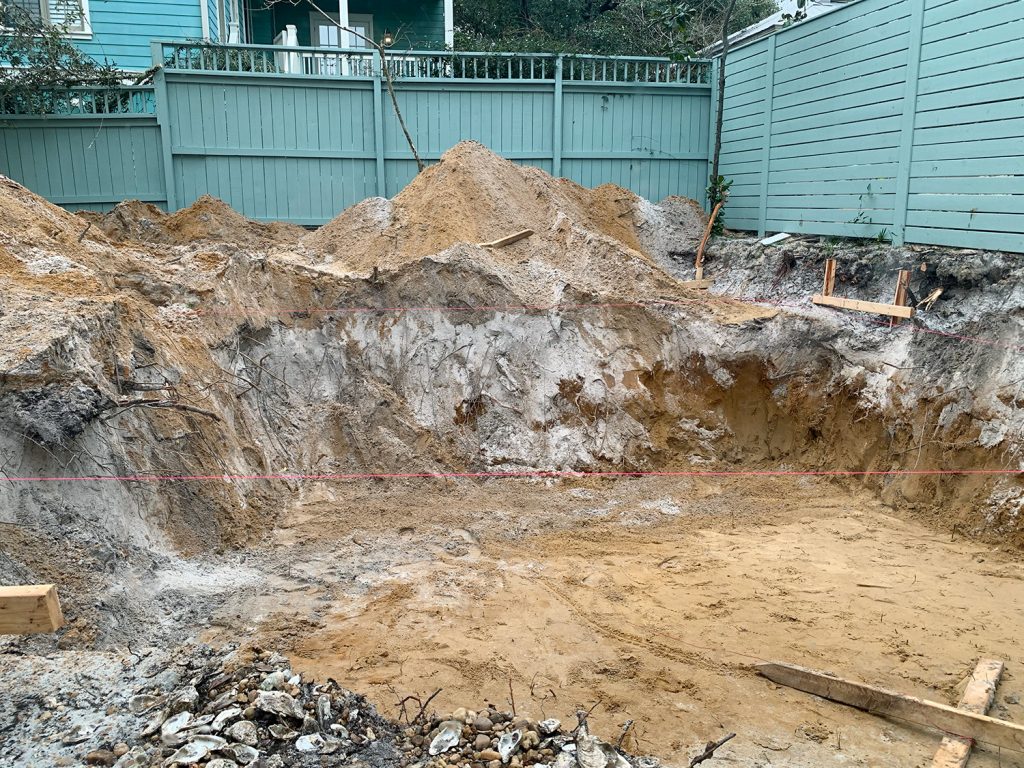
Still March 2021: Then the area is framed out with wood, then rebar, and plumbing is run.
Still March 2021: Next came shotcrete (more on what that is here), which is applied to create the basic form of the pool. We also begin our relationship with the gross water that collects here for the next few months.
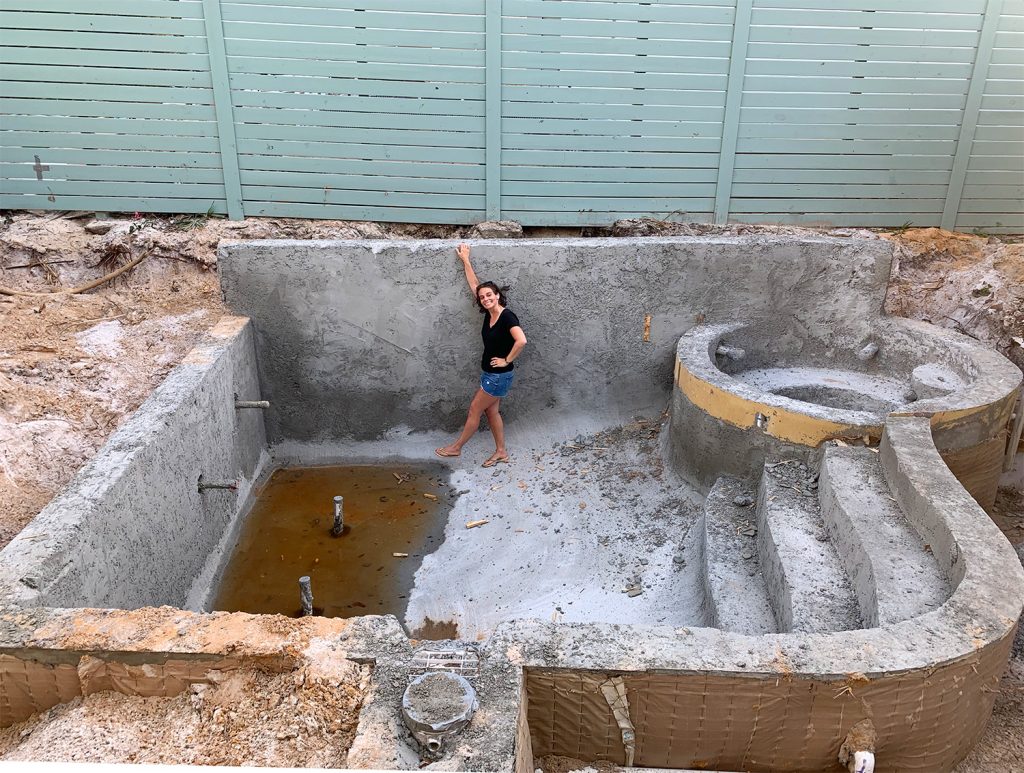
Things kind of ground to a halt after that. The shotcrete has to cure for several weeks before the tile can be applied. So nothing happened on the pool front for over a month, apart from us independently having a new section of fencing installed and painted so that the area would be fully enclosed to meet code. We also took care of some other code things like putting alarms on the doors and windows that lead to the pool, etc. Pool construction picked back up again in…
May 2021: The tile is completed around the waterline and along the retaining wall.
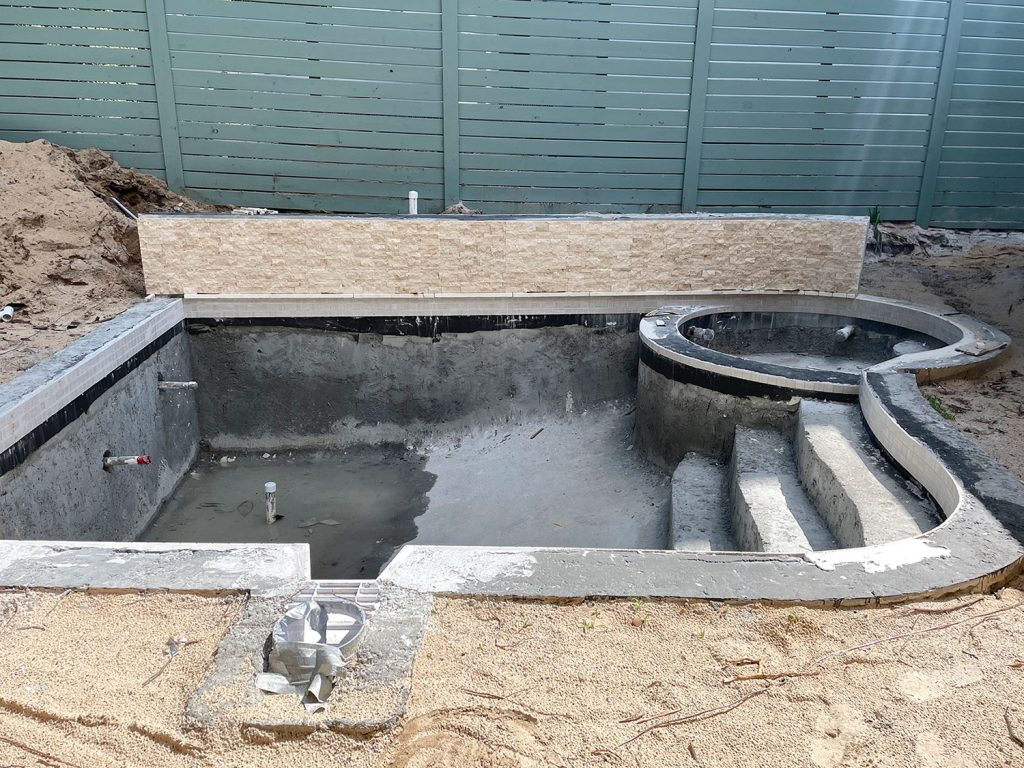
Also May 2021: Then the coping, patio, and stone retaining wall are installed and we began to landscape around it (more on this in a bit).
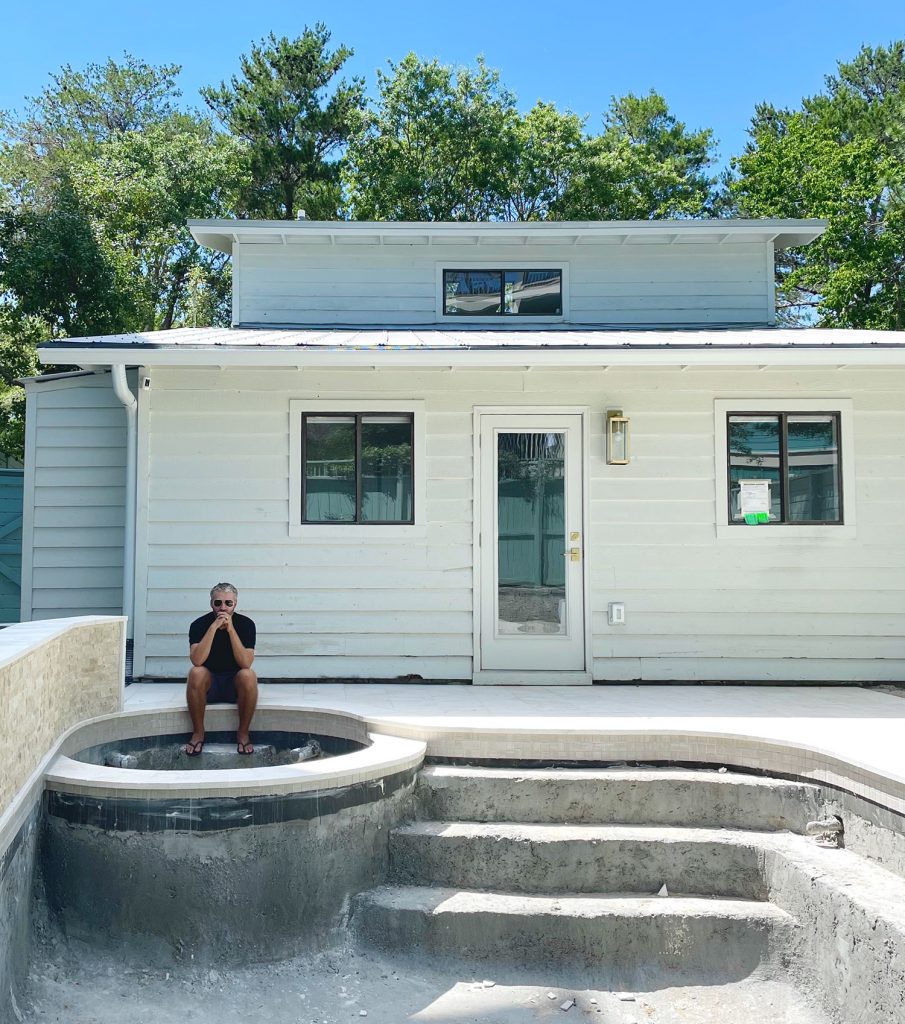
June 2021: Pool equipment (heater, pump, filter) is installed. The pool is plastered and we can officially fill it with water! The plaster cures better underwater, so you fill it almost immediately (within a few hours of the plaster being applied). It felt like a big moment. We even had our friends over to celebrate “The Official Turning On Of The Hose”
Note: That’s red duct tape holding a washcloth over the end of the hose, which the plaster guy added so the metal end of the hose didn’t scrape or stain the new plaster.
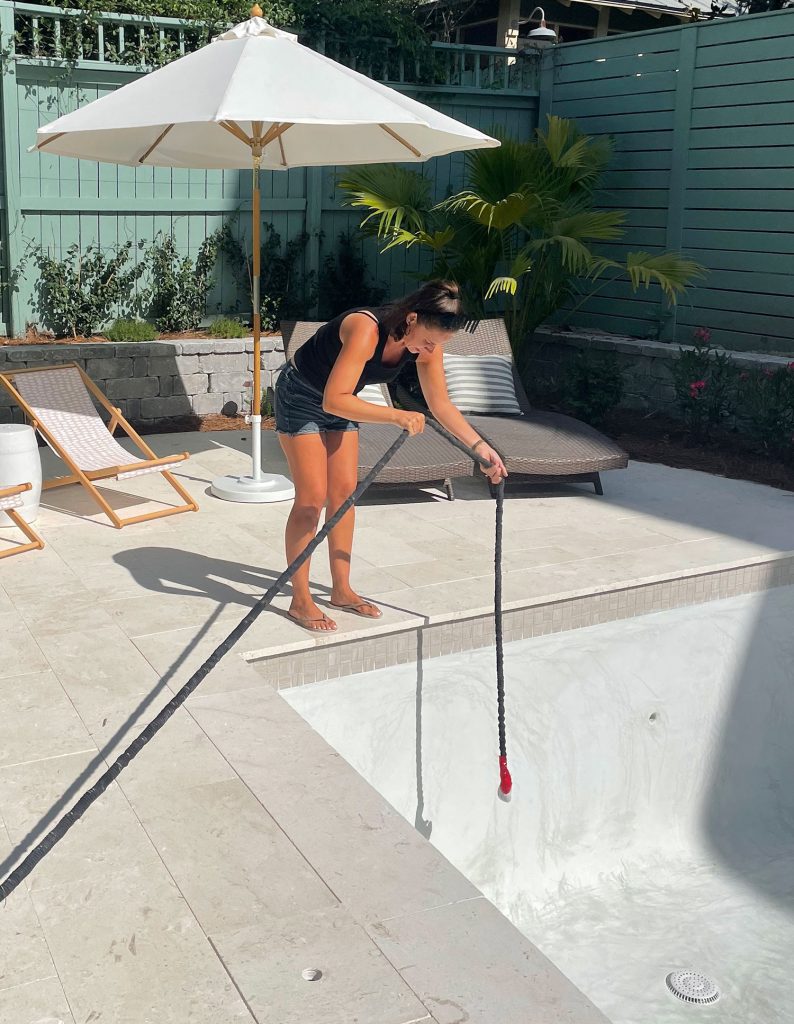
July 2021: The three fountains (aka: “scuppers”) that we added to the retaining wall are finally plumbed. The heater is also able to be turned on for the hot tub. You have to wait 30 days after plastering because lingering dust coming off the plaster can hurt the heating coils (see how rough and dusty the plaster looks in the photo above? Over time it gets brushed & smooths out to look a lot more uniform, which also removes any lingering dust before the heater’s turned on).
August 2021 (Present Day): Like I said above, we’re still awaiting a couple of back-ordered parts, like the fittings to make our spa jets bubble, but for most of our purposes it’s fully complete (the hot tub is still very nice when it’s hot, even without the bubbler fittings being in yet).

So that’s a very rough sense of how things progressed over the last 13-ish months. At times it was thrilling and the process felt remarkably fast (our retaining wall and patio got done in 2.5 days!) and at other times it felt like the worst possible time to add this (at least ten items necessary for a pool were back-ordered throughout the process, some longer than 6 months, which is why we likely won’t have those missing spa bubbler fittings until Jan or Feb of 2022!). In every sense of the word, it was a roller coaster, but all of that makes us that much more grateful that it’s 99.9% done, and we do not take it for granted even for a second. We’d do it all again in a heartbeat. But please don’t make us.
Landscaping, Furnishing, And Other Unsung Heroes
As much as the pool itself is the centerpiece of this space, we’ve realized that many of the OTHER decisions surrounding the pool also helped this area of our home transform the way it did. So let’s dive into some of those.

Landscaping
One of our favorite things about this project was doing the planting beds. We did it all ourselves, just using input from pros at the garden center when we dropped in to buy stuff (Sherry also swears by an app called PictureThis to plan which plants like certain lighting/water conditions and helps her identify local things that do well that we can then track down and plant ourselves). We had a few large Chinese Fan Palms delivered to gain some immediate lushness and tropical vibes, but everything else is just smaller plants that we loaded into our car across many trips to the garden center – like star jasmine, foxtail ferns, stonecrop, and red ti plants. We took about 8 trips to buy plants, gradually filling empty spots as we went.
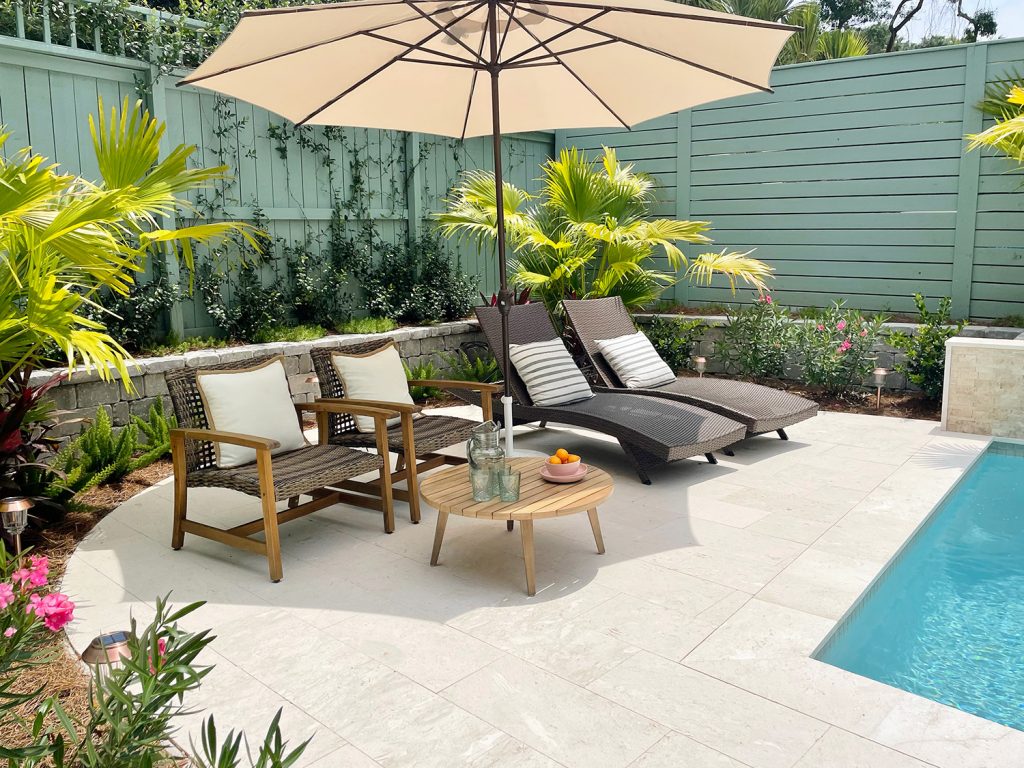
All of the smaller plants have noticeably grown since we started planting back in the spring (as soon as the patio went in we got to work) but the progress that we’re the most excited about is the jasmine along the back wall. Our neighbors already have it growing over the fence from their side, so we thought we’d join the party and train some of our own up our side. You already know we love jasmine (it grows really fast here), so we’re hopeful that by next spring this will be a big leafy wall full of flowers that smell so good that time of year.
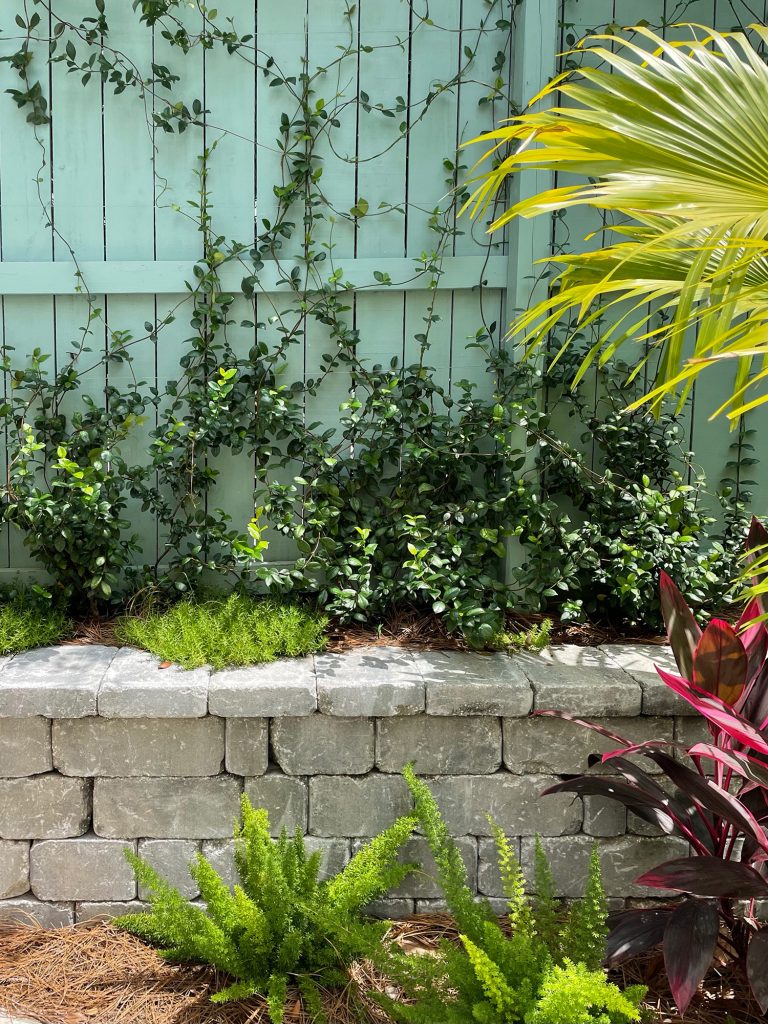
And that light green fluffy-looking plant is stonecrop that we planted between the jasmine, which should spill down down the retaining wall eventually too. Stay tuned to Sherry’s Instagram Stories for plant progress reports (it’s one of her favorite topics).
Retaining Walls
Speaking of the retaining walls, they were necessary due to the slope of our lot versus the others around it. The pool had to be built at the same level as our house and, as you can tell from the photo below, that put it a few feet lower than the existing ground and the bases of the fences on those two sides. Our neighbor’s houses are both on slightly higher ground than ours, so the retaining walls essentially keep dirt and debris from flowing downhill into our pool.

But again, knowing a retaining wall was in our future is what birthed the idea of the accent wall with the fountains in it, so it was a lemonade out of lemons situation. The running water sounds calming and the kids love pretending they’re running a smoothie shop with different “flavors” coming out of each spout. We can turn them on and off whenever we’d like, but usually just leave them on all the time (they just recirculate the pool water like the filter does). Also you can see in the picture below how the functional gray block retaining wall that runs around those two fence sides meets the pool’s decorative fountain wall to create a huge raised planting bed for that side of the house.

We tried to be really strategic about what plants would drop the least in our pool and surrounding area, and so far everything we picked has been super low maintenance. More Chinese Fan Palms give us that enveloped tropical feeling and will grow about double the size for more privacy and coziness over time.
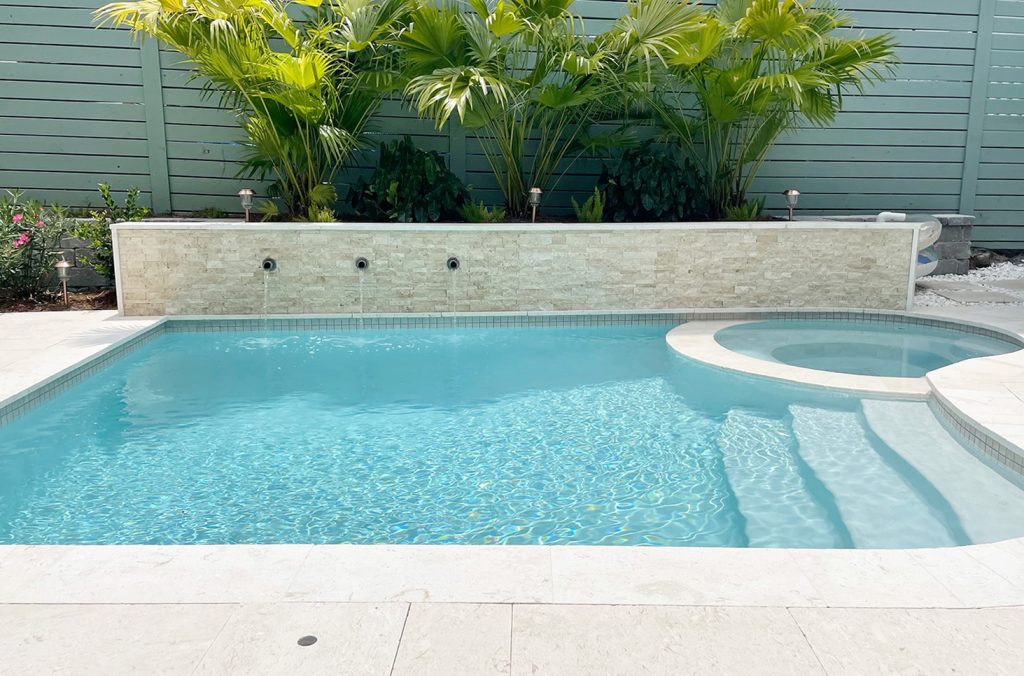
You might notice from the picture above that the fence appears to subtly slope down as it moves left to right. That’s because it does! Call it our one regret of this whole area, but when we had that fence installed last summer, they just followed the gradual slope of the ground (one of our other neighbor’s fences does that too, so it’s pretty common). In retrospect, we wish we had instructed them to keep the fence slats level – even though that would’ve meant incorporating a step-down at some point along the fence (maybe further up, hidden by the house). Every other fenced area that we added after that is level, and it’s just so pleasing to the eye. So you live and you learn. Luckily, it’s not super noticeable in person because there’s so much to look at, and we’re confident it’ll be even more obscured as our fan palms grow in.
Fences
As I mentioned, we were more careful to keep everything level when we had the other sections of fencing added (including the one around our bedroom fire pit area) and the one along the left side of the pool below. And since we “inherited” the fence in the back from our neighbors, it was nice to get their blessing to paint the back of it the same color as our fences (SW Halycon Green) to help unify things.
We actually kind of lucked out with the placement of this newest section of fence. We connected it from where the neighbor’s fence changed height (see above) to where our outdoor shower poked out from the corner of our house (below). We could’ve gone a foot higher with it (it’s only 7 feet tall) but we wanted it to connect to the outdoor shower in a logical way instead of poking up another foot in the air next to it, and we really like how it turned out.
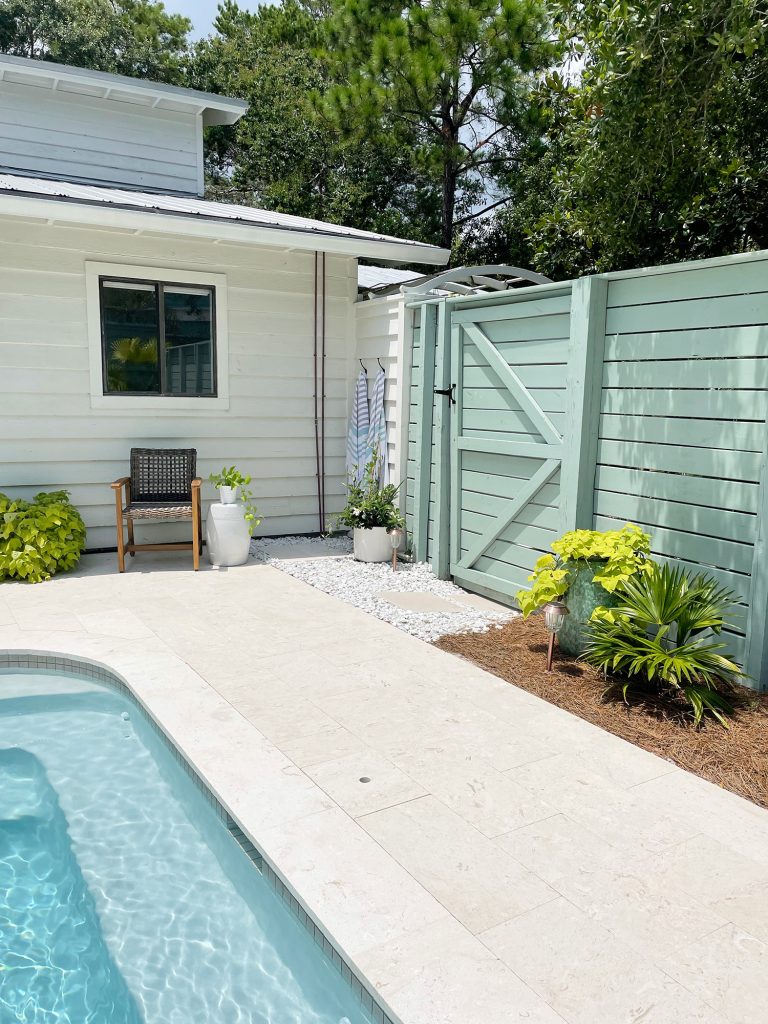
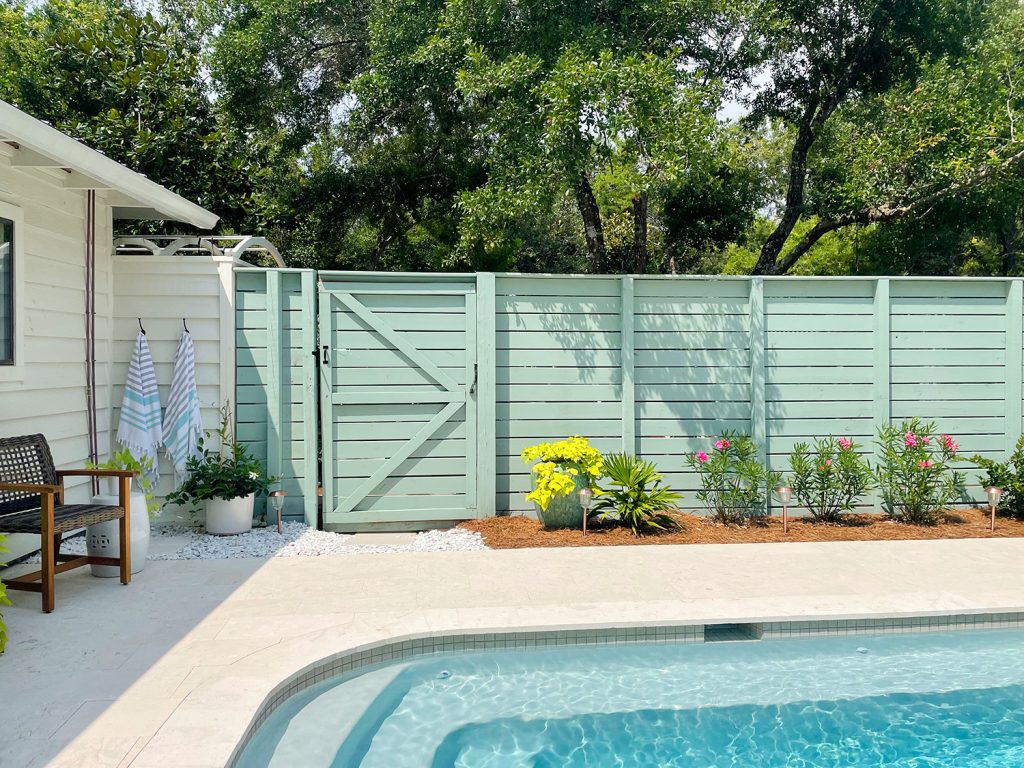
And by some miracle – I would love to say we planned this – this fence is almost perfectly parallel to this side of the pool. Maybe that doesn’t sound impressive, but our entire house sits skewed at an angle on our rectangular lot (which is one reason we added curves to our pool’s design to hide the skewed angle of the house a lot more than something rectangular would have). So anytime something lines up like this it feels like a small miracle.
This new fence also gives us some nice privacy and really helps to define the boundary of our “oasis” back here. Plus Sherry earned another landscape bed, which is basically her currency.
For reference, here’s what it looks like from the other side. That beautiful huge live oak tree that holds our kids’ swing is everyone’s favorite tree on our entire lot, and it’s thankfully well in front of where the pool area spans so we didn’t have to worry we were hurting the roots with our pool dig. And those are just large stepping stones from Lowe’s that we plopped down to lead to the pool gate and the swing, but we’ll likely add a more permanent path someday. And those light sand lines coming in diagonally from the bottom left of this picture on the pine needles are tire marks from living on a sand road. Sometimes we park the car in that front area (more on living without a garage and parking in pine needles here).
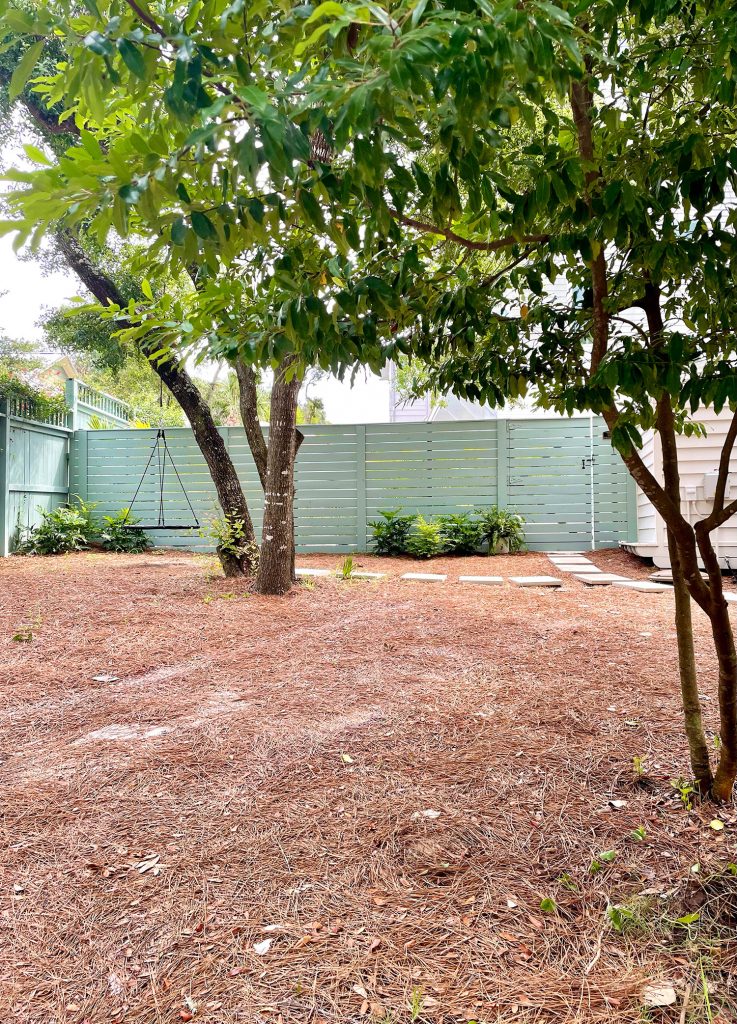
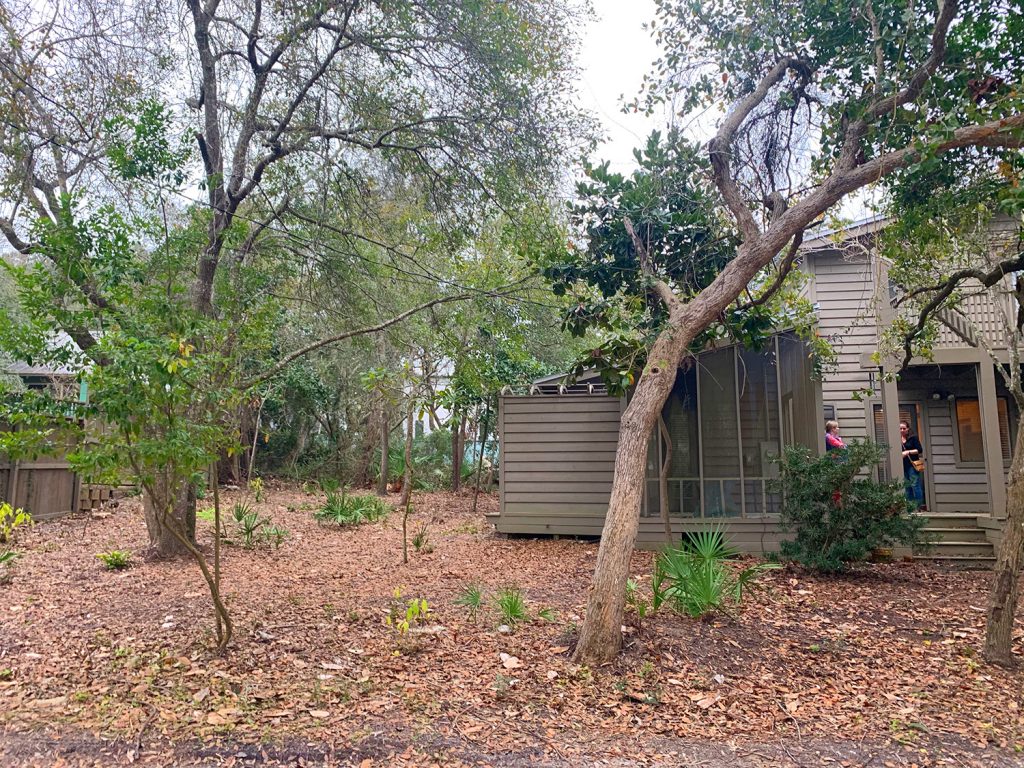
Aaaaaand while we’re on this side of the pool fence, let’s drop in a wider before & after. The photo below is from February of 2020, when we first laid eyes on our house. All of the bigger trees that you see in the background of our future pool area are behind it on our neighbor’s lot (they’ve since constructed a house there – you can see some glances of that here in this post).
And here’s the same angle now! Things are obviously much greener in August than February, and some things REALLY GREW IN. That tree near our garbage can is nearly double the size! And yes, we left our dusty garbage can in the picture. #keepingitreal
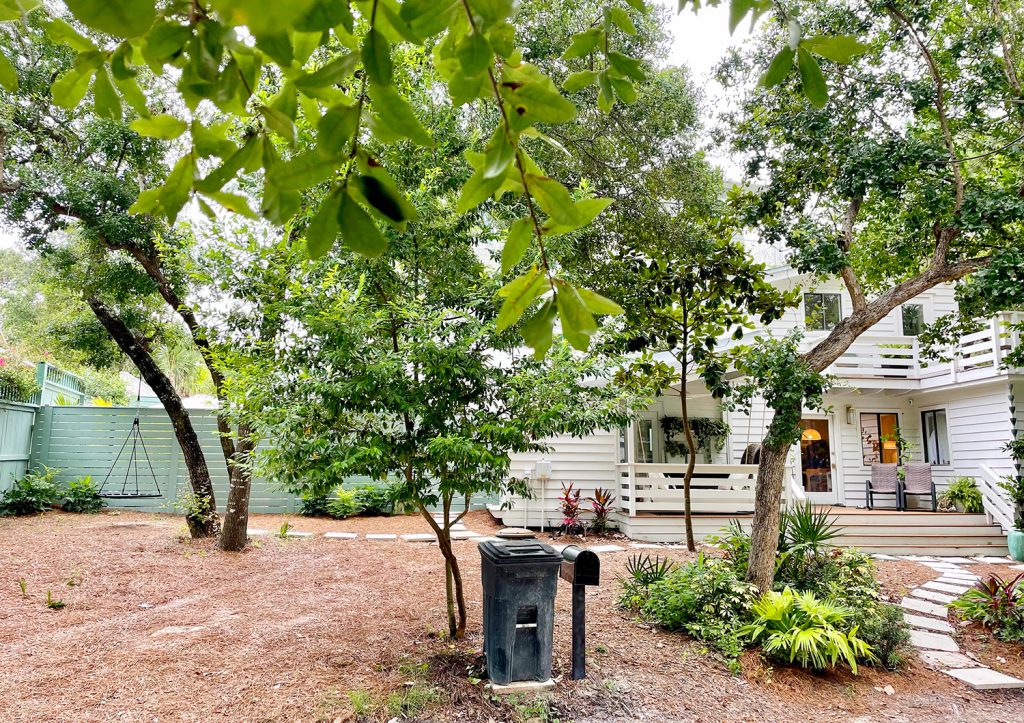
Hopefully that wider shot above shows you how cozy and insulated the pool area feels back there. It’s like a lush woodsy vibe on the front side of the fence…
…and then you pass through the gate into our little tropical paradise.
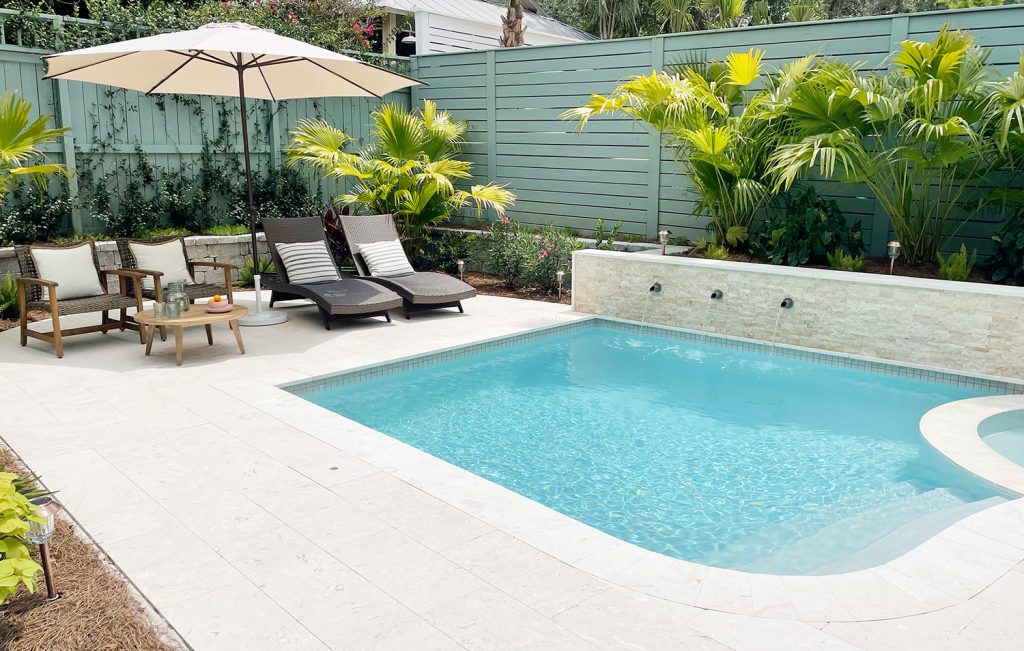
Seating Area & Furniture
Gaining this seating area has been awesome! We debated a dining table or four lounge chairs, but so far the mix of two more upright chairs with a coffee table plus two lounge chairs has been great. Both chairs and one lounger stay in the shade of our 11-foot umbrella nearly all day, leaving that last lounger in the sun for anyone looking to warm up or dry off. We also have had a lot more than 4 people hang out here (a few kids can sit on the loungers sideways for a snack and even along the edge of the pool with their feet in) so it’s nice and flexible.
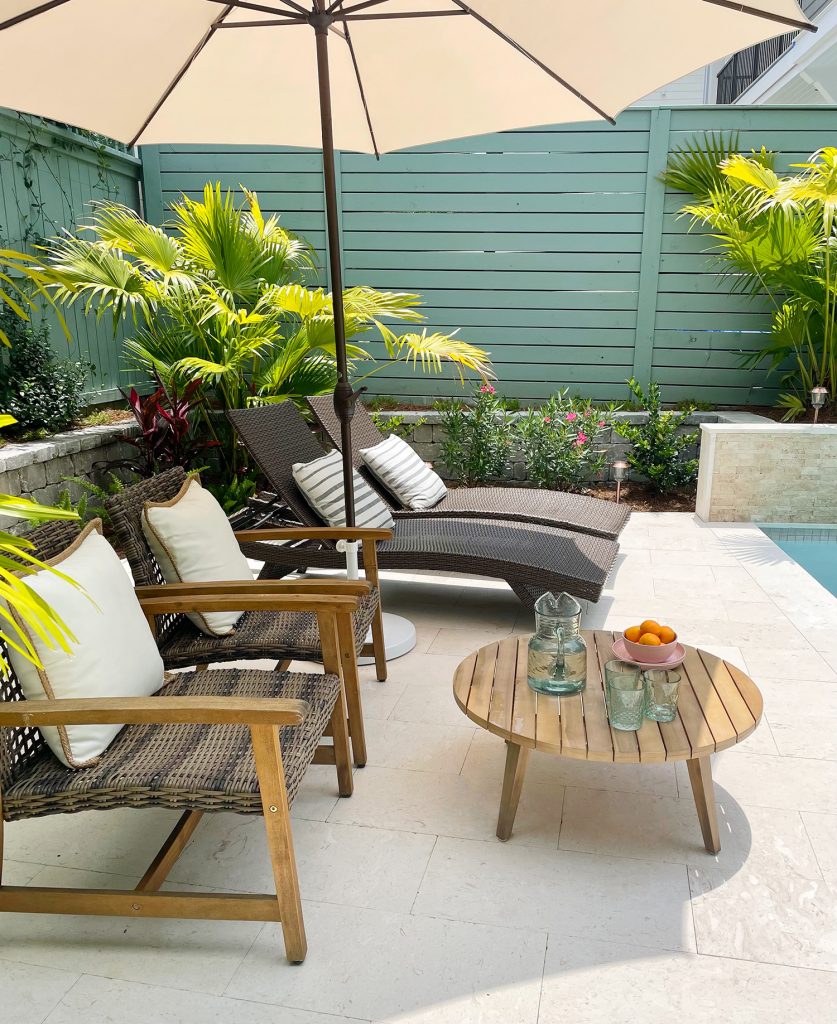
This area took a little adjusting until we got it “right.” We originally tried a 9′ umbrella that didn’t provide as much shade (it also was extremely difficult to put up over time because the fabric shrunk in the sun, which was so weird, but they let us return it because I guess that happened to a bunch of other people?). This new 11-foot version has been worlds better all around. And this is the free-standing umbrella base we got for it.

We also purchased these solar LED fairy lights that are designed to go under a patio umbrella. In fact, all of the lighting here is solar powered (apart from the pool light and one sconce on the house). You can see it better in the video, but here’s a screenshot below. We’ve got our go-to solar pathway lights surrounding the patio and some more solar fairy string lights along the fence. All of the solar lights go on automatically each night, so it’s glowy back there without any effort.
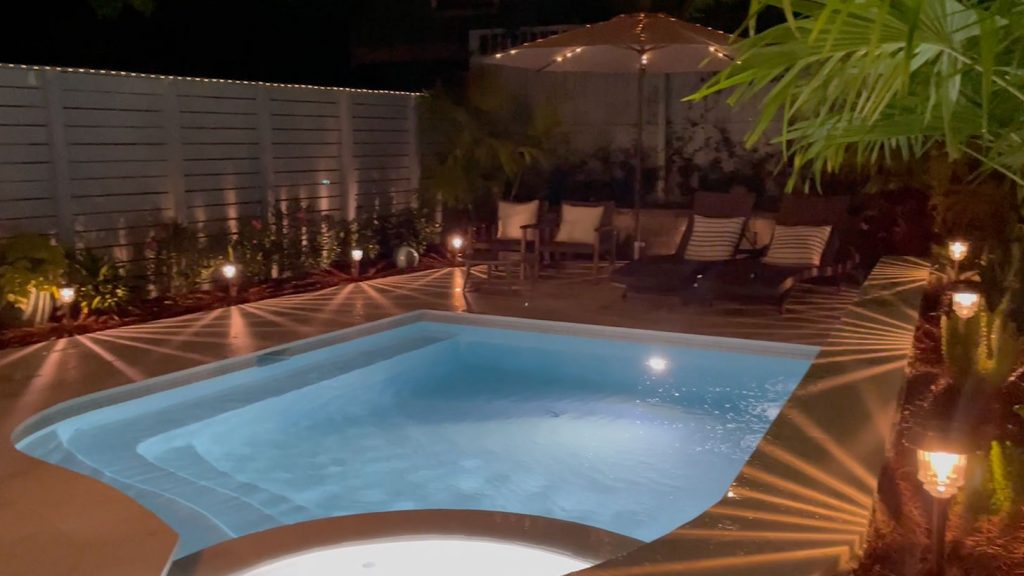
We also originally had some fabric cabana-style chairs in place of these wood & wicker ones, but they got black mildew all over the wood in under a month and we learned it was because although they were made for the outdoors, they didn’t come sealed (?!?!). We tried to pressure wash them back to looking good so we could seal them ourselves, but no dice. So these chairs – plus some outdoor pillows from Pottery Barn – have been MUCH better all around (the lounge chair pillows are also from PB). The coffee table acts as the perfect place to prop up your feet or eat a poolside lunch. I wish I could link it, but we literally bought the floor model because World Market had discontinued it! Here’s a similar table though.

We also have one more chair on the other side of the pool, since this area becomes shaded by the house in the afternoon. It also gives us another seat we can drag over if we want an extra one in the main seating area. Someday we may get a bigger, maybe egg-style chair for this area, but this works for now.
This shot is actually a great transition to talk about…
Pool Organization
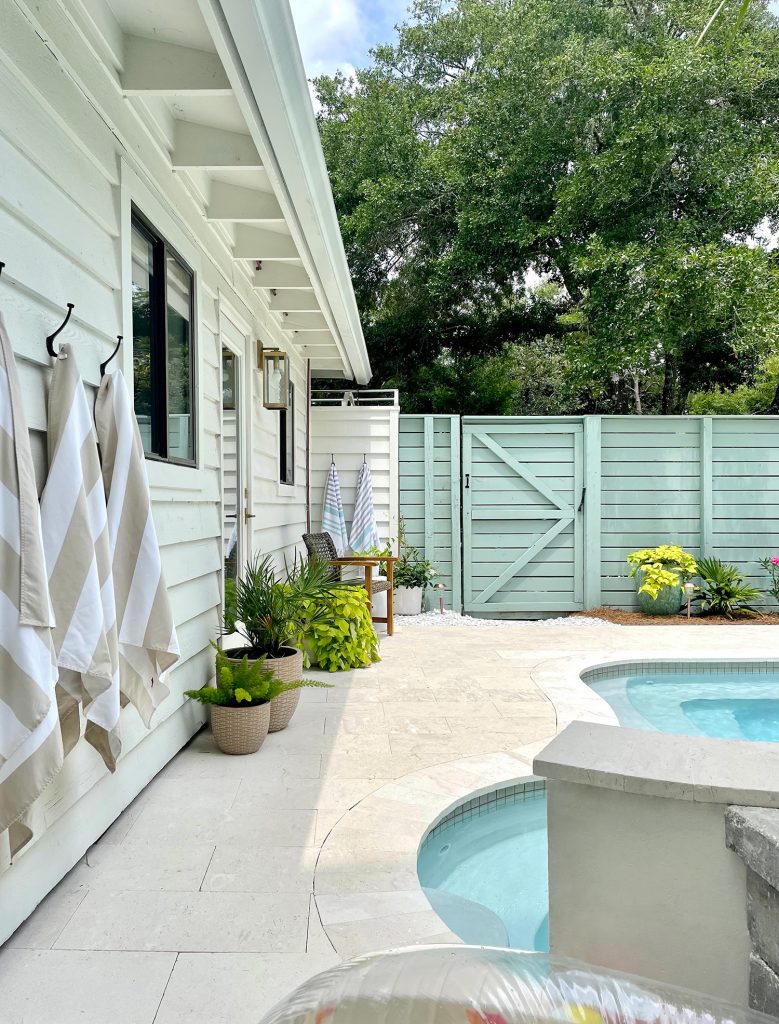
The photo above is taken behind the hot tub (that’s the back of the fountain wall in the bottom corner). Note all the hooks in that picture. You literally cannot have enough hooks when it comes to all the wet bathing suits and towels that living close to the beach and having a pool creates. Along with the five hooks that you see in the picture above, we also have two in the hallway leading out to the pool (you can see that in the video we shared earlier) as well as three more around the corner of the house. And frankly, I think we could still stand to add some more!
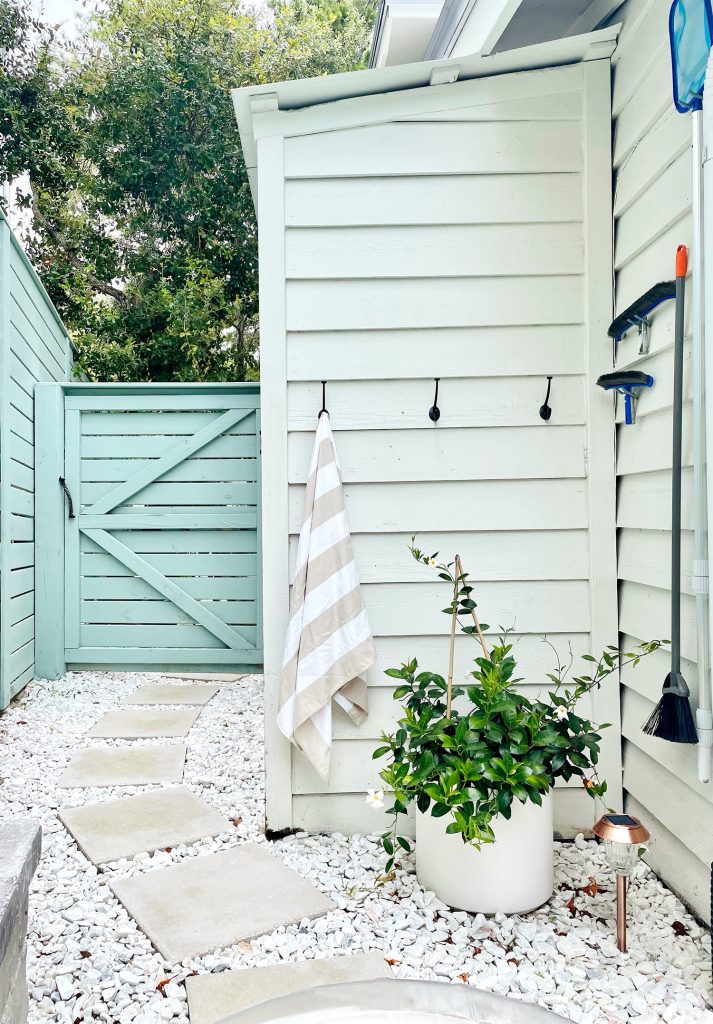
You can also see our little wall of pool “tools” hanging on the side of the house in that photo above. Those are just some garage hooks that keep our brushes, pole, and skim net neatly wrangled. The gate in the background leads to where all of our pool equipment is installed. The gate also hides some ugly stuff like our generator, gas meter, and A/C unit.
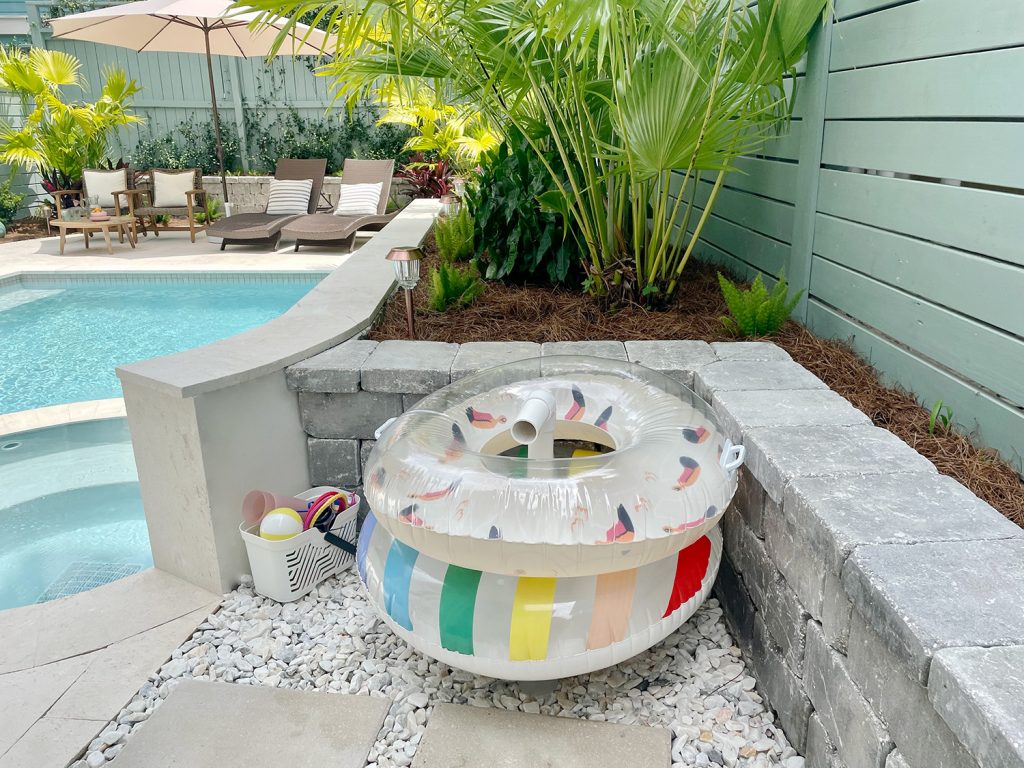
Back in this corner, we’ve also got a spot for toy & float storage. Sherry DIYed a float holder using a plant pot full of white rocks with a leftover PVC pipe from the pool guys that juts out of the rocks like a submarine viewfinder and keeps them from blowing around. We learned that lesson the first day it was windy and the tubes had a pool party of their own.
Most other pool things – like towels, sunscreen, a Bluetooth speaker, etc – we keep inside in our laundry closet. Since we don’t have a big covered awning or some other totally waterproof/weatherproof area back here, it just felt like a losing battle to try to store all of the pool stuff out by the pool in some sort of bin where they might get damp or musty. Thankfully it’s a quick walk to the laundry closet from the hall that leads to the pool, so it has been fine. We duck in to use the bathroom, get snacks, etc – so it’s just as easy to grab the speaker or some towels when we need to. Speaking of Bluetooth speakers, we got this one and so far we really like it.
Miscellaneous Pool FAQs:
Do you have a foot wash or outdoor shower by the pool?
We have an outdoor shower that we love (seen here) but it’s not accessible directly from the pool (you go out the gate in the photo below and it’s to your left – which is also where we have a hose for easy foot-washing). We thought it might be annoying to have it behind the gate, but so far it hasn’t been an issue for us, mainly because we tend to head out here from inside the house (where we aren’t sandy or in need of a rinse before going into the pool). And if we return from the beach and want to go in the pool, our routine is to return our beach chairs and beach toys to the bin on the front porch – so it’s easy enough to use the outdoor shower that’s right there and then just walk to our pool sand-free and ready to swim.

We originally had plans to add a foot wash, showerhead, and/or hose bib inside the pool area itself in that corner that you see above. The plumbing for the existing outdoor shower already runs down that corner of the house (it’s the copper pipes you may have noticed in the above photo) and we figure it would be extremely easy to tap off of those. But now that it hasn’t been much of an issue we might never do that. Time will tell.
Do you have a salt or chlorine pool?
We went with a saltwater system since it’s the standard around here (almost every new pool near us is built the same way ours was and has a saltwater system). One interesting thing is that it had to be chlorine for the first month because salt can hurt the plaster while it cures. But exactly 30 days in, our pool guy arrived and literally just dumped bags of salt into the pool (which is food grade, he said you can eat it, but like… don’t be weird and drink pool water).
The main reason saltwater is standard for our area is pretty simple: a) because it’s more eco-friendly and involves fewer chemicals, b) because it’s less harsh on eyes and skin (it’s not like a salty ocean experience where your eyes burn – it’s a much lower amount of salt) and c) there is zero smell, unlike the chlorine smell we had for the first month. It’s also much less harsh on bathing suits/towels. You can read more about the differences between chlorine pools & saltwater pools here if you’re interested

What are you doing for pool safety?
Pool code here requires a fence around the pool, complete with latches that are high up so smaller kids can’t open them and self-closing springs so pool gates close firmly behind someone walking in. It also requires loud blaring siren alarms on any doors and windows that lead to the pool from inside the house. We also added a camera to our pool area that senses movement (specifically of humans, not squirrels – technology is pretty amazing) as an extra precaution. It sends an alert to our phones in the event of someone walking into the area (we temporarily disable it when we’re all out there). It’s a great safety feature as well as a security feature that gives us a lot of peace of mind. Many camera systems have this human-sensing technology now, like Ring outdoor cameras for example, if you’re looking to add more safeguards to your pool.
Are you maintaining the pool yourself?
Since we’re first-time pool owners, we’ve enlisted the help of a professional pool pro who comes weekly to vacuum the pool, balance the salt levels, and maintain the pool equipment. He has already been SOOOO helpful in making us feel knowledgeable about our system and troubleshooting a few minor issues that have popped up. We were on the fence about hiring someone at first, but are so glad we did. He also said he’s happy to teach us to do it ourselves if we ever want to take over entirely. So it’s always an option down the road. Maybe in year two of pool ownership.

What kind of pool equipment do you have?
We’re still new to the world of pool systems and we largely just went with what our pool builder suggested and what we heard recommended by a few neighbors. Everyone said the same thing: go with a variable speed pump, which is a bit more expensive up front but more energy-efficient and eco-friendly over time. So that’s what we have, and it’s not very loud, works well, and we’ve been very happy with it so far. Our equipment is by Hayward too if that helps.
Is your pool heated?
Yup! We have a spa (aka: a hot tub), so heat is an important element. Otherwise, it would be a cold tub. Har-har. Almost every pool in our area, even the ones without hot tubs are heated since no one in our area “closes” their pools for the winter season like they do further north. We’ve only used the heater a few hours in the evening for the hot tub so far, since the main pool has stayed 87-91 degrees naturally from the sun. We’ll have a better sense of the cost of heating the pool once we get through the winter, but the Energy Star sticker on our gas heater estimates a cost of $8/month. We’re thinking ours might even be lower since it’s not a large pool.

Is your pool “smart”?
Every pool has a controller, which is essentially a box they mount right onto the wall (or the fence in our case) near your pool equipment. Think of it like an electrical panel box, but it has all of the buttons to operate your pool, turn on the lights, turn on the spa, adjust the temperature, turn on the fountains, etc). Our controller has an antenna that allows us to operate it with a remote. The remote is also on backorder (insert my best Homer Simpson “D’OH!” here) but we bought a special receiver as a workaround that allows us to control it using an app on a smart phone. So it means that everything from the heater to the lights and the fountains can be turned on or off from our phones. It is GREAT. Highly recommend it.
The Budget
All said and done, our pool cost was roughly $45K for everything the pool builder did (so that doesn’t include the fencing, landscaping, furniture, etc) and our initial pool estimate from the other company was in the same range. While sharing our progress on Instagram Stories, we learned firsthand that pool prices can vary widely – depending on everything from the location, the size, the soil type, the chosen materials, how easily accessed the yard where you want to put the pool is, etc. The second Sherry said “the pool is costing around 45K” her DMs filled with people saying “in Texas my quote was $100K!” and “I’m in Arizona and it was $150K!”
There are definitely regional factors as well as other things that make the cost of a pool vary widely, and I think a lot of the factors that helped to keep our costs down a bit more than it would be in some other areas were location, soil, access to the dig spot, and pool size. There’s a large number of pool builders here, so many tend to price themselves competitively compared to a spot that has just one game in town (which means they can jack that price right up). Our soil is also sand (like literal beach sand), so it takes just a few hours to dig the hole. Pool builders don’t find themselves blasting away deposits of subterranean rocks, which we heard is a common thing in areas like Texas and Arizona, which quickly skyrockets the price (and can take a lot longer).

We also lucked out that the area where we were adding the pool was extremely easy to access (you could drive an excavator right up to it from the street, so it wasn’t one of those situations where parts had to be craned over a house or dug by hand because a truck couldn’t fit). I’m sure the relatively modest size of our pool helped keep the total down too, just because it means less wood for framing, less shotcrete, less tile, less plaster, etc.

So that’s ALL THE WORDS AND PICTURES about our pool build, from start to finish (well, almost finished).
Not counting whole-house renovations like our beach house or our duplex, this pool is the longest and most expensive project we’ve experienced in our 15 years of homeownership… so thank you for indulging us in this SUPER long post, and forgiving us as I’m sure we’re going to show and talk A LOT about the pool for the foreseeable future.
*This post contains affiliate links, so we may earn a small commission when you make a purchase through links on our site at no additional cost to you.
