This redesign comes from two very special readers. Tom and Kathy bought their Northern Virginian home 30 years ago as a new construction. Over those three decades, four children grew up and eventually left the nest, just recently leaving the couple with lots of spare bedrooms and decisions about what to do once Kathy joins Tom in retirement. One potential plan includes selling their home and moving to Richmond to be closer to their favorite/only son – me! That’s right, this is my parent’s bathroom redesign.
In preparation for selling the house I grew up in, my mom and dad realized they’d need to update their bathroom. And because it’s hard for bathrooms of the ’70s to compare not only to cheap bathroom suites but of course to the monster new bathroom of today in terms of square footage, they at least wanted it to boast modern features like fresh new ceramic tiles and a granite topped sink. So my dad seized the opportunity to wrack up a slew of new DIY skills, my mom got to flex her decorating muscles, and Sherry and I managed to snag a few before & after pictures to show off their handiwork.
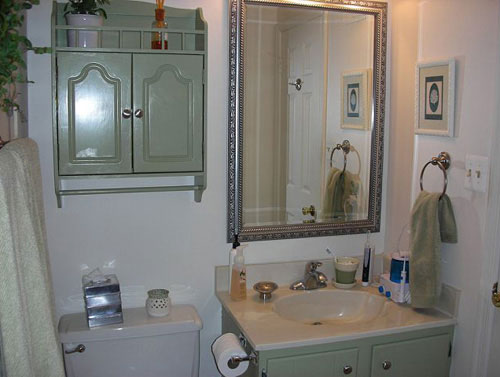
Like this before shot of the sink side of the room:
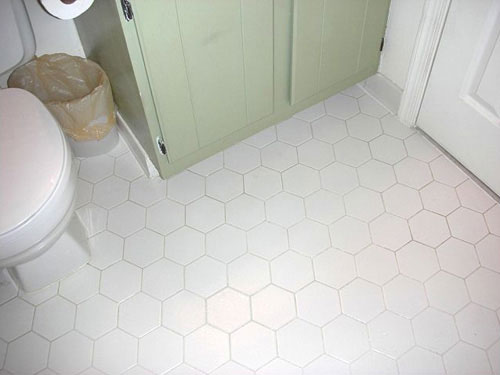
One of the biggest overhauls was re-tiling the entire floor and shower surround so here’s a picture of the old hex-tile floor before (sorry, we don’t have a picture of the original fiberglass shower surround as my dad enthusiastically demo-ed it out before we could take one).
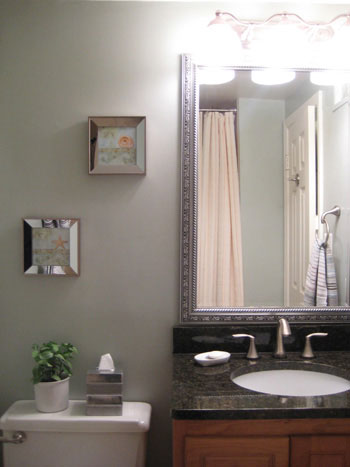
And here’s their bathroom after a whole lot of renovating, retiling and redecorating:
One of the biggest updates was replacing that basic, fiberglass builder-grade shower stall with floor-to-ceiling ceramic tile. They chose a crowd-pleasing neutral tile accented by a stone border for a bit of added wow-factor. The little river rock pattern of the border is very spa-like, indeed. My dad cut, laid and grouted all of the tile by himself (his first DIY tile job, mind you) and learned valuable lessons like “measure twice, cut once” along the way. Similarly, he highly advises planning out your tile pattern so you don’t end up with small, impossible-to-cut slivers when you get to the edge of a row. By finding your center line and laying out your tiles before cutting and grouting, you’ll end up with something balanced and intentional, instead of something that looks lopsided and unplanned. Good tip, dad!
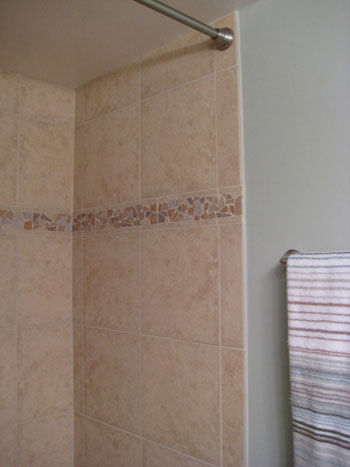
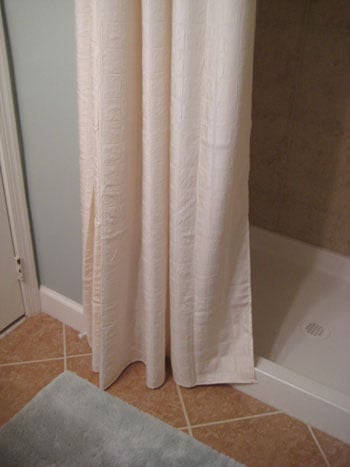
Sherry helped my mom find an extra long shower curtain so they could hang the rod as close to the ceiling as possible to complement the fully tiled wall and give the bathroom the illusion of added height.
My parents also chose a ceramic floor tile in a complimentary earth-tone that my dad laid on a diagonal to help it pop against the horizontally placed wall tiles for extra interest and an open and expansive feeling (diagonal tiles are said to make a space feel bigger).
To balance the warm tones in the tile and new maple vanity, my mom (with the help of Sherry and her trusty paint swatches) picked out a cooler gray-green tone for the walls (Comfort Gray by Duron). And while the girls were picking out paint and accessories (note my mom’s Target towel score that managed to capture just about every color in the room’s palette), the boys were in charge of re-installing the toilet. It was my dad’s first toilet replacement, so it was kinda fun to lend my toilet-installation expertise to my old man.
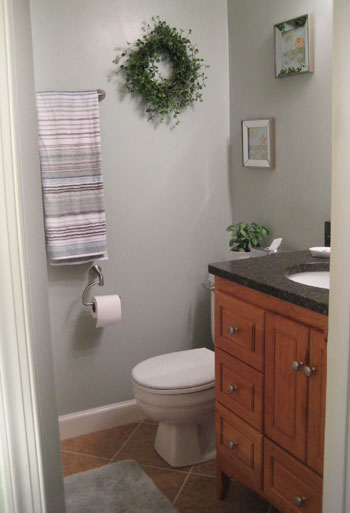
To help the small bathroom feel even larger, my parents also chose a vanity that sits up off the ground which allows the eye to see more floor space (in turn making the room feel bigger).
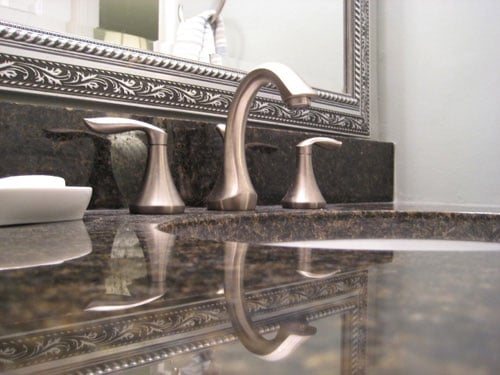
And check out how the cool gray-green wall color even complements the new brushed nickel fixtures along with the rich new granite counters. It certainly doesn’t feel like a bathroom from 1979 anymore…
So we’re sending a big virtual pat on the back to my parents and their new DIYed bathroom. It’s certainly, to borrow HGTV’s language, designed to sell! So let’s hope that the real estate market recovers soon so they can pack their bags for sunny and scenic Richmond sooner rather than later. And assuming my dad brings his new tile saw with him, just think of possibilities for our bathrooms…
I feel like I should end this post with something like “paid for by the committee to get John’s parents to move to Richmond.” Love you mom & dad!

life a colorful life says
This is beautiful! Name of paint color, please? I am painting my main bathroom next week and this seems to be what I’m looking for. And hope the “committee” is successful…
Lindsay says
Great bathroom re-model! Yay for your parents moving closer! We live 4 miles from my hubby’s parents and 8 miles from mine… love it!
Susan says
Me too please! Paint color is fabulous! I need the details!
Natalie says
Oooh what a great transformation! :)
YoungHouseLove says
Hey guys,
Glad you’re enjoying the fabulous bathroom transformation! We still can’t get over it every time we walk into that bathroom. It’s like a whole new room! As for the paint color, it’s “Comfort Gray” by Duron which sounds a lot less green than it really is. I’d describe it as a soft green tone with a dash of gray to keep it sophisticated, soothing and muted. The pictures actually capture it pretty well so hopefully that will give you a good idea of what it’ll look like in your space! Happy painting…
xo,
Sherry
SSM says
Love it! But John, you have to give mom and dad props for at least keeping the original mirror! At least one thing stayed in the room.
And where did the shower curtain come from?
Julie says
Too funny… I have a committee to move my parents to Richmond too. Next up on the get the house ready to sell list? The bathrooms.
jbhat says
I just love a good before and after. And yes, they should sell the house and move closer so they can enjoy their future grandkiddos! Or at least they could take care of the white ceramic critters if you go out of town.
Jen says
Their bathroom looks great. Good advice from Dad too on the tile measuring. Did you use a certain book or magazine article as a guide in getting ready to do his first tiling project?
I really want to do our downstairs bath floor…but I’m scared :) I’ve read up on it a lot but still feel like I’m not quite ready to take the plunge. Or did he just use his son’s great expertise? :) Thanks for another great before and after…love them!
erin says
Beautiful! Love that vanity especially. And maybe it is just me, but is it quite tall? I.e. taller than the “standard” 30″ or whatever most bathroom vanities are, maybe like a master vanity (ours is around 36″ I think)?
YoungHouseLove says
SSM- The shower curtain came from Bed Bath & Beyond (they’re good about having extra long versions, and they have more choices in the store than they appear to have online). Happy hunting…
Erin- The vanity does appear to be a bit taller than 30″- maybe around 34″-36″ thanks to those legs and that gorgeous slab of granite. Good eye!
xo,
Sherry
Lindsay says
Do you have an DIY instructions on how to get rid of a fiberglass tub/shower?
YoungHouseLove says
Hey Jen and Lindsay,
As for how John’s dad demo-ed the fiberglass tub and laid the tile, he did a ton of research and then just took the plunge. He said that a few manuals and tutorials contained conflicting advice (some said to caulk certain parts of the tile while others said to grout those parts) but in the end either method would have worked so he just picked the one he liked best and followed it to the letter.
I guess the lesson is that research is definitely in order before tackling a full bathroom renovation, but checking out library books and trolling the web for tips and tricks is certainly a great way to go into the project armed with info! Hope it helps!
xo,
Sherry
Tracy says
Love this remodel! Great job:)
Ann-Marie says
Nice work! I love the paint on the walls, the counter tops and fixtures, and especially the fact that you kept that gorgeous mirror above the sink.
RIC to DC says
Hey, you guys are in the Post’s “Express” today! Picked it up on my way to work on the Metro and there you were. Awesome!
YoungHouseLove says
Hey RIC to DC,
Thanks for the heads up about the Washington Post Express. We’re just as surprised as you! We chatted with them a while back and wondered when it would come out. We’ll have to bribe John’s parents into grabbing a copy so we can see it! Maybe it’s even online…
xo,
Sherry
Denise T. says
I love the vanity on legs. Is it a custom cabinet? The wall color compliments the stain on the cabinet beautifully.
YoungHouseLove says
Hi Denise T,
The vanity actually wasn’t custom (they ordered it online)- although it does look it now! Not only was it off the shelf, they also had to make some minor alterations to it (they actually slimmed it down a hair by taking a little off the frame around it). Of course they also had to shorten some of the drawers since they interfered with the plumbing. Didn’t they do a bang-up job?!
xo,
Sherry
Becky says
We are re-doing the bathroom *right now*. It is very encouraging to see another DIY tile job that looks so good. Please tell you Dad that he inspired me!
We have floors and walls and a toilet… can’t wait to put the sink back in. So far we have been very successful reading different books and tutorials and blogs : )
Trish Milburn says
I love this fabulous re-do! My master bath screams 1970 — all done in harvest gold. The paint, sink, toilet and shower are all harvest gold. The shower door is one of those pleated fiberglass deals you see in RV’s. This is exactly how I want to redo my bath! Can you tell me where they purchased the vanity?
Thanks for showing this — it is just perfect!
YoungHouseLove says
Hey Trish,
Here’s the info on the vanity, straight from the father-in-law’s mouth:
“The bathroom cabinet is a Strasser Woodenworks, Ultraline, Natural Cherry, 30″ wide x 34 1/2″ high x 21″ deep. Purchased online from KitchenBath.com (1-800-646-1305) and picked up in our car in Oreland, Pennsylvania (near Philadelphia) at Milford Sales. The price online (for the cabinet only) was: $838.50. My memory is that this price was about $400 less than the in-store price from a local shop. And, of course, we were already slated to be in Philadelphia so it was convenient.”
Hope it helps!
xo,
Sherry
SoBella Creations says
Great transformation!
caitlyn says
The bathroom looks awesome!
Do you have any info about the granite countertop? I am planning to redo my bathroom, and I love that granite. Thanks in advance!
YoungHouseLove says
Hey Caitlyn,
More info straight from the dad-in-law:
The solid granite countertop and backsplash (Strasser) cost another nearly $500.
You can visit any local stoneyard and check out their granite in person (it certainly beats looking at a tiny sample, which can often be deceiving and lead to an expensive mistake). You can also ask if they have any “remnant pieces”- especially for a sink project in a bathroom. This just means that you’d be willing to use the extra cuttings from someone else and it could result in some serious savings. Just Google “stoneyard” and your city or check out the yellow pages and see what you can find!
xo,
Sherry
shelly says
What a great before and after. I love the vanity. Do you know what color or kind the granite is? Thanks.
YoungHouseLove says
Hey Shelly,
Good question! We’re unsure of the exact name of the granite, but we do know it has black, gray, brown, and dark emerald green flecks in it. Any stone yard should be able to dig up something extremely similar! Happy hunting…
xo,
Sherry
Janice says
I love the bathroom, can you tell me about the tile on the floor and shower. I like it all. Who is the manufacturer, the color of the shower tile, the accent piece and the floor tile.
YoungHouseLove says
Hey Janice,
Tom and Kathy got all their tile at The Tile Shop so perhaps you can visit one near you (they’re a national chain) and bring in a printed picture of this bathroom so they can show you where everything that they chose is. We do recall that the accent tile stripe in the shower was called something like Lestrada. Hope it helps!
xo,
s
sue says
have a very small bathroom in old house we rent and want to fix up this tiny bathroom. It is painted dark navy blue including woodwork around doors. Has a old deep bathtub (yellow) which is nice and deep so want to decorate leaving it. Has a small door that goes to storage under eves. Has a little larger closet with door. not much flor space. 5’X7′ . any help with ideas will be appreciated. I will start with cream walls (Maybe). Making height by making ceiling and 1′ down lighter to give height. Want to make flower garden or hobbit theam.
YoungHouseLove says
Hey Sue,
We say go for it! It sounds like you have some great ideas so just do what makes you happy and take things one step at a time so it’s manageable. Good luck!
xo,
s