Clara has had her play kitchen for over a year and a half and she still plays with it nearly everyday, which is practically a toy miracle considering how quickly other items are dismissed. So play kitchens have a special place in our hearts. And this one is extra special because, well, Casey and Phil had a ton of fun making their own – and brought lots of new ideas to the table. They don’t have a blog, but they outlined their process here for you guys:
Much like you guys, my husband Phil and I decided to build our daughter Zoey a play kitchen for Christmas. I sketched it out to mimic our kitchen cabinets, and I knew she’d love a pretty realistic looking stove in a fun color. Luckily my husband is a fantastic carpenter, so we built the whole thing from scratch using scrap lumber from from our whole-house renovation and butcher block left over from our previous house’s kitchen renovation.
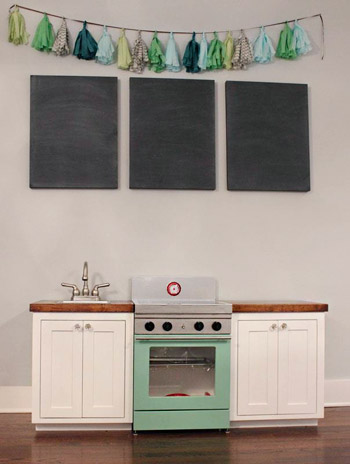
All said and done we spent an embarrassing amount of time on this, but I think the end result was worth all the work!
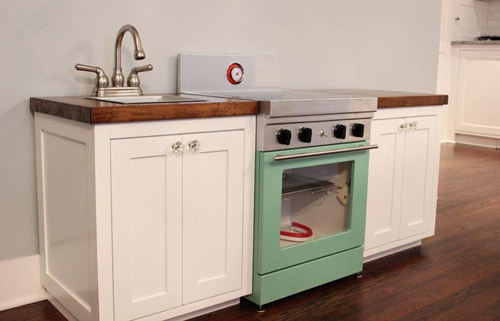
The cabinet building was pretty straightforward- we built basic cabinet boxes, added the face frames, then added the extra paneled detail on the sides. Phil build the doors separately and we attached them after everything was painted. The stove was a little (okay, a lot) trickier. We build it in 2 major parts- the lower half (the painted part) is all one unit, and the upper half (the stainless part) is the other half.
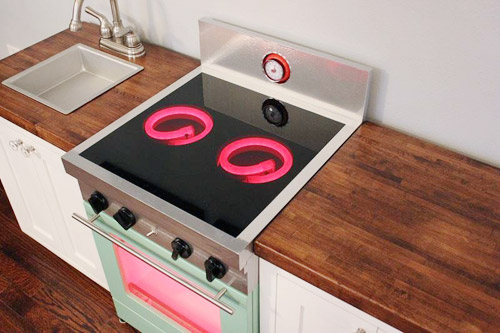
Phil loved the idea of dimmable “burners” so that was definitely our biggest expense in the whole project – but he was right that it takes the whole thing to the next level. Zoey loves them! For the top half we sandwiched the LED lighting in between 2 layers of wood to hold it in place. We used a 6″ hole saw to create the 2 openings where the coiled LED lighting shines through. We wrapped the top part in stainless contact paper, covered the lighting with a piece of tinted plexiglass, then we put the whole thing on top of the lower half.
And I know people love a good resource list, so here’s where we got things:
- Cabinets- made from scrap wood from other projects
- Countertops- leftover from previous kitchen (lumber liquidators)
- Sink – Amazon
- Faucet – Amazon
- Cabinet knobs – Target
- Paint color on cabinets – Benjamin Moore’s Super White
- Paint color on stove – Benjamin Moore’s Meadowlands Green
- Handle on stove – Ikea
- Knobs on stove – Amazon
- Timer – Anthropologie
- “Stainless steel” contact paper – Home Depot
- Oven rack – Dollar Store
- Flexible LED neon – Del Lighting
- Dimmers – Amazon
- Plexiglass for stovetop – eBay
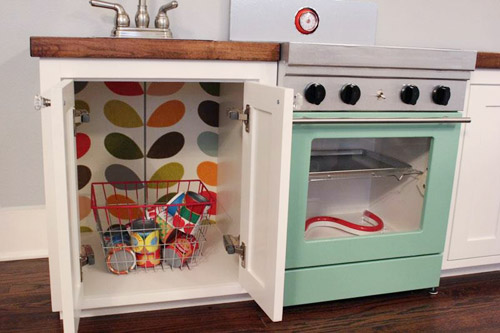
- Wallpaper on interior cabinet – leftover from Zoey’s nursery, Wallpaper Direct
Hope you enjoy! -Casey
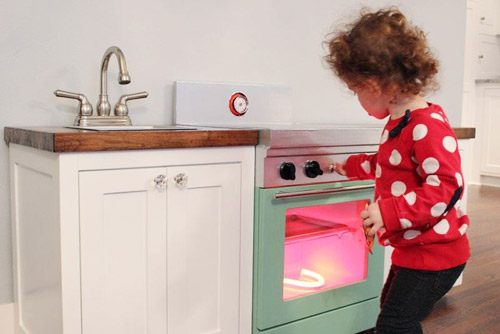
Isn’t it awesome? Zoey is one lucky kid to have such resourceful and creative parents who have so much fun building things for her. Thanks for sharing your creation with us, Casey and Phil!

Marc says
I have never seen such detail in a child’s play kitchen. And people say that parenting has gone to the dogs. I beg to differ and would point to you as amazing parents! Good on ya!
Paula M. says
Fantastic job! Love all the extra touches and imagination that went into it.
And it’s both a credit to their fantastic work and a knock against my condo that their “play” cabinets look a better than my real-life, “Big Girl” kitchen cabinets. Hee!
Laura says
This is my favorite redesign ever! Amazing work and way, way cuter than Pottery Barn!
allison b. says
Holy cow! That looks amazing! Thanks for sharing such a fun project. :)
Erin says
Oh my god. That is nicer than MY kitchen. My actual, real, adult, grown-up, functioning kitchen… Fabulous work!
Kelly says
Um… can they come build my real-life kitchen? Please? (:
nichole says
I LOVE THAT OVEN!!! The little details that make it so realistic rock my socks off!!
we have a kidkraft retro kitchen which I love for the price and the fact that we aren’t as crafty/don’t have much time to build one ourselves but the thing I HATE most is the oven! The door doesn’t even open the correct direction (downward). My daughter actually gets confused by it! she does love the whole thing in general, so thankfully it’s still a favorite in our house!
Elizabeth says
What an amazing play kitchen! That stove is beyond incredible! I want one!
Mindy says
The wallpaper on the backs of the cabinets is so fun!!!
Kathryn says
That stove it amazing! I love it!
joa says
Whole house renovation?? How do they not have a blog!? This is amazing!
YoungHouseLove says
Agreed. We want a blog! We want a blog! We want a blog! (come on guys, chant with me)
xo
s
Mary Kamerer says
My parents built one for me for Christmas when I was about 5, and so when my husband and I enclosed a porch a few years ago, we added some shelving in a corner, we put little doors on the bottom shelf to make a cabinet, painted the top like a stove and painted the front like oven windows. My kids loved playing kitchen just as much as I did!
Dianne says
Impressive! Wouldn’t mind having that in a public area of my home – and the images tricked me, too — I also thought it was real.
Monica B says
That is the BEST DIY kitchen ever. One lucky kid!!
MG says
Love it! I pinned it….now only if I could get my husband on board with that AND the farmhouse table (from Ana White) I’d be set! So cute.
Allison says
Are you kidding me? This is insane…insanely amazing!
Andrea Worley says
this is awesome! if my kid had this kitchen i’m pretty sure i’d be playing with it instead. So, so cool! Well done guys!
Felie Hempfling says
Wow, that is amazing! Their little girl is going to have so much fun!
Janice says
I love the Orla Kiely wallpaper!
Elizabeth says
The level of detail is killing me! The real faucet. The real doors with real hinges. The stove has little feet. And an oven light with a flip switch. Those are real knobs. It is just perfect. I’ve wasted way too much time reading about those LED neon lights! My only question is what is the chance the knobs would fit on those dimmer switches? If it was me 0%, but this couple seems to have the magic touch. Sooooooo darling.
CrayolaJW says
I kinda want one for my adult self! :)
Lindsay says
This is amazing! Takes me back to my childhood~ my dad built us an entire playhouse on stilts (sandbox underneath, naturally) and we spent HOURS bringing Little House on the Prairie to life in the back yard. This little gal is lucky to have such creative, joyful parents!!
Kathy says
Awed…truly awed. There is nothing better that one can spend one’s time or money on than a child’s imagination. Lights, stainless steel and butcher block, fantastic ideas. You’ve created an heirloom. Your grandchildren will love coming to your house!
Stephanie says
Wow! I would love if they sent you more photos of their house. If their play kitchen is that amazing, I would love to see their real kitchen.
Jen says
Love it! The ‘burners’ really take it to the next level, any little kid would find it fun.
Katarina says
Seriously? Amazing
kk says
Where did you get the ribbon garland and the chalkboard??
I love the colour coordination on the garland as well!
That kitchen is just amazing!
YoungHouseLove says
Hope she drops in with that info!
xo
s
SassafrasNA says
ADORB! Love these heritage pieces that can be handed down generation to generation. Awesome job!
Christina B. says
I can see it now. She is going to get her first apartment and think “My play-kitchen when I was 3 is better than this one!”.
ELLEN says
Oh my goodness how freakin cute!!!!
Shannon says
Wow! That’s awesome! I love play kitchens. I have no handy carpenters around so instead of building my daughter’s(which I would have loved) I bought her the My First Kenmore kitchen, the one with all the stand alone pieces. I’m a bit obsessed, so I have a pinterest board devoted to play kitchens. http://pinterest.com/mommyshannon84/play-kitchens/ There’s even a photo on there of part of my daughter’s kitchen, mostly her table but you can see her stove too.
YoungHouseLove says
Your whole board is adorable! So much fun!
xo
s
Nikki H says
This is adorable!
Bethany @ Dwellings By DeVore says
Wow! I think that’s nicer than my real kitchen! :) I love a good play kitchen makeover and hope to make one for my daughter soon!
Theresa says
Day-um!
Casey says
Hi Everyone! Thanks so much for all the lovely comments- you guys are too nice! Here are a few answers to the questions above- I think this catches everything:
Jackie- I didn’t keep track of everything closely, but I think we spent about $200 by the time we bought paint, hinges, etc. The lighting was definitely the most expensive part, so if you made it without that you could do it pretty cheaply.
Kristin- we got the Amico knobs on Amazon. We bought them in a 4-pack that seems to be sold out or something. Try this link instead:
http://www.amazon.com/Amico-Kitchen-Plastic-Cooktop-Switch/dp/B00880S2GS/ref=sr_1_fkmr2_3?ie=UTF8&qid=1377214894&sr=8-3-fkmr2&keywords=Amico+Kitchen+Gas+Cooktop+Stove+Range+Burner+Knob+Switch+Replacement+5+Pcs
kk- the chalkboards are just an old door cut into pieces and painted with regular chalkboard paint. The garland was a 30 minute craft project I made with tissue paper I scrounged from my wrapping paper stash. It was supposed to just be her 1st birthday party decor and I couldn’t bear to take it down! There’s lots of tutorials out there- I used one like this:
http://pizzazzerie.com/how-tos/diy-how-to-make-your-own-tassel-garland/
kk says
wow. thanks so much :)
YoungHouseLove says
Thanks so much for all the info Casey!
xo
s
sarah @makingitmyhome.blogspot.com says
totally puts the fisher price kitchen set to shame! it looks amazing
Holly @ The Freckled Mask says
This is nicer than my real kitchen! hah.
Amazing!
Cindy says
Really, REALLY cool.
Tricia says
An heirloom play kitchen, to be sure. Wow, wow and wow!
How about a tutorial for that stove?
Emily says
wow. that is ridiculously amazingly adorable.
kalibrooke says
Um. Done. Best play kitchen I’ve ever seen (aside from Clara’s, natch).
Melinda @ love,melinda says
Love this! I love the wallpaper on the inside of the cabinet!
Matthea says
The best parts are TOTALLY the light-up “elements” for stove and oven, and the turnable knobs for the faucet. So cool!
Mary says
Is this powered via batteries or does it plug in?
YoungHouseLove says
I believe it’s batteries. Hope they drop in with that info!
xo
s
kristi says
This is amazing!! I’m trying to build a kitchen for my little girl and I love the leds but was wondering how do u make them go on and off?
YoungHouseLove says
I think they might be battery, so there’s a switch on them (perhaps accessible under the oven?). Hope they drop by with more details for you!
xo
s
Casey says
Hi Kristi,
There’s actually a power cord in the back that plugs into the wall. The knobs on the front turn the “burners” off and on with a dimmer, and the switch in the middle of the knobs (the one Zoey is grabbing in the last picture) turns the oven lights off and on. Hope that helps!
Casey
Jim says
We are making our own kitchen for our son and you have set a very high bench mark. I have one area of concern since I am an electronics engineer. Please could you let me know what power source/voltage you used.
Regards Jim
YoungHouseLove says
Hi Jim, this was not our project – it was one submitted by a reader – so I unfortunately don’t know the answer to your question. So sorry!
-Johm