We’re over the moon for this fantastic chair makeover. Here’s Vanessa’s letter:
I read your blog daily and just wanted to send you a link to a project I just completed. It was inspired by your recommendation of this Target chair during their Home Design Event…
… a few months later I came across a chair at my FAVORITE second hand store, Second Thyme Around in Manhattan, KS. I liked the lines and thought, maybe this could be my first foray into reupholstery. I read about reupholstering on the internet and then I bought the chair for $25. Using multiple coupons for Hobby Lobby and Joann’s, I bought all the supplies I needed. Every single thing on this chair was at least 40% off, except the staples and spray paint, which I had to buy full price at the hardware store.
So here is the chair before…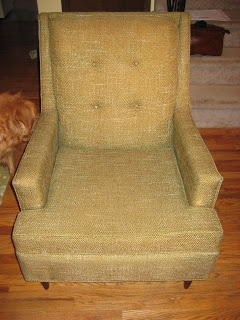
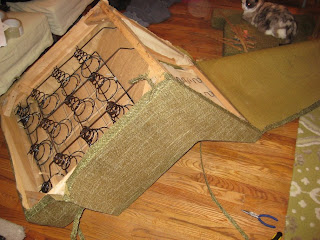
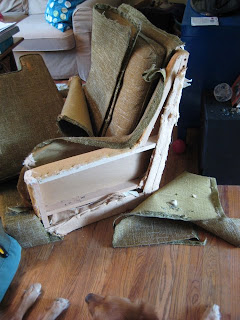
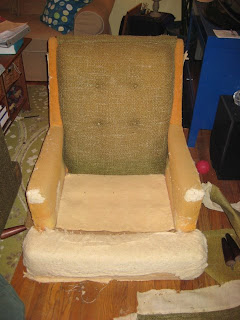
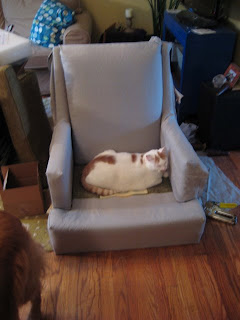
The legs were pretty beat up so they got a fresh coat of paint. Krylon spray paint attaches to anything!
Here it is with the button tufting on the back complete. Reese seems to like this chair. He actually sat in it while I did the tufting and played with the waxed twine. Never got out of the chair.
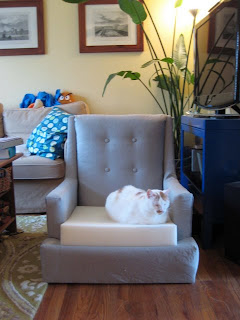
Due to coupon use, the entire chair redo including the cost of the chair, was $73. And I had fun for 5 days worth of evenings. So I thought you might enjoy seeing the results. I wanted you to see the spirit of do-it-yourself your blog has encouraged in my life. Thanks again for the terrific blog! Best Regards, Vanessa
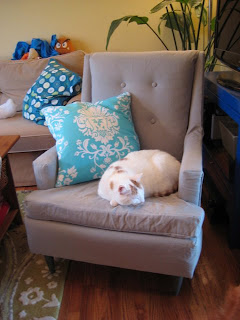
Seriously, could this made-it-myself story be more inspiring? We’re so excited that Vanessa’s foray into reupholstery was a positive one. Love that DIY spirit! Thanks so much for the pics, Vanessa… and we sincerely hope that your kitty gives you some much deserved chill time in that chair too!



Beth Anne says
Vanessa, John and Sherry,
Vanessa, nice work! I love the final product- cat and all! FYI for anyone else that may be interested in future re-upholstering projects: there’s this little tool called a staple remover that would have made pulling all those staples out easier that sells for about $16, and it’s well worth the money. See it here: http://www.perfectfit.com/15362/154589/Tools/Osborne-Staple-Puller.html
You can also buy a bigger piece of foam for the seat then cut the foam with an electric turkey carving knife to fit that weird T shape that some chairs have. I learned this from an up-holstering class I took to satisfy that creative side a few years back, but now we have a three year old running around. There is less time to indulge in these fun projects. Speaking of kids, I can’t wait for you, John and Sherry, to have one or two of your own so we can all benefit from your designer and organizational savvy with little people hanging out! Fantastic blog, John and Sherry, and fabulous chair, Vanessa!!
Beth Anne
Anna See says
Wow, Vanessa! What a classy, gorgeous chair! Reupholstery scares the daylights out of me, but this makeover has me drooling!
Paula says
Oh wow! Fantastic job with the chair!
And, you may have just changed the course of my weekend. I bought a little arm chair a while back for $40 at a used furniture store. I’m at wit’s end with it, its probably from the 30s, and no chair cover fits it (all are way too big) because its teeny.
I hadn’t thought about using the old pieces as templates for new pieces of fabric.
What I’m seeing is a denim covered chair to match the bed skirt in our master bedroom. There’s lots of provencial colors in there. My guy will kill me (he wants each room to be ‘done’ before we start a new one), but I’m gonna go look for some fabric and get working on this! Hee hee, he’s at work today. Sorry, honey :)
ellis says
So fun! I’m from Kansas but currently live in
Austin. Per your recommendation, Vanessa, I may have to check out that Manhattan thrift store. I am now eying this rather dilapidated chair in my apt- I could totally re-cover it!
Amy says
Beautiful job! Don’t be afraid to just jump in and start a re-upholstery project. I taught myself while my husband and I were in medical school. It is still a skill I use today! John and Sherry, Thank you for giving us all the courage to have a beautiful home on a budget. I have spent the last 17 years of my marriage waiting to decorate my home because I felt I needed to spend a lot of money. After running across your blog I have finally started to decorate using many of your ideas. My home is starting to feel beautiful! Keep up the good work!!!
April Z says
That is gorgeous and classy! I’m so impressed that Vanessa only spent $73.00.
jbhat says
OMG, Vanessa, please bring your can-do attitude over to my place and I’ll supply the supplies. And the chair.
Sibylle says
The link to the second hand store took me to a “vista print” site, but not the store. ? Is there a different address for the store?
Thanks!
YoungHouseLove says
Hey Sibylle,
It seems like their site has either been removed or is temporarily down, but here’s their address/number in case you’re a local and want to swing by in person:
1312 Pillsbury Dr
Manhattan, KS 66502
(785) 539-4489
Hope it helps!
xo,
Sherry
Anita says
Wow, very classy looking! I always love seeing something old recycled into something new. I’m impressed with the button tufting.
Vanessa says
Wow! Thanks so much to the youngsters!! I never dreamed this would make it onto your blog. My whole family in Europe and California will be clicking on soon.
I am VERY happy that so many people are inspired to try a little upholstering because of this. It is definitely something that most people could manage. I will, however, most assuredly look into the staple removing tool. I still have a red mark on my thumb!
So…secretly, I had originally wanted to buy the Target chair for a nursery. :) That was a while ago, and we had no reason to hope at that time. However….. we found out that I am finally pregnant last week. So, this baby will be nursed on a chair it’s mama upholstered for it! The only problem is I really wanted to spray paint some lamps this weekend, and now I think it might not be entirely safe. Time to lure the husband over to the spray paint!
Thanks again youngsters!!
YoungHouseLove says
Wow! Congrats on the little bundle of joy that’s headed your way! I’m sure that your wee one will love his or her chair, as long as the cat is game to share it!
xoxo,
Sherry
Melissa Anderson says
Oh my goodness that is the chair that I’ve been begging my hubby to let me buy. I found 2 of them on Craigslist and both are selling for $250 and they were regularly $299/each. I actually posted the pics on my blog about a week ago and no one liked them which was really disappointing, I think I need to rethink this and get them since I do love them.
P.S. I featured your site on my blog on Friday since it’s my #1 favorite site.
YoungHouseLove says
Hey Melissa,
It’s a sign from the chair gods! You must snatch those chairs up asap. Thanks so much for the kind words about our blog. We love yours right back!
xoxo,
Sherry (& John)
Brigitte Dussert says
Félicitations pour la rénovation de ce fauteuil un travail de professionnel
Brigitte
Christina says
Hi, I couldn’t help but leave a word of advice. The chair looks great and upholstery is no easy task (as you know). If you haven’t already done so, buy some Dacron batting to wrap around the cushion before you stuff it into the casing. It will look nice and tight and cover over any imperfections. Enjoy!
Paige Cotney says
Hey! I was wondering if yall could do a little tutorial on this tufting business. I have a papasan sun that I would really like to recover myself instead of paying an upholstery store to do it or buy a whole new cushion because my cushion is perfectly ok but the fabric is old. I’m just not sure how to do the tufting thing.
YoungHouseLove says
Hey Paige,
We actually haven’t tacked tufting yet… so it might be hard to whip up a tutorial with zero experience! The good news is that we always love taking on new projects, so if and when we roll up our sleeves and get tufting we’ll definitely blog about it and include all the step-by-step details for ya!
xo,
s
Paige Cotney says
Thank you so much for always responding so quickly! I look forward to you guys doing a tufting project so I possibly can! Thanks again!
ashleyat87 says
I love reading how other people tackled their upholstery projects. I just did an office chair yesterday that turned out pretty darn well… surprisingly!
http://designwaffle.com/2013/03/07/office-chair-makeover/
YoungHouseLove says
Awesome Ashley!
xo
s