As exhilarating as demolition can be, there’s always that nagging voice in the back of your head reminding you that you’re going to have to replace whatever you’re demolishing.
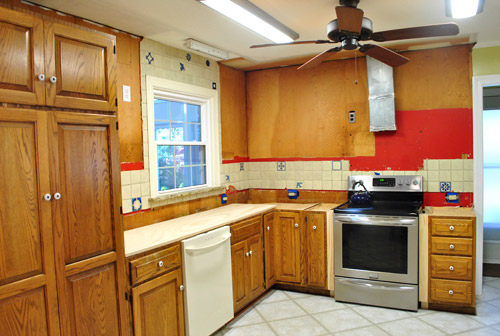
Bummer, right?
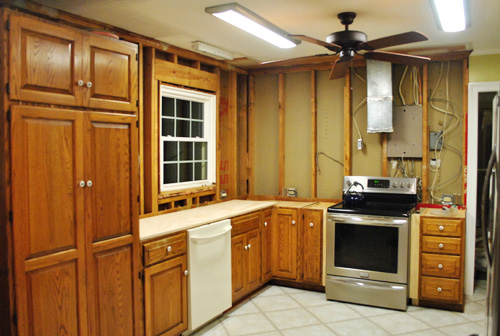
Well, we didn’t let ourselves wallow in that realization too long and dove right into reconstructing the kitchen. Actually, between demoing the tiles and the plywood we actually snuck out to The Tile Shop (in my sister’s borrowed SUV) to buy cement board so we’d have all of our supplies ready as soon as demo was done.
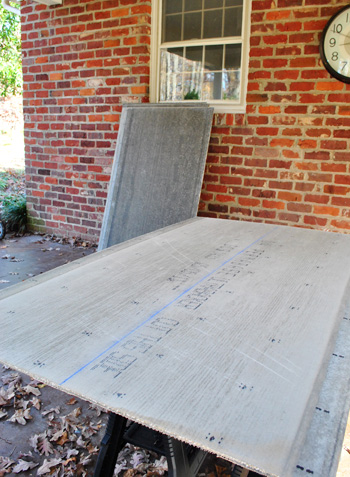
The cement board (1/4″ thick Permabase Ultrabacker to be exact) was about $10 per 3ft x 5ft sheet after the 10% discount code that they offer everyone (YHL10) and I bought four of ’em. Actually, I bought eight of them because of some gross miscalculations on my part but only used four. So once our extra board returns were made it was about $40 spent. We knew we’d be using them along the entire back wall above the stove (that’s going to be our focal wall with tile to the ceiling, a big range hood, and open shelves) as well as wherever else our standard 18″ backsplash would go on the other walls of the kitchen. I started with the 18″ backsplash boards first since they were smaller and more manageable. They just required some careful measuring to ensure that I cut accurately around the window and for the outlet holes.
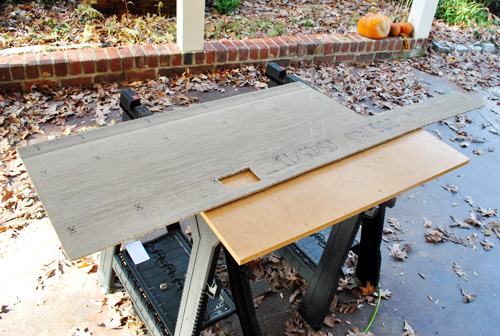
To make my cuts I used my jigsaw, since it was convenient and I was good at controlling it. I also wore a gas mask (not a paper one, a real deal rubber one with filters) to avoid ingesting any of the nasty dust that flew. Though I’m pretty sure I wasn’t using the right blade for that material though. It cut just fine, but by the end of the job my blade looked like this:

Notice all of the missing teeth in the middle? Cutting literally sanded them off. So yeah… lesson learned. Maybe I was supposed to use a diamond blade since cement board is so coarse? Either way, I was happy to get ‘er done.
Setting the cut boards in place was pretty easy. I was able to balance them along the old plywood under them (they were the same thickness, which was really handy for a seamless result). Then I just made sure they were level and drove some screws in all by myself while Sherry kept Clara out of the danger zone (aka: our tore-up-from-the-floor-up kitchen).
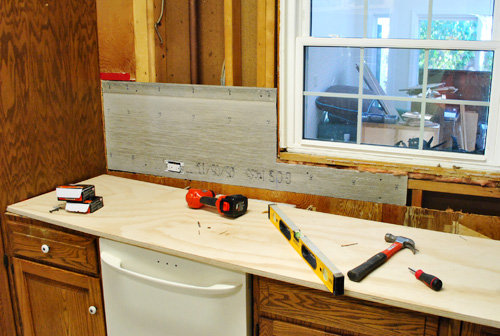
So once I was sure that all of my screws were adequately sunk into the cement board (pokey screw heads are bad for flush-laying tile) I continued on my merry way around the room. This wasn’t so bad, actually! Especially since I dreaded it so much because we didn’t exactly have a great time with the same process while rebuilding our first house’s bathroom. Maybe absence makes the heart grow fonder?
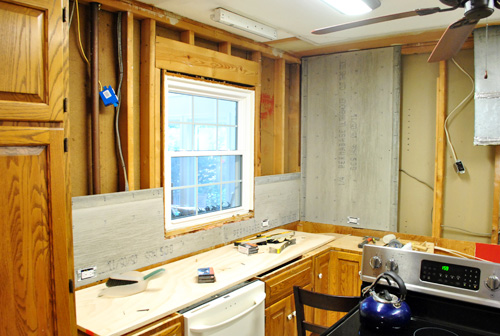
The thing that made my life much easier was the fact that the 5ft tall boards fit just about perfectly in my 5ft tall wall behind the stove. That meant I didn’t have to do any cutting on those boards (except for the outlet holes). So the ease of cutting made up for the extra difficulty of maneuvering a bigger, heavier board. Luckily Clara was napping by this point so I was able to enlist Sherry’s help to hold them in place while I drilled. It certainly made this part of the day go much faster.
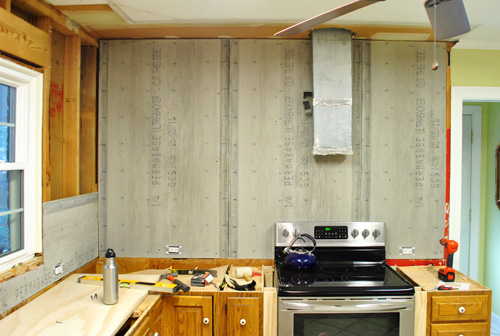
Oh, and as for the dangling outlet up by the vent – it’ll eventually be used to hook up our future range hood. Since we’re not 100% sure how /where that’ll be hooked up we just placed it somewhere temporarily that could (hopefully) work . If not, at least the hole will be hidden behind the vent cover we’re eventually going to build (and there’s some play in the wiring that connects to that junction box so we’ll be able to move it if we need to).
If you look at the photo above you’ll see that our future range hood won’t be perfectly centered on that wall of tile, but it will be perfectly centered on that back wall of the kitchen (when you include the space next to the cement board over the doorway). So once we add our penny tile to the ceiling and install our open shelves and our built-in range hood, we think the way that we “accessorize” the floating shelves will also help restore balance. We plan to use them to house everyday dishes that we’ll use so often they don’t have a chance to get dusty along with other items that are always stored out in the open like vases, some art, a plant or two, etc (more on the whole dust/open shelves thing here).
But just because cement board was done, didn’t mean we were done with our walls. After all, we still had this going on above the sink and pantry:
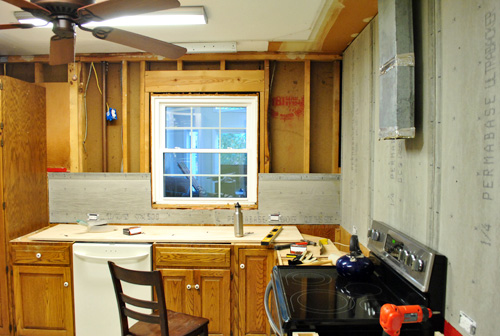
We briefly talked about doing more tile to the ceiling on that wall, but thought that one focal wall with open shelves and a big range hood with tile to the ceiling would be enough. So we decided that a regular old wall with a standard 18″ backsplash will better balance the other side of the kitchen which will also have that going on next to the fridge. Oh and we also thought tile over the pantry would just be super weird, and that would be the natural stop point for a rectangular effect like the other wall, so we’re happy we bailed on that idea.
But the walls of the kitchen aren’t drywall. Nope, remember they’re painted paneling (which we actually don’t mind for the soft texture and coziness it adds once it’s painted – we had some in our first home’s den too). So we did the unthinkable…
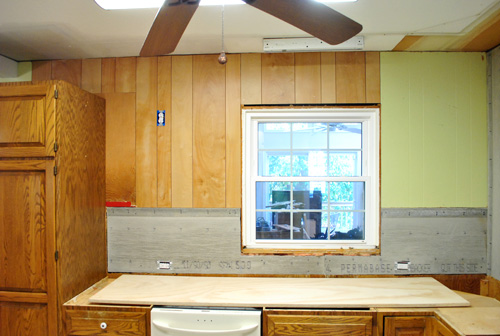
… we actually purchased a sheet of paneling. And oy how it pained us. We’re pretty sure everyone at the checkout was thinking “welcome to 2011, why the heck are you buying paneling?!” Luckily we had one leftover piece of painted paneling leftover from the doorway opening project that we were able to reuse to the right of the window above where the backsplash will go. So I just had to buy one sheet at Lowe’s.
So yes, that was a first. Never in my life did I think I’d be BUYING new wood paneling. And thank goodness it’ll get painted any second now (along with that rough looking ceiling), so we didn’t have to worry about matching color.
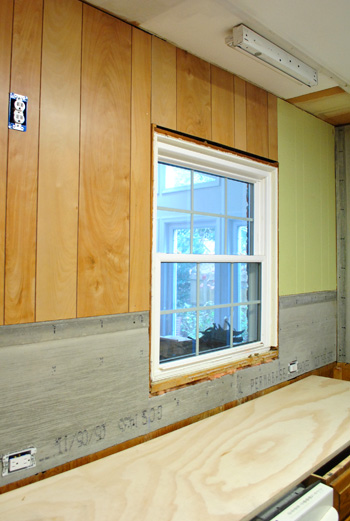
Luckily that one 4ft x 8ft piece o’ paneling covered all of the areas that we needed. We had the guy at Lowe’s cut the pieces to size so (a) they’d fit in our Altima and (b) we didn’t have to do it ourselves. But I did buy a new jigsaw blade while I was there (so I could cut the hole for our microwave outlet).
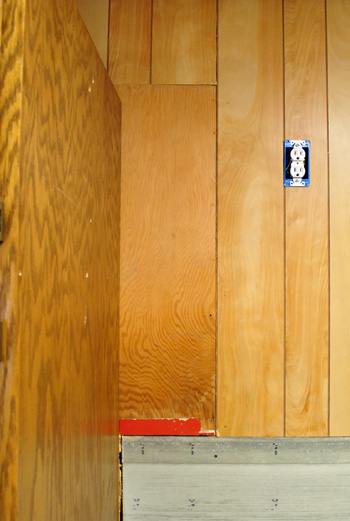
Oh yeah, and notice our moment of laziness above? Since a small-ish upper cabinet will be covering that section of wall we didn’t go through the trouble of cutting out that piece of plywood (it would’ve meant moving the pantry, and it won’t be seen once we install the cabinet with added crown molding around the top anyway). Gotta love one wall-hanging shortcut along the way.
As for the cement board seams, we’ll be taping them and then using thinset over them to set the tiles, which should hold everything in place for the long haul per The Tile Shop’s recommendation. But wait, let’s go back to this picture of that wall head on:

You might be wondering about that oddly placed window (it’s not centered on that expanse right now) but once we add the small-ish upper cabinet to the right of the pantry there will be exactly 14″ of wall space between the side of that cabinet and the window trim. There will also be 14″ of wall space between the right side of the window trim and the 12″ floating shelves that will be hanging on the focal wall (they’ll jut out 12″ to house all of our big dishes and stuff, which is nice because the window will eventually look perfectly balanced with 14″ of wall space on either side).
Anyways, here’s what the kitchen was looking like when we were all done. Still not great, but definitely better. And not only do we love how the room feels without upper cabinets crowding us, it’s also nice to start to see what it’ll look like once the tile backsplash is installed. I wish I had taken a wider shot so you could see the paneling on the other side of the room with the 18″ backsplash that will go over there (next to the fridge) since it really feels nice and balanced with one wall of tile and two standard backsplashes on each of the other two side walls.
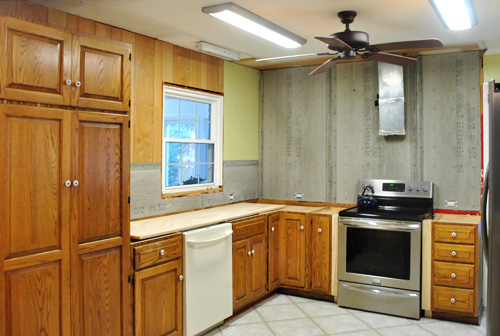
Oh, and since lots of folks asked on our last kitchen post – these are both interior walls (that window looks into to our heavily insulated sunroom, not the outdoors) which is why they weren’t insulated before and why we didn’t opt to add any insulation during this step of the process. We lived here through last winter (which was colder and snowier than most) and we knew that the sunroom didn’t get very cold, so thankfully the kitchen never feels drafty or uninsulated (in our experience, brick ranches are great about maintaining a comfortable temperature in general since they’re so solidly built and aren’t usually drafty).
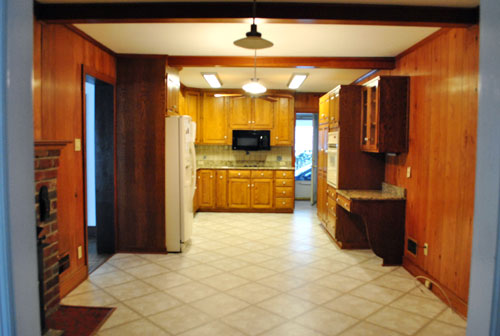
As for the timeline, this whole destruction/reconstruction process took us two days (one for demo/buying cement board, one for installing the new walls) so overall it wasn’t that bad. Though I was pretty darn sore by the end of it all. Thankfully Sherry pointed out that our next step was paint touch ups, which aren’t too bad (ceilings are my least favorite surface to paint, but we don’t have much of it to deal with). We’re actually kind of excited to get that done because the room will hopefully look less Frankenstein than it’s looking now (mismatched appliances + mismatched cabinetry + mismatched paneling = ca-razy). But still better than the before that we started with:
What about you guys. Have you ever hung cement board or actually had to (gasp) buy paneling? Any ceiling painting on your agenda?
Pssst- We’re over on BabyCenter chatting about the birthday time capsule that we finally completed for Clara to open on her 18th birthday.
Psssst- We’ve listed our black above-the-range microwave on craigslist if anyone is interested (it’s only a year old, works great, and is still sold by Sears). Here’s the link.

Lindsey d. says
Ha! I plan to (one day) buy enough paneling to re-cover the walls of three rooms (living room and two bedrooms). The walls are shiplap wood (unfortunately not in good enough condition to uncover and paint) and currently covered in in this crazy thick, fibrous paneling.
Three reasons for continuing paneling:
1) My kitchen is already paneled, so I figured that continuing the paneling will make everything more cohesive
2) Paneling will just be cuts and nails and not taping, mudding, sanding, etc. Also, I nail and drill lots of holes in my walls, then change my mind about placement or rearrange furniture/hangings, and the paneling is easy to throw up some wood putty, sand and paint. I find it very hard to recreate the texture of dry walling when I come back through with DAP on bigger holes.
3) Modern paneling is thin, so my trim/molding will stick out more, as opposed to the current thick paneling (it’s very old and weird), which comes level with the trim.
YoungHouseLove says
All good reasons! I bet it’ll look gorgeous!
xo,
s
Lindsey d. says
Painted paneling, of course… Goes without saying, I think!
Jess @ Little House. Big Heart. says
I think paneling is cozy when painted, too! The house I grew up on was paneled EVERYWHERE, so it just feels like home. Don’t think I’d ever voluntarily put it up though.
Allison @ Quite Simply Home says
Awesome progress! You guys keep chipping away and it looks great. I can’t wait to see the counters in, and the tile, and the painting…ok I guess I can’t wait to see everything happen. I love being along for the ride instead of just seeing the final results!
Laurel M. says
We once bought paneling, too! Oh, the shame of it :) Our OLD kitchen was paneled and we wanted to cover up a redundant doorway, so it was an effort to match. And we did paint it, powder blue.
Priscilla says
Why didn’t you guys add insulation to the window wall since you had the wall board down? We just put in new cabinets, and everywhere the wallboard came down, I put in some insulation.. on an otherwise non-insulated brick rambler.
YoungHouseLove says
There’s a paragraph in this post about that for ya (the second one above the last picture). Hope it helps!
xo,
s
Tina @ heatherandtina.com says
Ceiling painting is not fun. I tried to get away with the current ceiling color when our den was repainted a dark blue (RL Blue Leather). What was a pretty neutral white now looks like super-bleached, movie star teeth white. It’s on the list to repaint, but I’ve been procrastinating. Are you guys doing any new lighting in the kitchen? Sorry if you’ve already covered that and I missed it. – tina
YoungHouseLove says
Yes, can’t wait to replace that old stuff!
xo,
s
RMILLS says
I think she looks like Sherry, hands down!!
Jessika says
Our upstairs bonus room is all paneling. UGH. But, since we might pop out the roof in 5ish years, I didn’t want to go to the hassle of changing it for drywall. So, I patched, sanded, and textured the paneling. All 500 square feet of it. Yes, really. Then painted. Results? Much nicer. I would have just painted, but the dingbat who installed the paneling did not line up the lines well, so it would not have looked so nice with just paint. Sigh! But, now it’s finished (thank goodness!).
YoungHouseLove says
Sounds awesome! Congrats on the major update!
xo,
s
Kelli@becomingkelli says
I have purchased paneling, and the stares in the checkout line were almost more than I could bear! Our house was built in 1945 and “updated” in probably the sixties, so it’s wood paneling throughout. I kind of agree with you about the texture thing, though; I’ve sort of fallen in love with the way it looks when it’s painted. And I think we can get by with bolder paint colors than if it was drywall.
Maureen @ This (Kinda) Old House says
I can’t even get my small main bathroom done, and you two are moving along so fast with this kitchen! LOL Hopefully I am done before January, or I need to throw in the towel. :)
I love how you guys think of EVERYTHING. Like making the window look more centered, etc. These are things I just don’t think of, so I LOVE when I learn from your ideas!
Once again, I love all these kitchen updates!!!
Laura V. says
Great progress! Wonderboard is such a pain… I concur with the scoring and snapping suggestions!
Although I must admit I am (sort of, but not really) patiently awaiting the post(s) for the cork floor installation… *tap, tap, tap*. :D
YoungHouseLove says
Haha- we can’t wait to get to that step because we’ll be nearly done! Maybe in early January?
xo,
s
Sarah H. says
Love seeing the kitchen progress! Like everyone else, I can’t wait to see the tile go up.
We are partially redoing our small bathroom and the ceiling painting is up next…although I’m 25 weeks pregnant, so my hubby will be doing all the painting!
Rad Designing says
What a great post! Sadly im currently in an apartment so no fun demolitions in my near future… definitely excited about when i get a house! i know the first place I’ll go to for tips is YHL. Love you guys!
ErinEvelyn says
Paneling totally has it’s place! Both Sarah Richardson & Thom Filicia have knotty pine in their homes. Thank heavens there’s something out there that can allow us regular folk to get the look for less. Don’t be hatin’ on it. ;)
YoungHouseLove says
Haha, you’re right! It’s definitely one of those personal preference things! Some folks like it au naturale and some folks like it painted!
xo,
s
Sara says
Wow, it is coming along so smoothly, at least from my point of view! HOPEFULLY I will be buying cement board in the near future. Meeting Contract-Her tonight to discuss how & what we can do next week with my gutted kitchen.
Rosemary M. says
HELP! I’m at the checkout screen for WE. I came to look for the code but it’s not here :( No more West Elm discount code?
YoungHouseLove says
So sorry, we haven’t had a West Elm discount code for a while. Maybe if you google around for one (ex: search “West Elm coupon code”) one will come up though! Hope it helps!
xo,
s
Elizabeth says
We actually had to purchase new panelling for our mudroom to match the existing. Of course, we painted it all out like you all did, but I felt so self-conscious as we were wheeling it through Lowes. Who buys panelling?!
jody says
The paneling will look GREAT once painted – no worries, right?! You guys are so fun to follow along to!
But — Puhhllease let us know how you feel about the window above the sink looking into your sunroom. We have the exact same thing and it just bugs me – I don’t know if I should remove the window or decorate it or what?! It’s just an oddity I cannot get past!! Help!!
YoungHouseLove says
Sure! We’ll definitely keep you posted! Oddly enough in our first house we also had a window over the sink that looked into our sunroom. What are the odds? Turns out a lot of old 50s and 60s houses added a sunroom in the back behind the kitchen so you could wash dishes and look outside/into the sunroom. So funny, but I guess we’re used to it so for now we don’t mind it and definitely appreciate the added light!
xo,
s
Janet Gaupp says
I can REALLY start to see the potential…..that being said I have a suggestion. I know I can sometimes dislike suggestions halfway through a project especially since I have to do said suggestion, but I just can’t help myself.
I think if you continued the penny tile on the whole wall (up and over the door frame) that would look really rich and beautiful..a real full wall effect…..
Okay do you hate me? Its going to look great anyway you do it!
YoungHouseLove says
Haha, no worries! We thought about that a lot (since it was originally our intention) but in person we thought since there’s another door frame to the right of the other one (one leads into the laundry room and one leads into the office) that it would look most balanced without tile over one doorway which is right next to a doorway with paneling above it. We also just thought that backsplash tile to the ceiling makes sense over the area with the counter, but backsplash tile over a doorway without a counter underneath might be weird! But we definitely though it through!
xo,
s
Janet Gaupp says
Maybe you could humor me and if you have enough tile you could prop it up on the door frame and snap a pick? I really think it could give better balance to the range hood…..pretty please.
Yeah feel free to ignore this request…I’m kind of obsessed about the idea! Sorry!
YoungHouseLove says
Haha- we’ll see if we have a moment to do that with baby + book stuff going on! I promise you either way that we’ll continue to consider every single possibility!
xo,
s
Teresa says
I just noticed, for some reason, that the former owners of your home actually tiled about the kitchen window… rather odd….
YoungHouseLove says
Isn’t that funny? We’ve actually seen some pretty kitchens with subway tile around and over the window and it’s so pretty!
xo,
s
Leslie says
Congrats on the new book!! Now that’s hard work & keeping it all hidden from the blog photos must have been a trick. The kitchen looks great…I’m still fighting plaster & cement dust from 2 years of construction. Will it every go away?! Enjoy your blog! Now…get back to work.
Vanessa says
When my parents redid their kitchen way-back-when we covered the walls in “graffiti” before they hung the cabinets and tiled. If someone ever destroys that kitchen they are going to know that “Bon Jovi Rules!” Ahhh 1987.
Did you guys consider hiding some mementoes in the wall? Maybe a note or time capsule. Oooo then future Burger could find it….
YoungHouseLove says
Yes! We definitely plan to hide a time capsule somewhere- stay tuned for those deets! We’re getting closer….
xo,
s
Jen says
We recently removed our vent hood over the stove to replace it with a stainless steel one. Next to the vent hood is a little six inch “spacer” (too narrow for a cabinet, but basically just wood to attach the vent hood and the cabinets over the vent hood to). We assumed it was closed off on the side facing the stove. It wasn’t. Imagine our surprise when we pulled off the vent hood to find…. two stuffed bunnies perfectly positioned to stare back at us! They looked homemade and had faces sewn on and were wearing dresses. We didn’t see a note or anything and it was more weird and a little creepy than cutesy. We actually just left them in there when we put the vent hood back on. Moral of this story, don’t leave anything creepy behind.
YoungHouseLove says
Bwahahahaha. Comment of the day. Cracking up over here.
xo,
s
Lizzy says
Looking good guys!
Forgive me if you’ve already mentioned it but how are you planning on hanging your open shelves?
When we re-do our kitchen after the holidays, we plan on removing half of our uppers and replacing with open shelves. I have read several opposing suggestions for the type of materials to use and how to secure them to the wall. Our shelves will end up being about 5ft long so I’d want to be sure they are secure enough to the wall to support a lot of LBs!
YoungHouseLove says
Not sure yet! We’ll tile first and then hang them (for the most seamless look) but we’re not sure how. We’ll hopefully figure it out when we get there (we try not to do too many steps at a time since it can get overwhelming!).
xo,
s
Sarah says
I have a living room with paneling that I’ve been dying to paint, but I have been told by many people not to paint it since it is so easy to maintain as it is and has a “classic” look. After reading about your paneling I guess I need to buy a can of paint and move into 2011!!
Lindsay says
Looks great guys!
Meaghan says
What a lot of work! It looks like you guys are really progressing and will have an amazing end result.
I wish I lived near by and needed a black above-the-range microwave….because I would come buy it just to say hello!
Valerie says
Next time you’re in NOVA/DC, you should visit a new restaurant in the Penn Quarter area called Meatballs — I swear that they have the same penny tile on one of their walls (the bottom half of the wall is your penny tile, the top half is painted red). Looks gorgeous (and the food is pretty good, too). I looked online, but there aren’t any good shots of it in the restaurant’s interior.
YoungHouseLove says
Ooh sounds awesome. Thanks for the tips!
xo,
s
Jill says
I see the score-and-snap method has been mentioned — it totally works and I’m guessing with 1/4″ it would be a real snap, ha! Use a carbide scoring tool rather than a utility knife unless you want to make multiple multiple passes at it while ruining your knife blade (BTDT). Not sure if all cement board can be scored and snapped, but I know Hardibacker can. For the cutouts use a carbide blade, no need for pricey diamond blades.
YoungHouseLove says
Great tips Jill! Thanks!
xo,
s
Kelly says
We have a wood-paneled lower level (of a tri-level) that we painted this summer. We think there used to be a kitchen down there because there was a big vent fan in the wall. We took out the fan and had to buy a piece of paneling to use to cut out a hole to fill in that area. It was definitely funny to be buying house materials from the 60’s! We finally threw away the remnants of the piece last week with the hope that we’d never need it again!
Kristi says
Looking Great!!!! You can really get a sense of where the tile is going and what the finished space is going to look like! Also – not going to lie – I was TOTALLY trying to scope out the sun room to see if I could see any unregonizable projects in there…you know…book projects! Ha ha – I can’t wait for it to come out!
YoungHouseLove says
Haha- you sneaky lady!
xo,
s
Betsy says
I bought white paneling for my front porch – and I had no shame about it! It covered some pretty amazing orange & yellow rectangles painted all over the walls, so it was a HUGE upgrade.
I also painted every single ceiling in my house (along with basically every other paintable surface) in the year before I decided to suddenly sell my house & move for a new job, so I feel your pain. It’s not nearly as much fun to paint once you know you won’t get to enjoy it!
Nikki says
This is sort of random but I saw some old pumpkins in the background…what do you DO with those things? I have 4 small and one gigantic one on my steps…I feel so bad just throwing them away but we don’t compost and I remember that your had an incident with composting pumpkin anyway. Any thoughts?
The kitchen looks great…I cannot wait to see the final product! You guys are really keeping up the momentum!
YoungHouseLove says
We actually just dumped them in the back corner of our property (in a spot that’s hidden by some bushes and trees). John is hoping we get a few pumpkins out of the deal next year! We’ll keep you posted!
xo,
s
Leslie N says
Loving the progress guys! Thanks for sharing. Can’t wait to see more! Looking great.
Hannah says
Are you going to use the special ceiling paint that goes on pink but dries bright white? I love that stuff because you can see where you have already painted. It’s kind of scary to apply (who wants a pink ceiling?) but it really does dry perfectly white.
YoungHouseLove says
Haha- never seen that stuff! The previous owners left us some ceiling paint that matches what is already up there so we’ll probably use that just to touch things up, but we’d love to try the pink stuff someday!
xo,
s
Karin K says
It’s really looking great!!! I had to ask the “Why don’t you consider opening up the kitchen to the sunroom?” question, but it has been asked and answered. Makes total sense.
Audra says
We had to buy wood paneling for a project we finished in May, all but one wall of the room was paneled, and we decided it would be easier for it to all match (after being painted of course) than to sheet rock just the one wall. You can read about it here: http://www.thehousewiththebluedoor.blogspot.com/2011/04/walled-in.html
YoungHouseLove says
Love it! Looks great!
xo,
s
blake says
Did you consider tile backsplash adhesive instead of thinset? I just watch an episode of Ask This Old House where they used it and it was so simple. It’s like a super sticky sheet and the tile attaches to it and stays put. They said it works great for vertical surfaces. Then you grout like normal.
Here’s a link to the video: http://video.pbs.org/video/2162393453
YoungHouseLove says
Thanks so much for the tip! The guys at The Tile Shop suggested a specific type of thinset for the job (they helped us figure out how the heck to redo our first bathroom too) so we deferred to their expertise. That adhesive stuff looks really cool too though!
xo,
s
Short, Sweet Season says
That’s so funny that everyone who knows you guys in real life thinks Clara looks like John. I think she looks just like Sherry, other than her hair color. Both are beautiful girls!
Aislynn says
Looks great!!
Have you guys looked into the “Wedi Board” for tile? It’s another option instead of cement board – and WAY lighter and easier to handle.
We used it in our bathroom when we re-did our tile shower.
Looking forward to seeing photos of the kitchen when it’s all finished :)
Aislynn
YoungHouseLove says
Never heard of that! Thanks for the tip – we’ll have to try it out someday!
xo,
s
Krystle @ Color Transformed Family says
The saw blade is amazing! It took me a second to figure out where the teeth used to be. I am not a fan of paneling either but it looks pretty good painted. Keep up the good work!
Jessica at Lavender and Lilies says
Yep Cement board has been done in both of our bathrooms. No paneling though. I am loving painting the ceiling a color now. In my daughter’s room I left the walls white and painted the ceiling a pale aqua and I love it!
CFBetcher says
Our family room is covered in the paneling too– everyone thought I was crazy when I said I wanted to keep it, but with big expanses of wall the texture is really nice. When we put up a wall to create a mudroom, we had to buy more of it. I made my husband go to the store alone. But now that it’s all painted (coral red!) I don’t regret it. And it looks great it your room too!
Sara says
We have definitely had to venture to Lowes to buy wood paneling! When we bought our 1959 ranch it had painted wood paneling and when the previous owners tore down walls to create an open concept the wood paneling stopped in strange places and it drove us crazy. So we bought about 6 sheets of the already primed wood paneling and we thought everyone at Lowes thought we were crazy. It looks much better with the painted wood paneling being continued to the end of walls. Totally worth all the strange looks!
Paloma says
I wish ceiling painting were on my agenda. We have popcorn ceilings *shudder* and a boyfriend who’d rather keep it up than try to make the huge mess of removing it. But I’ve heard that popcorn ceilings from earlier than the 80s might have asbestos in it so I’m not touching it…
I do have some huge painting plans though. The ugly mural in the third bedroom that’s been there since we moved in has GOT to go, like, NOW.
Everything is looking awesome guys! Keep up the great work!
Sue says
As someone who will also soon be installing a tile backsplash in my kitchen, I’m curious about why you used cement board. I can see using it around the sink area, but why around the stove and up to the ceiling?
Just trying to do my homework. :)
Thanks
YoungHouseLove says
It’s just what The Tile Shop recommended when we asked (they also helped us redo our bathroom a few years back since we kept going back there and asking questions, haha). It’s our understanding that cement board is always what you should put behind a wall of tile (like we did when we tiled to the ceiling in our bathroom) since it can support the weight a lot better than something like drywall could. It’s thicker and stronger and provides a nice base for thinset and tile. Hope it helps!
xo,
s
Sarah says
I absolutely love wood panelling (I count myself super lucky that I have really really nice white wood-pannelled kitchen units in my rented flat!). There’s something about it that equates to coziness and home comforts for me…! Loving the updates on the kitchen overhaul – was it difficult preparing for Thanksgiving with it all going on?
YoungHouseLove says
It was pretty crazy to tackle this stuff in the middle of Thanksgiving, but thankfully we weren’t hosting dinner (and did some traveling to see other family members)!
xo,
s
Mari says
A couple of questions:
1. Why did you buy new paneling rather than re-using the paneling that was cut down with the large door opening? Wouldn’t that have made a better match in terms of the pattern in the paneling?
2. Why haven’t you switched out the dishwasher yet? Are you waiting until after the counters are installed?
3. What is up next? Are you painting first? Or maybe building the microwave cabinet and installing the microwave?
4. Why are you deciding to put tile also on the peninsula wall? Did you have to install cement board for that too?
YoungHouseLove says
1. We reused all of the paneling that we had from the opening on the back of the wall near the peninsula and to the right of the window (see the green painted stuff we hung?). Just needed a bit more!
2. We have to put the dishwasher in last because we want cork to run under it and also to run under the fridge (which we will slide out)
3. Painting the paneling and ceiling, adding trim back around the window and brackets for the counter is next, then hopefully the counters will go in and we can hang the microwave cabinet and build the doors and paint the cabs, etc. Lots to do!
4. We will be tiling 18″ above all the counters in the room for balance (and because backsplash is handy for wipe-ability) along with the full wall of tile on the oven wall.
xo,
s
GreenInOC says
I have no sense of balance, height or levelness so I could be totally wrong but isn’t that outlet between the sink and the pantry awfully high?
Have you found it surprisingly useful to have it so high?
If not, why not move it down while you have all the deconstruction?
YoungHouseLove says
That’s for the microwave which will be hung under a half-height cabinet and plugged into the cabinet from the top like an over the range microwave! Hard to explain, but you can see that we did the same thing in our first kitchen here for a built in look: https://www.younghouselove.com/2008/01/113-days-later/
xo,
s
GreenInOC says
Oh duh – you probably have written about it 14 times and still it didn’t penetrate my thick skull!!
YoungHouseLove says
Haha- no worries!
xo,
s
Amy says
We’re getting ready to paint our ceiling (and walls) too! I just posted some pics (http://stormcloudnine.blogspot.com/2011/11/got-mud.html) about the mudding and sanding going on in our rec room and (just like you guys!) opening up a doorway into that same room.
I’ve been following you guys like crazy lately to catch your every move and see if there’s anything I can take away to use during our room reno. Keep up the great work! :)
YoungHouseLove says
So much work! Amazing progress!
xo,
s
LMG says
Hello,
I was just wondering how you guys are checking into possible asbestos when you’re doing this construction? Just wondering since we’ve started thinking about it in our own home and one friend of ours got a professional tester and had to have it “cleaned.” How can you tell without paying a testing company hundreds/thousands of dollars to check and clean?
Thank you!
YoungHouseLove says
There are actually asbestos test kits that you can order online (from places like amazon.com) and then you can figure out if you have asbestos in the ceiling (some popcorn ceiling has it- we didn’t have any in ours) or in your floors (we did find out that we have an asbestos liner under our vinyl tile, so as per the recommendation we’re just floating the new cork floor over it to seal it in (ripping it out can release it into the air!).
xo,
s