As exhilarating as demolition can be, there’s always that nagging voice in the back of your head reminding you that you’re going to have to replace whatever you’re demolishing.
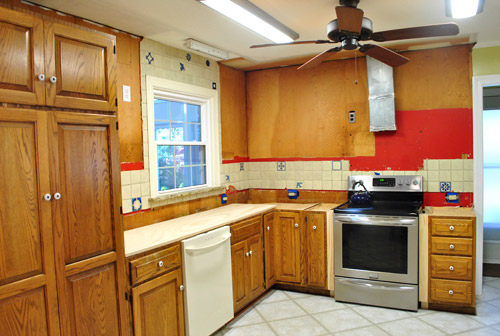
Bummer, right?
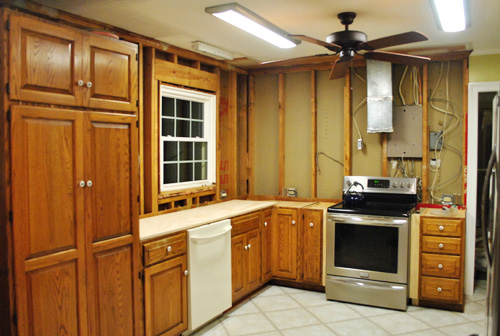
Well, we didn’t let ourselves wallow in that realization too long and dove right into reconstructing the kitchen. Actually, between demoing the tiles and the plywood we actually snuck out to The Tile Shop (in my sister’s borrowed SUV) to buy cement board so we’d have all of our supplies ready as soon as demo was done.
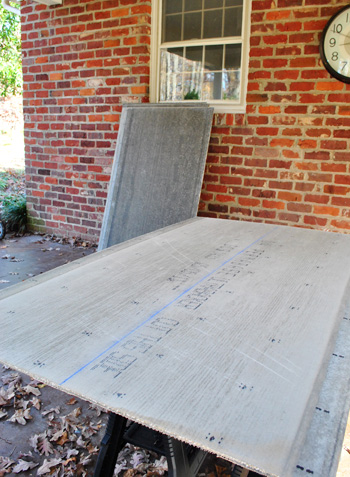
The cement board (1/4″ thick Permabase Ultrabacker to be exact) was about $10 per 3ft x 5ft sheet after the 10% discount code that they offer everyone (YHL10) and I bought four of ’em. Actually, I bought eight of them because of some gross miscalculations on my part but only used four. So once our extra board returns were made it was about $40 spent. We knew we’d be using them along the entire back wall above the stove (that’s going to be our focal wall with tile to the ceiling, a big range hood, and open shelves) as well as wherever else our standard 18″ backsplash would go on the other walls of the kitchen. I started with the 18″ backsplash boards first since they were smaller and more manageable. They just required some careful measuring to ensure that I cut accurately around the window and for the outlet holes.
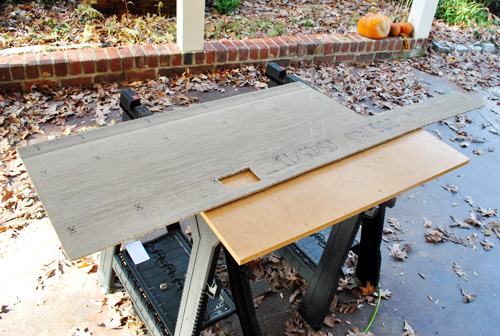
To make my cuts I used my jigsaw, since it was convenient and I was good at controlling it. I also wore a gas mask (not a paper one, a real deal rubber one with filters) to avoid ingesting any of the nasty dust that flew. Though I’m pretty sure I wasn’t using the right blade for that material though. It cut just fine, but by the end of the job my blade looked like this:

Notice all of the missing teeth in the middle? Cutting literally sanded them off. So yeah… lesson learned. Maybe I was supposed to use a diamond blade since cement board is so coarse? Either way, I was happy to get ‘er done.
Setting the cut boards in place was pretty easy. I was able to balance them along the old plywood under them (they were the same thickness, which was really handy for a seamless result). Then I just made sure they were level and drove some screws in all by myself while Sherry kept Clara out of the danger zone (aka: our tore-up-from-the-floor-up kitchen).
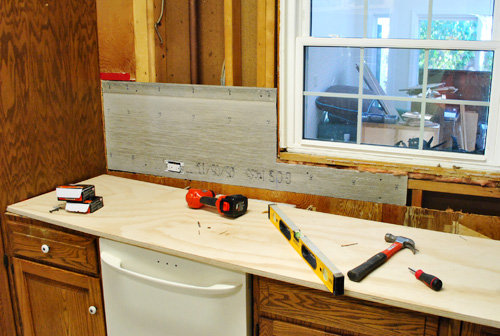
So once I was sure that all of my screws were adequately sunk into the cement board (pokey screw heads are bad for flush-laying tile) I continued on my merry way around the room. This wasn’t so bad, actually! Especially since I dreaded it so much because we didn’t exactly have a great time with the same process while rebuilding our first house’s bathroom. Maybe absence makes the heart grow fonder?
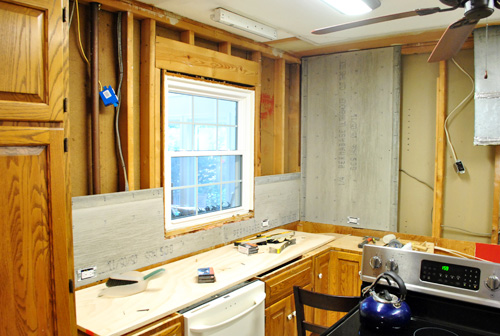
The thing that made my life much easier was the fact that the 5ft tall boards fit just about perfectly in my 5ft tall wall behind the stove. That meant I didn’t have to do any cutting on those boards (except for the outlet holes). So the ease of cutting made up for the extra difficulty of maneuvering a bigger, heavier board. Luckily Clara was napping by this point so I was able to enlist Sherry’s help to hold them in place while I drilled. It certainly made this part of the day go much faster.
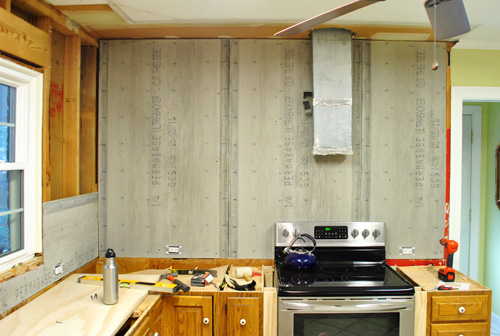
Oh, and as for the dangling outlet up by the vent – it’ll eventually be used to hook up our future range hood. Since we’re not 100% sure how /where that’ll be hooked up we just placed it somewhere temporarily that could (hopefully) work . If not, at least the hole will be hidden behind the vent cover we’re eventually going to build (and there’s some play in the wiring that connects to that junction box so we’ll be able to move it if we need to).
If you look at the photo above you’ll see that our future range hood won’t be perfectly centered on that wall of tile, but it will be perfectly centered on that back wall of the kitchen (when you include the space next to the cement board over the doorway). So once we add our penny tile to the ceiling and install our open shelves and our built-in range hood, we think the way that we “accessorize” the floating shelves will also help restore balance. We plan to use them to house everyday dishes that we’ll use so often they don’t have a chance to get dusty along with other items that are always stored out in the open like vases, some art, a plant or two, etc (more on the whole dust/open shelves thing here).
But just because cement board was done, didn’t mean we were done with our walls. After all, we still had this going on above the sink and pantry:
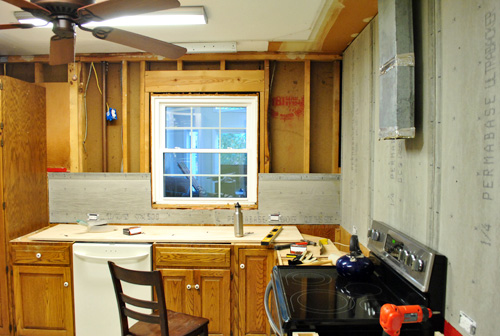
We briefly talked about doing more tile to the ceiling on that wall, but thought that one focal wall with open shelves and a big range hood with tile to the ceiling would be enough. So we decided that a regular old wall with a standard 18″ backsplash will better balance the other side of the kitchen which will also have that going on next to the fridge. Oh and we also thought tile over the pantry would just be super weird, and that would be the natural stop point for a rectangular effect like the other wall, so we’re happy we bailed on that idea.
But the walls of the kitchen aren’t drywall. Nope, remember they’re painted paneling (which we actually don’t mind for the soft texture and coziness it adds once it’s painted – we had some in our first home’s den too). So we did the unthinkable…
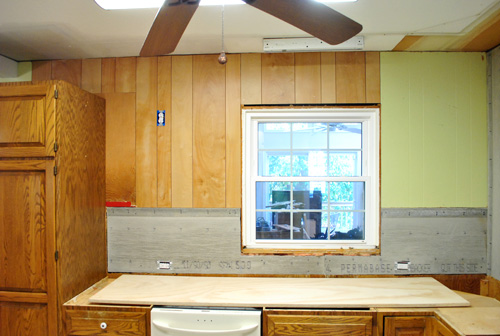
… we actually purchased a sheet of paneling. And oy how it pained us. We’re pretty sure everyone at the checkout was thinking “welcome to 2011, why the heck are you buying paneling?!” Luckily we had one leftover piece of painted paneling leftover from the doorway opening project that we were able to reuse to the right of the window above where the backsplash will go. So I just had to buy one sheet at Lowe’s.
So yes, that was a first. Never in my life did I think I’d be BUYING new wood paneling. And thank goodness it’ll get painted any second now (along with that rough looking ceiling), so we didn’t have to worry about matching color.
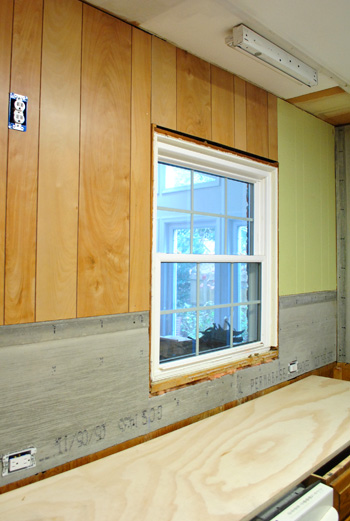
Luckily that one 4ft x 8ft piece o’ paneling covered all of the areas that we needed. We had the guy at Lowe’s cut the pieces to size so (a) they’d fit in our Altima and (b) we didn’t have to do it ourselves. But I did buy a new jigsaw blade while I was there (so I could cut the hole for our microwave outlet).
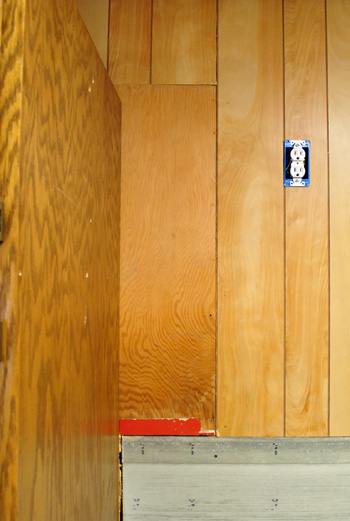
Oh yeah, and notice our moment of laziness above? Since a small-ish upper cabinet will be covering that section of wall we didn’t go through the trouble of cutting out that piece of plywood (it would’ve meant moving the pantry, and it won’t be seen once we install the cabinet with added crown molding around the top anyway). Gotta love one wall-hanging shortcut along the way.
As for the cement board seams, we’ll be taping them and then using thinset over them to set the tiles, which should hold everything in place for the long haul per The Tile Shop’s recommendation. But wait, let’s go back to this picture of that wall head on:

You might be wondering about that oddly placed window (it’s not centered on that expanse right now) but once we add the small-ish upper cabinet to the right of the pantry there will be exactly 14″ of wall space between the side of that cabinet and the window trim. There will also be 14″ of wall space between the right side of the window trim and the 12″ floating shelves that will be hanging on the focal wall (they’ll jut out 12″ to house all of our big dishes and stuff, which is nice because the window will eventually look perfectly balanced with 14″ of wall space on either side).
Anyways, here’s what the kitchen was looking like when we were all done. Still not great, but definitely better. And not only do we love how the room feels without upper cabinets crowding us, it’s also nice to start to see what it’ll look like once the tile backsplash is installed. I wish I had taken a wider shot so you could see the paneling on the other side of the room with the 18″ backsplash that will go over there (next to the fridge) since it really feels nice and balanced with one wall of tile and two standard backsplashes on each of the other two side walls.
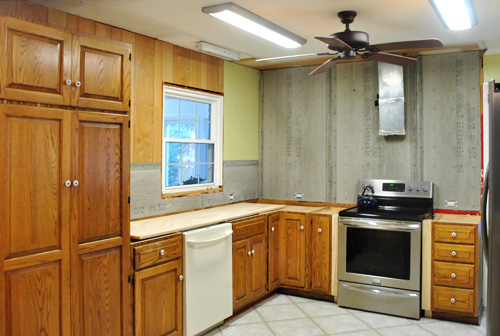
Oh, and since lots of folks asked on our last kitchen post – these are both interior walls (that window looks into to our heavily insulated sunroom, not the outdoors) which is why they weren’t insulated before and why we didn’t opt to add any insulation during this step of the process. We lived here through last winter (which was colder and snowier than most) and we knew that the sunroom didn’t get very cold, so thankfully the kitchen never feels drafty or uninsulated (in our experience, brick ranches are great about maintaining a comfortable temperature in general since they’re so solidly built and aren’t usually drafty).
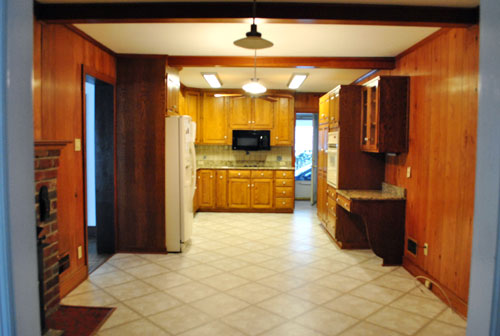
As for the timeline, this whole destruction/reconstruction process took us two days (one for demo/buying cement board, one for installing the new walls) so overall it wasn’t that bad. Though I was pretty darn sore by the end of it all. Thankfully Sherry pointed out that our next step was paint touch ups, which aren’t too bad (ceilings are my least favorite surface to paint, but we don’t have much of it to deal with). We’re actually kind of excited to get that done because the room will hopefully look less Frankenstein than it’s looking now (mismatched appliances + mismatched cabinetry + mismatched paneling = ca-razy). But still better than the before that we started with:
What about you guys. Have you ever hung cement board or actually had to (gasp) buy paneling? Any ceiling painting on your agenda?
Pssst- We’re over on BabyCenter chatting about the birthday time capsule that we finally completed for Clara to open on her 18th birthday.
Psssst- We’ve listed our black above-the-range microwave on craigslist if anyone is interested (it’s only a year old, works great, and is still sold by Sears). Here’s the link.

Demi says
I can’t wait to see how it turns out!
Completely off topic question, but what are your opinions on white pictures frames on white walls?
YoungHouseLove says
I like it! If the items in the frames are high contrast (black and white) or have some color (not just another white thing) it can look great! Like an art gallery!
xo,
s
Nette @ This Dusty House says
It’s a wonderful moment when studs are covered back up… even if it is paneling!
Just out of curiousity… I haven’t seen anyone else ask, so maybe this is a really stupid questions, but… why cement board? I know you need it for a bathroom since it can get wet and not be damaged. But I didn’t think it was necessary in a kitchen, even if you’re tiling. Is it necessary or are you guys being cautious?
Can’t wait to see the tile go up!
YoungHouseLove says
It’s just what The Tile Shop recommended when we asked (they also helped us redo our bathroom a few years back since we kept going back there and asking questions, haha). It’s our understanding that cement board is always what you should put behind a wall of tile (like we did when we tiled to the ceiling in our bathroom) since it can best support the weight (drywall might not be able to bear the load). It’s thicker and stronger and provides a nice base for thinset and tile (in a wet or dry environment). Hope it helps!
xo,
s
Lee says
I know you live in Richmond, but did you insulate the outer wall, or think about sounds from the fan in the other room?
YoungHouseLove says
There’s a paragraph in there about that (the second one above the last pic). Hope it helps!
xo,
s
Heidi P. says
Again, super impressive.
And that’s is CRAZY what happened to that blade!
Ann says
I was just wondering what Clara has to say when she wakes up and sees all the changes. My guess is that she notices everything!
YoungHouseLove says
Oh yes she’ll point or laugh or stare and then run off and play or ask for a snack. Haha. Oh to be young again!
xo,
s
manyhatz! says
I’ve been scouring your first kitchen redo to find out more about what could’ve been done about the original cabinets. Your first home’s kitchen (before pics) looks EXACTLY like the kitchen we are redoing and we can’t fork out the bucks for new cabinets. Any ideas? It’s also a teeny kitchen with one window…Know of any before/after pics?
YoungHouseLove says
We actually painted the cabinets and replaced the hardware and hinges in our original kitchen for a quick makeover, so maybe that would work? Eventually we decided to majorly change the layout and also didn’t like that our upper cabinets weren’t standard depth (our dinner plates didn’t even fit into them because they were so narrow) which is why we eventually replaced them (after saving up for that over time). Hope it helps!
xo,
s
Jessica says
you have been busy bees! starting to all come together!!
Trish says
Feel your pain. Just had to buy a sheet of that fake brick paneling to paint this week!! Growl. Sometimes it’s just easier to work with what you’ve got instead of ripping it all out!!
Jennifer says
Lookiing great you guys!! We got the countertops, but still havn’t gotten around to the backerboard or buying tile or anything else! Oh well, happy holidays! That will be my excuse for another month and then we will have an infant and then well….I guess it will be time to finish the kitchen?!
val says
Oy vey, ceiling painting. I’ve got that on my agenda, any tips for that excruciating task? At least with my brand new roof, I won’t be worrying about ceiling leaks again for about 30 years!
YoungHouseLove says
My tip is just to go into it knowing you’ll be sore. Then if you’re not it’s a bonus! Haha. And count on getting some paint in your hair.
xo,
s
KathyG says
Lookin’ Gooood!
I know you guys are Bravo fans, do you watch Work of Art on Wednesdays? I love that show!
YoungHouseLove says
Yes! It’s my favorite ever. We loved the first season too. Since I went to art school in NYC I like to channel my fine arts roots when I watch it. I would totally choke on that show. They’re all amazing! And I loved Abdi and Perregrin from season 1.
xo,
s
Caitlin says
This is a really random question, but here goes. I have the same DSLR camera and Flip camera as y’all. I’m in the market for a tripod and I’m wondering…does the tripod I’ve seen pop up on the blog every so often work for both cameras?
YoungHouseLove says
Yes! It’s just a detachable basic tripod (John got it in high school).
xo,
s
Ashley says
I know you are right in the middle of kitchen heart surgery but holy cow! what a difference! your kitchen looks AT LEAST twice as big. looks like a breath of fresh air :)
I always think of you guys when I watch Modern Family. Did you see the Thanksgiving episode? Punkin’ Chunkin’… I thought I was going to pee my pants.
YoungHouseLove says
Ooh we have it saved on our DVR and can’t wait to watch it! Sounds hilarious.
xo,
s
Kaylene says
Hi Sherry & John,
My husband and I just bought our first home a few weeks ago, it came complete with perwinkle colored kitchen cabinets, pink rose wallpapered living room, and ENDLESS potential.
Your blog has been such a great resource for us, you’ve shown us that we really CAN do a lot of the renovations ourselves and save some major cash, which is our favorite thing to do ;)
Thanks for the inspiration!
-Kaylene
PS – our kitchen is so dark and dingy, I want to brighten it up by painting the cabinets a fresh/”now I can breath” white.. BUT the linoleum and the counter top are white.. I’m afraid that if I paint the cabinets before we replace the floor and counter, it will look completely white washed… would I be better off to wait and do it all at once?
YoungHouseLove says
I would paint them and just use things like accessories and wall color to keep things from being too white. For example, a colorful fruit bowl, tea kettle, art, area rug by the sink, wall color around the room, and curtains or shade on the window will break up all the white!
xo,
s
Mike Grant says
Looking great. I really enjoyed the image of the worn out saw blade. I could not stop laughing because I have had similar experiences. It must have been tough going towards the end of the day. If you want a good laugh check out my wife’s attempt at a new cookie recipe. http://www.mikegrant.com
YoungHouseLove says
Haha- love it!
xo,
s
Allison says
How are you guys handling meal-time with your kitchen in the state it is?
We’ve recently tiled our shower and bathroom floor (new construction so there was no demo). The hardest part was having to build out the 2x4s so that the cement board was flush with the drywall. And also building the recessed shower shelf. Shown here: http://mattandallisonkelly.blogspot.com/2011/09/tiling-shower.html
And here:http://mattandallisonkelly.blogspot.com/2011/10/tile-floor.html
YoungHouseLove says
We still usually eat at home since we have a functional fridge, stove, and dishwasher. It stinks to be sinkless, but the dishwasher and fridge and stove are all we really need (and we wash anything that’s not dishwasher safe in the hall bathroom).
And wow- awesome work in the bathroom!
xo,
s
Sara says
I wish I had your know-how. I just bought a fixer upper..the bathroom and kitchen need completely re-done..and it’s proving to be a challenge, to say the least. Especially with the time constraints caused by having a 5 month old and a full-time job.
Painting ceilings? I did that last weekend… It’s my least favorite thing to do. Ripping up asphalt tile covered with linoleum is my second (in case you’re wondering..we’re taking all of the precautions that come with tile from that time period..asbestos is not something to mess around with).
Wonderful job so far. I can’t wait to see your finished kitchen!
YoungHouseLove says
Man, sounds like you’ve been busy! Congrats on all that you’ve accomplished so far!
xo,
s
Angela B says
Saddest day ever – my work has blocked your photos! Although the last photo in this post is showing…weird…
YoungHouseLove says
Oh no! They’re all hosted in the same place (even the last pic) and we haven’t changed anything on our end so I’d be willing to bet that they’ll all pop back up in a day or two (might just be a spyware/ad blocking thing that’s hiding them for a day or two and then they’ll come back). We hear that happens pretty frequently. Fingers crossed!
xo,
s
Rosemary says
I painted a ceiling ONCE and decided delivering children (as in birth) was easier.
YoungHouseLove says
Haha, it can definitely be a pain!
xo,
s
Nicole Elbert says
About to start my kitchen reno…..but while we worked in my basement, which is wall to wall to ceiling paneling, I had to buy…..wait for it TWO sheets to patch a wall! :)
YoungHouseLove says
Haha, you win!
xo,
s
Heather says
Looks interesting. Just wondering, did you insulate your outside walls as it looked like they didn’t have any and you guys get winter too right? Of course, it helps a ton in the summer too with the heat. Keep up the good work.
YoungHouseLove says
We actually chatted about that in the second paragraph above the last photo! Hope it helps!
xo,
s
Diane says
Painted paneling … that’s how I first found my way to your blog. I was doing some research on it to see what might be new, since it had been a number of years since I had painted any (long before you even bought your house and blogging started!) My house was the model for this home builder in 1971 (and no, I’m not THAT old – I bought in the 90’s!) I inherited faux wood paneling, gold foil tree wallpaper on unprimed walls, and green & blue bathroom fixtures, to name a few. I loved reading about your projects, similar to what I’ve been doing since then – a little at a time, learning as I go, with no end in sight! And like you, I love every minute of it … even my painted paneling. (Kudos to you for keeping yours!)
Chrissie says
I have a panel-related question – is all of your panelling of the same width? We have a panelled wall in our living room, but they’re all odd widths – there’s a big fat one (don’t tell it I said that) next to a teeny skinny one and then a couple of almost-the-same-size average ones and so forth.
It took me a while to notice, probably mainly because there’s not much light there, but I’m wondering whether it will be less or more noticeable once we paint.
YoungHouseLove says
Oh yes, both the paneling we had and the new paneling have fat widths and skinnier ones with some in between. So strange and random, but we’re so happy the stuff they make now still has the same odd wide and skinny widths so it’s consistent! Oh but once you paint it, it’s less noticeable since it reads more as one color with just some subtle vertical texture (kind of like beadboard).
xo,
s
Chrissie says
Thanks so much for responding! I honestly had not noticed yours was odd widths too, and it’s definitely not noticeable with the paint on there! I do love that little bit of texture, I can’t wait to paint ours.
Mandy says
I’m SO looking forward to the finished product!
Sally says
My husband and I own a small rental house; just evicted our tenants, and now have to completely wash the inside of the house, floor to ceilings (extreme nicotine staining), then oil based primer, then paint. Everything. I just got done washing the entire dining room (that’s where my tenants smoked the most), and my shoulders are beat. If the house is this bad – and it is, the tenants lived there six years – what are cigarettes doing to the people?
Sally says
Have you guys ever heard of using actual paneling in place of drop ceiling tile? It would have to be cut to size, but I think it might be an interesting look. It would depend on the kind of paneling, but wouldn’t it work? Just paint the grid a complimentary color?
Of course, I am not crazy about dropped ceilings at all, but sometimes you have to live with it.
YoungHouseLove says
Ooh, that actually sounds really cool! It could look charming and vintage, like decorative beadboard! I’d go for it!
xo,
s
Kim says
Well, we kinda purchased paneling, but not THAT type. (We’ve painted quite a lot of THAT type in past houses, though. ;P) We purchased barn-style-something-wood-something for our current house, as most of the house is done in that. I like it. It has lots of texture and looks nice painted or un-painted (the kitchen is un-painted and gives it a more “cabiny” feel, and the rest is painted. The kitchen might also be un-painted because after fixing up (just cosmetically, really) 3 houses, I’m about burnt out. And I have small children now. Though you don’t let that stop you. =D) I have no doubt that your paneling will look just lovely when you’re done. ‘Cause you’re all classy like that. ;)
Carshena says
I think Clara looks like John, but she has your eyes, Sherry.
Sammiham says
My husband and I just bought our first home 2 weeks ago and the first thing we did was remove the popcorn ceiling that was present in the whole house! We’ve been looking up at the ceiling while removing the texture, sanding it after the water dried and now we’ve moved onto painting. For now we are going to leave the ceilings flat and give us time to decide what we want to do with the ceilings, we might not go the texture route but try some paneling instead. So the little patch of ceiling you have to paint seems like a breeze compared to what we’ve been doing. In fact, we’re still not completely moved in yet because we were so determined to get the texture down.
mp says
“in our experience, brick ranches are great about maintaining a comfortable temperature in general since they’re so solidly built and aren’t usually drafty.”
Agree 1000% percent. The only room that gets cold and drafty in my 1975 rancher is the aluminum and vinyl 1985 addition (my bedroom). (The 2007 bathroom added to that is toasty — talk about weird indoor weather!) I solve the problem by sleeping with flannel sheets and four chihuahuas.
And when we bought the house, we also bought a piece of paneling to repair a piece around the fireplace that had been ruined by incoming water from faulty flashing. When I gutted the room last Christmas, I replaced the very ugly and damaged paneling with drywall. I’m sure it looked okay in 1985, but let’s just say it didn’t age well, even with several coats of Kilz and a lovely Behr yellow.
I admire your taking on the tile. Me, my best DIY skill is writing the check. I have several ER visits to back this up.
Ali says
I’m cracking up thinking about you guys going to buy a sheet of paneling. Reminds me of when my brother was in high school and went to buy a Backstreet Boys CD. LOL You just hope no one notices. :)
Lush says
Loving the reno! I would so totally have gone all sledge hammer & had to go buy more ply LOL
Just a thought, did you think of taking the opportunity to install insulation in the external walls since you had the lining off?
Can’t wait to see the end results.
Cheers
Lush
YoungHouseLove says
We actually chatted about that in this post (check out the second paragraph above the last pic). Hope it helps!
xo,
s
Melissa M says
Nice work John! It’s looking good.
Saw this shirt on Etsy this morning and thought of you!!
http://www.etsy.com/listing/68494413/retro-bike-diagram-bicycle-screen
YoungHouseLove says
Thanks! I just ordered that as an Xmas gift for someone!
-John
Diana @ Boy + Girl says
Looking good guys! You guys work fast!
– Diana
Yeidie says
I <3 you guys! I just love, love checking your website everyday to see the progress. You have great taste and I can't wait to see the final product come together. Keep up the great work. =)
Eva says
Hey common you guys! Wood paneling is cool! I have two walls in my home where I kept the old wood paneling… but I painted the doors on those walls in crisp white to get some contrast going. And it looks fab… I might have to send you a picture so you’ll start showing good old wood-paneling the respect it deserves :)
Chris says
Have you talked about your plan for lighting fixtures at all? I am so curios to see what you do. Keep the fan? What about the current fixtures?
Chris
YoungHouseLove says
We’re probably going to go with four recessed can lights around the cooking area (no more fan or fluorescents) and two pendants hanging down over the peninsula as well as adding a big chandelier over the dining table!
xo,
s
Lauren says
Ya know whats strange? I JUST now noticed the ceiling fan in your kitchen. Has it always been there? Are you guys planning on keeping it there or taking it down?
I never thought to have a ceiling fan in a kitchen before, but I guess it wouldn’t be a bad thing for when the stove and oven are heating up the place!
YoungHouseLove says
We’re planning to redo all the lighting and lose the fan (we never use it and didn’t have one in our last kitchen so we think we’ll appreciate the airy feeling that we’ll gain from removing it).
xo,
s
Layla says
YES! To the paneling question! :-)
I actually talked my friend, Shaunna, into purchasing some for her new dining room design:
http://theletteredcottage.net/shaunnas-dining-room/
Here’s a link to the reveal:
http://www.perfectlyimperfectblog.com/2011/09/the-dining-room-reveal.html
70’s-style paneling is the new black in my book- LOL! :-D
YoungHouseLove says
OH MY GOSH, IT’S GORGEOUS! Hooray for painted paneling!
xo,
s
Andrea says
My hubby and I re-did our kitchen from top to bottom. We still need to finish the ceiling and put the backsplash up and other minor details. I was so excited to finally get countertops the week before thanksgiving! It’s been too long I went without counters!!!! I can’t wait to have everything finished!
Jen says
I love reading your blog but haven’t ever left a comment but after reading your post today about buying paneling I had to write to you. We just brought home paneling today and had to order it…it’s hard to find, especially one that matches the paneling that was probably put up in our house in the 70s. I love the paneling painted, adds texture and gives a cottage feel. We are putting ours above our mantel to cover the upper part of our brick fireplace. Fingers crossed that it turns out! Good luck with the rest of the kitchen remodel.
Mary says
We had to buy wood paneling when we redid our kitchen too! The previous owners had spent hours to painstakingly make a faux tile look out of DRYWALL as the backsplash. I think that’s one of the least cleanable surfaces ever, so we scraped and sanded it all down and had no choice but to cover it up with wood paneling because the remaining wall was in such bad shape. But once it was painted it definitely gave the kitchen a more modern cottagey feel, which we love. Not to mention the fact that it was way cheaper than tiling three kitchen walls!
Corrie says
I was just wondering if you ever mentioned why you kept the paneling? why not just drywall over it all when you are doing the rest of the kitchen remodel?
YoungHouseLove says
We actually like the effect of painted paneling (we had it in our first house’s den and it was always cozy- sort of like painted beadboard). We love that it adds some texture and those subtle vertical lines can heighten a ceiling. It’s definitely a personal preference thing though!
xo,
s
Shelly says
I see the last comment was in December 2011. Are you guys still around??? Do you have a finished pic? I would love to see what you did with the paneling. p.s. I am more interested in your hard work than your grammar skills. ;) I mean really….get over it people! You were probably EXHAUSTED after doing this manual labor to “think” of the exact words. Anyway, new pics please!! :)
YoungHouseLove says
You can check out the finished product here: https://www.younghouselove.com/2012/03/the-big-kitchen-reveal/ – oh and we’ve since painted the stools too (here). Just click our House Tour button under the header to see updated pics of the whole house. Hope it helps!
xo,
s
Crystal @ 29 Rue House says
Hi- We’re going to be installing some tile in the kitchen (pretty sure we’re going with penny tile from The Tile Shop too – can’t beat the price!) but never done it before we we’re gathering information! I wanted to ask you if you’ve ever heard of putting the cement backer board right on the existing wall or if you have to tear out the old wall first then put it up like you did.
Thanks guys!
YoungHouseLove says
We thought just because of the weight and how high we were going (the whole wall) that cement board made the most sense. I would ask what they recommend at The Tile Shop when you buy it- they have so much awesome info!
xo,
s
Nila says
Hey there, We are in the midst of a similar project. Did you tape around the outlets, similar to how you use thin set and tape at the joints? I can’t find that answer anywhere online. Love your website – lots of great info I haven’t found elsewhere online!
YoungHouseLove says
We cut the holes in the cement board to fit closely around the fixture boxes, which allowed us to tile up to the edge of those boards. Then we added the outlet cover for a smooth transition. No mudding and taping required!
-John