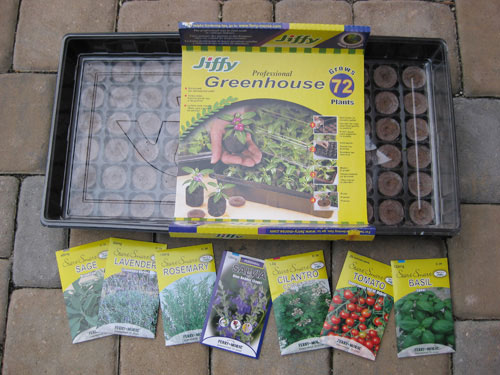
This year we thought we’d try our hand at starting a few herbs, vegetables and flowers from seeds. After seeing this seed-starting post, we felt encouraged (if a child can do it…) and after seeing this baby at Home Depot, we decided to take the plunge:

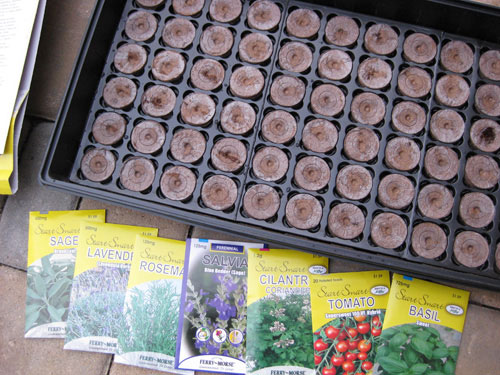
The entire greenhouse contraption was only $6.99, and all the seeds that you see laid out below (sage, lavender, rosemary, salvia, cilantro, tomato and basil) were just $1.59 each. Total spent for 72 potential plants (plus a reusable greenhouse)= $18.12. That breaks down to just 25 cents a plant!

The entire contraption is pretty idiot-proof. Just fill the bottom of the tray with two quarts of warm water and wait for the dirt pellets to fully expand. They go from little quarter-sized circles to two inch deep cylinders so you gently pull back the netting around the top of the pellet, create a little hole and drop in a seed or three. Then just fluff a little bit of dirt back over the top of your babies and place the clear dome on top of the tray.
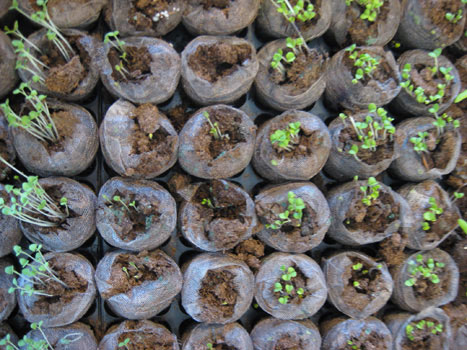
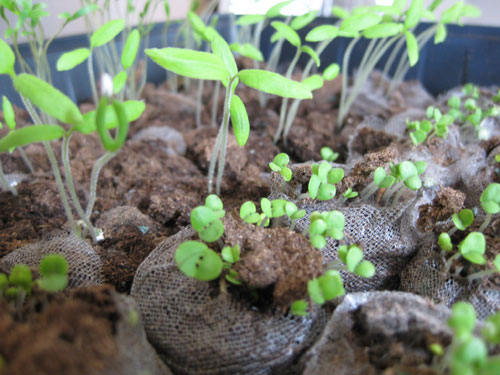
The greenhouse then just needs to sit in a warm location away from direct sunlight (we slipped it on top of the dresser in the guest bedroom and didn’t even look at it again for four days- at which point we sprinkled a bit more warm water over the tops of all the pellets). And that’s when the magic happened. I don’t know if it was just the passage of a few days (4-5) or the sprinkling of warm water over the pellets after a few days in the dome, but slowly & surely, little seedlings started to emerge.

Look at that happy little cilantro! Next to it we have our tomatoes poking up, and some pretty lush looking basil out of frame to the right. We were sure to sketch out our rows on a piece of paper and label the seeds in each one so we can keep it all straight (ex: row 1: cilantro, row 2: tomatoes, etc).

Now we just keep them happy and growing til the time comes to pop them in the ground. And the Jiffy packaging (which we were sure to keep) even offers up a few tips for acclimating them to the outside environment (put them out during the day but take them in at night until they get used to it, etc). So far, so good…
If we can do it, anyone can! So grab a greenhouse of your own (or check out Katie’s egg carton method here) and get down to business. And if more seasoned seed-starters have any tips or tricks for growing your own herbs, veggies, and flowers, please fill us in! We’d love to learn anything and everything to help our little garden grow.

Lori says
Love this idea
heather s. says
What a timely post! I was heading to HD today to pick up the same thing (but different seeds)!
Liz N says
Hey Sherry & John –
I have used this product before and hope you can learn from a few of my mistakes. 1. Don’t put the plants out too early. I was fooled by the South Carolina warmth and low and behold along came a frost – so be sure all your frosts are behind you. You are smart to keep them inside. I started them later (Mid March/early April on my sun porch) 2. The “biodegradable” wrapping of each seed pod didn’t really biodegrade :( – you might want to gently peel away its jacket when you place them in your containers or ground. I found the little jackets stunted the growth on some of my plants. 3. Be careful not to over water while they are in the green house. Objects in tray are wetter than they appear.
Other than that this is a great way to start some plants. Even with all of my mistakes I had a few great herbs, bell peppers and tomatoes.
Good Luck!
– Liz
Emily says
I use the Jiffy seed starter kits every year for my herbs. In Colorado we can’t plant outside until at least the middle of May, so I don’t start my seeds until St. Patrick’s Day. These are great for starting seeds – butyou might find that they outgrow the little pellets close to planting time.
momomatic says
Those are fun! My boys had an absolute blast doing this last summer. :) Happy Harvest!
Christina says
Love this idea. I want to go out and get one this weekend.
Sam & Jacci says
Fun post, guys :) I did this with my children two years ago. I have something to share from my mistakes that might help you all out. Apparently, there’s something called “damping off” that happens when seedlings are about the size of your little guys. Suddenly, the stems just sort of go kapput. It can be prevented, though, with proper *air circulation* and not over or under watering. So, it’s advisable to run a little fan (and I know you have a cute one!), on low in the same room as your seedlings, and continue watering from below (letting the roots soak up). The fan should not be blowing directly on them, but just giving the air in the room a little movement.
Also, sanitary conditions at planting time help with damping off woes, too, but you’re already past that step. Other readers may want to google “damping off” to read more about how to plant cleanly and avoid this pesky problem :)
Jacci :)
Christine says
You are going to love cooking with your own herbs. We have one of those aerogardens and we love it. It’s great to be making dinner and grabbing fresh basil and cilantro that you grew yourself.
Sam & Jacci says
One more thing, guys :) I want this to go well for you!! From the photos, it looks like it’s time to thin out some of your seedlings. That just means gently pulling all but 1-3 stems from each pellet. Keep the strongest looking ones! :) By thinning the plants out, you’ll be encouraging less but stronger, healthier growth. Again, a google search on “thin seedlings” would be useful.
Jacci
Melissa says
Neat idea!
By the way, I just ordered some burro tail plants via Amazon because I loved yours so much. Now I’ll have to try this idea too!
Lindsay says
Oh, I can’t wait to start my own! Thanks for the post! I think I think I will head across the street on my lunch break to snag my own kit!!
Denise T. says
We live in zone 6 in the western NC mountains. Following the advice of local gardeners, we’ve already planted seeds for cool weather crops like snow peas, carrots, radishes, beets, and spinach directly in the garden. It seems a little early to me, but last year I gorged on snow peas “with edible pods” in a friend’s spring garden. She always plants her peas on February 6th! I should take a “before” picture just in case this little experiment works. We use Sherry’s method to jump start warm weather vegetables.
Cindy says
Talk about timely! I had seen Katie’s seedling post and decided this year would be a great year to try it for ourselves!! So last night, I stopped back at my dad’s house (where I still have tons of stuff in storage) and I picked up an old terrarium so I can start herbs as well. However, this kit looks pretty cool, so I may have to pick it up instead and use the terrarium for cacti and succulents instead!
Kim says
I plant an outdoor garden every year, but I start from 4 inch plants that I pick up at the local nursery. I have a few tips, make sure the soil outside is tilled up and watered a few days before you plant. Also (if your plants are tall enough) plant them a few inches deeper into the soil. So at least 1-2 inces of the stem is burried. This will help the plant stablize in the soil, because of the fine hairs on the stem. This helps grow stronger roots!! Then give them daily water (not when the sun is strong – better in the evening or morning) and watch them grow!
AliCherri1 (HisBirdie) says
I’ve been looking for a good (cheap) way to grow herbs as wedding favors; thank you so much!
My fiance and I really want to start and herb garden once we’re married and this will also be a good way to get that started :)
Paula says
Woohoo! We have two smaller versions of that little greenhouse in our window right now! We’re growing flowers and some tomatoes. But now I think I need to consider some herbs. I love rosemary…
Kim & Ryan says
Thanks for the post. I think I may get the guts to start my own seeds. I wanted to plant some herbs, but I really didn’t know if I could start them myself.
You’ve made me braver.
Meredith says
I have to admit…even the thought of gardening is intimidating to me. I’m pretty sure that I’ll end up killing everything. And it still seems so early. And our backyard is a mess. And this is all just overwhelming.
But you may have convinced me that I should try.
misty says
I am so excited for warm weather herb gardens!
Picked one of these up last weekend. my husband had no idea what it was for~!!
Ash I. says
YAY!!! I’m going to try to grow a garden this year for the first time in my life, and this post was super helpful!!! Cheers!
Natalie says
Fantastic idea! I’ll definitely have to try that out.
…you guys are so inspiring :)
Gillian says
We live in an apartment and only have a balcony. Do you think it would be possible to grow these inside till they are ready to transport and then put them in pots on our balcony? We would love to have some greenery!
PS A great post for all of us apartment dwellers would be balcony decorating. It’s such an awkward little space. I’ve looked everywhere online and there are only a couple blog entries on it.
Happy Gardening and thank you for all that you do!
YoungHouseLove says
Hey Gillian,
Herbs and even veggies and flowers are great candidates for container gardens on a patio! Just figure out if you get a lot of sun or some shade and pick your seeds accordingly (they’ll say what sort of light they need on the package, and many will say that they’re “great for container gardens”). Happy planting…
As for the balcony decorating post, that’s a great idea! We’ll add it to the list and hopefully have time to tackle it soon!
xo,
Sherry
Gillian says
Thanks Sherry!
YoungHouseLove says
Speaking of thanks, we have to say a big thank you to everyone who chimed in with planting tips and tricks! We’re so excited about our little sprouts and we really appreciate all the help we can get!
xo,
Sherry (& John)
Lauren says
i actually just started seeds using the same greenhouse! i’ve been following your blog since the washpost article was published and you inspired me to start my own. my husband and i relocated from fairfax to the richmond area in august 2007. we just started yardcandy.blogspot.com a few weeks ago to kick off our backyard project. i welcome any suggestions you may have on our project – love your style.
YoungHouseLove says
Hey Lauren,
Our suggestion: keep at it! We blogged for months with no comments and hardly any visitors (besides our blood relatives)! I swear we were talking to ourselves. But we kept at it and had fun along the way. Wishing you lots of luck on your new adventure in blogland!
xo,
Sherry
green plants says
What a great way to give green plants a head start. We love to garden. Will have to check this out. Thank you so much for all your helpful information.
Jules says
What a neat product! Mikey would love it. I’ll have to go to Home Depot and check it out. Thanks!
Lindsey says
I love starting plants frm seeds! You’ll feel so satisfied when you get to literally reap what you’ve sown.
One tip–if you like cilantro, keep starting its seeds every 2-3 weeks. The plant gets spent really quickly…the leaves of these early ones may be no good by the time the time the tomatoes are ready for fresh salsa (but let it go to seed anyway to get your own coriander!). Basil and others will go all season long. Happy gardening!
Danielle says
I start seeds every year and have a few tips for you:
1. Get air flowing. I set up a desk fan about 10 feet away from my seedlings and set it on low. It will help a lot when you harden off your wee little plants outside (you do have a screen porch, yes? You can harden them off out there, but not yet.) This helps strengthen the stems so that when they do get outside, the wind doesn’t flatten them right away. This will also inhibit any mold growth.
2. Lettuce, spinach, cabbage, and beets can be direct-sown as soon as your weather is above freezing during the day. I save milk jugs, fill them with water, and set them down the center of my planting bed so that the sun warms the water during the day, and the warm water gives off its heat at night, which generally keeps my cold crops from freezing.
3. Thin those seedlings. I know it seems *so* cruel (they’re so cute!) but thin those puppies out and you’ll be rewarded with stronger, healthier plants. Get some of the 4 inch Jiffy pots and some potting soil enriched with compost and transplant them when you see the little soil ball become root bound. I label them as I go, since I have a tendency to forget what variety is planted.
4. I set a fluorescent shop light about 3 inches above my seedlings and plug them into a timer, which I set to 16 hours “on” and 8 hours “off”. I raise the shop light when the taller plants grow high enough to touch the light.
5. Before planting outside, let your seedlings hang out in a protected area for a few hours a day. This is called “hardening off” and I introduce my babies outside for 2 hours the first day, 3 the next, until they’re outside for 8 hours. The fan helps tremendously while they’re growing, but I’m a bit paranoid and harden them off for about a week anyway.
Have fun!
heather s. says
Local store ads for metro Detroit have seeds and starter kits on sale this week. (Meijer, Kmart, etc.) Just thought I’d share for anyone who is thinking of doing this and wanted to save a little cash.
Claire says
I love this idea! I saw on the Today show this morning that the government is encouraging us to plant “Victory Gardens” this year to save money. Yall are one step ahead of the game.
Rachel says
They look great so far! Don’t forget to rotate and it looks like its time to thin as well. It’s so hard to thin in the beginning (you want to keep everything!) but in the end it’s worth it!
YoungHouseLove says
Thanks so much for the tips everyone! We’ve thinned our babies out and have a fan going for a bit of much-needed ventilation. Now we just have to keep ’em alive til we can plant them in our sunny little garden out back when it warms up. Stay tuned…
xo,
Sherry
Lisa B says
My son (he’s 6) and I got ours set up today!! I’m just not sure where I should store it . . . it’s on our dinning room table right now . . . Our bedrooms get pretty cold (we tend to keep the doors shut during the day) so I’m not sure if it would be a good spot. Any ideas?
http://gallery.me.com/mikebrandow/100299/IMG_1951/web.jpg?ver=12374231730001
YoungHouseLove says
Hey Lisa B,
Anywhere that stays pretty warm and has a lot of sun is a great place! Sun and warmth are key for those little guys. We’ve also been running a fan so anywhere that you’ll be able to plug in a table fan to get them “hardened off” later in the process is a good spot (you’ll want to wait to do this until after everything has sprouted and you’ve thinned your sprouts out so there aren’t five per pellet). Hope it helps!
xo,
Sherry
Tj says
When you first start the seeds a good place to put them is on top of the fridge. It is nice and warm and will help the seeds germinate. Keep them there for about a week until the seeds start to pop out. Then you can move them to the lights. Just a tip.
Lisa B says
That IS a great idea! Too bad my Fridge is built in with cabinets on top! I ended up putting them in a downstairs bedroom and I made sure to open the vent so it will stay warm (and hopefully some good air circulation). I checked it this morning and it was still pretty wet. Is that okay??
YoungHouseLove says
Hey Lisa B,
Hmm, ours never really look wet (in fact, they always look kind of dry). I would check them again in 24 hours and if they still seem too moist you might want to blot them a bit so they’re just a bit moist but not too sopping wet. Of course we’re first timers too, so we’re no experts! Hope it helps!
xo,
Sherry
Tj says
Lisa B if soil should be damp but not wet. You might want to take the lid off and put it in a window sill to dry it out a little
Rachel says
I bought this and I am so excited. Not all the seeds have sprouted, but most have. But now…how to transfer them into pots? I have a variety of things: herbs, flowers, veggies. I don’t want to mess it up! Oh, and WHEN do I transfer them as well? The instructions on the package aren’t too clear. :)
YoungHouseLove says
Hey Rachel,
That’s the question of the hour! You’ll probably want to wait until all the seeds have sprouted (some of ours took an extra week or two but they eventually came in as strong as the others). You’ll also want to thin them out so you only have one or two sprouts in each pod (as opposed to all the little seedlings that poke out of each one, which will quickly begin to choke each other out).
Then getting a fan running for a good amount of time each day in the room where you store your seedlings is a good way to “harden them off” and get them ready for transplanting. I’m not quite sure when you know it’s time to move them, but definitely if their roots seem too cramped in those little pods it’s a clue (remember it’s our first time at this too!).
Sometimes the directions on the back of each seed packet are more of a help than the directions that come with the mini greenhouse so don’t forget to check there for some info too! And of course places like bhg.com have helpful little gardening tips. Hope it helps! Happy transplanting…
xoxo,
Sherry
Kichael Miller says
This was really great information. I know it’s a year later but I was wondering how it all went? We are trying our own outside garden now in a container with holes in the bottom for tomatoes and we have been looking around for all the help we can get.
YoungHouseLove says
Most of our seedlings didn’t make it (we later learned our Low-E windows were to blame since they block so much sun) but our small plants from the farmer’s market really thrived and we had a HUGELY successful edible garden. Check our our How To page under the “Exterior Ideas” category to read more about how our edible garden worked out. Hope it helps!
xo,
s
Riva Balkey says
Whenever I find a blog like yours, I like to comment on how much I like the way it is organized, thanks.
Becky says
I have used these trays before, and LOVE them! But my trick is I keep them in the kitchen where the windows let in just the right amount of light