Alright folks, you know I have a love affair with fabric, so when I realized I had never attempted to make a roman shade (even a fixed one that’s just for looks) I knew I had to get on that. So here’s how I got my fake roman shade on.
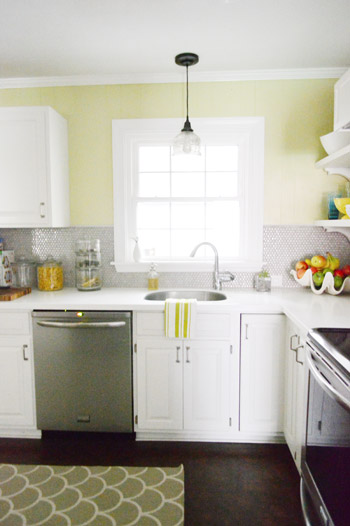
First of all, is this bare kitchen window begging for some fabric action, or what? It actually leads into the sunroom, so it didn’t need anything functional to draw/close, which is why I opted to go the faux shade route (actually all of the bamboo blinds in our first house remained open since I loved the light flooding in, so if you’re not a shade-drawer, a faux shade might work in any room for ya).
I didn’t follow any tutorial for this, I just sort of made it up as I went along, but here’s how it all went down. First I measured the window and realized that I wanted a finished shade that was about 47″ wide by x 18″ long, so I cut a rectangle of fabric that was 49″ wide (to account for an inch of hemming at the sides) and 30″ long (to account for the looping I was going to do with the fabric to make it look like a roman shade).
We used Gazebo Cloud by Braemore as our fabric (you might recognize it from here). We loved it so much, and it looked awesome in the kitchen, so we grabbed one more yard of it at U-Fab here in Richmond for $16 during a little store-expansion sale. Woot! Here’s an affiliate link to the same fabric on amazon for any non-locals.
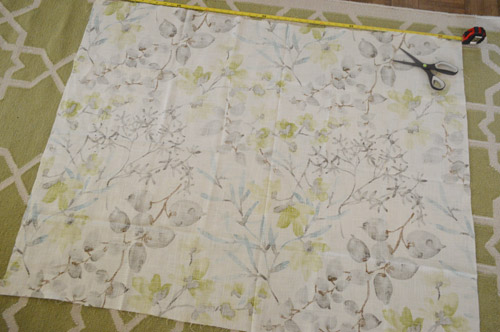
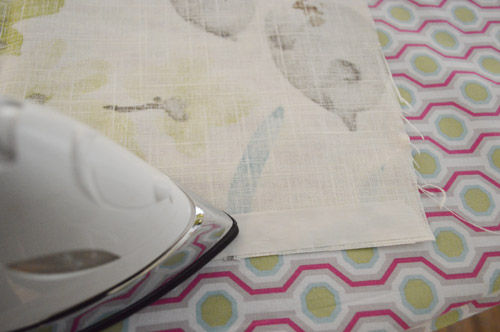
The first thing I did was hem all four sides of my 49″ x 30″ rectangle of fabric with no-sew iron on tape (I like heavy duty Heat N Bond, which I get for a few bucks at Michaels). Oh and there’s a little video tutorial on how to use no-sew tape here for anyone interested.
Then I cut a piece of 1 x 2″ scrap wood to the width of the fabric so we could hang the shade up (the finished width was 47″ wide). Although you could get them to cut you a piece of wood to the right size at Home Depot if you don’t want to whip out a saw yourself (I hummed the MacGruber theme song while sawing, BTW).
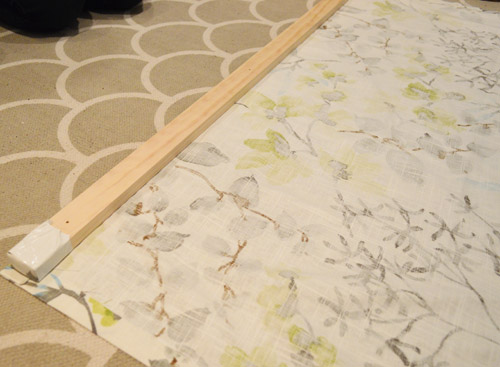
Next I wrapped scrap pieces of fabric around each end and secured them with white duct tape. That way once it was hung, you wouldn’t see raw wood from the sides.
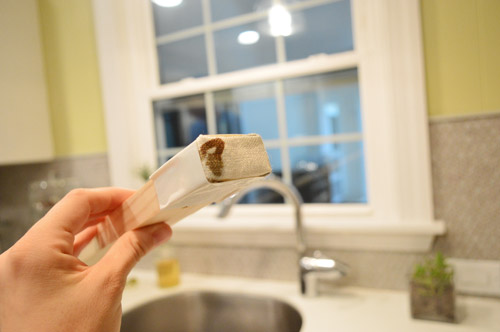
Then I rolled the fabric around the wood piece and secured it with more white tape (being sure the tape was on the back/bottom of the wood so it wouldn’t be seen from the front when the shade was hanging). See the flat 2″ part of the board in this photo (the part that’s facing up)? That will be the part of the board that is screwed into the wall to secure the shade (so the top and front will not have any white tape on them, it’s just on the back and the bottom of the board which won’t be seen).
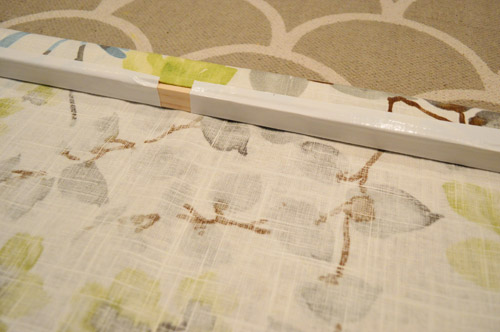
As for how I made the roman-shade-esque fabric loops, I just eyed things and tried to use a ruler where I could to keep things straight. Lining up the top of the shade with the top of our area rug in the kitchen also helped me try to keep things even (laying it down on the floor at an angle might have made it harder to eye things, so at least knowing it was straight on the floor and lined up with the rug gave me a nice frame of reference). As you can see from this picture, I made about a 5″ loop of fabric (which would show in the front of the shade) and then pinned that loop in place from the back of the shade. See how in this photo the fabric is folded back and comes to a point in the corner? That’s where the first pin went in. Then I followed that same line all the way across the back of the shade with pins, holding that loop in place along the entire front of the shade (and tried to keep the loop/pins at the same distance from the wood piece up top so it all looked even).
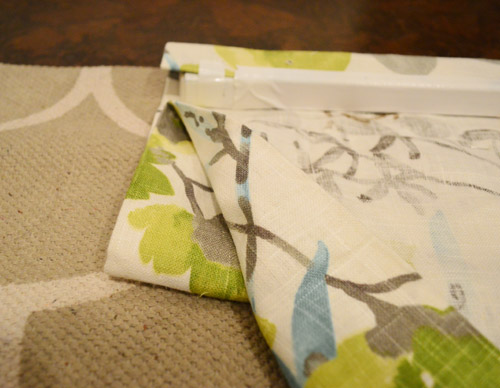
Here’s a shot where you can see two of my straight pins (see the one in the middle of the picture and the one on the right?). The key was to let them grab a lot of the fabric in the back (where they won’t be seen) but only grab a tiny bit of the fabric in the front since I didn’t want the pins to be super obvious.
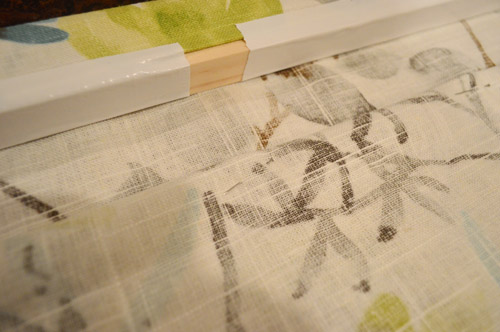
I used rows of pins to make two folds about 5″ apart, along with pinning the bottom of the shade so it appeared to roll up/billow out as well. There definitely was some noodling when I turned the shade around and surveyed it from time to time (sometimes a row went up at one end so I repinned things to look straighter, etc). All in all the cutting and hemming process probably took about twenty minutes and the pinning/noodling/repinning process might have taken forty minutes or so. So it wasn’t a super long project, but I didn’t get all of pinning whipped out in ten minutes on the first try or anything. But with a little patience, I was able to get things looking a lot more lined up and then I could stop sweating so much. Haha.
Originally I had planned to pin each fold and later go back and “tack” each area where I pinned the fabric (tacking is basically doing a few manual stitches to hold things in place once you have pinned them and are sure that you like the look), but I worried that tacking might cause more puckering and the pins were holding very securely (and of course it was easier to call it done since everything felt nice and solid) so I did. Done ditty done ditty, done done done.
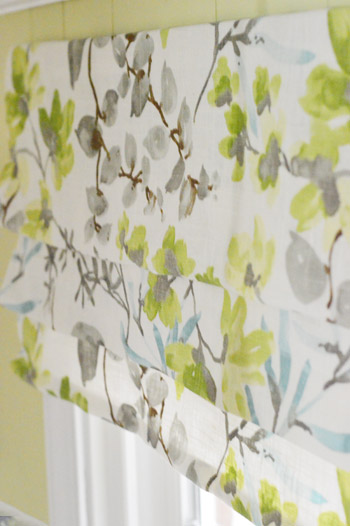
As for hanging it, we predrilled three holes in the wood piece and then hung it up with screws (nothing is drilled through the fabric to secure it to the wall, the fabric is pulled aside and the wood is just screwed into the wall directly and then the fabric in front can drape over it so it’s hidden).
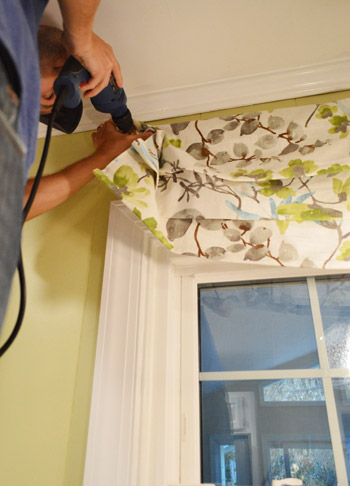
Maybe this shot explains it better. See how John is lifting the fabric up so he can drill right into the wood part to secure it to the wall? Then he let the fabric go and it fell back down in front of the wood piece so there aren’t any screws or wood that can be seen.
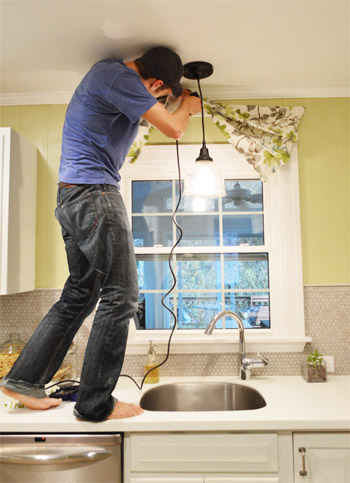
Like so:
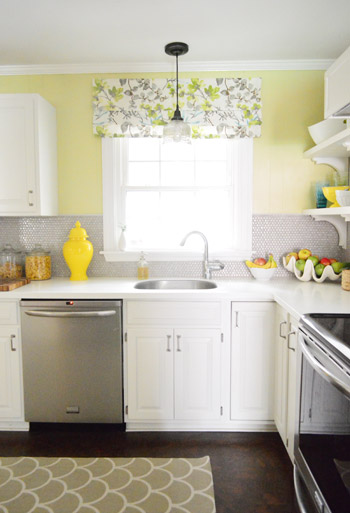
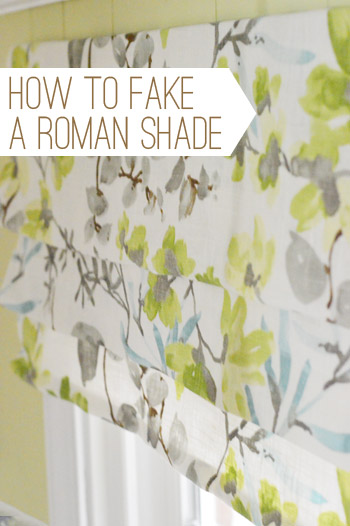
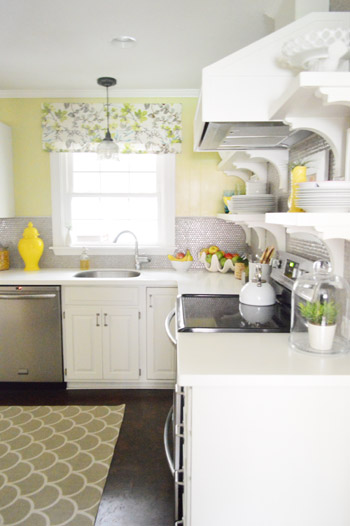
It definitely feels like it finishes that formerly naked window a little more, adds color and pattern, and even balances other things in the room like the range hood. The coolest thing about the fabric is that it ties the wall color into the gray tile, so it’s sort of like a bridge to connect the shiny penny tile and the gray rugs with the soft avocado walls.
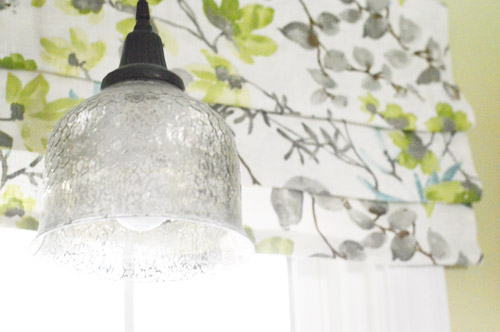
Bam, detail shot. See how you don’t see any pickering or pins? I worried if I tacked things it might look more lumpy and bumpy. But if anyone out there has faux shaded a window and used another method, I’d love to hear what worked for you!
All in all, I definitely like how it makes the window feel taller, doesn’t block any light at all, but looks a lot more finished than the bare window did before. For about an hour of time and $16 worth of fabric, it was totally worth it!
What are you guys faking around the house these days? Any faux plants going on? Faux fruit? Faux shades? Faux cleanliness? That’s what I call it when we shove all of our clutter into baskets and closets so it looks like we’re not drowning in chaos. Haha. It’s all an illusion!
Psst- Wanna know where we got something in our house or what paint color we used? Just click on this button:


erikam says
Am I allowed to pin this? I listed your site in the pin, but I am not sure if its okay to pin your photos? http://pinterest.com/ernickam/
YoungHouseLove says
Of course! Pin away! We even have a pin it button under each post when you click into it. Thanks!
xo
s
Sarah | The Accidental Okie says
Love it. My biggest short cut is in my gluten-free baking. I’m probably one of the only gluten-free bloggers who advocates using shortcuts and mixes. I’m all about the path of least resistance. :)
Brenda says
That fabric looks fantastic in the kitchen! The colors tie everything together so well. I was surprised that you didn’t tack the sides, but I guess sometimes “if it ain’t broke, don’t fix it.” I wouldn’t have thought to pin it across in the first place, so I like that it’s so easy anyone could do it. Actually, I have mini-blinds in my apartment, and I’m not sure I want big curtains in such a small space, but this would be an awesome (and easy) way to dress up the windows. Love this project!
Amy says
I was considering a roman shade for my kitchen in the same fabric… Weird! Seeing yours makes me want to run out of the office and into the fabric store right now! Ha!
YoungHouseLove says
Aw, good luck Amy!
xo
s
bekah says
I did the same thing in our kitchen!!
You can kinda see it here, but honestly…its a bad pic..probably not worth the click..
http://www.countrymousetales.com/2012/10/kitchen-progress.html?showComment=1351196220441#c1977862435448936304
I am glad to see you guys do something similar – I thought I might be crazy for thinking it looked good, but if YHL approves it has to be cute, right?
YoungHouseLove says
Totally worth the click! So cute! Love the stripes.
xo
s
Iris says
I absolutely love it!!! In fact it is hard to get an nice roman shade at this time here in Berlin Germany if you don´t want to spend a LOT (!) of money for a custom-made one. And at most times you only need it to cover some ugly wall and not really for letting it down! So I am very thankful for this idea, its so simple and easy but if you don´t know…
and btw..I received your book today and I´m otally amazed..won´t you come to Berlin, Germany for signing? haha? (Am I the most far away book buyer?)
XO
Iris
YoungHouseLove says
Aw thanks so much Iris! So glad you like the book. We’d love to end up in Germany someday!!
xo
s
Skye says
Love that fabric and such a simple project with a nice big payoff. Wish I wasn’t on the wrong side of the country for your Canadian visit!
Tip for the shade: Velcro instead of tape to secure to the wood, then you can pull it off to wash it if needed (in which case tacked instead of pinned as well). Otherwise a lot of dusting to keep it clean, especially along the top.
YoungHouseLove says
Smart!!
xo
s
Amy B. says
That looks really nice!
I’ve faked a relaxed Roman shade, where it’s lower at the bottom edge than the sides, with thumbtacks and little binder clips. Tacks stuck underneath through the fabric to the window sill worked pretty well at the top, though I prefer your method using a strip of wood. I’ll do that next time. You can see one or two spots where it puckers slightly.
I just gathered the fabric along the sides until I liked how it looked, then secured each level of swag with the binder clips. It’s been in my kitchen for a couple years now, with no one the wiser!
YoungHouseLove says
So smart!!
xo
s
Lindsey says
Thank you, thank you, thank you for posting this (especially in the midst of travel chaos). I’ve been wanting to do a faux roman shade for our kitchen windows, but haven’t found a tutorial that made much sense. You always make things so much more understandable.
YoungHouseLove says
Aw, you’re welcome Lindsey! Good luck!
xo
s
Takeyce Walter says
Isn’t that clever!! Love that fabric too. Where did you get it? It would be perfect in our master BR.
YoungHouseLove says
It’s from a local store called U-Fab in Richmond, but it’s by Braemore (called Gazebo Cloud) if you want to look it up online. Hope it helps!
xo
s
Takeyce Walter says
Thanks, Sherry! I’ll see if Joanne’s has it.
Shannon says
I love it. I wish I could convince everyone to let me paint my cabinets white!!
Jana says
Looks great! I’ve been planning to cover a roller blind in that same fabric for my kitchen window.
littleoakcreations says
That fabric is gorgeous! Perhaps I need to try tackling a roman shade one more time. Last time I tried, it was a total fail!
Stephanie says
I never noticed your window looked out into the sunroom! Do you love it or was it weird at first to be looking into another room in the house?
YoungHouseLove says
It was exactly the same at our first house. We don’t mind it too much, but we keep joking that someday we’ll have a kitchen window that looks outside. Haha. Someday! Maybe when we retire…?
xo
s
Jen says
So so fantastic! I have been wanting to go the faux route in our master bedroom and this is my favorite tutorial yet!
It is awesome the difference the romans made in your kitchen! The colors and pattern couldn’t be more perfect!
Hope you have happy and safe travels this week!
xo,
Jen
notsupermum says
What a coincidence, I did exactly this last weekend! It took me an age to figure out a way to do it though – if I’d waited I could have just read this!
Ashley C. says
Oh, I am all about the faux cleanliness these days. We’re waiting out our last few weeks in our too-small apartment before we close on our house, and now whenever we have company, I just pick up everything that doesn’t fit on a shelf or table, stuff it into our bedroom, and shut the door. And then people come in and comment on how clean and well-organized my place is, and I kind of feel guilty! hahaha
YoungHouseLove says
Hahahah!
xo
s
Heather W. says
Just thought you’d want to know that Jen Lancaster gave your book a shout out w/pic and everything on her latest blog entry (11/8). I love her books and her blog is where I came across your blog initially and have been a reader of both ever since. =)
YoungHouseLove says
Gahhhh! Her blog is amazing and I love her. Have to remember to breathe. Crazy! Thanks for the tip!
xo
s
Laura says
That fabric is perfect in there! It really does tie everything together color-wise. How did you decide how long they should be? Like, compared to the length of the pendent. What that a factor? It looks great!
YoungHouseLove says
I didn’t want to block much of the window/light so I just decided how high I wanted to hang it for the illusion of height and added a few inches to that so it would hang down over the window trim and make the window look tall without blocking much light!
xo
s
Vicki says
This is perfect timing! I just picked up fabric to try and make a Roman shade for the door in our kitchen, but I have no idea what I’m doing! Faking it sounds like a much more feasible plan.
Emily says
I’m in the market for a new teapot– I’ve had two Le Crueset pots rust on the inside! UGH!
What brand is yours? Do you like it? How long have you had it? Do you leave water in it between use?
Thanks!
YoungHouseLove says
It’s by Kitchenaid and I love it! Have had it over a year and just boil water and use it over and over again. Sometimes it stands in there a day or two, but I have tea every night.
xo
s
Lindze says
NO WAY! I just wrote a post about hanging a shade in my kitchen too… but (hangs head in shame) I bought mine.
http://interiorfunction.wordpress.com/2012/11/12/kitchen-reveal-blinded-by-the-light/
I love your idea though! It really makes your pretty light stand out now. :)
Maybe I will try this for my bathroom window! It’s just frosted and could use some love!
YoungHouseLove says
Love it!
xo
s
Amy says
I did the faux roman blinds, but I hung it with a tension rod, and created the folds by sewing loops (in my case 2 on each side at different lengths) onto the sides of the fabric rectangle, then pulling the loops into command hooks that I stuck on the sides of the window. You can’t see any of it and that gave them a nice soft drape.
Dawn says
What a great idea! And it looks totally clean and fresh. Just an fyi, pins will eventually rust in the high humidity area and the stain may show through. Thank you for sharing this project because I have always wanted the look of roman shades, but didn’t have the confidence to tackle such complicated instructions.
YoungHouseLove says
Great tip Dawn!
xo
s
Micki says
How are you going to clean it with all those pin in it?
YoungHouseLove says
I don’t throw roman shades in the washer or anything, so I’m just going to dust the top of it with a feather duster and call it good (we have the same fabric on our headboard, which is upholstered so we can’t wash that but it’s doing just fine).
xo
s
Lauren says
Love the shade! Also wondering where you got the hurricane vase on the counter? (I checked the source list but couldn’t find it.) I’m having trouble finding one that’s large enough..
YoungHouseLove says
That’s from HomeGoods!
xo
s
Kristina says
Maybe someone else asked this already (too many comments to read through!), but how does the shade look from the other side (i.e., if you’re looking at it from the sunroom)? Because I made a faux roman shade, and it looks great from the front, but pretty crappy from the outside. So I’m hesitant to make any for my kitchen, since it faces the front of the house.
YoungHouseLove says
Thankfully it’s hung so high that the pinned part is over the trim and wall part, so it looks great from the other side (the part that you see through the window doesn’t show any pins).
xo
s
Jane says
I got my book in the mail today!!! Just had to share :) It’s amazing!!
Jaime says
LOVE LOVE LOVE the rug in your kitchen, where did you buy it?
Thanks!
YoungHouseLove says
It’s from Urban Outfitters. You can read more about it here: https://www.younghouselove.com/2012/06/anyone-in-the-mood-for-scallops/
-John
Emily says
My faux roman shade did droop when I just tacked them in a few spots….but since I wanted a casual soft look, I don’t mind too much. I did wonder if I could have used hem tape to make the folds…perhaps? Or as someone said, hem them like a pair of dress trousers…that seems smart! Thanks for the faux treatment post…the shade looks awesome!
Amanda says
This looks so fantastic! I’m a huge, huge fan of this fabric, and it goes perfectly in your kitchen. Love!
Tessa says
The colors are perfect for your kitchen! Lovely kitchen sink vignettte.
I took one super-cheap-clearance panel from JCP & turned it into two shorties for my kitchen window, & love how it “softened” things up.I also have an ORB pendant over my sink, crushing on your mercury glass–mine is just plain ol frosted.
Annie says
I’ve been trying to figure out how to execute this with burlap coffee bean bags I have. Thanks for the tips!
jeannette says
awesome. you two have the planning skills of generals. we are not worthy.
xxx
Lindsy says
Cute! This reminds me of when I redecorated my bedroom in high school. (I wanted it to look more “grown-up.”) I made a faux roman shade by stapling the fabric to the wall around the window frame and then tied up the sides with ribbon. Ahh, the memories…
Hailey Bopp says
I love this! My husband and I are about to purchase our first house and I’ve stumbled upon your blog just in time for inspiration. Your family is delightful!
erika says
Any new o th erescheduling of soho in ny?
YoungHouseLove says
Not yet, sadly. But there was talk of early December at some point. We’re working on it!
-John
Tania says
Cute!
Georgia says
You are so right, that makes a huge difference. Looks awesome. When you get a spare moment (in a month or so), i would recommend tacking your folds, because those pins will rust and stain your fabric….particularly being over he sink. Or just use some more iron on hemming tape.
YoungHouseLove says
Great tip Georgia!
xo
s
Kirsten says
I love it! It finishes off the space beautifully.
Heidi P. says
Oh how I love it! Look at you with duct tape and pins! You *are* a clever lass aren’t you!
Chelsee says
How has nobody asked you where your rug is from?! I need to know!
YoungHouseLove says
It’s from Urban Outfitters. More on it here: https://www.younghouselove.com/2012/06/anyone-in-the-mood-for-scallops/
-John
Brittany says
our basement is huge and has a lot of wall space. I had curtains from our small rental house that I loved and wasn’t going to get to use when we bought our home because we got new furniture for our upstairs living room. We put our old furniture in the basement. So even though there are no windows down there I put the curtains up on the wall…..it looks like it’s a walk out basement…but surprise! No door! Just curtains hanging on the wall! Faux walk out basement!
Kym Lynch says
I so need this right now. And what beautiful fabric. Thanks!
Also, if you don’t mind, do you have any advice for hanging kitchen lighting?
YoungHouseLove says
Hmm, if you’re wondering how to hang it there are great tutorials on youtube.com. And if you’re just looking for a great source, we love overstock.com and local lighting outlets for great finds. Hope it helps!
xo
s
Selina@CreativeJuicesDecor says
I love that! you picked the PERFECT fabric….it adds a lot. One time I had the glass break in a large rectangular picture frame so I put fabric in it and turned it into a really pretty valance, I was shocked at how perfect it looked!….here is the link if you wanted to check it out :-)
http://www.creativejuicesdecor.com/2012/04/easy-diy-valance-from-old-picture-frame.html
YoungHouseLove says
LOVE it!!
xo
s
Cassondra says
I wish I could be in Toronto today! I’m from Winnipeg and am still secretly plotting driving to Minneapolis later this week for your signing…my husband just doesn’t know he’s okay with it yet.
I will definitely watch The Morning Show on Global tomorrow though!
Love you guys and before I even get out of bed in the morning I go to your site to see if the morning blog post is up. I’m just starting my own blog (about 2 weeks in) and so far so good, but it’s crazy already – you are amazing for keeping this up so long and doing such a great job :).
Bec says
Yay!
My book FINALLY arrived today. Took it a while to ship to Aus. Had a browse but been at book fair for three hours tonight buying school books so my eyes are not quite focussing. Guess I know what I’ll be doing on the weekend. End of year report reading? What end of year report reading??
Richard says
I probably missed out on this conversation, but I have found that an inch of red wine or sweet vermouth (I HATE to waste my wine!) in a wine glass (the tall sides are important)a squirt of dish soap, and just a quick blast of water to make some suds is a super solution to the fruit fly issue. The trick is to keep it sudsy, so they get stuck in the bubbles. I can reblast suds three or four times before starting over. Unless the bugs gross me out too much, that is!
Kristin says
Looks great! Love the fabric!
Here’s a tip from when I did it at my house…. I have very nice honeycomb blinds that came with the house but I still wanted to cover. I also didn’t want to put any permanent holes in the trim. So I created a faux roman shade very similar to yours. But on top the panel is flat with a strip of the soft velcro sewed directly onto the panel. Then I stuck the 3M velco strips on the plastic part at the top of the shade, there’s one in the middle and one on each side. Then voila! My faux shade velcros to the blind that’s already installed and when we sell the house I have no damage to the trim or the blind that will stay with the house.
YoungHouseLove says
Really smart!
xo
s
steph says
hmm we need privacy. Do you think a bamboo shade would look weird under one of these?
YoungHouseLove says
Hmm, I haven’t seen that. Anyone seen it done? Does it look nice? Maybe a roller shade could go under it for privacy and be rolled up and tucked out of the way under the roman shade?
xo
s