As promised, we’re back to detail the simple steps that anyone can follow to DIY some chic and cheap vintage-looking wood signs. We first unveiled these guys in our big bathroom reveal post yesterday morning, but now we’ll divulge the step-by-step process so you can follow along at home. Just remember to sing “I saw the sign” by Ace of Base the whole time you’re making them like we did. Good times.
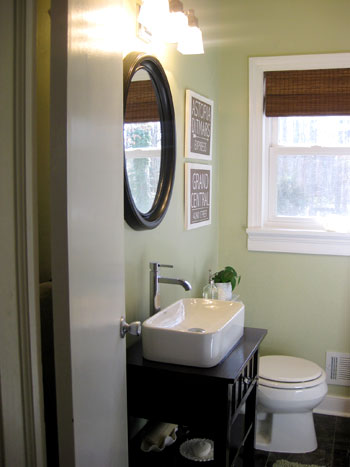
John actually came up with the idea of creating vintage-looking wood signs (isn’t he quite the artisté?) after I lamented that square frames next to the rounded mirror might look a bit chaotic. We wanted something simpler (nothing with reflective glass or a strong raised edge to compete with the frame of the mirror) so John’s one-plane-only wood sign idea was the perfect fit.
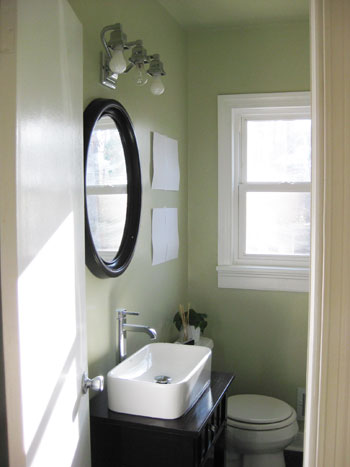
And speaking of the perfect fit, we didn’t have a clue how big we wanted our art to be (or even how many pieces we wanted to make- two? three?) so we simply taped up white paper cut to different sizes in a few different arrangements until we settled on a layout that we liked. Two rectangles on top of each other would subtly mimic the shape of the window and feel balanced and inviting next to the mirror (and my fears of creating something that would compete too much with the curved mirror happily faded away). Hooray for fast and free paper templates to take the guesswork out of art size! The next step was just to measure those pieces of paper (they each turned out to be 16″ x 13″) and figure out what the heck our signs would look like…
We knew we wanted to draw inspiration from our time spent in NYC (where we met and fell in love) so we decided to try our hand at making signs that would resemble the look of old NYC subway signs, like these that we hunted down on google.
Did you guys click over and check out the $1600 price tag?! Yowsa. But when it came to inspiration, they were dead on. Of course we adapted ours to be horizontal in format and a bit less dark to complement all the white and neutral tones in our bathroom (and in our house for that matter). We also picked two subway stops with the most meaning to us to add a customized vibe that we love (we met working together near Grand Central and both lived in Astoria Queens at different times). We created our signs in Photoshop (but any program that allows you to edit type a bit should work). We also integrated some fun little details like the arrow and the horizontal rules around 42nd Street just to keep things interesting, but they still looked pretty flat as jpgs on the screen. Not to worry though, we had a few ideas for adding a bit more vintage character to them once we printed ’em. Note: the typeface that we used was Abadi MT Condensed Light in case anyone wants to duplicate them that closely.

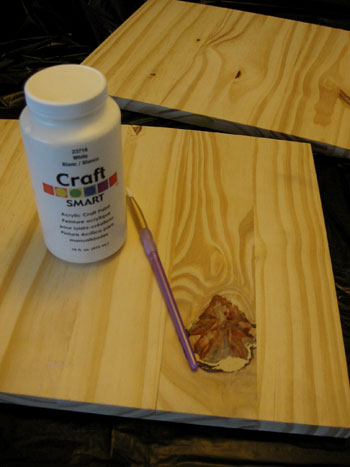
After we printed them out ourselves for free on regular old printer paper (we ran off a couple of extras so we could experiment with them a bit) we headed off to Home Depot. There we picked up one $6 piece of 1″ thick plywood (it was in the area near the chair legs among a ton of differently sized plywood options). The plywood sheet that we selected happened to be 16″ x 30″ so it was easily sliced down by the kind folks in the wood cutting area. They quickly transformed our plank of wood into two 16″ x 13″ rectangles with only a bit of scrap wood leftover. Gotta love getting two pieces of art out of one piece of $6 wood.
After bringing home our pre-cut planks it was as easy as painting them white with craft paint that we already owned (it was thinner than latex wall paint so some of the wood grain still showed through)…
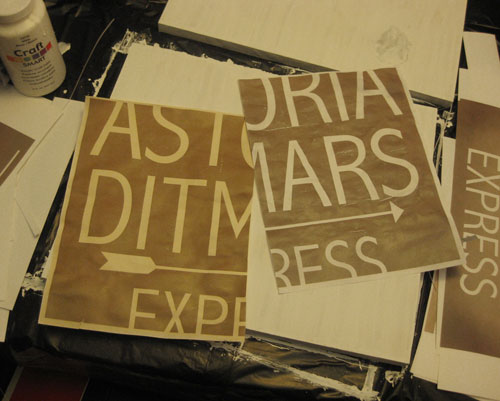
… and trying our hand at a few different aging techniques to bring our “vintage signs” (aka: modern day computer printouts) to life. As you may be able to tell from the print on the left below, we had some fun brewing tea and rubbing the empty tea bags on one of our “tester”printouts but opted against it since it made the prints look so yellowed that they didn’t feel as crisp as the white painted wood that would be behind them (and we really wanted to maintain a clean and airy look, even after the “distressing” stage).
So after just saying no to the tea-staining process, we moved on to trying to rough up our prints with some good old fashioned elbow grease. First we placed one of them on a slightly textured (ie: nubby plastic) cutting board. Then we simply ran a sponge over it to wet it down and slightly wear away at the perfectly printed finish. We thought it might smear the ink, but happily it just buffed the surface for a pretty convincing timeworn look.
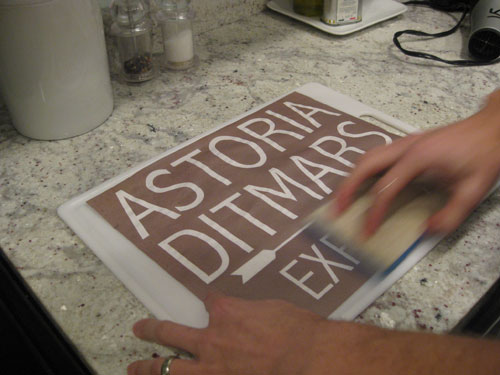
Next we rubbed a paper towel across the surface, being careful not to rip the paper but doing it vigorously enough to rough up the surface of the dampened piece of paper to further wear away at the formerly crisp appearance.
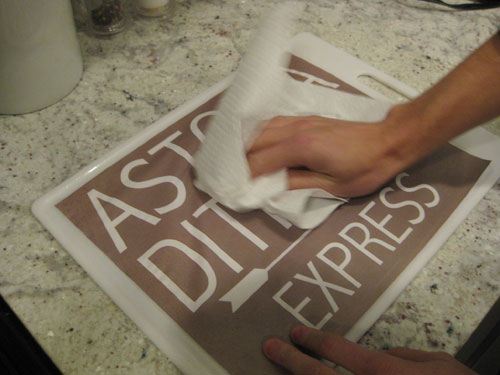
Then it was time to break out the ol’ hairdryer to get rid of any remaining moisture so the sign was ready to be attached to its designated wood plank.
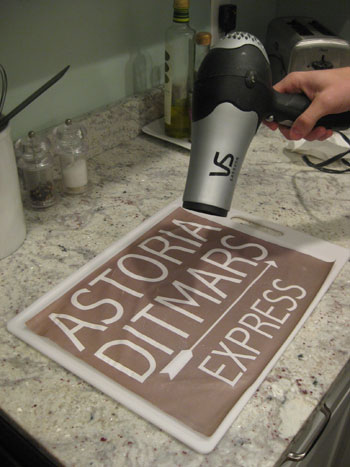
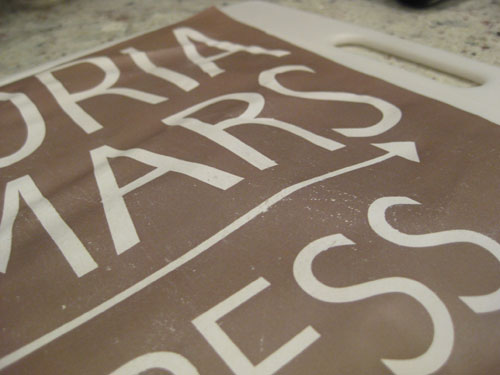
It dried a bit lumpy bumpy but that’s all part of the plan. Of course at this stage we thought it might be ruined but we just went along with it and what do you know, it all worked out in the end. Trial and error is the name of the game here. Anyway, this is a detailed shot to show you what the sponge + paper towel technique did to the finish of our prints. See those worn down areas and those slightly rubbed off spots? These babies were looking less freshly printed already!
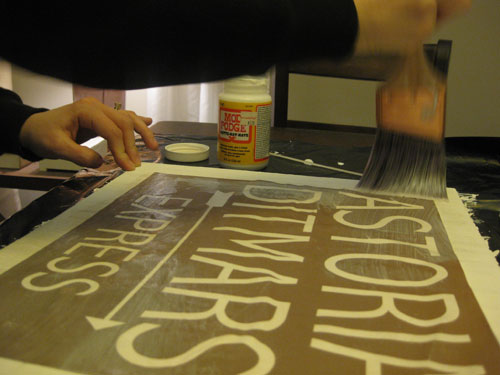
Then it was Mod Podge time. We already owned a big tub of it (and actually used one of our paint brushes) so this step was also free like the printing and distressing phases. We flipped the paper over and applied a semi-thick coat of Mod Podge to the back of the print and then flipped it over again, carefully placed it in the center of our wood plank, and applied a thick layer of Mod Podge to hold everything in place. The great thing about the stuff is that although it looks like white Elmer’s Glue going on, it actually dries clear, so not only did our top coat of Podge hold our print in place, it also created a glossy hardened appearance (which is perfect for a bathroom since it “sealed” the sign from any future moisture-related problems).
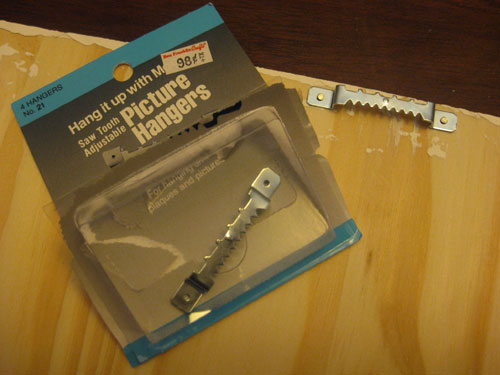
Once everything was dry we flipped over each sign (on an old towel so as not to scratch the front) and gently hammered in two little nails to secure 98 cent picture hangers that we already had in our hardware drawer. Presto, an easy way to hang our new bathroom art for zero dollars and zero cents. Note: If you don’t already own white craft paint, Mod Podge or Picture Hangers, they can all be picked up at a craft store like Michael’s or Hobby Lobby for around five dollars total.
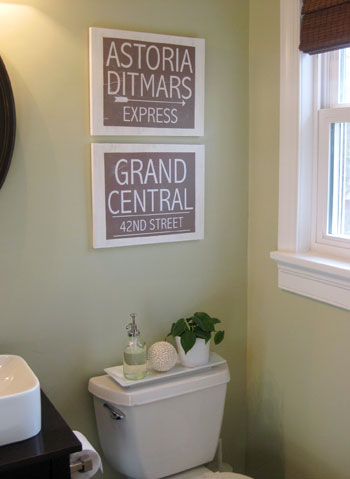
Here are our new “vintage” wood signs hanging happily in the bathroom. One of the coolest things about the fact that our prints were a bit bumpy from the wetting, distressing, and drying stage was that when we Mod Podged them they each got a wrinkle or two which looked oh so worn and weathered (see the one through the D in Ditmars and the G in Grand Central?). This was, well, perfect for the imperfect look we were going for and once the Mod Podge dried it was seamless and sealed (so there wasn’t a big wrinkle that stuck out from the wood or anything- everything looked flush, flat and pretty darn fantastic).
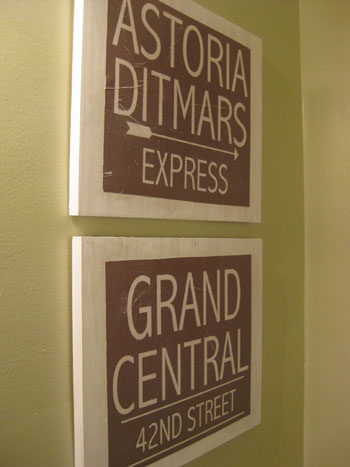
There you have it. The story of our $6 homemade wooden sign art. We hope you guys are inspired to try your hand at something similar. And you don’t have to stop at subway sign ideas either, you can always pick a small shop in your hometown that has special meaning to you, create a message of some sort (like a “please remove your shoes” reminder by the back door), or even whip up a personalized sign for your son or daughter’s room with their name on it. The possibilities are pretty much endless.
So we’ll leave you with this detail shot which further shows our gently distressed signs hanging happily above the toilet (a place that all art aspires to be hung, we’re sure).
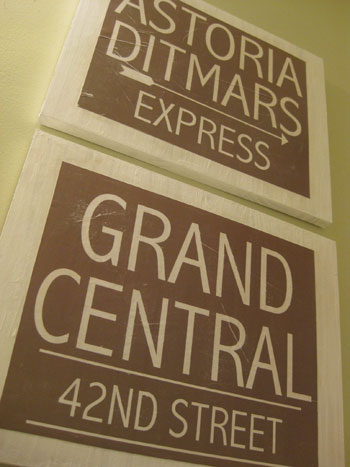
Isn’t it funny how two pieces of paper that we taped up on the wall could so easily turn into this with six bucks and a bit of let’s-see-what-happens spirit?

But enough about our little Mod-Podge-Meets-Ace-Of-Base DIY fest. What kind of art have you guys been whipping up with your own two hands these days? From painting colorful canvases to framing collections like bottle caps and matchbooks, we’d love to know what made-it-myself masterpieces hang proudly on your walls.
Psst- Speaking of DIY art, here are a few other homemade art projects you might enjoy: making a magazine monogram, whipping up custom pet art, making free inspiration art, using chalk for freehand wall decor, painting pop art over old art, and creating a bunch of other cheap wall art.

ShopKim says
I love this idea! They came out perfectly and I love the cost of it. I have some plywood around so I might try my hand at something similar. Might use some pictures I already have though instead of printing something new.
Michelle says
This is such a cute idea! I may just have to try it soon!
ErinEvelyn says
I have done this exact same thing, only instead of modpodging onto wood, I did it onto artists’ stretched canvases, for my kids’ room. I wanted something BIG on the wall, for cheap, and it had to withstand fingers and the possiblity of falling off the wall without breaking or hurting anyone (I used eyehooks & wire to hang them on safety wallhangers). With vintage-y clipart, I Photoshopped a couple of posters, and even tweaked the colors to coordinate with walls & bedding. With ModPodge (from Michaels, bought with a coupon) & a large 40×24 canvas (I waited for s half-off sale at Hobby Lobby), my kids’ chic wall art came in at under $20.
YoungHouseLove says
Ooh that sounds like such a great idea for large-scale art that’s kid safe. Amazing idea!
xo,
s
Courtney says
A couple of years ago, my mom was getting rid of an old TV stand, but I convinced her to pass it on to me. I used (A LOT) of mod podge and some coordinating scrapbooking and cardstock paper (all in blues/greens/whites so it wasn’t too intense) to cover the TV stand! It turned out great – it looked like a patchwork piece of furniture that my roommate and I adored. It’s a great conversation piece and I was able to do it in one weekend!
Barbara says
So, when are you taking orders for signs? :)
You two have me almost convinced to tear out my shower surround tile – it’s laid like lath and plaster, with wire and all…I’m just afraid of the electrical and plumbing that lurks just underneath the walls…but you’re tempting me big time…
___
Barbara
http://ifididnthaveasenseofhumor.blogspot.com
Taylor says
This is great! Did you use matte or glossy Mod Podge?
YoungHouseLove says
Good question! We used the matte kind. Hope it helps!
xo,
s
Rita says
Wow!!!
I would like to make one… did you use a laser printer?
Rita
YoungHouseLove says
Yup, a regular old laser printer did the job. Hope it helps!
xo,
s
Rita says
Oh nooo… I just have an ink jet :(((
I will print from someone else printer :)
Thank you so much and good night. I’d better stop staring at you wonderful blog and go to bed!
Kisses from Italy
Rita
YoungHouseLove says
Definitely give it a try on an ink jet before giving up! We’re betting it’ll work. It’s free to see if it’ll do the trick so it’s worth a shot, right? We’ll cross our fingers for you!
xo,
s
Lydia says
I love this idea! I bought a jar of ModPodge a few months ago without a project in mind but knew one would come up eventually. . .
I just tried my luck at distressing picture frames for a kitchen makeover project – easier than I initially thought it would be!
http://lydiasnextstep.blogspot.com/2009/11/i-could-make-that-distressed-picture.html
95831mom says
Hey Sherry & John: just stumbled upon your website last night when I did a google search for “white shadow box.” Your post about your laundry room shadow box project popped up and I was hooked on your site instantly! (Too bad I got sidetracked and still havent found the a shadowbox.) Just wanted to say that YHL is my new obsession and that I absolutely love your design style and philosophy behind looking for bargains and repurposing. BTW — where did you get the white shadowbox in your laundry nook? I keep checking Michaels and Joanns and they never have the size I’m looking for (about 11×14).
hearts!
95831mom
YoungHouseLove says
So glad you found us! We actually got that shadow box at Michael’s but we’ve seen similar versions at Target and Ben Franklin so those might also be worth a look. Hope it helps!
xo,
s
Elisa @ whatthevita says
That is IT. I have gotta do something like this… wood, a cool print out, mod podge, thats it?? My office is begging for some art and I just might do this instead of spending 100+ on art…. Just gotta find the perfect art to print out. Or maybe a collage of some sorts from magazine photos? Hmmm… My mind is workin’ overtime, thanks for the simple but great idea…
Erica says
Cool signs, I keep seeing those everywhere. Your sink is awesome…my eye was immediatly drawn it. Have you used it yet, is it hard to use since the sides of the basin are high?
YoungHouseLove says
Oh yeah, we’ve been using our sink for almost two weeks and it’s great. The height is perfect and the high sides are nice to keep water from splashing out so it turned out really well. Hope it helps!
xo,
s
Quinn says
i love that you guys made your own ‘vintage’ subway art- i love those pieces, but like you said, its ridiculous how expensive they are! in case you guys ever do another similar project, look into Distress Ink pads (originally made for scrapbooking use) http://www.rangerink.com/products/prod_dyeink_distresspads.htm – I love them and they do wonders!
kelly says
LOVE this idea! My husband and I are revamping our bedroom right now (new paint, painting the floor too, new baseboard) and now my mind is wandering to art. I am thinking for Valentines Day I might make him one that says “Cherry Hill” after the park where we went on our first date and “Red Rock Canyon” after where we got engaged.
Thanks for the inspiration!
Kelly
anna see says
Great job! And as they say…Mod Podge Rocks!
Condo Blues says
Ah, memories… Astoria Ditmars Bld was my husband’s stop when he first moved to NYC. I had a repro of the station sign made for him as a gift.
Krista Haws says
They look great! Other options you could have tried (or try in the future) is paper from a craft store (like michaels) that is already distressed They sell alot of those “now days.” As for the transfer papers meganORSI was talking about, you can also get them in iron on form and I used those for this Christmas to print out pictures and phrases and iron them on to distressed paper and then onto a distressed wood block. Then I sealed them with Modpodge. They turned out great. I can post them on my facebook page if you want to see and I would love to make one for the your new little baby girl when she is born :)
Holyoke Home says
Those came out GREAT!!!!!!!
Abby says
I thought for sure you guys had bought those signs at Home Goods or Marshalls!!! That’s awesome that you made them! Love it!!! You make everything look so easy and like it was something we could have thought of as well! I better get moving! :)
Kitsch Krafts says
These signs came out great! Between this posting and some of the comments I think I have just figured out a better way to complete a little art project I am currently working on for my little guy’s nursery. Thanks! Here is one crafty “art” project I did finish up already:
http://www.kitschdesigns.com/post/Making-This-Is-What-I-Did-With-My-Jenn-Ski-Alphabet-Cards.aspx
As always, keep up the inspiration!
Caitlin says
Your bathroom renovation is beautiful!! I love the color of the marble tile and that subway tile in the shower is gorgeous and looks so clean & crisp!! My husband and I redid our half bath very similar, round mahogany wooden mirror, white & gray marble tiles and dark bamboo accents….I was so proud of ourselves after I saw your finished project ;) I have a question, what will you use to clean the marble floors?? We’ve been using a steam cleaner on ours, and I’ve also risked using Mrs. Meyers all purpose cleaner on it a few times. I know this is risky as far as ruining the finish, and want to use something specific to marble floors. Any suggestions?? Thanks!
YoungHouseLove says
We’ve actually been using Mrs. Meyers All Purpose Cleaner (watered down a bit) with a moist rag… it works like a charm! Of course this isn’t specific to marble (you can probably find something at a local tile shop for that) but it’s mild and not abrasive or acidic so it works perfectly. Hope it helps!
xo,
s
Caitlin says
That’s good to hear! I will stick with Mrs. Meyers as well. I figured because it is all natural that it shouldn’t be too harmful, but I wasn’t completely sure. Thank you for the feedback and enjoy your new loo :)
YoungHouseLove says
Just avoid anything too acidic (like something with lemon juice in it for scent) and you should be just fine. Hope it helps!
xo,
s
G&D says
The bathroom re-do looks FANTASTIC! I love it! Love the DIY art too, as always. You guys are so creative!
YoungHouseLove says
Thanks G&D! Congrats again on baby Kate! Maybe she and the bean can be virtual friends when they get a little bit older (well, and once the bean is out of Sherry’s belly).
-John
Diapers and Divas says
That is an awesome project! I love the colors and the idea is so great! I’ve been struggling with the same issue for our master bathroom walls… This might just be the something we try! Thanks!
Ruby Showalter says
great idea! i think it works perfectly and so love that it’s cheap too. [; i would love to make wall art to match a pattern on dishes i bought from pier 1. what is the best way to get a high quality photo off a plate and would it be okay to just frame it?
YoungHouseLove says
Your best bet would probably just be to take photos (with your camera on a high-res setting) of the plates without a flash on to cut down on the glare. Then you can look at the images online and crop them if you’d like and then print them out and frame them. Hope it helps!
xo,
s
margaret says
Hi,
I am so glad I found this site- I was going to buy the subway signs! Yours came out great. I do want the black background- what type of paint do you thinkI should use?
Thanks
Margaret
YoungHouseLove says
Hey Margaret,
Any sort of black craft paint or even black latex wall paint will work for the background. Hope it helps!
xo,
s
Nikki Barber says
Love the subway art! You guys did a great job!! Thanks for posting! I am curious, where on earth did you get that really cool handsoap dispenser on the back of the toilet? I have been looking everywhere for something like that.
YoungHouseLove says
It’s from Target! And it’s made from recycled glass. Love it.
xo,
s
Amanda says
I love these signs and how they turned out so nice with the typed words. I have tried to make my own signs and painted the words on but they obviously don’t look as nice. Did you just use regular size paper to print on? What would you suggest doing for a longer or bigger sign? :)
YoungHouseLove says
We printed our signs out at around 11 x 14 (we had access to a printer that could produce slightly larger images). But for anyone who doesn’t have access to one of those, we suggest just bringing a regularly sized printout (or jpg) to a place like Kinkos and asking them to blow it up for you (or print it out at a larger size if you bring a jpg). Hope it helps!
xo,
s
Amanda says
I just wanted to stop by and let you know that I linked to this post today from the new Home & Garden channel at Craft Gossip. :) My hope is to share many of the fabulous projects I see everyday with the vast CG audience. I hope you will not only stop by and subscribe to CG, but will tell your friends about the new category! Hope you see some traffic from it!
Your feature will appear in the main Craft Gossip RSS feed, on the main home page and can be found directly here
http://homeandgarden.craftgossip.com/subway-art-round-up/
YoungHouseLove says
Thanks for the shout out Amanda! Off to check it out…
xo,
s
Jessica says
Thank you so much for this idea! I made my own subway art at home – I used different phrases and framed mine, but I copied your font! They look beautiful. I had no idea I could make something like this at home. I have spent too much money on art prints, I am going to start making my own. Thanks again.
YoungHouseLove says
So glad it worked out so well for you! Congrats on your new DIY art!
xo,
s
Mod Podge Amy says
I love this. Of course.
cami says
how did you get the paper smooth? every time i use mod podge with paper, the paper is wrinkled or bubbled underneath. any suggestions?
YoungHouseLove says
Hey Cami,
We use the matte kind (which sometimes helps) and we also apply it to the back of the paper and the wood and then smooth it down as best as we can. It’s not perfectly smooth, but when it dries it looks that way. So if things look bumpy when wet, let them dry and they should shrink up and look smoother. Hope it helps!
xo,
s
Almeria apartment says
Really interesting how you came up with so much cool and original stuff for your home. It is inspiring, for as an inept handyman, to see ordinary folk being so creative even when they label themselves ‘dorks’.
Catherine says
I love these signs, and have made a ton of art for my house and friends on wood – so cheap and easy. Good idea.
Lindsey says
Love these! I am new to handy work as I just moved into my first home and I am a single parent so I have a few questions: 1. How did you attach these to the wall if they were cut from a hardware store (i.e. no holes to hang like typical frames or pictures have) and 2. You mentioned taking whatever you want printed to an office store to enlarge. Do you take the printed picture or o you take a jpeg file on a thumb drive? Sorry if these are stupid questions but I REALLY want to try this! I read through all the comments to make sure you hadn’t already answered. Thanks for all the inspiration!
YoungHouseLove says
We took a jpg on a thumb drive so they could print it to the size we needed. As for hanging them, we got those little teeth hangers that you can hammer into the back of the wood to hang them (they look like tiny saws with small nails to attach them and they’re around $2 from a craft store like Michael’s). Good luck!
xo,
s
Lindsey says
Thank you so much for the response! I JUST saw your picture with the hangy-doo dad things, ugh! Sorry for not noticing it the first time. I will be trying this, this weekend :o)
YoungHouseLove says
Good luck!
xo,
s
Tiff says
I lov the signs…
This is off the subject but where did u get your sink from?
YoungHouseLove says
We made it! You can read about that here: https://www.younghouselove.com/2010/01/tackling-the-bathroom-chapter-seven/
-John