The transformation of $6 hotel nightstands into a built-in-wall-to-wall-desk-for-two continues. If you recall, we last removed the hardware, sanded, and primed them all in preparation for painting them white.
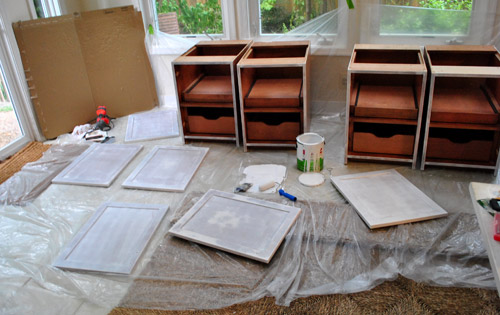
But before painting, we had to do a bit of construction (we needed to attach them in pairs and built them up about four inches so they’d be desk-height). And before doing any construction we decided we ought to look at them in the space first…
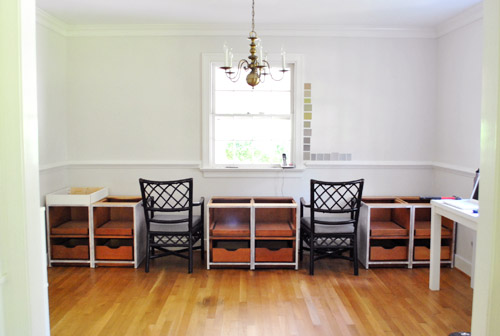
… which is clearly something that we should’ve done sooner (but they’re darn heavy, so moving them back-and-forth isn’t fun – which is why we plopped them down in the sunroom and moved on to sanding and priming). Oh well, better late than never. Once we had them in place we realized that it was a bit more cramped than we expected; the three pairs of two cabinets left hardly any wiggle room for our chairs. And things just looked, well, a bit tight. (Ignore the beginnings of construction on the cabinet on the far left. Our original photo of this got deleted by accident so we had to retake after I had already altered a cabinet. And while you’re ignoring things, pay no attention to the paint swatches on the wall. Not sure we like any of ’em so we’re still at square one with that).
This little space planning exercise inspired us to take out two of the cabinets and look at the wall with four of them instead (two in the middle and two on each side). MUCH better. We loved this configuration a lot more, because not only would it look less crowded, we’d actually feel like we were sitting at desks (which usually have more breathing room than a few inches on each side of the chair). And there’s still more than enough storage space between the four remaining cabinets and our double wide two-tier file cabinet on the other side of the room.
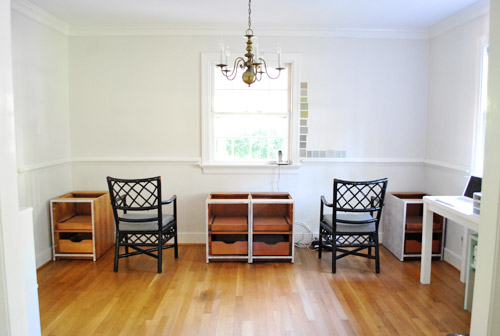
Had we spent more than $6.30 on all six cabinets, it might’ve been a harder decision to ditch two of them, but I think we can handle eating the $2 (and the wasted time spent priming and sanding the extras). And who knows, maybe we’ll even figure out how to repurpose them (Sherry has been yacking about making a play kitchen for Clara for a while, so I’m sure she’ll fill you in if that happens).
Now on to the construction part of this process. The goal was to (1) visually connect the two cabinets in the middle so they’d look like one large two-doored cabinet instead of two cabinets randomly parked next to each other and (2) build the cabinets up four inches so that they’d be standard desk height (around 30″ tall with a counter) so our existing chairs could easily slide under the counter. I debated all sorts of fancy versions of this process, like:
- “I’ll build a drawer!… which would be about 2″ thick… and therefore totally not worth the trouble/expense… so never mind“
- “I’ll build them up from the base so the things in the cabinets are easier to access… by a few inches… wait, it’s a lot easier to build up the top since the bottoms have legs and a few inches won’t make a difference… never mind”
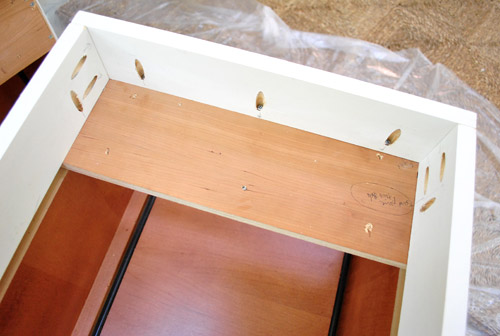
Finally I opted for a simple budget-friendly solution: I just picked up a bunch of 1 x 4″ boards at Home Depot (including some that were pre-primed, hooray for convenience) and cut them to size to create a nice little built-on frame to raise them up four inches.
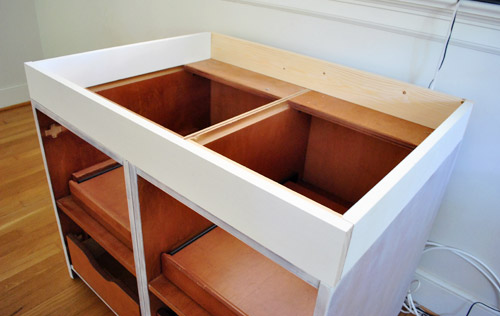
Then using my Kreg jig I drilled some pocket holes to attach the front and side together, and then screwed them into the top of the cabinet. You can see it more easily on one of the single side cabinets in this shot:
Then I attached the back piece which is where I used an un-primed 1 x 4″ (because it won’t be visible at all against the wall and under the countertop). Why? Because an 8ft piece of primed 1 x 4″ was about $1 more, so using unprimed boards wherever they weren’t visible saved me a few bucks. Sure, I could have saved $3.50 more by just using unprimed wood everywhere and priming the visible parts afterwards, but since we already primed all the cabinets we lazily decided that it was worth spending $3.50 for primed wood in the visible spots so we wouldn’t have to break out the primer and do all that clean-up again. We figure finding six dollar cabinets makes small luxuries like an extra $3.50 spent on pre-primed wood ok in our cheapskate hearts.
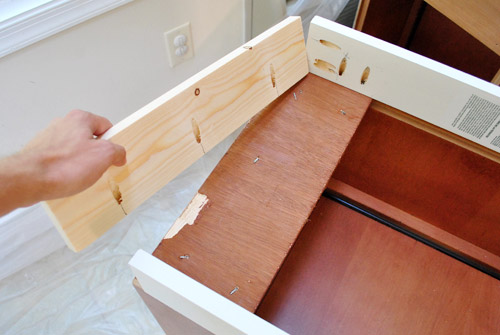
That simple frame accomplished exactly what I needed in terms of building things up and connecting the two center pieces, but the cabinets weren’t thoroughly prepared to handle a counter top quite yet. That’s where some 1 x 3″ boards came into play. I cut a few pieces that would span the inside of my new frame and drilled them into the top of the cabinet. This added even more strength/stability, just because I’m Captain Careful.
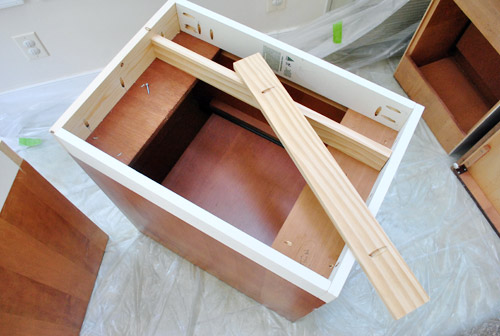
Then I topped that with some leftover 1 x 4″ slats that lay flat – which created a platform for me to screw the counter top into when it comes time. They’re not attached in this pic below, so you can see that they don’t sit level with the frame at this point – but I’m going to add some washers to raise them up a smidge when it comes time to actually screw them in (so it’s all one big level plane):
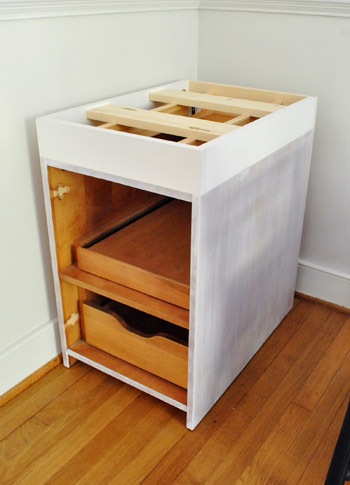
With that, the construction portion of the project was largely over – well except for the counter of course, which we’re still working on and will cover in a few days. We’re doing something similar to the top of our living room console table… sort of (more details as soon as we’re a little further along). Once that’s all said and done, we’re also planning to add some baseboard trim around the bottom of the cabinets (where they meet the floor on the sides and front) to make them look even more “built in.” So yeah, I guess maybe the construction portion isn’t completely over. But we’re good for now.
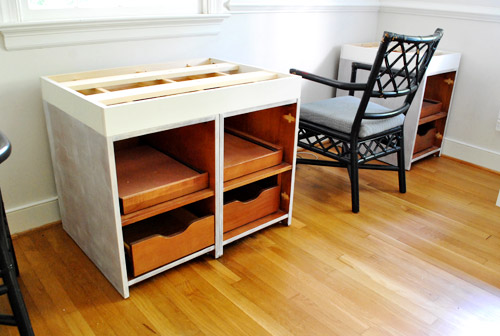
So let’s move on to painting the cabinets. As we’ve mentioned, we’re painting them white for a nice clean look (which will tie into the white built-ins that are visible in the adjoining dining room, don’t wanna get to crazy with colored built-ins near white ones- we just want these to look like they’ve always been here).
We decided this was a perfect opportunity to try Benjamin Moore Advance paint, which a number of you guys have raved about recently. It’s self-leveling, which means it helps coat more evenly for a smoother finish (something that’s perfect for a cabinet project) and it’s a high quality alkyd formula (so it should be nice and durable) and it’s also water based and extremely low-VOC (even after the colorants are added) which is always a plus for us – and is extremely rare for cabinet paint.
The only drawback is that it’s expensive, at least for cheap-os like us (it’s around $45 a can). But as a thrifty reader named Heather suggested, Sherry told the Benjamin Moore guy about a 30% off sale at Sherwin Williams and asked if he could match it. He said he couldn’t do 30%, but offered 10% off on the spot – without so much as a coupon. So she saved around $5 by asking a quick question at the register.
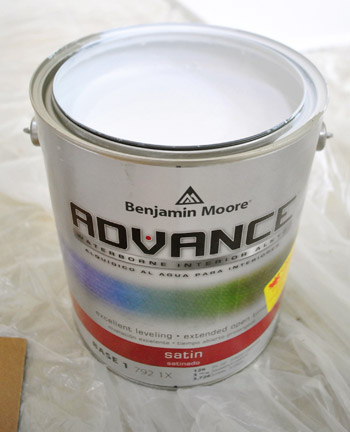
We got the paint in Decorators White (a bestselling color by Benjamin Moore), which is pretty much the perfect white tone according to the lady wife. You could hold fifteen swatches of white paint up and they’d all look the same to me, but apparently Sherry can see all sorts of variations and likes Decorators White the best. Oh and we got it in a satin finish because they only offered that or high-gloss (which I worried would show more imperfections).
Interesting side note – the pic above is taken after we were done painting all of our cabinets. So you can see the insanely small amount of paint we used for this project (it was nice and thick, so it covered really well). This means we definitely could have gotten by with a quart (for around $25) but we’re glad we got a gallon since we plan to use the rest of the gallon to paint the cabinets in the kitchen down the road. Which might further take the burn out of a $40 gallon of paint. Haha.
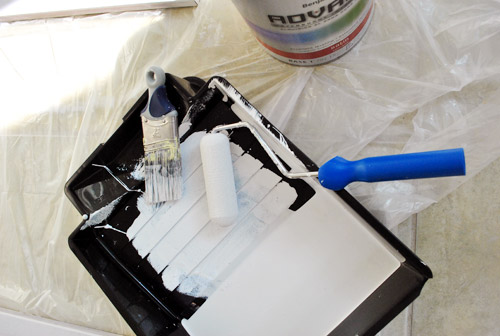
Sherry’s tools for the painting task were both a brush (to get in cracks and corners) and a small foam roller (for a quick, smooth brushstroke-free finish on large surfaces).
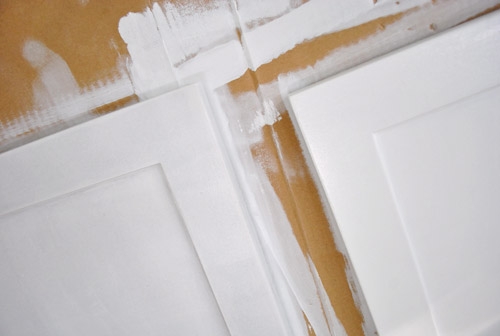
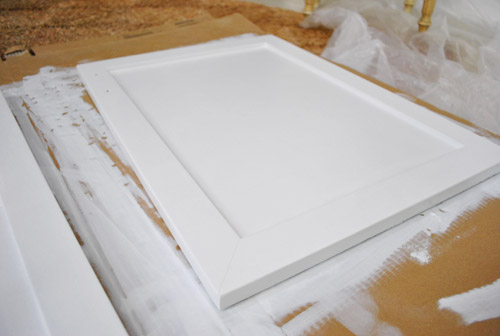
You can (hopefully, although it depends on your monitor) see the slight difference between one coat (on the door on the left) and two (on the door on the right). Two coats probably would’ve been fine, but we did a third just to be safe – and to make sure there wasn’t a difference between the areas that we primed and painted and the pre-primed 1 x 4″ boards that we only painted (which were much lighter than anything else to begin with). Three thin and even coats (remember, this is Sherry’s mantra) definitely did the trick, and as seen from the photo of the paint can above, we hardly used any paint. Which is nice since we initially wondered how far it would go.
Here’s a finished door after three full coats. Each coat took Sherry about 30 minutes, which wasn’t bad at all. Except that the can called for over 16 hours of drying time between coats, so instead of finishing this process in an afternoon it was a bit more drawn out over the course of a few days. But everything cured up nice and strong and looks great. As for Sherry’s review of the Advance paint: “I want to marry it.” So yeah, she loves it.
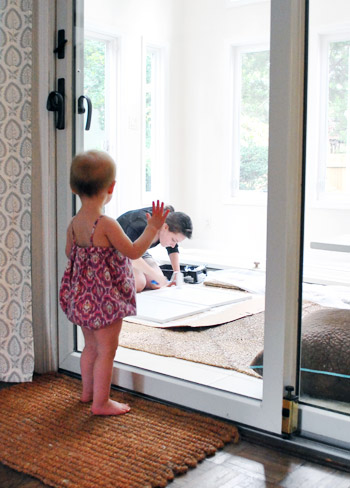
And of course, a few consecutive days of painting is made much easier when you’ve got a fan club watching you intently (as some of you already saw on Young House Life). Here’s the wife in the sealed sunroom sporting her inside-out painting clothes with the bean looking on. You can see that we just used some leftover cardboard (from old Ikea purchases like the file cabinet) to paint on.
Even though the Benjamin Moore Advance paint is low-VOC, it’s not no-VOC. Which is why Sherry painted all of the doors in the much-ventilated / Clara-and Burger-free sunroom (also to avoid baby hand-print and puppy paw-print mishaps). We had to paint the cabinet bases in place in the office (the big middle section was too heavy to lift once the two cabinets were built up and connected), so we just kept Clara out of the room and opened all of the windows and ran some fans (Sherry painted during her nap, so by the time she woke up things were aired out and then we just kept her out of the room so we didn’t get little fingerprints going on). Thanks to a little flat-cereal-box-under-the-spot-being-painted trick (to keep paint off the floor), we got to avoid putting down drop cloths. Oh yeah, we’re rebels.
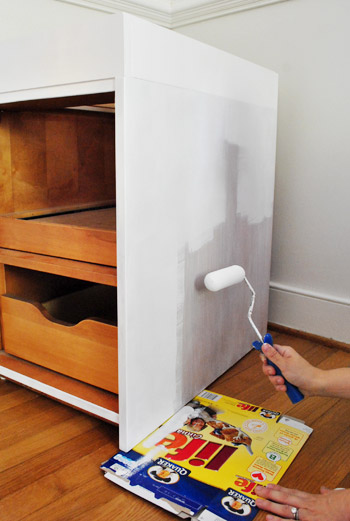
Oh and the shot above demonstrates how nice the BM Advance paint coverage was for us. This is just the first coat going on over the coat of primer that Sherry added a few days ago. That’s a really good showing for a first coat according to my paints-everything wife.
So here’s the finished piece all painted (and with the cabinet door just laying on top – we later moved that out of the sunroom to make way for countertop progress).
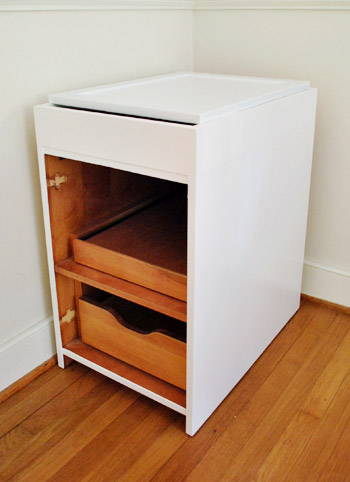
Oh and as for why we didn’t paint the inside of the cabinets, here’s an excerpt from our initial post about that for anyone who missed it:
As for the backs of the doors and the cabinet interiors, from day one we decided that we wanted a nice clean glossy front for our wall to wall built-ins, but to keep the backs and the interiors (and slide out interior fittings) of the cabinets the same natural wood tone that they were to begin with. We certainly know that not everyone would go that route, but the new KraftMaid drawers that we installed in our first house’s kitchen renovation had wood interiors and we really liked them (you can actually see some of them here full of tools):
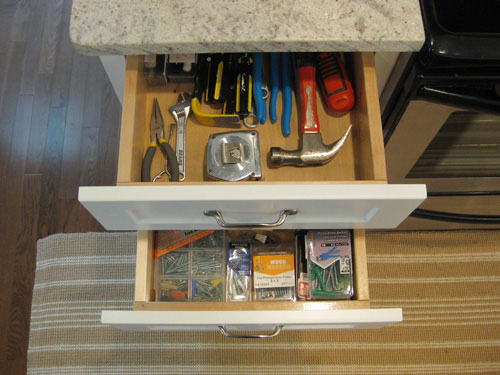
They had glossy white drawer fronts, but inside they held up a lot better to natural wear and tear than anything painted (since we’re weirdos who will stash hammers and screwdrivers almost anywhere). And we actually don’t mind the whole wood + white look (sort of like the dresser we refinished for Clara). Although in this case we decided from the outside that the cabinets would look entirely crisp and white (no contrasting color in the door front or anything), and only when you swing them open will you see the wood tone.
But back to our freshly painted cabinets. The white paint was a big help in making the middle pair seem like one piece. We contemplated adding some caulk or wood putty in the slight crack down the center, but we held off since we thought it might be less obvious once the doors were reattached.
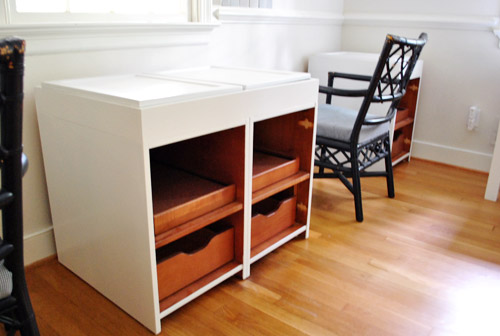
And sure enough, they were. So here’s everything built up four inches and fully painted. We just needed to wait a few days to attach the cabinet doors…
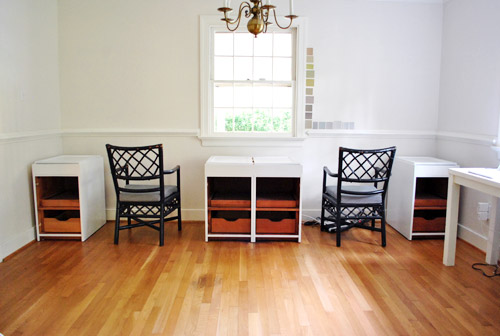
… which looked pretty darn good once we added those:
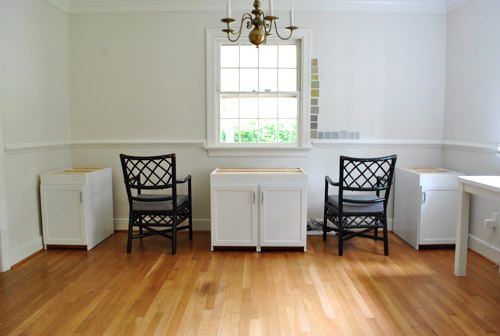
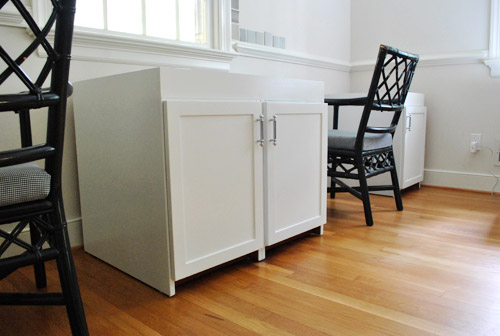
Of course we still have to add molding around the base of them all (so they look even more built-in), which will hide any areas down by the legs that still appear to be wood toned. And we’re going to trim out the sides as well (so they appear to attach to the walls on either end). We’ll hopefully be back with those details soon. But in the meantime, you know we love a budget breakdown, so here’s the wall-to-wall desk tally so far:
- Cabinets (from Habitat For Humanity ReStore): $6.30
- Kilz Clean Start No-VOC Primer$0 (leftover from painting the kitchen paneling, but it would be around $20 to buy for those wondering)
- Electric sander & sandpaper: $0 (already owned, but would be around $25 to buy)
- Benjamin Moore Advance paint (in Decorators White, satin): $40 (thanks to 10% off haggling/begging)
- Pre-primed & unprimed wood to build up cabinets (from Home Depot): $51
- TOTAL: $97.50 (which was about the cost of one unfinished base cabinet at Home Depot or Lowe’s)
We’ll also be back with all of our countertop details soon- just gotta make enough progress to snap some pics and share that stuff. One thing is for sure: we can’t wait to use our new double desk. And yes, Sherry has been walking around saying “double desk” like Robert DeNiro says “double dose” in the Little Fockers trailer (not sure how I feel about this weird club mix of it below though):
What did you guys do over the long weekend? Any building? Painting? DeNiro impersonating?
Psst- To follow our cabinet makeover process from the beginning, here’s the post about finding our $6 cabinets, the one about other places we looked, and the post about sanding and priming the cabinets to prep them for paint.
Pssssst- I just shared one of the coolest dresser makeovers we’ve ever seen on BabyCenter (and it’s not just for kids).

Kim says
About to tackle my ugly wood kitchen cabinets. Thoughts about using this particular paint for those?
Sara @ Russet Street Reno says
It looks so great! How are you going to continue the base trim under the doors, when your existing base trim is so much higher than the ‘feet?’ When we made our built-ins, we put them on a 2×4 frame to raise them up 5 inches, and the base trim went cleanly underneath the doors. I’m interested to see how you handle it…can’t wait to read all about it!
YoungHouseLove says
We’re just going to use shorter trim for that area (sort of like how folks use quarter round to trim things out). We’ll keep you posted!
xo,
s
Kirst says
This is looking really good guys. I’m hoping to do a similar built in bench in our new home office and was contemplating using six cupboards like you initially were going for but I really like the idea and look of the four. I’ve only just recently found your blog and I love it, thanks for all the inspiration. I’ve gone back and read all the archives, that was a project in itself!
Elisa says
Thanks to you guys I am repainting my kitchen cabinets. We went with high-gloss white thinking it would wipe clean better, because the cabinets above our stove get really greasy. We also thought we would use a brush so it would go on more smoothly, without the texture of a foam roller, and thus clean up better, but I see you used a foam roller and now I’m second guessing myself. I still have another coat to go before mine are done… should I use a roller on the last coat?
YoungHouseLove says
It’s really up to you. If you don’t have brush stroke or globby issues with the brush, I say stick with it!
xo,
s
rae says
I cannot believe you got those cabinets for under $7!! that is an absolute steal! I’m so J….hawaii has to be the absolute worst place for thrifting and garage sales. everyone here pretty much rolls w/ plastic all the way.
Looks great so far and I can’t wait to see the finished product.
Natalie says
Oh my gosh, the cabinets look GREAT!
I’m SO glad you guys opted for using 4 instead of 6. My immediate reaction when I saw the first pic was “uh oh…” so I’m glad you tried it out in the space first.
Can’t wait to see it all put together! :)
Jill B. says
This project is so creative! You two never cease to amaze me! Can’t wait to see the final product!
Joy Franks says
I fell in love with Benjamin Moore paint. We live on a ferry-served island so going to the mainland is something we rarely do which causes us to buy a lot of things right here. I wanted the color, Lush, in semi-gloss for our kitchen cabinets. I could only get it in pearl finish so I said okay. (I certainly didn’t want flat) Wow. I’m so glad I ended up with the pearl finish. It went on very easily and looks beautiful. Then we decided to paint the outside of our house we went with Benjamin Moore once again. The exterior paint which was very thick and easy to brush on. I think in paying more for Benjamin Moore paint, we’ll have a finish on the cabinets and exterior that will last for a fairly long time. The old saying, “you get what you pay for” really does pertain in this situation. Your desk is going to look fantastic!!
Brent Ford says
Why don’t you use the two wood cabinets in place of the Ikea cabinet on the other wall. You’d essentially make a file cabinet from it and it would look more cohesive. Also, it would look more cohesive if the cabinet hardware all matched, whether you keep the Ikea cabinet or not. Just a thought…
YoungHouseLove says
We thought it might be too matchy matchy for us (we’d prefer that the other furniture in the room look collected over time, so we like that the file cabinet is a bit taller and once we add a chair and ottoman into the other corner it won’t look too kitchen-y with cabinets everywhere (at least we hope). Who knows where we’ll really end up though. Haha. We’re definitely just beginning this whole office makeover thing.
xo,
s
Erin says
Oh! I had thought when I saw the cabinet painting post that you were painting the kitchen cabinets! (Were you painting them, too? I’m just dying to see them glossy white!!)
These look lovely. Great work! I adore the handles. I would be admiring them constantly, had I done the work in my own house! :) Can’t wait to see it all put together!
xx
YoungHouseLove says
Oh yes, the kitchen cabinets are definitely on the list once we make some other decisions in there (we like to paint cabinets as one of the later steps of a kitchen makeover – just so they don’t get scratched or hurt during other phases like redoing the backsplash, etc).
xo,
s
lcg says
How do you work it out (after painting and cabinet making etc) to have the floors sanded/refinished? Do things get damaged?
YoungHouseLove says
Just like the built-ins that we added to our bedroom in our first house, these will just stay in place and the floor will be refinished around them. Our floor guy said that if someone else wants to remove them and refinish those small spots to match it’s an easy enough job. We never removed the built-ins in our old master bedroom – but did tell the new homeowners about that detail when they made an offer and it wasn’t an issue).
xo,
s
karen says
looks so good guys! so curious to see the counter top.
oh yah..i’m liking one of those darker greyish-greenish-clayish colours for the room.
Gigi says
One burning question? So how are you going to clean under the heavy nighstands? All I can think about is little dust bunnies and fur being sucked into the dark recesses and then being hard to reach with a Swiffer to clean.
Other than that…I love them and the whole desk concept! Can wait to see the finished room. I love your blog too. One of the only ones I read-read vs skim reading! =)
YoungHouseLove says
We’re adding baseboard so nothing will get under there. It’ll be all sealed and raised with trim around it like base cabinets in a kitchen. Hope it helps!
xo,
s
Gigi says
Ahhh, I must have missed that. Very cool. Thanks for responding!
YoungHouseLove says
Sure thing!
xo,
s
Stephanie L says
Looking great you guys! Can’t wait to see the finished product – I’m curious to see what the trim looks like on the bottom/sides.
The hubs and I spent the weekend working on our wooden front porch – with some help from your post from the old house! We wanted to prime and paint the whole thing over the long weekend…but it turns out one of the corners was rotted through, so instead we learned how to use a reciprocating saw and how to patch tongue and groove decking. Turned out great and no one lost a finger :)
YoungHouseLove says
Wow- that sounds intense! So glad it turned out so well!
xo,
s
ashlee says
hey sherry,
boy was i glad to see this post today! i started painting the kids’ playroom table, which i bought second hand, and it is solid oak. some people would shame me for painting a solid oak table, but whatever! colour, baby!
anyway, i am using zinnser (spelling?) 123 bulls eye primer. i sanded the table HARDCORE. i’ve put two coats of primer on so far, and i can still see the lines of the wood grain. should i try a third coat of primer? or does this indicate that i’m using the wrong primer?
YoungHouseLove says
Hmm, I can always see wood grain through primer, so as long as you use a nice high quality paint (preferably something alkyd and self-leveling like the Advance stuff we used) you should be all set after a few thin and even coats of that. Good luck!
xo,
s
ashlee says
oh….i thought it was just me who could see it through primer. lol. see, obviously i’m a total AMATEUR painter. i have some leftover behr ultra white and bj decorators white. i think i’ll slap a coat or two on tomorrow. they say you shouldn’t leave primer sitting too long without a paint coat, eh? i haven’t decided what colour i’d like to do the table yet. i might as well just do it white for now while i think it over. i’m thinking maybe a chalkboard surface…but my kids might be getting a bit old for that :(
YoungHouseLove says
Ooh chalkboard sounds fun, and white is always a classic choice. Good luck!
xo,
s
Lisa says
Hi guys! I painted my office this weekend and learned how long it takes one person to paint a room! Quick question for you, how do you clean the brush after using oil-based primer? I had to run out to the store mid-cleanup for some nasty solvent. It’s really toxic so I know you have another way. Thanks!
YoungHouseLove says
We like to use mineral spirits, but have also heard that olive oil can do the job well too (just takes some good scrubbing).
xo,
s
Jill says
Did you guys see the item on woot today? Seems like something you would want, it’s a Dremel kit. http://www.woot.com/
YoungHouseLove says
Thanks for the heads up! John loves his Dremel.
xo,
s
Rhune says
I was told that I should use oil-based primer when painting furniture, as it cures to a harder finish than water-based primer. I’ve also read that oil-based primer helps prevent (or alleviate) the sticky/tacky issues from regular semigloss top coat.
Since you used a water-based primer this time, do you think the finish will be hard enough? Or perhaps the base of the primer didn’t matter as much because –
(a) you used a Waterborne top coat?
(b) the cabinets aren’t in a high moisture/splatter area such as kitchen/bathroom/laundry?
(c) it’s not a horizontal surface that you will be putting things on, like tabletops and shelves?
Hope my text shows up okay. I don’t know how to format an indented list in a blog reply-box.
YoungHouseLove says
I always always used oil-based primer. But then we had Clara and that stuff is nasty, so I gave this Kilz stuff a try since they’re a very reputable brand. My experience: I love it just as much as the oil-based stuff. We didn’t have any issue with tackiness or curing. Thin and even coats are key for sure, but ours is nice and hard. I wouldn’t have been able to tell there wasn’t oil-based primer used if I hadn’t have done it myself! And I plan to use the same method in my kitchen and when painting furniture in the future (even things like tables where you rest things on the top). Hope it helps!
xo,
s
Pamela Heller says
LOVE these cabinets. I am definitely going to use the same paint for my kitchen cabinets. I am actually waiting to do mine until you all do yours, so that I will have a boost of confidence. I have the same granite that you do, so it will be great to see how whatever color you paint them turns out.
Nikki says
I know you commented on putting 3 in the middle, but did you consider two on each side and only one in the middle? It just seems a waste to not have more storage, i.e., installing 5 cabinets instead of 4… inquiring minds want to know!!
YoungHouseLove says
Yup, we tried that but it looked too top heavy with the big double window above just one small cabinet. Sorry we didn’t include pics of the other arrangements, but we just liked this one best. And I have big plans for the two leftover cabinets!
xo,
s
sarah b says
thanks so much for your detailed posts. i’ve learned so much from you guys!
a question, though, regarding the cabinet color and trim color. you used the BM decorators white for cabinets, and Olympic white for the trim. did you have any issue with the whites looking weird next to each other? we just bought a house and while the previous owner left the paint cans, we don’t know what the colors are. i was thinking of going with one of the whites you recommend for a bookcase, but am worried it might clash with the existing white trim. am i being too anal?
YoungHouseLove says
Happily those two whites look so similar it cant be detected. Hope it helps!
xo,
s
carrie says
hi guys- long time reader, first time poster!
i’m in the process of redecorating and just had some shelves made out of solid pine which i’m planning on painting a high-gloss white. after your rec, i’m pretty sold on getting the benjamin moore advance (in high gloss white), but i’m wondering if the “high gloss” instead of semi gloss means i should try for an oil based primer… any thoughts? i’m also painting this in my small one bedroom apartment (with the windows open of course), so low-voc is preferable…
YoungHouseLove says
Hmm, I bet you could get by with the no or low-VOC primer if you tried, but of course the oil-based primer plus high gloss paint would be super smooth and awesome! Either one could probably work so it just comes down to personal preference.
xo,
s
Kim Corazzini says
Not sure you read late comments but I was wondering if you used any sort of sealer post paint? You recommend it in some of your older posts. I’m getting ready to refinish a craigslist antique dresser and just checking!
Thanks,
Kim
YoungHouseLove says
Nope, we didn’t use any sort of poly since these (whenever we paint cabinets we don’t use a sealer since primer + a high quality paint is usually the recommended method). As long as the paint isn’t flat (like satin or semi-gloss) it has wipe-ability and poly can yellow things or gum them up a bit so it’s harder for them to dry). They came out great without it and still look mint after over a month of use!
xo,
s
amanda says
So are you guys planning on using the satin finish or high gloss finish of the Advance paint on your kitchen cabinets? Do you think you’ll stick with the Decorators White to match with the cabinets in your office or mix in a different white in your kitchen?
YoungHouseLove says
We’ll definitely use what we have (we love the color and used such a small amount) if we go with white. Might do a slight tone on the cabs since the counters will be white. Not sure yet!
xo,
s
Courtney says
I have been studying your DIY desk for months, and I am just now ready to do something similar in our office (had to paint, re-do flooring, oh and I had a baby in there too). I was perusing the comments and all the posts but I can’t seem to find how much room you now have for your chairs? I know initially you had 30 inches but then you dropped two cabinets. Can you let me know the measurement if at all possible? Thanks so very, very much!!!
YoungHouseLove says
Sure, it’s 44″ between the cabinets for the chairs! It probably could be tighter and still be comfy (maybe don’t go smaller than 35″?) but this is comfy too (and it’s just the measurement that worked out by ditching the two cabinets- haha).
xo,
s
AmyL says
Quick question on painting the cabinet doors, did you paint the backsides too? I couldn’t tell from the post. Thanks!
YoungHouseLove says
We actually left the inside of the door unpainted since the inside of the cabinets were unpainted, so it’s a two-toned look with white on the outside and wood on the inside!
xo,
s
Lindsay Y. says
So I know this post is now super old, but I just started painting a dresser using BM Advance in Decorator’s White and have a question for you if you have a chance!
So far I’ve done two coats, and it is looking good, but in some spots it looks a little streaky / grayish / not totally white white. Did you guys come across this at all while painting these or your kitchen cabinets? Do I just need to do another coat?
Thanks!
YoungHouseLove says
Hmm, I would make sure your paint is shaken really well and let it dry and do one more coat if you need to. Hope it helps!
xo,
s
Sarah says
I have recently discovered your blog, and absolutely LOVE it! I am especially interested in all your great tutorials about refinishing furniture and cabinets.
I have a question though: How do you determine when to use a regular latex paint with the safecoat (like you did with Clara’s dresser) vs. using the BM Advance paint with no topcoat (like you did for this desk and the kitchen cabinets)? Thanks so much!!!
YoungHouseLove says
When we want something to last like crazy and be super durable (something that gets hard hits everyday like cabinets and desk door) we go for the Advance. When it’s in a kids room and although it might be handled everyday, it’s handled more gently (you don’t bang the drawers like closing and opening cabinet doors in a kitchen) we use latex paint (preferably no-VOC) and Safecoat.
xo
s
Lani says
I’m about to paint our kitchen cabinets. Since its been a couple years, can you tell me how the BM Advance has held up? Is it really more durable than regular latex? Also, a painting expert said that the white will yellow over time. Have you experienced this effect? (We plan to paint our cabinets an ultra white) (Also, I apologize if this is a repeat question but the responses were overwhelming to read through!)
Thank you for your blog. It really does give us ‘ordinary folk’ the inspiration to try projects that sometimes seem intimidating.
YoungHouseLove says
We’re so happy with it! Holds up so well. We’d never use anything else! It’s definitely very durable and hasn’t yellowed at all (never use a poly over paint, that tends to yellow things a lot, and even lower quality paint can yellow faster which is why we love Advance since it’s made for cabinets). Hope it helps!
xo
s
Lani says
Thank you SO much for your response! I’m off to buy some BM Advance tomorrow. Your blog and response has given me the confidence to go for this project! Your blog rocks! It’s so detailed and you post such great tips.