Somebody put a cork in us, because we’re done with our latest swift and simple DIY project. We wanted to create a convenient little bulletin board in the kitchen to keep favorite recipes and meal ideas on hand (and on our mind- anything in a recipe book is so far out of sight that it’s immediately forgotten). But we also didn’t want our collection of clippings to clutter things up in the kitchen.
Our solution? A hidden pin board that we created in around ten minutes for under $5. And all we needed were a four-pack of cork tiles from Target (snagged for less than 5 clams) and a bunch of push pins (which we already had in our junk drawer). The cork tiles came with little self adhesive squares for easy hanging, so the entire process was fast and furious.
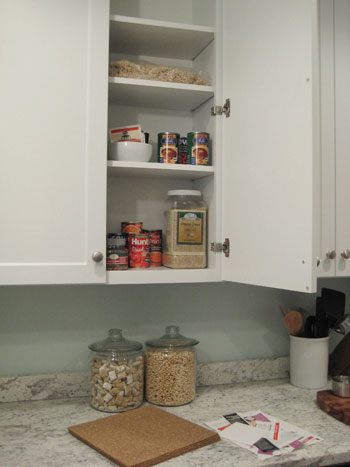
Here’s what we started with: a blank interior door, a pile of cork squares, and a stack of recipes and easy make ahead meals that we’re constantly forgetting about:

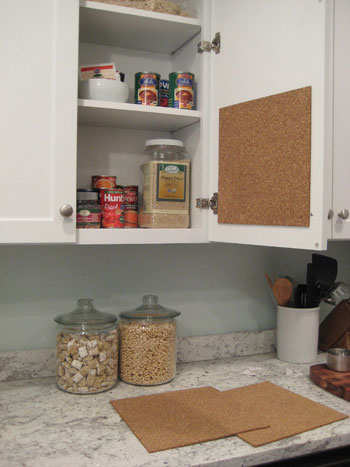
In minutes I had my first tile up on the door. Other than making sure that the cork square was super straight before sticking it on, this step was no sweat.

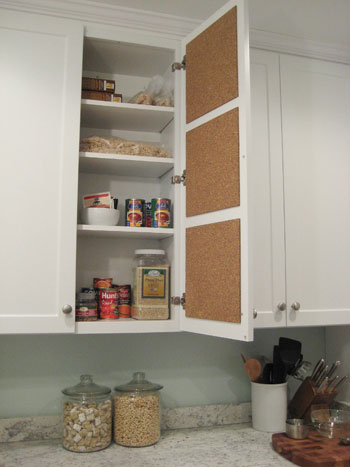
I decided I wanted a bit of space between the tiles, and determined just by holding them up that three squares would fit perfectly on the door with a little breathing room between ’em. Houston, we have a pin board.

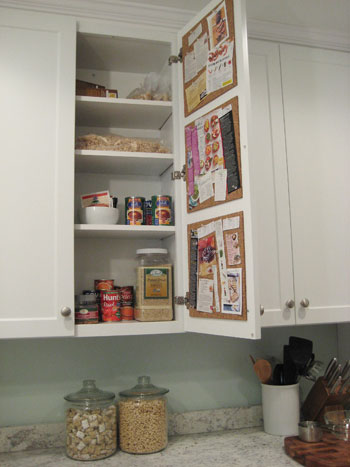
Then I just got to work pinning up all of the forgotten recipes, meal ideas, and food related paraphernalia that we used to collect and neglect. Finally they have a proper place right in front of my face.

The result is an inspiration board of meal ideas and recipes that remind us of their presence every time we reach for the spices or the olive oil. I even see it in the morning when I’m making oatmeal so I have time to think about what we could have for dinner waaay ahead of time, which is actually a novel idea (no more forgetting to defrost things). And it’s also a great place to pin shopping lists or grocery store coupons so they’re all in one spot.
We even toyed with the idea of painting the inside of the opposite cabinet with chalkboard paint to create a message center for jotting down notes, reminders, and even shopping lists- but we actually wondered if the fumes from the paint were the best idea in such a contained space full of food (maybe there’s no VOC chalkboard paint, which would definitely make us reconsider).
But even without the chalkboard, you gotta love that the whole cork square project was easy, efficient, and super inexpensive. Plus it can be adapted to display anything from chore lists for your kids to extracurricular schedules that usually clutter up your fridge. Kitchen organization never tasted so good!

Shannon says
What a great idea!! I just LOVE LOVE LOVE your site!!! Thanks so much for all your wonderful ideas!!
Deanna Divino says
Oh… as if I didn’t have enough DIY projects going today… now I have to add this one!! :) Thanks!
jusme says
That’s too funny…I’ve been wanting to do something like this since my husband and I purchased our new home in September. Thanks for all the ideas. We haven’t started remodeling yet, so your site is coming in handy!
katie says
we’re planning to do something similar with magnet boards for our spices. my husband’s formidable spice collection lives in shakers with magnetized backs and labeled, see-through lids. currently they reside impressively on the side of our fridge, but the ultimate goal is to put them in a cupboard so as to keep the spices out of light and heat.
Renae says
Oooh, command strips, I have a ton of those! Why didn’t I think of that? Also, I wanted to comment on your chalkboard idea. Uppercase Living (and maybe other sources) have those rub-on chalkboards. You peel it off the backing and then use the credit card thingy that comes with it to smooth it on. That might work for you guys if you’re still interested!! Thanks for the post tip. :)
Kristen says
Hi Sherry and John,
First I’d like to say that I LOVE your blog. My sister just informed me of it on Tuesday and I can’t get enough!
Second, I also tried this on my own kitchen cabinets. However, my cork squares fell after only 10 minutes or so. Do you have any suggestions that may keep them from falling?
Third, I noticed a Virginia hat on John at some point on the blog…so, as a UVA grad myself, I’d just like to say WAHOOWA! :)
YoungHouseLove says
Definitely try Liquid Nails or some other adhesive to keep them up. Hope it helps!
xo,
s
p.s. John says wahoowa right back atcha!
Kristen says
Thanks Sherry…I will definitely try it! (I still have the cork boards and a pile of paper items to pin up laying on my counter. :)
Stephanie says
I love this! I am going to feature it as part of my Menu Planning workshop this Wednesday on crazydomestic.com
Thanks for the great idea!
Shantay says
I’ve toyed with using these corkboards in my own kitchen, but worry they aren’t thick enough to allow the push pin to hold properly, or will go through and pierce the cabinetry. Have you had any problems?
YoungHouseLove says
Hey Shantay,
Nope no problems at all. Those cork squares are meant for holding pins and they work like a charm. Hope it helps!
xo,
s
Danielle says
Love, love, love your blog! :) When I saw this tonight, I HAD to run upstairs with a cork tile I already had and slap it onto my cupboard door! It took about 5 minutes – my kind of project!!! And it’s perfect for the stray meal plans, recipes, and ideas floating around in there! Thank you so much! :)
Melissa says
Just wanted to share my own version (with props to you guys!). Thanks again for the inspiration!
http://houseography.blogspot.com/2010/06/making-pantry-work-double-time-kitchen.html
Julia A says
Oh, I love this idea!
I have to say, I think you went with the right choice with cork vs chalkboard paint. I used chalkboard paint in several projects for our wedding this summer and I was very underwhelmed. I found it really only worked well once and was hard to wipe clean enough to even see the 2nd application. Maybe some chalkboard cleaner might work but I just wouldn’t want to deal with it on a day-to-day basis. Corkboard is much easier and much easier to replace once it starts to get worn!
Christy says
Sherry & John,
I like this idea a lot, and I have even purchased the same cork squares. However, my cabinet is wider than yours. Should I cut them to fill in the extra space or just center them? My cabinet looks framed out on both sides, meaning the outermost 2 inches or so are thicker wood. Also, I was thinking it would be nice to cover them with a pretty fabric. Do you have any suggestions for how to do that? Thanks in advance.
YoungHouseLove says
We would just center them and call it a day since cutting them might leave raw edges- although you can buy cork by the roll at some places which might allow you to create larger squares to solve this problem. As for covering them with pretty fabric, that’s a great idea as long as the cork is thick enough (so you’re sure pins will stay in, instead of popping out and falling on the floor). As for how to do it, we’d suggest wrapping them with tightly pulled fabric around the backs with clean flat strips of duct tape so they hopefully lay flat against the cabinet and using something like Liquid Nails to adhere them (pressing them hard while you glue so they’re nice and flush). Hope it helps!
xo,
s
Karina Gardian says
Your home is amazing and the fact that you guys do a lot of the projects together is even more amazing..You don’t know me but someone posted this on facebook and now im hooked.I love that you actually share how you do your projects giving other people the tools to make them too and give us ideas for our own homes.I already have seen so many cool ideas that I will probably (attempt) to try.Thank you for sharing with us:)
Karina Gardian
http://www.diynewlyweds.com/ says
Hey Youngsters,
This project was so clever that I had to recreate it in my kitchen! Hope you guys don’t mind, but I used one of your photos as an inspiration photo in my blog (giving your cleverness full credit of course). I’m loving this project, thanks for another great idea!
http://www.diynewlyweds.com/2010/10/kitchen-cabinet-cork-board.html
YoungHouseLove says
Sweet! Off to check it out!
xo,
s
amy says
When you say that you use “pins” to hold up your recipes, what kind of pins are you talking about? Flat, silver metal push pins/thumbtacks or the plastic head push pins, or something completely different?
YoungHouseLove says
Those clear push pins that look like plastic or acrylic (sold everywhere like Target, Office Max, etc). Hope it helps!
xo,
s
Amanda says
I love this idea. I did something similar in my kitchen. I made one of my cupboard doors dry erase on the inside. Either Home Depot or Lowes (I forget which) sells a stick on sheet with a dry erase finish. It is just a thin sheet, almost as this as contact paper and it’s super easy to apply. I think it cost about $10, without sales tax. It only came in one size, i believe- something like 20″x10″, give or take a couple of inches.
Jenny says
someone may have already said this, but you can make you own chalkboard paint! Any color and paint, check out martha’s directions http://www.marthastewart.com/271574/make-custom-color-chalkboard-paint
YoungHouseLove says
Love it!
xo,
s
Samantha Severson says
I love this idea. I don’t have enough cupboard room in our house, because it was built in the 1940s and everything seems to be small in this house. But this is really the perfect idea. I tried this project this weekend, and also added some “pockets” on the inside of the doors to hold utensils etc.
Thanks for such an awesome idea!
Jennica says
We did the same thing with sheet metal for magnets. It is so clean and so handy. Thanks for all the great ideas.
Ella B says
Great blog! Didn’t read through all of your comments so not sure if someone already suggested this but I amazon sells chalkboard contact paper: http://www.amazon.com/Kittrich-Corporation-Chalkboard-Contact-Paper/dp/B000KKMO90/ref=sr_1_1?ie=UTF8&qid=1314552706&sr=8-1
This would solve your fumes problem! Thanks for all the ideas.
Lisa says
Curious about name of paint color on backsplash. thanks!
YoungHouseLove says
That’s Glidden’s Gentle Tide. Hope it helps!
xo,
s
Monette says
Thanks for sharing! I use our fruit basket to dump receipts,recipes,coupons,etc… in my kitchen.:( It is pitiful. I can’t wait to do this this weekend.
RachelSD says
Hi guys, just thought you’d want to know the November 2011 edition of Better Homes and Gardens shows a cork-on-cabinet organizational project similar to yours!
YoungHouseLove says
No way! That’s too funny. We’ll have to check it out!
xo,
s
Bonnie says
I found this on pinterest last night and love it! I repinned it as well on there.
I hang my daughter’s school calendar and dental reminder cards and such on the fridge all the time. When we got our new stainless steel fridge a few years ago, for some reason, the magnets don’t hold very well. At least a few times a week, when I open the fridge, a few papers end up flying off the fridge, and with my bad knees, it’s an ordeal to pick them up. Last time it happened, the paper went by the cats’ bowls and I ended up knocking over the bowl of water as well… fun, fun :/
Can’t wait to do this! Will be doing it without telling husband first ;o) as I know he’ll be against it, but once it’s done, what can he say? lol
Andrea says
Hi! I’ve been using this idea for a while, and I couldn’t keep the pushpins in my cork. So I just started using a mini-stapler to post items, and this is working great (without any damage)!
YoungHouseLove says
Love that tip!
xo,
s
julee says
Hi!! I love this! What type of adhesive did you use to adhere the cork board?
Thanks!
julee
YoungHouseLove says
We just used the self-adhesive pads that came with our cork pads, although something like Liquid Nails could work too!
xo,
s
ali says
Ha ha – in related news, Target Corp execs meet next week to discuss the nationwide unexplained run on floppy cork squares.
YoungHouseLove says
Hahahahaha. Get your cork while you can, people!
xo,
s
Dora says
Made my own cork message board in pantry. I can not put anything up on my refrigerator doors, this was a great solution! I read about the issues with the cork board sticking to wood. I used carpet tape to tape the cork boards worked out great! Thanks for the great idea!
Jeannie says
I live in an apartment and would love to do this. Any idea how well those come off? I don’t want to damage the cabinet doors.
YoungHouseLove says
I would use 3M removable velcro or other temporary adhesives that they make- just in case!
xo,
s
Laura says
Shoot! I went to target for these and they didn’t have them in the store or online. I am searching Amazon now.
Thanks for the great idea!!
Laura
Lesley says
Ended up here from the soup can storage post.
Know we are not even talking about the same kitchen anymore, but there is a way to apply chalkboard surface without paint. I bought a roll of adhesive drawer liner (“MacTac”) at my local $ store that is meant for this purpose, it is matte black. Should be ‘seasoned’ like any black board surface, and works great!
YoungHouseLove says
So smart!
xo,
s
June Elder says
Loved the cork board inside cupboards…I’m picking up some next time at Target…June
Jennifer {Pure & Simple Organizing} says
Hello!
Love the project! I am a blogger for The Charlotte Moms and working on a blog post about organizing kitchens.
http://www.thecharlottemoms.com/
I would love to use the last picture from this post, and am required by the blog owner to ask for permission, and credit details.
Thank you so much!
YoungHouseLove says
Sure! Feel free to use that pic with a credit/link back here :)
xo,
s
Jen says
I use a peel and stick chalkboard sticker inside my cupboard door for a grocery list. I bought a chalkboard marker for less mess. I take a picture of it with my iphone whenever I go grocery shopping. No paper wasted for lists anymore! I love it. :-) I might put one on the neighbouring door for a to-do list.
YoungHouseLove says
So smart!
xo
s
Cariann says
I love this idea. I am thinking of doing this inside a couple of cupboards. My spice cupboard needs a place for bulk recipes and shopping lists..
Genevieve says
Hi…I did this yesterday as I love love love the idea … and we have a stainless frig (which by the way, I HATE stainless…if we had our choice, I would have nice clean white appliances) so nothing sticks…but, color me stupid… the pushpins don’t push in all the way to keep things secure… what did you (or anyone) do/use? I don’t think I can cut the pins as they won’t go thru paper then…sounds so ridiculous, but it has me stumped! :(
YoungHouseLove says
Maybe double up the cork so it’s thicker by somehow adhering a second layer? Or search for shorter pins? I think they vary in length so those flat pushpins might have less of a pointy part than some of the long clear ones.
xo
s
Genevieve says
didn’t read the second page! LOL… I was at goodwill (recycle/reuse) this weekend and found an old, but still in package, pink Swingline Tot stapler with staples for 69cents!!! PERFECTION!!! I leave the mini stapler in the cupboard (with the staples) … it works perfectly with the thin corkboard, as that fits in the recess of the door as if it was made for it! … next.. tackling the clothespin lamp! YES!!! :) Thank you…enjoying your blog!
Tammy says
Personally I like command products for hanging things up that won’t damaged walls-like in a rental
Tammy