Whilst discussing office plans last week, a few of your comments about the blue trim situation in that room were the push that we needed. We were fooling ourselves to think we should paint all that trim by hand (we’re talking baseboards, crown molding, and five windows totaling 66 individual panes). So we decided to bite the bullet, break out the paint sprayer, tape everything off, cross our fingers and toes that we didn’t get any bleed-through on those wood floors, and say hasta la vista to some more blue trim this weekend.
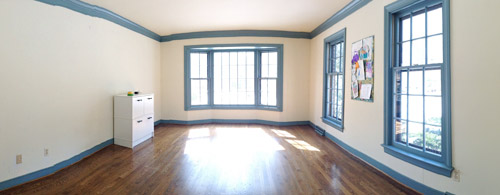
We had painted all of the upstairs trim with the sprayer before we moved in and before the new floors went down, which was an easy no-brainer decision (nothing to worry about ruining). But for the downstairs trim that we’ve tackled (just in the kitchen and foyer so far) we’ve worked by hand – mainly because those rooms needed to remain functional during painting, so we didn’t want to cover them with paper, plastic, and tape while a fog of paint-spray flew through the air. The office, however, didn’t have much furniture to move out, and could easily be sectioned off in a paint quarantine for a few days. So we went for it.
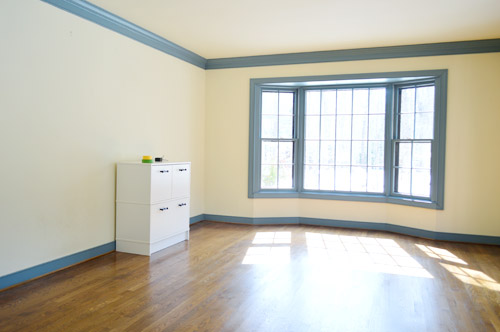
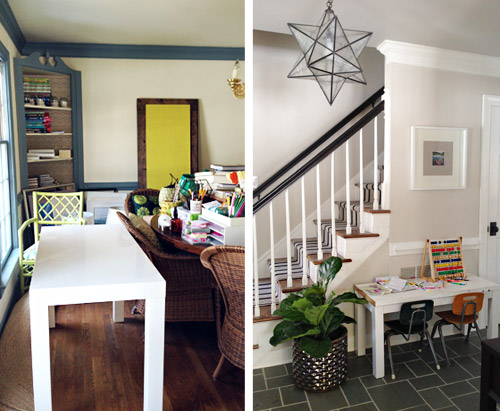
Last Thursday morning we emptied the room (except for the file cabinet, which was heavy enough that we decided just to cover it) and basically took over the dining room and foyer with all of the displaced items. Good thing we’re comfortable with chaos by now.
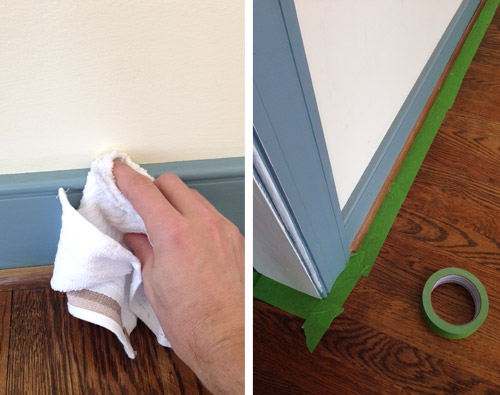
As excited as we were to attack this blue trim using a new method (we’ve never taped off a room to spray it before) we were both curious to determine if we felt like it was ultimately much of a time saver, since the prep is obviously a lot more intense. Although some things – like wiping down the to-be-painted surfaces and taping off the floor – would’ve happened anyways.
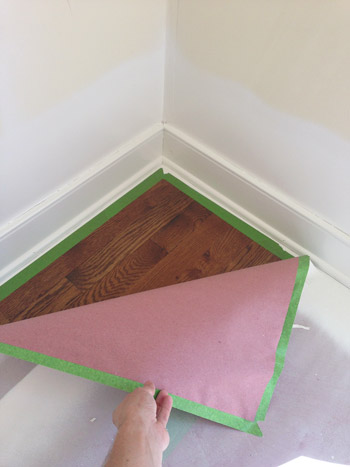
Next we rolled rosin paper out all over the floor since we’ve learned that paint mist gets EVERYWHERE from our particular brand of sprayer (which I’ll admit I’m growing less enamored with – we’ve since switched to this one). We did our tape edging and our rosin paper as separate steps, just so we could focus on getting the taped edges nice and secure (paint on the hardwoods = our nightmare) before shifting our focus to taping each row of paper down. It meant that we ended up using more painter’s tape than we probably needed to, but the extra precaution felt like good nervous-first-timer insurance.
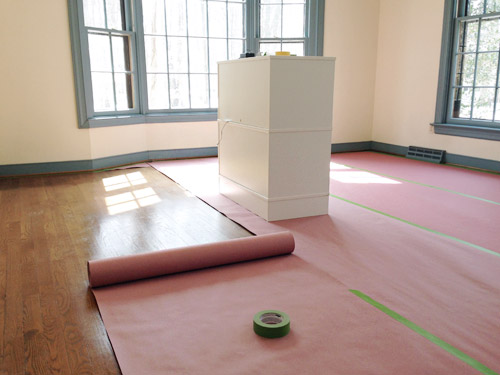
So here’s the room with the floors all taped over. Clara thought it was the coolest thing ever, especially when we let her come draw on the floors while we worked on the next prep step: windows.
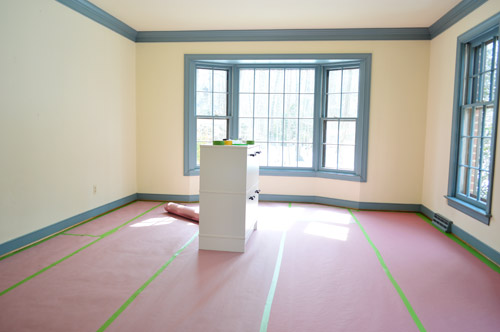
I’ll admit I was a bit perplexed about what to do with the windows. I’ve heard lots of talk about “liquid masking film” that you can paint on your windows before spraying, which helps the dried paint just peel off seamlessly afterwards. It sounded awesome, but after reading some message boards it started to feel too good to be true. Lots of pro painters complained that it took 2 or 3 coats of it to work, so most recommended just doing the old fashion scrape technique anyways.
Wanting to save ourselves a bit of trouble, Sherry came up with the idea to roughly cut some rosin paper squares and tape them to the center of each pane. We didn’t meticulously cover every edge, but figured this would at least save us time on the back-end from scraping the entirety of each of those 66 panes. I left one empty just to test if the paper was a waste of time (spoiler: it wasn’t – that uncovered pane was a giant pain!). Oh and that big paper-covered thing between the windows is Sherry’s overflowing bulletin board full of Clara-art that we decided to just cover instead of removing (it was nailed right into the wall at the four corners as opposed to hanging on a hook).
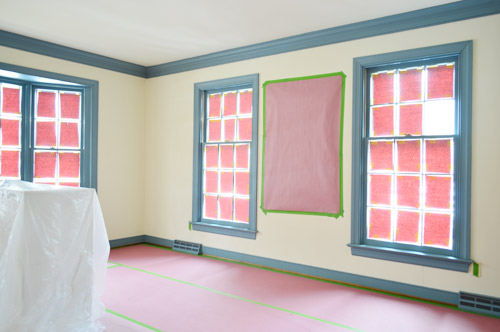
With furniture out (or covered), floors protected, and windows “dressed” our last prep step was to seal off the office from the rest of the house. We carefully taped up a tarp across the doorway (on both the inside and outside of the door frame) and then used this handy instant zipper thing we found at Home Depot (it basically sticks to any tarp and then you slice an opening as you unzip it, giving you a resealable doorway in your tarp. Best $10 we spent on this whole project. That thing was airtight, which meant it single-handedly kept all of that swirling primer and paint dust from sneaking out into the foyer (while still allowing me to enter and exit the room between coats for a lot less hassle than a taped off tarp would provide).
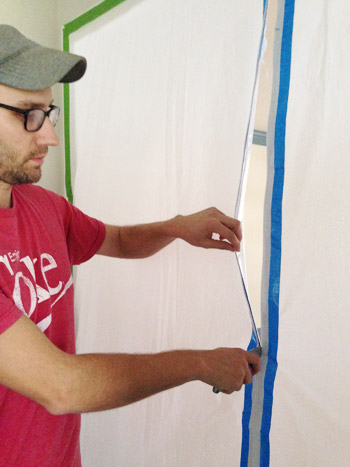
Next, Sherry saluted me and wished me luck as I loaded in all of my supplies: paint sprayer (lately we’ve been using this Wagner sprayer), extension cord, and a can of primer (we used Kilz Premium). I also got dressed in the painters suit and booties that I bought and told Sherry to send reinforcements if I didn’t emerge in a few hours. I don’t know why, but I was actually kinda nervous about how this would go.
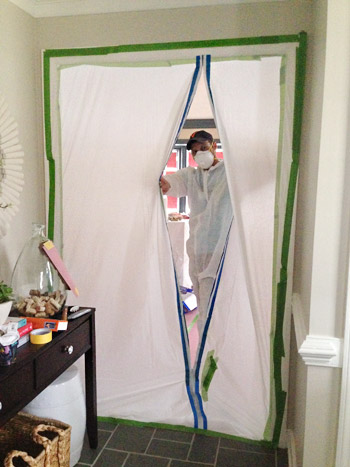
Well, it didn’t go great. At least it got off to a rocky start. For starters, my paint sprayer immediately got clogged, so before I could aim it at any blue trim, my hands were covered in primer and my sprayer was sputtering and leaking. About 30 minutes later, I was finally spraying. By this time it was about 4pm, and between clouds rolling in and all the paper on the windows, the room was suddenly pretty dark. And it only got darker as I sprayed the windows with primer. I’m so used to this room being crazy bright that I hadn’t even thought about needing a work light. Oops.
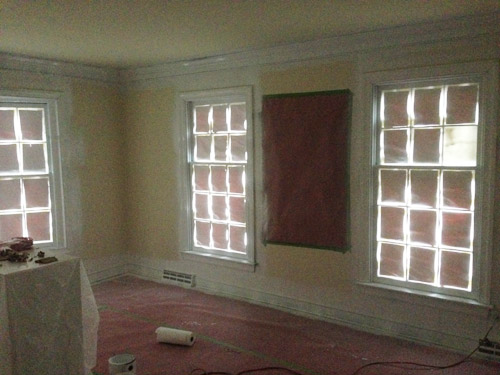
I actually didn’t own any work lights that we didn’t mind getting misted with paint spray (between this and just recently buying a dolly, you guys are probably questioning our preparedness) so I ran out to Home Depot after I was done with the primer coat and bought a couple, along with the trim paint that I’d need the next morning (Simply White in semi-gloss by Ben Moore – but here are some other top white paints you could use instead). The lights revealed that my priming wasn’t perfect, but it’d do the trick.
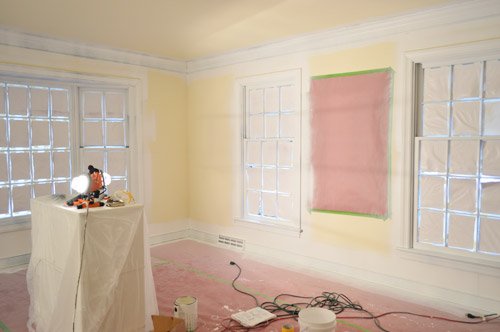
After letting the primer dry overnight (and thoroughly cleaning and de-clogging the sprayer) I woke up early the next morning (Friday) ready for my first coat of paint. This is the room right after I finished that coat. Note the paint fog.
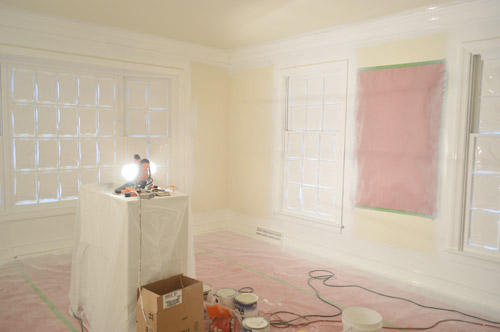
After cleaning the sprayer once again, I let that coat dry the entire day since we had showhouse stuff to do that afternoon in Northern Virginia. I was hoping the next morning (Saturday) would just be a clean up day, but we weren’t entirely satisfied with that single coat of paint. It did a great job covering, but it didn’t get all of the various nooks and crannies of the trim.
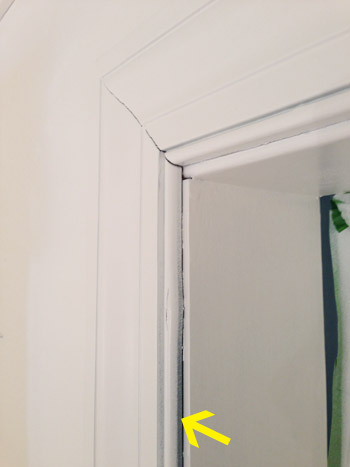
This was one of my fears about spraying this room because it’s virtually impossible to get all of the angles and sides of the trim in one swoop, and you can’t just go back right away and spray from a new angle because you’ll apply too much paint and get drips. So instead of getting to dive into clean-up with Sherry on Saturday, I did a second coat of paint in an effort to get those spots that the first coat missed.
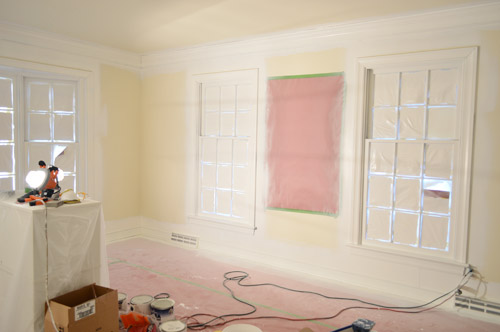
So now we were on Day 3 of paint quarantine in our office, which was also looking not so pretty from the outside. Luckily by now I think the neighbors are used to us always being the middle of a project, so it doesn’t really raise many eyebrows anymore.
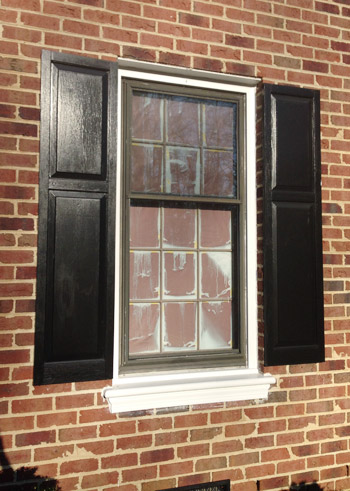
We let the second coat dry all day Saturday, and started the clean-up process yesterday morning. You can tell by the photo above that our homemade window coverings were far from perfect. We learned just how imperfect they were as we started to peel them off… leaving chunks of rosin paper stuck behind in various places. I was ready to curse our decision, and the time we had invested, in those quick little coverings.
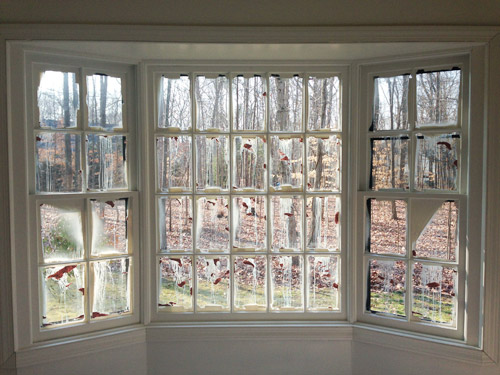
Sherry and I tag-teamed window scraping, since neither of us had the stamina (or the hand strength) to scrape 66 windows clean ourselves. The coverage was so thick (one coat of primer, two of paint) that it took lots of effort to peel it off, but some serious scraping did the trick. In the end, the best method we found was using straight razors to get most of the windows clean, and then going back to scrape the corners with an exacto (we also tried using a putty knife for those corners, which was a little bigger and harder to control, but also worked semi-well).
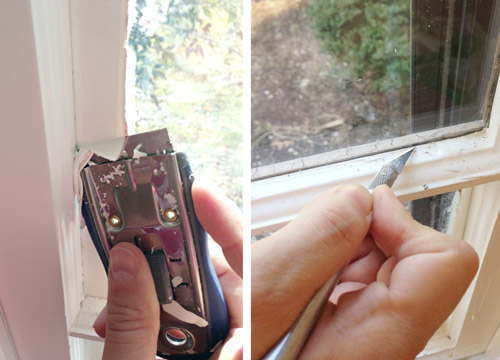
This basically ate up half of our Sunday (with breaks to feed Clara, hand her a few new activities, take bathroom breaks, etc). It sucked. I won’t lie. The whole time I was brainstorming what I’d do differently and it mostly boiled down to not owning windows, which I don’t think is a great solution.
But I said above that we don’t regret the rosin squares. That’s because the pane that we’d left completely uncovered was ten times worse. Maybe even a hundred times worse. My fantasies of this one magically peeling off in one giant sheet were far from reality. It was hard and grippy, so we could only chip it off slowly. It took Sherry a good 30 minutes to do just this one pane.
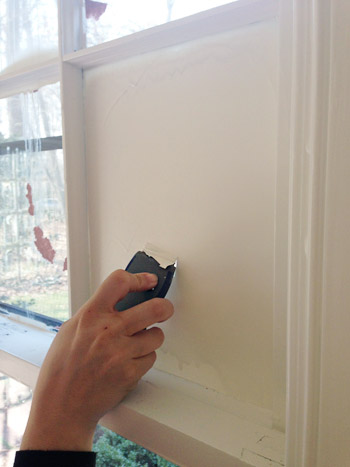
But by around one in the afternoon we had them all cleaned and enjoyed a nice celebratory lunch. It was glorious to have our bright office back (and even brighter).
We considered calling it quits from here (our hands were both aching) and we thought it might be nice to leave the paper down while we painted the rest of the room (walls & ceiling), but I was getting paranoid that our rosin paper on the floor had only performed as well as it had on the windows (I was picturing giant blobs of paint having leaked through) so we went ahead and peeled it up. And it was PERFECT. Phew!
So here’s the room as of now (Sunday afternoon, when I’m writing this). It’s looking a bit gnarly with all of the over-spray beyond the trim on the walls and ceiling… but there’s no blue in sight!
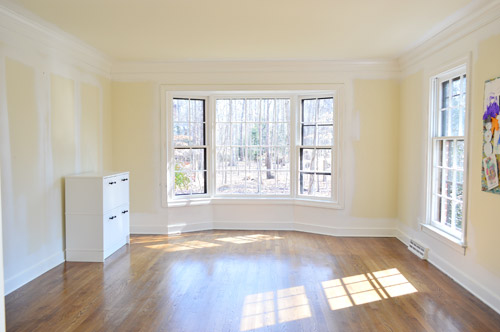
We’re excited to go ahead and paint the ceiling and walls, since we figure it’ll be easier with all of the furniture still out. And we’re used to painting without the floors being completely covered, so there was no harm done by pulling up all that rosin paper.
But our trim-painting task isn’t quite over. For some reason my second coat of paint was especially drippy (once again, I’m less enamored with our sprayer than ever – we now use this Wagner sprayer), so we had to sand down a bunch of spots that are still in need of some paint touch ups by hand.
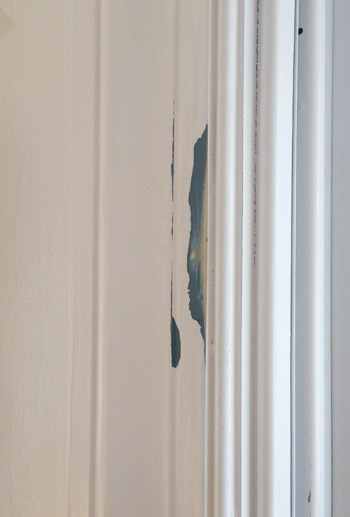
But before I break out the touch-up paint, we still need to do some caulking. I didn’t realize how rough some of our trim was looking until it was all painted white. So there are a bunch of spots where the moldings and walls meet that need some filling.
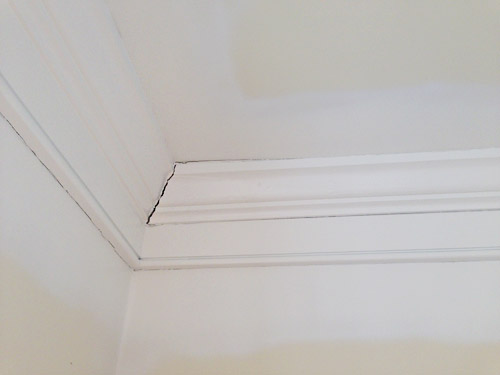
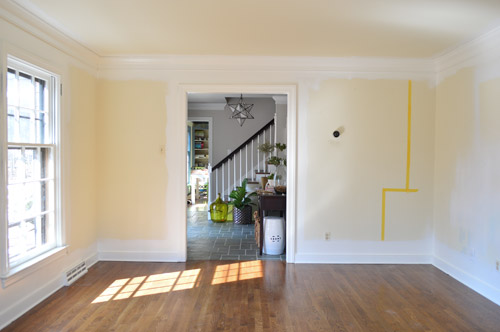
I also never noticed how yellow the paint was in there until now. Sherry and I are still debating colors. We’re both thinking of something nice and light, but not white – and maybe with a hint of color. Not sure yet. Though you can see below that we’re starting to tape off where things like the built-ins might go, just to try to picture everything and make a final call on layout/placement.
Oh, but the verdict on spraying vs. painting by hand? I’m not totally sure yet. Spraying was definitely WAAAAY faster when you just measure the time spent painting. It took me just about 30 minutes to do a single coat, so one primer coat and two paint coats were a total of just 1.5 hours spent spraying – versus a single coat probably taking around 4+ hours by hand. But we’ve still got some kinks to work out in our prep/clean-up system before I’m convinced it’s less trouble overall (for example, when we paint by hand, we don’t get nearly as much on the windows so it’s a lot easier to scrape, and we don’t have drips in the trim that we later have to sand and touch up).
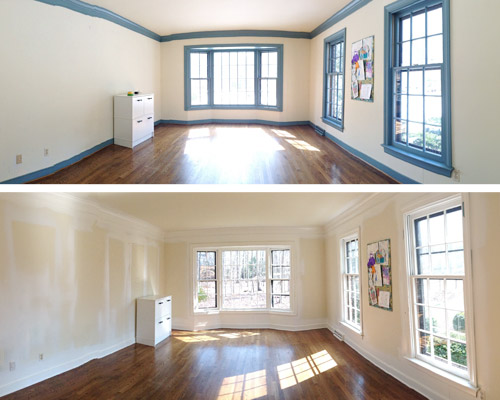
I’d love any tips or suggestions from those of you who are more well-practiced in the art of paint spraying. We plan to spray the dining room when the time comes since, like the office, it has little furniture and can easily be sectioned off. So I’d love to work out some kinks before taking that room for a spin – and then share all the “this worked better” tips when we get ‘er done. Can you believe that room is our last room with blue trim?! It’ll be a big day when it’s done.

karen l says
I think it’s Jenny on Little Green Notebook who uses the windex method – not sure if it would work as well on overspray as over-brushing, but I used it on my last project. After brushing all those individual panes (messy me), allow paint to dry at least overnight, then spray liberally with windex and wipe the excess paint off the glass with paper towels. I did break out the exact knife to clean up a few edges, but this worked for me!
YoungHouseLove says
Love that tip!
xo
s
em says
This really looks like an awful project. Congratulations on getting it done. What about making a carboard template of the window panes and then cutting plastic sheeting (like maybe a shower curtain liner) into little squares and then taping around those squares? I heard that, in addition to being a pain in the neck, scraping windows is not great for the window glass- it weakens it. Do you happen to know if that’s true?
I think I would just tape the whole window and then do the panes by hand, probably by using a piece of sturdy plastic or plastic coated cardboard right up against the edge of the wood that you could move from pane to pane instead of taping off each pane before hand. I think maybe you could cut a square from a milk gallon jug. Maybe even attach a little handle to the plastic “edger”, like a looped piece of tape, to make it easy to hold in each pane.
YoungHouseLove says
Love the tips Em! Thanks!
xo
s
Samantha says
You guys did a great job! It’s looking so bright and cheery! As for the windows…I’ve had success using brown paper bags from the grocery store roughly cut to the size of the window pane then taped on using painters tape. I did try to be pretty precise in taping so it wasn’t the quickest task in the world, but I didn’t have any bleeding problems. Can’t wait to see what color you guys choose for the walls!
YoungHouseLove says
That’s awesome Samantha! Thanks so much for the tip!
xo
s
Shelly says
Wow! What a difference some back breaking, hair pulling, insanity causing work makes! Congratulations on making it through! I bought a set of school lockers at an auction and spray painted them to use as a pantry. I used a paint brush to brush Vaseline all over the metal handles and number plates since they were attached by rivets and I couldn’t figure a way to take them off while I sprayed the lockers. The Vaseline worked awesome and no paint stuck where it was at all, very easy to just wipe off the painty Vaseline after the rest of the paint on the lockers had dried-win!!
YoungHouseLove says
Thanks for the tip Shelly!
xo
s
Laurie says
Thanks for taking a hit for the team in the name of trim-paintin’ research!
With the window scraping, it almost sounds like the time for both processes isn’t hugely different. While I’m sick to death of painting trim (I do not have your fortitude, hats off guys!) at least the paint brush method allows me to listen to podcasts and books on tape to entertain myself. It becomes almost meditatitive even though it hurts my back and knees.
Man, I never thought there could be a plus side to living in a little ranch-style house with few windows but we may have just found one!
YoungHouseLove says
Total plus! Haha!
xo
s
Misty says
The new paint looks great! I don’t know if you guys ever watch Rehab Addict on HGTV, but she used this goop one time on her windows before having them all sprayed with paint (sorry I can’t remember the name of it, but it might be on some sort of buyer’s guide through her show). She simply rolled the goop on all the glass panes of her windows with a paint roller… they sprayed everything then when the paint was dry the goop just peeled off the glass in solid plastic sheets. She said it made spray painting so much easier for windows. Maybe you guys will have luck finding something like that!
Misty says
P.S. I did some more research, I think the stuff is called Jasco Liquid Mask & Seal. Hope that helps!
YoungHouseLove says
Thanks Misty! We’ve researched that a little (John mentioned that in the post, although not by name I don’t think) but all the contractors he saw on a few DIY message boards were saying it takes around 2-3 coats of application to work properly so just scraping by hand is what they prefer. Although after our experience it might still not have been as bad to apply 2-3 coats…
xo
s
Lauren says
I definitely imagine John writing this post all hunched over and curmudgeonly, sneering at a spray painter tossed in the corner, wishing ill on it and it’s family.
YoungHouseLove says
Hahaha! That’s a pretty accurate description.
xo
s
Sue says
Don’t know if anyone else suggested this, but what about trying Press and Seal on the windows? Then you could trim with an exacto knife to get a really close fit. I think I’ll have to try this the next time I paint a window!
YoungHouseLove says
A few others have suggested that too! We’re not sure if it would gum up and get stuck (like painting over wallpaper, which makes it harder to remove). Anyone tried it?
xo
s
Mrs. Money says
I cried a little inside for all the work you had to do scraping those window panes :/
Randi says
Hi guys – the room looks great and I’m excited to see the paint color you choose.
Question unrelated to painting but would love your opinion – I have a window in my bedroom that is not centered on the wall. I’m planning to install sconces on the wall and am wondering whether to center them based on the window or the walls? Hope this makes sense! Thanks for your opinion..
YoungHouseLove says
I would hang curtains on the window first (you can cheat those a bit if you’d like to make the window look more centered by making them wider on one side) and then hang the sconces in relation to where the window appears to be (same distance from the outside of each curtain panel). Hope it helps!
xo
s
Sharon S says
We have the same paint sprayer and although we haven’t had to paint windows with it we can relate with the drips that seem to come out of nowhere. Our only tip is to line the canister with a ziploc bag before you fill with paint and screw it on…helps with the cleanup time which is long enough!
YoungHouseLove says
Thanks Sharon!
xo
s
Anne @Stoneybrooke Story says
We bought the same Graco sprayer based on your experience with it last summer but IMMEDIATELY returned it after painting the first coat on our shed outside. I honestly didn’t like anything about it. But, we LOVE LOVE LOVE the Husky HVLP and Standard Gravity Feed Spray Gun Kit from Home Depot that you use with an air compressor. Its much cheaper, and A MILLION time easier to use. Cleanup is always a pain no matter your sprayer, but there’s so much more control over the flow and direction of the paint with the Husky. I would recommend it in a heartbeat to anyone. I use it for painting furniture too whenever its warm enough to paint outside. The coverage is beautiful and super smooth.
YoungHouseLove says
Thanks so much Anne! We’ll have to check out the Husky.
xo
s
sara says
Wow, you must feel so accomplished getting all the trim in the house knocked out before baby. Good for you!
Also, I lol’d at the work light/dolly comment. That happens to all of us! (right? definately me anyhow…)
YoungHouseLove says
Oh man, I wish we had knocked out all the trim! We still have the dining room’s blue trim (that last paragraph is confusing a lot of people I think! Sorry!) and then there’s the hall bathroom upstairs (still with cream trim) and the wood trim in the living room. But we’re getting there!
xo
s
Megan says
What a job! I so admire your patience on stuff like this… and smart decision to get ‘er done before baby boy arrives. More kids and tedious projects are a difficult combo, trust me!
I totally get the light, layered palette you’re going for in this house (and it’s looking amazing)… but I really hope color or prints find their way into more than just the accessories. I miss that aspect from your second house. I can just picture some awesome wallpaper on the non-window wall… is it too soon to mention that? :-)
YoungHouseLove says
That would be fun! We’re definitely into spoonflower wallpaper (it’s removable and still so much fun, so it seems like less of a commitment than the hardcore stuff).
xo
s
Cheryl says
Too bad those window tic-tac-toe things aren’t the removable type… right? ;) I’m exhausted just reading this! Can’t wait to see the room painted – I vote something with a little more color because you already have a lot of white in the house. That’s just my opinion. :)
YoungHouseLove says
It would have been awesome if those were removable!
xo
s
Amy E. says
agree with the more color suggestion for the walls. i think all the light in the room will allow you to do something more saturated without risking the room becoming too dark.
YoungHouseLove says
We’re planning to do a dark saturated dining room (which is right across the foyer from the office) so we just don’t want it to feel like the foyer leads to two deep saturated spaces, so we think a light office and a dark dining room will be a nice balance.
xo
s
Kelsey says
In regard to Amy E’s comment, I’ve heard it is actually rooms with LESS light that should be painted more saturated colors and rooms with lots of light to be painted light colors. Counterintuitive to the way most people think though ;)
From http://www.sherwin-williams.com/architects-specifiers-designers/inspiration/stir/sw-art-stir-low-light-colors.html:
Q. What do you think is the biggest mistake homeowners make when choosing colors for rooms with no or insufficient natural light?
Divers: The biggest mistake is to follow the notion that you must paint the room a light color because light colors reflect more light. Yes, light colors do reflect more light, but if there is limited light in the room in the first place, then there’s not much that’s going to be reflected, and light colors can end up looking sad and gray.
Frasca: Some homeowners think they need to forgo color altogether in a dark room. There’s this common myth that painting a small, dark space white will make it appear larger. That may work to a certain extent, but it can also result in making an already uninteresting room that much more uninteresting.
YoungHouseLove says
So interesting!
xo
s
Sarah @ Sarah's Daybook says
Ahhhh that’s a breath of fresh air. Can’t wait to see the finish room! AND in one week we can find out the secret project! Yay!
YoungHouseLove says
AHHHHHHHHHH!
xo
s
janet @ ordinarymom.ca says
It looks so amazing. Even with all the overspray. The sun coming in was always pretty but without that blue dampening it, it is just gorgeous now! LOVE!!
Melanie says
I’ve been wanting to ask this forever, and this seems like as good a time as any! Sorry to get off topic :)
We’ve been doing a TON of work on our house in preparation for our new baby (who will be arriving in a month!), and we have really made tons of progress. Unfortunately, despite everything we’ve accomplished I only see what still needs to be done. Do you guys ever get discouraged by how much work is ahead of you? I suppose it’s a little easier knowing your livlihood is connected to having more projects instead of wanting to just get your house finished, but I can’t help but be annoyed that for every thing I get done another thing gets added to my list. Any tips for staying positive?
YoungHouseLove says
OH YES! In our first house we were in a constant state of annoyed-this-isn’t-done. That house took us 4.5 years though, and it was an awesome lesson in “things just take time – and rooms that come together over time are usually more functional and beautiful than the ones you throw together anyway” – so that’s sort of our mantra when we worry about how long everything is taking. Good things come to those who wait (and paint a whole lot, haha!).
xo
s
Mikki says
What about painting the room a soft steely gray/green/blue (light)? That would coordinate nicely with the gray wallsr and flooring in the foyer, plus with all the light in there, it will take on soothing look. It’s also pretty neutral and would be easy to decorate with. I like your Ben Moore color choice in Cool Breeze, but I also like Silvery Blue (1647), Rhine River (689), Opal Essance (680) and Colony Green (694). Of course, you are free to choose what you like too! LOL! It looks great…but I would be terrified of spraying!
YoungHouseLove says
That could be pretty! Thanks for the names!
xo
s
Evia says
Wonder if you could cut contact paper to cover window panels and peel it off when done?
YoungHouseLove says
Thanks Evia! Anyone ever try that?
xo
s
Rachel says
Oh my, this is the most horrifying project you guys have done to date. The whole time I’m thinking “Oh, what MISERY!!!” I probably would have done it all by hand, but I’m not much of a “prepper,” and I like to cut corners, which is why I make a horrible seamstress. :)
It does look 1 million times better with the white trim though…nice job!
Nicky says
I’ve never owned a sprayer, nor have I had the privilege of painting window panes (thankfully!), but after all that time putting rosin paper in each window pane, would it have just been easier to paint them by hand? It would have been easier than freehanding without covering the glass, but not that heavy overspray either.
YoungHouseLove says
We actually painted the windows by hand in a lot of the rooms upstairs (we worried spraying them would be a huge mess) so we just wanted to try spraying them in this room since there were 66 panes (the most windows we have in any room). That could have worked too though!
xo
s
Melissa@TheChicDream says
Wow! What a job. I bet it feels great to get rid of that awful blue paint. It already looks really bright and crisp. I can’t wait to see the room finished. I think it’s going to be my favorite room of yours.
Allison says
Have you ever considered using a small nappy roller? I had a painter just suggest that to me for the trim in my house. I haven’t tried it yet, but sounds like a tempting, quick, trick!
YoungHouseLove says
Never even heard of that! You’d still need a brush for getting into certain areas though, right? Intriguing…
xo
s
JG says
I came up with a neat trick- which is to use a small roller to roll a coat on, and then right away use your thumb to “lock” the roller in place (so it doesn’t roll) and pull it over the entire rolled surface in (hopefully) one stroke. The latter part gives it the brushed on look (in a nice wide swath), but it is much easier than using just a brush!
It works especially great for trim before it is installed and for door frames.
You can use a brush or paint pad to touch up where it abuts another surface, such as corners and baseboards.
I hope that description is clear enough…
YoungHouseLove says
That sounds so smart JG!
xo
s
Shaina says
As someone who has painted almost a whole house of trim (still need to do the scary stairs), I’m still a believer in painting by hand over the sprayer. I had to do 2 coats of primer and 2 of paint, but just spraying things outside, with a fairly expensive sprayer that hooks to air compressor and we still have issues about every other outside use.
YoungHouseLove says
Yeah, they definitely can be finicky, can’t they?!
xo
s
MC says
I started reading your blog about a week or so ago…and I can’t get enough of it! You guys TOTALLY speak my language. I was a homeowner for 6 months before I moved to get married (I met him a month after closing on my house). I never got to do any cool projects besides painting the walls since I worked full time and didn’t make a whole lot to experiment with DIY stuff. And my house was in really good shape overall. However, husband and I will be buying a house in the next few months (we moved overseas and will be back in the US soon). I can’t wait to play around with our mystery future house! After reading so much of the blog, I can’t decide if I want a house that needs a little work or something that just needs more superficial changes. You’re both really motivating me to DIY, tho! As soon as we know where we’re going, I’m going to buy your book and soak in more information! I’ve been reading a few different DIY blogs and yours really hits the spot for me. Just enough information to break complicated things down, but not so many details (like exact measurements) that make anything overwhelming. Seriously, I love the balance you have going!
I realize this has nothing to do with the post…so to change that, I’ve gotta say that I love the white trim and can’t wait to see the finished house without any blue!
YoungHouseLove says
Thanks so much MC! You’re so sweet. All the best with your house!
xo
s
Pat says
Spayer? I just met her.
I’m trying to find the one you guys bought, & i vaguely remember a Graco handheld one, but if you guys aren’t too thrilled about it… maybe i get the next step up. I know the Graco Magnum LTS 15 is a little more expensive and definitely not handheld. But so far its got 5 of 5 stars on most sites.
-p
YoungHouseLove says
Bahaha, your first line = my favorite thing today. Also, thanks for the Graco tip! Good to know!
xo
s
Andrea says
I had a high school English teacher that would always respond to words ending in -er with “(repeat word)?I didn’t even know her!”
Like- Jumper? I didn’t even know her! Romper? I didn’t even know her! Bumper? I didn’t even know her! and so on haha
It sounds like it would get annoying but honestly it was always funny :)
YoungHouseLove says
So funny!
xo
s
Kristen says
Definitely looks brighter in there! If it’s possible, you guys can always try popping off the window panes (and then you can just tape off/cover the glass). Growing up, my dad did this when he needed to paint the panes or wash the windows.
Kristen says
And if the panes don’t come off, you can always try sliding a large sheet of paper or something between the pane and the glass!
YoungHouseLove says
I wish we could have done that! Our panes are each individual pieces of glass, so the wood pane is actually holding each of them in place (and can’t be popped off like newer windows can).
xo
s
Stefanie says
I took the plunge and bought a spray painter about a year ago after reading every review I could get my hands on. Ultimately I went with this one http://www.amazon.com/Wagner-Flexio-Outdoor-Hand-held-Sprayer/dp/B00FBP4QT0/ref=sr_1_1?ie=UTF8&qid=1394462480&sr=8-1&keywords=Wagner+Flexio based on reviews, company customer service and because Bob Vila likes this sprayer..and I’m not one to argue with Bob. I use it primarily for spraying furniture and LOVE it. There’s virtually no mist and I’ve never once had a clogging issue. It saves soooooo much time and paint. I can’t say enough great things about this sprayer…and it seems like it’s deeply discounted on Amazon right now!
Completely unrelated..I stopped by Proper Pie Company yesterday and got some sweet slices to go. Have you guys tried the buttermilk raspberry!? I’m actually considering driving back down today (I’m in Fredericksburg) just for another slice!
YoungHouseLove says
Mmmm, that sounds so good. I want it NOW (screams the pregnant lady). And thanks for the sprayer tip. We’ll have to look into that!
xo
s
Amy E. says
Rather than a home with no windows, I’d aim for a home whose windows don’t have those pane-strip-thingies that I KNOW you know the name of and I’m just too lazy to look up.
I’d go crazy without windows. Well, crazIER.
YoungHouseLove says
Haha, that’s a good point!
xo
s
Jennifer says
Just curious about the part where you said that Clara’s cabinet was nailed to the wall. Any chance you can explain that further or do a post on baby proofing? I’ve got a toddler and am trying to figure out the best way to secure the furniture to the wall and would love to hear what you did. Thanks!
YoungHouseLove says
We’d love to do a post where we cover a bunch of ways we secure stuff to the wall (leaning mirrors, TVs, etc) – we have been getting that question a lot so it would hopefully help to have it all in one place!
xo
s
Andrea says
Am I correct to think that there is a green box photoshopped over the office chalkboard in the dining room chaos picture? ;)
SECRETS!
YoungHouseLove says
So funny! That’s actually just the back! You can see it in this pic: https://www.younghouselove.com/2012/10/fall-pinterest-challenge-getting-board/
xo
s
Liz says
Looks good!
Being such a tedious process, I have to ask why you just do one room at a time? I think your dining room still has blue trim so I would assume you would tackle that at the same time – so you don’t have to set up/clean up so many times? Unless you plan on painting the other trim something other than white?
YoungHouseLove says
Good question! We actually shared a pic of the dining room (see that third pic down?) which is where we put all the office furniture. When we’re tackling one room, the rooms around it usually get full of stuff, so we can’t usually do more than one at a time, and it wouldn’t save us much time (we’d still have to clear that room and tape it all off, whether we did it at the same time or later when it’s not full of office stuff).
xo
s
tess says
What a big, huge undertaking!
Looks great after all that work!
Just one question, why did you take up the paper if you will be painting the ceiling and walls after?
YoungHouseLove says
John tried to mention that in the post for ya. We just worried we’d find bleed-through on the floor (like we did on the windows) so we were anxious to remove the paper and check things out. Thankfully the floors were just fine, and our usual MO is to paint walls and ceilings after clearing them (we don’t tape everything off) so it’s par for the course to do that again in there.
xo
s
Brittany says
We’ve been looking for a way to keep heat from escaping through a doorway to an unfinished section of our house, but we also want to keep it easily accessible since we keep trash and recycling out there. How do you guys think the tarp and zipper setup would work? I saw that and a lightbulb went off..I’m hoping it would help with the enormous fuel bills we’ve had this winter! Thanks!
YoungHouseLove says
I think it would be great. It ballooned out a bit when the heat kicked on or when the front door opened (changes in air pressure) but seemed to hold – at least for those 3 days.
xo
s
Rachel says
Looks so much bigger and brighter. Well done John – hard work paid off! Can’t wait to see what you guys do with the room now. :)
Unrelated question for you and all your American readers – what’s the quality of West Elm furniture like? I’m looking at buying chairs on their UK website, but because they’re a pretty new store for the UK I don’t know anybody who’s owned stuff. The chairs I’m looking at are solid wood. How does their stuff hold up? Would you buy it again? Is it worth the price tag?
YoungHouseLove says
We have a dresser from them along with two daybeds that we have LOVED. The daybeds are 7+ years old and still going strong, and the dresser is only about 6 months old but we also really like it so far.
xo
s
Rachel says
Thanks, that’s really helpful. Are your daybeds solid wood?
YoungHouseLove says
Yes, they both are. They have sort of an open fretwork/frame look, but have been really sturdy with holding up the slats/mattress, etc.
xo
s
Rachel says
Thanks Sherry!
Melissa says
I usually spray vinegar-water on the glass to scrape the paint off. It comes off much faster when its wet and the vinegar seems to help quite a bit.
YoungHouseLove says
Smart!
xo
s
jaclyn says
My husband uses a spray gun to paint cars/car parts. Even though the paint is sold to be used “straight up”, he ALWAYS thins it down with thinner. That means it takes more coats for the right coverage but it also means the spraying goes MUCH more smoothly.
Not sure if there’s a similar trick for home paints but it’s an idea, maybe.
When it comes to process, I hate-hate-hate clean up. So I always choose the cleaner method. Even if it takes me twice as long, I don’t care because like I said, I hate-hate-hate clean up!
YoungHouseLove says
Thanks Jaclyn!
xo
s
Emily says
I am not sure if someone else has already tried to ease your future worries, but I have participated in and/or witnessed dozens of floors covered with rosin paper while the paint and sheetrock work are done and the paint has never bled through. Pain dries to quick to bleed through the paper. Just fyi though, big globs of sheetrock mud on the paper can cause a problem because of all the moisture just sitting on the paper for days.
Congrats on no blue trim! I hope you ate your celebratory lunch where you could admire all your hard work; after all, that is the best part!!!
YoungHouseLove says
Thanks Emily! That’s so nice to hear!
xo
s
Michele from IL says
Looks SO much better, even without wall paint. I’m sure you’re SO GLAD it’s finally done (it’s one of those “I SURVIVED!” moments)!
rachel says
The white trim makes the room look SO much better!
But I’m curious — if you’re going to paint the walls soon, won’t you have to take down the bulletin board to do that? Why not just take it down when you cleared the room to paint the trim? Especially since the photos of the office you posted on Wednesday show the bulletin board in a different location. Just trying to help you achieve your goal of “working smarter, not harder!” :)
YoungHouseLove says
That could have worked too! John just wanted to get started and we had moved that the day before while planning things out (like the built-in tape line, etc) so I figured whether I spent time taking it down then or when it’s time to paint the walls it’s the same difference, right? ;)
xo
s
rachel says
Actually, it’s not the same, because you spent time covering it and taping it off when you could have just taken it down. I just thought this was a good example of an opportunity to work smarter, not harder.
YoungHouseLove says
Thanks Rachel, that definitely would’ve saved us that minute that we spent taping it off, but John would have had a later start by about 15 minutes (all the pins need to be removed before it comes off the wall, so it’s sort of a pain) and we had a meeting to get to right after that first coat went on, so we were rushing to get started. Having the leisure of removing it later, when we had less time pressure, felt like working smarter and not harder in that case. But it definitely could have saved us a minute if we didn’t have that meeting :)
xo
s
Rachel @ My Urban Oven says
Love this post! I have a whole lower level I want to update to white trim, from the brown/yellow/orange color it looks right now. I did our bathroom first and sanded the wood first then did 2 coats of white paint, that seemed to do the trick, but it was a TON of work. I have noticed you guys don’t sand the wood first. Is there a reason for that? Do you find that primer works better? I don’t think my color is as dark as your blue, but I am always worried about bleed through…
YoungHouseLove says
If any wood is sealed/glossy it’s smart to sand it and use a liquid deglosser before primer and paint. Sometimes it’s chalky and dry (like ours) so it’s already roughed up enough to hold primer and paint nicely.
xo
s
Kate says
I am not a big fan of the paint sprayer but maybe it was just the one we had. I am open to suggestions on better models. Ours was a model you didn’t have to thin the paint. Or at least that is what it claimed but wasn’t the case.
To fix the window problem. I would cover the inside of the window with a big sheet of paper and then spray the room and trim and sills. Then I would hand paint the panes. I would rather paint 66 panes then have to scape them again.
Good luck with the dining room.
YoungHouseLove says
Thanks Kate! That’s what we did upstairs (painting the trim by hand to avoid over-spray) so we thought trying something new down here in our room with 66 panes (the most we have in any room) might end up being faster. Turns out that scraping was a total pain though!
xo
s
Amanda Jones says
I painted Windows once. Not by accident… I was just to lazy to prep them! Anyway two things: Windex or oven cleaner. Oh-my-lanta does it ever make paint just wipe right off! I even got overspray on the wood floors and oven cleaner got it right up!!
YoungHouseLove says
SO GLAD to hear that!
xo
s
jeannette says
it looks like a whole new landscape in there. honest to god, the way the dark color outlined the parameters and openings made it seem oppressive and much, much smaller.
i never criticize or question your priorities, because it’s your house, after all. i just want to say i am so happy that as work-at-homers you are on your way to making your office the space that you deserve.
if i had a million dollars, i’d buy sherry something awesome for her office, like a baby nurse and a weekly foot massage house call and an engraved mont blanc fountain pen and diamond chandelier earrings a foot long, working at the kitchen table is a b*tch. xoxo
YoungHouseLove says
Haha, thanks Jeannette! You’re the sweetest.
xo
s
Rachel says
Thank goodness you only have one more room left with blue trim! I love what you guys have done already with this house, and can’t wait to see where you take it. John’s comment about the neighbors makes me curious. Do you guys get a lot of comments or funny looks? It cracks me up to hear about how you’re sometimes worried what the neighbors might think, because I worry about that too!
YoungHouseLove says
They’re so sweet! We love our neighbors! We tend to get “holy cow, getting those trees down and painting the door made such a difference!” or “I’m so glad you guys moved in – this house must love you for it” comments, which are really sweet. Sometimes they ask us for DIY advice too, which is fun. I love getting peeks at their houses and projects. I’m nosy like that. Haha!
xo
s
Susan Lewis says
Don’t hate me, but I actually painted the trim in my daughter’s room that very same blue! (and lived to regret it) It was the nineties and we thought it looked quite stylish. You guys are my heroes. I only had two windows and the baseboards to do. White Trim Forever!!!!!!
YoungHouseLove says
Haha, thanks Susan!
xo
s
JG says
It’s funny, when we were looking at houses ages ago, one house had a kid’s bedroom with the trim painted the exact blue of painter’s tape! I kept doing a double-take, wondering why they hadn’t peeled off the tape!
Stacy says
It’s possible someone has already mentioned this, so sorry if it’s a repeat. I learned the hard way with a paint sprayer that it does NOT work with primer – hence all the clogging and cleaning. I think the thinner formula of the primer has something to do with it. Looks good though!
YoungHouseLove says
Thanks for the tip Stacy!
xo
s
Cindy says
Thanks for inspiring me to love my house for what it is rather than focus in what it’s not. Our house is working so much better for us since we changed perspective! :) One of my struggles has been our trim… we have a mix of different colors and wood tones going on which you can imagine is just about as fabulous as your blue trim! I noticed you painted your 1/4 round in the office…. did you do anything special to prep it aside from priming? Thanks!
YoungHouseLove says
We just wiped that down, used primer, and paint. If it’s super glossy (ours is sort of chalky) it wouldn’t hurt to lightly sand and use a deglosser on it first too!
xo
s
jeannette says
and a large SPRAY (<—- see what i did there) bottle of something yummy from Aedes de Venustas, which is heaven in Greenwich Village. L'Artisan Parfum, Antonia's Flowers and Serge Lutens specially recommended. xoxo
http://www.aedes.com/
YoungHouseLove says
Hahahaha!
xo
s