Whilst discussing office plans last week, a few of your comments about the blue trim situation in that room were the push that we needed. We were fooling ourselves to think we should paint all that trim by hand (we’re talking baseboards, crown molding, and five windows totaling 66 individual panes). So we decided to bite the bullet, break out the paint sprayer, tape everything off, cross our fingers and toes that we didn’t get any bleed-through on those wood floors, and say hasta la vista to some more blue trim this weekend.
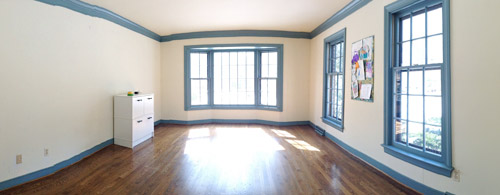
We had painted all of the upstairs trim with the sprayer before we moved in and before the new floors went down, which was an easy no-brainer decision (nothing to worry about ruining). But for the downstairs trim that we’ve tackled (just in the kitchen and foyer so far) we’ve worked by hand – mainly because those rooms needed to remain functional during painting, so we didn’t want to cover them with paper, plastic, and tape while a fog of paint-spray flew through the air. The office, however, didn’t have much furniture to move out, and could easily be sectioned off in a paint quarantine for a few days. So we went for it.
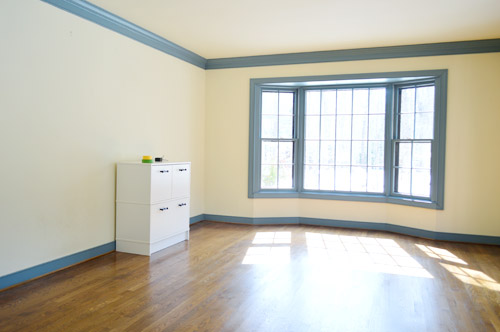
Last Thursday morning we emptied the room (except for the file cabinet, which was heavy enough that we decided just to cover it) and basically took over the dining room and foyer with all of the displaced items. Good thing we’re comfortable with chaos by now.
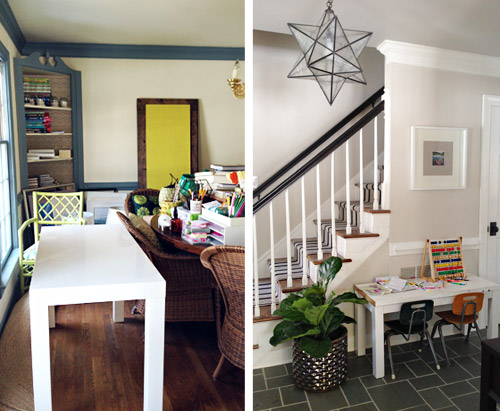
As excited as we were to attack this blue trim using a new method (we’ve never taped off a room to spray it before) we were both curious to determine if we felt like it was ultimately much of a time saver, since the prep is obviously a lot more intense. Although some things – like wiping down the to-be-painted surfaces and taping off the floor – would’ve happened anyways.
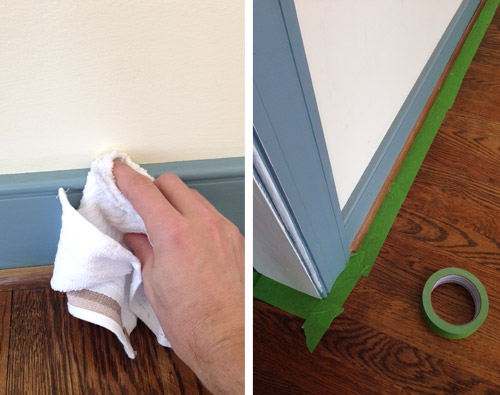
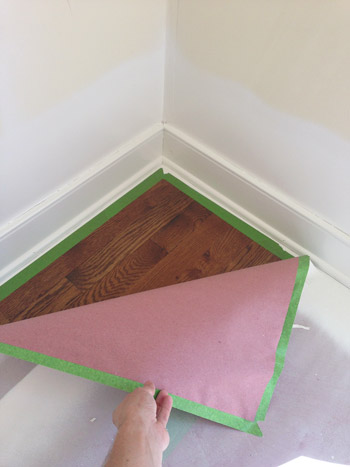
Next we rolled rosin paper out all over the floor since we’ve learned that paint mist gets EVERYWHERE from our particular brand of sprayer (which I’ll admit I’m growing less enamored with – we’ve since switched to this one). We did our tape edging and our rosin paper as separate steps, just so we could focus on getting the taped edges nice and secure (paint on the hardwoods = our nightmare) before shifting our focus to taping each row of paper down. It meant that we ended up using more painter’s tape than we probably needed to, but the extra precaution felt like good nervous-first-timer insurance.
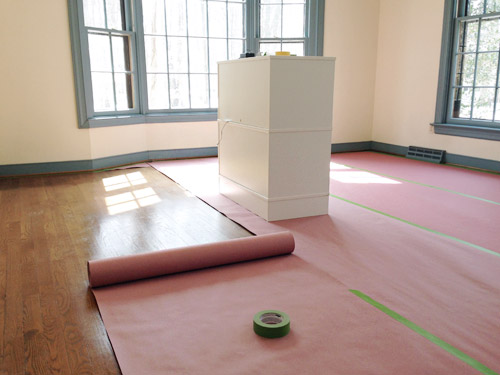
So here’s the room with the floors all taped over. Clara thought it was the coolest thing ever, especially when we let her come draw on the floors while we worked on the next prep step: windows.
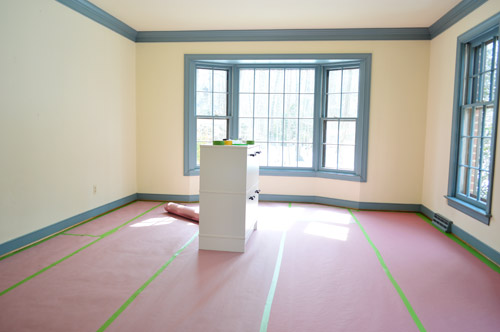
I’ll admit I was a bit perplexed about what to do with the windows. I’ve heard lots of talk about “liquid masking film” that you can paint on your windows before spraying, which helps the dried paint just peel off seamlessly afterwards. It sounded awesome, but after reading some message boards it started to feel too good to be true. Lots of pro painters complained that it took 2 or 3 coats of it to work, so most recommended just doing the old fashion scrape technique anyways.
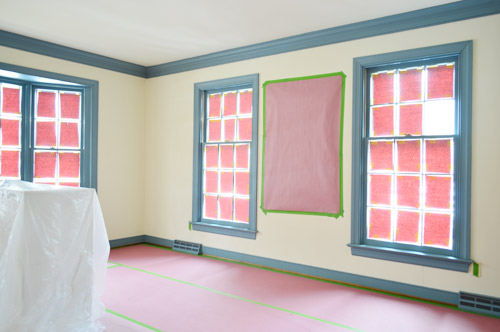
Wanting to save ourselves a bit of trouble, Sherry came up with the idea to roughly cut some rosin paper squares and tape them to the center of each pane. We didn’t meticulously cover every edge, but figured this would at least save us time on the back-end from scraping the entirety of each of those 66 panes. I left one empty just to test if the paper was a waste of time (spoiler: it wasn’t – that uncovered pane was a giant pain!). Oh and that big paper-covered thing between the windows is Sherry’s overflowing bulletin board full of Clara-art that we decided to just cover instead of removing (it was nailed right into the wall at the four corners as opposed to hanging on a hook).
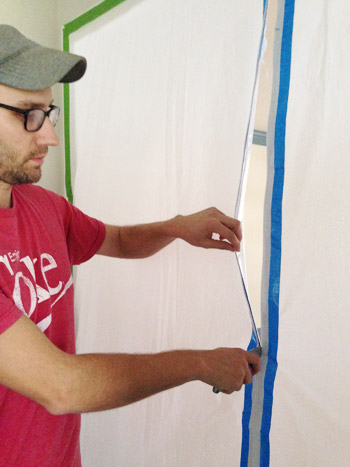
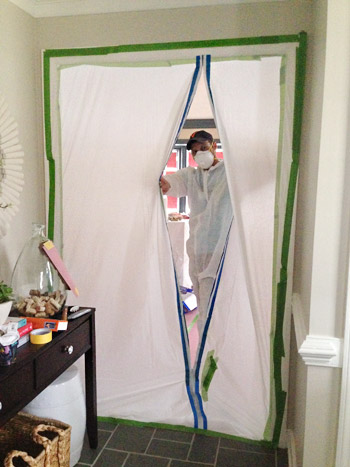
With furniture out (or covered), floors protected, and windows “dressed” our last prep step was to seal off the office from the rest of the house. We carefully taped up a tarp across the doorway (on both the inside and outside of the door frame) and then used this handy instant zipper thing we found at Home Depot (it basically sticks to any tarp and then you slice an opening as you unzip it, giving you a resealable doorway in your tarp. Best $10 we spent on this whole project. That thing was airtight, which meant it single-handedly kept all of that swirling primer and paint dust from sneaking out into the foyer (while still allowing me to enter and exit the room between coats for a lot less hassle than a taped off tarp would provide).
Next, Sherry saluted me and wished me luck as I loaded in all of my supplies: paint sprayer (lately we’ve been using this Wagner sprayer), extension cord, and a can of primer (we used Kilz Premium). I also got dressed in the painters suit and booties that I bought and told Sherry to send reinforcements if I didn’t emerge in a few hours. I don’t know why, but I was actually kinda nervous about how this would go.
Well, it didn’t go great. At least it got off to a rocky start. For starters, my paint sprayer immediately got clogged, so before I could aim it at any blue trim, my hands were covered in primer and my sprayer was sputtering and leaking. About 30 minutes later, I was finally spraying. By this time it was about 4pm, and between clouds rolling in and all the paper on the windows, the room was suddenly pretty dark. And it only got darker as I sprayed the windows with primer. I’m so used to this room being crazy bright that I hadn’t even thought about needing a work light. Oops.
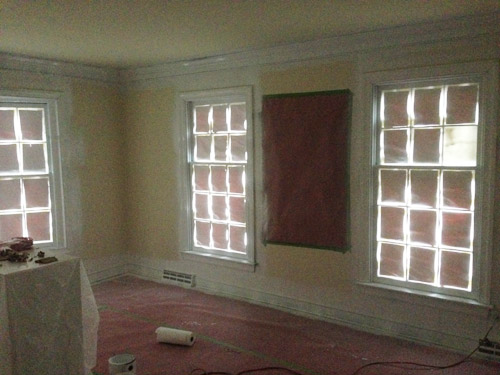
I actually didn’t own any work lights that we didn’t mind getting misted with paint spray (between this and just recently buying a dolly, you guys are probably questioning our preparedness) so I ran out to Home Depot after I was done with the primer coat and bought a couple, along with the trim paint that I’d need the next morning (Simply White in semi-gloss by Ben Moore – but here are some other top white paints you could use instead). The lights revealed that my priming wasn’t perfect, but it’d do the trick.
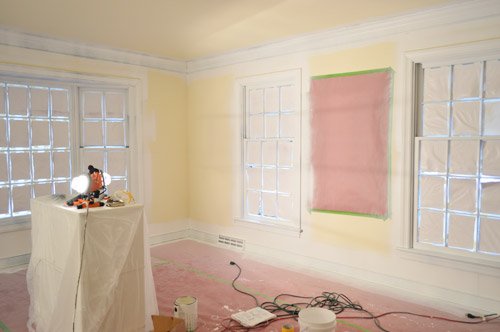
After letting the primer dry overnight (and thoroughly cleaning and de-clogging the sprayer) I woke up early the next morning (Friday) ready for my first coat of paint. This is the room right after I finished that coat. Note the paint fog.
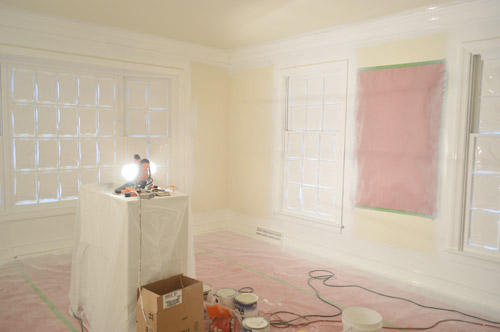
After cleaning the sprayer once again, I let that coat dry the entire day since we had showhouse stuff to do that afternoon in Northern Virginia. I was hoping the next morning (Saturday) would just be a clean up day, but we weren’t entirely satisfied with that single coat of paint. It did a great job covering, but it didn’t get all of the various nooks and crannies of the trim.
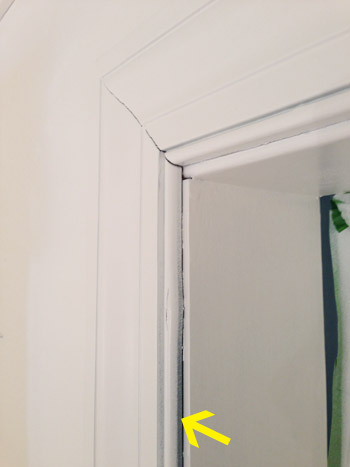
This was one of my fears about spraying this room because it’s virtually impossible to get all of the angles and sides of the trim in one swoop, and you can’t just go back right away and spray from a new angle because you’ll apply too much paint and get drips. So instead of getting to dive into clean-up with Sherry on Saturday, I did a second coat of paint in an effort to get those spots that the first coat missed.
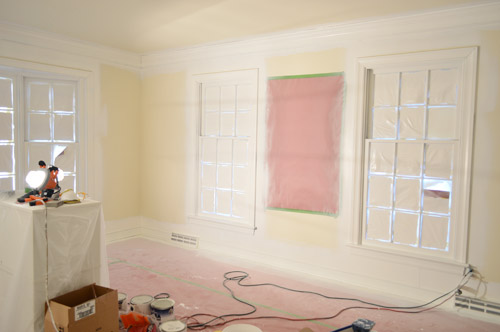
So now we were on Day 3 of paint quarantine in our office, which was also looking not so pretty from the outside. Luckily by now I think the neighbors are used to us always being the middle of a project, so it doesn’t really raise many eyebrows anymore.
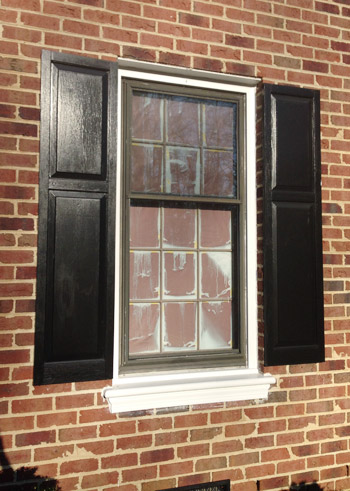
We let the second coat dry all day Saturday, and started the clean-up process yesterday morning. You can tell by the photo above that our homemade window coverings were far from perfect. We learned just how imperfect they were as we started to peel them off… leaving chunks of rosin paper stuck behind in various places. I was ready to curse our decision, and the time we had invested, in those quick little coverings.
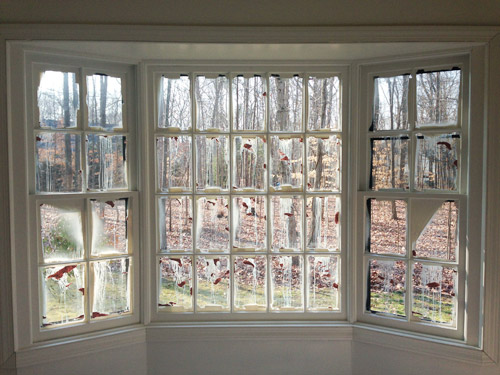
Sherry and I tag-teamed window scraping, since neither of us had the stamina (or the hand strength) to scrape 66 windows clean ourselves. The coverage was so thick (one coat of primer, two of paint) that it took lots of effort to peel it off, but some serious scraping did the trick. In the end, the best method we found was using straight razors to get most of the windows clean, and then going back to scrape the corners with an exacto (we also tried using a putty knife for those corners, which was a little bigger and harder to control, but also worked semi-well).
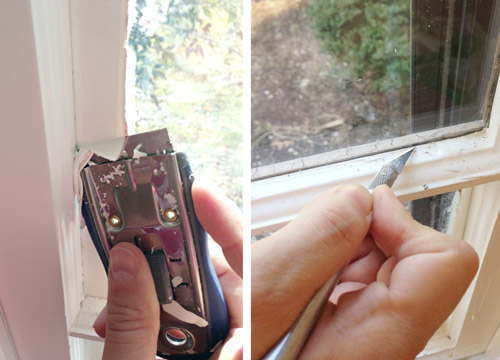
This basically ate up half of our Sunday (with breaks to feed Clara, hand her a few new activities, take bathroom breaks, etc). It sucked. I won’t lie. The whole time I was brainstorming what I’d do differently and it mostly boiled down to not owning windows, which I don’t think is a great solution.
But I said above that we don’t regret the rosin squares. That’s because the pane that we’d left completely uncovered was ten times worse. Maybe even a hundred times worse. My fantasies of this one magically peeling off in one giant sheet were far from reality. It was hard and grippy, so we could only chip it off slowly. It took Sherry a good 30 minutes to do just this one pane.
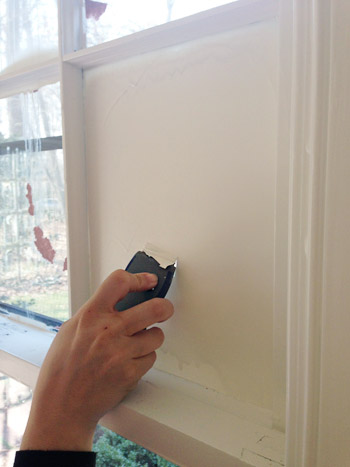
But by around one in the afternoon we had them all cleaned and enjoyed a nice celebratory lunch. It was glorious to have our bright office back (and even brighter).
We considered calling it quits from here (our hands were both aching) and we thought it might be nice to leave the paper down while we painted the rest of the room (walls & ceiling), but I was getting paranoid that our rosin paper on the floor had only performed as well as it had on the windows (I was picturing giant blobs of paint having leaked through) so we went ahead and peeled it up. And it was PERFECT. Phew!
So here’s the room as of now (Sunday afternoon, when I’m writing this). It’s looking a bit gnarly with all of the over-spray beyond the trim on the walls and ceiling… but there’s no blue in sight!
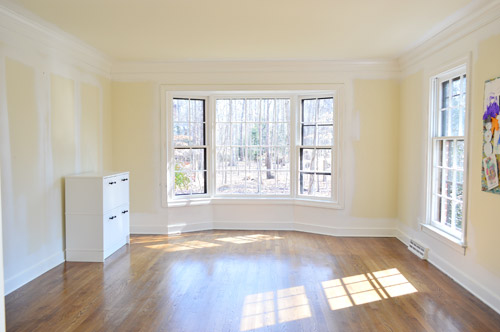
We’re excited to go ahead and paint the ceiling and walls, since we figure it’ll be easier with all of the furniture still out. And we’re used to painting without the floors being completely covered, so there was no harm done by pulling up all that rosin paper.
But our trim-painting task isn’t quite over. For some reason my second coat of paint was especially drippy (once again, I’m less enamored with our sprayer than ever – we now use this Wagner sprayer), so we had to sand down a bunch of spots that are still in need of some paint touch ups by hand.
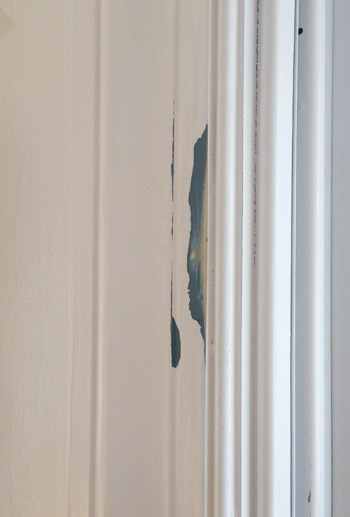
But before I break out the touch-up paint, we still need to do some caulking. I didn’t realize how rough some of our trim was looking until it was all painted white. So there are a bunch of spots where the moldings and walls meet that need some filling.
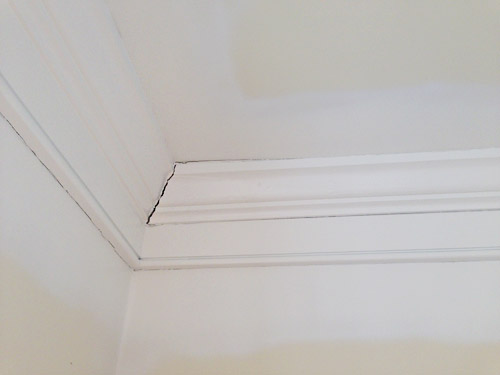
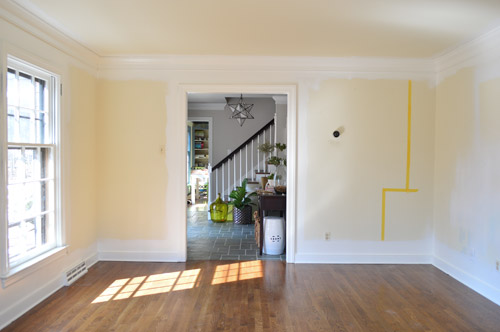
I also never noticed how yellow the paint was in there until now. Sherry and I are still debating colors. We’re both thinking of something nice and light, but not white – and maybe with a hint of color. Not sure yet. Though you can see below that we’re starting to tape off where things like the built-ins might go, just to try to picture everything and make a final call on layout/placement.
Oh, but the verdict on spraying vs. painting by hand? I’m not totally sure yet. Spraying was definitely WAAAAY faster when you just measure the time spent painting. It took me just about 30 minutes to do a single coat, so one primer coat and two paint coats were a total of just 1.5 hours spent spraying – versus a single coat probably taking around 4+ hours by hand. But we’ve still got some kinks to work out in our prep/clean-up system before I’m convinced it’s less trouble overall (for example, when we paint by hand, we don’t get nearly as much on the windows so it’s a lot easier to scrape, and we don’t have drips in the trim that we later have to sand and touch up).
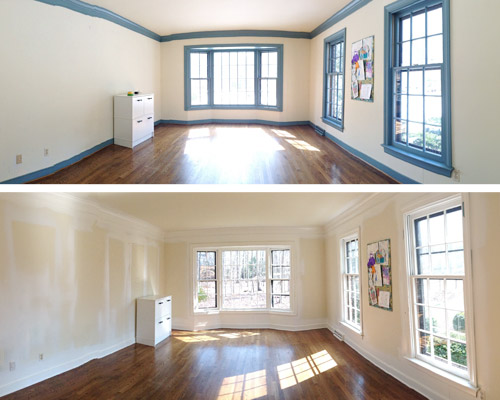
I’d love any tips or suggestions from those of you who are more well-practiced in the art of paint spraying. We plan to spray the dining room when the time comes since, like the office, it has little furniture and can easily be sectioned off. So I’d love to work out some kinks before taking that room for a spin – and then share all the “this worked better” tips when we get ‘er done. Can you believe that room is our last room with blue trim?! It’ll be a big day when it’s done.

Caroline says
What amazing before and afters!! Can’t wait to see it finished!
How about the air vents? I saw they were blue and you left them in- did any paint get into your HVAC?
Also totally random and not my business- but are you guys being compensated at all for the show house? I know you have a budget to work with but is your time being compensated or is it all for habitat? :o)
YoungHouseLove says
We closed off those vents, so the spray didn’t get any further than the front of the grills. Seemed to work (and we turned off the HVAC too while spraying, just so nothing was blown around).
xo
s
Haley J. says
What if you covered the interiors of the windows really well, sprayed the baseboards, crown, and maybe the trim on the outside of the windows, then painted the mullions by hand? Or maybe just do all of the windows by hand? Then again, would that even be much of a time savings? Just thinking out loud.
YoungHouseLove says
Yeah, we’re not sure if that would take more or less time. We did all the windows by hand upstairs and they seemed to take forever!
xo
s
Lesley says
I was surprised your dream of simply peeling the pane of paint in one big swoop didn’t work out too…
We learned some time during our last spate of painting that the best way to clean our paint tray was to leave the paint in to dry then peel it out, trick is to leave a thick enough coat (not a tonne of paint but a continuous layer). Latex on plastic, works like a charm. Based on that I thought the window panes would work just as well.
Then it occurred to me what I already knew, it doesn’t work like that with primer.
Suggestion: Hand paint the primer coat (also allows you to note where cracks are as you go) then spray the paint coats – latex on glass should also work like a charm.
YoungHouseLove says
SMART!
xo
s
Ashley says
Such a refreshing change! Since you guys are still considering colors, may I suggest this article: http://ayearofproductivity.com/angela-wright-interview/ It’s a great read :)
Also, have you considered floating your desk space between the two front windows? As much as you guys have mentioned wanting to be able to see outside as you work, I’m still SO baffled as to why you’re pushing yourselves right up on a wall… Something like this http://oi58.tinypic.com/2u8l095.jpg would utilize your existing plans, but allow you to work on your laptops next to the window. And if you have meeting guests over (and will you have that many after you’re done with the showhouse?), a table with casters would allow you to roll it back to the middle per your original plan. Lastly, I know it’s important now, but planning around a small desk for Clara might not work out because she may tire of it and grow out of it. Move her over to the built in desk for a long-term plan (and using your “John & Sherry” desks from the original plan, you’d have two spaces in case you’re still there when Barn’s old enough to use a desk too).
Eesh, it seems like I’m harping on you guys… I’m just worried that these built ins are going to be too permanent for you guys to get what you REALLY want — a space that looks outside. I’ve been there, and I thought “Oh, I can live with just turning around to see out the window I like” but it was never the same.
– Ashley
YoungHouseLove says
Thanks so much for all the ideas Ashley! We’re definitely thinking everything through a bunch of times before committing, and I’m off to check out that color link right now!
xo
s
P says
The white trim looks very nice! Every time you paint a room, I just love the warm yellow color on the walls, especially with the wood floors! Hopefully there is room for yellow/cream somewhere in your color plan; not sure what it looks like these days.
Sarah says
Do the “grids” in the windows pop off the window pane? Is it possible to take those off the windows, seal the windows, and spray the grids outside or on the paper? That worked on my parents’ older home, but I don’t know how your windows are set up.
YoungHouseLove says
I wish! Each glass pane is a different piece of glass being held in place by the window grill, so it’s not removable. That would have been awesome though!
xo
s
Kristin F says
I continue to be amazed at what a difference glossy white trim is making in your home. I’ve been a high-gloss white trim gal for a couple decades now, so haven’t really been in a home without it. But it really makes such a huge difference.
Oh, and please, please put a color in there!! You guys seem to have been playing it a lot safer in this house without Sue the Napkin around. This house reminds me of your first one, very neutral. Call Sue back, it’s time to get some color going again!
YoungHouseLove says
Thanks Kristin! The color thing is funny to me since I feel like we’re doing some bold things here, like a bright blue door in the foyer (our last house’s interior side of the front door was white) and a ton of color in Clara’s room (coral door, colorful raindrops, pink ceiling, bold rug, etc – whereas her last room was soft pink everywhere) along with our deep blue bedroom (which is sort of reminiscent of our last house’s guest room, but less teal). I can see how other spaces are feeling more neutral like our first house though too. We’re definitely planning to go with a rich/deep color in the dining room, so that makes us want a light and bright office across the foyer on the other side (so there aren’t too dark/demanding rooms right across from each other). We’re still pretty interested in this palette that we mapped out a while back – although we’ve made some slight deviations along the way. Can’t wait to see where we end up!
xo
s
Lisa says
The room looks SO much better with white trim! I’m in the process of painting the trim in our house white and I’ve got a long way to go! But luckily, mine’s not blue, just 80’s oak :)
Can’t wait to see the room once it’s painted!
http://fabulousfarmlife.blogspot.com
Katja @ Shift Ctrl Art says
I am following this very closely. I want to spray paint our master closet in a few months. I have the same sprayer you have. So far I have only sprayed some wicker chairs for outside and it worked perfectly on that. No dips, no gumming up.
Video of me spray painting (before I lost weight. hm)
http://shiftctrlart.com/Blogpost/ukhi
YoungHouseLove says
Wahoo! So glad you had no issues with yours!
xo
s
Liz says
Wow! This looks great. Do you guys normally paint the ceiling the same color as the trim? In our house the trim/crown molding is all a vintage white (from BM) but the ceilings are not. My ceilings need to be repainted and I can’t decide whether they should match the crown molding (in flat instead of semi-gloss?) I’m lost!
YoungHouseLove says
Typically we do the ceilings in flat paint and the trim in semi-gloss, although sometimes we’ll do a subtle accent color on the ceiling (and tried eggshell in the foyer ceiling which was actually shiny and pretty).
xo
s
Candice S says
I covered our old 4-over-1 windows with thick contact paper from the Dollar Tree. (It was pebbled, like faux leather) The nice thing was I could measure out the panes, then use the grid lines on the back to cut the sheets ahead of time. It was very quick work and the paint didn’t seep through like your paper. There was still some scraping involved, but not nearly as much as the time I did it without covering, and the prep was much faster than taping.
They used to sell painters tape corners, about 10 years ago. I have looked and hadn’t ever seen them again after that, but those were awesome, for serious.
YoungHouseLove says
Oh man, that sounds awesome!
xo
s
Jamie D says
I found painter’s tape corners this year (and last year) at ACE Hardware!! They are blue and ACE brand. I do love them, but they don’t have the stickiness of FrogTape, so I usually put a corner up first, then FrogTape right over the edge of the corner to make sure it sticks.
YoungHouseLove says
Wahoo!
xo
s
Theresa M says
The zipper in the wall is the best! We had to buy an entire zipwall system when I sprayed our cabinets. I was unprepared for the amount of paint dust everywhere, but the plastic wall that covered an opening of 20feet was a life/house saver! Honestly, I think drips happen more often with white paint when multiple coats are involved. It’s really hard to see to paint. Can’t wait to see the colors you pick for the rest of the office.
Ammie says
Maybe for the dining room you could rent/borrow a different brand of sprayer. That way you could get a sense of whether it’s the spraying process you really aren’t fond of or if it’s your sprayer in particular ruining it for you. Just a thought : )
YoungHouseLove says
We’d love that so we could see if it’s user error or just our sprayer!
xo
s
Susan says
While I thoroughly get the DIY part of this, when you factor in your valuable time and materials and still having to go back to touch up, would it have been worth the cost of hiring a pro in this case?
YoungHouseLove says
It’s a good question, and everyone would draw the line differently. For us, we don’t think it would be worth hiring someone, just because we’d rather spend that money on office furniture or an amazing light in there. So to two hopeless DIY lovers like us, spending the time (and this being our job) just makes these into learning opportunities for us. We usually prefer to save the pros for things that are actually out of our skill set (like dangerous electrical or load bearing stuff) but we figure if we can gut bathrooms and lay patios, we can paint trim – ya know?
xo
s
Julianne says
Nice work, guys! I actually kinda like Clara’s desk out in the hallway under that picture. Hmmm….
Sorry everything was so gruelling! I can feel your pain. :O( What we did when painting our frames, was to use just the painter’s tape to fill each window pane. Still lots of work, but if you get the wider tape, it takes less time to apply and definitely makes life easier when cleaning up.
The room looks fabulous, though! *One* day you’ll be able to laugh about it. I did say *one* day….not now! ;O)
Kaesey says
Oy, that’s a lot of prep work! I have to say, I do the trim by hand. At this point I’ve painted so much trim that I don’t even tape off…I just drag a tarp around with me wherever I’m painting and keep a damp rag for the occasional drop. Once of these days I will spill a bucket of paint and curse and curse, but so far the 2″ angled brush and mobile tarp routine has served me well.
I was, however, debating a sprayer for a kitchen cabinet redo. Any suggestions for brands/models? Obviously you’re not thrilled with the one you have now but is there one you *wish* you had?
YoungHouseLove says
We have heard some good suggestions in this post, so maybe those will help? A Critter, Husky, and a higher model Graco all have been recommended so far I think!
xo
s
Robin hiscott says
It took me 1 year to do 4 sets of French doors front and back. Mine were stained 2 different stains but very dark, almost black. It took 2 layers of primer and 2 layers paint. I didn’t tape off but scraped the windows after. Will never do it again! You were smart! You did a great job even with the touch up!
YoungHouseLove says
Oh my gosh, that’s so much work Robin!
xo
s
Tara says
I am so impressed with how carefully you folks do things, trying hard to do them correctly and minimize mess/damage. I recently bought a house in which the previous owners had paid $$$$$ to have two bathrooms redone. It took me about five seconds to see that whoever had done them had used pre-primed trim from home depot which they never finished-just left the edges raw and all the finish nails un-filled and then ultimately never painted. They never caulked any of the trim (and these are bathrooms too)but they did use painter’s caulk around the bottom of the toilet (ew) so it just goes to show you that in the battle between DIY and “Pro” that what it really comes down to is ethics and caring about a job well done. You guys embody that and I raise my coffee cup to you.
YoungHouseLove says
Aw thanks Tara!
xo
s
kathyg says
Looks great! Strictly speaking time wise, after all the moving and taping and scraping and waiting – do you think you could have primed and painted it by hand in a shorter amount of time?
YoungHouseLove says
John and I thought about that and we don’t believe it would have been faster by hand (each coat would have taken 4+ hours, so it still would have been 16+ hours of work), which we don’t think we hit since spraying made it go so much faster, even with that prep on the front and back end.
xo
s
Katie says
I wish I’d known you were in NoVa – I would have let you paint some of my trim! :)
A couple of questions (since this is a project I need to take on myself, sans-sprayer):
1) What kind of primer did you use? Any suggestions for getting the paint to “stick” to the previously painted trim? I had issues with this before.
2) I can’t tell if those windows open. If so, how did you make sure you didn’t paint them shut?
Thanks!
YoungHouseLove says
Spraying windows actually doesn’t seem to paint them shut for us (they all just popped open, which was helpful when we scraped (opening them had us crouching down less). As for our primer, we use Kilz Premium (from Home Depot). If you trim is glossy you’ll want to sand first, but ours is sort of old and chalky so we go right to primer after we wipe things down.
xo
s
Lindsay says
We just had our kitchen cabinets and all the trim/baseboards professionally painted white last week. They sprayed everything, and between priming and the first coat of enamel, the painters thinly caulked all those nooks and crannies that white paint exposes so well. After the second coat of enamel everything looks seemless and awesome. Might be a trick for next time. Your office looks great though! Well done.
YoungHouseLove says
Thanks Lindsay!
xo
s
Marianne in Mo. says
John, what a trooper you are! My hubs would have thrown the sprayer right thru the window, then gripe that now we have to replace a window! ;-) Many moons ago (when home sprayers first came out) we had a Wagner. It was a pain, clogged, used a ton of paint and cleanup took forever. Wasn’t worth it for one room, but we did use it for major jobs. Found that cheap paint actually worked better in it than the thick, good stuff. Thankfully, our daughter married a pro painter, so now we just call him! Great, since it’s hard to paint wearing bifocals – you tip your head so far, that your eyes close – not fun! I used to love painting, but the old body stops me cold. Boo!
In spite of all the hassle, I think you did pretty good! Think the press n seal sounds like it could work. That carpet sticky stuff may leave a residue, it’s like a low tack tape almost. I’ve seen it either at home depot or Lowe’s.
Once again, great job!
YoungHouseLove says
That might be a better idea than have a house with no windows. Just befriend a pro painter! Haha!
xo
s
Melanie says
Not sure if this has been mentioned, but does the trim on the windows pop off? Just wondering if they could be taken off, sprayed, then re-glued or however they are attached. Not sure if that is even possible.
Love the white trim. It’s amazing what some paint can do to freshen up a space and bring it up to date!
YoungHouseLove says
I wish! In our case each window pane is a different piece of glass, so the window grill literally holds them all in place.
xo
s
Ariane says
It looks great ! For the windows, you could maybe tape all the glasses only with frog paint. It should probably be a bit expensive but you seem to rely on this brand so maybe you should give it a try ? Good luck for your last “de-blue trim” mission ! Take care.
YoungHouseLove says
Thanks for the idea Ariane!
xo
s
Jaime Baldwin says
We’ve had good luck with a combination of spraying/hand-painting with our 80 year old windows. We cut cardboard just slightly smaller than the windows and taped it to cover all of the panes, but not the window casing…we sprayed all baseboards and trim, then went back and did the individual panes by hand. Saved a lot of time masking, since you have to scrape anyway. :)
YoungHouseLove says
That sounds awesome Jaime!
xo
s
Katie says
Hi guys, the new white trim looks amazing and so fresh!!! A method I recently used when I sprayed my living room trim and windows was surprisingly taping them off with Saran Wrap. My husband held the wrap in placed as I taped the edges and secured the middle parts. It sounds confusing but between the frog tape and wrap…it peeled off seamlessly leaving no residue on the windows or tears. It worked so well that I did that in my dining room. Since it’s clear, we didn’t have to worry about loosing any sunlight too….yay!! Maybe worth a try next time you spray a room if needed.
YoungHouseLove says
Thanks for the tip Katie!
xo
s
Beth says
Have you tried a new spray tip to solve the sputtering issue? The tips wear out, which affects the spray pattern. The Graco website says the orifice gets bigger, while the fan pattern decreases.
What they don’t tell you is that your gun will start to spew if you don’t notice the wear and it goes too far. I have a different Graco model and the tip gave out after about 18 gallons. Because we hadn’t noticed gradual wear, we were convinced that the sudden spew-fest meant we needed to clean the gun, or strain the paint, or reclean the gun, etc… We wasted a good two hours fiddling with it and a new tip solved the issue entirely.
http://magnum.graco.com/products/M_Pages.nsf/Webpages/0Spray_Tip_Info
YoungHouseLove says
Such a great tip, thanks Beth!
xo
s
Jennifer says
I use a low volume/high pressure sprayer that I hook up to my compressor. It works amazing! I would never go back to the sprayer you guys used. It may be worth looking into…I’ve used it for walls, trim, furniture, bird cages and pretty much anything I want to repaint.
YoungHouseLove says
That sounds awesome!
xo
s
Bev says
I wonder if you could have covered the payees with that sticky cling wrap that we use to cover bowls of food …and still taped the edges…
YoungHouseLove says
Thanks for the tip Bev!
xo
s
Caroline says
I was priming beige trim and doors all weekend, so I definitely feel your pain! Your office looks so big and bright with the white trim. I’m sorry the window scraping was such a hassle. The previous owners of our house, for reasons that escape understanding, painted all the glass in a French door. I’ve scraped about half a pane and it took ages – I’m thinking I might need to take the door down and see if a bit of stripper on the panes speeds the process up a bit. Otherwise, claw hands 4eva.
Abi says
What if you sprayed everything in the dining room except the windows? You could tape them off just like Clara’s art board while spraying the rest. Caulk between primer and paint while spraying. Less ladders and scraping perhaps?
YoungHouseLove says
That definitely could work! Although we’re getting some great window tips here!
xo
s
Melissa says
I have painted a French doors. I used tape to do the pains, took forever to tape off. But so easy to clean. So I would think that the tape, contact paper, sticky carpet protector, or even the press and seal would work. Just cut around the edges after painting with and exacto knife, razor, whatever. Then make a big x in the middle to peel off from. That way you aren’t messing up your fresh paint trying to get it up to peel. Peel it out from the center of the pane. I hope that makes sense!
YoungHouseLove says
Thanks Melissa!
xo
s
Tammy Terrio Wallace says
That looks wayyyy better but I have to say all the prep work vs. taking the time to paint the old fashioned way? I think I would have stuck with the “by hand” method. All that paper and tape prep would have driven me crazy. You guys clearly have more patience than me!
Kirbee N says
Wow, thanks again for putting together such a well crafted post, including all the gory and honest details (and fine photo editing/splicing). Your hard work is such a help to us wannabes, saving us both time, money and heartache! So, Jon, I salute you, and know that your and Sherry’s frustration and extra effort aren’t wasted.
I’m continually amazed at your dedication and focus, especially as baby day grows ever closer, and knowing you both are also spending lots of time on other great projects.
YoungHouseLove says
Thanks Kirbee!
-John
Holly Aldredge says
So impressed with y’all and your paint spraying abilities! The paint sprayer and I are NOT friends!
Dana Leigh says
Don’t know if it’s already been suggested but as far as masking the windows go – I noticed you edged the floor with painters tape (great idea!), what about doing the same to the window pains and then topping it off with a rough cut of paper. Then the tape would just act as a gap filler. Another possibility would be to maybe cut paper squares that are slightly bigger than a quarter of a pane and slide it under the wood trim, one in each corner. In the end each pane would have four pieces of paper, overlapping each other, that cover the pane in it’s entirety. Follow me? Question though – I reckon the answer is a yes, but are you guys going to paint the ceiling to cover the over spray of the primer? Would you consider doing a color since the room is so bright?
It’s AH-MAZING what a little paint can do, huh?
YoungHouseLove says
That sounds smart! A few others have said that could work so we’ll have to try it! As for the ceiling we have thought about a color up there for sure. We’re doing a bold office ceiling at the showhouse so we don’t want to completely bite that idea here, so we’ll have to see where we end up!
xo
s
KimberJ says
I think you’re biggest problem is the quality of paint sprayer you bought. We started with one like yours and then quickly switched to a $300 professional grade (did the same with our power washer). You certainly get what you pay for. We’ve used the pro grade one on two houses for inside, outside, fencing, and deck. Its had primer, paint, stain, and polyurethane in it and its never clogged. We’ve been using it for over 4 years. The paint goes on so much better with no drips and the coverage is more comprehensive. Yet we still always put on 2 layers of paint, maybe force of habit? Get a better paint sprayer and you’ll love painting, plus your family/friends will love borrowing it.
YoungHouseLove says
Thanks for the tip KimberJ. That sounds awesome.
xo
s
Laurie says
Getting rid of all the blue makes that look like a completely different room!
We bought almost the exact same house as yours (seriously – I think the only differences I’ve seen are that our laundry room is downstairs and we a deck where your sunroom was) in the summer of 2012. It was a foreclosure with fantastic bones, but every surface in the house needed painting.
The prior owners, who we’ve been told were art students, painted all the trim in the entire house dark (almost black) brown so I understand your pain. We won’t talk about the rest of the paint colors – think 1970’s orange, brown, green & yellow.
After we figured out how many hundreds of panes we’d have to paint and scrape, we lived with them for a year, saved up the money and then just replaced them. I’ve been kind of curious why you haven’t gone that route – it is definitely an investment, but it also eliminates unsightly storm windows, lowers heating and cooling bills, and gives the house a much more updated modern look – esp if you go with new windows that don’t have the dividers. Is the painting a phase I project and you’re looking at replacement down the line? We’ve saved at least $75 a month this winter in heating bills and we’re in Atlanta where it doesn’t get as cold!
We bought an upgraded model of the same paint gun you have and have learned that you need to clean the gun out again before using it each time! I’m not sure why, but that has a made a huge difference in it not clogging up. We’ve done lots of small furniture projects and all 23 interior doors in the house and it was a huge time saver. I don’t know that I’d use it inside the house!
YoungHouseLove says
Good question! Here’s a thread about that for ya: https://www.younghouselove.com/2014/03/office-floor-plans/#comment-2919462
xo
s
Emily says
I saw on rehab addict that she put this paint on the windows before spraying believe it was called booth coat. Vaseline might work the same though?
YoungHouseLove says
Thanks Emily!
xo
s
Gaby says
Looks great! Did you ever consider painting the window frames black? In looking at the after photos you can see the darker frame of the exterior window. It would look seamless if the interior window frame was black. (not the window trim, leave it white. Just the window frame.)
Gaby says
something like this.
http://media-cache-ak0.pinimg.com/236x/0f/54/4c/0f544cb24d1cdbf088bc8a4b96135939.jpg
YoungHouseLove says
I have thought about that for our living room or dining room down the line. Will have to see if I have the guts…
xo
s
Hannah B. says
I love Gaby’s idea! The contrast would be great :)
Cait says
Nicole from Rehab Addict always uses something that she paints on her windows before spraying the outside of houses. You should check into it. It basically allows you to spray with out covering anything and then just peel the film on the windows away (maybe some LIGHT scraping).
YoungHouseLove says
Thanks Cait! John actually mentioned that in this post (after some research a bunch of contractors were saying it wasn’t worth the trouble). After all that scraping it might be though…
xo
s
Cait says
I should learn to read instead of skim and just look at the pictures (i love the pictures…and your blog)!
Laura says
Great job!
Can you share what caulk will you use to fill the gaps between the molding and the ceiling/walls?
Thank you!
YoungHouseLove says
We like Dap Window & Door caulk (white and paintable).
xo
s
Jeanna says
You guys rock! Just sayin’, it looks great :)
Natalie Waltman says
After using a sprayer for the last few years (a grace 3500 so it is similar?) these are some things I watch out for: worn out tips can allow paint globs out, replace the tip for a finer spray. The air intake; my model is different but there is an air intake hole that the instruction manual just said to flush. After experiencing problems I used a mini Phillips screwdriver to push through the hole and realized for all my OCD efforts some paint had dried up there limiting the air pressure. Paint consistency; are you thinning the paint? If so too much? Thin paint will drip easily! And lastly room temperature; although it can be uncomfortable I crank the temperature to about 75 to 80. This helps the paint dry quicker and will help prevent gravity from causing paint drips. And the overspray? No solution for that!
YoungHouseLove says
Thanks for the tips!
xo
s
Grace says
Oh my goodness, that post just brought up my PTSD from the one time I used a paint sprayer. I am so happy yours wasn’t so disastrous! I am excited to see what the verdict is and may just work up the courage to try again! Thanks for always inspiring!
Karen says
Ummm, invest in a top-notch sprayer…?
Camilla @ Something Is Done says
We’re also kind of undecided about whether spraying saves time over painting by hand. All the prep work is such a pain! I guess it’s good for things like painting really thirsty raw wood paneling/wainscoting or detailed things like louvered doors…or furniture where you don’t want any brush strokes… But in general it’s much easier for me to paint by hand and just clean a brush or two!
Michelle says
Oh my. Thanks for being honest. I am knee deep painting 11 windows that are paned like yours… Plus a thousand doors and walls of trim in our dinning room and living room. I have been lementing my lack of paint sprayer- but you are encouraging me in my tedious by hand method… Sort of. My wood is taking 5 coats (eek!!!) to cover (2 primer and 3 paint) so that’s a bummer. We have to paint because we found out there is lead in the varnish on our trim and hardwoods. Trying to get all the trim painted before we install new hardwood floors in a few weeks. Nothing like having no choice for the saftey of our kids to motivate ya!
YoungHouseLove says
Good luck Michelle!
xo
s
Betsy says
Wow. You guys get the award. Every time I start a DIY project now, I channel some Petersik thoroughness and make myself sand, degloss, prime and two-coat everything. Less than a month after spray painting my knobs and pulls ORB, they chipped and look awful. I reread how you did it and no surprise yours are still going strong. :)
Well done on another time-consuming but very rewarding project! I think that might be my favorite room in the house.
Krista says
I did my front door with spray paint and literally taped off every pane. It took some time but it was totally worth it, after I was done only a few panes needed a bit of scraping to clean up.
Because I didn’t have any rosin paper on hand I just taped the whole thing. my method was to just to strips of frog tape vertically that were too look, then I took an exacto knife to push the tape into the top and bottom edges and trim the excess. I will tweet you guys a pic!
Krista says
Wow so many typoes. *My method was to just tape strips of frog tape vertically that were too long*
YoungHouseLove says
Thanks Krista!
xo
s