We know this was supposed to be the final chapter when it comes to our big basement makeover, but because we tackled two different DIY projects (making a screen to block off our fugly water heater and frosting the windows for 100% privacy that still lets in the light) we realized it would be crazy to try to squeeze all those step by step photos and instructions into one post… so we’re breaking it down to two. Just look at it as twice the fun. So without further ado, here’s how we made a custom screen to hide our eye-sore of a water heater with $18 worth of secondhand bi-fold doors and a quart of punchy bright green paint (stay tuned for the window-frosting tutorial coming soon).
Before we get into all the nitty gritty details, we should remind you what the aforementioned water heater looks like. Remember this guy?
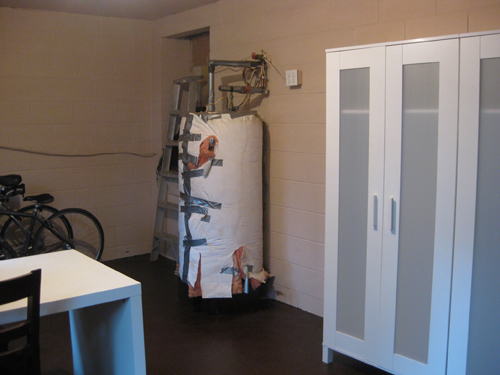
Of course the room has come a long way from that point (we added a rug, brought in a bike rack, upgraded the the lighting situation, papered the insides of the armoires, hung some art, brought in some storage, and organized our paint). But the frighteningly gross water heater remained… taunting us with its hideousness. We debated springing for a tankless variety, but because we’re big fans of working with what you have (and didn’t want to cart off our fully functional water heater to a landfill) we opted to create a screen that will block off the water heater along with the ugly trap door in the wall behind it (which leads to the crawl space under the house). And when this water heater finally breathes it’s last breath we’ll definitely consider upgrading to a tankless one (and we’ll still be able to use the screen to hide the unsightly trap door in the wall behind it).
But how did we end up with a giant screen without blowing our meager basement budget (many store-bought ones are in the $100-300 range and a bunch of those weren’t even tall enough to work for our space)? We just brainstormed materials that we could use to whip one up on the cheap. Here’s how it all went down.
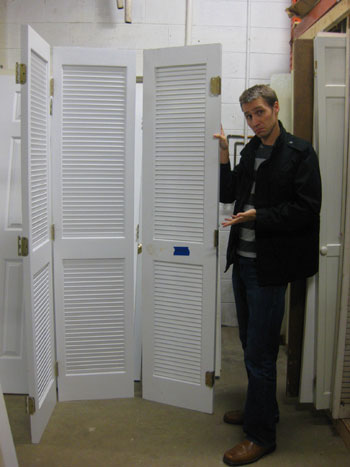
Step 1: Locate three adequately tall bi-fold doors that are sturdy enough to stand on their own and will easily obscure a 6′ water heater. After debating the use of everything from all-weather curtain panels hung from the ceiling to bookcases on wheels (which could be pushed aside for water heater access) we finally decided a screen was the perfect solution for our space. And what’s an easier way to make a screen than hinging three bi-fold doors together and calling it a day? At first we thought about cutting a full sized door in half but bi-folds are like pre-cut doors, so they’re ready to go. Even better. Plus they’re easy to move, relatively simple to find, and definitely would add some playful color to the room if we opted to paint them a bold hue.
So a plan was born. For just $18 we snagged these three bi-fold doors at our local Habitat For Humanity ReStore (they were having a 40% off door sale when we went in- uh, awesome!). Plus they already came with enough hinges to join them all together and create one large screen. Jackpot.
When we got to the checkout the lady was like “um, you’re missing a door” (since there are supposed to be four) but we explained that this wonky set of three bi-folds was actually perfect for us since we were going to make a screen by joining them together and didn’t need a fourth. She seemed excited for us until we mentioned that we were going to attempt to shove them into our good ol’ Nissan Maxima. Then she just shook her head and muttered good luck. Of course we took it as a personal challenge…
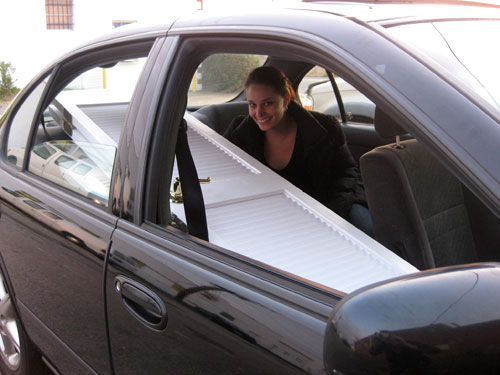
That’s me flashing my victory smile. A lot of people write to us and ask how we take on so many projects with such a small car. We’re just like anyone else with a modestly sized ride… we squeeze things in when we can and call John’s sister and beg to borrow her Ford Explorer when we can’t. In a pinch we’ve even been known to rent a pick-up truck from Home Depot for a few hours, just to cart something around. It’s all about, in the words of the ever-fabulous Tim Gunn, making it work.
Tip: when you recline the front seat and place large objects in the car as we did above, you can actually fasten the passenger side seat belt across them, which can help keep things safely in place so they don’t slide around and encroach on the person in the back seat- especially when she has an ever-expanding belly full of baby to protect).
Step 2: Place bi-fold doors on cardboard (for painting) and hinge them together in the room where your screen will be living (to avoid the annoyance of building it in one place and then moving it halfway across the house afterwards). When we finally got our precious cargo home we placed the doors on a large piece of paint-ready cardboard, hinged them together with the free hinges that we inherited with the doors, and stepped back to take a look. By golly this just might work. We also did a bit of puttying/sanding to fill in any recessed parts of the doors and smooth out anything that wasn’t exactly ready for paint (but for $18 pre-used doors, they weren’t bad at all).
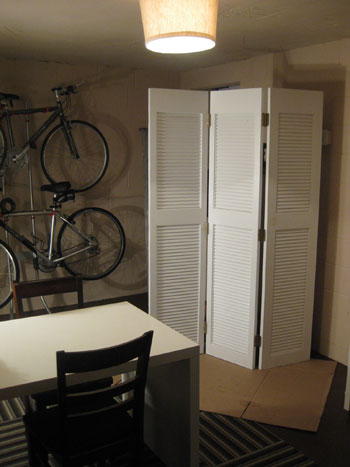
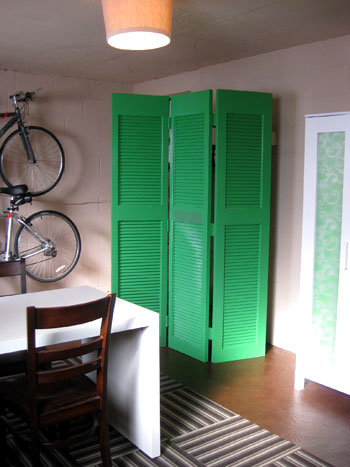
Step 3: Paint your newly made screen. That’s it. You’re done. I guess we should elaborate a bit. We used one quart of semi-gloss latex paint by Behr, which we had color matched to Benjamin Moore’s Bunker Hill Green 566. Two coats later John was finished. I love this whole being pregnant thing. No painting for me (of course for the impending bathroom and nursery projects we’ll be using no-VOC paint so I’ll be back on painting duty, but for the separate entry basement we figured low-VOC Behr paint worked for us- and at just $14 for the quart it put our total cost for the entire screen project at… (drumroll please)… $32!
We love the happy burst of emerald green that it brings to the space (it complements the paper behind the armoire doors, the large green tupperware bins we brought in, the storage boxes in our Ikea workstation, and even the subtle green stripes in the rug). And the function is great. It definitely hides the ugly stuff but still makes it easily accessible. Best of all, there’s still more than enough room- over 35″- to walk to the other side of the basement, roll out our bikes, etc.
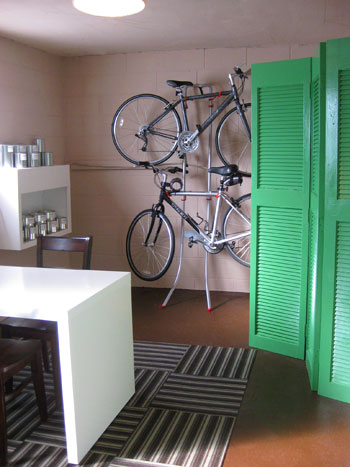
So that’s how you give an old set of bi-fold doors a whole new life on the cheap. We’ll be back with a window frosting tutorial followed by an entire basement project wrap-up (complete with photos from start to finish and even a budget breakdown for your viewing pleasure). And while we’re on the subject of repurposing bi-fold doors, have you guys reused doors or windows in any interesting ways? We’d love to hear how you’re giving old household staples a second life with a bit of DIY determination so do tell.
Psst- Want to look back on our big basement makeover from start to almost-finished? Here’s the first post, the second post, the third post, the forth post, the fifth post, the sixth post, and the seventh post. Ah memories.

Jeannine @ Small & Chic says
It looks GREAT! What a clever idea…and a fun, punchy color!
armchairdesign says
Hey Lovies!
Where did you get your window frosting from? We have two sidelights on either side of our (abnormally huge) sliding glass door and I’m loathe to curtain them because, well, that would look ridiculous.
Noni
YoungHouseLove says
Hey Noni,
We grabbed ours at Home Depot (the brand is Gila). Hope it helps! Of course we’ll be sharing a lot more window frosting details in our upcoming post about it. Stay tuned…
xo,
s
Vonda says
As usual, great job!! It makes me wish I had a basement.
I do get a little jealous at all your cool projects, the energy you always have going into them and how fun they seem to be to you. Somehow our home projects never end up being fun, well except the being done and decorating it part!
Cindy says
I love the green! Great pop of color and it definitely does the job.
Our hideous-turned-beautiful DIY adventure was resurfacing our bathtub. Like you guys we only have one tub in the house and after 84 years of use (I know!) it was DISGUSTING. But I couldn’t justify hauling it out and replacing it with a cheap new tub, so we spent (another) long weekend without a tub and resurfaced it ourselves! You can see a peek of it here: http://germannsaga.blogspot.com/2009/05/reduce-reuse-recycle.html We’re so happy with how it turned out and it only cost us $42 and a wknd without a shower!
Sheryl J says
You guys are awesome. And thanks for answering the question about transporting your brand new purchases. Since I have a small Civic, I am left to figure out how to fit anything big in there.
Rachael B says
My husband drives a Maxima and we use it as our “truck” too!!! My car the seat doesn’t let down in the back to slide things through, so I am so glad he has the “Max”…hahaha!!!
Heather M says
Very nice! We’re re-purposing a door that we currently have in an old office building we own. It’s a beautiful old panel door with 2 glass panels on the top half of the door. We’re going to bring it home and replace our current door that goes into the laundry room from the kitchen/ living room area. It will bring so much more light into the house, since the Laundry room faces south and gets a lot of light, but the kitchen and living room windows are shaded by the woods in the back of our house. Just some sanding a painting. We’re also currently in the middle of installing french doors where we knocked down a wall to create a dining room, which will also help bring the light in to the main area of the house. It’s amazing how doors can make such a difference!
Tiffany S. says
Screen looks great! Just a thought – you could turn them upside-down and use the slats to hold photos or mementos. That may be too mesy looking for you (or things may slide through) but it definitely can be dual purpose!
YoungHouseLove says
Hey Tiffany S,
That’s a great idea!!! We’ll definitely play around with that option down the line. You know, after we tackle our gutted basement and get moving on the nursery! Ha. Thanks again for the suggestion you crafty gal, you.
xo,
s
Amanda says
I’m glad someone else has the same car issues as I do. I have a ’95 Saturn SC2 that’s so small, no one ever takes me up on my offers to drive (works for me!). But it is a challenge getting home improvement items from point A to point B. It requires a lot of seat folding and all-around creativity.
I like the screen a lot! It makes me feel warm and fuzzy that you guys were able to reuse those doors while benefiting the Re-Store.
Fleurzty says
It is amazing the things you guys come up with. Your basement looks abolutely beautiful!
Ally says
My husband and I recently squeezed 100 ft of 4in corrugated drain pipe in our Honda Civic. We had a small audience in the parking lot by the time we were finished. My husband told one of the onlookers to sell his truck and get a Civic. :)
Jill Stigs says
It looks marvelous!!!!!! Loving the green color to kick up that dark corner a notch. Your basement is stellar.
Amber says
It looks great! I LOVE the color!
Were the doors wood or that lovely vinyl that is sometimes used for interior doors? I have a few of those laying around but I don’t know if I would be able to paint them.
YoungHouseLove says
Hey Amber,
Good question! Ours are solid wood. You probably could paint the vinyl ones you have, but you’ll want to use a good oil-based primer and maybe even rough them up with sandpaper first. Hope it helps!
xo,
s
Laila says
Hey guys!
Love your blog. Hate the green doors. I think that’s the first decorating idea that I’ve disliked with this much passion. Why green? Why that shade of green? It’s a good solution for hiding the heater but it’s not exactly the most beautiful thing and the color only calls attention to it! Grey or slate or even keeping it white would’ve been way better imho.
-Laila
Amanda V says
Uh oh S and J,
I love the idea of bring in a contrasting color, but I don’t think I like that green. It is almost too green…I think if the middle part of the screens were a different color, maybe a cream or a lighter green, it would flow a little better.
I would have painted the screen the same color as the floor. it would kind of look like the floor is extending up and around the water heater. It would probably look like that screen is supposed to be there.
sorry on this one. :O( but the project is looking awesome!
YoungHouseLove says
Hey Amanda & Laila,
No worries! Design is definitely subjective, so although we love the bright happy dose of color (which we matched right to the green storage boxes in our Ikea workstation) we certainly don’t expect the entire internet to agree! We do think that you might see more of how the punchy green tone fits in with the rest of the space when we share final reveal pics of the whole room (there are pops of that emerald color on every wall, so it really does feel cohesive- at least to us). Stay tuned…
xo,
s
lynnor says
Love it!
Question: I have a bunch of stained (as in late-60’s wood stain) bi-folds I want to paint white. Tips on painting the bi-folds? Esp *all* the slats to get good and even coverage?
YoungHouseLove says
Hey Lynnor,
Well if they’re stained you’ll want to prime them first with one thin coat of oil-based primer (applied with a 2″ brush). Then move on to two thin and even coats of semi-gloss latex paint applied with a high-quality 2″ brush and you should be good to go. There’s really no secret to getting into those slats other than using a nice brush and avoiding drips by not overloading your brush (go thin and even with the coats instead of slapping too much on at once). Hope it helps!
xo,
s
Kate says
I’m just impressed that you got those doors in your car! :)
elizabeth says
I have a Civic Coupe (2 door) and also take pride in my “transporting large things in a tiny car” skills. I’m especially proud of the time (right after college) that I moved from DC to Raleigh with all of my belongings in my car, including a futon. I love that I can remove the passenger seat’s head rest and recline that seat completely flat to fit pretty much anything in the car.
brianne says
Quick bit of advice on no-VOC for bathrooms. We used Sherwin Williams, and I haven’t researched other brands, but we found that their Harmony line (noVOC) doesn’t come in Semi-Gloss which we wanted for our bathroom. Bummer! We bouth a quart of ‘Duration’ for the walls, but went ahead with Harmony we already had for the ceiling, but no-VOC also means it doesn’t have the anti-microbial ingredient and we have mildew spots on the ceiling already! So, i’d go w/ a different brand (even though i love Sherwin Williams) if they make a no-VOC paint that comes in semi gloss AND has the anti-microbial you want for steamy bathrooms!
YoungHouseLove says
Thanks Brianne! We’ve also heard BM’s Natura line isn’t very good for bathrooms/moist environments so we’ll definitely do our research before settling on anything!
xo,
s
Hailey says
I love it! We have an old door in basement that came with the house (looks like it used to be hung between the kitchen and dinning room). We want to paint it and make it into a headboard for the guest room.
I love the screen you made and might steal the idea to cover up our ugly furnace in the basement (until we finish it in a few years). The green is so fun and cheerful!
Kim Hannemann says
They don’t call it a Maxima for nothing!
Nice work. Painting shutter-type bifolds can be a pain.
Jamie says
Wow – I once painted a slatted door like that and I wanted to kill myself because of it. So congrats on making it through three of them
Dana says
I’m lovin’ the look and the pricetag! I think that screen will feel quite ‘garden-esque’ (maybe even modern cottage-y) when entering from the backyard to that hidden room. One question: Where did you find out about the Habitat for Humanity ReStore? Any info you could give readers? Thanks!
YoungHouseLove says
Hey Dana,
Glad you’re digging our latest project. As for the ReStore, it was actually a tip from one of our readers a while back. If you google the name of your city and the words “Habitat For Humanity ReStore” you’ll hopefully find one near where you live. They’re a great place to donate old things and pick up reused items that you can give a second life. Hope it helps!
xo,
s
Kelly says
I am about to tackle a similar project, but in a much smaller space and including a furnace. It’s a bathroom area, so I want the stuff at least somewhat covered up. I’m also concerned about flame retardancy with the furnace there. Any suggestions?
http://farm4.static.flickr.com/3138/3042003387_a73c74c8d2.jpg
http://farm4.static.flickr.com/3278/3041999705_b6b34387ef.jpg
We’ve actually done a lot of work in that area already, so it doesn’t quite look that junky now.
YoungHouseLove says
Hey Kelly,
Good question! So good, in fact, that we don’t have a clue what the answer is. We’d suggest just doing what we do when we go into almost every project around here: do a ton of research. We google the heck out of products and projects to find things that will work for our situation. We even take our bums to the library or Barnes & Noble if we don’t find the answers we seek online. Of course you can also ask around at your local home improvement store to see if they can suggest anything that’s adequately flame retardant and perfect for your space. Good luck!
xo,
s
Kelly says
OH! Also, I totally understand about squeezing things into a little car. The backseat in my Mazda Protege folds down, so things can go from the trunk to inside the car. I can fit things up to 8 feet long as long as they are narrow enough to maneuver.
heather s. says
It looks nice but I guess I thought you’d do something more creative after all the build-up. Use the screen for more than just to hide the heater. I’ve seen tons of screens in various magazines over the year that would have looked great in your space and provided dual-function.
YoungHouseLove says
Hey Heather,
As we mentioned in the post, we thought of some pretty intense solutions for hiding the water heater (like bookcases on wheels that could be carted away when necessary) but in the end we didn’t need the function to be anything other than obscuring the water heater and the ugly trap door behind it (so buying a bookcase, even a cheap one at Ikea, would have been a waste for us). In fact we have tons of empty storage bins that remain in our basement as we speak, so the last thing we needed was more storage or display space. Hope that explains a bit more about why we went with what we did. And the price tag didn’t hurt either!
xo,
s
Katharine says
I LOVE this idea and am storing it in my mental “do this someday” file.
Oh I have to say and my husband and I are masters of fitting stuff in a teeny car. We have a 2-door Honda Civic and we have gotten the funny looks SO many times as we load up doors or lumber or fencing stuff or whatever. Your pic made me laugh because it’s fun to find someone else with a subcompact that thinks it’s a pickup.
Remodelaholic says
I love the green! I love how bright and fun it feels.
And I must say wow, if that were my space there would be a lot more junk. Maybe I should whittle down my junk!
micah says
Great idea! Love the color!
Laura@JourneyChic says
Wow – I was totally expecting you guys to keep the doors white like the other furniture in the basement, but I LOVE that you coordinated them to the armoire door paper. Great idea!
Stop by my blog – we’re having a giveaway!
Kathy Whitham says
I think that the bright green reflects youth and life–which is what you two are all about right now! On VOC paint: Like you, I LOVE the magic of paint and have been using the FRESH AIRE brand. I’ve used a lot of different brands of paint, and I love how this paint goes on. It’s not drippy or smelly and the colors are always true. There’s a VOC-free FA primer too. We recently painted our entire livingroom, mouldings, and large bookshelves with it.
YoungHouseLove says
Hey Kathy,
We also love Home Depot’s Freshaire line! We’ve used it for about a year on our trim (we have a big gallon of white semi-gloss that comes out all the time for touch ups) and we love how odorless and easy it is to use!
xo,
s
Katrina says
I love that you choose a bright paint for your bi-folds instead of playing it safe! I love Habitat ReStores they have great items
Danielle@Newlyweds Paradise says
Wow! I LOVE the green! The color just brightens up the room!! Btw, I love Tiffany’s idea about using the screens for pictures, etc. How cute would that be when your kiddies get older and they could hang their art work in the area!
You guys always do such fun ideas!!
YoungHouseLove says
That would be really great once our future kids come along and use that room as a craft room of sorts! We have visions of lots of finger painting going on at that Ikea workstation because everything down there is so blissfully wipe-able! And then we could “hang” their art on the screen afterwards! Love it.
xo,
s
cassie says
great idea, I love them!! but don’t you have them upside-down? Isn’t the right way the way they are in the picture of John at the ReStore–with the wider part on the bottom?
YoungHouseLove says
Well what do you know… it looks like we do. Good eye Cassie! Nothing we can’t fix with a little lifting and turning. So funny that we didn’t even notice!
xo,
s
Jen Z. says
Awesome! {clapping} We are going to do something similar to our furnance & hot water heater in our Laundry Room/Utility Room. But ours will not be free standing. We don’t have the room. We will put them on tracks and if we need to get to the equipment, we can just remove them to work on the equipment. Your rooms came out great.
cassie says
I do architectural rendering, it’s my job to notice things like that. that’s not always a blessing though (crooked switchplates in my apartment, I’m talking about you!) ;-)
Ashley M. [at] (never home)maker says
I’m a huge fan of the screen idea. Now, I have a question for you two. How’d you pick your color scheme? That green is fantastic! I have such trouble picking two or three colors that really go together . . . and you guys are so great at it.
Have any quick & dirty tips to share?
Thanks!
<3 Ashley
YoungHouseLove says
Hey Ashley,
Our color schemes usually begin with one item that we love, so we build the rest of the room around it. In the case of the basement, we really liked the green storage boxes we found at Ikea (check out the quasi-mood-board we tossed together for this post). Things just sort of snowballed from there. We selected a rug with a green stripe in it and also dug up similarly toned bright green rubbermaid bins for storage. Then we picked up the green wrapping paper for our armoires and also used those original green storage boxes for the screen’s color inspiration (we literally held a paint deck up to them and picked the closest color). Of course grounding the room with chocolate floor paint and bringing in clean-lined white furnishings help to temper all the color so it has a nice balanced effect in the end. Hope it helps!
xo,
s
Stephanie says
I love it! Looks really great and so affordable. I have been trying to come up with a way to hide my treadmill in the living room and still make it functional….I don’t think these would exactly work though. Any ideas?
YoungHouseLove says
Hey Stephanie,
Hmm, if you don’t think a screen will work to hide the treadmill (we’ve see that approach work a few times on TV and in other people’s homes) you could also try hanging some sort of a curtain from the ceiling to “seal off” the treadmill area and hide it from view. You could also create a false wall with something like a large bookcase to diffuse things. Hope it helps!
xo,
s
Taylor @ thehouseonpennylane says
Thank you so much for mentioning the Habitat ReStores. What a great resource. I had never heard of them and thought, surely they wouldn’t have any ReStores in Oklahoma. No way, Jose. But sure enough, they do! Several actually! Here’s a link for those who want to find a ReStore in their area: http://www.habitat.org/env/restores.aspx
YoungHouseLove says
Hey Taylor,
Thanks for that link! We hope it comes in handy for other people searching for a ReStore near them. So glad you found a few!
xo,
s
Jan's camera says
Great idea! You kids crack me up.
Barb says
But why do you need a desk in your basement that is used for storage?
YoungHouseLove says
Hey Barb,
Good question! We thought long and hard about the function-factor in the basement and since it’s full of bins and boxes we knew if we were going through them for something we wouldn’t want to have to squat on the floor to sift through things. By adding the desk area we can place things up at counter height and go through them more comfortably. Plus down the line we picture the room transforming into a messy arts and craft room for our future bambinos (since everything is so wipeable it’s the perfect place for finger painting!) so the desk will also come in handy then. Hope it helps!
xo,
s
Angela says
I love that you painted the screen green – and it’s a great shade of green too! Your basement is looking amazing! :)
susan says
i love it! i’m so glad you didn’t leave it white. that lovely shot of green is so cheery :O)
Tran says
I have a pile of old household materials that are in working order but are just outdated, mismatched, or ugly. And with a kitchen renovation the pile was growing fast so I discovered Habitat for Humanity’s ReStore and offered to donate a dishwasher. I was surprised that their response was they had an over abundance of dishwashers and to check back in a couple months!
Anyway, I never thought about going there are a buyer instead of a donater. Great idea!
Jen says
I like it! I think the basement is a perfect room to step out of the box and use some bright cheery colors that you wouldn’t use in your main house.
I’m glad you figured out the screens were upside down- just blame it on preggo brain :)
YoungHouseLove says
Haha, John must have prego brain too!
xo,
s
Mary says
This is AWESOME! And, I didn’t think I was going to like the green (in favor of the white), but I totally love it. Adding color is definitely sprucing the room up and making it feel less like a basement and more like an everyday room!
Erica says
Hi Sherry,
Would you happen to have a link to a picture of the bathroom when you had the window-frosting on the window? I haven’t been able to find a roman shade that works (WalMart and Target were forced to take all theirs off of the shelves because of a choking hazard with the darn string..When I heard this I thought…really?!? )So I think I’m going to do the window-frosting to our downstairs bath window. The window is 40 years old and just ugly so I don’t like the idea of leaving it bare. If it weren’t so ugly we’d go au-natural like your window!
YoungHouseLove says
Hey Erica,
Here’s a super old post with a few photos of the frosted bathroom window of yore: https://www.younghouselove.com/2007/11/bathroom-va-va-voom/
Of course there will be a lot more detailed pics along with a tutorial coming with the final chapter of the basement makeover next week. Stay tuned…
xo,
s
Amber V. says
Another question! Are there any tricks to painting a hinge? Are you not supposed to move the screen from that position once it is painted?
YoungHouseLove says
Hey Amber,
In most cases we would advise against painting hinges (if they’re new and in good shape they’ll move more fluidly without paint gunking up the joints). But since our hinges were all secondhand (and looked a bit worse for wear with dings and paint splatter) we opted to quickly paint them to match the rest of the screen. The key is to apply one thin coat of paint, let them thoroughly dry, move them so the paint cracks and the hinges can function, apply another thin coat of paint, wait for it to dry, and then move them again to crack off any paint that gums up the works. Hopefully you’ll end up with painted hinges (but since you moved the joints between coats and afterwards they shouldn’t be fused or coated with too much paint in-between where they have to slide against each other). Hope it helps!
xo,
s
Loriana says
You guys did such an awesome job on the basement, and I love all the punches of green. I been coming up with ideas on how I would decorate my home and I’m constantly leaning towards green for some reason. So seeing green just makes me want it more. Also, I saw that your bed frame is the Malm bed from Ikea, how is it holding up and how long have you had it? I can’t make up my mind about it.
P.S. I was watching Color Slash on HGTV and it was a garage makeover and they had water heater and some little box was built that he said can be taken off easily by undoing one screw and popping it off and it reminded me of your basement water heater. http://www.hgtv.com/decorating/swanky-garage-lounge/pictures/page-2.html its in the corner if you can notice. Just thought I show you other ideas, but I love what ya’ll came up with.
Thanks so much,
Happy Holidays:0)
YoungHouseLove says
Hey Loriana,
Sweet. Thanks for the link! We love seeing what other people do and it’s definitely an awesome alternative for those who love a good build. Awesome.
xo,
s
Hayley says
Oh, I love reusing old things for new uses. We made our bed (headboard and footboard) out of old doors from our favorite antique store in the middle-of-nowhere. Since they are both five-panel doors, turned on their sides with a little crown molding around top, we made our HUGE cal-king bed for less then 200 buckaroos! Looks like it could have come from Pottery Barn and everyone loves it!