We know this was supposed to be the final chapter when it comes to our big basement makeover, but because we tackled two different DIY projects (making a screen to block off our fugly water heater and frosting the windows for 100% privacy that still lets in the light) we realized it would be crazy to try to squeeze all those step by step photos and instructions into one post… so we’re breaking it down to two. Just look at it as twice the fun. So without further ado, here’s how we made a custom screen to hide our eye-sore of a water heater with $18 worth of secondhand bi-fold doors and a quart of punchy bright green paint (stay tuned for the window-frosting tutorial coming soon).
Before we get into all the nitty gritty details, we should remind you what the aforementioned water heater looks like. Remember this guy?
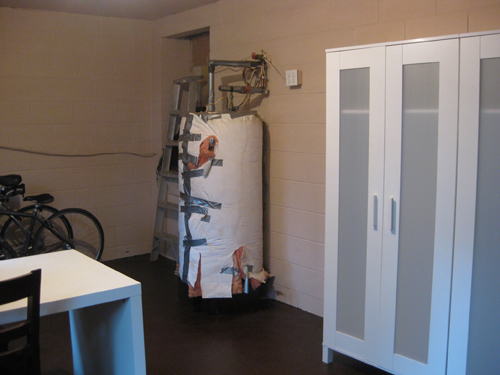
Of course the room has come a long way from that point (we added a rug, brought in a bike rack, upgraded the the lighting situation, papered the insides of the armoires, hung some art, brought in some storage, and organized our paint). But the frighteningly gross water heater remained… taunting us with its hideousness. We debated springing for a tankless variety, but because we’re big fans of working with what you have (and didn’t want to cart off our fully functional water heater to a landfill) we opted to create a screen that will block off the water heater along with the ugly trap door in the wall behind it (which leads to the crawl space under the house). And when this water heater finally breathes it’s last breath we’ll definitely consider upgrading to a tankless one (and we’ll still be able to use the screen to hide the unsightly trap door in the wall behind it).
But how did we end up with a giant screen without blowing our meager basement budget (many store-bought ones are in the $100-300 range and a bunch of those weren’t even tall enough to work for our space)? We just brainstormed materials that we could use to whip one up on the cheap. Here’s how it all went down.
Step 1: Locate three adequately tall bi-fold doors that are sturdy enough to stand on their own and will easily obscure a 6′ water heater. After debating the use of everything from all-weather curtain panels hung from the ceiling to bookcases on wheels (which could be pushed aside for water heater access) we finally decided a screen was the perfect solution for our space. And what’s an easier way to make a screen than hinging three bi-fold doors together and calling it a day? At first we thought about cutting a full sized door in half but bi-folds are like pre-cut doors, so they’re ready to go. Even better. Plus they’re easy to move, relatively simple to find, and definitely would add some playful color to the room if we opted to paint them a bold hue.
So a plan was born. For just $18 we snagged these three bi-fold doors at our local Habitat For Humanity ReStore (they were having a 40% off door sale when we went in- uh, awesome!). Plus they already came with enough hinges to join them all together and create one large screen. Jackpot.
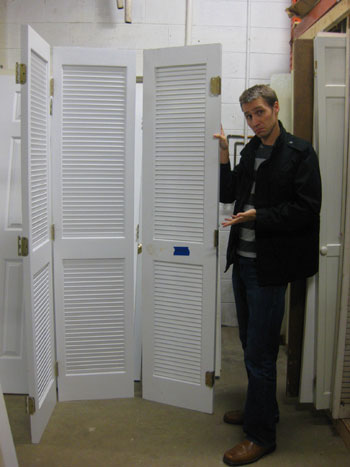
When we got to the checkout the lady was like “um, you’re missing a door” (since there are supposed to be four) but we explained that this wonky set of three bi-folds was actually perfect for us since we were going to make a screen by joining them together and didn’t need a fourth. She seemed excited for us until we mentioned that we were going to attempt to shove them into our good ol’ Nissan Maxima. Then she just shook her head and muttered good luck. Of course we took it as a personal challenge…
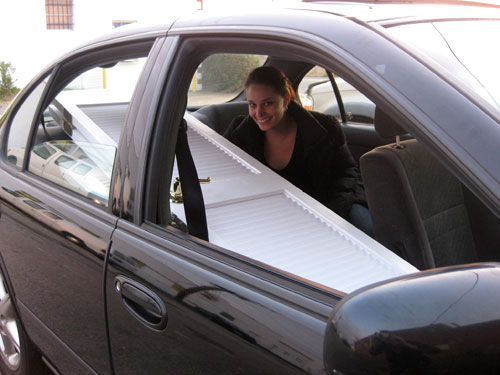
That’s me flashing my victory smile. A lot of people write to us and ask how we take on so many projects with such a small car. We’re just like anyone else with a modestly sized ride… we squeeze things in when we can and call John’s sister and beg to borrow her Ford Explorer when we can’t. In a pinch we’ve even been known to rent a pick-up truck from Home Depot for a few hours, just to cart something around. It’s all about, in the words of the ever-fabulous Tim Gunn, making it work.
Tip: when you recline the front seat and place large objects in the car as we did above, you can actually fasten the passenger side seat belt across them, which can help keep things safely in place so they don’t slide around and encroach on the person in the back seat- especially when she has an ever-expanding belly full of baby to protect).
Step 2: Place bi-fold doors on cardboard (for painting) and hinge them together in the room where your screen will be living (to avoid the annoyance of building it in one place and then moving it halfway across the house afterwards). When we finally got our precious cargo home we placed the doors on a large piece of paint-ready cardboard, hinged them together with the free hinges that we inherited with the doors, and stepped back to take a look. By golly this just might work. We also did a bit of puttying/sanding to fill in any recessed parts of the doors and smooth out anything that wasn’t exactly ready for paint (but for $18 pre-used doors, they weren’t bad at all).
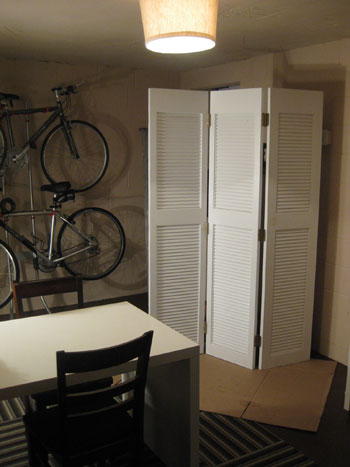
Step 3: Paint your newly made screen. That’s it. You’re done. I guess we should elaborate a bit. We used one quart of semi-gloss latex paint by Behr, which we had color matched to Benjamin Moore’s Bunker Hill Green 566. Two coats later John was finished. I love this whole being pregnant thing. No painting for me (of course for the impending bathroom and nursery projects we’ll be using no-VOC paint so I’ll be back on painting duty, but for the separate entry basement we figured low-VOC Behr paint worked for us- and at just $14 for the quart it put our total cost for the entire screen project at… (drumroll please)… $32!
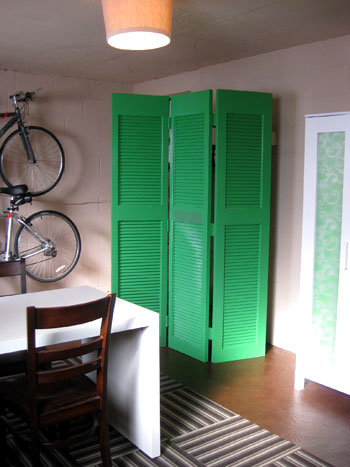
We love the happy burst of emerald green that it brings to the space (it complements the paper behind the armoire doors, the large green tupperware bins we brought in, the storage boxes in our Ikea workstation, and even the subtle green stripes in the rug). And the function is great. It definitely hides the ugly stuff but still makes it easily accessible. Best of all, there’s still more than enough room- over 35″- to walk to the other side of the basement, roll out our bikes, etc.
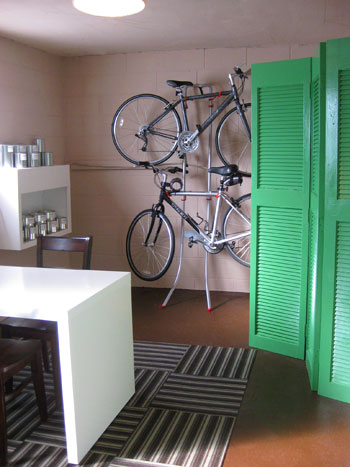
So that’s how you give an old set of bi-fold doors a whole new life on the cheap. We’ll be back with a window frosting tutorial followed by an entire basement project wrap-up (complete with photos from start to finish and even a budget breakdown for your viewing pleasure). And while we’re on the subject of repurposing bi-fold doors, have you guys reused doors or windows in any interesting ways? We’d love to hear how you’re giving old household staples a second life with a bit of DIY determination so do tell.
Psst- Want to look back on our big basement makeover from start to almost-finished? Here’s the first post, the second post, the third post, the forth post, the fifth post, the sixth post, and the seventh post. Ah memories.

Donita says
LOVE the doors, and the color. HEY I have a Nissan Sentra and haul all kinds of things, love that my back seats fold down to the trunk…you can get alot of STUFF in a small car. LOL FUN FUN!!
Sandra says
Benjamin Moore’s Aura in Eggshell has not lived up to its reputation in our bathroom, either. It’s not the matte bath & spa version though, that was released a couple of weeks after we painted.
And despite it saying that a primer is not required, I’d go back in time and use one of those mildew-lock primers (like Killz).
Pretty disappointing for almost $50 a gallon, let me tell you.
YoungHouseLove says
Hey Sandra,
That’s good to know! It’s a bummer because we’ve heard amazing things about Aura paint, but maybe it’s just the moisture in a bathroom that takes it down a notch. Thanks for the tip!
xo,
s
Kelsey says
Omg, I love this idea! I have been racking my brain lately to figure out how I could obscure our electronics and media console so that I could leave our blinds open more often! (we live in a 1st floor apartment right next to a walkway, so privacy is a bit of an issue…but I refuse to live in a cave with the blinds closed all of the time!)I`m totally going to talk the boytoy into making one of these with me! Love it!!!
Tiffany says
If you ever decide to spend any large amount of time in the basement, or move the doors to another room, you could use the doors as a message center as well. Attach notes to the slats, or even attach a dry erase board or corkboard over the door.
YoungHouseLove says
Hey Tiffany,
So true! Love that idea. Thanks so much for sharing!
xo,
s
Sarah says
Oh my gosh, we did almost the exact same thing last year! We found a set of bi-fold doors at a yard sale, solid wood, for $5. We sanded and painted them, hinged them together, cut out the wooden slats, and filled them with fabric. You can see them here: http://onehourofhome.wordpress.com/2008/11/23/project-folding-screen/
The basement looks gorgeous, I love that color!
YoungHouseLove says
Hey Sarah,
Cool project! Thanks so much for the link. We love the fabric spin you added!
xo,
s
Emily S. says
You’ve inspired me to dig some old closet doors out of my garage. Great idea and seems easy enough!
anna see says
Super fun and I love the green. Just got rid of 4 of those doors that were in my kitchen. hmmmmm….
Emily says
I re-purposed an old door that had been left in our basement by previous owners: My husband wanted a new desk, and he wanted just a wide, open space to work on. So for Christmas I bought a short shelf (just about 30 inches tall) and took an existing filing cabinet. I cleaned all the old hardware off the door (hinges, doorknob, and this weird latch) and simply set the door on the shelf and the filing cabinet, one on each end. Presto! New desk (if it’d been for me, I definitely would’ve painted the door first, but he prefers wood). The best part? The hole that the door knob left was the perfect place to run cords for his computer and desk lamp through.
YoungHouseLove says
Wow! That’s genius Emily. We love that the door hole ended up being perfect for cords and wires! Thanks so much for sharing!
xo,
s
Katie says
Fabulous idea!
dinah says
i was surprised to see that the green color didn’t make the room look smaller! it definitely looks a whole lot better than leaving it stark white!
LOVE it :)
Go Amie says
I like it, but I wonder why you hinged them in a zigzag formation instead of a C formation – wouldn’t the latter fit more neatly?
YoungHouseLove says
Good question! The hinges are flexible enough to make a C or a Z out of the screen, so I guess it was just a personal preference to place the screen in a zig-zag shape instead of a cylinder-ish shape around the water heater. Maybe because we thought a C-shaped screen made it more obvious that we were hiding a big cylinder shaped water heater? Hope it helps!
xo,
s
Erin says
I had a set of bi-fold doors that I got for free and decided to make a shelving unit out of them. I had some wood cut to the length I wanted for the shelves (paint this wood to match bi-folds), then cut out the slats on the doors at the heights that I chose, then stood each set of bi-folds up a few feet apart and partially folded so that they stand on their own, and slid the wood shelves through each set at the openings created by cutting out the slats, and I had easy shelves that I use to store my crafting supplies. It stands quite well on it’s own, however, I would, of course, recommend making sure to secure it if you have children.
mribaro says
Wow! for another (more and more) beautiful makeover!
I just want to add, that while you were announcing in the beginning what changes you would make in your cellar, and you mentioned something like art or mural for your bicycle wall, I envisioned something like this: http://www.apartmenttherapy.com/images/uploads/hakarl05.JPG
and I thought a mural of two trees in your favorite shade of green (like boxes and giftpaper you used) would be a nice background for the two bikes, suggesting airiness, space and many nice bike rides through nature :) Seeing that you have just added green screen, the mural might be too much green, but you never know who can be inspired from it too :) Also, I’m not sure how easy/painful would be to apply that mural to the humpy brick surface of the cellar walls… Keep up with the good work – your posts are always an eye feast!
YoungHouseLove says
Hey Mribaro,
What an awesome mural! Thanks so much for the link. Originally we were thinking we might not be able to get the bikes off the floor so we’d need something to fill that back wall and create more of a focal point over there (which is where the idea of some large-scale art came in). But thanks to the on-sale gravity bike stand we found (which required no screwing or nailing at all!) we now have vertical bikes on the wall… so they ARE the art! Seriously though, that mural link is really cool. Sometimes we’re soft on wall murals and decals but that one is really crisp and graphic.
xo,
s
Eddie Williams says
“By adding the desk area we can place things up at counter height and go through them more comfortably.”
Now I know why the desk was there. I thought that was gonna be an office or something.
Maya says
haha…we’re the kings of carrying too much in our little car. Hatchbacks can carry almost anything– we’ve transported a queen sized bed and a sofa in ours (separate times, separate cars.)
Paige says
Hey I was looking at the Deck the Halls on the Cheap link under the How To tab and I saw on a comment you responded to about your monogrammed P that you have in your house and you said you sold one from every letter of the alphabet in your store under the Shop tab and I do not see it. Are they gone?
YoungHouseLove says
Hey Paige,
Unfortunately everything in our shop is limited edition so because we sold those monograms last year they have since sold out. So sorry to disappoint, but here’s a DIY monogram art tutorial so you can whip up some of your own.
https://www.younghouselove.com/2009/10/how-to-make-a-magazine-monogram/
Hope it helps!
xo,
s
Michelle says
The basement looks great!
We recently bought our first home & I had an old 6 pane window just waiting to be redone. We left the origional paint & destressed it a bit further then used chalk board spray paint to turn the windows into mini chalkboards. We hung it in my reading nook & it looks awesome. :)
Raf says
I see somebody commented negatively on Benjamin Moore’s Aura paint.
We’re using the Eco-Spec paint, also from Benjamin Moore, also with zero-COV (none in paint base, none in colorings either), but cheaper than the Aura! I haven’t used the Aura, so I can’t compare the two, but I really liked the Eco-Spec, which I used in egg-shell finish for a baby nursery. (We also used the Eco-Spec primer since we had to cover a dark green wall).
One thing to keep in mind, though: the Eco-Spec is intended for the professional painters market, so not all Ben Moore branches will carry it or agree to sell just one gallon to a homeowner.
YoungHouseLove says
Thanks Raf! Also very good to know.
xo,
s
jbhat says
I love the screen solution, and what a fantstic bargain to boot. Once you get them turned right side up, I wonder if you would consider adding tiny wheels to the bottoms to make the thing easier to maneuver?
YoungHouseLove says
Hey Jbhat,
Good question! We actually debated the idea of casters but thought the screen needed more stability than a bunch of little wheels would give it. We opted to leave it caster-less so it could rest its full weight on the chunky zig-zagged bottom edge, which keeps the screen extra sturdy. Hope it helps!
xo,
s
Aimee says
Okay, that pic of you in the car is cracking me up, Sherry, because we do exactly the same thing. Last time, it was with a door the same size, and DH had to squeeze under/behind it, because the other two spaces in the back seat were occupied by our sons! (I definitely do not recommend that approach, but when you find a good deal in Ikea’s As-Is section, you do what you have to!)
Melissa says
Thought on tankless water heaters…for most families they save energy because you’re not storing ever-cooling hot water at times when you don’t need it. But they place a lot of electrical demand on the power system, and this happens at times when demand is high (demand generally peaks at getting-ready-for-work time in the winter, and at getting-home-from-work time in the summer). So in theory, lots of tankless water heaters could cause a decrease in average demand and an increase in peak demand, which means more “peaking” power plants, which are sometimes less environmentally friendly (e.g. nasty old oil-burning units that only need to run 3 days a year), and usually more expensive (like the jet-engine style combustion turbines that are quick to build as peakers).
If that’s true, then tankless water heaters might be less environmentally friendly on the whole. And most people would say, who cares if my own bill goes down? But power companies are considering a system called “critical peak pricing” where newfangled electric meters can charge a different price every hour, making electricity more expensive at peak times. In those cases it’d be better financially to have a water heater on a timer than can heat the water at cheap times such as 3 a.m., though of course you’ll need lots of insulation or a bigger tank to make that last.
These are the kinds of things environmentally-conscious power engineers toss around in between pondering “no new coal plants” groups who host charcoal-fueled barbecues served on paper plates. :-) Gotta think big and small picture as you’re trying to find the right path. And either way you’re doing the right thing by not junking your still-working water heater.
YoungHouseLove says
Lots of good stuff to think about! We certainly plan to consider a tankless water heater when our current one dies, but we promise that we won’t blindly jump into anything and will also consider a version with a tank so we can weigh the pros and cons of each system when the time comes! There’s so much to take into cobsideration so we definitely want to make an informed decision!
xo,
s
Erica in SF says
I know this post was a while ago but maybe you still receive comments…this solved my serious marital conflict I was having… we got some free bifolds today and I’m using this to block all our hanging laundry in front of the radiator (why we have radiators in SF beats me)…until I can redo our laundry area like you guys did in your new house..I want to get the same washer dryer and our space is exactly the same size as yours… have to get the electricity 220 set up first. But since my hubby will probably still want to hang stuff this screen will be great! Yay for the creative youngsters solving problems for everyone everywhere!
YoungHouseLove says
Aw so glad! Good luck with everything!
xo,
s
Andrea says
Hi guys! Love the ideas for the basement. Our basement looks very similar to your original, and I am inspired! Any ideas for a cheap, easy diy cover for our basement ceiling? We have a low, exposed ceiling (gross). My husband and I are both tall, so a drop ceiling is not an option. Fabric, bamboo? Any ideas? Thanks!!!
YoungHouseLove says
Hmm, I like the bamboo idea! Maybe you could get some woven bamboo blinds and somehow secure them to cover the exposed stuff? Or even use long bamboo sticks (or faux bamboo). Of course fabric could work too, but if it’s moist down there you might worry about the fabric absorbing some sort of odor or mildew or something. Good luck!
xo,
s
Allison says
Spending the weekend reading every blog posted from the beginning, and I must say the green shutter screen next to the bikes totally reminds me of the new nursery! Funny how life is sometimes a foreshadow!
YoungHouseLove says
So funny! You’re right!
xo
s