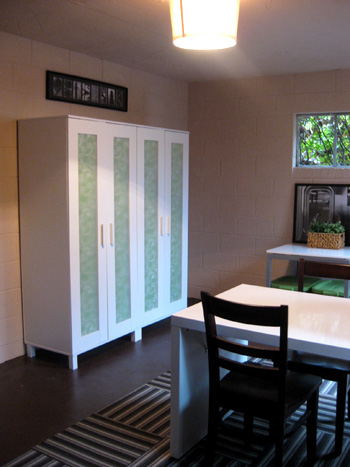
We’re back with our weekly basement update (here’s where we left off) and this week we painted the dingy built-in cabinet, added some art, obscured the semi-sheer doors to our armoires and brought in a bevy of bins to organize everything we have on hand (and everything we’re sure we’ll acquire down the line- now there’s lots of room to grow). Here’s just a taste of the latest updates:
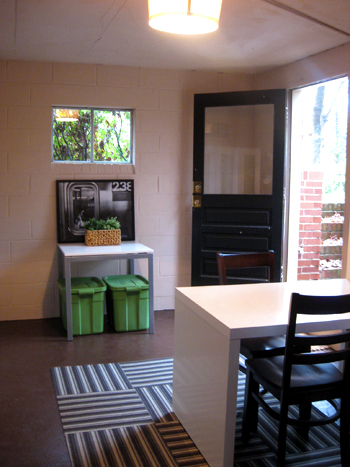
But before we get to all the dirty details we owe a huuuuuge thank you to the wonderful peeps at True Value who made a lot of this week’s undertakings possible thanks to their generous gift card (which we’ve been using left and right these days). True Value was the source of the paint for the built-in and a slew of storage bins that we picked up to maximize both armoires and the space under the little Ikea table that we already owned near the door. Our basement never looked so good. Seriously the spiders who used to live down there wouldn’t even recognize the place. Thanks True Value!

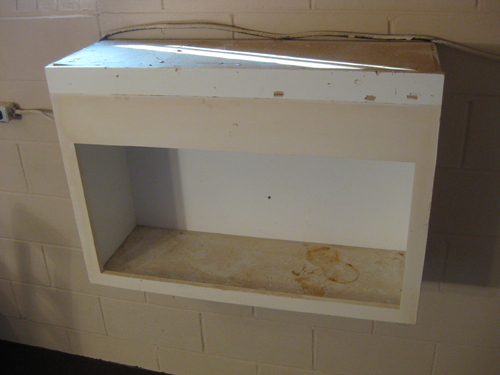
But back to this week’s latest projects. First we grabbed some crisp white semi-gloss paint to clean up the built-in wall cabinet that we inherited with the house (we have big plans for what we’ll store there so stay tuned). Here’s what we started with, just to refresh your memory:
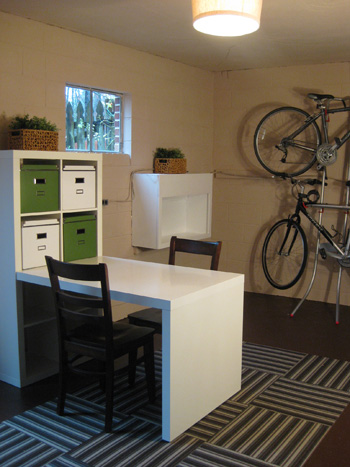
And here’s how it looks with a few coats of white paint. It honestly looks as new as our recently purchased Ikea desk to the left of it. Yay paint!
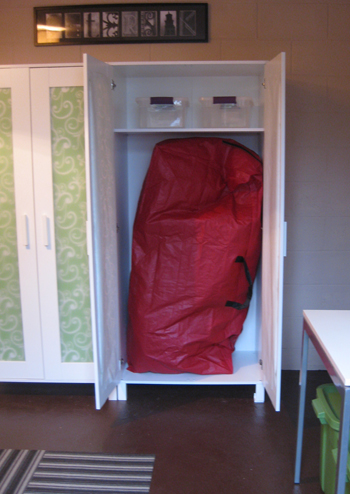
You also may have noticed that we dealt with the semi-sheer panels on the two wardrobes we recently picked up. See, after we filled one with our giant Christmas tree bag and added a few bins up top…
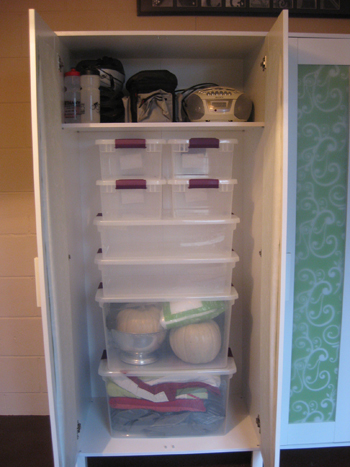
… and used the other armoire to house eight variously sized bins (only two of which we’ve filled- so we still have a lot of available real estate)…
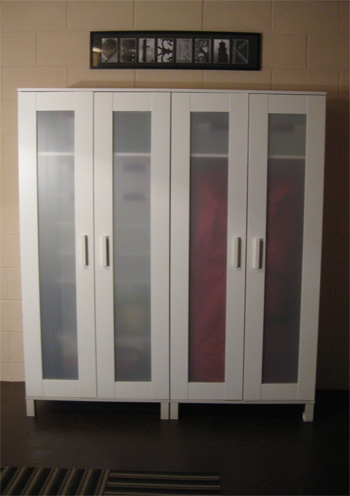
… we were left with colors coming through the fronts of the doors, which looked a bit chaotic and unbalanced thanks mostly to the big red tree bag on the right.
So we snagged two rolls of green and white wrapping paper from Target and cut them each down the middle of the roll to create four nearly perfectly sized panels of paper that we trimmed down a bit more and double-stick-taped to the inside of each door.
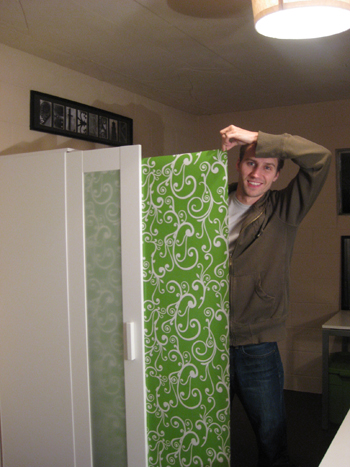
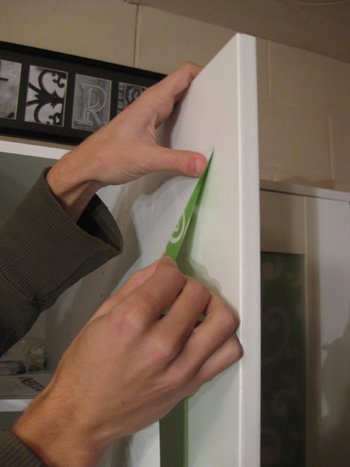
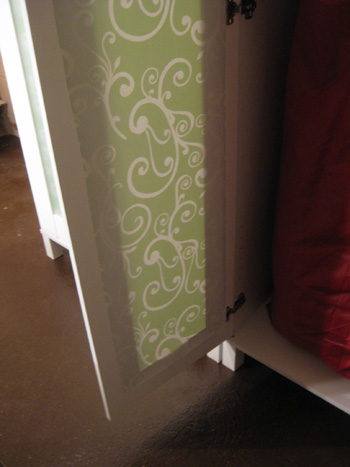
Presto, fun color and pattern that comes right through the semi-sheer door panes and adds some textured interest to the entire room. And the total project cost was just $6 (with some paper left over to wrap a few presents). Can’t beat that with a stick.
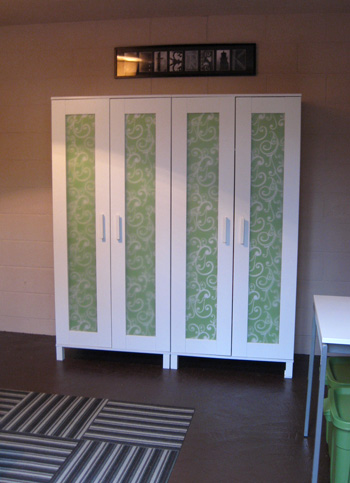

And you might notice the art hanging above the armoire (along with the large black and white framed print leaning above the table near the window). Well, the print near the window was one that we already had laying around – and it was as if it was meant for the basement (the black frame and moody art looks great with the black stripes in our rug). And the long framed piece above the armoire was actually a recent groomsman gift for John (it’s our last name spelled out in photographs of objects that resemble letters) and it also worked perfectly with the newly spruced basement color scheme.
But how did we hang the print above the armoire when our cinder block walls are so famously difficult to screw into (everything we’ve attempted to secure into the wall pulls out seconds later with a puff of dust)? Well, we grabbed some Command Picture Hanging Strips… and they did the trick! They’re super strong sticky strips that act sort of like extra-strength velcro to hold things in place.

You just remove the protective backing and stick one side to the back of the frame…
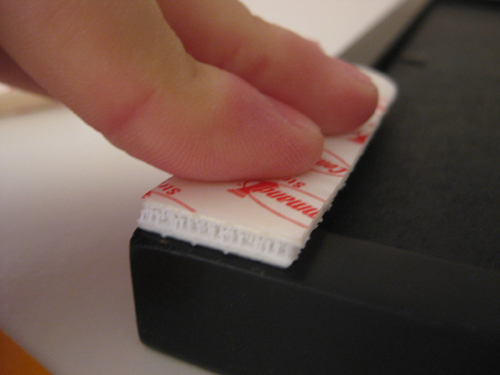
… and remove the other side’s protective backing and stick that side of the strip to the wall. Then you apply some decent pressure to the frame against the wall to get things to stick well for about a minute and then separate the pseudo-velcro strips so the pieces on the wall can “cure” for an hour or two without the weight of the frame pulling down on them. Then it’s time to reattach the velcro-ish pieces on the back of the frame to the two pieces that are then completely secure on the wall. Voila: your art is officially hung in a totally screw-free manner. It was so much less frustrating than fighting with our temperamental cinder block!
And because we visually revealed what we were using the bins in both armoires to store (some Halloween decor, an air mattress, some family quilts, etc) we might as well share what those two green bins under the table by the window are currently housing:
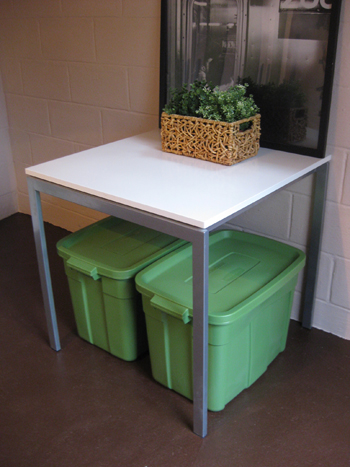
They’re storing all of our Christmas decor, which is super amazing since it used to be strewn about the house in various kitchen cabinets, bins under the bed, and boxes in my closet.
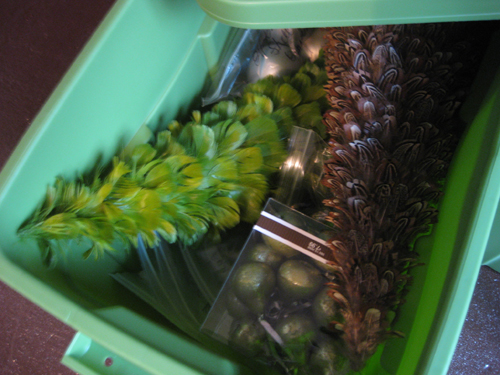
It’s so nice to have everything reunited in those cheerful oversized green bins. This stuff shouldn’t excite us that much but for some strange reason it just rocks our world.

So that’s where we are as of this week. Of course we’re still not finished (we have to add some privacy to those windows, create a screen to hide the ugly water heater and share our fun little storage project for the newly painted built-in cabinet) so stay tuned. And speaking of not being finished, do you guys have any projects that are half done? We’d love to know what you’ve started but have yet to finish. Because we of all people can totally relate to how that feels…
Psst- Want to look back on our big basement makeover from start to almost-finished? Here’s the first post, the second post, the third post, the forth post, and the fifth post. Ah memories.

Jane @ the Borrowed Abode says
Leave it to you guys to create such a gorgeous storage/workspace out of a bare-bones basement! :)
Seriously, though, fantastic job!!
Laure says
My husband and I (well, maybe I should really be giving just him the credit) are total do-it-yourselfers! We have been remodeling our home over the last year and a half. Our current project is our screened porch. Previously it had ugly purple tile and really just a dismal look. So far we have re-tiled the floor with a great 18 inch travertine, replaced the gross ceiling fan and have purchased a dining set and conversation set. The final project on the porch is a built in area with a bar fridge and sink…perfect for entertaining! We are using a stacked stone made of granite remnants to create the perfect look. It is a slow process…but it looks like we will be finishing up just in time for the holidays!
heather s. says
It looks great! I love the wrapping paper (I have to go buy some now for actually wrapping gifts). I, too, think I would fashion shelves in the armoire just because I’d hate to constantly unstack the boxes to get to what you need. I’ve been considering getting that armoire for my basement as well to hold out-of-season clothes and another for my suitcase and other storage items I’d rather not have bugs get near.
Ms. Bright says
Looks amazing, but seriously…how do you only have 2 bins for Christmas decor?! We must have at least 6 bins double their size! (and I’m no packing slouch, either!) Must be nice to keep them pretty and neat like that!! And P.S.- the command strips are my wonder product for decorating in the unfinished sections of basement!
Rebecca says
Your basement is coming along so nice! My husband and I also in the process of reorganizing our basement and trying to maximize our space with storage shelves..of course we went for the typical basement-y home depot storage units and now I’m so jealous of how chic yours look! I don’t know how you guys do it, you make everything look so clean and cohesive, even down to your basement!
So I have a question for you (and I really hope this doesn’t come off the wrong way) about your home renovation projects. I know you can’t really compare apples to apples because everyone has a different situation as far as bills, debt, etc…but how the heck do you guys afford to do all your home renovations? I saw that you mentioned you’ve replaced all the windows in your home, put in new hardwood throughout some of your rooms, had an entire kitchen renovation with new appliances, and now an upcoming bathroom renovation. (And they say kitchens and bathrooms are the most expensive rooms to renovate!) How do you guys do it and you’ve only been in your house like 3 years right? My husband and I have been in our house a year and we finally just finished having all our windows replaced in the house. We had to do it in sections (front, sides, then back) because we couldn’t afford to do it all at once. Our 50+ year old home needs a new kitchen, new bathroom, and new siding but it seems like it’ll be YEARS before we’ll be able to afford to get to those big projects! How did you do it all so fast?
I hope you don’t think I’m being super nosey and I’m asking you what your bills are or anything, thats not what I’m trying to say! Are you guys just really good at budgeting and you pinch your pennies to save for things like that? Did you go for lower end cabinets or countertop in your kitchen rather than the premium grade? Did you go the DIY route and install your hardwood or cabinets yourself?
YoungHouseLove says
Hey Rebecca,
Good question! We actually get it a lot. The answer is that we’re actually super thrifty (as you can probably tell from our “Save It” series and our love of Target furniture). And we actually purchased our house for a lot cheaper than most homes due to its dated and overgrown condition (a lot cheaper, as in, well under 200K). Instead of getting a house that was 350K, we put the money we saved into improving our fixer upper (we never had to take out a loan, but we made a huge effort to score the best deals by getting multiple estimates and negotiating as much as possible). And we actually ended up saving a ton of money by getting a super cheap house and doing the work ourselves as opposed to getting an already-renovated house for a lot more. We’ve only spent about 35K on the entire project, inside and out!
Hope it helps! Happy home improving…
xo,
s
Jessie (Vegan-minded) says
The basement looks awesome and so inviting now! I love the wrapping paper trick. :)
Mandi says
I will never ceased to be amazed at the transformative powers of plain old paint! That cupboard really does look as new as the desk unit.
I have one of those Fast Lane toll paying transponders for use on our toll roads around here, and they gave away strips of that 3M not-velcro with the device. I love it, because I can attach the thingy to the window, or once in awhile – move it to the other car if that’s the one making the road trip.
Rebecca says
Thanks Sherry! I guess we pretty much did the same thing as you guys. We bought a cheaper house that we hoped to renovate ourselves and make “our own” rather than have a higher mortgage for an already renovated home. I guess it just takes time and patience (which is hard for me because I want things to be perfect right away!) Your home is proof that it can be done! Thanks for being such a great motivation and inspiration to us!
Emily says
It looks great – but here’s my question – what will you use it for? just storage? (if so, why the table etc?) I don’t see an interior entrance.
YoungHouseLove says
Hey Emily,
The idea is that the basement will be an organized and highly functional storage space (yes, it’s separate entry). We actually wanted the desk/workstation because we envision ourselves rooting through bins to retrieve things and didn’t want to be crouched on the floor to do it. We also think that waaaaay down the line it would be a cute little place for messy finger painting projects with the kids since virtually everything in the room can be wiped down. Hope it helps!
xo,
s
Beks says
I just love how the black and green compliment each other. I’m earth-tone obsessed myself and usually hesitate to incorporate black, but the combo makes your basement completely modern and inviting.
And can I give a huge thumbs up for the command picture hanging strips? Our entire apartment is cinder block (eesh) and those strips are a lifesaver. From the wall clock, hanging art, to even our coat rack, those little strips get the job done!
Keep up the great work. :)
Tracy says
I love what you did with the light (using a lamp shade). We have a bare light in our basement and I couldn’t think of a way to cover it…. after seeing what you guys did, I went out and bought a funky lamp shade and it looks fantastic! Thanks for the great idea!!!
Sally says
This is by far my favorite project that has come through the blog! It’s so much fun to watch the transformation step by step. I really like how the wrapping paper looks on the cabinet doors. And I’m nuts for organization, so I totally understand the thrill of having all of your Christmas decorations in two bins! Order is a beautiful thing. :)
Sunny's Life in Rehab says
Awesome, awesome, AWESOME! I have a salvaged glass door I’ll be using for the new kitchen pantry, and I was a little concerned that it might reveal too much. That wrapping paper trick is just perfect!
Kathy says
A quilt will rot if you store it long term in a plastic bin. If it’s a cotton quilt, that is. A pillow-case is much better for it. It should also be refolded differently periodically to avoid set-in creases.
Of course, it all depends on how “valuable” you perceive the quilt to be (sentimental or otherwise), if you hope to pass it on or not. A “family” quilt to me is always much more valuable and interesting than a sale special reproduction from Target.
It’s ok if you don’t like quilts, or the style of these specific quilts. It’s ok to store extra quilts in the basement. It’s also totally ok to barter or trade the quilts with somebody else in the family for something that you need now or will use more often. Just a thought.
YoungHouseLove says
Hey Kathy,
Thanks for the quilt tip! It’s actually a recently acquired blanket from Target (nothing valuable or very sentimental) so it’s quilted but “quilt” is probably the wrong description since it’s mass produced. And we pull it out from time to time but just wanted a place to stash it on the “off season.” Hope it helps!
xo,
s
Krysta says
Every time I see one of your gorgeous brown floors I get the urge to rush home and start painting my basement. Love!
As for WIP: I’ve installed stick ’em tiles in my small bathroom (so long nasty carpet) & need to reinstall the base trim. And project “I Hate Wallpaper” is about 4 hours in…only 100 or so more to go!!
Stephanie says
This is so inspiring! You guys make your house seem so spacious simply by the way you organize. I’m also impressed by your initiative and follow-through – you got through this by putting in some work every week and it wasn’t some crazy long drawn out process. Like I said, inspiring. Thanks for sharing with us. Maybe, just maybe, we can tackle our garage.
Jennifer S. says
Looks good! I was a little worried when I first saw the black frames in the pics. Today I bought white frames for the first time ever, inspired by you, and now I was afraid you were switching to black (until I read they weren’t new purchases…). Now I have to get brave enough to put my white frames up — a big step for this black frame lover.
As far as projects I haven’t finished, there is the back door. We began stripping it over the summer and we re-hung it in a terrible state. It is a mix of paint and bare wood and needs to be sanded and stained.
Kyley says
wow – love it! An organized person’s dream! good job! :)
Yvonne says
wow!!!!! i am impressed! great job guys! I cant wait for the result!!!
Loki says
Wow, I love that idea with the wardrobes! We have the same ones and I think I might have to go looking for the perfect wrapping paper to cover ours!
Niki says
So cool that you have EXTRA storage room, so jealous!
SusanMC says
Wow – it looks a great. I love everything you did. It definitely doesn’t look like a dingy basement. I love the gift wrap idea. Mind if I steal it?? ;) My husband has his grandfather’s old very large gun case. He doesn’t use it so I moved it into my craft room to store all my gift wrap supplies. It has two doors with clear glass. So far I am liking seeing the pretty colors and all the paper and ribbon but I know I will eventually like to cover the doors with something. Since the case will someday go to one of our sons, I don’t want to do anything permanet so your gift wrap idea is great. Can’t believe I didn’t even think of that — and with all that gift wrap staring at me through the glass doors. DUH moment!! :)
Betsy says
Oh, this is oh so helpful! I have basement issues and part of my basement is actually living space, so it behooves me to make it nice. :-) LOVE the bare bulb -> shade solution! I only wish I had read about this magical Drylok before painting Kilz basement primer on my masonry walls!! Boohoo! I have a water seepage problem in one area, so I guess I’ll try to strip off the primer and re-paint with the Drylok.
Mary @ StyleFyles says
I love the way that armoire turned out. The wrapping paper totally classed it up and gave it such unique style, compared to the plainer look from before. Three cheers for red Christmas tree bags, right? Also, good tip on the velcro wall hangings….I could totally use those for a thing or two around my place….
Raf says
Hi,
I see you used semi-gloss paint on the cabinet. Is there a technical reason or is this the finish you prefer?
My boyfriend and I will use edge-glued pine shelves to build bookshelves and we want to paint them white. We are trying to achieve the look of EKBY JARPEN shelves from IKEA (http://www.ikea.com/us/en/catalog/products/90056988).
So far we looked at high gloss finishes and the only zero-COV brand I found was Mythic paint, which is not available in our province. However, white semi-gloss latex is readily available… Do you think semi-gloss would do the trick?
Thanks and keep up the inspiring work!
YoungHouseLove says
Hey Raf,
We love semi-gloss paint for furniture so it’s easily wipe-able and durable. Definitely go for it! Flat paint isn’t as easy to wipe down for furnishings (nor as flexible as semi-gloss so it’s prone to cracking more easily) and some people find high gloss to be a bit too shiny (and it’s harder to get a seamless look since it hides less imperfections than semi-gloss). Hope it helps!
xo,
s
April says
Are you kidding? I have a house full of unfinished projects.
*Our robe doors are still waiting to be painted. Luckily they are a whitish colour and don’t look too bad.
*Our linen cupboard doors are still waiting to be painted.
*The front door needs to have the glass replaced, and have its final coat of paint (are you seeing a pattern?)
*The skirting boards in the lounge need to have the nail holes gooped, and to be painted (I have done half the room, but then got bored).
*The kitchen needs tiling and you guessed it, to have the arcitrave painted.
Hmmmm, seems I really do hate painting.
meryl rose says
I actually just bought the same Ikea storage containers for my laundry room a few weeks ago. I was having the same see-through dilema (a vacuum cleaner, mops, booms and cleaning supplies are not very lovely to look at) so thanks for the WONDERFUL and CHEAP way to cover up the shear panel. Thanks!
Kim Smith says
Hi Sherry & John,
Just wondering if you considered a tankless water heater? Since you’ve done so much hard work on making your basement look great, it could add more room, as well as a sleeker look.
Kim
YoungHouseLove says
Hey Kim,
We definitely have considered a tankless water heater but because our current water heater still functions perfectly well we hate to send it off to a landfill. The plan is to wait until it needs to be replaced and then upgrade to something tankless at that time. And trust us, we’re super excited for that day to come!
xo,
s
thursday says
I have used the wrapping paper trick before, but I think next time I’ll try some fun fabric instead. Of course, that’d be a little bit more expensive unless you had a few lovely yards laying around! And, if you get sick of the wrapping paper, it’ll be fairly easy to switch out.
Stephanie says
You can really fit all your Christmas stuff in those two green bins?!?!?!? Even all ornaments?? What am I doing wrong???? I am so in awe and jealous of your organizational abilities. The room is looking great!
YoungHouseLove says
Hey Stephanie,
Well we only have one tree that we decorate and I like to keep all the original ornament boxes since it keeps them from shattering so it’s just a matter of stacking a few boxes (each full of 6-12 ornaments) so around a hundred or so fit in one bin. Meanwhile the other is devoted to feather trees, bows and other holiday accessories. Hope it helps!
xo,
s
fatalefemme says
As renter’s, we’re obsessed with the command strips! We’ve just gotten into the habit of buying a massive batch before every move so that when we go, we don’t have to fill in tons of holes but still have our art and photos hanging around the house.
I actually think we’ll continue this practice when we own a home, so that we never have to fill holes or repaint, they’re genius!
Erica says
First of all, I love that wrapping paper and your green and black theme! The basement looks so nice! If I were you, I would be so excited too! I wish I had a basement instead of a cellar, but I do have a nice 2 car garage so I can’t complain much…
Projects I’m working on… well, I’m in the middle of fixing up a house I just bought, so that’s my major project! I’ve refinished 4 rooms of hardwood floors, painted 5 rooms, and laid tile in my kitchen. I’m waiting on the rest of my new cabinets to come this weekend so I can hopefully start organizing all my dishes and kitchen stuff and food!
*Primering and painting my kitchen. It’s nasty looking and I’m so excited to paint it a bright cheerful yellow!
*Removing old paint from the beadboard in the kitchen. This has to be done by hand with a screwdriver and a hammer, and it takes forever. There are at least 20 coats of paint on it. :-) Once that’s done, I am repainting it white.
*Removing the chipping, peeling paint off all the baseboards, moldings, window frames, and wood in the entire house. Sanding them down and hopefully staining them to preserve the original wood. :-)
*Chipping the paint off of all 4 exterior doors in the house and repainting them. I’m thinking red. :-)
*Either painting or buying new closet doors for all 3 closets. Rehanging the closet doors so my visitors can’t see inside my closets! :-)
*Painting a sideboard, possibly my futon, a medicine cabinet for the bathroom, a dresser, and a coffee table.
*Replacing doorknobs and deadbolts on 2 exterior doors.
*Hanging all my curtain rods correctly and removing the old hardware from the previous owners.
*Bringing in all my belongings from where they are stored in the garage and finding a place for them in my house! This may require getting some cool closet organizers! :-)
In addition to all these things, I am working on a few holiday projects (decorative stuff and making placemats for my dining room table.) I didn’t realize how much stuff I have to do until I made this list! Yikes!
Amy E. says
my husband and i LIVED by those command picture hanging strips for years! they’re not only great for walls that you can’t drill into because of the material, but they’re also the renter’s DREAM! we used them to hang everything from clocks to artwork to diplomas, corkboards and key hooks and more! and not a scratch on the walls! love ’em!
the little velcro-ish interlocking pieces can actually be reused too, just gotta buy more of the adhesive strips by themselves.
Melissa says
Love the wrapping paper idea.
I can’t believe you only have those two little bins for Christmas decor. We have at least 8-10ish and that is after me purging a whole lot last year. haha! I did manage to fit my fall decor into 2 medium sized bins and 1 small bin for Halloween stuff. I guess I really have a thing for Christmas. :) I do have 3 trees in our house so there you go.
Dana says
The printed paper you added to the armoires is my fave. It’s so subtle yet colorful and playful at the same time! Your basement is really coming along. I LOVE ORGANIZATION.
As for us, we ALWAYS have a project going on. I’m in the middle of gearing up for painting and organizing my laundry room. I’ve already grabbed some Goodwill mirrors and painted them white, but still need to paint the walls and find some decent, inexpensive baskets for storage… all in good time.
condo blues says
Ah…you had me at storage. I love an organized room.
My front flower beds are my unfunished project. Everything died or was eaten by japanese beetles. Last summer my husband and I put in raised flower beds but couldn’t do the planting because we stink at landscaping. Looks like we’re on the hunt for a landscape designer come spring!
Eddie Williams says
Me too, i like that pattern behind the glass, never thought of that one for our piece. As for unfinished projects, we’re still not through with baby-proofing the whole house. I think we’ll never be done with it since our needs will change as our child and family grows.
Amanda says
I love the paper you used on the doors- that looks great! The groomsmen picture is fantastic too. I’ve seen those before just can’t put my finger on where, but I love them!
Belinda Laing says
Hi guys!
The basement is looking great!
I am curious about your little plants. What are they? Also, are they still in original pots or are they actually planted into the baskets??
B x
YoungHouseLove says
Hey Belinda,
They’re faux plants from Ikea! We grabbed them on a whim since we knew we wouldn’t go into the basement and water anything real with much regularity and we tossed them into some baskets that we already had laying around. We love the mixture of texture and greenery- and they actually look pretty convincing (on an Ikea budget no less). Hope it helps!
xo,
s
Jennae @ Green Your Decor says
We’ve had our Aneboda wardrobes for so long, and I was never able to figure out what to do about the semi-transparent doors. This is why I love you guys :) I have some fabric that matches the wall art in our office that would be perfect for this purpose. We actually store clothes in our wardrobes, so I’m pretty sure paper would just get torn up by the hangers.
And leave it to the Petersiks to make plain green plastic bins look absolutely fabulous. A lot of days I wish our home were a blank slate so we could decorate it from scratch without all of our old stuff we have to work around :)
Jamie says
Sorry if you mentioned this previously, but where did you get your little plants and baskets? Are they real plants or faux? Thanks!
Jamie says
… Wow, it would help if I clicked to the last page of comments, wouldn’t it? Sorry about that, never mind, lol!
YoungHouseLove says
No worries Jamie! Glad you found the answer!
xo,
s
Tiffany S. says
OMGosh – it just looks so amazing! I love the cohesiveness (as in everything you two do).
For privacy, might I suggest window film as shown here (with all sorts of links): http://www.shelterrific.com/2009/04/23/more-fun-with-window-film/ (You can cut this out of my comment if you don’t want to promote another site. I understand.)
My husband (you’re going to start to think I’m such a shrew but I’m really not) came home from the hardware store with window film but it was this horrid amber color that you could see out through but not in. Anyway, do not get that! Anyway, we’ll be retackling the window film project ourselves one of these days.
YoungHouseLove says
Hey Tiffany S,
Thanks so much for the link! We love shelterrific.com and actually revealed a bunch of comments back that we will be using window film (!) so it’s like you’re reading our mind. Stay tuned for that project coming soon- along with our DIY screen to obscure the water heater.
xo,
s
threadbndr says
Great makeover, btw, but one thing puzzles me. Why are you storing your bike rack and bikes in the basement instead of in the garage? I would think it would be much easier to get them out from the garage.
I wish my basement were concrete block instead of rock and mortar. I love the look of the foundation from the outside, but it’s rough and very hard to work with from the inside. I am going to try repointing and doing something along the lines of venitian plaster in the wine cellar as an experiment.
YoungHouseLove says
Good question! Our big double garage is unfortunately a bit of a haven for bugs and leaves so now that our basement is all finished and dry and bug free it really appeals to us for bike storage because they’re all clean and pristine (which definitely encourages us to ride them more). Hope it helps!
xo,
s
Renee Smith says
This has my husband and I drooling. We’ve been trying to tackle our junk room to make a guest bedroom/media room and our garage has had us down. First we have to get our garage under control, though. Did you guys consider the Pax wardrobe series from IKEA, by chance? The sliding doors are appealing for our tight-on-space garage, and since we don’t have a basement, that is our biggest storage zone, which we’d also like to use to park cars one of these days! Was price a determining factor? Let me know.
I’ve really enjoyed your blog for over a year now, through some big-time house transformation and the birth of our first child. I hope you’re enjoying preparations for your own little one; babies are such a blessing, and you’ll appreciate having all that organization in place BEFORE the baby is born, as I’m sure you’re already aware!
YoungHouseLove says
Hey Renee,
We did consider going with Pax wardrobes (as mentioned in this space planning video we whipped up a few weeks ago) and actually have two of them in our bedroom (we love ’em!) but they’re larger and therefore more expensive and we knew we could get by with the space in two Aneboda wardrobes instead of two Pax ones (a choice that saved us $100). If you need sliding doors though they’re definitely a better choice with more options and fittings- plus they’re more solid since they’re not up on little legs so they might just be the perfect choice for you. Hope it helps!
xo,
s
Renee Smith says
Thanks, Sherry!
I knew I had seen all the options for the basement somewhere… I have to warn you that my OBGYN says that with each child you also give birth to half of your brain (I hope you miss out on that wonder of childbirth, but I definitely appreciate a “medical” excuse for my new-found forgetfulness!)
I appreciate the quick response! Take care,
Renee
josie says
i was searching for storage wardrobes today (for the millionth time) and ran across the aneboda wardrobes on ikea and recognized them from a certain blog i read. i’ve garage-saled and craigslisted and googled myself to death and can’t find a wardrobe that is both in my price range and aesthetically appealing. and i need storage in my guest room RIGHT NOW. i just can’t take it anymore. so. . . my q for you is, since there’s only one teeny shelf in there (and several shelves would really be ideal) can you think of a budget friendly way to shelf that thing up? or do you have any suggestions for a similar, more shelf-y wardrobe? thank you in advance for what i’m sure will be an inspired solution. :)
YoungHouseLove says
Hey Josie,
That’s a toughie. Ikea doesn’t sell extra shelves for the Aneboda wardrobe so you’d probably have to cut plywood to fit and create your own shelves. You could also go for a Pax wardrobe from Ikea which comes with unlimited fittings so you can grab as many shelves as you’d like (along with hanging bars, drawers, etc) so that’s a more flexible option that’s only a bit more expensive but also extremely adaptable (we have two in our bedroom and love them). Hope it helps!
xo,
s
Ashley says
I love the basement! We will be tackling doing our basement in the next year or so. Thanks for some great and easy ideas!
One question – Can we get a close up of the picture above the tall cabinet?
Ashley
YoungHouseLove says
Hey Ashley,
Sure thing, you can see that framed art (which says our last name, Petersik) up close in this post: https://www.younghouselove.com/2009/11/tackling-the-basement-chapter-six/
Hope it helps!
xo,
s
Kelly says
Hey guys, can you tell me where you got your Christmas tree bag? I want one like it but can’t find them anywhere!
Thanks!
Kelly
YoungHouseLove says
We actually got it at Target. Hope it helps!
xo,
s
Roseanna says
My hubby and I are just starting to think about a nursery. (Yay!)But unfortunately, the room we will be using doesn’t have a closet. I’ve been considering the Aneboda wardrobes and even went to my local Ikea to try to physically see and feel one but they didn’t have it set up in the show room at the time. Do you think it could stand up to the war zone that will be a kids room, or would the Pax system probably be my best bet?
YoungHouseLove says
Hmm, the only safe way to use either system in a nursery would be to anchor them to the wall (very securely) so they can’t fall over on a little one. Of course we’re sure you were planning that anyway. As for your question about sturdiness, the Aneboda might be a bit less solid just because it’s up on little legs (and the Pax would definitely be the more substantial option) but we wouldn’t completely rule out the Aneboda as long as you anchor it securely to the wall so it’s less rickety or unstable (this should provide some nice support for the whole piece). The best test would probably still be to try and see one in person though, just in case you don’t think the sheer-ish door panels (they’re made of a semi-clear plastic ribbed plane) will hold up to repeated beatings with trucks or magic wands. We tend to think most things in a nursery end up taking quite a beating and usually don’t look mint after a few years of kiddos anyway but maybe we just have crazy kids in our family!
xo,
s