We recently shared how we Dryloked every surface of the basement to completely waterproof it (days of monsoon-ish rain have proved to be no match for our newly sealed basement- there’s not an ounce of moisture down there!) and painted the floor a nice rich chocolate color…
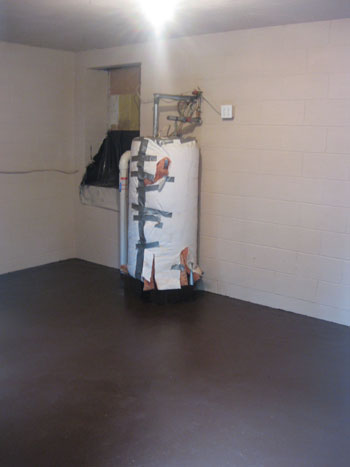
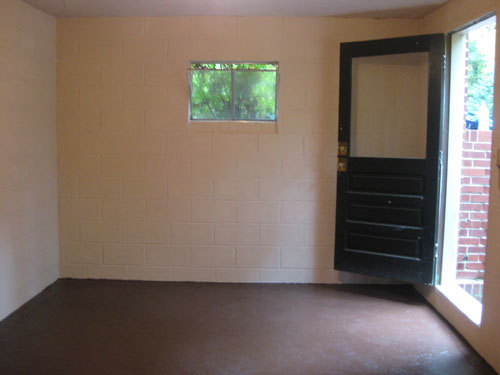
… and now we’re back to get to the fun stuff: floor planning and picking the right storage pieces. Of course we still have some small logistical projects to complete (cleaning up the hatch door that leads to the crawl space, rewrapping the water heater more neatly, building a divider to block the view of the water heater from the door, snagging a dehumidifier to keep moisture in check down there, etc) but we’ll get to those a bit later.
And for our floor planning sesh, we even got a little matherrific and whipped out some old school graph paper to create a to-scale drawing of the space, which really helped us pin down what we needed (and definitely helped us eliminate a bunch of things that we didn’t). In fact, John’s hands were cast in the starring role of “graph paper method explainer” in this video (watch it below or check it out on YouTube):
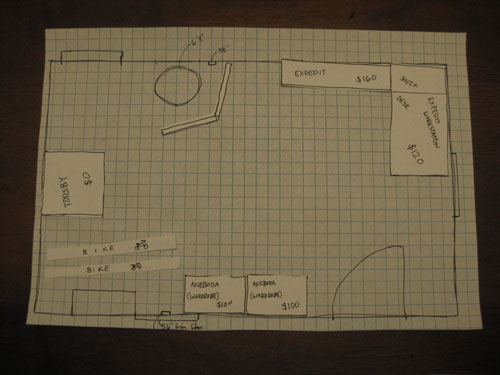
But for those of you at work who can’t exactly sit back and watch a quick flick about how we did all of our floor planning/storage-piece evaluating right now, we also remembered to snap a few photos of the process to detail how it all went down. First we descended into the basement with a measuring tape to take down the dimensions of the space (being careful to note exactly how far from the left wall the water heater is, where the windows are placed, etc). Then to whip up a little to-scale drawing all we did was decide that one square on the graph paper would be equal to 6″ and before we knew it we had a little sketch of the space that was completely accurate (just a lot smaller for obvious reasons). Then we used the same one-square-equals-a-half-foot method to sketch out little rectangles and squares to represent all of the Ikea storage systems that we were considering (their measurements were easily found online) which left us with a pile of confetti-esque shapes that looked a little something like this:
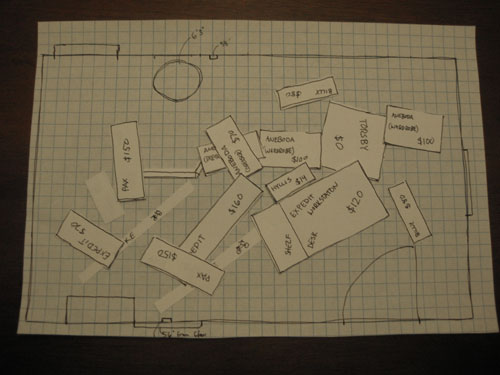
You might notice that we labeled each piece with its quirky Swedish name (for identification purposes) and the price (which also helped us evaluate which items would give us more bang for our buck and which were too rich for our blood). It was amazing how a slew of storage options that had our brains spinning suddenly became a lot easier to evaluate once we could compare their footprints and truly experiment with where we could put what. In fact, to knock a bunch of options out right away we quickly made a list of the items we hoped to store down there (seasonal decorations, bikes, sporting stuff, extra cords, wires, hoses, old yearbooks, etc) and then opted to sort our storage options ruthlessly to see which ones would accomplish that (and which ones wouldn’t really help the cause). On the left side we put the pieces that we thought would offer the most function, and on the right side we put pieces that certainly wouldn’t hurt, but might not be as fabulously efficient. Here’s how the split-em-up method worked out:
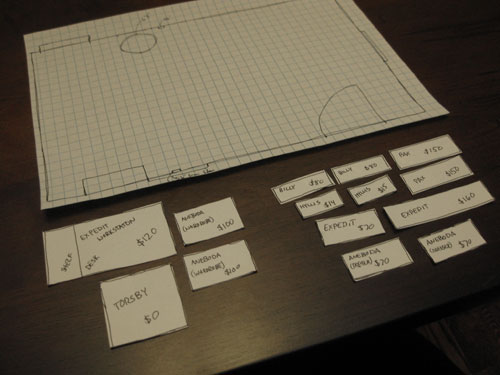
We easily identified that the Aneboda wardrobe was cheaper than the comparable Pax wardrobe but would still afford us the same amount of concealed storage (and we could snag two of them for $100 less than the cost of two Pax wardrobes). Then the decision was easy: Aneboda in, Pax out. We also decided that the Expedit Workstation would work overtime since it’s just $120 for a desk and an eight-slotted shelf that we can kit out with baskets and bins to store smaller objects in a somewhat organized way (thanks to all the compartments). It was definitely more of a plus for our space than the larger Expedit shelf without the desk (which was more expensive at $160 and didn’t provide a surface to set things down and sort through boxes like the Workstation did). We also realized that Billy bookcases wouldn’t be of much use to us because seeing them all sketched out to scale, we realized how little depth they offered (so we quickly deduced that we could store way less on such shallow shelves).
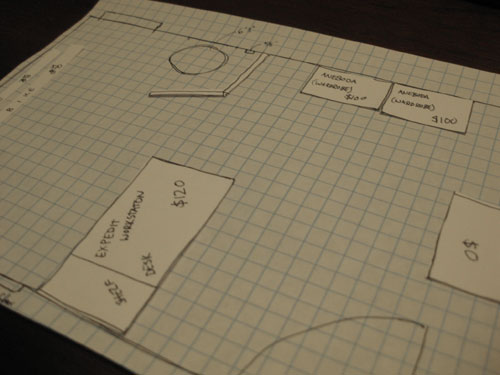
In short, evaluating things when they were all drawn out and comparing prices & shapes really helped our brain go from scrambled and uncertain to “hmm, we might just have a plan here.” Then we got to move our best contenders around on the actual floor plan to see what felt best where. Here’s the winning floor plan:
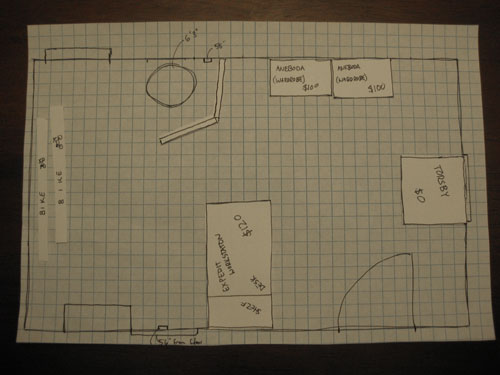
We love that it’s a combination of surfaces where we can set things down when we’re sifting through boxes to locate something, but there’s also tons of open and concealed storage that we can maximize without blowing the budget (since we already own the Torsby table we only need to purchase three large pieces from Ikea and we’re set!). We also really liked the dimension and visual separation that the Expedit Workstation’s peninsula created (which still allows for a 30″ wide passageway between the divider that we’ll be building to obscure the water heater).
But let’s back up. We definitely landed on a few less functional (and more spendy) floor plans first. Like this one which didn’t offer the added desk space of the Expedit Workstation but actually would have cost us more in the end. We also thought it looked really basic and bare (like someone with a gun told all the furniture to get up against the wall). It’s a perfect example of how spending more money doesn’t always mean you get a more complete look in the end…
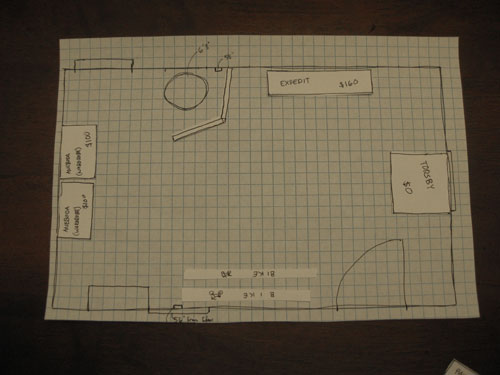
We also tried this plan, but again it would have been substantially more money and we liked placing our bikes on the left wall because we actually have an artsy little idea that we’d like to implement behind them (and if the larger wardrobes are on that wall instead, we’ll lose the opportunity to create a focal point that can be seen upon entry)…
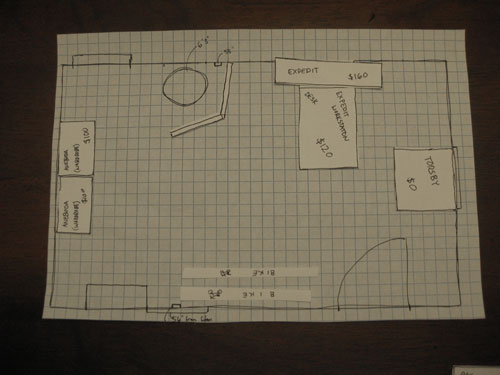
We also tried this arrangement but again liked the bikes on the opposite wall (this layout would also have been substantially more moolah than our winning floor plan):
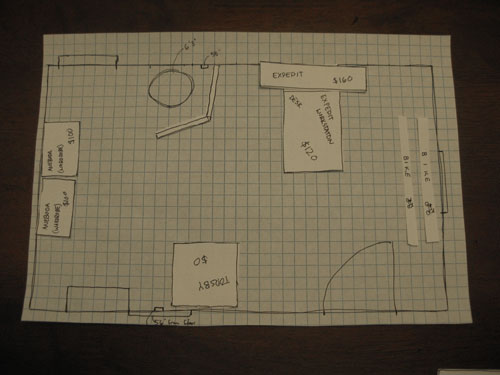
And lastly we tried this floor plan but everything felt a bit crowded (especially with the bikes shoved in between everything) and it was the most expensive solution yet. By a long shot.
So that’s how we played around with little paper squares for about 30 minutes…
… to suss out the right combination of storage pieces for our little basement makeover (here’s the winning floor plan again to save you from all that scrolling):
Now our shopping list is pretty straightforward:
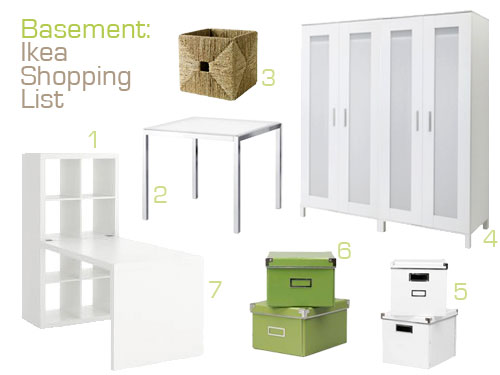
- Expedit shelf (included in the total Expedit Workstation) -$120
- Torsby table (already owned, so it’s free!)
- A woven basket or two – $17 each
- Two Aneboda wardrobes – $100 a pop
- A few white storage boxes – $12 for two
- And a few green storage boxes to keep things interesting – $12 for two
- Expedit desk (included in the Expedit Workstation) accounted for above
Grand total: Somewhere around $361. Not bad for a large 19′ x 13′ room full of storage (that was previously a bug graveyard). Especially when you consider that one armoire is usually around $500-$1000. And of course the floor plan could change once we have everything in the space, but it’s great to have that well-researched confident feeling that we’ve gained from our little graph paper experiment. You know how stepping into Ikea can be a bit overwhelming if you don’t have a serious plan? Now we have one. Oh and it bears mentioning that the above image isn’t a complete mood board as we plan to introduce art, lighting, other accessories, and DIY projects to round out the look. But it’s a great start for taking an utterly useless room that used to look like this…
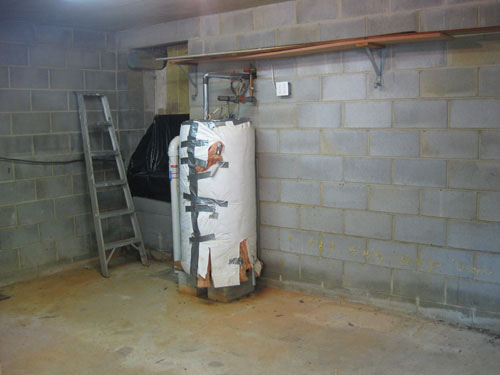
… and turning it into something totally efficient and polished. Stay tuned for more updates after we snag (and build- ugh!) all of our Ikea furniture. Fingers crossed we survive hours of allen wrenching! And while we’re on the subject of building Ikea furniture, do you guys have any favorite Ikea systems or pieces in your home (the Malm bed? the Lack shelf? the Expedit bookcase?). Do tell.
Want more floor planning fun? Check out the graph paper madness here and here over on All Things G&D.

Andrew Odom says
Are you kidding? The Malm bed, of course. I have owned a Queen size in all three colors now. I had one in Virginia Beach, VA (sold on Craigslist). I had one in Savannah, GA (gave it to a friend in exchange for an Atari 2600 and an automatic kitty litter box). I had one in Brooklyn, NY (sold on Craigslist). They are beautiful, affordable and….well, easy to mix in with other furniture. I don’t have one now as I have moved to a SleepNumber bed (my wife insisted on one and now I am so glad she did) but if I had to go back…it would be the Malm for me!
Julie says
I like the planning method. I’d do something similar myself, but also would cut out a model of myself so I can get an even better idea of how much space will be between things. You can cut out a little Burger just for fun too :)
Also, my bf and I love our Lack large coffee table. It’s the perfect size to be a coffee/dining table (we have a small 1BR on the UWS). Unfortunately, it has become really rickety (post-move trauma) and we cannot find a replacement (same dark brown/black color) in the tri-state area for the life of us. :( The Ribba picture ledges are also nice, but the thick Ribba frames barely fit without toppling down.
Aimee says
Your final product is always fabulous – but it is these steps the that show the PROCESS that helps my house to look great, too. Thanks a million for sharing :)
steph anne says
Awesome – I can’t wait to see pictures of it when it’s done!
We have the Malm bed and I hate it now… I think mainly because I’m tired of sleeping so low. We bought a box spring & so it’s a little bit higher than before. I want to be able to climb into bed!
Pamela says
Have you tried the IKEA planning software? They have one for kitchens and for bed/living rooms. I used their kitchen one to design my laundry room. The best thing was it allowed me to see my design in 3D so I could see where things were too tall or too tight to reach into. It also warns you when you don’t have enough clearance for doors to open.
Once you are finished it prints you out a shopping list with a total price. Really neat.
I actually didn’t end up with anything IKEA in my laundry room because I got free salvage cabinets, but it still worked great.
YoungHouseLove says
Hey Pamela,
We haven’t tried the Ikea planning software yet. We’ll definitely have to check it out!
xo,
s
Amanda says
I’ve laid out every room on graph paper first – so easy, and it really helps put things in perspective for when you think you have too much (or too little) for the space you have. Love!
My most Ikea-rific purchase? The 4 x 4 Expedit, hands down. I have a craft room, and the cubbies display yarn, hold my crafty book collection, and have just the right number of baskets to hide leftovers and all of my fabric. It’s a fantastic focal point, especially with a crazy spaghetti-limbed lamp on top (also Ikea, but I can’t seem to find it online).
Michele says
The rack Le posted at 3:35 doesn’t require any drilling — it just leans up against the wall. Might be a good option.
YoungHouseLove says
Hey Michele,
Thanks so much! Off to check it out again!
xo,
s
Shifra says
I’ve been wanting a giant expedit for the longest time but I have no idea how to get it home in our Maxima. What are you planning on doing?
YoungHouseLove says
Hey Shifra,
Good question! We’re certain our Maxima won’t cut the mustard so we’re trading cars for the day with John’s sister (she has an Explorer). Fingers crossed we can jam it all in!
xo,
s
Vic says
I love the graph paper trick… I’ve been doing it since I was a kid when I would want to rearrange my bedroom furniture and my parents would say “I don’t think it’s going to work”… that way I could get it right and say “Yes it will!!”
As far as IKEA goes… I LOVE IKEA! Recently I have really been digging their Besta system with it’s slew of mix and match pieces and different doors and drawers you can really achieve almost any look! And I also am loving those green boxes you are going to get… I own a bunch of the white ones (I even covered some in a damask looking wrapping paper… and they look great and super stylish!).
Good luck with the basement! And P.S. I totally love your ideas and your blog. I fell in love with your bedroom when I happened to pick up my first issue of DIY magazine and I’ve been hooked on YHL ever since! You two are just too adorable!
Katie says
For Kyley re: scuff marks- Magic Erasers get rid of them in no time! Some might take a bit of elbow grease, but I’ve never met a scuff mark I couldn’t get rid of with those guys.
Mel says
I grew up on Ikea furniture. Now that I’m “all grown up” I have my own apartment full of Ikea (which cost me $1300 to fill a whole 900 sq ft apartment and has lasted well over 3 years). My absolute favorite piece is my Edland bed (in dark brown). It’s my dream bed. And to think, it came from Ikea for under $300!
Brittany B. says
I bought the 68in White Meltorp dining table to use as a desk. My boyfriend and I are always trying to BOTH do something at the same time in the office so I decided we needed an upgrade to a bigger desk. The dining table fit perfectly in our budget at $70 and its long ans skinny so it could pass as a desk! The only thing I didn’t really think through is that there isn’t any built in storage. :( Other than that, I LOVE IT. It fits in with your love for all things white!
julia says
I noticed that the wardrobes don’t come with a lot of shelving – just a clothes bar and one shelf. Do you plan on somehow installing more shelves to maximize the storage space? These would be great storage for my garage, but I would need them to have more shelf space.
YoungHouseLove says
Hey Julia,
When we get there we plan to see if we can purchase additional shelves or fittings for the wardrobes (which is usually an easy option at Ikea). And just in case that’s a bust we can always stack large tupperware tubs and other storage containers inside the wardrobes to keep things compartmentalized and organized beyond the singular shelf. Hope it helps!
xo,
s
Megan says
The basement is looking good guys. Can’t wait to see the finished product. Do you actually get time to ride your bikes with all the renovating you do?
I used to work in an office building right above our local IKEA. It was very dangerous though as i used to spend more time and money there than i should have (especially during work hours). If anyone in the office needed anything from IKEA they would ask me and i could tell them the exact place to find it that’s how much time i spent there.
YoungHouseLove says
Hey Megan,
We do occasionally get to enjoy a bike ride on the weekends but not nearly as often as we’d like. You’re right- between blogging and renovating time just slips away! Next year we’re hoping to stop and smell the roses a bit more (don’t people always say that- next year…).
xo,
s
LauraC says
“Weird Swedish names” = favorite part of the whole video! I was just at IKEA today (15 min. drive!) with my sister, mom, and daughter (it’s my birthday!) for a fun girls’ day out!
We have a black/brown Expedit bookcase (the BIG one) in our basement and it’s full! Expedit is my favorite because of how big, solid and sturdy they are, but I do like all the pretty doors in the Billy line too!
Lauren says
Just wanted to pass along the websites http://incompetech.com/graphpaper and printfreegraphpaper.com – they are great! I never have graph paper on hand when I need it, and it is super easy to customize the quantity and size of the boxes.
Cecelia says
At my back door, I have an Ikea Lack Shelving Unit that I use as a bench/dog managing station.
Each cubby has a bin that contains their toys, their harnesses and leashes, or pup grooming supplies (I use the Kong Mutt Mitt on their paws every time they enter the house and cannot recommend it enough)and towels for rainy days.
Holy cow, these hounds are work!…
heather s. says
I was also going to point you to G&D’s post using graph paper. Looks great – can’t wait to see it once you have the furniture in place!
Rachel says
The Expedit workstation is really cool. I wish we had a space that needed it.
Rachel says
I love the workstation and really wish we had a place that needed it. Someday when we have our own place we’ll have more space.
Stacy says
That is awesome that you used graph paper and cut outs! My husband and I did the EXACT same thing when space planning for our wedding reception. We took pictures of all the different options along with a little slip of paper saying how many tables were in it and how many we could seat with that arrangement. It was so helpful!
Sarah says
I have the Aneboda shelving unit – very nice. (I call it the Amoeba.) I asked about adding shelves to the Aneboda wardrobe – it can be done, you just have to drill more holes. They don’t sell shelves especially for the Aneboda, but you know they have all sizes of shelves. We were too lazy to do this ourselves.
In your floorplan, is it going to be easy to get your bikes in and out? It looks the workstation blocks the way a lot.
YoungHouseLove says
Hey Sarah,
Thanks so much for the Aneboda shelf info. Definitely good to know! There’s actually 30″ of space between the workstation and the divider that we’ll be building, which is the average width of a doorway so we’ll easily be able to walk our bikes in and out. That’s one of the reasons we love using graph paper to map everything out! Hope it helps…
xo,
s
April in CT says
Not sure if anyone mentioned this, but I put all the little parts and pieces in a muffin tin to help keep them corralled when assembling furniture with a gazillion and three pieces.
All this IKEA talk has me jonesin’ for a visit!
YoungHouseLove says
Thanks for the tip April. Love it!
xo,
s
Ann says
I really like what you have planned for your space! Can’t wait to see the results!
Lori says
We love IKEA! =] We bought our house in August and remodeled it throughout September. One month of painting, work and one huge shopping trip to IKEA. Everything is new, except the Klippan sofa which we found at a garage sale for ten bucks! We just picked up a new black slipcover for it. A few of my favorite things we got was the bathroom sink [LILLÅNGEN] and the curtain panels we got for the living room [DIVISION/ANNO SANELA].
threadbndr says
John’s got very expresive hands!
My favorite IKEA isn’t furniture, but the kitchen shelves and bars and hooks – I don’t have stainless appliances, but the brushed stainless finish of the shelves play off the stainless steel edged of my vintage countertops and creates a bit of ‘sparkle’ in my galley kitchen.
You might want to budget for a couple of stools or backless chairs to fit under the workstation table. If you are sorting, you’ll want to sit down at least sometimes.
YoungHouseLove says
Hey Threadbndr,
Good point! We actually have two deep mocha wood chairs (which will blend right in with the floor choice) that we need to store in the basement, so of course it’ll be convenient to “store” them at the desk areas so we have a place to take a load off. Hope it helps!
xo,
s
Laura says
I’m a bit addicted to the Billy Bookcase, I have 4 and a corner one, it’s my library. I like the Malm bed, but I think what I really like about it is the (optional) headboard with the pull out shelves. One day . . .
joanne says
If you ever feel like going high-tech, Google Sketchup has loads of user-contributed to-scale models of IKEA furniture (and other furniture, too). There’s a learning curve, but it’s fun to see your potential room in all its 3D glory.
YoungHouseLove says
Awesome tip Joanne! We’ll definitely check it out!
xo,
s
yansy says
Hi guys,
I love the plans for the basement. I know you two will do an amazing job. Sorry I’ve been m.i.a for the last couple of weeks. Guess what? I just got engaged and your wedding is going to be a great source of inspiration for my wedding.
Thanks for all of your support.
xo,
Yansy
YoungHouseLove says
Yansy- Wahoo! Congrats girl! We’re so excited to hear about your engagement and we wish you all the best!
Mandi and Sunny- Great tips about the dehumidifier. We actually heard about the charcoal method Sunny mentioned and were very intrigued (John still wants something to plug in and I want something super easy to DIY- we’ll see who wins this one. Lot’s to think about!
LauraK- Thanks for the planyourroom.com idea. We’ll have to try it soon!
Dan- We definitely will be altering the door and the windows to provide more privacy and security! Not to worry. We also have motion sensor lights around the perimeter of our home along with a whole house alarm and a pretty barky little dog so we feel great about our house’s protection- but it’s always a nice reminder that we can step things up even further! Thanks for that!
xo,
s
Joe says
Great ideas here! I’m planning to reconstruct my basement.
Jennifer F says
I had to laugh when I saw this because I did the same thing in our house. We have just 960 square feet of space, and lots of things we wanted to accomplish…plus a few items that just had to stay. We did the graph paper layout of each room and every major piece of furniture (I did highlight them so they would stand out) and we tried out lots of configurations before deciding on which items would belong in which rooms…it is totally worth the effort!
Mandi says
We knew we needed a dehumidifier for our basement when we moved into this house. We read lots of reviews, and settled on this one at Amazon:
http://www.amazon.com/Soleus-CFM-40-40-Pint-Dehumidifier-Humidistat/dp/B00009RAVO/
We’ve had it running nearly continuously for three years now. It runs right above my dryer, so I do make sure to de-lint it every few months, but that won’t be an issue in your basement space. I hang a lot of laundry to dry, and the dehumidifier makes snappy work of the process!
The issue of draining the dehumidifier: I wonder if it would be worth your time/money to install a utility sink, probably near the water heater to take advantage of existing plumbing? The dehumidifier could live on a shelf above, with its hose in the sink. Perhaps you have another scheme in mind, though – just don’t leave yourself the chore of having to empty it by hand, ugh.
Margaret says
We have 4 Expedit’s in our house – one in each of the 3 kids bedrooms and one in the back hall to corral all the hats/mittens/dog stuff. I think I could put those together in my sleep by now!
Laura K says
I highly recommend using planyourroom.com for these layouts and configurations. It’s free, super easy, and you can export the layouts as picture files. That might really help you display your ideas on the blog. Check it out and see what you think! :)
joni says
a couple months ago my fiance and i were looking for a functional office idea. I had been googling like crazy and found some desks and then noticed they were the expedit bookshelf and desk! we actually have two of the 4×4 shelves and 2 desks, we put them facing each other and thus an AWESOME functional office. we love it. i’ll have to send some pictures sometime to you guys.
sarah says
Olá
Adoro toda a vossa decoração e o modo como o demonstram. Pessoalmente, gosto do Ikea. É muito versátil, o que permite variar na decoração.
Felicidades.
Beijinhos de Portugal
Sunny Pritchard says
OMG, I have graph paper everywhere as I’m doing a post-house-fire remodel!
When you said dehumidifier, it made me think of a cool project that was in the latest issue of Workbench Magazine: a lidded plastic container with holes drilled in the top simply filled with charcoal. It also deodorizes, and after a month or so, you replace the charcoal and take the older charcoal and grill something! Or in your case, roast some s’mores in the cool firepit.
Dan says
The two items which struck my eye when I first saw your pictures were the window and the door. You’re changing those out, right? I love security and although you may live in a crime-free community, never let your guard down. Perhaps it’s the fact our home was burglarized when I was 9. I wasn’t home, no one was, but the image lives with you (me). Good luck with your basement adventure!
Melissa S says
Oh I am so jealous! We have to drive at least four hours to get anywhere near an Ikea!!! We have so few options for affordable furniture in Northern Vermont. Thanks for the great idea with the floor planning- I’ve never thought to make the furniture their own, movable, pieces- I am DEFINITELY going to try this!
Thanks!
M
http://senesacfamilyhomestead.blogspot.com/
Jenny says
How fun! I love the graph paper and paper shapes! Space planners after my own heart :) It’s been really fun watching your basement project progress! Cheers!
sarah says
You could gain even more floor space by hanging your bikes on the wall – there are tons of systems out there from simple hooks to floor to ceiling tension racks.
YoungHouseLove says
Sarah- Great idea! We actually thought of that but have been having the hardest time anchoring anything that will hold some weight into the cinder block walls (it pulls right out with a cloud of dust). Bummer, eh? We’ll make the best of it though!
A- Good eye! But you’ll just have to wait and see…
xo,
s
Samantha says
Yes! I love seeing more ikea storage being used to overhaul a space! I just blogged about this last night. I spent about an hour at home a few weeks ago on IKEA’s website trying to figure out the best way to organize my craft supplies, but still keep in line with the look I was going for in the room. But when I got to IKEA, I actually ended up mixing and matching different kitchen organizers when I realized there were MUCH more affordable options available than the ones I saw online.
So I spent another half hour at the store on one of the kitchen counters laying out the storage pieces and measuring how wide they can be and the best use of space on my tiny, angled wall. For about $50 I was able to organize all of my art, drawing and sewing supplies. And like you, I picked up a few of those darling boxes to hold my scrap fabric (I’m sure I can turn into SOMETHING, right?), magazines, and scrapbooking stickers and labels.
2 things I love, Ikea, and organizational supplies!
As for the google sketchup idea, I tried that out before too. I don’t know if I’m just slow, but it was really difficult to figure out. I’m still not getting it, but the things people create in there are amazing!
A says
Isn’t the Torsby table from the wrapping paper station in the 3rd bedroom? What are your plans for that side of the room now?
Lori says
Love your basement plans! Looks great. One thing – the storage boxes you show are great for storage in indoor spaces, but not garages, basements, attics, etc.
I’d recommend buying plastic bins with handles that lock the lids on – keeps out moisture, critters, etc. etc. And if you get clear ones, it’s easy to see what’s inside (even if you label them also, it’s nice to have a visual).
YoungHouseLove says
Thanks for the tip Lori! We actually use some of them in the garage and they’re great so we might just stick with them and also bring in plastic bins for the items that we want to protect even more. Hope it helps!
xo,
s
Kristi W. says
I really enjoy posts like this, so thank you so much for sharing. We are also big on floorplans and pre-planning our rooms. We use floorplanner.com, which you recommended in a previous post (thanks again).
And yeah… you can’t really beat Ikea for affordable stuff that looks pretty nice (as first time home owners, we really need to budget for any purchases we make). We recently got the Pax closet system, which we absolutely love!
kelly@TearingUpHouses says
i thought the same thing about hanging the bikes that someone else mentioned for more room, but also because i think that it just looks neat (but i’ve also dealt with block, and it can be a pain).
i’m interested in how you end up liking those wardrobes. i have a few small rooms where i’m actually considering removing the really tiny, inefficient closets altogether (particularly here: http://tearinguphouses.blogspot.com/2009/09/before-progress-pictures-video-little.html) and ordering these — i have no patience for actual in-store experiences at ikea :) anyway, i think since the wardrobes might be a good solution for rentals since they take up less room AND cost much less than rebuilding or reworking drywalled closets.
my main concern is the quality. a lot of ikea products that i’ve purchased in the past have been iffy. i have pretty considerate tenants, but still, i’m wondering how they will hold up over time… i’ll keep checking in for your reviews… (or maybe you’ve purchased these before and have had a good experience?) interested in what you think!
kelly
YoungHouseLove says
Hey Kelly,
Good question! We actually have had two readers who own the Aneboda wardrobes pipe up and say that they love them so we’re feeling pretty good about it! We also have Ikea Pax wardrobes in our bedroom and we’ve had great luck with them along with our Malm bed. Most of the time Ikea quality is actually great if you take the time to assemble everything properly, but the only item we’d warn you about are the Malm dressers. They just seem to go off track and start falling apart after a few years. Hope it helps!
xo,
s
LeilaMac says
I love the graph paper floor plan! I always do that when I’m figuring out a space. :)
I get that this will be sort of a work/storage space so you want it to look nice, but wouldn’t it make sense to build built-in shelving along the full back wall for maximum storage? Just some simple 2x4s or 4x4s and plywood (or nicer) for shelving you make at whatever height or depth you want? Then slap on some white paint (and perhaps dropcloth curtains to conceal stuff)? It is definitely more labor intensive but you’ll maximize the space for you and future owners! We have industrial shelving units in our basement work/storage area that drive us crazy because the shelves aren’t the right height and/or depth for the stuff to be stored, and we’re dying to build out built-ins. Just a thought. :) But I love what y’all came up with!
YoungHouseLove says
Hey LeilaMac,
It would make total sense if our cinder block walls would cooperate. Anything that has to support even a small amount of weight just pulls right out of the cinder with a cloud of dust (even when we use metal snap anchors and drill bits formulated for stone, etc). Such a bummer! We actually knew it might be a problem going into things because the previous owners had tried to install some shelving without much success (things shook like crazy and could barely support the weight of one item). Oh well, we’ll definitely get around it by bringing in self-standing pieces. And you know we love a challenge!
xo,
s
Choua Xiong says
I can’t wait to see how your basement will turn out! =)
Denise says
I first read about the two of you and your makeovers in DIY way back when… loved everything I saw. I noticed you had a website but I kept forgetting to check it out and then a month ago I looked at it. I visit your blog every day, I started going through the archives and I am now in Jan of 2009. In reality I should be painting the kitchen ceiling and then I should start on the walls but I spend so much time on your site that before I know it, it’s time to get the child from school.
As for IKEA, it is one of my favourite stores, I can’t go there without spending way too much money, thank goodness there isn’t one close to us. We did drive from Denver, CO to Draper, Utah in May, 13 hours each way so I could go shopping there but we only brought the car, couldn’t put too much in there!
Love your basement plan, I think it’s time we drove to Draper again.
Magchunk says
Making little floor plans like these was one of my fave hobbies as a kid (geek much?). And funny enough, I still have one of the Aneboda wardrobes (in that light wood) in my childhood bedroom. I had the matching shelved cabinet in all my apartments until we moved this last time. Not sure if anyone has mentioned it, but the doors on the Aneboda can be somewhat see-through, so I’ve heard painting the inside of them (white or a color) or covering them with paper can be a fun way to hide any messy storage. My wardrobe at my folk’s house now holds my old dolls and a huge children’s book collection. Think my mom is ready to move that stuff along though… :)
YoungHouseLove says
Hey Magchunk,
Thanks for the tip! We definitely planned on either using paper or fabric to obscure the semi-sheer door panels but the paint idea is super fun too. Thanks for sharing it!
xo,
s