It’s about to get exciting…
But first, I have to start off this post with a brief side story. I love Jones Soda, partially because there are random little fortunes under the cap. I got this one the other day:

Tasks where skill is essential (sounds like a bathroom remodel to me) may be accomplished. MAY? Only may?!? That’s not a very confidence-inspiring fortune. Good thing we seem to be doing more than “maybe” accomplishing our latest bathroom projects.
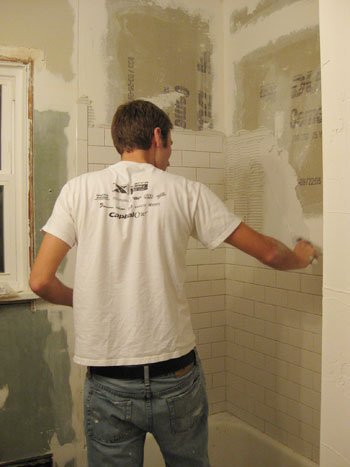
Take tiling for instance. Even though Sherry gave you a peek at the tile job last week, I’m back for the official tiling post as promised. You may recall from Chapter Three of our bathroom redo project that my dad and I spent a four day weekend-on-steroids putting up drywall and cement backerboard in preparation for re-tiling our shower surround and our floor. Thanks to a few “challenges” during the weekend, I barely got to start tiling the shower by the time my dad left that Monday evening. In fact, I was in the midst of it when this goodbye photo was snapped.
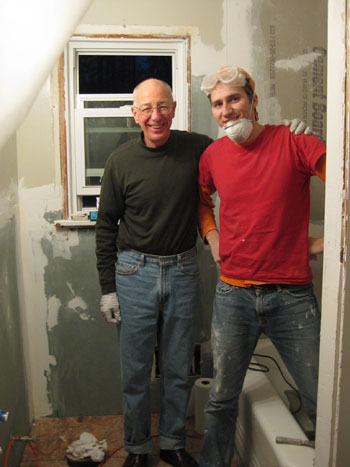
I worked for another couple of hours after he left, but by the end of the day I had only managed to tile a mere two rows. Sigh. Yes, it looked like another part of this project that wouldn’t be as fast or as easy as I had hoped. But why?
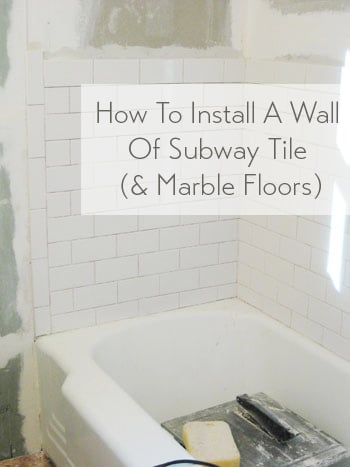
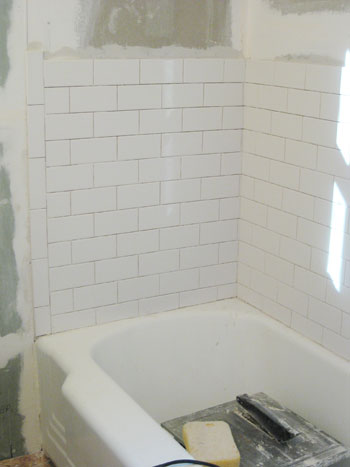
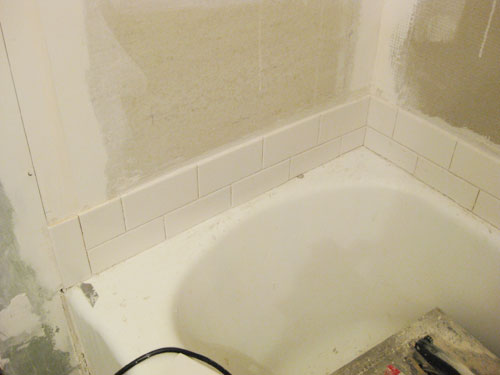
Well, our tub wasn’t level. So my original plan of using the edge of the tub as my guide went out the window (once we admitted to ourselves that having slightly unlevel lines would look “off” enough to bug us – and realized that we’d risk the tiles not lining up correctly at the corners). And while I’ve seen some people recommend finding the center point of your wall and starting there, with such small tiles it was more important to us that we didn’t end up with a sliver of tiles running along the edge of the tub or the ceiling (we wanted tiles to look as full as possible in those places for a more planned and balanced look). So I spent most of that first evening using a wet saw to shave off varying slivers of ceramic from the bottom side of each subway tile that sat against the tub to create one level line that I could build off of from then on. It was a good three or four hours of tedious trial and error-ish fun, but I got ‘er done.
I’m not being sarcastic when I say “fun” though. It was just the kind of home improvement project I love – it involved more mental concentration than physical strength (after all, I’ve already had my fill of that for this renovation) and it resulted in a big change that I could immediately appreciate. Plus I got to try out some new tools and learn some new skills. But since it was my first time tiling, I’ll give you the brief play-by-play about how I did, rather than an official “how-to” since there are definitely varying methods (all of which would work depending on your preferences) and because this was my first tiling fling. For true expert tutorials, I suggest checking out some of the sites that I referred quite a bit during my stint as Mr. Tile (I included the links at the bottom of this post for ya).
But on to the nitty gritty tiling details. First, let’s look at my weapons of choice:
- Wet saw (borrowed from my dad)
- Tile cutter (purchased halfsies with my dad)
- A couple of big buckets of thinset mortar adhesive
- Margin trowel (again, borrowed)
- Notched trowel (ditto)
- 1/16th” spacers (for the floor, the subway tile conveniently had built-in spacers that achieved a 1/16th” space naturally)
- Tape measure (already owned)
- Level (already owned)
- Pencil and sharpie to mark cuts on tile (since pencil didn’t show up on dark marble)
- Paper towels and a bucket of water (to help manage the mess)

The wet saw and tile cutter were my tag-team tools for trimming tiles to the perfect sizes. The wet saw is like a circular table saw with a thick masonry bit, but the blade runs through a tray of water to keep it from overheating, wearing down too quickly or spraying too much dust (it does, however, create a pleasant “mud” that needs to be cleaned up every so often). The wet saw was great for making small cuts (like when I needed to trim just a little bit of tile) and non-straight cuts (like notching semi-circles to go around pipes – though I did have to break out my dad’s hole saw drill bit once to go through the middle of one tile). You can make straight cuts with it – it even comes with an adjustable guide – but I found I couldn’t be as precise with it as I’d like. And as much fun as I had using it, it was a bit on the messy side. I kept it in the bathtub while working on the shower (it was conveniently at my feet) and in a heavily drop-clothed area in the hallway when working on the floor. Had it not been the middle of winter, I probably would’ve worked outside.
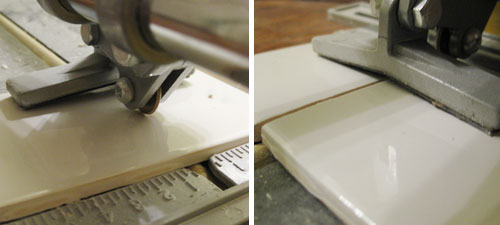
The tile cutter, on the other hand, was mess free – and pretty simple to use. It’s only for straight cuts (like when I had to cut half tiles to create the staggered, running brick pattern in the shower). Once I marked where to cut my line using a pencil, I lined up the tile against the flat guide surface then ran the tiny scoring wheel a few times across the surface of the tile. I always waited for the nails-on-chalkboard style scraping noise to know I was doing it right. Then with just a little bit of pressure, the angled pad helped me snap the tile cleanly. The only bummer was that this tool wasn’t powerful enough to cut our thick marble floor tiles, so I had to rely solely on the wet saw when it came to the floor (but at least by that point I was more of an expert with it since I did the tub/shower surround first to “warm up”).
Cutting was the slow, tedious and mathy part of the whole process. Setting the tiles was pretty speedy and painless by comparison – the only challenge was using the right amount (and a consistent amount) of thinset mortar to make sure there was enough to hold the tile, but not too much so that tiles would lay unevenly or cause excess thinset to squish out between the grout lines (spoiler alert: I wasn’t so hot at this).
So after slapping on a hunk of thinset to the wall and spreading it around a bit using the back of the margin trowel, I switched over to the notched trowel. This trickly little fella has two straight edges and two notched edges. First, I used the straight edge to even my thinset (by running it across the wall at a 45 degree angle with enough pressure to leave a thin-ish coat on the wall). Then I’d go back over the area with the notched edge (again at a 45 degree angle and a bit more pressure this time) to leave long grooves in the thinset. Then I was ready to press the tile into place using enough pressure to set it firmly into the thinset so that it laid evenly with its neighbors (which you can conveniently check with a level).
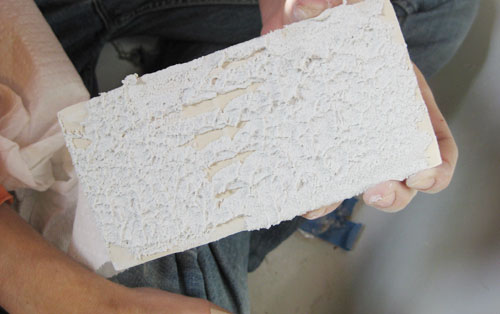
I picked up a tip along the way about how to tell if you’re using enough thinset by prying up a tile right after setting it and making sure the entire tile has thinset on the back of it. If it doesn’t you need to use more. Though this is where I made my life harder. I probably overcompensated and used too much in some places, which created a lot of extra thinset squeezing up between my tile grout lines. Not a huge deal… if you’re diligent about cleaning it all out before it dries (I suggest a combo of your finger, a paper towel or even an old toothbrush). I learned my lesson the hard way and spent a good chunk of a Saturday knocking dried thinset out of the cracks with a razor blade (which is a lot harder than removing it when it’s wet). Gotta leave room for that grout after all, right?
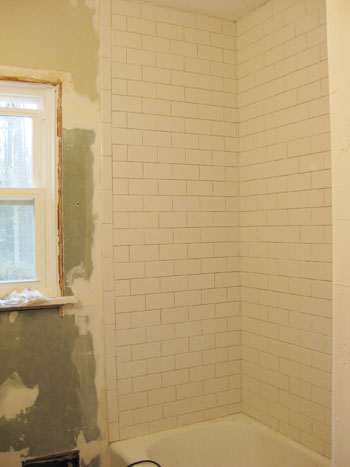
After that first evening of tediously tiling the bottom row, things moved pretty quickly since most of the tiles were whole (except for the edges and corners). I was able to accomplish the rest of it in two 5-hour sessions after work on Tuesday and Wednesday of that week. Victory was mine! In fact, we would’ve had the whole thing grouted that next weekend had it not been for two errors on my part: the aforementioned messy grout line cleaning that had to be factored in at the end, and a simple label-misreading that caused me to ruin a batch of grout by mixing in twice as much water as it required. More on that later in the week, but just know that the snowstorm that hit that same weekend prevented us from driving out to get more so we were on tiling “pause” for a bit. Not to be deterred, we turned our attention to the walls.
We primed them with a special Valspar drywall primer and landed on Benjamin Moore’s Dune Grass as our subtle muddy greeny-taupe hue of choice. We actually didn’t use Benjamim Moore paint though, we just brought a BM swatch to Lowe’s and had it color matched to their no-VOC Olympic Premium semi-gloss bathroom paint (the base is no-VOC but we did learn that adding color to it makes it low-VOC, which was still extremely mild and low odor). We figured it was actually a nice plan to get as much painting out of the way before laying our marble floor so we didn’t have to worry about paint drippage quite as much. Hooray for happy accidents that cause grouting & floor tiling to be put on hold and painting to commence! It all worked out pretty nicely (and painting feels like 1st grade arithmetic compared to the advanced algebra-ish challenges of tiling).
But then it was back to the floors. I first finished the prep job my dad and I had started by installing the cement backerboard (that he kindly cut and set aside before he left the previous weekend) over the plywood subfloor (tip: we used extra long screws to ensure that they went all the way through the backerboard, through the 3/4″ plywood underneath, and deep into the diagonal subfloor for a super strong and uncompromising hold). Once the four puzzle pieces were securely set and generously screwed into place we used mesh tape and mud to fill the seams and any remaining gaps. After giving that a day to dry, we sanded off the extra and did a thorough sweeping so the backerboard was 100% free of any dust or cement crumbs that could spell disaster for our tile.
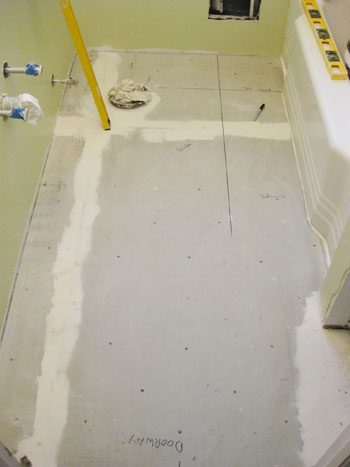
As eager as I was to break out my wet-sawing skills again, we first had to plan our placement strategy to ensure that the layout looked good and that it was the smartest plan when it came to tile cutting (we wanted as many full tiles as possible in the most visibly spots and since we had to work around the curved tub and linen closet entrance we didn’t want to end up with awkward slivers). Again, some recommend finding the center of the room and working out from there, but with such a small room we thought our criteria (having large tiles where the floor was most visible and avoiding dreaded tile slivers in corners) was more important in our case. So we did a dry run of a few arrangements with our actual 12″ x 12″ tiles (including spacers!) and settled on a layout that called for pretty simple cuts and allowed us to lay full tiles nearly the entire length of the bathroom. Here’s a shot of the guidelines that I drew to start everything off:
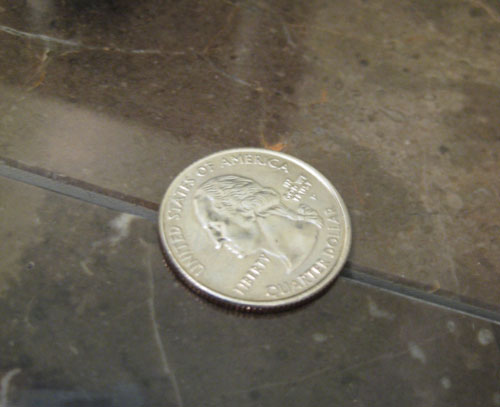
I won’t bore you by repeating the process of laying the floor tiles, since it was largely the same as laying the wall tiles. The only added challenge was that, as hard as we tried, our floor still had a teeny bit of a slope to it. So we opted to “back butter” our tiles to help compensate for this (we also heard that with marble many experts recommend this technique to keep things extremely firm and wiggle-proof for less cracking and long-tern wear and tear). This meant spreading a thin layer of mortar on the back of the tile in addition to the floor (using the same notched trowel technique) so that we could be more precise about making sure each tile was set level to its surrounding tile friends. And while we relied on a level as our main guide for levelness (is that a word?) we broke out a little quarter trick recommend by a friend to double-check ourselves. We gently ran a quarter across two neighboring tiles to see if it went smoothly or if it caught on one (meaning one was set too high).
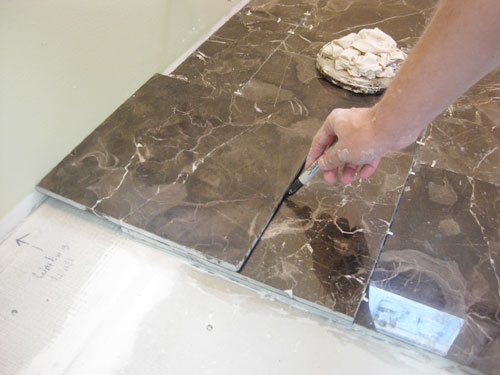
The other trick someone taught us, which came in handy big time with the floor, was an easy way to measure any cuts that you needed to make against a wall. Once you’ve set the closest full tile, place the next tile that you want to use carefully on top of it (I found the rubber spacers helpful in creating a small buffer between my tiles so nothing got scratched). Then take a third, spare tile and place it on top of the stack, but this time slide it gently until it touches the wall. Just like that I’d exposed the portion of the middle tile that would be needed to fill the empty space. Then I simply used my Sharpie to mark a cut line on the middle tile and headed off to the wet saw for a little trim. Lo and behold, this worked like a charm every time.
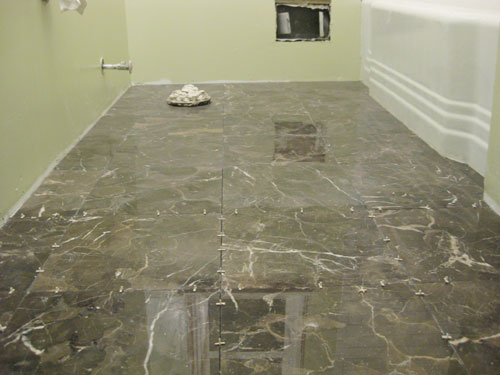
Tiling the floor, since more than half of the 37 tiles required wet-sawing, took me most of Christmas Eve (as much as I could do before we had to hop into the car to spill the beans about our baby girl bean to the fam) and another few hours of the evening when we returned home on the 27th. So all in all it was a lot of work, but dang it felt good to be a gangster to be done with all that tiling. Though I was sort of gonna miss the wet saw. We had some good times together.
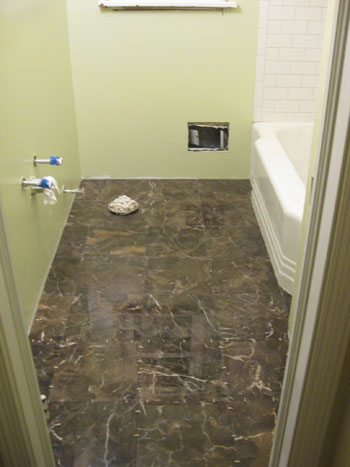
Laying the floor isn’t the end of this tiling adventure though, since we still have the grouting and sealing process to share. But once again, that’s enough for now. I’ll post later in the week about the rest of our holiday bathroom adventures so stick around (is that a Thinset pun? it wasn’t intentional).
As I mentioned above, we referenced quite a few experts for our first foray into tiling. We found that instructions can vary and are rarely exact to your specific situation, so be sure to keep in mind what will work best for you and your home. Here are some links that we used that will hopefully come in handy for you guys as well: All Bower Power, AskTheBuilder, eHow, Home Depot, and Lowe’s.
Psst- Wanna read about the first few chapters of the big bathroom makeover? Check out Chapter One, Chapter Two, Chapter Three and a little teaser post that we recently shared.

Kelly says
Looks amazing, and is definitely giving me the motivation I need to tackle our three bathrooms that all need some love. Question about the second trick that helps make cuts for tiles you need against a wall – did you have to take into account the amount of space you needed to leave for the grout line (i.e., did you make your cut 1/16″ away from your measured line?)
YoungHouseLove says
Good question, Kelly. What actually helped me was that the Sharpie line was pretty thick and I cut along the line so that the entire line was cut away (the wet saw blade is pretty thick itself). That technique, I realized, shaved off enough extra that it made perfect room for the 1/16th” space. If anything there was a bit of extra space, which was fine because I just left extra room on the wall side since it was going to be covered with trim anyways. Hope that clears it up!
-John
Anita says
Love the bathroom tiling posts. I feel your pain regarding how you didn’t get as far as you thought you would. We spent NYE’s demolishing the built in bar in our dining room and now we have all kinds of other stuff to deal with.
Quick question – when you spackle, do you sand afterwards or do you do the damp rag wipe down thing while the spackle is still wet?
YoungHouseLove says
Hey Anita,
I did the sand afterwards technique because, well, I had never heard of the damp rag trick. But now I’m totally curious to try it because it sounds like it takes less elbow grease!
-John
Anita says
Oh John, A damp rag or thick sponge is a beautiful thing. When the spackle is still wet (keep in mind, you’re only applying what’s needed) just smooth it down with a wet rag or sponge in swiping motions until smooth and you won’t even need to sand! We saw contractors do it this way at our neighbors home. It does take practice though (Kinda the way you use your finger to smooth out the grout). It sure beats all that white dust all over the place :D I do the same thing with nail holes. With nail holes, I wait until it’s dry (to see if there is sinking) and then I go over it and “sand” using a damp rag. Smooths it right down.
YoungHouseLove says
So smart, Anita. As you’ll soon see in my grouting post, I loved that technique when I did the tile grout so that’s why I’m so excited by the possibility of using it on drywall. Man, if only I had heard this two weeks ago! :)
-John
Holly says
Is this the only full bathroom in your house? If so, where have you been showering the whole time while its been under construction?
YoungHouseLove says
Hey Holly,
We’ve been using John’s sister’s shower (thankfully she lives extremely close) and the showers at the gym. It’s actually not so bad and we know it’ll be oh so worth it in the end!
xo,
s
Anna, Sydney says
Dear John… (no it’s not a Dear John letter, hehehe) Dear John and Sherry. I’m begging you, on my bare knees (on bare knees in front of laptop now) to write a post that teaches the following: ” I was able to accomplish the rest of it in two 5-hour sessions after work …”
HOW… HOW, I beg you, do you find the energy, motivation and … ENERGY to take on such things after work?! Or even a whole weekend cooped up in a bathroom?
I BEG you, please, how do you get that mind-set to get things done?! And after work! It’s incomprehensible to both of us but we would love to be that person.
If you bottle it, I’m buying 10.
I know this is not a motivational/self-improvement blog but I think your attitude to get things done so consistently does have a place. Please? Purty please?
Luv luv LUV your blog.
YoungHouseLove says
Hey Anna,
Your question is officially on our to-do list. Stay tuned…
xo,
s
Anna, Sydney says
YAY!!! :)
Anita says
Anna,
I know your question was to John, but here’s how we get motivated. We actually set up dinner parties or get togethers and then make that date our goal to finish in order to wow our guests. ;)
YoungHouseLove says
Anita,
That’s a great idea! We’ll have to add it to our list of get-motivated-quick tips.
xo,
s
Meleah says
Kudos for being brave enough to tackle your only bathroom and maintain an upbeat disposition. Looks great. Can’t wait to see the finished room!
28 says
Love it! We’re doing our bathroom right now, too, and are at about the stage you guys are at. I’ll race ya! ;)
Roeshel says
Catching up and wow – what a gorgeous first time tiling job! It looks awesome!
Brigidanne says
Love your progress on this job so far.
I’d like to know how you figured out to get the tiles level on the first row with an unlevel tub. Did you have a guide line for the row and cut the first row from there? How did you determine there would be full rows all the way to the top?
Can you also tell us the brand of tiles you used.
Thanks
YoungHouseLove says
Hey Brigidanne,
Good question! We used a long level to draw a completely level line on the backerboard a few inches above the tub (where the top of the tiles would lay) and held the tiles up to see how much needed to be “shaved” off the bottom of each one (and at what degree of an angle) in order for the tops of each tile to hit the level line precisely. We did a lot of the shaving by eye (taking less off at first so we always had the option to go in and take more- you can never add tile back but you can always trim it again!). Then we just held them up as we went to ensure that everything would be level going up the wall thanks to the fact that we were matching the top of that first row of tiles up with the level line. Hope it helps!
xo,
s
astersia says
Because there are several people looking to this piece for
guidance on their own projects, I’d simply like to offer that a straight edge at the bottom of the tub (a straight 1×2 or 1×4 screwed to the walls) allows the field tiles to be installed first, cure, and then the first row of tiles scribed to the tub afterwards. This allows the field tiles to be put on quickly, providing a level template for the first row of tiles, rather than creating the level line by eye each time, with each tile. (Perhaps a time-saver for future projects?) The bullnose tiles could have been extended beyond the front lip of the tub. The current layout creates a bit of a triangular gap at the front edge of the tub. This is a place for water to find it’s way into the wall. I have a very similar (perhaps identical) tile surround on my two tubs, so the process is really familiar. I could send you an email privately with a photo, if you would be interested in posting it as a comparison.
YoungHouseLove says
Thanks for the suggestion! We definitely have learned that when it comes to home improvement undertakings like these there are many ways to skin a cat (sorry, that’s such a gross expression). So although the method we detailed worked for us we’re sure there are plenty of other approaches that can work for others!
xo,
s
Gloria says
You guys are motivating us to try some things around our house! Would love to tile the bathroom floor, but am planning on painting the existing cabinet instead of replacing it. My question is, Do the toilet and cabinet need to be removed before tiling, or can we tile around them?
YoungHouseLove says
Good question! There’s definitely no right answer to this one since some people would just tile around the toilet and the vanity while others would remove them and tile completely underneath each one. We would err on the side of being thorough and would remove the toilet and vanity (which only takes an hour or two) so you can tile the entire floor. That will help with potential future water damage and it’ll keep everything level. Plus later if you have an incident with the vanity or toilet and have to replace one of both of them it won’t be nearly as heartbreaking if your tile runs under them (so the new versions will always look seamless instead having to “fit” those tile edges that may be apparent when you switch things out). Hope it helps!
xo,
s
Tilers Oxford says
Hi John n Sherry,
Great blog, been looking all things tile and found your website. Great tiling job!! I have renovated a few houses in my time (Not done one with the wife yet!) massive feel good factor doing it, hope all goes well. Can’t wait to read your progress. But trying to find some reclaimed victorian tiles for client at moment.
Regards
Bernie
Laura says
How did you end up liking the marble floor tiles? Were they really slippery if they got a spot of water on them?
YoungHouseLove says
We loved them! Never slipped once. We used a bath mat of course and all was well.
xo,
s
Sharon says
I know this is an old post, but do you have any posts on how easy/difficult it is to remove and replace the toilet when tiling? We are going to retile our bathroom floor but I’m afraid of the toilet removal/replacement! Thanks!
YoungHouseLove says
It’s not too hard! Here’s a post on that for ya: https://www.younghouselove.com/2009/01/how-to-replace-a-toilet/
xo,
s
zhou liping says
John,the flooring tiles is so beautiful! where to buy them? does the shop have a website?
YoungHouseLove says
They were from Lowe’s on sale!
-John
Monika says
HI, what kind of waterproofing did you use under that tile (shower and floor)?
YoungHouseLove says
We have a tub (not a stand-in shower) so we didn’t use a membrane since the pros told us the hardibacker and nonporous tile and the type of grout we were using were good since the bulk of the water goes into the tub, which is obviously waterproof (it’s cast iron). Hope it helps!
xo,
s
Monika says
Quick question, what kind of waterproofing did you use for the shower surround and the floors? Did you use any at all? If not was there a reason?
YoungHouseLove says
Once the tile was grouted and sealed, the wall and floors itself are considered waterproof. We also caulked along the edge of the tub – where it met the shower surround AND where it met the floor to further ensure water wasn’t seeping into places we didn’t want it going. Hope that helps!
-John
Ericka payne says
Hi! We just bought our first home and plan to do many diy rehab projects. Bathrooms and kitchen tile and floors first. What tools would you recommend we buy first and which to rent as we go? We don’t have any family/friends yet where we live so borrowing isnt an option. Thank you!
YoungHouseLove says
I would rent a demolition hammer for sure (you don’t use it much – only to break up tile if it’s stubborn) and buy things like a power drill, a miter saw, and a nail gun. Hope it helps!
xo
s
Tall Tee says
I love the picture of Dad the best :)
Nikki says
Hi John,
What a fantastic job! We’re about to tackle our very first renovation (ever) and it so happens to be our guest bath and are really intimidated by installing the subway tile. We’d like to stagger it, and it will be flush to the wall like your bathroom. I’ve been told that the edges will look uneven because of how the cut side of the tile will lay. How did you do the edges where it was flush to the wall where the bullnose tile is placed? Did you place the cut edge against the bullnose piece or the other way around? Any tips to making it look even where the cut side lay against the neighboring piece?
Soooo appreciated. Thank you in advance!
YoungHouseLove says
We put the cut edge on the inside so that the uncut (and therefore slightly beveled edge) met the bullnose. That way all of the edges that met the bullnose looked similar, since the cut edge was less noticable when it was in the interior of the pattern. It’s not a big deal either way, but that way was more appealing to us visually.
-John
Jessica says
Hi! So I know this is a comment on a years-old post, but I am interested in hearing about the tub reglazing process. We currently rent, and our landlord needs to reglaze our tub because the old finish is cracking and peeling. We have a 13 month old son, and I was worried about making sure we are out of the apartment long enough for the fumes to dissipate enough to be safe for him. Our landlord said we would have to leave for 6 hours. Did you have your tub reglazed, and if so, how long before it was safe? Thanks!
YoungHouseLove says
The guys who did ours were so great (they vented things right out the window so the room didn’t get very stinky). We left the house just to be safe I believe (went on a long walk) and then aired everything out when we came home just to be even more cautious (windows and doors open, etc) but it wasn’t too bad.
xo
s