I’m back with the LAST chapter before the quote-unquote “big reveal” next week. I know you might be rolling your eyes at the continued suspense, but the wait actually mimics the true pace of this project. This ain’t no TV show where you get a before and after tied up nicely with a bow 30 minutes later. Instead you get the nitty gritty play-by-play as we go. But lucky for you it’s a bit less dusty and tiring than what we’ve been experiencing firsthand. Plus you’ve all been happily showering at home every day over the last month while you patiently (or not so patiently) wait for the after pics. In contrast, we just took our first shower in the newly completed bathroom this morning after about a month of remote gym showering. Yeah, it was awesome. So hold your breath a smidge longer as we take you through last weekend’s big project: the vanity!
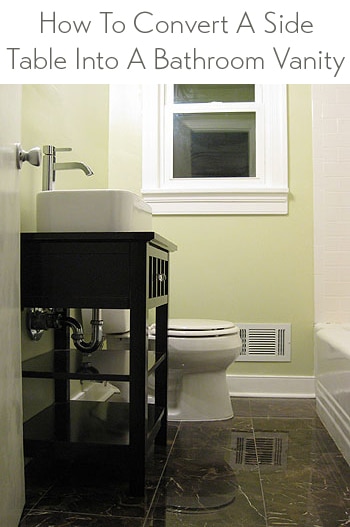
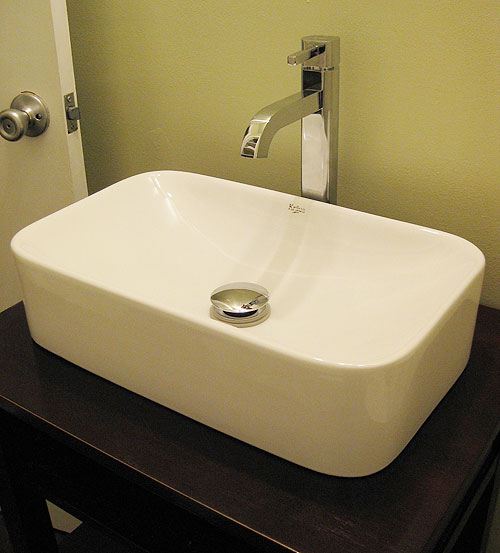
Just as Sherry described in our first bathroom post, we opted to create our own DIY vanity by retrofitting a piece of furniture. Despite drooling over similar options at Pottery Barn and Restoration Hardware, we weren’t about to blow our budget on a $1500 piece. So thanks to some internet sleuthing by Sherry and a full day of home decor & thrift store hopping (don’t I deserve good husband points for that?) we settled on a discounted clean-lined white sink and a sleek chrome faucet from Overstock.com that we’d pair with a Crate & Barrel night table purchased with a 15% off coupon (see more info about the mood board below here).
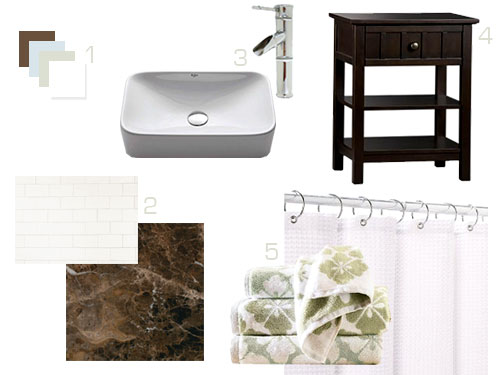
Those finds added up to a modern-meets-traditional vanity that barely touched the $400 mark… not bad when you look at vessel sink cabinet options from Lowe’s and Home Depot that ring in at around $500 without including the faucet or the sink in that price (like this one and this one). Oh and we actually ended up ordering a slightly different faucet than the one in the mood board above (from amazon.com with free shipping instead of from a random ebay seller) so that explains why it looks a bit different in the pics below.
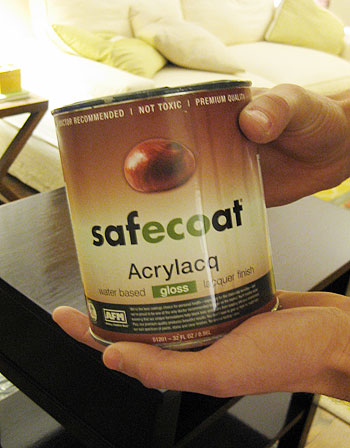
Anyway, assembling (yes it came home in a “some assembly required” flat box) the night table was so easy a pregnant lady could do it (in fact, one did while I was tiling). But since the finish on a night table isn’t quite splash ready, we added some extra durability and waterproofing with three coats of protective lacquer. After some research, Sherry discovered an eco-alternative to our usual go-to: oil-based polyurethane. We bought this Safecoat Acrylaq at a local store called EcoLogic, where the sales person swore by its easy application and durability. Update: For any non-locals, they also sell it on Amazon, so here’s an affiliate link for ya.
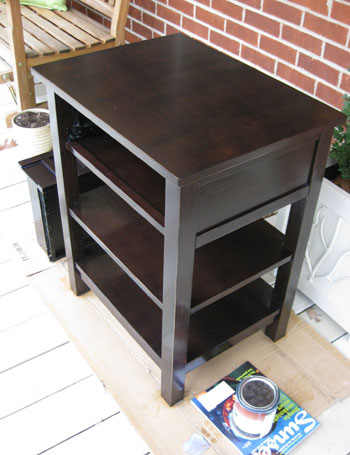
Although the Safecoat is low-VOC, Sherry took the extra-cautious-mom-to-be route and applied all three coats (after giving everything a light sanding) on the porch just to be as well ventilated as possible. Yes, a pregnant girl sealing a dresser on a front porch is something our neighbors put up with thanks to our home improvement obsession. And while we haven’t really put it through years of rigorous testing yet, so far we’ve been extremely impressed with the lacquer we chose. Droplets of water bead up right on the surface and it seems as though this stuff is generally impervious to water (which is a good thing in a bathroom). Here’s what it looked like all Acrylaq-ed up and begging for some vanity-ification:
The elbow greasiest part of the project was poking holes in all the right places so the faucet, sink and related plumbing would all sit nicely (and firmly) in the right spots. So once the night table dried (and the floors were in place) we put the table in the bathroom to see what modifications we’d have to make to accommodate the plumbing. Luckily, the p-trap sat perfectly under the drawer and upper shelf, meaning both of the bottom shelves could stay 100% intact (this felt like a miracle discovery at the time- picture cartwheels and happy jigs). But of course, the hot & cold water pipes stuck right into the back of the drawer (and I’d need to drill some holes in the top of the vanity for the drain and faucet to pass through).
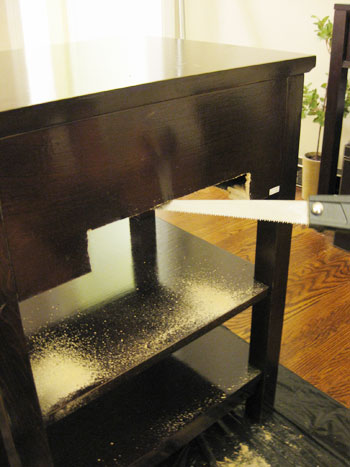
So I carefully marked which sections of wood needed to go and started cutting away. Despite my new obsession with power saws, I did this the old fashioned way: drilling a pilot hole big enough to get my handsaw through and then cutting things manually. It was actually pretty easy considering a lot of what I was cutting were thin panels, not thick support legs.
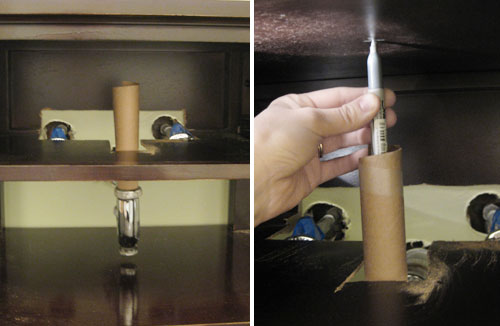
With the back cut out enough to accommodate the plumbing so we could push the night table flush against the bathroom wall, our next step was to figure out where we needed to make those two holes through the top. Our main concern was making sure we drilled the hole for the sink drain directly above the p-trap so no “creative” pipe tricks would be required. Fortunately, it only required some creative marking techniques instead. We simply used a slightly trimmed, empty paper towel tube as a stand-in drain pipe followed by a silver Sharpie centered in the tube to mark the underside of the tabletop. After drilling a small guide hole up through that spot, I officially had my mark to begin carving a big hole in the top from above.
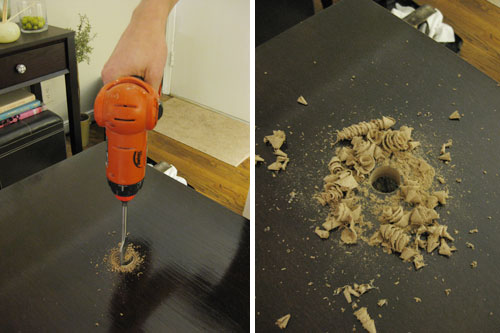
Using the measurements included in our sink’s directions, I purchased a hole boring bit for my drill to do the job precisely. It was totally worth the $6. I was through the thick tabletop in no time with a perfectly sized hole (and a bit of a mess – good thing we had laid down a towel and a plastic bag for easy clean-up afterwards).
We then put the sink temporarily in place to make sure the drain stopper fit (it did) and figure out exactly where we wanted the faucet to go from there. With that marked, it took just another few spins of the drill to have the second hole ready to go.
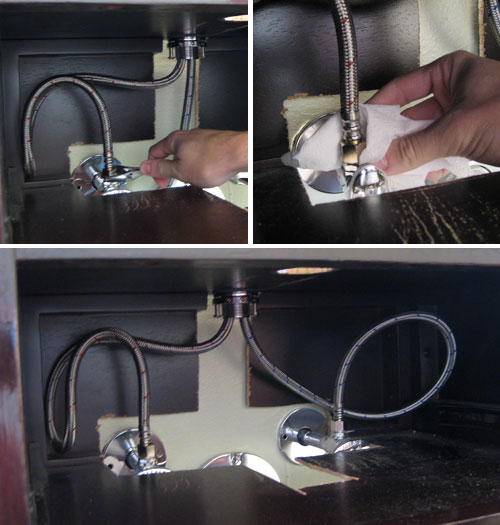
Next we decided to install the faucet before placing the vanity in the bathroom, mainly because it would be easier to screw it tightly in place from behind (without a wall in the way). After attaching the provided hot and cold braided hoses to the faucet itself, we just fed them through the top of the hole and began tightening the nuts on the other side. This is where we realized another strip of wood had to be cut out so that the nut sat flush and tight against the underside of the vanity top. A few cuts of the saw and one creepy, reflected glare later, we had this:
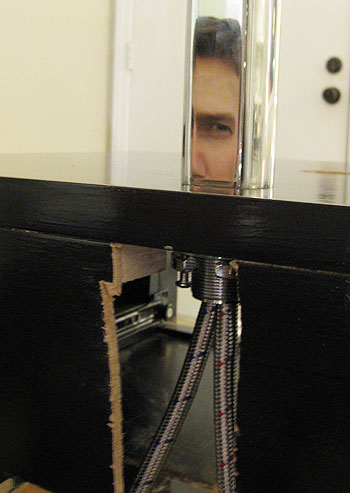
Note that my cuts are far from pretty – but since they’re all hidden against the back wall (with a soon-to-be-adapted drawer that would obscure them from the front) I wasn’t too concerned with how they looked as long as they were in the right place. Someone would literally have to remove the drawer and squat down to be at eye level with the vanity to see ’em.
So with the faucet firmly attached and everything tightened, we carried the piece into the bathroom and connected the water hoses to the plumbing on the wall. This step just called for a combination of plumber’s tape and a few turns of the wrench (the key is tight, but not overtight!). Oh and we can’t forget my simple “paper towel test” (patent pending… not really) to see if anything was leaking. Explanation: I hold up a dry paper towel for about 60 seconds to see if any water spots appear. No spots = you’re good to go. Then with both water hoses attached, I shoved them as far back in the drawer cavity as possible and sailed along to the next task (we’ll explain how we retrofitted the drawer bit later).
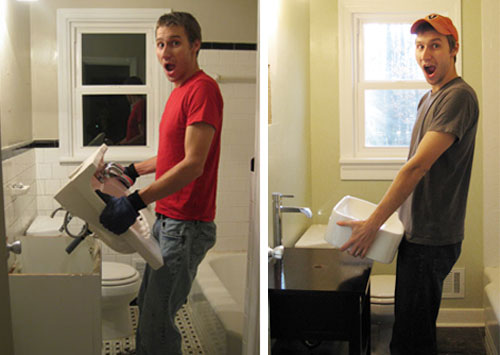
The next thing on the agenda was attaching the sink, which would be held in place through a combination of plumbing and adhesive. But before doing that, we carefully did a “dry run” installation where I brought the vanity, sink and faucet in and loosely hooked up all of the plumbing to make sure things were lining up perfectly. Fortunately, they were – except that I need about 4″ of extension pipe to connect everything. But even an unplanned trip to the home improvement store couldn’t dampen my enthusiasm for the progress we had made in about an hour of vanity building. For instance, see how much happier/crazier I look in the “after” sink picture below? I look like I’m auditioning for Glee.
Ok, so after returning with the small section of extension pipe that we needed to connect all the plumbing, we now had the confidence to glue the above-counter sink onto the top of the vanity. For this we used a clear waterproof silicone caulk – since it would do both the job of adhering and blocking water. Plus, the guy at Lowe’s had just done something similar in his bathroom the week before and was convincingly confident about it (and we knew the plumbing for the drain would also firmly hold the sink in place for added security).
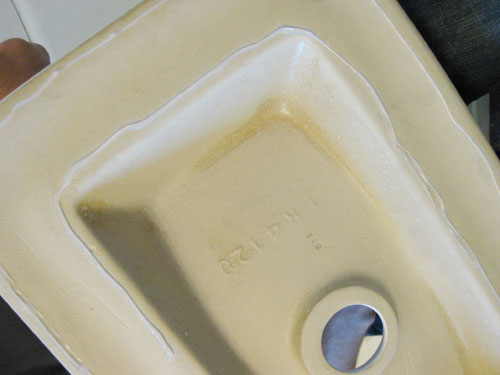
We laid a line of silicone along both edges where the sink would rest on the vanity top (the bottom of the sink appears flat in the photo below, but it actually arcs in the middle so we only applied caulk where the sink would directly make contact with the vanity). Oh and we did leave a small break in the caulk line at the back of the sink – reasoning that if we had a leak issue down the road, it would be nice for it to seap out the back of the sink where we could see it (instead of silently collecting between the sink and the vanity top while we had no idea what water damage was lurking underneath). Oh, and even though the caulk looks white in the picture it dries clear.
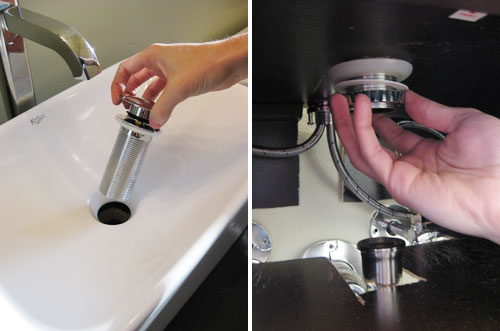
With the sink laid carefully in place and pressed down, it was ready for plumbing. Since I’d confirmed that all the plumbing would fit together before during my “dry run,” there wasn’t much magic to this step. I inserted the drain stopper from the top, screwed on and tightened the washer and nut from the bottom (all per sink instructions) and attached the rest of the drain pipe using plumber’s tape and some tightening (but not overtightening) with a wrench. Then – with my trusty paper towel sitting on the shelf under it to help me identify leaks – we turned on the water and (after a couple of tightening adjustments) had a leak free sink. Victory. More happy jigs and cartwheels ensued.
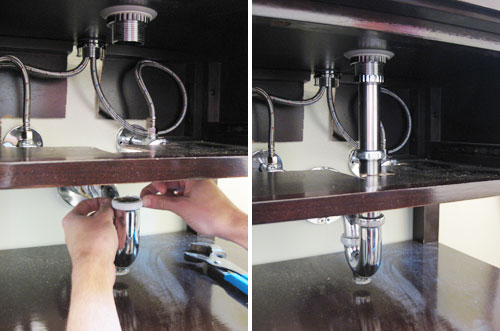
Then we whipped out the same clear silicone caulk that we used to hold the sink down to seal around the base of the sink where it meets the vanity (except for that small span of space in the back which we left unsealed to alert us of any potential under-sink leaks). Looks pretty much complete, eh?
Nope, two other tasks were in order before we could wash our hands of this project (and then subsequently wash our hands in this project). First we wanted to be 100% sure that our DIY vanity wouldn’t pull away from the wall (since the only thing holding it in place were some pipes). So using some simple L brackets and a few long screws we secured the vanity tightly against the wall in two spots right under the drawer base (meaning they’re completely hidden from view). Now this baby isn’t going anywhere.
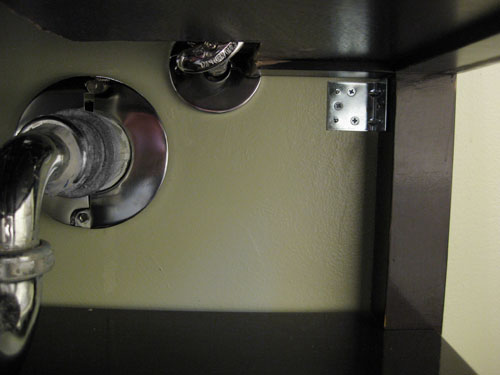
Our second job was to adjust the drawer to work around all of the plumbing that I had just carefully installed right behind it. Thanks to some trial-and-error before moving the piece into the bathroom, we figured out that all we needed to do to salvage the function of the drawer was to trim the big base panel and reinstall the back panel at a shorter depth (ie: shorten the drawer to create clearance for the pipes). This was easy since Sherry had constructed the thing in the first place, so it was no big deal to take the drawer apart and make those adjustments.
After unscrewing and removing the back of the drawer and sliding out the bottom panel, we used a circular saw to shorten the bottom to the new depth. The wood was thin so a handsaw would’ve easily cut it, but this cut needed to be straight for a secure fit (so not trusting my hand, I went over the top and headed to the garage where the power tools with laser guides could do my dirty work). The shortened base panel slid right back into place and with a few self-made drill holes, we easily attached the back of the drawer at the new depth.
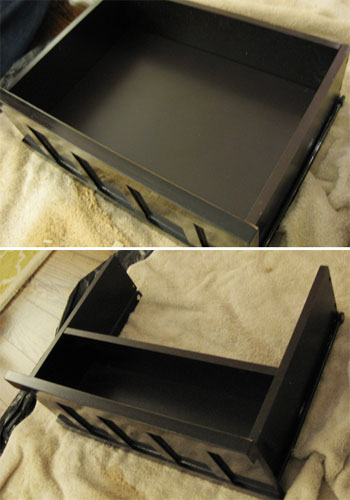
So with the drawer in place (which left just enough room to store toothbrushes, toothpaste, contact cases and deodorant) we were officially D-O-N-E with the vanity! And it only took a few hours to accomplish the whole thing. Not bad for saving several hundred bucks, right?
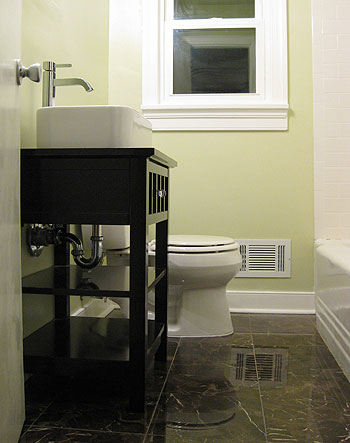
And now that this chapter is also d-o-n-e, the next post up will show you the whole shebang completed and accessorized. Not to mention a full budget breakdown and us answering the ten million dollar question: would we do it all again? And don’t worry, we’ll still follow-up after the big reveal with other details like how we reglazed the tub and made some new art. Details, details. But one thing we won’t be covering is the riveting tale of re-installing the toilet, which you can see is already in place (since we’ve got that step-by-step available here). Besides, I’m spent.
What about you guys? Has anyone else altered a piece of furniture in some way to make it more customized and functional for your home? Sherry’s mom actually turned an old cabinet into a sink over ten years ago, on a serious budget no less (so that’s where Sherry gets it from!). We’d love to know what sort of furniture “hacks” you guys are taking on these days. Do tell.
Wanna read about the first few chapters of the big bathroom makeover? Check out Chapter One (Moodboard), Chapter Two (Demo), Chapter Three (Wall Reconstruction), a little teaser post, Chapter Four (Tiling), Chapter Five (Grouting) and Chapter Six (Trim) right here.

Amanda says
Very impressive! I’ll be interested to hear how the sealed wood holds up to water. Sounds like it should do pretty well.
I wish I had some cool furniture repurposing project to share. Maybe someday, if the creativity fairy ever decides to visit.
VéroniQC says
So nice!!! I love the look! I like how you can still use the drawer, very clever! Great job you guys!
Also: big LOL (at work!) at the: ”I look like I’m auditioning for Glee”… So true! :D
Sarah says
awesome!
Cindy @ The Flipping Couple says
Woohoo!! It looks so great you guys!! Can’t wait to see all the little details and congrats on a shower this morning. I remember the first time I FINALLY showered in our own bathroom after 2 months and it was FANTASTIC. Well, except that we hadn’t reglazed the tub yet so that part was disgusting, but whatevs. : )
Katie says
So gorgeous! Love the contrast of the dark wood and floors with the white sink and subway tile. In the last pic, it looks like you may have replaced the knob with a clear one?
YoungHouseLove says
Good eye Katie! We actually grabbed the glass knob off of our old vanity (which we picked it up at Anthropologie years ago) and switched it out for the oil-rubbed bronze knob that came with the vanity. Since the fixtures in the room are chrome we thought the sparkle of a glass knob would complement everything.
xo,
s
Katrina says
I love how everythings turning out so nice!! The clean lines of the table and the white sink look amazgin together! Wow
Gives us home we can re-do our bathroom ourself when the time comes
Amelia says
It looks fantastic! Can’t wait to see all the details and the big reveal (honestly, I’ve been waiting all week!)
kristen says
WOW!! It is really looking good and your hard work has paid off. I cant wait to see the final chapter!!!
Anon says
No disrespect but, John, you are a total beast!! I’m literally bowing at the computer screen right this second! Total kudos on a phenomenal job. So far, everything has looked top-notch, professional grade. But then again, what else could we expect?
Jen Z. says
wow it looks great. can’t wait to see the big reveal.
layersofmeaning says
Wow! Great job John! (& Sherry)
Becky says
OK Would it be wrong to just copy this project directly into the new bathroom in our basement? :) Looks fab guys!
Renee Smith says
BRILLIANT!
I think I’ve just found the courage to replace our p-trap in our master bathroom… It looks beautiful, John and Sherry. I read the blog daily, and after wrist surgery this week (and our house turning into a chaotic mess) it has really helped me through the pain and loopy drugs to see that somewhere in the world someone is making fabulous progress! Luckily I’ll be back on the house (horse?) next week! Take care, and big hugs to little P (and burger).
Jessica @ How Sweet says
I need to husband to read – he can’t do any of this!
YoungHouseLove says
Hey Jessica,
A month ago my husband didn’t know how to do any of this either! We’re just big believers in learning as we go and we always do as much research and asking around as we can beforehand. We had never laid tile, grouted, or converted a vanity before this project so that’s a testament to how anyone can do anything with a little googling, elbow grease and enthusiasm!
xo,
s
Annie says
Brilliant, amazing, incredible. I love your choice for the nightstand. Can’t wait to see how it all comes together!
Stephanie B says
That looks amazing! The colors and clean lines have a very soothing effect. I’m almost a little sad I don’t have a bathroom that needs a renovation like yours.
Barbara says
What I wouldn’t give to have someone around that could cut a vanity apart without wrecking it!! You both are so talented that it makes me ache with envy!! The bathroom is so, so pretty!!
__
Barbara
http://ifididnthaveasenseofhumor.blogspot.com
Kara says
I happily join the chorus in saying what an amazing (and professional-looking!) job you guys have done – only beat, surely, by how happy you guys surely were to take your first shower in there.
I was wondering about using the nightstand as the vanity… how do you like the height of it (I realize that the sink gives you a few inches but C&B says the table’s only 29.25 inches tall?)?
Can’t WAIT for the big reveal!!!
YoungHouseLove says
Good question Kara! Our old vanity was actually only 30″ tall, so the new one is actually an improvement because although the night table is also around 30″ tall, with the raised sink and the faucet on top it’s a lot closer to counter-height. Very comfortable indeed!
xo,
s
Kasey at Thrifty Little Blog says
I love how the new vanity turned out! I’ll be counting down until next week’s big reveal :).
Sara says
WOW! is all I can say. It looks GREAT! So creative! I would have never ever thought to do something like that. I would have paid the ridic price on an already made one and had no mula left over for accessories. Thanks for the great blog!
I like the vessel sinks, but where do you guys plan to put the soap and toothbrushes and stuff? (maybe I need to wait for the LAST chapter)
Haha, that picture of John had me LOL at my desk at work. The Glee comment was what did it, lol
YoungHouseLove says
Hey Sara,
There’s definitely still space for hand soap on the vanity behind the sink (and we’ve always kept our toothbrushes in a cup in our open linen closet) but you’ll have to wait for the big reveal to see where everything ended up after the makeover…
xo,
s
candace says
The.Vanity.Looks.Awesome!!!
Jessie (Vegan-minded) says
The new vanity is gorgeous! You guys are so creative, I love it. Can’t wait to see the big reveal! :)
jo says
i love your blog and usually love all of your posts and DIYs. but i will admit when you first started this bathroom project i was kind of like “blah blah blah boring.” but i am totally “ooohh aahhh wow for reals?!?” i’m so incredibly impressed with what you guys have accomplished. i am inspired to finally re-do our yucky bathroom but i fear we aren’t as patient or talented as you (despite your claims that anyone can do this sort of stuff)!
This Thrifted Life says
Looks fantastic!!
Handy Man, Crafty Woman says
awesome! I’m glued to the screen waiting for the big, “final” reveal!! I just love bathroom makeovers! Well, room makeovers of any kind.
Kim at Yellow Brick Home says
I loved that sink from the moment I saw it in your mood board, and I still love it.
Well done, youngsters.
Becky @ TheCodyHouse says
Love the vanity! Everything looks great…can’t wait for the big reveal!!
Emily @ Waldo Bungie says
Looks ammmmmmmazing! I’ve been inspired by your bathroom reno and hopefully we’ll be able to do something similar in our home in the next couple of months! I bet you’re excited to get some of the West Elm stuff from your mood board at 40% off since your Richmond store is closing? (Sad that it’s closing, but good that you can get a great deal!)
YoungHouseLove says
We actually got out bath mat there super cheap (plus it’s organic!). We ended up snagging patterned towels at TJ Maxx. Can’t wait to share all of our accessories next week!
xo,
s
amelia says
amazing, once again! Love the nighstand turned vanity – i think it really opens up the bathroom, choosing anything larger would have tightened the space. Love the little handy drawer – i think you’ll be surprised how much you can actually store in there, especially if you use organizing trays and what not. Can’t wait to see the finished product – so excited!!!!! ps. just wondering, and i’m sure you have, you’ve kept little beanette in mind when organizing your new space – or perhaps you’re thinking of store all her bathroom essentials in her room?
YoungHouseLove says
Hey Amelia,
These days we always have the bean in mind, but thanks to a pretty deep doorless linen closet next to the tub we’ll be able to stash lots of little girl things in a basket, lacquered box, etc. Hope it helps!
xo,
s
Karrie says
Looks great!
Beth says
Looks great, you guys! Love the vanity/sink! Almost makes me want to redo my bathroom… Almost. Very good post, too. I rarely read the step-by-steps because I’m not planning on doing anything similar, but this one was really interesting! :-)
Meredith says
The vanity looks AMAZING!!!!! You guys really out did yourselves!!!!!
Melissa says
Loving your new bathroom! Can’t wait to see a full final reveal.
amelia says
certainly does help sherry! i always forget about that closet on the other side! Just curious about how you’re re-organizing (or not) your home for when your bean is here – my main bath is quite small, and although i don’t have any kids yet, i know this will be “their” washroom in the future and i’m always thinking of how i would “fit” them in – if that makes sense (and not just in the bathroom, but the kitchen, linen closet, etc. – i have many friends with wee ones and man do they have a lot of stuff!)
YoungHouseLove says
We’re learn as you go people, and we definitely plan to cover the whole restructuring and reorganizing of our house when the bean arrives and we amass more kid-stuff. Right now we’re shifting our focus to the nursery but we’re sure our whole house will change (many times with different kid-stages) over the next few years. Stay tuned for all the dirty details as they begin developing this spring!
xo,
s
Kristin says
Nice job! When we re-do both our master and upstairs Jack and Jill bath, your “tutorials” are going to be my first stop. Glad you both can shower at home again! :)
Tracie@Gurtler+Home says
That looks great! I’ve always wondered how people are able to make their own vanity.
MissCaron says
LOVE IT! Y’all did a great job! Wanna come do mine now? ;-)
AlysonO says
This is amazing guys!!! I’ve been bookmarking all your progress for my husband to read when we finally do our bathroom!!! And I cannot WAIT to see the nursery!! Right now we’re working on turning an old dresser we found in the basement when we moved in into a sideboard/wine rack. If we can pull it off I think it’ll be an awesome piece for our dining room!
Sasha says
You guys ROCK! So inspiring and nice that you have broken down each and every part. I love that you make it look it can be done. Can wait for the final reveal! Thank you
Jill Stigs says
LOVE LOVE LOVE it! Very cool vanity and I love the sink too. I would be too OCD to have a round glass one, the one you guys selected rocks. Can’t wait for the next installment! WOO HOO to using your own shower whenever you want to………it’s the little things!! :)
Deb says
Can’t wait for the big “pull it all together it’s finally DONE post” – I bet you guys are ecstatic! :)
I probably shouldn’t have started my bathroom until yours was done. I’m second guessing my choices now – ha! Who would have thought it would be so hard to choose drawer pulls and faucets? ;)
misty becken says
You guys are so creative and inspiring! Great job!
Jen says
I am not so patiently waiting for the re-glazing information. :)
We have – what I think is – the same bathtub. And, it desperately needs to be either re-glazed or replaced. I want to do the most environmentally- and kid-safe option. My husband and I are going back and forth on this issue. HELP!
YoungHouseLove says
Hey Jen,
Here’s the reglazing info we’ve already shared in the comment section of previous posts (lots of people are interested in the subject!):
We love our old tub! It’s large, cast iron, and just needed a bit of reglazing to look brand new (which is definitely cheaper than replacing it with something as large and solid- plus hauling it would be a bear). We’re all about working with what we have when we can, so since we sadly couldn’t save the vintage tile on the walls or the floor we thought keeping our original tub would be a great way to stay true to our home’s 50+ year old roots. We knew tub reglazing could be done right because our reglazed tub (which we inherited with the house) held up over 12 years until we decided it was time to have it redone (we had the original paperwork to prove when it was done). We used sites like Angie’s List and did some looking around at the Better Business Bureau to whittle it down to a few contenders and then we called their references (many who had the reglazing done 5+ years ago) to be certain that we landed on the best company for the job.
Long story short: we’re super confident with the guys we hired! They’re a locally owned and operated father & son team who had great online reviews and they personally do all the work themselves (the father did our tub) so they don’t farm any work out to people who can leave your house and mess or take any shortcuts. They also warranty their work for two years and say that it should last 10-12 years (just like our previous reglazing job) so we have all the confidence in the world in our choice. Of course you have to take care with reglazed items (you can’t use abrasive/acidic soaps and cleaners or grippy bath mats with suction cups which can cause the finish to mar) but since we lived with a reglazed tub ever since we owned the house it’s nothing new to us and totally easy to live with. Oh and we didn’t mind paying top dollar for a long lasting and durable result. It came out to $399 because our tub had previously been reglazed (and had to be stripped bare before they could refinish it again) but they only charge $299 if you don’t have a tub that was previously reglazed.
Hope it tides you over until we detail that step a bit more after the big reveal!
xo,
s
Rachel says
Wow, the vanity looks fantastic. It seems pretty easy, too! I hope to try it one day when I have my own little casa.
Ashley M. [at] (never home)maker says
What a great idea to change something you love (that was relatively cheap) to meet your unique needs! My question initially was about the height of the vanity — but I see you already answered that. If we didn’t just install a pedestal sink, I’d seriously consider what you two just did!
How do you like that raised style of sink compared to the big one you used to have? I’m a fan of it all being one piece . . . but for style sake, this is lovely!
<3
srabee says
hmmm… I dont love the sink, but the vanity is nice.
Katie says
This beautiful!!! My husband are renovating a bathroom in the near future and have not been able to find a vanity we like. What a wonderful idea.
Dana says
Who’d ‘a thunk it?! You youngsters, that’s who! This is stupendous. Great tutorial. (Who was doing the cartwheels? S or J?) Thank you!
YoungHouseLove says
Both of us. At the same time. Towards each other. With fireworks in the background. Fun times.
xo,
s
Megean says
Every week I get more and more jealous of your fancy new bathroom! And every week my family gets more and more wary of me saying “if John and Sherry can do it, I can do it too!” Was there ever a time you thought you neede more than 2 people to get the job done? I live alone and would have to do some fancy recruiting to get a crew (plus, I did some digging and discovered I have crazy wire-mesh covered walls too!)
YoungHouseLove says
Hey Megean,
Good question! This is definitely the biggest DIY project we’ve ever taken on and the good news is that there hasn’t been a single time that we’ve needed three people. John and his dad worked a lot on the demo and reconstruction without me at all (being pregnant has its advantages) and then I assisted with the finishing details like building the vanity and hanging towels bars, etc (way after John’s dad left). Therefore, two people can get a heckova lot done! Hope it helps!
xo,
s
Molly says
I love these building-things posts! Two questions:
1) It looks as if you sealed the vanity before cutting up the back. Did you then reseal the edges of cuts?
2) This is totally unrelated, but I’ve been wondering — it sounds as if you are planning on more than one bean. With only three bedrooms in the house, where are you planning to put them all?
YoungHouseLove says
Hey Molly,
Woah there nelly! We definitely love to learn and adapt as we go, so we don’t really think much about where to put more than one baby since we don’t even have one yet! Well, I guess we do for a minute here and there and we’ve decided that since we have three bedrooms we can easily have two kid’s bedrooms along with our master bedroom (and then even if we go on to have a third baby, that child will have to be the same sex as one of the other two- or they’ll have to be the same sex as each other- so the two girls or two boys, however it works out, can have the bigger guest bedroom and the other child will get the room we’re currently converting into a nursery).
Does that make sense? We also talk about additions and building loft spaces and all that good stuff so those are also possibilities down the line. Hope it helps! Oh and yes, we did seal everything that we cut so the whole piece is waterproof, even the notches that we added for the plumbing. Good question!
xo,
s