As if our bathroom didn’t already make it abundantly clear during the demo process, the act of putting things back together certainly proved that renovating an old bathroom is a lot of work. And it’s almost always full of surprises. Nothing we couldn’t handle though. Let’s just say we were kept on our toes.
As you may recall from this post, my dad just DIYed two separate bathroom remodels this year in his own home and kindly volunteered his time, expertise and tools to help us with ours (hooray free labor – although there was some obligatory feeding involved). So I took two days off of work to give the three of us a four-day-long-mega-weekend to whip our room back into shape. And yes, once again, the bathroom whipped us right back in return.
You may remember that that bathroom looked like this after my weekend o’ destruction:
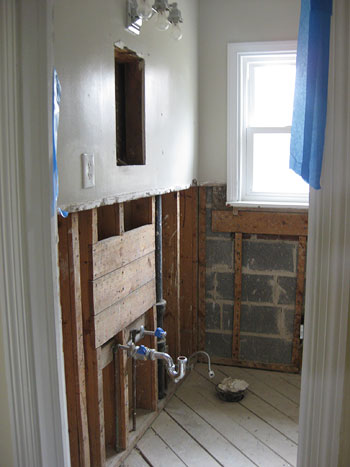
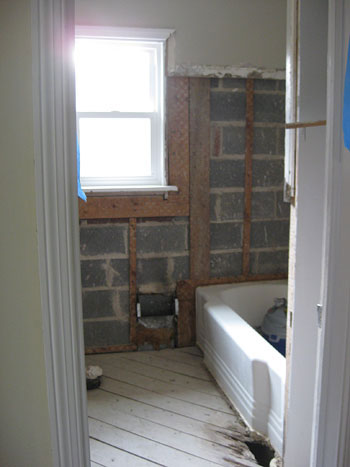
The plan for the following weekend was to begin putting everything back together: install new drywall on the walls, hang backerboard wherever tile was going, repair the rot in the floor, and tile both the shower/tub surround and the floor. My dad was actually able to hang drywall in both of his bathrooms in just a few hours and spent another day or two tiling them so Sherry (the most ambitious of the group) had big dreams that the room would be ready for showering and, um, other unmentionables by Day Four. I, on the other hand, just wanted to not die from exhaustion. Spoiler alert: only one out of the two goals were accomplished.
So here’s how it all went down- er, up.
***********************************************************
Day Zero / Shopping Day (Thursday night): My dad arrived shortly after I got home from work and a’shopping we went with list and room measurements in hand. Key items on our list included: enough hardibacker (aka cement board, aka backerboard, aka Durock) to cover the shower surround and floor, greenboard (which is moisture-resistant drywall) for the other walls, 3/4″ plywood to lay a super sturdy subfloor and some new 2x4s to repair the rotted floor planks that we uncovered. Plus some other little things like cedar shims, a couple of boxes of 2″ and 3″ drywall screws and a masonry blade for my dad’s circular saw (to cut the plywood and hardibacker – we were buying 1/2″ hardibacker, which is pretty hard to score and snap).
Here’s where we met hitch-in-the-plan #1: both the greenboard and plywood were too big to fit in my dad’s giant minivan. We were all shocked. Shark farts (30 Rock anyone?). No worries, Home Depot rents a truck for $19 for 75 minutes – plenty of time to get home and back. However it was 15 minutes ’til closing and HD didn’t trust us to keep the truck overnight. So the greenboard and plywood got to spend the night at the store while everything else came home with us.
***********************************************************
Day One (Friday): Our first full day kicks off with me and Sherry retrieving the oversized purchases thanks to the $19 Home Depot truck rental. Bonus: it’s also great for transporting a breakfast of Einstein bagels.

Along with the greenboard, plywood and bagels – we also picked up a bunch of furring strips to beef up our studs (hmmm, maybe in the future I should avoid using fur, beef and studs in the same sentence for search engine purposes). Anyway, the furring strips would help us solve hitch-in-the-plan #2. One challenge we didn’t think through was the fact that we would have to make sure the new walls matched up perfectly with the old walls. And the walls in our bomb shelter of a bathroom were inches of insane mortar, plaster and metal-mesh, which made them extra thick. It wasn’t an option to set the walls back a few inches to gain the space since we were keeping our tub, so the new walls had to come out and meet the edge of the tub just as the old walls had. Hmm…
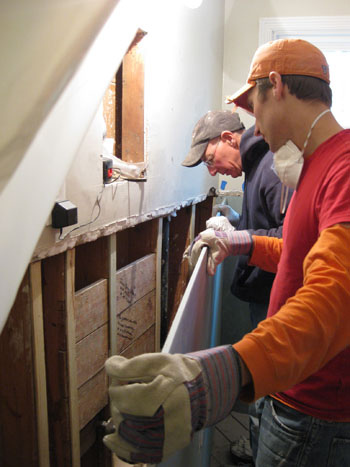
And because our extra thick hardibacker was still only 1/2″ thick, we couldn’t screw it directly onto the studs because that would set it back about 2.5″ from the edge of the tub and the rest of the walls in the room. Instead, I had to securely nail two layers of furring strips to every single stud before screwing the hardibacker into place to beef things up so the hardibacker would be even with the walls and tubs. Oh and here’s a tip, we used super long screws that could pass through both added furring strips and into the studs/existing furring strips so everything was secured together with one long corrosion resistant screw. This way things can’t wiggle loose as they would if you only secured one furring strip to the other which was attached to the stud with a separate short screw. It’s all about sandwiching everything together for a secure and super deep hold.
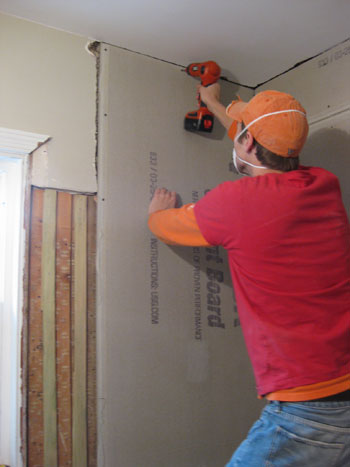
All this furring strip action wasn’t a hard task, it just ended up being extremely time consuming. In fact it was still early afternoon by the time we got our first board in place:
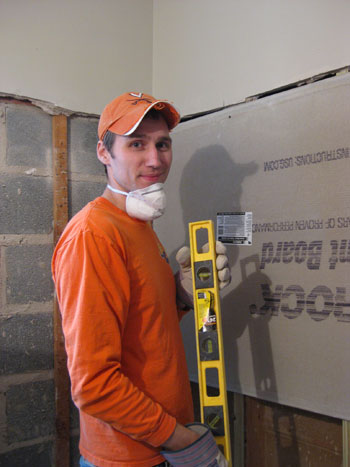
See that look on my face? That’s blissful ignorance. That’s because it’s before we realized our big oversight. Sherry and I always talked about running our subway tile all the way up to the ceiling. But that requires hardibacker being placed all the way up to the ceiling too. And as you can tell in the photo above – I hadn’t demo’d those top two feet of plaster/mortar/metal-mesh because we assumed we’d just line up the backerboard and tile everything. Baaaad idea.
After consulting more than a few experts – including people at my dad’s tile shop and the folks at True Value – our fears were confirmed: tiling over painted plaster and mortar is a big no-no (unless we heavily scored the paint and bought a special kind of latex- based mortar which was still an “iffy” short cut according to many). Call it hitch-in-the-plan #3 if you will.
So off came that first piece of hardibacker that we had so proudly attached. And then a couple of hours were dedicated to demolishing the remaining plaster, mortar and metal-mesh walls around the top of the shower (and cleaning it up). For a look back at how serious that demo gets, check out this post. Fortunately, even after all of that tearing-apart, there were still a couple of hours left in the day (and a few ounces of energy left in us) so we were able to get most of the hardiboard around the shower installed. And in the end we were glad we didn’t take any shortcuts like trying to tile over the old painted mortar and plaster walls. We’re all about making this bathroom last for the long haul.
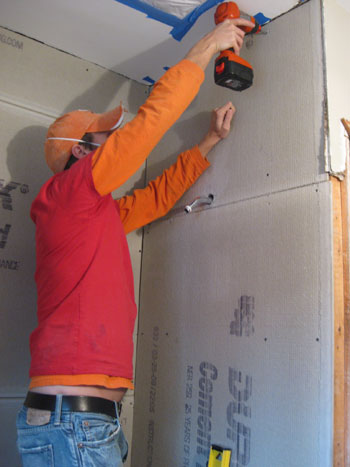
Then we ordered Chinese food. Nothing like a fortune cookie to end a busy day.
***********************************************************
Day Two (Saturday): On Saturday morning my dad and I threw our dusty clothes back on and got right to work finishing the hardibacker in the shower (yes, I will admit upfront that I wore the same outfit for four days straight without a proper shower- there was lots of sink hair-washing and washcloth bathing). Well, actually, if I’m being honest – that was after an early morning trip to the store to get more furring strips, some extra screws and a few other miscellaneous items. Running out to grab a few miscellaneous items is par for the course in most renovations, especially of this scale (the official count: four trips at this point in the weekend already).
With that done we could finally turn our attention to hanging greenboard on the remaining walls under the window and behind the toilet & sink that will be tile-free. I’ll spare you gory details, except to say that it was easier to cut than the hardibacker (hooray for just scoring and snapping!) but it involved lots more math and measuring (cutting around the window, heating vents, etc.) And lest we forget all the furring that was required before any piece went up to keep things flush?
Fortunately, although time consuming, the walls were pretty much a one man job. That meant it left one of us – my dad – to finally stop ignoring that rotten spot in the floor.

The rot only affected two planks and the top of two joists (one under the edge of the tub). So it was a relatively straightforward task of replacing the planks and reinforcing the joists. Here’s what it looked like with the nasty planks cut out and removed.
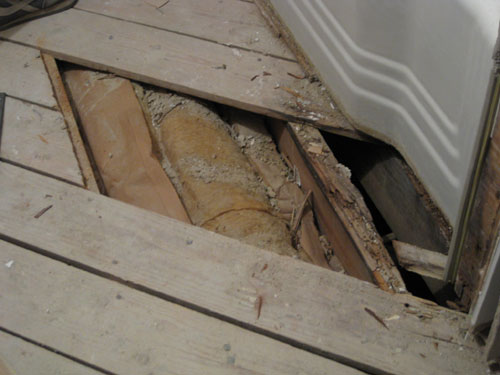
From there, my dad cut some 2×4’s that he could Liquid Nails and then screw into the side of the rotted joists (fortunately it was just the tops. Basically, since we couldn’t rest the new planks on the old uneven joists, we had to create new, solid joists that sat parallel to them. Once those were in place (and boy were they solid!) my dad installed fresh planks where the old ones had been. And voila – the crazy old diagonal subfloor was as good as new:
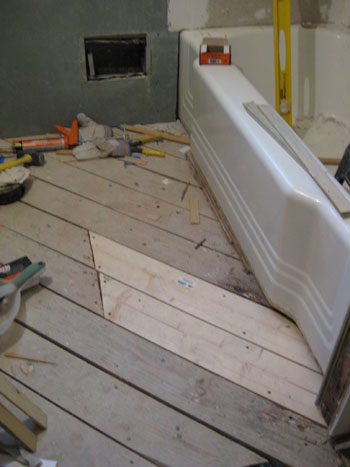
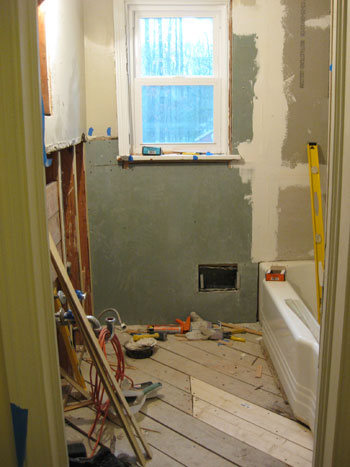
So we wrapped up Day Two by taping and mudding the shower surround so that it would be dry in time to begin tiling on Day Three… despite the fact that we still had one long wall left to install greenboard on (see the one on the bottom left?), not to mention a piece of plywood to install on the floor to reinforce everything and bring it up to a height that matches the rest of the house. So yeah, maybe tiling on Day Three was a lofty goal…
***********************************************************
Day Three (Sunday): Like the days before it, Sunday kicked off with a miscellaneous supply trip to the home improvement store – this one included things like paper towels, a metal corner fitting, some extra mudding tools and (yes) more furring strips. Oh, and we grabbed a few plastic drop cloths because Mother Nature wasn’t cooperating. Heavy rain + cutting drywall in a detached garage = the need for some way to transport things into the house without allowing everything to get drenched.
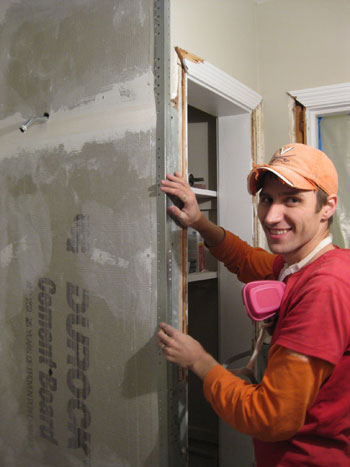
The third day included simple tasks, like fastening the metal corner fitting to the wall:
And not so simple tasks, like installing our biggest piece of greenboard yet (about 8ft by 4ft) – which involved cutting four perfectly placed fixture holes. It actually wasn’t that difficult (thank goodness mathiness runs in my family). But then we hit hitch-in-the-plan #4. I noticed a pipe leaking in the wall. Crud. It wasn’t a big leak, but enough that it made me grateful to be discovering it before installing new moisture resistant drywall over it (it’s not like the stuff’s water proof- and nobody wants a leak in their walls!). So at least we saw it before sealing things up.
After some investigation, my guess/fear that we knocked something loose during demolition was wrong. It was actually a tiny leak in our roof (the pipe extended all the way up the wall and through the roof) that was dribbling down the outside of the pipe behind the wall. We’re not sure how long it had being doing it but, again, we felt lucky to be noticing it at the perfect time to take care of it. Apparently the heavy rainstorm that day was a blessing in disguise!
So off I went to the store (trip #6) to get some silicone caulk to plug up the leak in the roof from the interior for the short term (the long term solution will involve getting up on the roof with some tar). Who would’ve guessed that our bathroom remodel would be sending me squeezing into the narrowest section of our attic – oh the “pleasant” surprises of home improvement. At least it solved the problem (though I do have a trip onto the roof in my near future to solve the problem more permanently).
And speaking of surprises, Sherry and I thought we’d leave one in the wall for whomever renovates this bathroom next. Before placing the last piece of greenboard on the wall behind the sink, she scrawled this note onto one of the boards: “John & Sherry (& Baby P) were here on Dec 13th, 2009. The question is: who will find this note? Someone else? Or us in 50 years when we’re renovating again?”
At least if it’s us finding it again we’ll be better prepared for what’s required to get ‘er done in this crazy high-maintenance bathroom of ours. And if it’s not us, hopefully that person will be grateful it’s just simple greenboard between them and the studs instead of inches of mortar and metal-mesh.
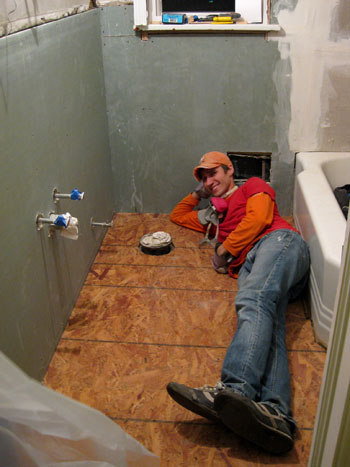
With Day Three quickly coming to a close (and still not having even touched tile thanks to various time-consuming set-backs) we managed to find time to at least lay the new plywood subfloor that my dad and I had measured and cut earlier in the day (it only took three tries to get it perfect – a victory considering the fact that our tub is curved). And we were really happy with our decisison to use 3/4″plywood over the 1/4″ stuff. It really made the floor super solid (less flex= longer lasting tiles that don’t crack) and raised it up to be level with the rest of the house so there wasn’t a tiny step down into the bathroom. Things might be taking forever but at least we were being thorough. Oh and in case you’re wondering, our trip count to the home improvement store was at seven at this point. Yes seven trips in a little over 72 hours.
Here I am enjoying our new, super-solid subfloor. And yes I realize my head is right next to the “toilet hole” (again, that’s a technical term).
***********************************************************
Day Four (Monday): Let’s just say that by this point things start to get a bit blurry. After three long days of construction, our brains weren’t working at 100% anymore – but we were more determined than ever to open a box of tiles. And luckily there was only one task standing in our way: cutting the hardibacker for the floor. (Oh, and trip #8 to the hardware store took place. I have no memory of what we bought since by this time the shopping trips were blurring together).
The good news is that cutting the hardibacker to fit the floor was relatively painless. We just used our cut plywood to trace the shape onto our hardibacker so it would go in perfectly. Then, in a shocking turn of events (I’m kidding, nothing was shocking at this point) we decided to not install it, since we worried that days of walking over it would just lead to crumbly and dusty cement board with dings and drips on it (i.e. not a good surface for laying tile). After all, we still had to finish all of the tiling, mudding, sanding, priming and painting before introducing our pretty new marble tiles into the room.
So with the hardibacker for the floor cut and laid to the side for later installation, what was next? TILING! Yes, it was lunchtime on day #4 and we could finally bust out the wet saw and thinset so that we could start getting those subway tiles on the wall. But you know what, that’s a topic for another day. We actually have a full tiling play by play in the hopper for ya. But for now, let’s just say some tiling was completed… and despite all of the rigorous and exhausting work, we still ended the four-day weekend with smiles on our faces (and all sorts of dirt under our fingernails).
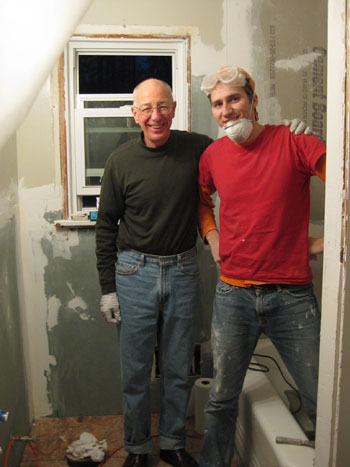
And, of course, we owe a HUGE thank you to my dad for imparting all of his fatherly knowledge and remodely ninja skills on us. And for being so patient and helpful when it came to all the challenges and unforseen curveballs thrown our way by this old-but-loveable house of ours. We figure all of these hitches will just make our big victory in the end that much sweeter…
Psst- Wanna read about the first two chapters of the big bathroom makeover? Check out Chapter One right here and Chapter Two over here.

Kristen says
WOW! lots accomplished. Congrats :)
D says
John seems a bit confused…he’s sporting the Wahoo hat, but wearing Hokie colors. I vote that he ditch the hat :)
Jessica @ How Sweet says
I just went back and re-read the other chapters – your bathroom looks great so far. We have one that really needs a little TLC!
Kari M. says
Brings back oh so many memories of doing our bathrooms.
My helper-dad has since passed away. Not to be gloomy–just a note to appreciate the help when you have it. Those types of dads are awesome!
hishouse;herhelp. says
yummmmmmmmm Einstein bagels.
did you consider removing and/or replacing the tub? my boyfriends bathroom is his house we are renovating has that same tub (& same exact layout) and it takes up so much room!
YoungHouseLove says
Hishouse;herhelp- We did consider replacing the tub but ours isn’t that big and it’s actually original cast iron so we love it. Getting it reglazed will make it look as good as new and it’ll be a lot easier and cheaper than trying to remove it since it’s super heavy and wouldn’t even fit through the door without additional demo. Plus you know we love working with what we have whenever we can!
Vanessa- Good point about the water sealer! Our brick exterior actually has a membrane between the brick and the cinder blocks so there was no need for us to use the water sealer step that you mentioned (which would definitely be necessary for porous bricks or unsealed cinder blocks!). Great tip for anyone out there without that membrane who could use the extra water protection!
xo,
s
vanessa says
We did the same process over the summer. It wasn’t very fun, prep never is! I didn’t see where you used a water sealer on the concrete blocks and the durock. You need to apply 1 coat to the concrete blocks as well as 2 coats to the durock. It is a VERY vital step in the process. We used a bonsil product that has the consistancy of a melted Gumby. Good luck with the rest of the reno.
Nicola says
I need a father as handy as yours. I don’t think mine would have any clue about how to fix a rotting floor.
Your blog inspired me to go out to buy pretty bins to organize all the clutter in the spare room. It still looks pretty empty in there, but now all of our seasonal stuff is organized and out of sight in the closet. Thank you!
Jennifer says
I love this reno! Its so much fun and I cant wait to see how it pans out!!!!
Heather M says
What a sweet dad you have John. And what a crazy weekend, it sounds like you guys need a long nap.
Jessie (Vegan-minded) says
First of all, Sherry definitely has the pregnancy glow going on! Secondly, you guys are making great progress on the bathroom. It’s a lot of hard work that I would probably never have the patience (or know-how) to do. You guys are so lucky to have John’s dad helping out with everything. Great job so far, I can not wait to see the finished product, which I know will be awesome as usual. :)
Jill Stigs says
What doesn’t kill us is supposed to make us stronger right?
Well John (& your Dad and Sherry) are certainly being tested with this bathroom that’s for sure!
Looking great so far!
Katie Lynn says
If only we could redo our bathroom! It’s really just the floors that need replacing, but they’re WHITE linoleum, which I’m certain is the devil’s flooring. Alas, we live in an apartment complex run by a national management company, so replacing the bathroom (and kitchen) linoleum is probably not in the cards for us. Good luck with finishing everything!
P.S. John, your dad is positively adorable!
Rachel says
That last photo is priceless. We are facing a bathroom renovation and this has been SO helpful. I especially appreciate the details about what goes “wrong” and how many trips you end up taking to the home improvement store. That’s the kind of thing that other sites leave out and which makes such a difference to know so you can get a realistic picture of what’s involved. THANK YOU for this fabulous post. Can’t wait to see the tile! (Sherry’s baby bump makes me happy your dad is in there and not her! Are you finding it hard to stand back, Sherry?)
liz tsang says
way to go, john! so fun to see the progress – makes me want to break out my sledge hammer. and major points for a 30 rock reference… you’re a star, you’re on top, somebody bring you some ham!
Kathleen says
You guys are doing a great job! I can only imagine how frustrating it is for Sherry not to be able to get in there and help. John, I applaud you for all your hard work and the patience to sit down and blog about it afterword!
Jenny @ Words On Wendhurst says
Ugh. Sounds like a blast and a half of a weekend. :-) We spent hours on Sunday working on demolition in our previously finished basement. We’re pretty sure the previous owners were on crack, so we’ve opted to tear everything out and start fresh. It’s a long, back breaking process, but it will be so worth it, as will your beautiful new bathroom. Are you tired of shower hassles yet?
Greg Smith says
Super.
It’s probably too late now, but I recommend you check out Schluter Kerdi (It’s german) for bathroom remodel jobs.
Jason says
Looks great so far! You had mesh on the half of your walls above the old tiles and not just drywall or plaster? Crazyness! I have drywall, old 1950s drywall, the new fangled thing back then lol.
Can’t wait to see the rest!
-J
YoungHouseLove says
Jason- There actually was some metal-mesh and mortar on the top walls above the shower since we believe it was probably just easiest for the installers to hang it on the entire wall and just tile part of it and plaster part of it. Crazy, eh?
Greg- Thanks for the tip! We’ll check it out.
Jenny- Shower hassles aren’t actually that bad. We’re pretty used to sink shampooing by now. And during the week we get out and use gym/sister-in-law showers so we’re doing ok. I think we have our eye on the prize so we’re trying to remind ourselves that this too shall pass and it’ll all be worth it in the end…
Kathleen & Rachel- It’s insanely hard for me to resist getting in on the bathroom action! It’s a good thing I’m so in love with the bean, which makes it a little easier to abstain from all the fun. I just wish I could help more, so I’m always hovering around outside offering drinks and granola bars and asking what’s going on. I’m like a kid in the car saying “are we there yet?”- I always need a progress update. Even if it’s just been ten minutes since the last time I asked.
Liz- Hysterical. I’m gonna bring John some ham the next time he’s in there and sing that very song.
xo,
s
Dasha says
I’m enjoying this project so much!I can’t wait for the next installment, the finished project, and the nursery!
Sarah says
So how exactly did it play out when you uncovered the few setbacks? I know home improvement has a tendency to make tempers flare, but you guys seemed to handle things calmly and just take things as they come. Any advice on how to keep from turning a bathroom demo into a marriage demo?
YoungHouseLove says
Hey Sarah,
I think the best anyone can do when there’s an unforeseen setback is to just roll with the punches. It probably helps not to get your expectations too high (the higher they are, the harder they fall) and to just work together towards the common goal. It’s not like it was ever someone’s fault when we encountered an issue (and even if it would have been, blame doesn’t really get you anywhere) so our best advice would just be to take these challenges as an opportunity to work together and accomplish something as a team, which really can bond you even more. And if someone reaches their boiling point and they just can’t handle things, giving them time to cool off and regain their composure is always the nice thing to do. Thankfully we didn’t run into any of those moments… yet!
xo,
s
Elaine K says
Trips to the hardware store and surprises–that’s what I remember from redoing a bathroom in our 50 year old ranch 18 years ago! And a toddler who picked up a few words I didn’t want him to know from his dad and uncle who redid the bathroom. The next one we just had PermaCeram reglaze the tub and tile.
Amelia says
well done guys. Everything looks to be coming together nicely. I know it must be a little disappointing to have strayed from your timeline, but, like you said, better to do it right the first time – or like Mike Holmes says “make it right!”. Although tiling, painting, and decorating is the fun part, it would all be wasted energy and time if what was underneath was, for lack of a better word, crap. Hang in there! It’ll be totally worth it in the end – especially when your little bean is here!!
Jason says
That is so crazy! I had to replace the exterior wall of my bathroom basically due to water issues outside, actually tear it down till the tile and some old studs that weren’t termite eaten or rotten were all that was left – thank god that stuff is strong! I built back around it. But anyway, my drywall above the tile went then and also above the tub tile because they had done 2 layers there at some point to cover over the old damaged drywall and I wanted it to look even and be proper so I took it out. I’m so thankfull all I had was drywall above my tiles and not concrete mesh! And while it was gone I had a cool above bath/shower high window into the bedroom covered in plastic so I could use the shower lol – gone now just greenboard:( Thank you guys so much – you teach us all and especially great for me since we have the same vintage homes! I love to see how they are alike/different. I can’t wait to send you pics when my house is done!
-J
Jason says
PS – to make that make sense – the temporary window showed up because I had also taken the drywall off in part of the bedroom that meets the bathroom.
Megean says
Yikes! This is quite a job. I don’t know whether to be scared or inspired! My bathroom (house built in 1948) needs some serious attention, and I am trying to determine if anything is salvageable or if I need to start from scratch. My biggest fear is what is underneath the tile (which surrounds the whole bathroom)! Were all of your walls plaster, or just those around the shower? I have plaster walls throughout the house, and I haven’t been able to find decent information about repairing them (in my bathroom for instance, which suffered from a leaky roof as well). Any thoughts?
YoungHouseLove says
Megean- All the walls were plaster or mortar in there (some with metal-mesh behind them if they were tiled). The funny thing is that demoing out the walls without the metal-mesh was a lot easier (you could knock/cut them out in huge chunks while the metal sheeting made that impossible) so hopefully that lifts your spirits!
Jennifer- After extensive research (including a lot of time spent on the John Bridge forums and on the phone with tiling contractors and other experts in the field) we learned that membranes are only necessary for instances when water pools in a specific spot (like on a tiled shower floor for example) but because we have a tub and were just tiling the walls (which get runoff, but no water pooling) the membrane was unnecessary. Of course there are varying schools of thought on this (as there are with most tiling processes- people go back and forth about what to caulk and what to grout and whether sanded or unsanded is better, etc) but the one thing we’ve learned from our adventures in home improvement is that there’s definitely more than one way to skin a cat. So after extensive research on our part we opted to pass on the membrane since many tile experts told us that the Durock was 100% sufficient for the job we were doing. Hope it helps! And thanks for the tip! We definitely recommend that everyone do as much info-seeking and talk to as many experts as possible to come to a decision that works best for them in every specific situation. In fact here’s a post all about that for ya: https://www.younghouselove.com/email-answer-diy-damage/
Hope it helps!
xo,
s
Lauren H says
Hi John and Sherry,
I just wanted to say how funny it is that we are at very similar places in our lives right now! We are currently working on remodeling our black and white bathroom (http://www.withtwocats.com/search/label/Bathroom) and we are also currently pregnant and due in May (http://www.withtwocats.com/search/label/Baby) It’s so much fun to watch your progress. Congrats!
Lauren
Sandra says
Such hard work! you guys are really earning your remodel!
And you’re so lucky to have such a great dad to help guide you through such a scary process. Make sure you keep that father-son victory picture, because I expect that John and baby P will be posing just like that one day. :)
Jennifer says
Good work guys! It is so exciting to see things begin to come together again. I’m concerned, though, that there doesn’t appear to be a vapor barrier behind the backer board. Are you planning a topical barrier like redgard or Kerdi? Hoping I just missed the mention or those details are coming later. I think someone mentioned in an earlier post the John Bridge forums but they are an amazing resource if you find yourself unsure at any point in the process! Best of luck to you!
heather s. says
This certainly proves that nothing is ever as easy as it seems! Good work on the bathroom!
Victoria says
Keep up the great work, guys! I knew you guys would kick this project in the butt. We started demo on our bathroom back in April and we are STILL not done. Talk about setbacks. We had to pause to replace 50 year old gas line and breaker box. Drama! We are happy to be alive. Happily, we are to the finishing drywall stage. My goal was to be able to shower in our house before the New Year, which we made, so its all details from here on out. I do want to know where you found your 1×6 planking, though. Our kitchen floor was rotten when we moved, even down to planks. We ended up cutting it all out and just replacing with plywood, but I know we have a small hallway that needs some spot plank replacement, once we get around to it. Thanks for any help!
Victoria
YoungHouseLove says
Hey Victoria,
We actually had 2×4″ planking as our subfloor, so that was easy to find at Home Depot. Finding 1 x 6″ planks sounds substantially harder though, have you checked a local lumber yard instead of a big box store like Home Depot or Lowe’s? Hope it helps!
xo,
s
Amy E. says
after demo-ing in late August, taking 3 weeks off for a european vacation, and mostly working weekends, we’ve only just finished tiling yesterday! (detailed on my blog http://entegans.wordpress.com) and that doesn’t include the floor cuz we didn’t touch that! luckily we have another shower in the house, but it’s still trying sometimes.
seeing the tiles go up, that’s definitely a great feeling. and seeing the last of the tiles go in was momentous (and recorded on video for posterity). i’m not worried about you two getting it done, just glad to hear you’re taking the moments as they come and rolling with it. good job!
Emily says
We just bought a 1930s cottage with an original bathroom that looks much like yours. All the sinks and tubs in our house (two bathroom sinks, one clawfoot tub, one tub like yours and a farmhouse kitchen sink with double drainboards) are cast iron. Everything but the sink and tub in the bathroom that looks like yours were refinished before we bought the house less than a year ago. The point I’m getting at is that you definitely shouldn’t cut corners with the refinishing of your tub. Our seller did and we now have serious chipping of the “new” finish and will most likely have to have them removed and refinished properly. Anyway, just a heads up! Bathroom looks great!
YoungHouseLove says
Hey Emily,
We definitely plan to hire an expert and call for references and all that when it comes to getting the tub reglazed. We’ve heard horror stories from people who got someone in on a budget so we plan to splurge for something that will last for the long haul (and even try to see other tubs they’ve done in person before signing on the dotted line). Thanks for the tip!
xo,
s
Cassity @ Remodelaholic says
First of all, Sherry you look so cute pregnant. I hope that doesn’t sound weird! It is just so fun to be pregnant for the first time, I hope you are enjoying it.
Secondly the bathroom is looking great! I can’t wait to see it all done, especially the tile in the shower!. Good luck!
YoungHouseLove says
Cassity- Aw thanks! I really am loving it. They say the second trimester is the honeymoon stage of pregnancy and I wholeheartedly agree. I’m adoring every minute of it. The bean is kicking up a storm lately so that’s exciting and we can’t wait to find out if it’s a girl bean or a boy bean in the coming weeks!
Rachael B- John’s my hero too. Isn’t he the best? We definitely plan to take a bathroom break (har-har) over the holidays to enjoy time with family and friends. In fact we’re both counting down the seconds…
Eryn- Thanks so much for the tip! For anyone who’s not privy, restaurant.com is a great place to score discounted gift cards to favorite dining haunts near you (and not just chains, mom and pop restaurants are on there too) so check it out and enter SANTA at checkout to get 80% off gift cards (we’ve scored a few $25 ones for $2!).
xo,
s
Rachael B says
John, you are my hero…the simple fact that you did all of that work, and remembered it enough to type all of it up!!! You go!!! Where do you find the time!!!
Also, I am re-doing my bathroom…I am glad you two are going first so I can learn from yall!!!
Hope you take some days to rest and enjoy the holidays!
Holly G says
1) love the word mathiness; and 2) always great to see Tom’s face! He is in a class of his own! Great work – I admire your tenacity!
Eryn says
Thanks for the detailed posts! Also, I know you guys keep up with this and just saw Restaurant.com is offering 80% off with the code word SANTA. Happy holidays!
Danielle@Newlyweds Paradise says
O goodie! I love finding more problems out once you get started. lol. It was like that with our kitchen. But you guys are handling it well. Can’t wait for the next post!
Jamie Lee says
I just wanted to say that you’re really lucky to have such an awesome, helpful dad! Good luck finishing the rest!
Leigh-Anne says
You guys rock!
susan says
how cute your daddy is! and how awesome family is, no??? those who will work for food and for fun and fellowship are the best!
your bathroom is looking awesome!!!
way to go!
Barbara in CT says
This post just shows why that TV show, which must not be named, was so worried about the name of your blog. It is so helpful to know some of the pitfalls that can occur. Your attitude, in dealing with them, is even more appreciated. Hopefully, you’ve used up your allotted pitfalls on this project.
John, are you and your father available for rent?
Cindy says
Have you thought about reglazing the tub yourself? We did it this summer and for only $40 in supplies (and another no-shower weekend) we were super happy with the results! We’ve heard we may need to re-do it again in the next 5-10 years, but that was definitely a fair trade in our book for the great price and DIY ability!
Tran says
Our master bath has been out of commission for a few months after I detected water leakage after each shower! After poking and prodding here and there, I pried off a couple tiles this past week. Somehow it was addictive and now we have exposed studs instead of a shower. The bf and I were battling like children to be able to demolition, so I totally understand that you wanted in on the action!
And we also scribbled a little note on our kitchen too! http://homeowned.blogspot.com/2009/04/easter-eggs.html
Jenni O says
oh good lord…you really are reliving our bathroom remodel down to the tiniest details. Ah, the day we too realized we needed to beef up the studs so the walls woulds once again line up with the drywall was a good one. So was reinforcing a wall AND ceiling joist from old plumbing leaks. AND the day we had a big rainstorm and we too noticed the not so tiny drip of water that we realized came from a leak around the drain pipe leading out of the roof! Fun times. Just wait till you start tiling that floor and realize the walls aren’t *quite* square.
Lindsay says
Good luck with the rest of the Reno!!! It never is that easy but you’re hanging in there pretty well!
Lindsay
Jennifer says
Hi Sherry,
I don’t at all mean this to sound argumentative, I just want to be clear we’re talking about the same thing. It can be confusing with so much terminology floating around, but what I’m trying to discern is if you stapled any type of moisture barrier (such as roofing felt or 4 mil plastic sheeting) to the studs before hanging the Durock?
I know there are many ways to approach a project like this, but I’m afraid that you were given bad advice if you were told that the Durock alone was sufficient. It is not waterproof, nor is tile or grout and any moisture that gets through to the studs and/or stud cavity is very bad news. While water will not be standing on your shower walls, it will still get soaked several times per day. Since I know you guys like to be thorough and renovate for the long-haul, I just had to put that out there! There is lots of info to be had online but here is a thread on GardenWeb that discusses the specific requirement of the Tile Council of North America. Most locales use TCNA guidelines as code for shower construction:
http://ths.gardenweb.com/forums/load/bath/msg081009223434.html
I know you guys get so much advice from your readers and you handle it all so well! Good practice for all the unsolicited parenting advice that will soon be coming your way, if it isn’t already! :)
Best, J
YoungHouseLove says
Hey Jennifer,
As we mentioned, many experts will say different things so we’re not surprised that you’re pro moisture barrier while we opted to go without. The experts we chatted up said hanging a moisture barrier before hanging Durock was not necessary since water will pool in the tub and our shower walls merely have to deal with runoff. And although both tile & grout can absorb a bit of water and Durock holds up to water but isn’t waterproof, neither is mortar (which we recently removed after 50+ years of use to find no rot, mildew or mold on those studs!). We plan to use this bathroom for the long haul so we weren’t about to take any shortcuts! And just to ease your mind we dug up a number of online tutorials that also skip the moisture barrier:
http://www.doityourself.com/stry/ceramicwalltile
http://www.ehow.com/how_5007681_install-cement-board-under-tile.html?optype=text
http://www.ehow.com/how_5174942_tile-shower-walls.html
We especially loved this great video: http://www.tileshop.com/DIY/index.aspx
By contrast we know you can dig up just as many links that suggest using a moisture barrier and we definitely know all about conflicting advice (unsanded vs. sanded grout, caulking shower seams vs. using grout). The best anyone can do is research things and make an informed decision that works for them. Hope it helps!
xo,
s
Crafty Woman says
oh my…this brings back memories (or is it NIGHTMARES?!) of our bathroom remodels…we’ve remodeled FIVE of them! One in the first house, 2 in the second house, and 2 in this (current) house. It was ESPECIALLY FUN in the 1st house that had only ONE bathroom…not!
Tracie P says
The bathtub in our 65 year old house is curved just like yours! We’re planning on tiling the floor at some point, and all I can think is how much fun cutting those tiles will be!
jbhat says
I too am impressed that John felt up to re-capping all of that for us after actually doing all of it too. What an enormous project. Does this rate higher or lower on the difficulty scale than the kitchen re-do? I vote higher.
Amy says
Hey!
it’s looking so good!!! one question- did yall move the shower head up? in one of our bath reno’s, we moved the shower head up to a more appropriate height, but it took quite a plumbing manuever to do it!! just curious~
thanks
:)amy
YoungHouseLove says
Jbhat- Good question! The kitchen reno was four whole months of insanity but the level of difficulty was nowhere near that of the bathroom so far (which can be compared to a rigorous sprint while the kitchen was more like a moderately paced marathon).
Amy- We didn’t raise the shower head since it would have called for some pretty major plumbing maneuvers and luckily we both thought the original height was just fine as it was (even my 6′ man agreed). Of course it would have been nice to have a super high shower to cascade over us but it just seemed like a huge undertaking so we opted to work with what we had. Hope it helps!
xo,
s