As if our bathroom didn’t already make it abundantly clear during the demo process, the act of putting things back together certainly proved that renovating an old bathroom is a lot of work. And it’s almost always full of surprises. Nothing we couldn’t handle though. Let’s just say we were kept on our toes.
As you may recall from this post, my dad just DIYed two separate bathroom remodels this year in his own home and kindly volunteered his time, expertise and tools to help us with ours (hooray free labor – although there was some obligatory feeding involved). So I took two days off of work to give the three of us a four-day-long-mega-weekend to whip our room back into shape. And yes, once again, the bathroom whipped us right back in return.
You may remember that that bathroom looked like this after my weekend o’ destruction:
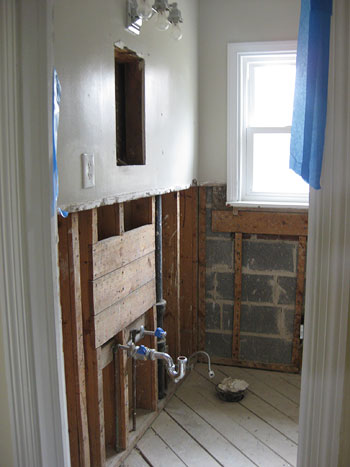
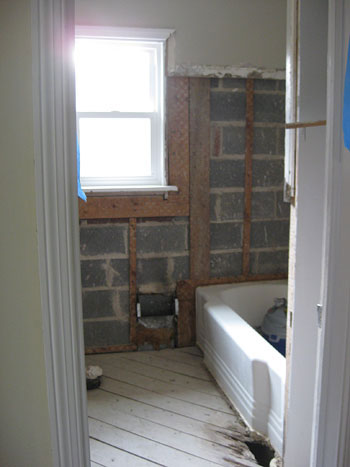
The plan for the following weekend was to begin putting everything back together: install new drywall on the walls, hang backerboard wherever tile was going, repair the rot in the floor, and tile both the shower/tub surround and the floor. My dad was actually able to hang drywall in both of his bathrooms in just a few hours and spent another day or two tiling them so Sherry (the most ambitious of the group) had big dreams that the room would be ready for showering and, um, other unmentionables by Day Four. I, on the other hand, just wanted to not die from exhaustion. Spoiler alert: only one out of the two goals were accomplished.
So here’s how it all went down- er, up.
***********************************************************
Day Zero / Shopping Day (Thursday night): My dad arrived shortly after I got home from work and a’shopping we went with list and room measurements in hand. Key items on our list included: enough hardibacker (aka cement board, aka backerboard, aka Durock) to cover the shower surround and floor, greenboard (which is moisture-resistant drywall) for the other walls, 3/4″ plywood to lay a super sturdy subfloor and some new 2x4s to repair the rotted floor planks that we uncovered. Plus some other little things like cedar shims, a couple of boxes of 2″ and 3″ drywall screws and a masonry blade for my dad’s circular saw (to cut the plywood and hardibacker – we were buying 1/2″ hardibacker, which is pretty hard to score and snap).
Here’s where we met hitch-in-the-plan #1: both the greenboard and plywood were too big to fit in my dad’s giant minivan. We were all shocked. Shark farts (30 Rock anyone?). No worries, Home Depot rents a truck for $19 for 75 minutes – plenty of time to get home and back. However it was 15 minutes ’til closing and HD didn’t trust us to keep the truck overnight. So the greenboard and plywood got to spend the night at the store while everything else came home with us.
***********************************************************
Day One (Friday): Our first full day kicks off with me and Sherry retrieving the oversized purchases thanks to the $19 Home Depot truck rental. Bonus: it’s also great for transporting a breakfast of Einstein bagels.

Along with the greenboard, plywood and bagels – we also picked up a bunch of furring strips to beef up our studs (hmmm, maybe in the future I should avoid using fur, beef and studs in the same sentence for search engine purposes). Anyway, the furring strips would help us solve hitch-in-the-plan #2. One challenge we didn’t think through was the fact that we would have to make sure the new walls matched up perfectly with the old walls. And the walls in our bomb shelter of a bathroom were inches of insane mortar, plaster and metal-mesh, which made them extra thick. It wasn’t an option to set the walls back a few inches to gain the space since we were keeping our tub, so the new walls had to come out and meet the edge of the tub just as the old walls had. Hmm…
And because our extra thick hardibacker was still only 1/2″ thick, we couldn’t screw it directly onto the studs because that would set it back about 2.5″ from the edge of the tub and the rest of the walls in the room. Instead, I had to securely nail two layers of furring strips to every single stud before screwing the hardibacker into place to beef things up so the hardibacker would be even with the walls and tubs. Oh and here’s a tip, we used super long screws that could pass through both added furring strips and into the studs/existing furring strips so everything was secured together with one long corrosion resistant screw. This way things can’t wiggle loose as they would if you only secured one furring strip to the other which was attached to the stud with a separate short screw. It’s all about sandwiching everything together for a secure and super deep hold.
All this furring strip action wasn’t a hard task, it just ended up being extremely time consuming. In fact it was still early afternoon by the time we got our first board in place:
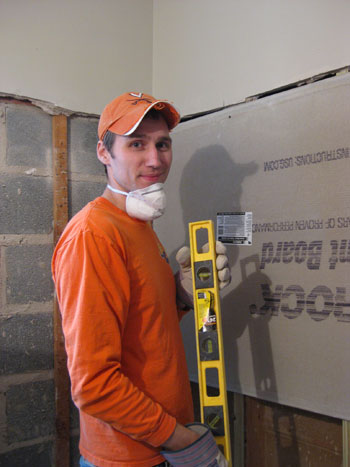
See that look on my face? That’s blissful ignorance. That’s because it’s before we realized our big oversight. Sherry and I always talked about running our subway tile all the way up to the ceiling. But that requires hardibacker being placed all the way up to the ceiling too. And as you can tell in the photo above – I hadn’t demo’d those top two feet of plaster/mortar/metal-mesh because we assumed we’d just line up the backerboard and tile everything. Baaaad idea.
After consulting more than a few experts – including people at my dad’s tile shop and the folks at True Value – our fears were confirmed: tiling over painted plaster and mortar is a big no-no (unless we heavily scored the paint and bought a special kind of latex- based mortar which was still an “iffy” short cut according to many). Call it hitch-in-the-plan #3 if you will.
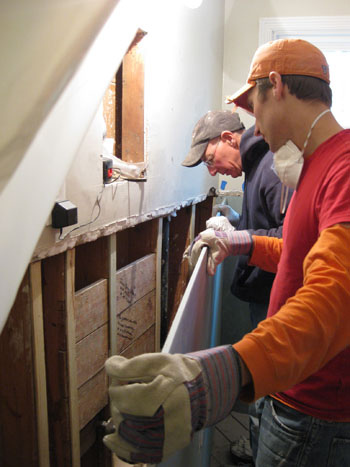
So off came that first piece of hardibacker that we had so proudly attached. And then a couple of hours were dedicated to demolishing the remaining plaster, mortar and metal-mesh walls around the top of the shower (and cleaning it up). For a look back at how serious that demo gets, check out this post. Fortunately, even after all of that tearing-apart, there were still a couple of hours left in the day (and a few ounces of energy left in us) so we were able to get most of the hardiboard around the shower installed. And in the end we were glad we didn’t take any shortcuts like trying to tile over the old painted mortar and plaster walls. We’re all about making this bathroom last for the long haul.
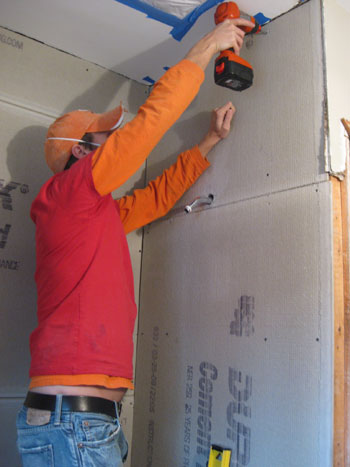
Then we ordered Chinese food. Nothing like a fortune cookie to end a busy day.
***********************************************************
Day Two (Saturday): On Saturday morning my dad and I threw our dusty clothes back on and got right to work finishing the hardibacker in the shower (yes, I will admit upfront that I wore the same outfit for four days straight without a proper shower- there was lots of sink hair-washing and washcloth bathing). Well, actually, if I’m being honest – that was after an early morning trip to the store to get more furring strips, some extra screws and a few other miscellaneous items. Running out to grab a few miscellaneous items is par for the course in most renovations, especially of this scale (the official count: four trips at this point in the weekend already).
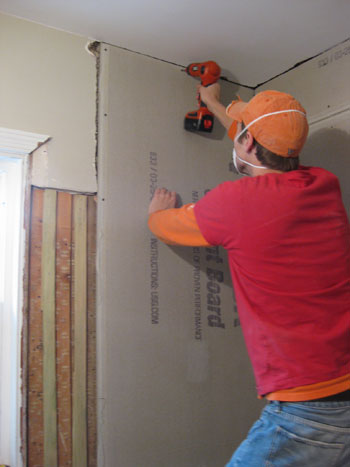
With that done we could finally turn our attention to hanging greenboard on the remaining walls under the window and behind the toilet & sink that will be tile-free. I’ll spare you gory details, except to say that it was easier to cut than the hardibacker (hooray for just scoring and snapping!) but it involved lots more math and measuring (cutting around the window, heating vents, etc.) And lest we forget all the furring that was required before any piece went up to keep things flush?
Fortunately, although time consuming, the walls were pretty much a one man job. That meant it left one of us – my dad – to finally stop ignoring that rotten spot in the floor.

The rot only affected two planks and the top of two joists (one under the edge of the tub). So it was a relatively straightforward task of replacing the planks and reinforcing the joists. Here’s what it looked like with the nasty planks cut out and removed.
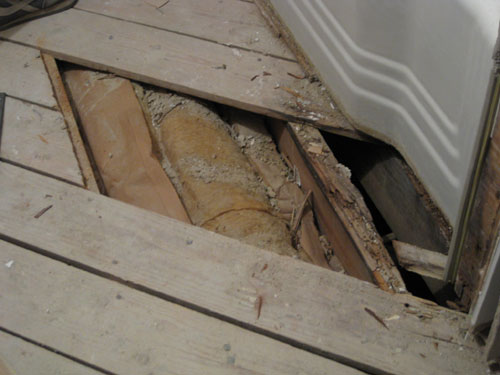
From there, my dad cut some 2×4’s that he could Liquid Nails and then screw into the side of the rotted joists (fortunately it was just the tops. Basically, since we couldn’t rest the new planks on the old uneven joists, we had to create new, solid joists that sat parallel to them. Once those were in place (and boy were they solid!) my dad installed fresh planks where the old ones had been. And voila – the crazy old diagonal subfloor was as good as new:
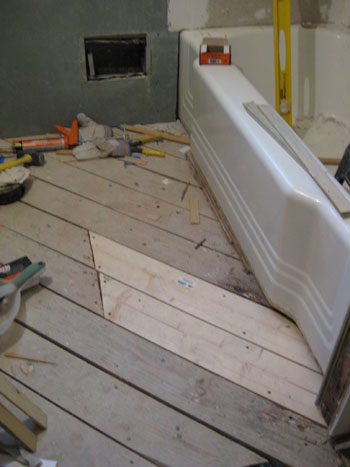
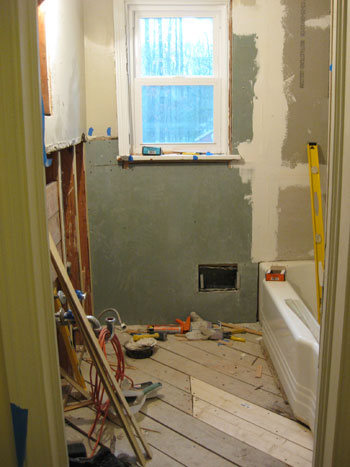
So we wrapped up Day Two by taping and mudding the shower surround so that it would be dry in time to begin tiling on Day Three… despite the fact that we still had one long wall left to install greenboard on (see the one on the bottom left?), not to mention a piece of plywood to install on the floor to reinforce everything and bring it up to a height that matches the rest of the house. So yeah, maybe tiling on Day Three was a lofty goal…
***********************************************************
Day Three (Sunday): Like the days before it, Sunday kicked off with a miscellaneous supply trip to the home improvement store – this one included things like paper towels, a metal corner fitting, some extra mudding tools and (yes) more furring strips. Oh, and we grabbed a few plastic drop cloths because Mother Nature wasn’t cooperating. Heavy rain + cutting drywall in a detached garage = the need for some way to transport things into the house without allowing everything to get drenched.
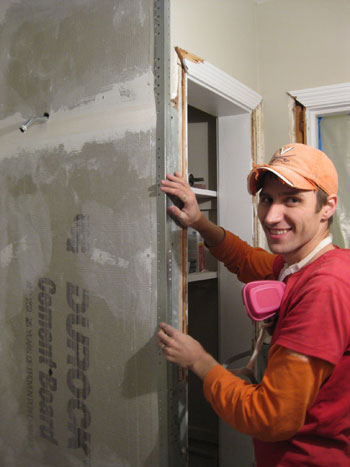
The third day included simple tasks, like fastening the metal corner fitting to the wall:
And not so simple tasks, like installing our biggest piece of greenboard yet (about 8ft by 4ft) – which involved cutting four perfectly placed fixture holes. It actually wasn’t that difficult (thank goodness mathiness runs in my family). But then we hit hitch-in-the-plan #4. I noticed a pipe leaking in the wall. Crud. It wasn’t a big leak, but enough that it made me grateful to be discovering it before installing new moisture resistant drywall over it (it’s not like the stuff’s water proof- and nobody wants a leak in their walls!). So at least we saw it before sealing things up.
After some investigation, my guess/fear that we knocked something loose during demolition was wrong. It was actually a tiny leak in our roof (the pipe extended all the way up the wall and through the roof) that was dribbling down the outside of the pipe behind the wall. We’re not sure how long it had being doing it but, again, we felt lucky to be noticing it at the perfect time to take care of it. Apparently the heavy rainstorm that day was a blessing in disguise!
So off I went to the store (trip #6) to get some silicone caulk to plug up the leak in the roof from the interior for the short term (the long term solution will involve getting up on the roof with some tar). Who would’ve guessed that our bathroom remodel would be sending me squeezing into the narrowest section of our attic – oh the “pleasant” surprises of home improvement. At least it solved the problem (though I do have a trip onto the roof in my near future to solve the problem more permanently).
And speaking of surprises, Sherry and I thought we’d leave one in the wall for whomever renovates this bathroom next. Before placing the last piece of greenboard on the wall behind the sink, she scrawled this note onto one of the boards: “John & Sherry (& Baby P) were here on Dec 13th, 2009. The question is: who will find this note? Someone else? Or us in 50 years when we’re renovating again?”
At least if it’s us finding it again we’ll be better prepared for what’s required to get ‘er done in this crazy high-maintenance bathroom of ours. And if it’s not us, hopefully that person will be grateful it’s just simple greenboard between them and the studs instead of inches of mortar and metal-mesh.
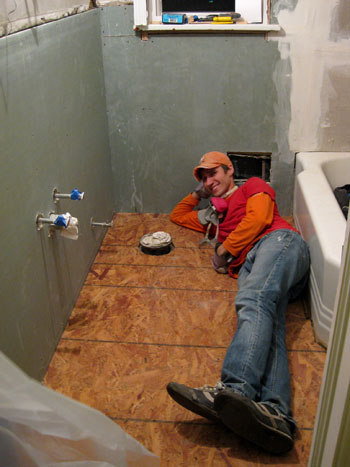
With Day Three quickly coming to a close (and still not having even touched tile thanks to various time-consuming set-backs) we managed to find time to at least lay the new plywood subfloor that my dad and I had measured and cut earlier in the day (it only took three tries to get it perfect – a victory considering the fact that our tub is curved). And we were really happy with our decisison to use 3/4″plywood over the 1/4″ stuff. It really made the floor super solid (less flex= longer lasting tiles that don’t crack) and raised it up to be level with the rest of the house so there wasn’t a tiny step down into the bathroom. Things might be taking forever but at least we were being thorough. Oh and in case you’re wondering, our trip count to the home improvement store was at seven at this point. Yes seven trips in a little over 72 hours.
Here I am enjoying our new, super-solid subfloor. And yes I realize my head is right next to the “toilet hole” (again, that’s a technical term).
***********************************************************
Day Four (Monday): Let’s just say that by this point things start to get a bit blurry. After three long days of construction, our brains weren’t working at 100% anymore – but we were more determined than ever to open a box of tiles. And luckily there was only one task standing in our way: cutting the hardibacker for the floor. (Oh, and trip #8 to the hardware store took place. I have no memory of what we bought since by this time the shopping trips were blurring together).
The good news is that cutting the hardibacker to fit the floor was relatively painless. We just used our cut plywood to trace the shape onto our hardibacker so it would go in perfectly. Then, in a shocking turn of events (I’m kidding, nothing was shocking at this point) we decided to not install it, since we worried that days of walking over it would just lead to crumbly and dusty cement board with dings and drips on it (i.e. not a good surface for laying tile). After all, we still had to finish all of the tiling, mudding, sanding, priming and painting before introducing our pretty new marble tiles into the room.
So with the hardibacker for the floor cut and laid to the side for later installation, what was next? TILING! Yes, it was lunchtime on day #4 and we could finally bust out the wet saw and thinset so that we could start getting those subway tiles on the wall. But you know what, that’s a topic for another day. We actually have a full tiling play by play in the hopper for ya. But for now, let’s just say some tiling was completed… and despite all of the rigorous and exhausting work, we still ended the four-day weekend with smiles on our faces (and all sorts of dirt under our fingernails).
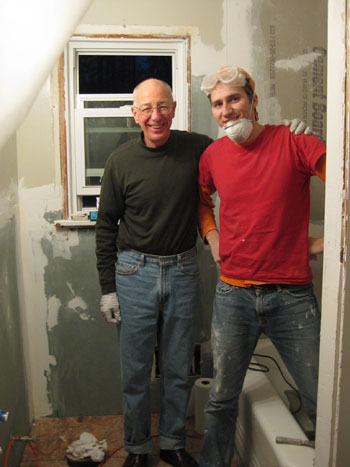
And, of course, we owe a HUGE thank you to my dad for imparting all of his fatherly knowledge and remodely ninja skills on us. And for being so patient and helpful when it came to all the challenges and unforseen curveballs thrown our way by this old-but-loveable house of ours. We figure all of these hitches will just make our big victory in the end that much sweeter…
Psst- Wanna read about the first two chapters of the big bathroom makeover? Check out Chapter One right here and Chapter Two over here.

Ashley @ SouthMeetsSouth says
You officially have me scared. I think we’re calling in professionals for our bathroom remodel…. at least the heavy duty stuff. I don’t think we have the remodeling ninja skills like y’all!!
Stacy says
Wow. Just…wow. I think you guys are insane. And amazing. :)
Hally says
Hey guys-
Great job, love reading your reno adventures. Someone may have already mentioned this, but does no one else find it amazing that Home Depot didn’t trust you both with the truck over night? If there’s anyone to trust it be you two, your dad, and your blog!
YoungHouseLove says
Hey Hally-
Our thoughts exactly! They were just following their policy but we thought “hey, we’re practically family here” so we were shocked when they sweetly said “see you in the morning.” Oh well, we’re rule followers anyway so we probably would have worried about the truck all night if we took it home with us!
xo,
s
anna see says
Shark farts, indeed. This reno is no easy task. Keep it up guys, you are doing great.
sasha says
I just wanted to say thank you for posting this. You have really broken it down into aproachable parts. Someday when do these things I know I will be less hesitant to a DIY option. Thank you again.
amanda says
Oh wow, I am so glad we didn’t have to gut our bathroom. My sister’s bf JUST remodeled my mom’s guest bath (a Christmas present from all of us-we bought, he worked). She’s had a new vanity sitting in her garage for a year. He has been staying at her house w/ my sister over a month after back surgery & I think he got bored doing nothing. The house was a mess for about 4 days, but it looks amazing! I wish we had thought to take before pics.
Just don’t forget about your local hardware stores while remodeling. We kept going to HD & Lowes, but remembered an old hardware store that was only a couple minutes away when we had to run and get something for the sink. They were so friendly and helpful. The guy who I think was the owner was very knowledgable. We had a kid cut some copper pipe (which from what I hear is expensive) then asked about something else, and the owner was like, why don’t you use the newer stuff? We were like, well we didn’t know and he already cut it. He just threw it aside and showed us the new kind they use and it was so much easier. I never get that kind of service at the chains!
YoungHouseLove says
Hey Amanda,
You’re so right about that! We love calling the folks at True Value and even a local plumber friend of ours for help along the way. The little guys definitely come in handy with all of their knowledge and one-on-one customer service!
xo,
s
Pamela says
It took me a while, but I finally realized that the “4-day weekend” was not this past weekend. Richmond may not have had the record breaking snowfall we had in DC, but I was worried about your safety had you been running back and forth to HD during Saturday’s blizzard!
YoungHouseLove says
Oh yeah Pamela, good point! We’re running a week behind with posts since it takes a while to upload the pics and write about every detail. So our big 4-day weekend of work with John’s dad was actually the weekend before this past one (so we didn’t have to deal with the snow). Thank goodness or we never would have gotten anything done!
xo,
s
Tracey says
I’m glad that’s not me doing all that hard labor but at the same time, i’d love to have a house to totally redo… One day… So what’s the ETA on a complete bathroom looking like for you guys? Do you think you’ll be done by Christmas day?
YoungHouseLove says
Hey Tracey,
Good question! Our goal is to be around 90% finished with the bathroom by Jan 4th when John goes back to work and then to just grab little finishing accessories that week to get the total “after shots” before Jan 10th or so. The bulk of the work (tiling, grouting, priming, painting) will actually get done before Christmas (barring any sort of unforeseen disaster) but then we’ll take some time off to be with family so it’s nice to have the early January goal as a buffer of sorts. Hope it helps!
xo,
s
Jason says
Good work on your house remodeling! I wanted to point out if I may, without sounding rude, just a point or two with your bathroom remodel. As you say, there may be different opinions on some aspects, but the lack of any vapor barrier or surface applied membrane in your tub surround is not up to any industry standards. Everyone is at liberty to do their work on their house in their own way. I’m just pointing this out for anyone that may be reading and following your lead.
I remodel bathrooms for a living and have torn out over 100 showers and tub surrounds. Having the appropriate membrane is crucial for a watertight and mold free bathroom.
I’m also curious as to what you used that you called a “water-proof” joint compound. I’ve never heard of such a product. Do you know what it is called?
Congratulations on your home and continued work!
YoungHouseLove says
Hey Jason,
Thanks for the kind words! We certainly appreciate your expertise and your comment is a great reminder to everyone that collecting many expert opinions beforehand is key to making an informed decision that works for your home! As we’ve reiterated in our comments to Jennifer above, we opted to pass on the moisture barrier after talking to many experts about our specific bathroom setup (people who build houses, tiling pros, contractors, even plumbers!). The advice that we received led us down a different path (and away from the use of a moisture barrier) but we’re always open to alternate ideas and solutions for future projects and we encourage all of our readers to do their own research to suss out which solutions will work best for them and their home. Hope it helps!
xo,
s
Amanda says
Good job so far! You are lucky to have your dad to help you guys. Can’t wait to see the finished product which I am sure will be beautiful like the rest of your home… Just don’t know how you are doing without a bathroom for so long….
YoungHouseLove says
Hey Jenae,
You’re so funny! I’m also on the edge of my seat for the next installment of the big bathroom reno but that’s because it’s TILING! And it’s so much fun. It’s finally starting to look like a bathroom in there again. Wahoo!
xo,
s
Jenae says
I couldn’t wait to hear what happened this weekend with the bathroom! Its so silly but I couldn’t wait to read the post! I love all of the tips and advice, I wish my husband was a little more handy, I’ll have to have him read this next time we tackle something. I appreciate the reality of it as it seems almost every little thing like changing a light fixture that I have tried has always had some sort of hiccup. Can’t wait for the next installment!!
Jessica says
Wow! You’ve accomplished so much already and it’s looking really great. I’m enjoying reading along–like other readers, reliving a bathroom redo (or three) of my own, and kind of relieved it’s not me showering at the gym this time ;-). I can’t wait to see the finished room (though I’d imagine you’re looking forward to that a lot more than the rest of us ;-)).
Christine says
You guys have NO IDEA how timely these bathroom remodel installments are. I know I’ve said this on every other bath post of yours, but we are just a few days behind you (at least in your posted progress) with our DIY bathroom remodel, and your detailed account of what you’re doing is fantastically helpful. My husband stripped the tile off and got the walls and shower ceiling to the studs over the weekend, plus installed a new window in the shower stall. Today he’s been installing an exhaust fan and laying insulation so that tomorrow he can lay vapor barrier and start the cement board. So, needless to say, you’re helping! Keep up the posts!
edthedawg says
You’ve heard this a few times but maybe hearing it again will hammer the point home. You’re doing beautiful work, you’re investing heavily in your home for your family, and then… you skipped out on a waterproofing membrane that could have massive ramifications down the road for you!
Shower walls take a HARD beating of water splash. Tilework, grout, sealers, thinset, Durock – none of that is waterproof. It will soak thru the board, into your framing, swell the wood, pop tiles, grow mold inside the walls – any number of nasty things. That’s not a maybe, might-could, or I suppose – it’s as sure as sunshine.
The good news – You can salvage what you have here!!
I had the same problem!
Just soak that joint compound, scrape it and the tape off, re-tape w/ alkali-resistant mesh tape & thinset, then apply a liquid waterproofing membrane (something like RedGard), and then tile as you were. This is like, less than $100 in materials plus a couple hours of work. And you’ll guarantee yourself decades of good service, vs. wondering what might be happening in your walls.
Everyone at the johnbridge.com forums is pulling for you to make the right call here :) Waterproofing shower and tub walls is a critical, necessary, code-mandatory item – don’t matter what “pro’s” feel they can get by without it…
hope this helps – keep up the good work!
cheers from CT!
-Ed
YoungHouseLove says
Hey Ed,
Thanks for your concern and your comment! We can assure you as just we assured Jason and Jennifer that we researched the heck outta this project and although we heavily considered a moisture barrier we opted to follow the many experts who advised against it in our particular situation. Just as many pros disagree about whether to caulk seams or grout them and argue about lining Durock up with the lip of the tub vs. raising it a bit, there are many conflicting tiling opinions and after much consideration we made our choice and feel great about it. In fact we’ve since completed tiling the entire shower surround and it looks fantastic!
Many contractors/tiling experts do not use moisture barriers for shower walls and many shower-wall-tiling tutorials do not include them. Of course we’re aware of other sites and experts who love them, but we’ve found that most DIY projects bring out conflicting opinions (all of which we respect) and it comes down to choosing the right path for you. For instance, when we ripped out our 50+ year old mortar walls, there was no membrane to be seen and although mortar is porous there was not an ounce of rot, mold or mildew on any of the existing studs. Even after 50+ years of shower usage! In tiling it seems as if there’s more than one “right” way to do things and opinions are equally abundant so to each his own!
xo,
s
erin p. says
our bathroom is going to be our next major project but we probably wont start till spring/summer after we add a shower to our half-bath…so we have a place to cleanup in the meantime, so I can’t wait to see your finished project to steal some ideas :) its looking good so far!
Karen says
Okay, I’m just curious — how far do you have to go to get to HD or TV? I’m totally jealous of anyone who has a hardware store within a 10 minute drive. Those 7 trips in 72 hours would have taken me…72 hours!
YoungHouseLove says
Hey Karen,
True Value is a ways away (around 45 minutes) so we make the trip out there to really chat up experts for a while. But for quick trips for things like drywall or drill bits we have a Home Depot and a Lowe’s about 15 minutes away. Which is a very good thing when you’re making a gazillion last-minute trips like us!
xo,
s
Marty says
Just wanted to chime in. Just stumbled on your site which is really well done and interesting. I’m a first time homeowner as well and I’ve almost finished my second bathroom complete overhaul.
I hope it all works out fine with your shower and nothing has to be redone down the line–honestly. I just want be as helpful as possible for future DIYers. Skipping the waterproofing membrane (either plastic or roofing felt attached to studs behind backerboard, or using a roll on membrane on the bathroom side of the backerboard) WILL lead to eventual failure of the tiled walls in your shower. Also, the seams on your backboard should be taped with alkali-resistant tape and filled with a cement based mortar–not with joint compound that will just erode when water hits it.
The links you posted to ehow and diynetwork are notoriously erroneous with their advice and people are much better served consulting expert contractors, or at least have input from experts in the field, such as on the John Bridge forums. No one on that site would have led you astray if you asked for advice.
Again, not trying to be critical, and I hope your install works out, but in an effort to help out your followers, the same mistakes shouldn’t be replicated if possible.
YoungHouseLove says
Hey Marty,
Thanks for your comment! Sherry has responded to this concern so you can scroll up to read our thoughts on the matter. After tons of research we’re extremely happy with our decision. We not only chatted with tiling experts and contractors that we trust who specifically said a moisture barrier wasn’t necessary for us, we also heard from a few pros who were adamantly opposed to the use of a moisture barrier since cement board and other non-waterproof materials (like mortar) have routinely been used for decades without them (they believe these barriers trap water that would otherwise evaporate, causing more harm than help).
My father recently redid two bathrooms in his own home that were heavily used for over 30 years and there was no moisture barrier behind the cement board that he removed. There was also zero rot, mildew or mold to be found! We also removed mortar from behind our tiles (which is by no means a waterproof material) only to find perfect beams and studs without any sign of moisture, rot, mildew or mold after 50+ years of use! There are just two schools of thought on this subject and we subscribe to one and you subscribe to another. I’m afraid we’ll just have to agree to respectfully disagree! Either way we encourage all of our readers to do their own research and draw their own conclusions when it comes to what’s best for their house. To each his (or her) own!
-John
Marty says
That being said, many contractors would advise differently as you point out. There is a very wide variety in the quality of work done by professionals. Many professionals would have done what you did, or not even used backerboard at all. I’m just trying to point out the “best” way to waterproof your shower for a life-long trouble free bathroom.
YoungHouseLove says
We wholeheartedly agree Marty! We just believe that there are different “best ways” depending on what individuals learn, their specific situation and how they see things! Clearly there’s no right answer here when 50% of pros and contractors do something one way and 50% do it another way, which is why we encourage everyone to do their own research and draw their own conclusions… conclusions that are “best” for them and their home!
xo,
s
Miss T says
Love that you guys put that note under the boards. And how good is your Dad helping you out. Best of luck getting it all done!
Julie K says
John & Sherry,
I just want to commend you on your amazingly polite responses to the numerous concerns about waterproofing your bathroom walls. I know that people are well-intentioned and want you to make the *best* decision possible but in your shoes I would go crazy! I come from a family of construction pros and anytime I tackle a project someone has to plant the seed of worry that I didn’t use the appropriate materials or process.
Kudos to the both of you!
YoungHouseLove says
Aw thanks Julie! We’ve learned that sharing our home’s transformation with the world means that people sometimes drop in with conflicting opinions. Decorating is certainly subjective (everyone has a different idea of what looks good) and we’ve even learned that DIY approaches can also be subjective (there’s usually more than one “right” way to solve a home improvement problem). That’s why our goal is always to learn whatever we can, make a decision that we’re happy with and then be respectful of other people and their opinions- even if they oppose our carefully thought out choices. It also helps to remember that they’re just trying to help, so we don’t mind further explaining why we did what we did!
xo,
s
Jonel says
Here is my bathroom remodel old/new pics
http://www.facebook.com/photo.php?pid=3033547&l=b34c7af72b&id=727754144
while I didn’t DIY, I don’t think I could have done it with my BF (I think he would strangle me after day 1) since it would have been our first major DIY project. I don’t think we are up to that status to tackle big projects of that size. We only have one full bathroom and a random toilet in the middle of the basement (absolutely disgusting). It was well worth the money and hassle, although the million and one endless trips to Home Depot and Lowe’s got tiring after oh day 1. I seriously hate those places and dread going in them to this day. It took forever to do my small bathroom.
Looks like you both are doing great and I am sure it will come out awesome.
Krista Haws says
I admire you two for all of your hard work! It looks like it’s coming along great! Good job for hanging in there!!!
Lynn says
Hey guys, the bathroom is coming along great! Thanks for the inspiration. Question: What is your bathrooms measurements?? I am dying to redo my bathroom but I don’t know if a coventional tub will fit.
Its small 81.5″ X 88.5″. What do you think?? Do looking forward to more pics!
YoungHouseLove says
Hey Lynn,
Our bathroom is around 7 feet long and 4 feet wide (until you hit the edge of the tub, so add the width of a standard tub to get the full width of the room). As for if a tub will fit in your space, just find the one you want and tape off where it would go on the floor to get an idea of how cramped (or not cramped!) the space will become. Hope it helps!
xo,
s
Deb and Drew says
Hey Guys,
Love the site. About 5 years ago, my wife and I bought a 1959 house not unlike yours. Asbestos rocks man!
Im redoing the bathroom and kitchen, hopefully finishing the basement soon (although my studio sorta likes the inspiration of raw joists and air ducts).
Ive got some ideas for really opening up rooms if they have closets. Ill have to send ’em your way.
Cheers
Drew Young (yeah its really a Young House)
YoungHouseLove says
We’d love to see those pics and ideas! Definitely feel free to send them our way. And good luck with those bathroom, kitchen and basement makeovers!
xo,
s
Fiona says
You have been very polite in the face of much feedback, but I have to ask–is it cost that made you skip that step? I would just err on the more conservative side myself, but that’s me.
Anyway, impressive renovation!
YoungHouseLove says
Cost definitely wasn’t an issue- we’re all about doing things right. And membrane is actually super cheap. We just chatted with a slew of experts (many who believe membranes actually trap in moisture and create more problems than materials that allow moisture to pass in and out of the walls freely without collecting anywhere) and weighed the fact that our bathroom had no membrane for the past 50+ years (without any wood rot at all) which made our decision easy. But again we encourage everyone to be informed and make the decision that’s right for them!
xo,
s
Mike says
Hello YoungHouseLove!
My wonderful girlfriend is a huge fan of yours and so, before I embark on my own bathroom adventures, I thought I would give your redo a check. Needless to say I’m very impressed! So much so, that I thought I would bug you with a quick question :). Industry specifications (as I understand them) for plywood panel subflooring requires a 1/8″ spacing between the panels and a 3/4″ spacing between the walls and other vertical obstructions. In the above picture with Mr. YoungHouseLove laying proudly on the subfloor, I believe I can see the 1/8″ spacing between the panels, but I can’t quite see the 3/4″ spacing at the walls. Does the drywall cover it?
Thanks for the help!
~Mike
YoungHouseLove says
Yup, it’s a very small space so it doesn’t read well in photos, and the drywall does obscure a lot of it. Hope it helps! And good luck with your reno!
xo,
s
Michelle @ Ten June says
THIS is what I will be doing all weekend! Exactly! My husband and I are renovating our 1952 ranch’s master bath. This weekend, we’ll be installing the hardibacker walls and getting everything ready to be tiled. We are also going to attempt to install a pocket door in the middle of our rectangular bathroom, to make a water closet. THANKS again for your advice- it is getting us through this process!
Brett says
So… tiling to the ceiling is a pretty normal practice. We had the basic 5 ft up tile from a 1980 built house. I was demoing up to the top of the orignal tile and was wondering if I should go on up. I know the fact that it had drywall all the way to the tub w/ greenboard makes it seem necessary to take all the drywall off to the ceiling and hardybacker it up and tile to the top.
YoungHouseLove says
Oh yes I’d go all the way up and use hardibacker so it stands up to long term use/moisture. Good luck!
xo,
s
Julie D. says
John, we are working on a reno in our bathroom that is of the same era as yours was. I tried to look back through the posts, but couldn’t find anything.. did you run into any trouble getting your shower fixtures off? We need to cut the cement board to fit around the pipes, but it seems like the fixtures are so old we can’t get them off. Any tips or tricks?
YoungHouseLove says
Hmm, unfortunately I don’t recall having any issue getting them off. Although I do believe they sell some sort of grease or oil that you can use to try to make joints like that loosen up. I don’t recall the name so you’re probably best off asking someone at your favorite home improvement store. Good luck!
-John
Mike Faircloth says
Wow, what an undertaking. Great job tackling all of the challenges presented to you. Congratulations!
Chad Pfeffer says
I am thoroughly impressed with all the work you did on your bathroom. Being in the construction business, the problems you run into are endless but it sounds like you went with the flow wonderfully! Keep it up!