When we say we’re “tackling a room” it’s usually a figure of speech, but in this case it’s pretty close to being a literal description of our big bathroom demolition weekend (check out this post for more info on why we’re doing it and this post for our plan for the space). The biggest surprise from our weekend of knocking stuff out and gutting the room? Well, the bathroom sorta tackled back.
Before we could be all “in with the new” we had to take care of that pesky “out with the old” part. Here’s what the bathroom looked like once we cleared all the simple stuff out (baskets, shower curtain, mirror, rug, etc). We told Burger to say goodbye and he wasted no time…
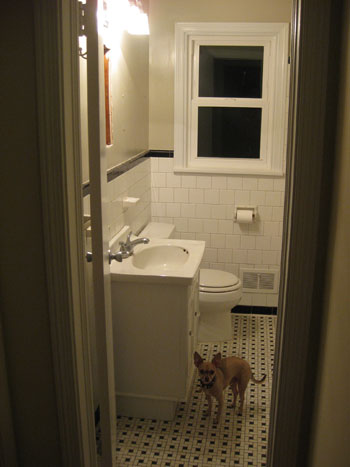
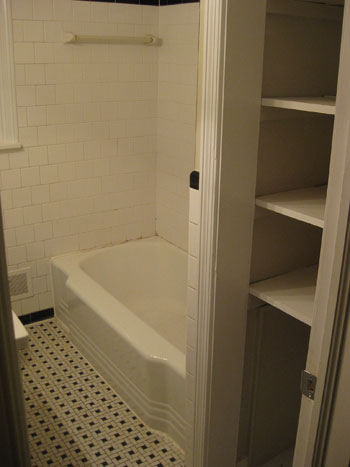
Then Sherry helped me remove all of the fixtures (toilet, vanity, faucets, shelves, shower curtain) and it was up to me to demo out the tiled portion of the walls and the entire floor (since Sherry’s busy doing other important things these days). And demolishing wall and floor tile was actually something I’d never done before (neither had Sherry, and boy was she sad to miss out on the fun). But how hard could smashing stuff up really be? Famous last words, right? After some online research and chatting with friends and family, we readied ourselves with the necessary demolition supplies. They fell into three categories:
- Tools for dismantling and generally busting stuff up (hammer, sledgehammer, small crowbar, screwdrivers, wrenches, razor, drywall saw, etc)
- Supplies for managing the mess (broom, dustpan, rags, buckets, trash cans, heavy duty contractor trash bags, painters tape to cover drains, a shop-vac, etc)
- Items to protect me and/or the house (goggles, gloves, gas mask, old clothes, cardboard and a cloth tarp to lay over the tub, and a plastic drop cloth to seal off the room).
Who knew knocking down a bunch of tiles took so much prep? But in the end I was thankful for (and used) every last item. Here’s the three-day fully detailed rundown.
****************************************************************
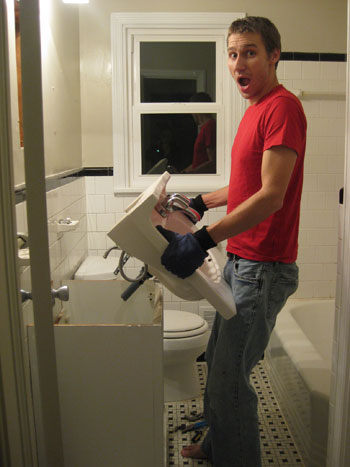
Day One: After shopping for all of this stuff last Friday evening, we returned home to do the basic – and cleanest – tasks first. We worked together to remove the old vanity by simply turning off the water, disconnecting the plumbing with a wrench and unscrewing the vanity and sink from where it was attached (both to each other and to the wall). After that it just took one strong tug to lift the sink off and carry it out of the room (quickly followed by the base of the vanity).
With that gone, we turned our attention to the toilet – which we actually plan to reinstall afterwards since we replaced it just a few years ago when we moved in. It was a similar process of turning off the water, then disconnecting the plumbing, the seat, the tank and the bowl one-by-one.
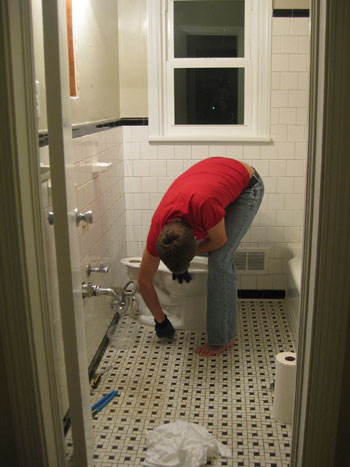
And of course we plugged up the sewage opening with an old rag to prevent any nasty fumes from escaping (and to keep debris from entering later).
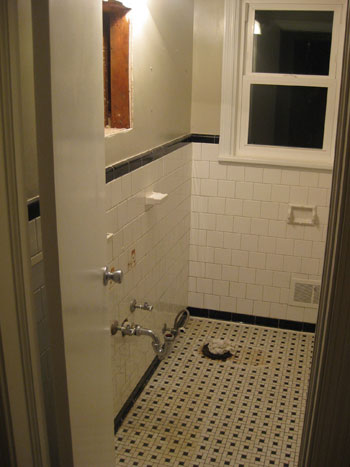
With those big items gone- followed by simply unscrewing the shower fixtures- the room was entirely clear and it was time to get rested up for Saturday.
****************************************************************
Day Two: We woke up bright and early thinking that Saturday would be the only demo day. I, the non-pregnant member of our household, was going to be a one-man wrecking ball while Sherry kept her distance from the mess and the dust (trust me, she wasn’t sitting around eating bon-bons she was hovering and wishing she was the one with the sledgehammer). But with our house being built during the era of lead paint, we were EXTREMELY careful about keeping Sherry away from the demo zone AND keeping the demo zone away from Sherry just in case there was any lead paint lurking behind the newer coats of latex (i.e. I didn’t wear my dirty clothes outside of the room, we sealed off the doorway with a thick plastic drop cloth, and any wayward dust or dirt was immediately cleaned up with a wet rag and TSP cleaning solution- which is recommended when dealing with potential lead-paint dust). And of course I was all decked out in my protective gear for added safety (goggles, gas mask, gloves, old clothes that we disposed of afterwards, etc).
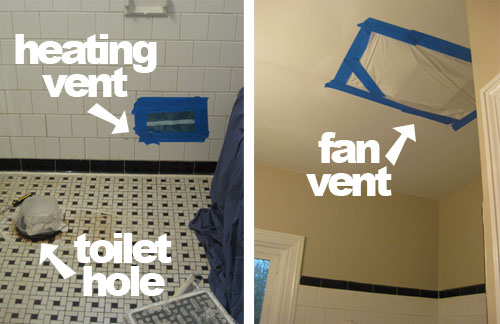
Oh and here’s a tip whether you’re dealing with lead dust or just regular dust (which is also nasty and will permeate every cranny of your entire house if you let it). It helps to seal up heating vents, bathroom ceiling fan vents and even to cover your “toilet hole” (yes, that’s a technical term) to keep nasty debris from invading those alcoves (and potentially spewing all over the place once the heat/fan is turned on). Plus you don’t want to clog up your sewer with fallen chunks of wall tile.
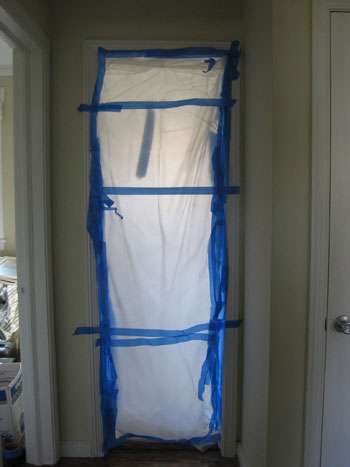
Speaking of sealing things off, here’s a view of the heavy duty plastic tarp that Sherry stared at all day, constantly asking me what was going on because she just heard banging, crashing, and probably a fair amount of muttered profanity. It’s just a heavy duty plastic drop cloth, but when taped in place it’s really an amazing way to keep everything nasty in the room… and out of the rest of your home.
But back to the view behind the bubble. As mentioned, I entered looking like a confused comic book character (the googles paired with the gas mask created sort of a pathetic villain vibe) and thanks to all my prep work the night before, I quickly began knocking off those wall tiles. I was implementing a simple crowbar-laid-at-a-tile-edge technique, followed by a few strikes of a short handled sledgehammer. Let’s just say it was slow going. As in, it broke loose a tile or two for every four or five swings of the hammer. Very quickly, the sheer amount of work this would take me started to set in. Not to mention what I discovered behind the tile was NOT modern backerboard or drywall (which I was hoping to saw out) but rather two inch thick concrete mortar sandwiching a sheet of thick mesh-like metal. It was an older tiling technique that I had read about online but somehow never realized could be found in our older home. D’oh.
But having committed myself (by way of heavily sealing myself into the room and already being quite dusty) I decided to plug away. After all, the “hit it as hard as I can technique” was working – just ever so slooooowly.
Fast forward six sweaty hours later (not sexy-sweaty, gross exhausted-sweaty) and I’d finally managed to get all of the tile off the wall. Even with the floor tile left on my to-do list, at this point I would have thrown my arms up victoriously… but I barely had enough energy to move them. Plus, the amount of tile rubble surrounding me made any fast movements a risk to my balance. I never imagined how much trash our tiny bathroom would create (it could have something to do with the fact that someone decided to tile ALL THE WALLS) but I was very grateful that we invested in a large box of heavy duty contractor trash bags. Note: don’t fill the bags with more than you can lift because I don’t know anyone who can carry a trash bag full of rocks (even a weird gas-mask-and-goggle-wearing comic book character).
But before turning to clean-up, I decided to power through two more hours of work (basically as long as my bladder would last – oh the irony of spending the day in the bathroom but having nowhere to “go”). Sure all the wall tiles were down, but I now had to demo out the stuff behind them to get down to the studs (and cinder blocks, I soon discovered)- which mainly consisted of a few inches of serious mortar with that maniacal metal-mesh sheeting nailed to the studs behind it. With my supposed “one day” of demo quickly looking like two (or three?) I wanted to at least make a dent in all of the thick metal mesh and mortar that taunted me from every angle. This involved smacking it with a hammer to knock as much of the mortar off (and often using the back of the hammer to pry it). Then, once that nasty metal-mesh was mostly exposed, I used the back of the hammer to pry it off of the wall (it either pulled it off of the nails in the studs/furring strips or pulled the nails right out along with it when I used enough force). And that’s when I discovered the cinder blocks (!) behind the window wall…
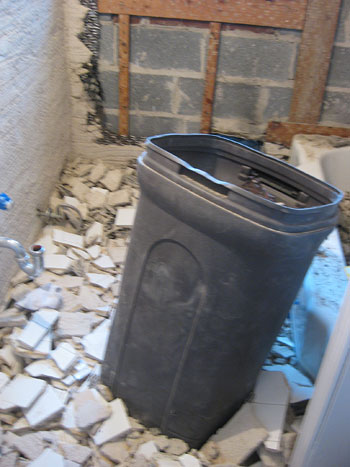
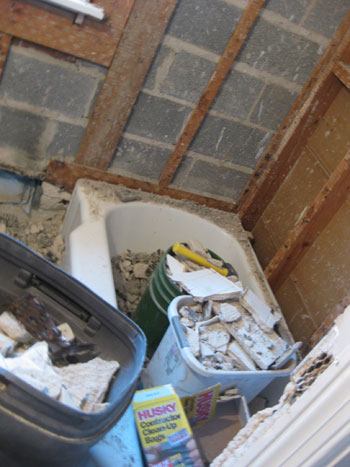
I got two walls completely stripped down to the studs/furring strips before my arms (and bladder) nearly gave out and it was time to call it a night. And since the gym was closed (where I’ve been showering) and I was coated with debris, I had to rinse off all the dust I collected over my eight hour workday outside with the hose in 40 degree weather. Sherry did bring me some hot water with a washcloth and a bar of soap in the end, but I was still standing barefoot on the patio freezing my sore bum off. Yeah, I don’t want to talk about it.
****************************************************************
Day Three: Sunday kicked off early with sore muscles, cramped hands and the removal of all of Saturday’s trash by way of dozens of heavy-duty contractor’s trash bags (I left about ten inches of demo’d tile on the floor the night before, so getting it out to the garage was important since balance is key when holding sharp objects like a crowbar). Oh and we started a pile of trash in our garage that we’ll haul away once the project is 100% complete. We plan to rent a $19-an-hour pickup truck from Home Depot and pay about $8 to drop everything off at the local dump (which ends up being much cheaper than renting a dumpster although it’s a bit more labor intensive since we’ll be hauling stuff ourselves). Just carting out all that smashed up tile, mortar, and metal sheeting took about an hour or so, followed by another four hours of metal mesh removal and then another round of clean-up. Why clean up again? Because I had to clear the way for my next assignment: the floor (so first I had to find it again). Here’s that intense metal mesh I’m talking about that was behind all the tile and a few inches of heavy-duty mortar. Yeah, it’s not chicken wire:
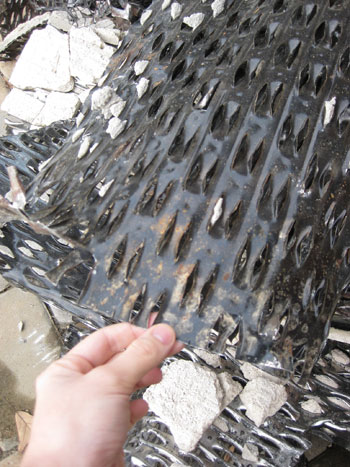
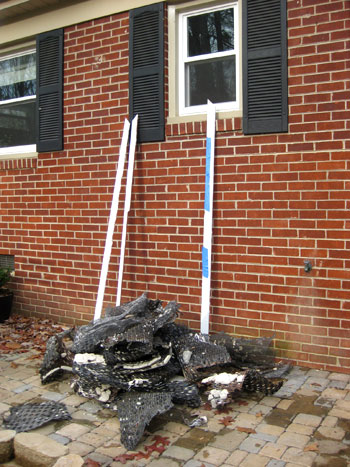
Seriously, our bathroom could have doubled as a bomb shelter.
Anyway, after having gone through all of this on the walls (and it being about 4pm on the day before I had to go back to work), I knew I could/had to do the floors more efficiently. We had actually chipped away a section of flooring before starting demo work, so we were already aware that our worse-for-wear-basketweave tile was also set in mortar atop metal mesh which rested on diagonally placed subfloor beams (the fact that the mortar and metal sheeting was also in all the walls of the bathroom was the added surprise). So, thanks to some googling ahead of time, I already knew that a demolition hammer was my ticket to getting ‘er done. And thank goodness hardware stores like True Value rent those suckers for about $60/day. Remember they gave us a place on their DIY Blog Squad along with a generous gift card? It certainly came in handy, so from the bottom of my heart, thank you True Value, for saving me from what I can only guess would have been ten more hours of hard labor.

But back to my new favorite power tool. The demolition hammer is like a mini-jackhammer and is by far the biggest powertool I’d ever used (that’s not saying much for me, though). So I trepidatiously placed the chisel against a grout line on the floor and pulled the trigger. With a few sharp pounds of force, up came a section of tile (and the concrete beneath it). Victory! Now somewhat reinvigorated by my trusty destruction device (and feeling more like a cool superhero instead of a disheveled goggle-and-gas-mask-wearing weirdo) I was able to break up the entire floor in about 90 minutes. Kinda made me wish I had used it on the walls. Sigh.
Speaking of which, I have to admit that this whole demo adventure was a little bit of a roller-coaster ride for me. There were times when I felt like giving up because the task seemed insurmountable and there were times that my body just wasn’t up to the challenge (after a few of the more challenging hours). But then there were other times – like as I pried up the last of the metal mesh on the floor to expose the raw bones of our house – that I was excited by the amazing transformation I was bringing to our bathroom. I mean, it’s kinda awesome to stare at the basic structure of your house…
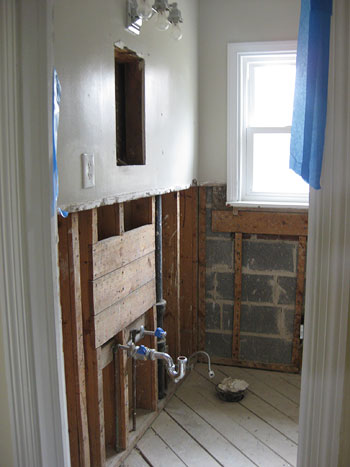
… even if it includes an area of rot next to the tub (more on how we remedied that in a later post).
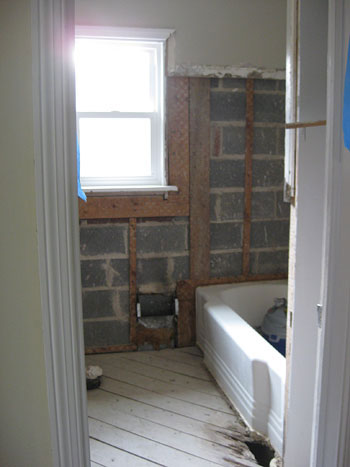
And happily, my roller-coaster ride came to an end around 11pm on Sunday night. There’s nothing like eking things out when it’s down to the wire. I had finally removed all the last bits of trash and rubble, dusted and shop-vac’d as much of the remaining dust and dirt as I could and even wiped down most surfaces and tools with a rag moistened with TSP cleaning solution (again, trying to be sensitive to potential lead issues). Amazingly, the demo was complete – just in time for me to get about seven blissful hours of shut-eye before dragging my weary body off to work the next morning. And yes, there was another cold outdoor shower, but this one didn’t seem half as bad…
*Now for a little safety suggestion: wear proper closed toe shoes when taking on projects! We don’t know what we were thinking in those two barefoot photos but we definitely recommend keeping your feet protected, especially for those heavy duty tasks. Safety first!
Psst- Wanna check out Chapter One of the big bathroom redo? Click here for those deets.

Bridget B. says
Wow! Thanks for sharing the details about your bathroom renovation. It’s definitely enocuraging to hear that even experienced renovators sometimes have projects from Hades!
Just thinking about everything that could go wrong before I start a big project is usually enough to cause me to get discouraged and start calling contractors.
p.s. thanks for the tip about the pick-up rentals from Home Depot. We’ve been trying to figure out a cost effective way to clear out a bunch of old construction waste from past projects.
susan says
wow! i really admire your seriousness about doing it yourself. this is awesome! i can hardly wait to see the outcome.
sarah says
WOW. I’m exhausted just reading about all that work! As much as I’m sure it stunk hitting those unexpected roadblocks, as a reader, it is nice to know that the “pros” have frustrating decor/demo days too! (It seems like every project we ever tackle ends up in total chaos!)
Liz says
Well this definitely brings back memories to my first bathroom remodel. And all we did was replace the tub and flooring! That’s a lot of work for just one guy. You make it look so easy, despite the hours of work.
I had no idea there was such as thing as a demolition hammer. We used a jackhammer for our floor and found it to be really hard to control. I’ll have to remember the demolition hammer for next time (hopefully, not anytime soon though!)
Connie says
Hey John,
Gold Star for putting in all that sweat equity. I know its lots of hard work. I’d like to speak for all your readers if I can. “We are cheering you on!” Go John go, Go John go, Hit em’ high, hit em’ low, Go John go.” Whew, now that cheer was hard work for me. (He-He :-) ). Thanx for keeping up posted!
jbhat says
I am totally floored. Sub-floored in fact. That was amazing to read. In our house, a project like that would have taken a month because frustration would take over. I applaud you for hammering it out, as it were.
Sherry, John IS a keeper. You knew that though. I hope you let him take the first turn in the finished products as his reward. Maybe warm up the nice new towel in the dryer before you hand it to him : )
YoungHouseLove says
Love that idea jbhat! I’m totally warming up a towel to greet John after his first shower in the new bathroom. Can’t wait til it’s shower-able in there again. That will truly be a Christmas (or slightly-after-Christmas) miracle!
xo,
s
Ursula Graham says
Wow what a job over the weekend! It looks ready for the much more fun part now. I know when we moved in there was porcelain towel rack holders which I had to take a hammer to and finding nothing behind them. It’s scary what demo can “unveil” sometimes. New walls will be nice though!!
foobella says
John. you are a superhero. I thought I was going to die just tearing up the vinyl tile in my bathroom! I can’t imagine doing all you did. Bravo. I hope sherry gave your a massage or something!
Heather says
Thank you for sharing! My husband and I have the same tile all over our kitchen and I can’t stand it! We have been thinking about taking on the project ourselves after contractors bid over $4000 just to remove the tile and put up drywall (no painting or priming included). We were just a little nervous about what we were facing but this will be very helpful!
Sally says
“Yeah, I don’t want to talk about it.” I did, in fact, LOL. I’m not really a DIY-er, but I love reading your blog because the way you talk about it is so fun. Maybe I’ll be inspired to DIY one day as a result. Thanks so much for taking the time to share.
amyks says
Amazing…I don’t know how you could have spent 8 hours in a small bathroom, and not taken a break! That is so impressive. Can’t wait to see the finished project.
Frankie says
I’ve been so excited to watch this bathroom reno! We have the exact same bathroom (size, layout, tub, everything) in our house and I can’t wait to see what you do with it. It’s kind of like getting a mood board for free. :)
Great job so far and good luck with the rest!
DJ says
You guys are incredibly brave to plunge right in like this… especially as it’s your only bathroom.
I’m sure it will be, like the rest of your home, simply lovely when completed.
And how lucky you were to find the dry rot before it got any worse and sent your tub down through the floor… see how I made lemonade there?
Tracy says
My husband and I are going through the same process of a major renovation of our only full bathroom in our house. In fact, I am hoping to send you the transformation once it is completed. We just bought our house a month ago and this was the first big project. Our house was built in 1896 and is in West Virginia, so there were many surprises to find after our renovation. The electrical work scared my dad (a trained electrician), a dead bird under the flooring, and the roof had dropped! All of these unexpected surprises has kept us from finishing in the expected time (we had a week off of work over Thanksgiving break).
After a week of taking showers at a nearby campground, I was happy to shower in the warmth of my house again. This last weekend we installed the tile. It will not be until after the holidays that we paint, but it looks so much better right now, even unfinished! So John, hang in there! Oh, and I know we have a whole house to start renovating, but your blog has been such inspiration for me! I even used some of your wedding ideas for our wedding! So thanks for sharing this post, and good luck!
Pam says
Congrats guys on finishing the hardest part of a bathroom demo! It brings back memories of when we renovated our bathroom last spring. It was our ONLY bathroom in our 1950’s house and we showered and used the toilet at our neighbours (we still thank them for that) and at work and the gym for over 2 weeks! And in Toronto there was still 2 feet of snow on the ground at that time. We had the same concrete walls under our tile and even found newspaper and what we assumed to be horse hair stuffed in the walls as insulation. When it was all said and done we estimate that we removed over 2 tons of debris from the bathroom. It is a ton of work (no pun intended) but it is totally worth it now and if I had to do it all over again I would in a heartbeat!
For all you DIY’ers out there, if you want to take on the demo part of a renovation yourself but are intimidated by getting rid of everything Home Depot (in Canada anyway) has something called a Rhinobag that is a canvas-like bag about 6 x 6 ft that you put on your driveway or lawn and it holds 3300 lbs of waste. When you fill it, you call Home Deopt and they come remove it for you (for a fee of course)! We filled two during our reno but it was a good alternative for us and might be helpful for some other less ambitious people out there looking for a solution.
YoungHouseLove says
Hey Pam,
Wow, your project sounds intense! And thanks so much for the tip about the Rninobag. It’s definitely an amazing idea! Sadly it looks like it’s just available in Canada for now, but here’s hoping it makes its way to the states soon!
xo,
s
Anne says
John,
You rock!!!
Keeping going all day long in that small, confined, messy area, taking nary a rest or bathroom break, and putting in all those hours of extremely hard labor to get the job done…..you rock!! I know that seeing the bathroom afterwards, with the wall and floor tiles gone and the room all cleaned up was a thing of beautiful for you!! (As long as you don’t get flashbacks!)
Last winter, we had some remodeling done to our “new” 1990’s townhouse. Since there was a lot of work to do, and we are both in our 60’s now, we hired a contractor for the job and to get it done quickly. The workers had to remove the floor tiles in all three of our bathrooms, the main hallway, and the kitchen. The first day, the guys did not have a jack hammer to remove the floor tiles. They were in good spirits and smiling when they came to the house at the beginning of the day. However, by the end of the day, they were dirty, sweating, and had nary a smile on their faces. Our contractor went and got them donouts in the afternoon, as he said morale was falling fast! The next day, they had that jack hammer, and it went so much faster and easier. I was so glad to read, John, that you had the right tool for that job when you started to tackle the floor tiles, especially after all the hard labor you had put in the night before.
You and Sherry should be so proud of all the labor you are putting in to make your home an updated, beautiful, charming home. Little bean is going to be so lucky to live there!
Christine says
THANK YOU for doing this and posting about it!! My husband starts demolition on our 1948 Cape Cod’s only full bath on Thursday, and I just mailed him this link. I hope we can learn from you! We’re terrified of what we’ll find under all that tile (We also wonder why the builders of our home felt inspired to tile the entire bath. Now we know we aren’t the only ones.) Keep the posts coming!
Amy E. says
*standing ovation* wow, i admire your grit, hard work, and determination. also, congrats on rolling with the punches when you found out that demo would take the entire weekend instead of 1 day. also, THANK YOU THANK YOU THANK YOU for always putting an emphasis on SAFE DIY. at work, we constantly have safety messages (it’s required that EVERY meeting begin with one). and hearing about people losing an eye, a finger, or their hearing due to not wearing personal protective equipment (PPE) is just discouraging. again, i must give you two another: *standing ovation*
Jenni O says
oh, the memories. We had the exact same concrete mortar/wire mesh surprise during our 60s bathroom reno last year. We also made the bomb shelter comment. It took us a lot longer than 3 days to remove all the wall and floor tile though! We chipped away at it for 2 hours a night till it was done (luckily we had a 2nd bathroom to use in the meantime!) But man, I love using it now, and am so proud we did it ourselves–even if a few tiles are a bit crooked!
Robyn in Chicago says
HOLY MACKEREL!!!!!!!!
John,
You get a big fat gold star, A+, blue ribbon, first place medal, big gold trophy for this one. I think I read most of the post with my jaw to the floor at the fact that you did this by yourself. You should be so proud. And you showered outside for 2 days when you were so exhausted, went to work the next day, didn’t give up, AND used the word trepidatiously very effectively in your post. I am so impressed.
This reno is very exciting….
Happy Holidays!
Tovah says
Whoa. That is amazing and I too applaud your hard work. (I’m also really glad I don’t have any plans to redo my bathroom.) I can’t wait to see how it continues to go!
Christine says
Oh my goodness! You guys did so much! It’s amazing the things you find behind walls when you tear them down. I can’t wait to see how it turns out!
Ryan says
I am holding off on the remainder of our bathroom remodel until I can also replace the plumbing in the house. We have an extra toilet in the basement to use, and I made sure to re-tile the floor before we moved into the house. So I’m doing it in stages. I’m also unsure of what I’ll find in the walls since sometime in the 50s/60s the homeowner replaced the ceramic tile with plastic tiles. So, did they remove all the previous mortar? or just plaster over it.
Contrary to your bathroom plan, I do plan to re-tile the entire perimeter of the bathroom. However, we don’t have a standing shower either, so the tile is at the same 4 foot level all the way around. I will make sure I do all this in the late spring or summer – just in case I have to rinse off with the hose.
Chrissy says
Nice work! You’ll surely appreciate it in the end. It’s even more enjoyable when you did the hard work yourself. My husband gutted and redid our one bathroom in our first home. There was a lot of putting the toilet in and out and “showering” with a hose over the basement drain. He even removed our cast-iron tub (that required help)! We had the tub reglazed when we moved in, but it didn’t hold up so well. We’ve had a tub reglazed in our second (now a rental home) and it’s holding up well. Get references and recommendations about reglazing companies in your area. If you can look at someone’s tub that has been reglazed, even better. Clear out of the house while it’s being done, it can be stinky, though the professionals are good at minimizing fumes. Good luck! Looking forward to seeing the end result!
YoungHouseLove says
Thanks for the tip Chrissy! We hadn’t thought about the fumes (we’re being really careful since we now have the bean to worry about) so we’ll be sure to be gone and stay gone til it’s all aired out. Great point!
xo,
s
kay says
Here in AZ I know the Home Depot has Waste Management’s “Dumpster in a Bag”, which is similar to the one Pam mentioned. You buy the bag, fill it, then Waste Management comes to pick it up.
YoungHouseLove says
Thanks for the tip Kay! We’ll definitely check it out.
xo,
s
Dana says
Man, I’m sore just reading this post. Way to get ‘er done, John. What a cathartic weekend you must have had but the bones of the bathroom look great!
On a lighter note, I was reminded of way back when, when the fathers would pace erratically outside labor and delivery rooms waiting for their child to be born. (Weird, I know.) In this case, the male/female roles are reversed and, of course, John’s ‘baby’ was a totally demo’d bathroom. Sherry, you must be one proud wife!
YoungHouseLove says
It’s true! John worked hard to give birth to a totally stripped bathroom! So proud of him!
xo,
s
caitlin says
I think this has been my favorite post! And the suspense at the end regarding the rotted floor… what is going to happen to it? :)
I guess it is too late, but I was going to suggest, if you hadn’t thought of it and had room in your budget, a heated floor. You can put coils beneath the tiles and flip a switch to make the floor warm. Sounds like pure luxury, but in a previous house I rented, we had one, and otherwise the bathroom didn’t have heat. It was pretty great.
YoungHouseLove says
Hey Caitlin,
Thanks for the suggestion! We actually thought it over but opted (for time and budget reasons) to pass on it this time around. It does sound luxe and lovely though. Maybe in 50 years when we’re redoing the bathroom again…
xo,
s
Jacci says
John – seriously. You showered with a hose in 40 degree temps after braving all the lead paint for your woman… and your house. That is love, brother.
If I were there, I’d give you a BIG pat on the back. Good work!!
Sherry – good work staying clear of that room! I know that has to be a tough job for you! ;)
~Jacci
YoungHouseLove says
So true! I know John had it really hard in there, but I was dyyyyying to know what was going on! Hard times all around.
xo,
s
AlysonO says
WOW… I am in awe…. and now also terror of what is waiting for me behind the walls of my HUNDRED year old bathroom… Sherry, I can’t imagine how hard it must have been to hear all that and not even be able to watch!!! AH!! But good for you for staying away, Stephani at Brooklyn Limestone told me a couple weeks ago that inhaling lead can actually be stored in your fat cells and passed on to a fetus!! EEK!! I had no idea!!! Its looking GREAT guys, can’t wait to see the rest!!
YoungHouseLove says
Hey AlysonO,
Yeah, we’re not even certain that our walls had lead but decided just to operate as if they did to be on the safe side. And we heard how even a small amount of lead dust can be inhaled and cross the barrier into where our little bean is swimming around, so we were extra careful! Definitely be cautious when it comes to lead everyone! It’s even dangerous for adults in high quantities so it’s not just little kids eating the chips that you have to worry about!
xo,
s
brandi says
Wow, wow, wow. You guys rock.
Amanda G says
I am so excited you are tackling (LOL) this project right now. My husband and I are about to rip out all the tile and drywall down to the studs around our existing cast iron tub (identical to yours actually) in our 1950’s bungalow starting New Years eve. What a way to ring in the New Year, right?! We will be hanging the new backerboard and tiling around the shower with the same white subway tiles so I’m super excited to see your tutorial on that. My husband and I are actually tackling refinishing the tub as well. Luckily my husband is a professional millwork finisher and he actually works on luxury yachts. Through our research and speaking with his supervisor at work, we discovered that the same products are used on the yachts that are used on bathtubs. So my hubby is borrowing the sprayer and all materials from work and DIY-ing the whole thing. I’m super excited about it and can’t wait to share pics! It’ll probably be a boring before and after pic but I’m so excited that my husband actually knows how to do things like that.
Wow…did I really just type all that?!
Thalla-Marie says
GREAT post! thanks so much for sharing! Looking forward to the final results.
christa says
Just wanted to say hooraaay John!
Kara says
Ok, WOW. Your last post had me set on redoing our bathroom… now I’m thinking it can wait!
Good work!! It looked exhausting, way to power through! I have to ask, how did you learn how to do all of this? Lots of Googling? I’m pretty clueless when it comes to anything this intense… re-caulking our tub is about as complicated a project I’ve undertaken! :)
YoungHouseLove says
Hey Kara,
We actually have a post all about the learning process over here at Casa Petersik set for later this week so stay tuned. It’s basically a whole lot of googling and asking experts. We’re also not afraid to hire a professional if we get in over our heads, but we always like to attempt things that seem to be in our skill level. Most of the time with enough research and determination we’re victorious!
xo,
s
Ati says
Oh my! I think we are going to have to look through our entire demo plan, and double the time it takes to get it done. We settle on our not-so-new (130 year old) house on Friday and plan to start demo on Saturday. It has two and a half baths, all that need to be redone. We bought a smaller version of the demolition hammer since we have a lot of tile (including the kitchen tile) to get done.
Are you planning to hire our the rest of the plumbing and new electrical in the bath?
YoungHouseLove says
Hey Ati,
We actually are keeping the existing electrical and plumbing (with a few minor tweaks that we can make ourselves). The pipes were updated a few years back and we had an outlet added back then too (can you believe this bathroom didn’t have a single plug for a hairdryer or electric toothbrush?!) so everything should be up to snuff. Hope it helps!
xo,
s
Jenny says
Congrats on the tile demolition! I’m sure it will be a beautiful, functional bathroom again in no time! I remember helping my dad knock out tile in our guest bathroom (very similar to yours except the tile was olive green and peach!! Ick!!) and I know that it’s a tough job.
Abby says
I, too, am ready to demo and redo my bathroom. But my 60-year-old-plus house probably has similar issues hiding beneath its, uh, vintage facade so I’m thinking I don’t want to go it alone. Does it add a LOT to your bill to have a contractor do the demo?
YoungHouseLove says
Hey Abby,
Good question! We’ve have heard of contractors charging anything from $1000 to $5000 just to demo out a bathroom that’s as intense as ours (with thick mortar walls and floors with wire behind them) so we definitely encourage you to call and get a bunch of estimates to find the right man for the job. Most handymen put in less insane days than John (usually from 8-3) so it would be at least three days of work and they’d probably want two men on the job… so you can see how the cost starts to get up there. You can definitely save some cash by DIYing it if you dare (or begging able bodied brothers, boyfriends, neighbors, uncles, etc). Other contractors might also quote a bit lower by taking “shortcuts” like skipping the floor demo and suggesting that you tile right over your original floors, but since we didn’t want ours to be raised a few inches (we wanted it to look seamless with the rest of the house) going all the way and gutting it seemed like the right choice for us. Be sure to find someone reputable though! You might find someone on craigslist who says they’ll do it for $300 but they might not even know what tools to use and they could even end up costing you more money in the long run (if they bust a pipe in the wall or tear through electrical wiring for example). Hope it helps!
xo,
s
Mary says
Wow. I’m exhausted just thinking of all that work. All while probably overheated to boot. Can’t wait to see the rest of your reports!
Amanda says
We just redid our 1960’s bathroom. Our shower was a little cave like closet covered from top to bottom with aqua tile. Since I too have a bun in the oven, my husband decided to call in the troops. Fortunately, one of his best friends owns a small construction company and they’re slow right now. When I got home from work after the demo day, something my husband originally planned to do on his own, his friend could not stop talking about how fortunate it was that hubby had called in reinforcements. We had four inches of concrete on each side and the same metal stuff too. Our little bathroom grew just by taking the old tile down (and busting down a small wall and getting rid of the ceiling that was 2 feet lower than the rest of the bathroom). I’ve got to say, the 1600 we spent on having the demo and everything fixed and reinstalled is starting to seem like a GREAT deal!
Can’t wait to see how yours looks in the end. We’re trying to decide whether we can manage the hall bath on our own.
Jessaca says
Wow. Just reading about demoing the tile I got tired. Good work. Can’t wait to see the rest of it!
Roeshel says
Holy cow! So much work but wow! You did an awesome demo job! I’m looking forward to seeing the transformation!
Tara says
That comment about how the bathroom could have served as a bomb shelter made me chuckle out loud. U guys are so funny. However, I am glad the huge dirty job is over as far as the demo. I am impressed John made it back to work on Monday. If only he could have worked out a deal with the gym like, hey, I will throw in an extra $25 bucks if you just let me shower in non-40 degree shower in my backyard when your closed! Laughing… I can’t believe you did that. Burrrrrrrrrrrrrrrr.
Denise says
Great work, John, and you did it in record time! When you bought your house did your half bathroom already have hardwood flooring or did you take up tile in that room, too? Also, did your house inspector give you a heads up about the rot at the tub since it may have been visible from the crawl space? My Mother in law lives in a 60’s rancher and it’s built like a tank.
YoungHouseLove says
Hey Denise,
Thanks! And good question – the half bathroom had some linoleum in it when we bought the house, but we peeled that up shortly after moving in and actually just painted and sealed the plywood as a temporary fix. But when we put down new hardwood floor in the kitchen and den we extended it into that bathroom for consistency.
And nope, the house inspector didn’t catch the rot when we bought the house. We don’t know if he just missed it (yes, it should’ve been visible from the crawl space) or if just wasn’t as severe back in 2006. We noticed a few months after buying the house that the way the tub slants it tended to divert water to that spot. We quickly fixed it with some heavy duty caulking but maybe the damage was already done! Either way, we totally agree with you that these things are built like tanks.
Best,
John
Angie says
Great job John! I hope that you took an Aleve! LOL I can’t wait to see the completed pictures! And Sherry I’m sorry that you are missing this project! You guys are great!
Ryan says
John,
After reading your blog I can totally sympthasize with you. My girlfriend and I have a house that was built in the 1970’s and I personally have come to find out that DIYing is not as easy as it seems at first. Enough rambling and to my question. When was your house built? We have two bathrooms that look almost identical to the one pictured in your blog and personally I strongly dislike one of them and believe the second one could use a face lift! Best of luck with all the home improvement!!!
YoungHouseLove says
Hey Ryan,
Our old ranch was built in 1956. Hope it helps!
xo,
s
Vicki K says
John,
Your commentary is informative and funny. I laughed out loud at some of your descriptions. We are just starting to remodel our guest bath. After taking down what we thought was one layer of wallpaper (actually two)we are now on the hunt for new vanity, tub, toilet etc. and lots of tile removal. We found that the size vanity we currently have is not a standard size so have gotten est. from Home Depot as well as a woodworking shop. OOOH expensive! Thanks for the “heads up” on the actual time involved. So my question for you. Are you planning to replace your tub? re -glaze etc.
YoungHouseLove says
Hey Vicki,
We’re definitely going the professional reglazing route. Our tub was actually reglazed about ten years ago (we inherited the paperwork with the house in 2006) and it held up really well for the most part. Of course over ten years later (and after John’s big demo) it’s ready to be redone so we plan to get lots of references and pay top dollar for something that will last for the long haul. Hope it helps!
xo,
s
TG says
Are you going to lay the tile yourself or are you going to contract it out? (I am especially interested in the floor tiling.)If you are doing it yourself, any tutorials in the works?
Alan says
Are you going to move the sink drain pipe up, so it’s kind of hidden like the Restoration Hardware model you linked to? Or are you going to keep it where it is and have it exposed? It looks like you might not be able to use the top shelf on the Crate and Barrel stand if you’re not moving the drain, but I’m sure you guys have it all figured out! I’d love to see a whole blog entry on the assembly/modification of the night stand-turned-sink!
YoungHouseLove says
TG- We’re definitely going to DIY the tile installation and of course we plan to share the step by step process when we get there. Stay tuned…
Alan- We’re actually planning to notch out the vanity a bit to accommodate the exposed plumbing because we don’t mind that look and it’s well within our skill level (while the Restoration Hardware approach isn’t). We think we can still use the shelves for the most part if we’re careful so stick around for the plan in the coming weeks.
xo,
s
Christi says
sounds like fun! i’m looking forward to seeing the finished result. my husband and i sit here and think to ourselves … do we dare buy an old fixer-upper in la? because it would need some serious love … oh the dilemmas!! thanks for the inspiration!
jane davila says
It sounds like there are a lot of us out here with bathrooms built to the same “bomb shelter” specs! Maybe it was the cold war era reflecting in construction techniques, hmmm. Both bathrooms in our 60s ranch had the metal mesh, inches of concrete mortar and stubborn little tiles. One was baby blue and one was pepto bismol pink (we still call them the girl’s bathroom and the boy’s bathroom, even though it’s just the two of us). Our former pink bathroom is now a marble, wood and glass oasis. And it’s at least three inches bigger than it used to be before the demo! The former blue bathroom is still a work-in-progress.