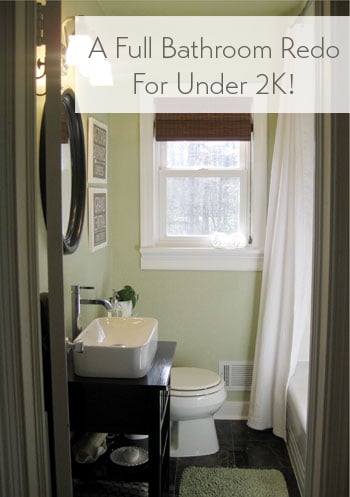
Oh happy day. We’re here to share all of our bathroom after pictures complete with a full timeline and a budget breakdown to detail every step of this month-long weekend and evening project of ours.
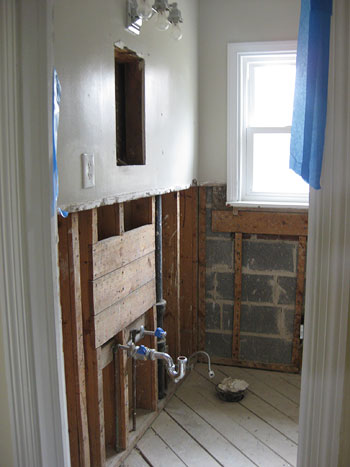
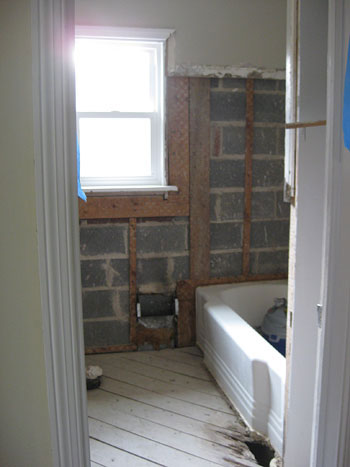
First we should remind everyone what the room looked like at the bleakest moment of the makeover. When it comes to most major renovations like installing a wet wall board, rooms usually have to get uglier before they turn the corner and start looking good, so let’s take a moment to appreciate just how un-aesthetically-pleasing our bathroom was when it was all stripped down after John demo’d the entire thing by himself over the course of about 24 hours spent in the bathroom (my hero!):
Now look at the same room all put back together again. We’re thrilled that everything seemed to click into place in the home stretch, and now our bathroom is honestly one of our favorite rooms in the house. Weird, but true.
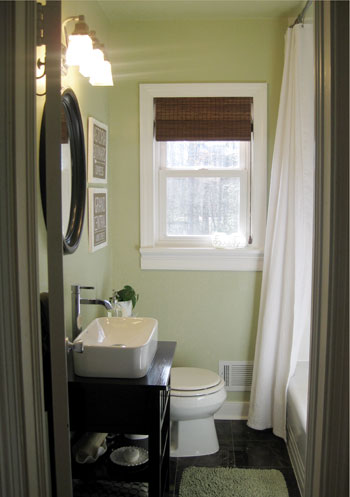
You can see that we hung a dark wood mirror (which we scored for $27 on clearance at Target) above the similarly toned vanity. We love that it also picks up the rich mocha color in our discount marble flooring (which you may remember we snagged for around $2.50/square foot at Lowe’s on clearance).
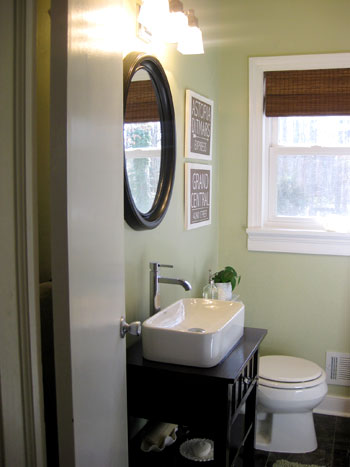
You’ll also notice some art on the wall… and you know we weren’t about to pay for something when we could make it ourselves, right? John actually came up with the idea of creating vintage-looking wood signs (he’s the brains of this operation, I’m telling you) after I lamented that the thought of square frames next to the rounded mirror could look a bit chaotic. So we picked up one $6 piece of wood, had it cut into two equal pieces right there in the wood cutting area of Home Depot and took them home to transform them into something worthy of our brandy new bathroom.
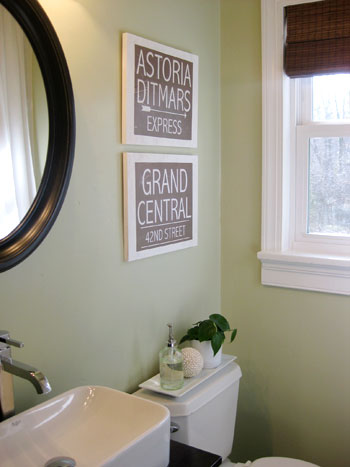
We took inspiration from our time spent in NYC (where we met and fell in love) so we thought making signs that mimicked the look of old NYC subway signs (like these that we hunted down on google) would be a special way to add more of that customized feeling that we love in our home. Of course we adapted ours to be a bit less dark to complement all the white in our bathroom (and in our house for that matter). We also picked two subway stops with the most meaning to us (we met working together near Grand Central and both lived in Astoria Queens at different times).
After bringing home our pre-cut planks of wood it was as easy as painting them white with craft paint that we already owned (it was thinner than latex wall paint so some of the wood grain still showed through) and designing two “signs” in Photoshop (we printed them out ourselves for free). Then we roughed up our prints for a weathered, creased, and vintage look and Mod Podge came in handy when it came to attaching them to the wood planks (the waterproof protection it added was also a plus since they live in a bathroom). Note: we’ll be doing a follow up post with more step-by-step sign making details for anyone who wants to take on this project themselves so stay tuned.
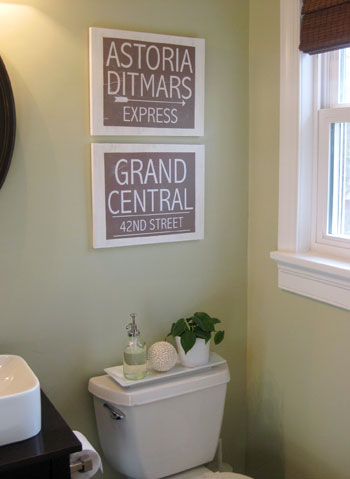
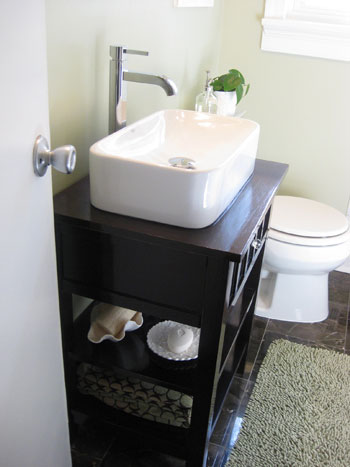
But on with the bathroom tour! If you look at the photo above, you’ll see that we actually opted to attach a simple chrome toiler paper dispenser to the side of the vanity since we didn’t want it attracting attention from the hall (which it would do if we placed it on the other side of the toilet under the window). We also picked up a simple white ceramic tray for the top of the toilet (we actually cut a thin strip off of one of our rubber rug-pads to form sort of a grippy buffer between the toilet and the tray to keep it “stuck” in place for the long haul). Then we used the tray to corral our favorite soap pump (which we waxed poetic about here) along with a cute little shell ball and a leafy green plant.
Although there was room for a soap dispenser on the back corner of the vanity behind the sink we thought it looked cuter a few inches to the right on top of the toilet- so while we know other people might want their soap pump right on the top of the vanity, we personally liked it on the tray (to each his own, right!). It really keeps the top of the sink uncluttered and sleek looking, and we always have the option to simply move the pump over to the sink if weeks of use make us rethink our nearby toilet-top placement.
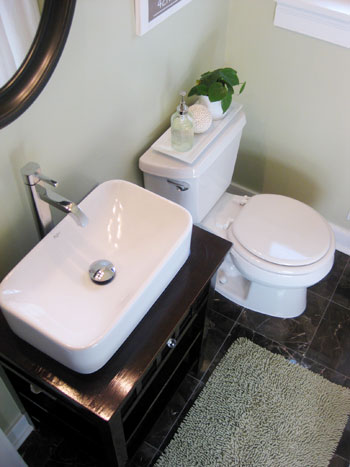
We also love that we were able to save the vanity’s drawer by shortening it (read more about the process of building the vanity here) so we can still fit a few staples in there: toothbrushes, toothpaste, and deodorant in a bamboo tray along with contact cases and John’s hair stuff.
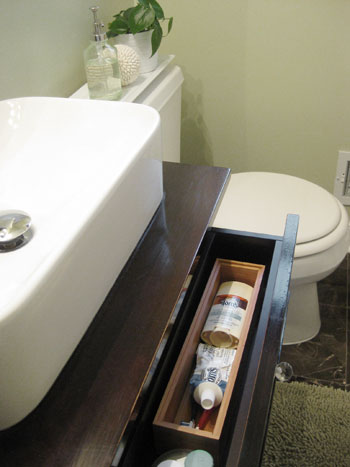
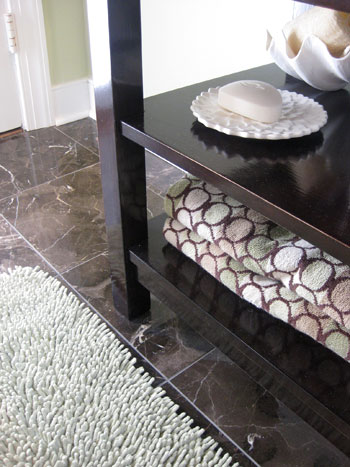
We love that our vanity also allows us to store a bunch of extra bath towels (picked up for just $6 each at TJ Maxx) along with a few cute decorative items like a loofah in a faux clam shell and a pretty scalloped plate with Dove soap on it for our guests (we use a bar of organic stuff in the shower, but when guests stay and want to shower/wash their face we can just mention that the soap under the sink is all theirs).
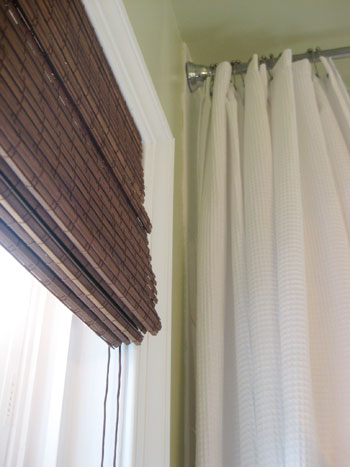
We also rehung our existing white waffle floor to ceiling shower curtain (read more about that project here) and really love that the shower tile now goes right up the ceiling to meet the bar for even more height and drama in the room. We’re so glad we spent the extra time tiling all the way up… the ceiling seriously feels over a foot taller. You’ll also notice that we snatched up a simple inside-mount bamboo blind from Home Depot for just $25. We love the texture and mocha color that it adds to tie in with the tones in the marble floor and even the vanity and the mirror.
At the very end of our renovation we also had our tub professionally reglazed for a completely convincing like-new look. The tub was actually already reglazed when we inherited it with the house and that treatment lasted over 12 years (we received the original paperwork from the first time the job was done years ago from the last owners). And this new reglazing job should last just as long even with everyday use. The key is finding the best professionals who use the best equipment and the best formulas for a long lasting finish that looks amazing (we call for references, look them up with the Better Business Bureau, etc).
As for why we opted to get ours reglazed instead of replacing it, we love the large, deep, original cast-iron tub. It was too great to send off to a landfill (and too heavy and expensive to try to remove & replace). We’re all about working with what we have, so because we couldn’t salvage the bathroom’s old tile, the least we could do was salvage the tub by refinishing it (to the tune of $399- oh and it would have only been $299 if our tub hadn’t already been reglazed for anyone out there looking for a cost estimate). Oh and because we’ve lived without putting shampoo bottles around the edge of the tub for years (since it was previously refinished and that’s not recommended) that’s not an adjustment for us at all when it comes to the newly reglazed finish. Note: we used this top rated family owned local company and are extremely pleased with their work.
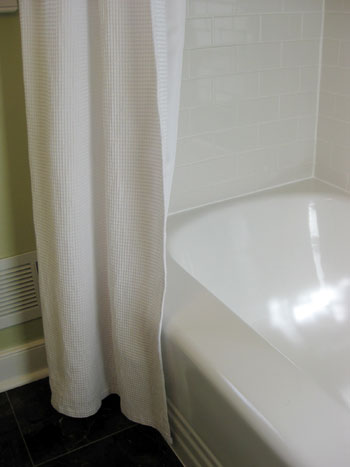
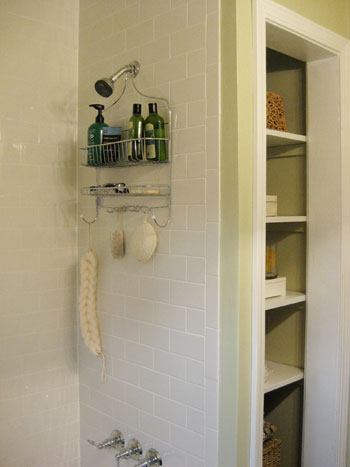
Here’s a shot of John’s amazing tub to ceiling subway tile. Doesn’t it look like the work of a pro? I couldn’t be more proud of my man and his first attempt at tiling! We also opted to add a simple chrome shower caddy (although we debated adding white porcelain corner shelves or even creating an enclave for shampoo and soap before we tiled) since we don’t mind the look and love that it kept our first tiling job sweet and simple.
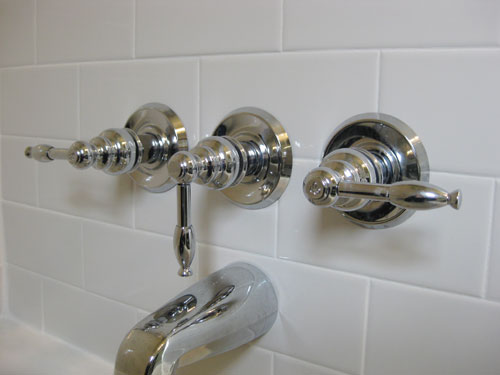
You might also notice that we replaced the shower fixtures with an insanely affordable $69 chrome set from Overstock since our old fixtures felt a bit too cottage-y with our new sink & faucet. The best part is that we Craigslisted our old fixtures (since they were only used for a few years and were in mint condition) and actually made back $30 of the $69 we spent on the new ones. Not bad, eh? Gotta love Craigslist. And on another note, how delicious does that twenty cent subway tile from Home Depot look up close? It’s so bright and shiny and clean looking- perfect for a tub surround. Mmm.
Oh and this is one project where we weren’t afraid to call in the pros. We paid $100 for an hour of an expert’s time so he could remove our old fixtures (they were soldered in place behind the wall) and put in our new ones (also soldering them in place for long-lasting durability and performance). It was totally worth it to avoid any potential plumbing issues down the line and after receiving many $300+ estimates for a simple shower-hardware switcheroo we found a great local plumbing company (Advanced Plumbing – 804.358.1616) who gave us a much more reasonable price- so we’ll definitely be using them again in the future.
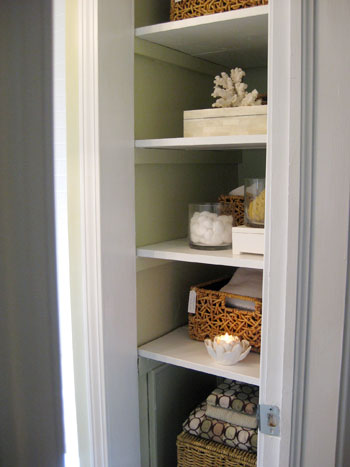
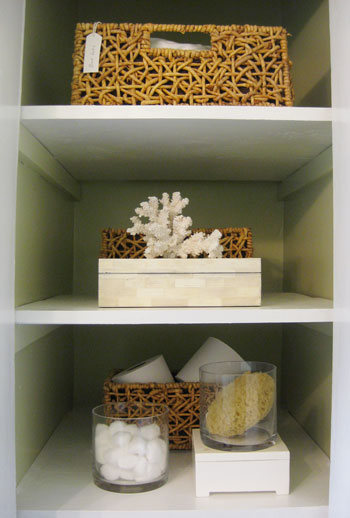
We also have our doorless linen closet (learn about how and why we removed the door a while back) which feels even more integrated into the room since we removed the threshold and tiled the floor of the closet (which used to be wood) so the entire bathroom now has seamless mocha stone squares underfoot. The difference really is amazing! It’s like it was always meant to be an open nook instead of a disparate linen closet. It’s a great place to store all of our extra towels, my hair dryer, my make-up bag, and other linen-closet stuff. But thanks to pretty boxes and bins (that we already had laying around) all the ugly stuff is hidden away for a clean and inviting look that’s organized and still super functional.
Oh and you might notice the tags on a few of those woven baskets (which we made back in the day). They keep us even more organized and John can’t claim he doesn’t know where anything is or fail to put things back in their places- gotta love a foolproof system that costs zero dollars and zero cents.
Here’s a shot of the other side of the bathroom with our new $6 TJ Maxx towels hanging on the back of the door (see a close-up of our personalized towel hooks here). We also hung a small towel bar next to the sink for easy hand-drying. We actually adapted that towel bar to fit our bathroom so stay tuned for a follow up post with those details from John…
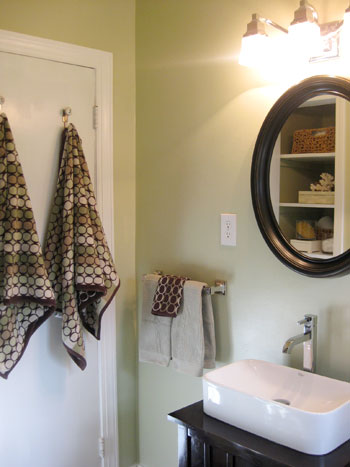
It’s the little things that really make a room feel finished. It was amazing how adding some towels and a few accessories seemed to bring the entire space from “in-progress” to “thank goodness we’re done!” And those last-minute touches only seem to emphasize and complement the more major materials like the veiny marble flooring, the crisp white trim and the soft taupey-green walls. Oh and speaking of the details, we scored our bath mat for $9 on clearance at our local West Elm (which is sadly closing its doors but that meant everything was marked down like crazy). It adds so much softness to the dark stone floors and the cushy texture is so inviting for bare feet.
And now for the budget breakdown. First we should mention that we got two informal bathroom estimates from contractor friends of ours (so we would have a pro price to compare to our DIY price) and both of them came in right around 10K for the entire demolition, room rebuilding, floor and shower/tub tiling and vanity installation (which they knew would be harder than a more modern redo since our 50 year old house had mortar and metal-mesh behind those walls – not to mention some old floorboard rot).
Of course we knew that we could save a significant chunk of change by doing everything ourselves but we also knew that just because a job is DIY doesn’t make it free (thanks to materials and supplies) so we headed into our bathroom makeover assuming that we’d spend around 3K on everything from demo to the final stage of accessorizing- especially because we were replacing everything from the floors and the walls to the vanity and the tile. Needless to say we were thrilled when we crunched the numbers and found out we came in blissfully under budget! Here’s how it all shook out:
- Demo: $67 (for the rental of the demolition hammer and a few other simple supplies)
- Subway wall tiles: $101 (from Home Depot for 21 cents a pop)
- Marble floor tiles: $120 (thanks to an amazing clearance price of around $2.50 at Lowe’s)
- Grout, spacers, sealer, caulk: $70
- Drywall, furring strips, hardibacker, plywood, nails: $136
- HD truck rental to get the big stuff home: $19
- Trim, quarter-round & supplies: $100
- Thinset & notched trowel: $75
- Manual tile cutter: $15 (we went halvsies on it with John’s dad)
- Wet saw: borrowed from John’s dad
- Circular saw: borrowed from John’s dad
- Miter saw: borrowed from John’s dad
- Drywall mud, tape, sandpaper & spackle knives: already owned/borrowed from J’s dad
- Primer: $11 (Valspar Drywall Latex Based Primer)
- Paint: $26 (Olympic No-VOC paint color matched to Benjamin Moore Dune Grass)
- Vanity: $410 ($165 Crate & Barrel nightstand after coupon+ $119 Overstock sink + $109 Overstock faucet + $17 Low-VOC eco-varnish)
- Shower Fixtures: $69 set from Overstock + $100 installation
- Toilet: already purchased a few years back
- Professional tub reglazing: $399
- Towels: $30 from TJ Maxx
- Mirror: $27 on clearance from Target
- TP dispenser and towel bar: $37 from Target
- Art: $6 for the wood (we already owned the paint/Mod Podge & printed ’em ourselves)
- Bath mat: $9 on clearance from West Elm
- Blinds: $25 from Home Depot
- Other small accessories & miscellaneous expenses: $67
- GRAND TOTAL: $1819.00
* It definitely bears noting that we were fortunate enough to get to borrow some tools and a few other supplies from John’s dad (ex: the wet saw, circular saw, and miter saw). If you were to purchase these items they’d probably come in around $450 but you could also rent them for far less from places like Home Depot and True Value.
Yeah we’re pretty excited about that final number. There may or may not have been some geeky high-fives being thrown around when we finally hit “=” and saw it come up on the calculator. Not only did we come in over eight thousand dollars cheaper than a professional most likely would have charged, we even came in more than 1K under our original budget. Thank goodness for clearance tile and places like Overstock, Target, and TJ Maxx for affordable accessories. And boy were we ready to have our new and improved bathroom back in action after exactly 40 days sans shower (although showering at the gym and John’s sister’s house weren’t all that bad after you got used to it).
Of course it wasn’t 40 solid days of work, it was more like four and a half weekends and a few evenings spent gettin’ her done. And we can’t forget that Christmas and New Years were thrown into the mix so we spent quite a bit of time taking a break with family and friends. Here’s a more detailed timeline rundown:
- Pre-project planning & shopping: 5 hours or so
- Removal of toilet/vanity before demo: 2 hours
- Tile demo: 24 hours (two twelve hours days)
- Getting supplies and installing drywall, hardibacker and new plywood floor: 42 hours (three and a half twelve hours days) Note: this step can be substantially shorter in newer homes where you’re not dealing with furring strips to build out walls to match old mortar depths, for example John’s dad tackled this step alone at his house in less than one seven hour day.
- Tiling the shower surround: 17 hours (one seven hour day and two five hour evenings)
- Priming and painting walls: 2.5 hours
- Tiling the floor: 11 hours (one seven hour day and one four hour evening)
- Grouting & sealing the shower & floor: 3 hours
- Buying, cutting, installing & painting trim: 9 hours
- Reinstalling toilet: 30 minutes
- Building and installing the vanity: 5.5 hours
- Hanging the mirror, art, shower curtain, towel bars, etc: 1.5 hours
- GRAND TOTAL: 123 hours (which breaks down into a little over five weekends of work)
The bathroom was definitely the biggest DIY projects we’ve taken on to date. We had never demo’d tile, used a wet saw, tiled anything, or even used a miter saw before! So we love to point to our latest big makeover as proof that anyone can tackle something like this in their own home with a good amount of research and some tireless enthusiasm and determination (for more info on how to evaluate whether a project is too big to DIY, click here).
So we’ll leave you with a photo of our bathroom as it looked when we purchased our sweet old house three years ago. Can you believe the previous owners actually had gross matted carpet covering the old basketweave tile?
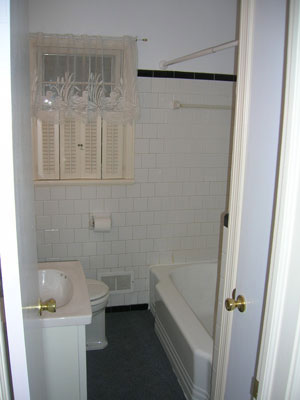
You’ve come a long way old friend.

Would we do it all over again? Heck yeah. We’re interested to see how much faster and more efficient we could be now that we’re not such newbies in so many areas of the bathroom renovation process. But would we start another bathroom remodel this weekend? That might be stretching it. While we love the pride and self-satisfaction that our big bathroom project elicited, we’d be flat out lying if we didn’t admit that it was hard work and we’re happy to take a little break from sledgehammer swinging and tile cutting for a little while. We’re not robots, ok? In fact, a nice long bath sounds about right after all that blood (some), sweat (lots) and tears (just a select few).
So what do you guys think? Is there anyone out there who recently took on a similar DIY bathroom project? Any first-time tilers who are about to take the plunge? We promise it’s not nearly as scary as thinking about it. Really, once you stop dreading the whole thing and dive in it’s kind of a relief to be “doing” instead of “anticipating.” Happy renovating to one and all!
Wanna read each detailed post about the big bathroom makeover? Check out Chapter One (Planning), Chapter Two (Demo), Chapter Three (Wall Reconstruction), a little teaser post, Chapter Four (Tiling), Chapter Five (Grouting), Chapter Six (Trim) and Chapter Seven (Building The Vanity).

Erin says
The bathroom looks amazing! I do have a silly question, where do you give Burger his baths? We have 3 small dogs and we currently bathe them in the tub but we have a detachable shower head on the arm (hope that makes sense) but I would love to replace it with a big fixed shower head. Maybe we could use the kitchen sink? You seem to have good solutions for everything, so I thought I would throw that out there as well.
YoungHouseLove says
Hey Erin,
Good question! Burger gets his once-every-two-month baths in the kitchen sink (he’s so low maintenance thanks to having close to zero fur and the grooming habits of a cat, it’s awesome). We have a little spray nozzle there that works like a charm. Hope it helps!
xo,
s
Jen Z. says
Gorgeous!!!! Love all of it. You guys did a gret job, quick and on the cheap. I love how low your final count come in. It’s great when you see that. :-)
Paula M. says
Oh, I meant to ask, as part of my earlier comment today:
How bad was the smell or fumes from the bathtub reglazing? I’ve heard they can be pretty bad, which is one reason I’ve been procrastinating on getting it done (more out of consideration for my two cats than myself, LOL)
Also, how long must one wait before a glazed tub can be used? I’ve heard three days or more.
Thanks!
YoungHouseLove says
Hey Paula M,
The treatment actually isn’t very smelly at all if you have a bathroom window and you hire someone with a ventilation system that they run the whole time (it sucks fumes right out the bathroom window). Our guy made sure to ask if we had a window once I mentioned I was prego and worried about the fumes. He even ran the ventilation system while he scraped the tub with a razor blade before beginning to reglaze, so he was very thorough and we really appreciated it! Then when he left he closed the door and left our ceiling vent fan on (we would also definitely recommend one of those for moisture reasons alone if you don’t already have one) and I was able to be in the house the rest of the night without smelling anything (and being pregnant I have the nose of a bloodhound!).
Of course if I opened the door to glance at the sparkly new looking tub it probably would have been a bit fumey in there, but thanks to his window ventilation system, our ceiling vent, and the closing of the door it wasn’t really an issue at all throughout the rest of the house. Oh and we could use the tub within 24 hours of him leaving- which was great! Of course we gave it an extra day so around the 48 hour mark is when we really used it, but we’re just better-safe-than-sorry people who are often laughably cautious. I’m sure if he said 24 hours would have been fine… it would have been fine!
xo,
s
Bethie says
We actually have the exact same bathroom as you used to have. We have lots of other renovations to do first (namely the kitchen) but we have taken immense inspiration from your bathroom remodel. I love that you were able to keep update it without making it look too modern. The dark woods looks beautiful in there and the wall color is so lovely and calming. Beautiful job!
Molly says
AMAZING! AMAZING! AMAZING! The final reveal is incredible! I hope to someday take on a project like this, and have it turn out just like yours. I am sooooo inspired. thanks!
Katie says
I love love love it! My favorite part is the vanity…you have inspired me to want to make one similar for our TINY half-bathroom that we want to remodel! THANKS!! :)
Jenny says
Lovely!
Amy says
Love the bathroom! I know it’s a long process but congratulations!
We’re in the middle of a bathroom re-do. It is “functional” but only half-way there! Since we started it the same month we spent our life savings on our house down payment, and it is the ONLY bathroom in the house so we had to call in a professional get ‘er done – we had to press pause!
We are still sans floor tile and sink, and we’re replacing the window, but we had help from some professional family and friends with new electric and the plumbing – for free!!!
I estimate the entire bathroom will cost us about $6,000 even doing the demo, electrical, plumbing, of course painting ourselves, and even getting a handy plumber’s wholesale price on the plumbing supplies, toilet and tub – oh vey!
Ann says
OK, can I hire you guys to come to my condo and redo my bathroom? 5th floor ocean view, pool, and literally right off the beach in Ventnor, NJ (just south of Atlantic City.)I’m only half kidding…I don’t have the confidence to tackle this kind of project alone, nor do I have a handy husband or friends. Kudos to you for a stunning renovation!
Ileen C. says
Love how it all turned out. I especially love the Astoria / Ditmars sign. I am originally from Astoria – now living in Orlando – and seeing that sign sure did bring a big smile to my face. Keep up the great work.
Ileen
Jen B says
Beautiful job, your ‘new’ bathroom looks so serene and spa-like! My favorite parts are the tile (awesome job) and the subway signs–can’t wait for that tutorial. Congratulations!
Meg says
Love it! My husband and I are remodeling our bathroom — mostly DIY but with some help of his cousin who is a contractor (for all the plumbing/electricity). We’re completely gutting it, moving things around, etc. We also had an old cast-iron tub in our home but unfortunately to open up space in our bathroom we had to remove it. We got a claw-foot instead so it’s freestanding – there was no good place to have a wall around the tub. The previous tub had a wall between the tub & toilet so it felt like a closet! Anyways… we have learned so far that everything takes much longer than we thought. But we’ve scored a few great deals (the clawfoot from Craigslist, towel hooks from Amazon, a faucet on eBay, etc.). I’ve found that if I comparison shop first, it takes longer, but I save more in the process!
Thanks for posting every step — it’s been helpful!
Mrs. Money says
It is so beautiful! I love it. I want to come and be the guest that uses the soap. ;) You can come visit me next.
Have you ever used Aubrey Organics products? I love their shampoo, and it’s something you probably would love too!
xoxo
Mrs. Money
YoungHouseLove says
Mrs Money- We love Aubrey Organics! Sadly we don’t happen to have any of their soap or shampoo at the current time (we’re also loving Aubrey Organics for shampoo and conditioner so that’s what you’ll see in our shower caddy). Thanks for the suggestion though!
Denise- We didn’t switch out the electrical outlet yet but we certainly plan to babyproof the entire house once our wee one is mobile! We actually registered for some of those tamper-resistant outlet covers… how nerdy are we?!
xo,
s
Denise says
I came back for a second look – your new bathroom is gorgeous!
John, since you and Sherry are adding a little DIYer to your team, did you retrofit a tamper-resistant electrical receptacle in your existing outlet? I just learned about this code required safety feature during our remodeling project. They’re a huge improvement over the old receptacle caps that we used when our kids were little.
foobella says
Hallelujah!! Great job, P’s.
Cecelia says
Beautiful! You’d never guess that a novice did the tile work.
I love the way the sink matches the tub. The lines on the new trim around the windows and the trim around the mirror echo the lines on the tub too!
That floor is so gorgeous that it gives me goose-pimples!
anna see says
Holy Moley! This is an A+++! Great job you two.
Nicole says
Absoultely stunning!!!!
ronda w says
Gorgeous job youngsters! It is beautiful.
Chrissy says
Okay guys, I was one of those people questioning the tub in the beginning, but now I think I understand why you guys chose to keep it and the refinishing looks really nice. I guess if you have a small bathroom it makes total sense to keep a large tub/shower combo for versatility, and you guys made such great use of every inch of space. Also with a little kid a tub will probably come in handy.
Enjoy your well-deserved hard work!
Jess says
beautiful, as expected! so pretty, and fits so well with the rest of your house!
allison says
great job! my husband and i are remodeling our bathroom at the present and from your pics i wouldn’t be surprised if our bathtubs weren’t the exact same make and model. we have layed slate on our floor and are preparing to do tub to ceiling slate as well. i was wanting to know if you reglaze the tub after all the tiling is finished or before? thanks for all the inspiration. allison
YoungHouseLove says
Hey Allison,
It was literally the last phase of the project (before hanging up the shower curtain and the towels and declaring the room “done!”). The reason for this is that you don’t want to drop anything (spackle knife, roller, screwdriver, etc) into the tub and scratch the finish after it has been reglazed, so it should always be the very last step of any bathroom reno. We even had the window treatments and towel bars hung before reglazing began so nothing but soft towels and our bodies would be in the vicinity of our freshly refinished tub for years to come. It only took the pro we hired around 5 hours (all in one afternoon) and it was completely usable after 24 hours. Amazing!
xo,
s
Anna S. says
I’ve been anticipating this post! You must be ecstatic to have another big project completed, and so far under budget too! Many many congrats.
Amanda says
The bathroom looks GREAT!! We redid our when I was 6 months pregnant, too. We also have that soap pump and it’s great! Gotta love Target!!
Brandi U. says
Wow great job! It looks so fresh and light, just like the rest of your home. I love it!
Lauren says
You’re both amazing! The amount of hard work you put into this project really shows. It is a fantastic re-do, beautiful!!
Jonez says
I absolutely love it! Beautiful work.
theclassywoman says
What a beautiful transformation! I love the colors and materials you chose! :)
Kathryn says
Yay!!! Cheers to being done. Looks fabulous. I LOVE the sink!
Christina says
Your bathroom is amazing. You did such a wonderful job! The design and colours, the fixtures and tiles and the towels and soap, everything works brilliantly and looks like a lot more that even $3000 worth. Thanks for sharing it with us and inspiring us! :)
linda says
Wow! Truly impressive. You two are very inspiring. Such a chic and calming space you’ve created.
Amanda says
Love the new bathroom! It’s perfect! I do, however, feel compelled to tell you that you can see through the bamboo blinds. They used to make privacy liners (which don’t let as much light through – I know), but apparently Target and Home Depot recalled theirs. Anyhow, I didn’t believe it until my husband made me go see myself one night outside. Hopefully you don’t have any neighbors to see in and then you can let the light shine on in! It’s gorgous!
YoungHouseLove says
Hey Amanda,
Thanks for the heads up! We actually didn’t need any privacy from the bamboo blinds (our bathroom is only visible from our private back yard, and you can just see the ceiling from the grass out back so there’s no threat of “being exposed”). In fact we don’t even plan to lower or raise them from their spot- they’re just there for a pop of color and texture. Hopefully that explains more of why we went for the bamboo look in there!
xo,
s
meghan says
I am so in awe. You two are inspiring beyond words. Thanks for sharing the whole process with us. Amazing!
OMG-YHL says
It’s gorgeous! And I can totally relate about the bathroom being your favorite room now; after I redid my bathroom, it was my favorite room for a while! I still smile a bit when I see its baby blue walls. I hope your bathroom brings you similar happiness!
That last sentence sounds weird.
Casey Martin says
I noticed you had painted – or somehow changed – the door knobs of the bathroom. I have the same brass knobs and they really date our house. What did you use? Thank you!
YoungHouseLove says
Hey Casey,
Good question! Years ago we replaced all of our brass knobs with cheap-o silver-toned ones from Home Depot but they’re not solid chrome or brushed nickel, just sprayed looking chincy ones to tide us over. They’ve worked for a few years but we dream of someday replacing all of our doorknobs with nice weighty ones to upgrade the whole look of our house (nice heavy ones that feel substantial in your hand are such a crisp finishing detail). In short: we suggest spraying or grabbing cheap-o knobs to tide you over, but there’s nothing like a real solid knob in the end, so you might want to just save your money towards that final goal. Hope it helps!
xo,
s
Kjirsti says
Wow! Soooo impressive. We are in the midst of a bathroom remodel as well. We’re still in the demo stage. It has been so inspiring and educational to watch you do it before us. Thanks!
Ruth says
Y’all are so inspiring. And the bathroom looks so great
Sonja says
Wow!!!!! I’m so impressed! Looking at your new bathroom totally “helps”! Consider me inpsired.
Julie says
I think your bathroom looks so good, you guys did a great job. I think what makes the difference is youre so meticulous about doing things right. Did you have that shower caddy before? I had one when I first moved into this house and I was soo mad because it started to rust!!! You would think they would be galvanized or something since their whole purpose is to be around water.
YoungHouseLove says
Hey Julie,
We actually sprung for a new shower caddy (which was included in the “other small accessories & miscellaneous expenses” line item in our budget) since we needed something with built-in suction cups to keep it from slipping! We love our new tile and freshly reglazed tub too much to put the old one back up (it wasn’t rusting but it would slip from time to time and send bottles flying). It’s amazing what two little suction cups can do on the new one! Anyway we’re so sorry yours started to rust and we wish we could tell you why. Maybe some are made better so they’re less apt to rust while cheap ones get a bit rusty after a while? Hope it helps!
xo,
s
JenWoodhouse.com says
Amazing work, guys! You should be so proud! You two are inspiring. Thanks for sharing.
Iiiiiiiiiiiimpressive.
Meredith says
An amazing transformation on a serious budget you guys!
JenWoodhouse.com says
PS. your pictures look great too. What kind of camera do you use?
YoungHouseLove says
Hey JenWoodhouse,
We use a Canon PowerShot SD1100-IS Digital Elph. It’s a small 8 megapixel camera that has great little features like a macro setting, an image stabilizer, and a manual setting (which we use 100% of the time so we can turn the flash off- pictures look so much better without it!).
xo,
s
Sue says
“Simply Beautiful”! Your work ethic reveals itself in the final product…..wonderful room! You should both be delighted and proud all at once.
laurajane says
I have the same towels!!
I am so incredibly jealous- what a showpiece of a bathroom!!! The bean will love bath time in the newly refinished tub. :)
Love the artwork too! Amazing project! Does this mean we’ll see the master ensuite you mentioned creating in previous posts?
YoungHouseLove says
Hey LauraJane,
We’re not sure what you mean! We actually only have two bathrooms in our house… this full one in the hallway and a half bath over on the far side of the house near the den. Sadly there’s no master ensuite to reveal, but you can see all the rooms in our house by clicking the House Tour tab under our blog header. Hope it helps!
xo,
s
Jenny says
Love it! It is so amazing how complete accessories make a project!
Alison says
Your bathroom is wonderful – inspiring even! After watching you begin to tackle your bathroom, I finally began tackling our small bathroom. New paint, floors, toilet and sink are all in store over the next few weeks. Thank you for sharing all of your renovations!!
Dana says
I love, love, LOVE this! You guys did a super fabulous, outta-this-world job. And you did it for >$8000 LESS than the pros! (I’m sitting here with my mouth hanging open. Wiping away the drool.) I didn’t read through all the comments to see if someone else had already mentioned this, but that linen closet looks so fresh painted green inside with white trimming it out. And who’da thunk John to be the one to conjure up such lovely artwork?! Not that he’s un-handy, but I’d think after all that hard labor he would’ve said, “My work here is done, Sherry. You accessorize.” 100 points for John. (Not to worry, Sherry, you will get 1,000,000 points for birthing his baby.)
The best part is that this ‘new’ room fits right in with the rest of your modern airy house… like it’s been there all along. That’s the sign of a great design!
Kimberlea says
I bought the same mirror (also for $27 on clearance!) a couple of weeks ago and absolutely love it. Mine is above my old-but-revived dresser (so much love that I had to throw it up on my blog). Genius to put it up in your bathroom. Your bathroom reno is nothing short of magical, love it.
Jenna says
WOW! (what more can really be said?) This is phenomenal! Great job!
Mary says
Absolutely gorgeous! You guys should be very proud. :)
Just out of curiousity, I noticed that you deviated somewhat from the paint colors you used in the past (i.e. using the same 4 colors throughout the house). Any particular reason? Did you guys want some new color in the house? Not that I don’t like the color – in fact, I love it!
YoungHouseLove says
Hey Mary,
You’re beating us to the punch! We actually have a post planned all about adding another tone to our whole house color palette (a muddy taupey-green fits right in with our neutrals and subtle blues-grays) and we’re actually planning to bring another similar green tone (with slightly more kick) into the nursery. In short: stay tuned for an update about the new green additions soon. We didn’t want to broaden the palette with anything too crazy (like a bright red bathroom or a deep forest green one) but keeping things light and airy with soft blues, greens and neutrals still seems to tie every room together for nice flow and cohesion as you pass from room to room. More info as soon as we get to painting the nursery and sharing our color choice!
xo,
s