Oh happy day. We’re here to share all of our bathroom after pictures complete with a full timeline and a budget breakdown to detail every step of this month-long weekend and evening project of ours.
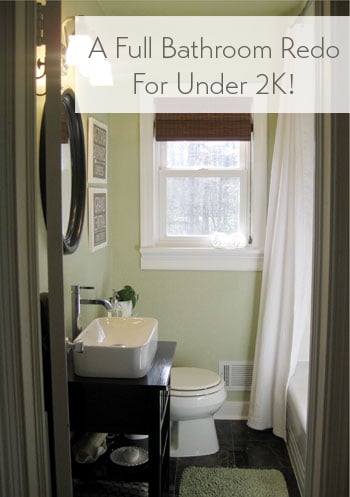
First we should remind everyone what the room looked like at the bleakest moment of the makeover. When it comes to most major renovations like installing a wet wall board, rooms usually have to get uglier before they turn the corner and start looking good, so let’s take a moment to appreciate just how un-aesthetically-pleasing our bathroom was when it was all stripped down after John demo’d the entire thing by himself over the course of about 24 hours spent in the bathroom (my hero!):
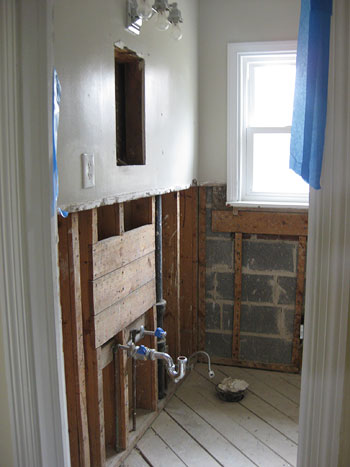
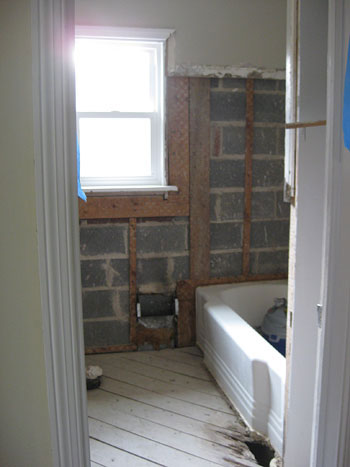
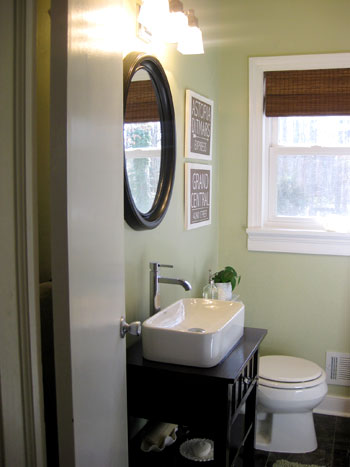
Now look at the same room all put back together again. We’re thrilled that everything seemed to click into place in the home stretch, and now our bathroom is honestly one of our favorite rooms in the house. Weird, but true.
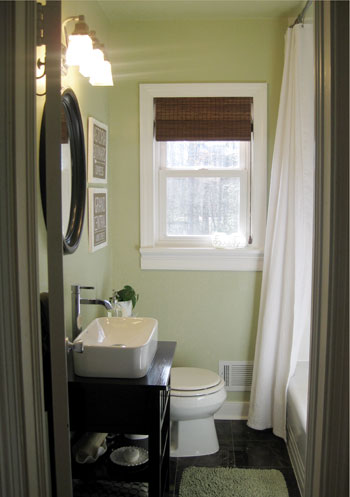
You can see that we hung a dark wood mirror (which we scored for $27 on clearance at Target) above the similarly toned vanity. We love that it also picks up the rich mocha color in our discount marble flooring (which you may remember we snagged for around $2.50/square foot at Lowe’s on clearance).
You’ll also notice some art on the wall… and you know we weren’t about to pay for something when we could make it ourselves, right? John actually came up with the idea of creating vintage-looking wood signs (he’s the brains of this operation, I’m telling you) after I lamented that the thought of square frames next to the rounded mirror could look a bit chaotic. So we picked up one $6 piece of wood, had it cut into two equal pieces right there in the wood cutting area of Home Depot and took them home to transform them into something worthy of our brandy new bathroom.
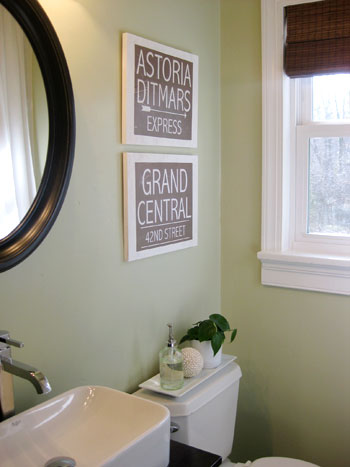
We took inspiration from our time spent in NYC (where we met and fell in love) so we thought making signs that mimicked the look of old NYC subway signs (like these that we hunted down on google) would be a special way to add more of that customized feeling that we love in our home. Of course we adapted ours to be a bit less dark to complement all the white in our bathroom (and in our house for that matter). We also picked two subway stops with the most meaning to us (we met working together near Grand Central and both lived in Astoria Queens at different times).
After bringing home our pre-cut planks of wood it was as easy as painting them white with craft paint that we already owned (it was thinner than latex wall paint so some of the wood grain still showed through) and designing two “signs” in Photoshop (we printed them out ourselves for free). Then we roughed up our prints for a weathered, creased, and vintage look and Mod Podge came in handy when it came to attaching them to the wood planks (the waterproof protection it added was also a plus since they live in a bathroom). Note: we’ll be doing a follow up post with more step-by-step sign making details for anyone who wants to take on this project themselves so stay tuned.
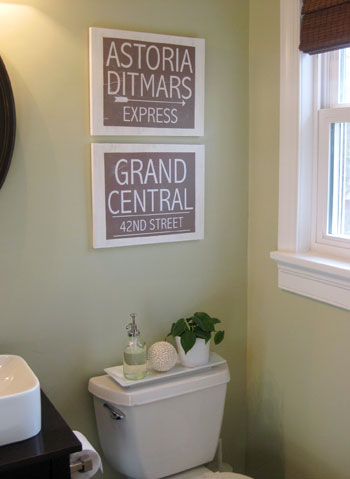
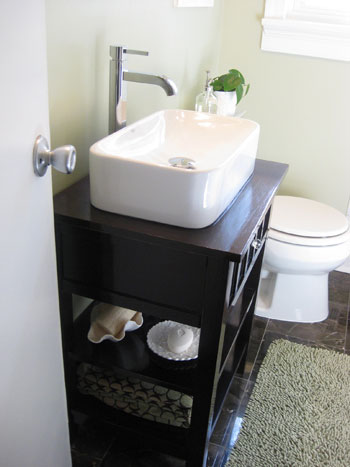
But on with the bathroom tour! If you look at the photo above, you’ll see that we actually opted to attach a simple chrome toiler paper dispenser to the side of the vanity since we didn’t want it attracting attention from the hall (which it would do if we placed it on the other side of the toilet under the window). We also picked up a simple white ceramic tray for the top of the toilet (we actually cut a thin strip off of one of our rubber rug-pads to form sort of a grippy buffer between the toilet and the tray to keep it “stuck” in place for the long haul). Then we used the tray to corral our favorite soap pump (which we waxed poetic about here) along with a cute little shell ball and a leafy green plant.
Although there was room for a soap dispenser on the back corner of the vanity behind the sink we thought it looked cuter a few inches to the right on top of the toilet- so while we know other people might want their soap pump right on the top of the vanity, we personally liked it on the tray (to each his own, right!). It really keeps the top of the sink uncluttered and sleek looking, and we always have the option to simply move the pump over to the sink if weeks of use make us rethink our nearby toilet-top placement.
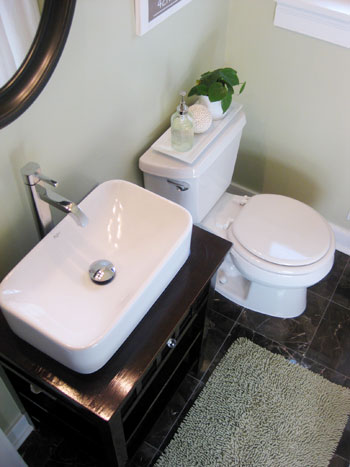
We also love that we were able to save the vanity’s drawer by shortening it (read more about the process of building the vanity here) so we can still fit a few staples in there: toothbrushes, toothpaste, and deodorant in a bamboo tray along with contact cases and John’s hair stuff.
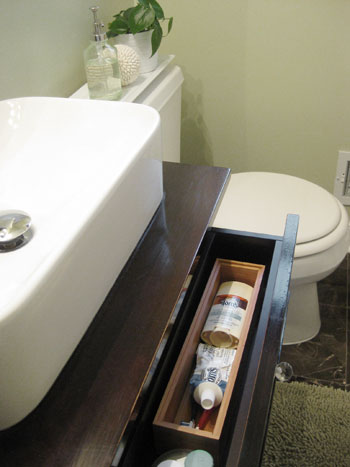
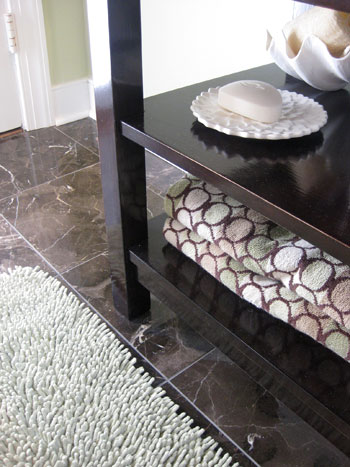
We love that our vanity also allows us to store a bunch of extra bath towels (picked up for just $6 each at TJ Maxx) along with a few cute decorative items like a loofah in a faux clam shell and a pretty scalloped plate with Dove soap on it for our guests (we use a bar of organic stuff in the shower, but when guests stay and want to shower/wash their face we can just mention that the soap under the sink is all theirs).
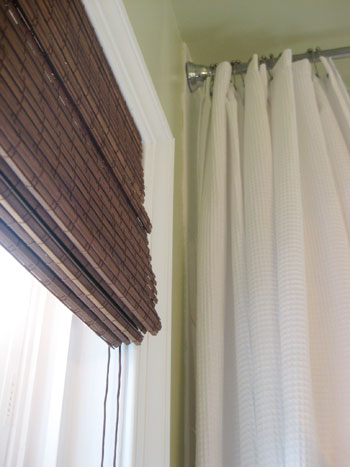
We also rehung our existing white waffle floor to ceiling shower curtain (read more about that project here) and really love that the shower tile now goes right up the ceiling to meet the bar for even more height and drama in the room. We’re so glad we spent the extra time tiling all the way up… the ceiling seriously feels over a foot taller. You’ll also notice that we snatched up a simple inside-mount bamboo blind from Home Depot for just $25. We love the texture and mocha color that it adds to tie in with the tones in the marble floor and even the vanity and the mirror.
At the very end of our renovation we also had our tub professionally reglazed for a completely convincing like-new look. The tub was actually already reglazed when we inherited it with the house and that treatment lasted over 12 years (we received the original paperwork from the first time the job was done years ago from the last owners). And this new reglazing job should last just as long even with everyday use. The key is finding the best professionals who use the best equipment and the best formulas for a long lasting finish that looks amazing (we call for references, look them up with the Better Business Bureau, etc).
As for why we opted to get ours reglazed instead of replacing it, we love the large, deep, original cast-iron tub. It was too great to send off to a landfill (and too heavy and expensive to try to remove & replace). We’re all about working with what we have, so because we couldn’t salvage the bathroom’s old tile, the least we could do was salvage the tub by refinishing it (to the tune of $399- oh and it would have only been $299 if our tub hadn’t already been reglazed for anyone out there looking for a cost estimate). Oh and because we’ve lived without putting shampoo bottles around the edge of the tub for years (since it was previously refinished and that’s not recommended) that’s not an adjustment for us at all when it comes to the newly reglazed finish. Note: we used this top rated family owned local company and are extremely pleased with their work.
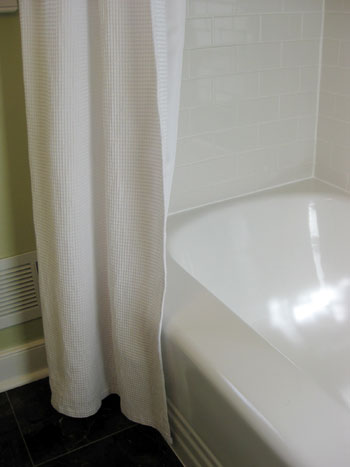
Here’s a shot of John’s amazing tub to ceiling subway tile. Doesn’t it look like the work of a pro? I couldn’t be more proud of my man and his first attempt at tiling! We also opted to add a simple chrome shower caddy (although we debated adding white porcelain corner shelves or even creating an enclave for shampoo and soap before we tiled) since we don’t mind the look and love that it kept our first tiling job sweet and simple.
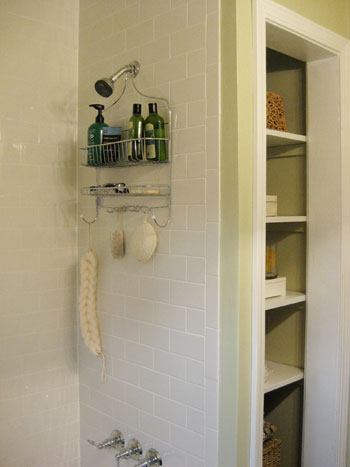
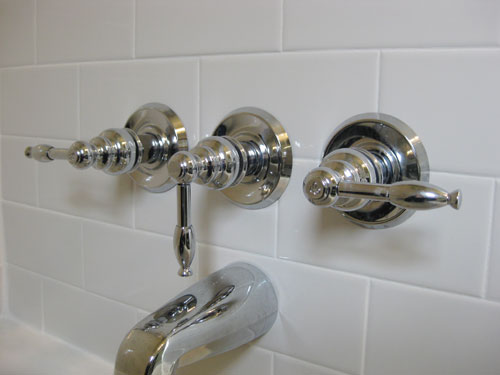
You might also notice that we replaced the shower fixtures with an insanely affordable $69 chrome set from Overstock since our old fixtures felt a bit too cottage-y with our new sink & faucet. The best part is that we Craigslisted our old fixtures (since they were only used for a few years and were in mint condition) and actually made back $30 of the $69 we spent on the new ones. Not bad, eh? Gotta love Craigslist. And on another note, how delicious does that twenty cent subway tile from Home Depot look up close? It’s so bright and shiny and clean looking- perfect for a tub surround. Mmm.
Oh and this is one project where we weren’t afraid to call in the pros. We paid $100 for an hour of an expert’s time so he could remove our old fixtures (they were soldered in place behind the wall) and put in our new ones (also soldering them in place for long-lasting durability and performance). It was totally worth it to avoid any potential plumbing issues down the line and after receiving many $300+ estimates for a simple shower-hardware switcheroo we found a great local plumbing company (Advanced Plumbing – 804.358.1616) who gave us a much more reasonable price- so we’ll definitely be using them again in the future.
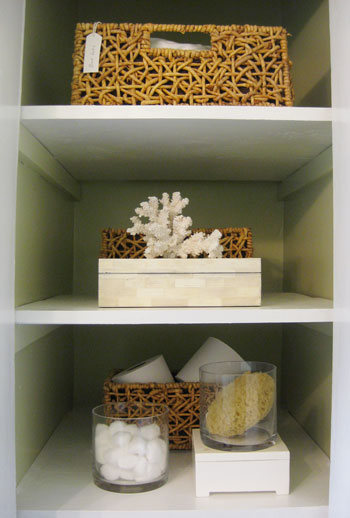
We also have our doorless linen closet (learn about how and why we removed the door a while back) which feels even more integrated into the room since we removed the threshold and tiled the floor of the closet (which used to be wood) so the entire bathroom now has seamless mocha stone squares underfoot. The difference really is amazing! It’s like it was always meant to be an open nook instead of a disparate linen closet. It’s a great place to store all of our extra towels, my hair dryer, my make-up bag, and other linen-closet stuff. But thanks to pretty boxes and bins (that we already had laying around) all the ugly stuff is hidden away for a clean and inviting look that’s organized and still super functional.
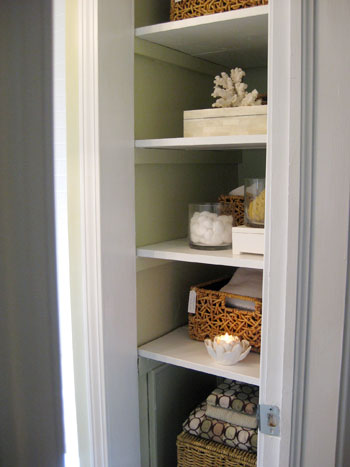
Oh and you might notice the tags on a few of those woven baskets (which we made back in the day). They keep us even more organized and John can’t claim he doesn’t know where anything is or fail to put things back in their places- gotta love a foolproof system that costs zero dollars and zero cents.
Here’s a shot of the other side of the bathroom with our new $6 TJ Maxx towels hanging on the back of the door (see a close-up of our personalized towel hooks here). We also hung a small towel bar next to the sink for easy hand-drying. We actually adapted that towel bar to fit our bathroom so stay tuned for a follow up post with those details from John…
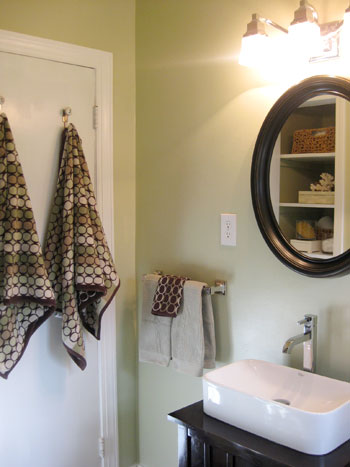
It’s the little things that really make a room feel finished. It was amazing how adding some towels and a few accessories seemed to bring the entire space from “in-progress” to “thank goodness we’re done!” And those last-minute touches only seem to emphasize and complement the more major materials like the veiny marble flooring, the crisp white trim and the soft taupey-green walls. Oh and speaking of the details, we scored our bath mat for $9 on clearance at our local West Elm (which is sadly closing its doors but that meant everything was marked down like crazy). It adds so much softness to the dark stone floors and the cushy texture is so inviting for bare feet.
And now for the budget breakdown. First we should mention that we got two informal bathroom estimates from contractor friends of ours (so we would have a pro price to compare to our DIY price) and both of them came in right around 10K for the entire demolition, room rebuilding, floor and shower/tub tiling and vanity installation (which they knew would be harder than a more modern redo since our 50 year old house had mortar and metal-mesh behind those walls – not to mention some old floorboard rot).
Of course we knew that we could save a significant chunk of change by doing everything ourselves but we also knew that just because a job is DIY doesn’t make it free (thanks to materials and supplies) so we headed into our bathroom makeover assuming that we’d spend around 3K on everything from demo to the final stage of accessorizing- especially because we were replacing everything from the floors and the walls to the vanity and the tile. Needless to say we were thrilled when we crunched the numbers and found out we came in blissfully under budget! Here’s how it all shook out:
- Demo: $67 (for the rental of the demolition hammer and a few other simple supplies)
- Subway wall tiles: $101 (from Home Depot for 21 cents a pop)
- Marble floor tiles: $120 (thanks to an amazing clearance price of around $2.50 at Lowe’s)
- Grout, spacers, sealer, caulk: $70
- Drywall, furring strips, hardibacker, plywood, nails: $136
- HD truck rental to get the big stuff home: $19
- Trim, quarter-round & supplies: $100
- Thinset & notched trowel: $75
- Manual tile cutter: $15 (we went halvsies on it with John’s dad)
- Wet saw: borrowed from John’s dad
- Circular saw: borrowed from John’s dad
- Miter saw: borrowed from John’s dad
- Drywall mud, tape, sandpaper & spackle knives: already owned/borrowed from J’s dad
- Primer: $11 (Valspar Drywall Latex Based Primer)
- Paint: $26 (Olympic No-VOC paint color matched to Benjamin Moore Dune Grass)
- Vanity: $410 ($165 Crate & Barrel nightstand after coupon+ $119 Overstock sink + $109 Overstock faucet + $17 Low-VOC eco-varnish)
- Shower Fixtures: $69 set from Overstock + $100 installation
- Toilet: already purchased a few years back
- Professional tub reglazing: $399
- Towels: $30 from TJ Maxx
- Mirror: $27 on clearance from Target
- TP dispenser and towel bar: $37 from Target
- Art: $6 for the wood (we already owned the paint/Mod Podge & printed ’em ourselves)
- Bath mat: $9 on clearance from West Elm
- Blinds: $25 from Home Depot
- Other small accessories & miscellaneous expenses: $67
- GRAND TOTAL: $1819.00
* It definitely bears noting that we were fortunate enough to get to borrow some tools and a few other supplies from John’s dad (ex: the wet saw, circular saw, and miter saw). If you were to purchase these items they’d probably come in around $450 but you could also rent them for far less from places like Home Depot and True Value.
Yeah we’re pretty excited about that final number. There may or may not have been some geeky high-fives being thrown around when we finally hit “=” and saw it come up on the calculator. Not only did we come in over eight thousand dollars cheaper than a professional most likely would have charged, we even came in more than 1K under our original budget. Thank goodness for clearance tile and places like Overstock, Target, and TJ Maxx for affordable accessories. And boy were we ready to have our new and improved bathroom back in action after exactly 40 days sans shower (although showering at the gym and John’s sister’s house weren’t all that bad after you got used to it).
Of course it wasn’t 40 solid days of work, it was more like four and a half weekends and a few evenings spent gettin’ her done. And we can’t forget that Christmas and New Years were thrown into the mix so we spent quite a bit of time taking a break with family and friends. Here’s a more detailed timeline rundown:
- Pre-project planning & shopping: 5 hours or so
- Removal of toilet/vanity before demo: 2 hours
- Tile demo: 24 hours (two twelve hours days)
- Getting supplies and installing drywall, hardibacker and new plywood floor: 42 hours (three and a half twelve hours days) Note: this step can be substantially shorter in newer homes where you’re not dealing with furring strips to build out walls to match old mortar depths, for example John’s dad tackled this step alone at his house in less than one seven hour day.
- Tiling the shower surround: 17 hours (one seven hour day and two five hour evenings)
- Priming and painting walls: 2.5 hours
- Tiling the floor: 11 hours (one seven hour day and one four hour evening)
- Grouting & sealing the shower & floor: 3 hours
- Buying, cutting, installing & painting trim: 9 hours
- Reinstalling toilet: 30 minutes
- Building and installing the vanity: 5.5 hours
- Hanging the mirror, art, shower curtain, towel bars, etc: 1.5 hours
- GRAND TOTAL: 123 hours (which breaks down into a little over five weekends of work)
The bathroom was definitely the biggest DIY projects we’ve taken on to date. We had never demo’d tile, used a wet saw, tiled anything, or even used a miter saw before! So we love to point to our latest big makeover as proof that anyone can tackle something like this in their own home with a good amount of research and some tireless enthusiasm and determination (for more info on how to evaluate whether a project is too big to DIY, click here).
So we’ll leave you with a photo of our bathroom as it looked when we purchased our sweet old house three years ago. Can you believe the previous owners actually had gross matted carpet covering the old basketweave tile?
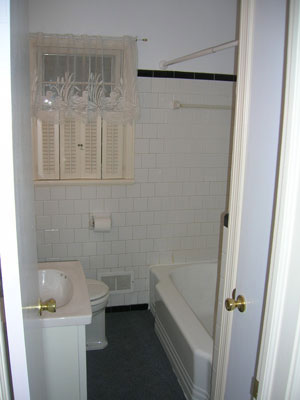
You’ve come a long way old friend.

Would we do it all over again? Heck yeah. We’re interested to see how much faster and more efficient we could be now that we’re not such newbies in so many areas of the bathroom renovation process. But would we start another bathroom remodel this weekend? That might be stretching it. While we love the pride and self-satisfaction that our big bathroom project elicited, we’d be flat out lying if we didn’t admit that it was hard work and we’re happy to take a little break from sledgehammer swinging and tile cutting for a little while. We’re not robots, ok? In fact, a nice long bath sounds about right after all that blood (some), sweat (lots) and tears (just a select few).
So what do you guys think? Is there anyone out there who recently took on a similar DIY bathroom project? Any first-time tilers who are about to take the plunge? We promise it’s not nearly as scary as thinking about it. Really, once you stop dreading the whole thing and dive in it’s kind of a relief to be “doing” instead of “anticipating.” Happy renovating to one and all!
Wanna read each detailed post about the big bathroom makeover? Check out Chapter One (Planning), Chapter Two (Demo), Chapter Three (Wall Reconstruction), a little teaser post, Chapter Four (Tiling), Chapter Five (Grouting), Chapter Six (Trim) and Chapter Seven (Building The Vanity).

Kristal says
Wow that is an amazing bathroom. We are planning on DIYing our bathroom this year {but we have an extra in the basement} so it is so good to see what you were able to do and your budget. Makes me feel like we could totally do it. Except, we have to get a new tub as we are moving our bathroom layout. But hey I never thought of selling it… that might work.
Love it and can’t wait to show hubby {oh… found your post through someone in my reader but I can’t remember who}
Rachael Ensom says
This bathroom is unbelievable. It makes me want to buy a house and guy the bathroom and update it myself. Very impressive.
Suzanne says
I love your bathroom renovation. My husband and I are going to do a similar renovation. Do you have any words of wisdom you could provide before we dive into our project?
Thank you,
Suz
YoungHouseLove says
Good question! Work together and don’t point fingers when something doesn’t go right, remember to laugh, listen to music to lighten the mood, take breaks for food (full tummies= happy people), and take pride in all the little accomplishments that lead up to the big makeover. You can also see a bunch of tips and tricks that we discovered along the way by clicking all the links at the bottom of the post above to read about each stage of our project in detail. Good luck and happy renovating!
xo,
s
Sherry says
Hi Sherry! Lovely work on the bathroom. It looks fabulous!
I have a question about your tub…what are the dimensions on it?
It looks like it fits nicely in a fairly narrow space, which might be similar in proportion to our bathroom, which we’d like to remodel.
YoungHouseLove says
It’s about 30″ wide by 60″ long. Hope it helps!
xo,
s
Jennifer says
You can tell I’m new to this home stuff – I have a question about the fixtures you got for your tub. What is the thing in the middle, right between the handles for the hot and cold water? My tub is about the same, only it doesn’t have anything between the hot/cold water handles. I see your set at Overstock, as well as one that’s very similar, just doesn’t have that thing in question. :) Thanks!
YoungHouseLove says
Hey Jennifer,
That knob in the middle is the toggle between the tub faucet and the shower. So when it’s in the down position the water comes from the tub spout and when it’s turned 180 degrees in the other direction is sprays from the showerhead. The one you’re looking at on Overstock may be for something that’s just for a tub or, if it’s like some bathrooms, the toggle is on the tub spout instead. Hope that helps!
-John
Jennifer says
Thanks for your help! That makes sense. :)
Jennifer says
Sorry, one more question! Did you use the same tiles for your border or did you use bullnose tiles? Thanks again!
YoungHouseLove says
Hey Jennifer,
We picked up bullnose “edging” tiles from Home Depot along with the white subway tiles that we used for the wall. We needed less than one box and they’re included in our “tile” price breakdown. Hope it helps!
xo,
s
Jeff C says
Hi – Is the bathroom mirror a perfect circle or oval?
Thanks,
Jeff
YoungHouseLove says
It’s an oval. Hope it helps!
xo,
s
Katie E says
Sherry –
Your whole house is amazing! I love reading your website; it’s so fun!
I recently purchased some floor tile that is very similar to what you used in your recent bathroom renovation and am having a hard time picking out a grout that will look right. If you remember, would you mind telling me what brand and color you used in your bath?
Thanks so much!!
Katie
YoungHouseLove says
Hey Katie,
Here’s a post all about grouting that has that info for ya: https://www.younghouselove.com/2010/01/tackling-the-bathroom-chapter-five/
Hope it helps!
xo,
s
Jennifer says
I can’t tell if your shower curtain rod is the kind you screw to the wall or a tension rod. With the weight of an extra long curtain and liner, which do you recommend? Thanks!
YoungHouseLove says
It’s just a regular old tension one that we’ve used with the same weighty fabric liner and curtain for years now. Works like a charm. Hope it helps!
xo,
s
Staci says
I hope you see this soon- I know you are always very good at replying to comments, but this post was a few weeks ago….anyway, we are doing a DIY vanity this weekend after being inspired by you! (We’re renovating a house and looking to save money everywhere.) We are using this exact sink and a similar faucet. But, our countertop space (a sideboard from ikea) is only 15.75″ deep- I looked yours up on Crate and Barrel and it is 17.75″ deep. So, you have an extra 2″. Can you tell me if you think those 2″ are critical? Would we be pushing it to try this set up? I love overstock, but the returns there can be challenging and costly! Thanks so much!
YoungHouseLove says
We think you can definitely still do it! We have a lip of about 4″ in front of our sink so you’ll just have a 2″ lip instead. Either way it’s not a large amount of counterspace so we hope that works for ya. Good luck!
xo,
s
staci says
thank you so much for the quick reply! we’re not worried about counter space- the sideboard is 61″ in length, so we’ll have all the space we need on the side of the sink. More concerned about the aesthetics/logistics of it. I think we’re going to go for it since it sounds like it WILL fit!
Jessica says
I have been following your blog for a while now and your bathroom renovation has inspired me to think about doing my own myself. I noticed your walls are different to mine, I think they’re gyprock/plaster? My walls in my home are concrete and I am unsure if I am able to change light fittings, faucet fittings etc. Do you know anybody with experience that has undergone a DIY project with concrete walls? I am very motivated to DIY but I am being put off by my concrete walls. Thanks :)
YoungHouseLove says
Wow, concrete walls are definitely a challenge. We have plaster walls throughout our house and those can be crumbly and annoying but concrete ones are even thicker and even more “touchy” so your best bet is to talk some pros at your local home improvement center along with doing as much google and library research as you can. It’s a totally free way to get lots of help, so hopefully you’ll find a tutorial or a knowledgeable expert who can shed some light on the subject for you. Good luck!
xo,
s
Jennifer says
Beautiful bathroom! Question about the marble floor tile – any slipping issues when its wet after a shower? My husband and I are about to remodel our bathroom and have purchased everything but the flooring. He thinks gouged slate might lead to stubbed toes and a polished porcelain tile we found would be too slippery in the bathroom.
YoungHouseLove says
Good question! We’ve had no issue with slipping at all but of course we have a bath mat on the floor to step out onto. We also have a small room so it’s not like we get a running start or anything, and if we ever did slip there would always be a wall nearby to grab. They do sell sealants for granite and marble tiles that add a bit of grit to them so they’re slip-resistant so that’s an option if you love the look but still worry about slipping around. Hope it helps!
xo,
s
Lisa says
I have a question with the shower curtain… I love the look of the floor to ceiling curtain, but I’m worried about blocking light. Our bathroom has no window, our only light source is the vanity light. If we went with a tall curtain, do you think we’d be showering in the dark?
YoungHouseLove says
There’s actually a really nice glow that comes through our curtain so it never feels dark in there, especially with the white tiled walls that also go to the ceiling. One way to experiment to see if you’ll block too much light- or love the effect- would be to get a tension type shower curtain rod (which could be mounted at standard or ceiling height without marring the wall) and just see what you think. You can even try hanging your existing curtain extra high to get an idea of the lighting situation even though it’ll be too short to stay that way. Hope it helps!
xo,
s
Lauren says
LOVE your bathroom! Such a great job. I was wondering where you got the light fixture above the mirror – I am looking for something similar for my powder room. Thanks!
YoungHouseLove says
We got that at Home Depot a while ago. Hope it’s still there!
xo,
s
Shannon says
Hi John and Sherry,
Your remodel is gorgeous, and thanks so much for naming the excellent Richmond reglazer. We’re dealing with some cracking tile in our similarly sized full bathroom (ah, 1940s Richmond houses), but given that we’re not going to make this our “forever” house, we’re having the tile repaired and the entire bathroom re-glazed in white. We hope it gives us a nice, clean subway-tile look without having to demo our whole bathroom. That wire mesh John had to pull out is terrifying! We’ll take before and after pictures and send them along when we’re done with the project.
Cheers!
Nancy says
The tiling does look like a pro did it! The last time I did tiling – it was horrible. Everything looks great and you did a great job with such great finds. Is this your main bathroom? I’m wondering if you feel you have enough storage space with that vanity plus your linen closet.
YoungHouseLove says
Yup it’s our only full bathroom but we find that we have tons of storage with the linen closet thanks to a bunch of deep bins and baskets in there. Plus the added storage of the drawer in the vanity is the icing on the cake. Hope it helps!
xo,
s
Jenny says
Your blog is such an inspiration! Thanks so much for giving so many great ideas!! I have a quick question. How did you get your shower rod up with it being right over the tile? My husband is convinced that we cannot drill into our new tile, and it goes all the way up to the ceiling like yours. Please help!
YoungHouseLove says
It’s a tension shower rod from Home Depot, so it just twists into place over the tiles- no drilling necessary! And it’s strong enough to hold up our extra long and weighty waffle curtain along with our fabric liner (hasn’t fallen once in the two years we’ve had it) so it’s just as good as the screw-in versions without the tile holes. Hope it helps!
xo,
s
amy says
Your new bamboo blind from Home Depot…what size is it? I am having a terrible time finding a 22×64 somewhere in a chocolate color. We just remodeled our master bath, and I’d like one to hang in the small window for some texture, color and a little privacy at night! I have googled, checked big box stores online, etc.
YoungHouseLove says
Our blind is actually 22.5″ wide (by at least 64″ long). If you go to Home Depot in person they really have a ton of options, and they also can cut things down for you there (for free) so it’s worth asking about. Hope it helps!
xo,
s
LT says
Well done, as always!
What is the finish on the light fixture above your vanity? I’m having a hard time telling if its silver or an an antique bronze. Thanks! :)
YoungHouseLove says
It’s chrome just like the faucet (along with the towel bar, the toilet paper dispenser and the fixtures in our tub/shower). Hope it helps!
xo,
s
Jennifer says
Hey, did you guys use white grout or off-white? I love the look!
YoungHouseLove says
Hey Jennifer,
We used a grout color called ‘Standard White” on the subway tile. It was a bit more off-white-ish than the “Bright White” they offered, but not quite as creamy as a true off-white color. Here’s a post that talks all about picking the color if you want more detail: https://www.younghouselove.com/2010/01/tackling-the-bathroom-chapter-five/
-John
Jamie says
Just found your blog and I’m already in love with it. The before pictures of your bathroom looks similar to ours (wall tile, cast iron tub). How big is the bathroom? I love what you’ve done with it.
Jamie
YoungHouseLove says
Hey Jamie,
So glad you found our blog! Our bathroom is approximately 7″ long by 6″ wide (if you include the tub and the open linen closet). Hope it helps!
xo,
s
Alyssa says
A friend recently recommended your blog to my husband and I since we are looking forward to closing on our first home in just a few weeks (yay!). After reading some of your posts, I have to say that I am hooked! You have a beautiful home and great ideas. In any case, one of the first projects we intend to tackle is painting our bathroom. What kind of paint finish do you recommend using in a bathroom? Due to the moisture released in the bathroom should the paint finish differ from other rooms in the house?
YoungHouseLove says
Yup, semi-gloss in bathrooms and kitchens. Flat or satin in other rooms. Hope it helps!
xo,
s
Katie says
Wow, I am absolutely enamored with your entire website and especially this bathroom! My husband and I are currently renting a home that was built in 1956, so it has MANY of the same charming (and not-so-charming) aspects that your house has and had before renovating. The bathrooms are interesting, to say the least. There is a guest bathroom off the hallway (which looks eerily like your bathroom before the renovation, without the carpet, thank goodness – we even have one of those old fashioned gas heaters on the wall that we had to have disconnected). The guest bath has a toilet and sink, but then is connected by a door to another room that has a shower and various cupboards for storage. That is then connected through a doorway to another bathroom with a toilet and sink. Sort of a weird Jack and Jill set-up. That bathroom is then connected to the master bedroom. Obviously we won’t be doing any major overhaul of the bathrooms until we buy the place (which we have the option of doing) and I can tell you, reading your site has made me feel MUCH better about things. While the current state of our bathroom is in a bit better state than what you started with, they need MUCH work. I also have the walls that are covered in tile (about halfway up the walls) in both bathrooms, so I can only imagine the demolition will be tough! I am definitely going to be asking your advice when it comes time for us to do our own massive overhaul!
I LOVE your site, Sherry and John!
Maggie says
Hi! I’m pretty much obsessed with your blog these days since my guy and I just purchased a little ’54 Sears-Built home in New York and are staring down a slew of projects as complete newbies. Your bath project is almost identical to what we are looking at…same tub and tile, except our tile is peachy pink and black and so much harder to work around design-wise. My question to you is(besides how you two managed to get the cahones to dive into this!), if we love the basket weave tile floor, but want to demo the peach and black wall tile like you did, how hard would it be to keep it in tact during demo? Is it an all or nothin’ scenario?
YoungHouseLove says
You can definitely salvage the floor and demo the walls! Just cover the floor extremely well with layers of cardboard and fabric drop cloths to keep it from being damaged by falling wall tile and go super slow and steady as you chip out those walls (catch as much as you can before it hits the floor, and once you get down to the bottom chisel things out extremely carefully around the floor tile). We would recommend googling around for more tips and also asking the pros at your local home improvement center- you might find even better tricks along the way. Good luck!
xo,
s
Sara says
Hi Sherry and John,
I just ordered the same shower fixture from overstock and I noticed a lot of the reviews said the showerhead wasn’t good and needed to be replaced. Just wondering if you kept the one that came with the set or replaced it. Thanks and hope you’re feeling well Sherrie!
YoungHouseLove says
Hey Sara,
The funny thing is that we kept the same showerhead that we originally had in there because we liked the pressure and the spray options better than the basic one that came with the fixture, but we switched out the faucet and knob part on the bottom (which we love by the way). Hope it helps!
xo,
s
Danielle says
WOW! I am so impressed with your bathroom renovation!! My husband and I bought our first house a few years ago and there is SO MUCH we want to do to it! We’ve even contemplated selling recently and just buying a more updated house because all the renovations we want to do are almost overwhelming! Your blog has given me hope to try and do some of the things ourselves. But, we have NO experience with tiling, demo-ing, or anything really. Well besides painting. I’ve painted every room in our house. But, do you think it’s really doable for us to demolish our bathroom (shower is all tiled and hideous! and bathroom is tiled halfway up also hideous!) and redo it ourselves??! I wouldn’t know where to start! And what if we messed it up… eek!
YoungHouseLove says
Hey Danielle,
You definitely can do it if you put in the time and the research. We didn’t have any previous experience with demo or tile either. At all! Here’s a post that will hopefully help to explain how we use research and enthusiasm to tackle projects around the house: https://www.younghouselove.com/2009/12/email-answer-diy-damage/
Good luck!
xo,
s
MaireJo says
My bathroom has the exactly the same dimensions and layout. I have bead board on the walls now and I hate it. It was installed to cover up the peeling, bubbling paint that was on the plaster walls. I think you stated in a previous post that your walls are plaster too. How did you get your walls so smooth & get the paint to stay? I plan to install a vent fan before I tackle the walls, so maybe that will help. Right now my bathroom looks like it has a contagious diease with all the bubbling & peeling paint on the walls and ceiling!
YoungHouseLove says
Hey MaireJo,
We actually re-drywalled many of our walls (click back through the links on the bottom of this post to see that first step of the process) so the new walls were no longer plaster and took the paint really well. And the walls that we didn’t re-drywall were in good condition (which is why we didn’t replace them) so they easily soaked up the paint and looked smooth and even. No peeling or anything to speak of. Of course we’ve always had a vent fan which definitely helps, so installing one of those will help, but if you already have bubbling and peeling paint you’ll want to sand that all the way down and get things smooth (or re-drywall) before painting. Hope it helps!
xo,
s
Aunty Zharm says
OMG. I was looking for a DIY site on hatching a giant mirror to my wall n I found u and I’m so so so hooked to yr website. I’ve spent the entire hour (bcz I dont speed read u see 8( ). wow keep up the excellent work. I’ve got goosebump even to type this comment. I’ve put u on my fav webs list!
Tiffany says
I love what you’ve done with the space! I am currently re-doing our bathroom and I have been looking for the perfect shade of pale green. I love the color that you used in your bathroom and I was wondering if you would share the paint color name? Thanks, you two are always inspiring me and my fiance
YoungHouseLove says
It’s Benjamin Moore’s Dune Grass. Hope it helps!
xo,
s
celestte says
I am so happy to find this post. I am in the middle of doing many DIY projects at home. I have the same layout in my bathroom (which is the next project on our list). I have the same tiny linen closet in the same spot. So many times I’ve hit the door with the entrance door and it’s very frustrating. I’ve been trying to figure out if I could live without the door and just leave the shelving open. I already have it neat and organized with baskets. When we replaced all of our interior doors (2-panel from Home Depot), the manufacturer didn’t make one small enough so we just painted the old original hollow door white. I don’t like that it doesn’t match the rest of the interior doors in the house. Now that I see how it looks in your space, the door goes. Thank you…your blog has inspired me more than I can express here. Continued success…and congratulations on baby Clara.
christine says
Thanks for the tips! Any ideas on were is a good place to look for a towel tower?
YoungHouseLove says
Hey Christine,
Have you tried target.com or overstock.com? Maybe even jcpenney.com or nextag.com? We would just google around to see what’s out there. Hope it helps!
xo,
s
Gali says
I was wondering regarding the lighting above the mirror. Could you share details?
I need to buy a light for our bathroom and this one is to my taste and also looks like it would provide good lighting for putting on makeup ;)
Congratulations on the birth of your daughter!
YoungHouseLove says
Hey Gali,
We got that light from Home Depot a while back. Hope it helps!
xo,
s
Gali says
It does thanks and I’m impressed with the quick response with a newborn at home! Hope you’re sleeping some :)
Cara says
This is simply MAHvelous, from design to execution and all of your cost-cutting tips! Thanks so much for sharing all of your home reno adventures with us peeping toms! :) One quick question and I’m sorry if it’s already been asked (I’m at work and don’t have time to read back through all the Q&A) but did you have to get your woven wood blinds cut to fit so perfectly in your window or was that just great luck? Seems like I’ve asked at Lowes if they can cut those blinds and they said no, so maybe you know of another source that will cut them w/o having to place a custom order? Thanks!!
YoungHouseLove says
We actually found the right size without cutting anything! Totally our lucky day. But we have heard that Home Depot can cut blinds (or you can actually do it yourself with a box cutter and a t-square). Hope it helps!
xo,
s
Aden says
We’ve been very inspired by this bathroom project and are coming right up on the end of our own DIY bathroom gut and remodel.
When you took the tile up to the ceiling, what was your strategy for drilling the shower curtain mounts through the tile? Or did you just use a tension rod? We really want to use a curved rod AND have tile to the ceiling but I’m nervous about drilling into my brand new subway tile!
YoungHouseLove says
It’s just a tension rod! And it hasn’t fallen once (it’s actually the same rod we’ve had for over two years now). Love it!
xo,
s
Kristen says
I love love love your bathroom – especially the color. I’d really like to redo our master bath in the same color (I even brought home the color swatch and taped it up.) However, in my painting experience, I’ve noticed that the “glossier” the finish you get (i.e. flat vs. satin vs. eggshell, etc.) the lighter/brighter the paint appears in the end.
Have you ever noticed this? What finish do you all use for different rooms? (From what I can tell, painting in the flat finish is the only way to achieve the same color on the swatch.)
Thanks!
Kristen
YoungHouseLove says
We do semi-gloss in kitchens and baths and flat or satin in all other rooms. We haven’t noticed the change in tone that you’ve mentioned though. Hope it helps!
xo,
s
meg says
hi guys,
love the bathroom redo. did you ever consider reglazing your tub yourselves? there are a bunch of DIY kits on the market and i am considering giving one a try. just curious if there was a specific reason you decided to spend on hiring a pro on that project.
thanks!
YoungHouseLove says
Nope, never even considered it. We knew it was a job for a pro (we’ve heard at least ten horror stories about DIY glazing from friends and readers) and since we know it’ll last at least a decade it was well worth the investment and the peace of mind- it even came with a warranty. Hope it helps!
xo,
s
Misty says
Hi! I have a question for you…How did you pick the Dune Grass for your bathroom? And really, this goes for any of your colors. Do you have a basic idea of the color you are looking for, then go grab a billion chips and see which one you like in your space? Or do you know certain “popular colors” then gather then and see which one works?
I ask because I go to the Benjamin Moore store and bring a bazillion (thats a technical term) chips home and hang them like your blog says for a few days to see it in different lighting. Then I get overwhelmed. lol..So, Im just wondering how you pick a beginning point because I know you use colors from different lines. Thanks!
YoungHouseLove says
Hey Misty,
We knew we wanted a color that felt pretty neutral (not too pastel or saturated) so we brought home a bazillion paint chips, picked out ten or so off the bat that we liked, taped them up on the wall to see which ones looked best in all times of day, and picked our winner. That’s pretty much always our method!
xo,
s
Misty says
Ok, that makes sense. But now I have a most amazingly stupid question…
I LOVE the color of your bathroom and bedroom/kitchen. They are exactly my style. So I brought then home (thankfully in little sample cans) and they both look pastel in my rooms. They definitely do not look pastel in your spaces. What would your suggestion be to remedy this???
YoungHouseLove says
It’s your lighting! Paint reads differently in many different lighting situations so we would suggest bringing home a ton of swatches and find one that reads a lot less as a pastel in your space (tones with more of a muddy gray undertone would be a good place to start). Hope it helps!
xo,
s
Kerry says
Really helpful post! I recently saw a clawfoot tub listed on craigslist that the owner “reconditioned beautifully” himself. Then I read about problems with having to reglaze often, and I’m leary. Obviously, I’ll go see it before we buy, but I’d love your advice. Also, clawfoot vs your shape.
Thanks!
YoungHouseLove says
Ooh clawfoot would be lovely, but you’re right to be leary about the DIY reglazing job. We’re willing to tackle nearly everything ourselves but we didn’t trust we could get a good long-lasting result (ours should last 10+ years and is warrantied by the company) so we hope that helps!
xo,
s
Jason says
Hi,
Sorry if this is mentioned somewhere, but what are the dimensions of your bathroom?
Jason
YoungHouseLove says
Hey Jason,
Just check out our FAQ page (see that tab under the header?) for that info! Hope it helps.
xo,
s
Amber says
Hi,
You have a fabulous blog! I recently purchased my first condo and am in the process of renovating it on a budget. I love this bathroom makeover that you guys did! I can’t tell from the photos, but did you extend the wall color all the way up to the ceilings in the bathroom? Or is the ceiling color white? I wasn’t sure if the trend was to leave the ceiling white or paint it the same color as the walls, so I wanted to ask!
Thanks for all the inspiration you’ve provided on this site. It’s truly fantastic!
– Amber
YoungHouseLove says
Yup, all the way up and onto the ceiling. It was white and it looked more closed in and jarring so we painted it the same color as the walls. This way makes it feel more airy and less heavy and defined if that makes sense. Hope it helps!
xo,
s
jeanna says
I would like to know where you got your shower curtain from? I love your website great info.
YoungHouseLove says
It’s from Target (ordered online via amazon.com since we wanted it to be extra long). Hope it helps!
xo,
s
trish says
I really like the clam shell & coral in the bathroom. Where did you get it? Also the ceramic tray? Everything looks wonderful!
YoungHouseLove says
The ceramic tray came from Target (in the dishware section) and the faux clam shell and coral came from a beach shop in Delaware (but perhaps you can google around for something online). Good luck!
xo,
s
Jenny says
hi,
just started to read your blog and love it!!! I am glad to see a tile floor that was dark marble, we actually used the same marble (or very similar) in our full bathroom. We are onto our next full bathroom remodel now, and we are not sure if we should use the same tile or something different, seeing as the marble was a bold choice, we want to keep the house streamline
YoungHouseLove says
Either could work! You definitely don’t have to stick with the same stuff but it’s an easy choice if you can’t find something else you like!
xo,
s
Tanya says
I just wanted to thank you for posting such a wonderful blog about tackling your bathroom. I have a similar bathroom and you have inspired and given me hope! The breakdown of prices and time (down to the details) REALLY helps.
wendy stoner says
OK – so I saw you on the Nate Show and will be spending whatever free hours I have in the coming days reading every word of your blog. Here’s a question…when in the process did you get the tub reglazed? We have very slowly been renovating our 1905 four-square for the last 10 years. However, most of it hasn’t been DIY. The bathroom will be next and I hate the idea of getting rid of a perfectly good tub that has probably been in here since the 1920’s. I just don’t know in what order to get the reglazing done? First? – last?
YoungHouseLove says
Last! You don’t want anything to scratch the finish, so it’s best to save it for the very very very end of the project. Good luck! And so glad you found our site!
xo,
s
Najlee says
Hi, my husband and I were supposed to start our main bathroom renovation two weeks ago but we’ve had to delay it. We’re actually going to start it on Saturday. I am really nervous because it’s such a big project. Fortunately my husband thinks it’s going to be easy. We have done a dozen or so projects including a small (second) bathroom remodel which took us a month because we could only work on it on weekends. So we’re definitely use to remodeling, but I’m still nervous.
YoungHouseLove says
Good luck! And have fun!
xo,
s