You might notice a theme when it comes to posts like this and this and this and this. Making this house feel like ours seems to be just as much about stripping things down and removing stuff as it is about adding new furnishings and wall colors. Just like the old matted carpets in the sunroom and the bathroom of our old house had to go (along with the crocheted duck curtains, the wallpaper, some small doorways, a few bi-fold doors, and the linen closet door) we’re all about working with what we have. Which could mean altering things a little bit to help them fit more within our aesthetic instead of just junking them and starting from scratch. Which is why the granite backsplash around the bathroom sink (which happens to live in a nook on one wall of our bedroom) had to go.
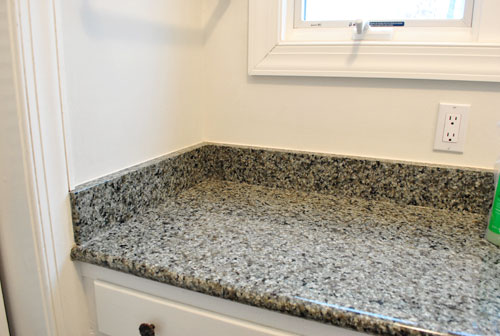
Wait, before you get all nervous, let me explain. We thought the backsplash made the sink scream “Look! I’m a sink! In the middle of the main bedroom!” And removing it might make it whisper “Hey. I’m a sink. But I look more like a piece of furniture because I’m slick like that.” We don’t actually mind the location of the sink, we just want to make it fit in more with the rest of the room instead of sticking out like a sore thumb. So this little project is step one of that process.
Thanks to some waterproofed caulk around the edge and some semi-gloss paint on the walls of that alcove, we won’t have any issues with splashing or water damage (our last house didn’t have a backsplash in either bathroom and the caulk and semi-gloss paint approach worked like a charm. I would even venture to say that the caulk & semi-gloss paint method took a licking and kept on ticking. Yes I just pulled out that hokey little rhyme. You’re welcome.
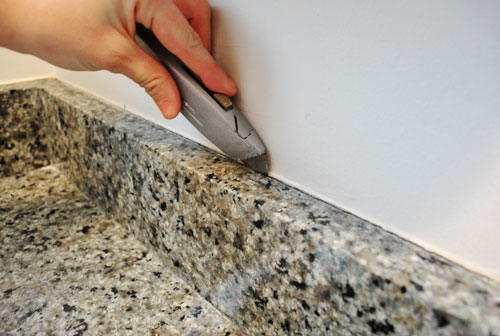
So here’s how it all went down. First I scored the clear silicone caulk by running a box cutter along the top of the backsplash:
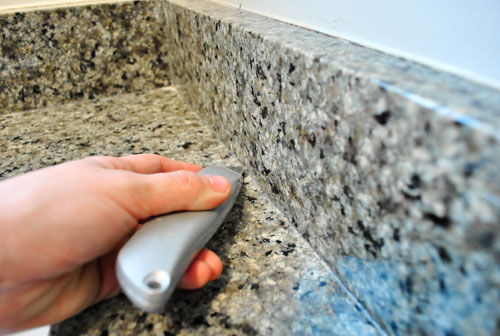
Then I scored the caulk between the counter and the backsplash using the same method:
Next I used a thin metal spackle knife to get in there behind the backsplash and the wall and pry it away slowly:
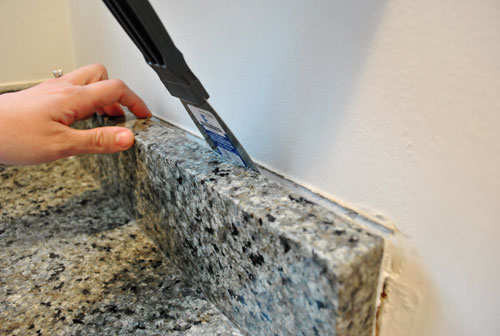
I was able to teeter (yes, that’s a technical term) each of the three backsplash pieces back and forth away from the wall and back again until they completely broke free of the wall and could be lifted out. Those suckers were heavy but I got ‘er done. In fact I’m pretty psyched that I was also able to do this whole project on my own while John was on Clara duty (she says with pride, while simultaneously patting herself on the back and brushing her shoulders off).
Wait. Did I mention I started it without talking to John first? I just wanted to see if removal was even possible and once I got into it there was no turning back. Or telling John what I was doing since the sink looked like this. I would have been in so much trouble (cue all the kids in class saying “ooooh” when the principal gets on the loud speaker and calls someone down to her office by name).
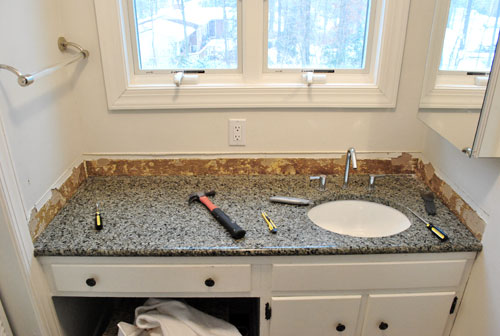
I wasn’t totally going rogue though. I knew he’d go for the backsplashless concept since we had chosen it for both of our previous bathroom overhauls in the old house. So I just crossed my fingers that I could strip things down and make them look a bit more presentable before he and Clara came in to see what I was up to. So here I am furiously scraping the silicone caulk off the surface of the granite counter with the same spackle knife I used to remove the backsplash pieces (it worked really well without scratching the granite at all):
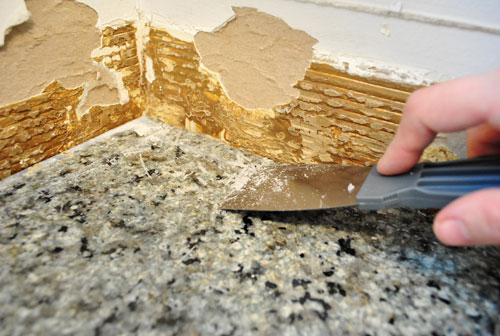
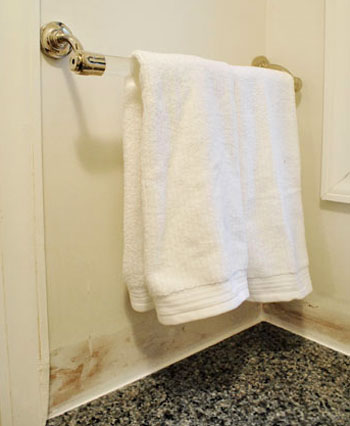
And here I am using the same trusty spackle knife to get in under all that nasty glue and flake it off to reveal a slightly roughed up (but much less gnarly and bumpy looking) piece of drywall:
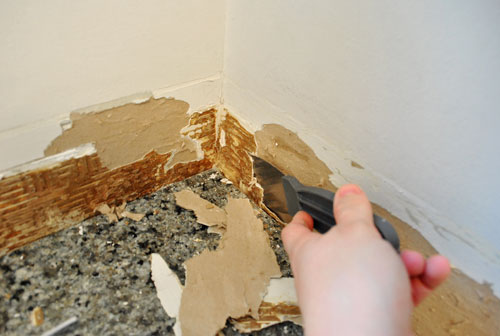
Here’s what it looked like when John came in to see what all the noise was about. Thank goodness it was a lot less grody looking once all that glue was scraped off. And he was, dare I say it, pleased (!) with the surprise project that I sprung on him. Whew.
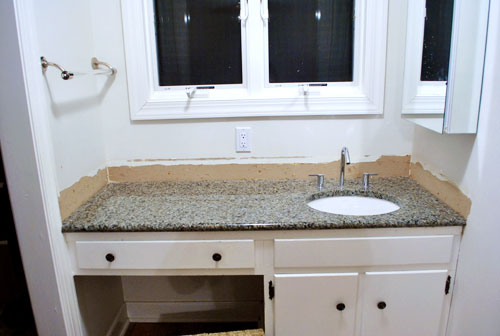
Then it was time to skim coat all the roughed up drywall so it would again look seamless like the rest of the wall. Some people would choose to mud the wall when skim coating, but I actually used some of the same lightweight Dap spackle that I mentioned in this post, which I was able to sand down to a totally smooth and even surface that looked seamless with the rest of the drywall (but remember, don’t sand until the spackle is totally dry). Then I used some white waterproof paintable caulk (I like the Dap door and window stuff) around the perimeter of the counter to fill and seal any tiny hairline cracks between the granite and the wall so no water could collect or drip back behind the counter or vanity.
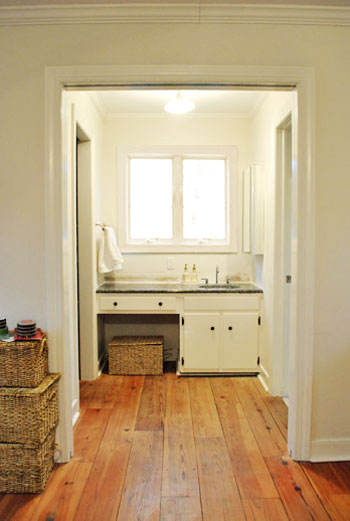
Here’s what she looks like now from afar (ignore the baskets and all the junk that we have yet to organize):
It’s not too bad when you compare her to her glory days (this next photo was taken when we first moved in, before removing the bi-fold doors and of course that backsplash).
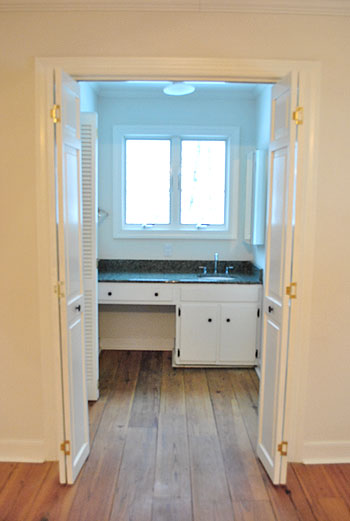
My apologies about the bad blue light, I’m still learning how to tell the Nikon who’s boss.
Anyway, I know the after pic above this one still might not look like much, but we’re psyched. We can picture how great some wipe-able semi-gloss paint will look on the walls of that little nook, and we have some other big plans for that area (to make it look even less bathroom-sink-ish). Oh and as for where those three slabs of granite that I removed will go, we’re sending them off to the Habitat For Humanity ReStore since someone else might be able to use ’em. You know in case they buy a house from someone who went crazy and stripped out their backsplash while the hubby was watching the baby and they’d now like to add it back in. Haha.

Olives and Daisies says
We just re-did our bathroom and it looks SO much better, and it is SO amazing what little things like removing a backsplash can make all the difference! We did a major remodel because it was so bad before (like padded toilet seat bad) and it we love it now!!
http://olivesanddaisies.blogspot.com/2011/01/guest-bathroom-remodel.html
original_ann says
Gosh, you too have such vision – I would have never imagined what a difference this would make. I love it!!
Amanda says
We struggled with the decision of putting up granite backsplash in our bathroom. We decided not to go with it. Makes me feel better that you guys didn’t, either! :)
thelittleyellowhouseblog.blogspot.com
Sarah says
I’m a new fan and I’m still looking though all the projects and posts on this site so I apologize if this question has been asked a thousand times already… I noticed you use a lot of simple, basic tools in a lot of your projects and this is great for me since I like simple and basic and am new to DIY around the house but I was wondering, what is the one tool you absolutely would not want to be without? Or, the first thing you reach for in your tool box when you’re gearing up for a new project?
YoungHouseLove says
We probably use our flat-head and phillips head screwdrivers in nearly every project. And sandpaper and caulk or spackle come in handy a lot too.
xo,
s
Claire says
Looks great guys! Sherry, you mentioned John feeding Clara a little snack while you tackled this project. I remember you mentioning that you were thinking of making your own baby food. Would love to see a post on this one day.
Thanks for the inspiration as always :)
YoungHouseLove says
Hey Claire,
We’re doing the “Baby Led Weaning” method when it comes to food, and we LOVE IT! Haven’t purchased one jar of baby food and Clara’s been on 100% homemade solids for over a month and a half. She’s thriving, loves a range of foods, has awesome hand-eye coordination, and is just generally a joy to watch at mealtime (or snacktime). We highly recommend checking out the book “Baby Led Weaning” (we have it on our sidebar under our Wish List (even though we already own it) because we can’t say enough good things about it. It’ll explain everything!
xo,
s
Keri says
I’ve kind of been wondering where you do your hair and makeup since your vanity doesn’t have a mirror. If you want to tell me to MYOB that’s fine. (Yeah, I just busted out MYOB.)
YoungHouseLove says
Hair and make-up? What’s that? I’m the mom of a 7.5 month old who works from home. I’m lucky not to be covered in crushed up Cheerios, let alone to have time to slap some makeup on. Ha. But in all seriousness, my hair is nearly always in a ponytail, which doesn’t call for a mirror (I could do that in my sleep) and I actually do my makeup in the car when we’re going somewhere (I have a little travel bag with some gloss, mascara, bronzer, etc) and since John’s the perennial driver of our relationship it gives me a second to try to get presentable in the passenger seat. So strange I know! But we’re working on making the mirror situation a lot more functional in there. Stay tuned…
xo,
s
p.s. I hereby award you 500 points for the awesome use of MYOB.
Ali says
Lovely – the space looks much taller and elegant without it! Well done.
Mhairi says
I hate to be pedantic and perhaps a tad inappropriate for my first post to your fabulous blog – I LOVE it, checking in at least twice a day!, however hopefully this may actually help in the not-so-obvious-‘sink’-in-the-bedroom dilemma. As the daughter of an architect I have had it drummed into me that a ‘sink’ is in the kitchen/utility and it’s a ‘basin’ in the bathroom – slightly softer all round sounding. Not sure whether this is one of those old funny British/American language issues but you could start a new trend.
As I say – I just love your blog and am loving what you’re doing to your new home.
YoungHouseLove says
Haha, I love it! We don’t say “basin” around here- but it’s nice and… I don’t know… refined sounding.
xo,
s
Ann says
What a huge difference! You wrote, “Making this house feel like ours seems to be just as much about stripping things down and removing stuff as it is about adding new furnishings and wall colors.” I completely agree, there was a lot of “ugly” going on in our house, from floral curtains and broken shutters to wallpaper. Removing ugly makes a huge impact.
Amy says
We never installed a backsplash in our kitchen because we liked the clean look and it has turned out great. Really, how often are you splashing things 18-24″ from the sink? Not often. Nice eye on visualizing how much more appealing that area could look, a little work = big results!
Jenn says
Woah Sherry! You’ve got guts! I would have been a little scared to tackle that project in fear of what may happen to the wall! Um, you’re a rockstar!
It’s amazing how much better and cleaner it looks without the half backsplash thingie. Great idea/job!!!
xoXOxo
Jenn @ Peas & Crayons
drew says
If you haven;t taken the granite pieces to be reused, you might want to hold onto them in case a future homeowner might want to put them back. I know, a slim chance but you never know. Or you might break them up and use as small pedestals under objects you need to elevate on a shelf or display. I’ve used the drops from our granite counters and the look sharp as a pedestal.
tosha says
Another good call! I HATE backsplashes – it’s just a thing for me, I really don’t like them. I think they look outdated. This looks much more modern, airy, and inviting! You probably already know this, but Home Depot sells a BEHR paint that is moisture resistant/moisture proof that isn’t glossy in case you prefer a more matte finish. We used it in our bathroom remodel and have loved it.
Hyeson says
This is NOT at all related to the backsplash thing…. (which, by the way, is great. We, too, have granite on our bathroom sinks without backsplash and it works just fine!)
Regarding the blue lighting – it looks like you need to adjust the white balance (WB) on your Nikon. If it’s like mine, there’s a little button and then a dial that will let you change the lighting – e.g. from sunlight, shade, fluorescent, tungsten, etc. Tungsten is what I use indoors and it looks like a round lightbulb on your control screen. That and no flash often takes the most natural picture indoors. Hope that helps.
YoungHouseLove says
Yes, I keep forgetting to white balance (and of course John the prodigy always remembers). I’ll get there someday!
xo,
s
Holly says
I love the way it turned out!! Honestly, I never wouldn’ve attempted to try this on my on, but it looks SO much better!
Chrissy Henry says
Ok when I first started reading this post I was like “You are CRAZY, Lady” … but I kept on reading, and laughing about you not telling John. I can totally imagine you trying to complete this impromptu project all stealthy like ;) Then I got to the before and after pics and I have to admit it looks WAY better! I should never doubt you!
Actually, I am off to complete this in my own bathroom right now, I have always hated my ugly tile backsplash!
Kellie says
Looks great! Love it… I never was a fan of using the granite for a backsplash. It’s too thick and intrusive.
Lisa says
Fully off topic, but I loooove those wood floors!
Claire @ Claire K Creations says
I would never think that little bit of marble would make such a difference. Nice work!
Erin says
i would LOVE to remove the granite back splashes from our master and guest bathrooms. the sinks (ha, basins!) are quite close to the back wall, though.
is there any concern of the wall soaking up water and, horror of horrors, developing mould? this is a perennial worry here in the damp, pacific northwest and i need to convince my husband that it’s a good idea!
YoungHouseLove says
Hey Erin,
Hmm, since we’re not experts on the pacific northwest, maybe you could ask around at the home improvement store? The key for us to live with backsplashless bathrooms over the past 4+ years were sealing the space between the counter and the vanity with waterproof caulk and then painting the walls with semi-gloss paint so it’s wipe-able. That way water doesn’t really have any way to penetrate. Hope it helps!
xo,
s
Jen F says
That is some good baby laughing!
nikki says
that is amazing! i never would have thought that removing such a small piece of granite would make such a big difference. the sink is much less obtrusive now. well done!
Nicole says
You are one gutsy girl! I could see myself doing something like that…starting in on a bigger project without my hubby knowing. :) Of course mine wouldn’t have turned out as nicely as yours!
Julie says
Great job on the backsplash…but what I REALLY love are your floors! Oh my word, I have floor envy. Gorgeous!!
Lisa says
Wow, what a difference! Looks fabulous!
Bobbie Brown says
Whoa! I had no idea removing a backsplash could make such a huge difference! I love it! And being a photographer who shoots Nikon I also love your comment on showing the Nikon who is boss! haha! Love it!
Jen says
Where are you? Hope all is well and can’t wait to catch your next post!
YoungHouseLove says
Hey Jen,
We’re off DIYing (and enjoying our weekend) of course! We no longer post on as much of a regular schedule (two times a day every single weekday was getting in the way of our projects) so you can read more about our new posting goals here. If we’re ever not blogging just remember we’re probably holding a paint brush or a hammer! Or eating or sleeping or being with family if it’s a night/weekend since we’re trying to find some balance and remain human! More on that here.
xo,
s
Kelly@TearingUpHouses says
Much improved! Cleaner.
Also, your floors are gorgeous, by the way.
Kelly
Martine Jennings says
Wow, it is amazing how one change can make such a huge difference. Just wanted to say that I always look forward to each post you inspire me every time.
Kind regards,
Martine (Australia)
Jenn(ifer) says
looks great. I loved to see that you wear your ring while DYIing ;)
Jade says
I LOVE your blog and check it everyday. I can’t wait to see how you transform your house. I know this is a bathroom post and you are super busy but if you ever have a spare minute could you tell me what shad of green would go with medium brown bedroom furniture and these curtains http://www.ikea.com/gb/en/catalog/products/10155001 actually in our bedroom the curtains look much darker because we don’t get much light. Any ideas? My bedding is grey so was thinking a grey green but I am terribel at picking paint colours. (Brit here so using colour not color!)
YoungHouseLove says
Hey Jade,
Oops, that link to the curtains didn’t work, but I’d recommend bringing home a ton of paint chips that resemble the gray green tone you like and holding them up against the furniture and the curtains to see what works best. I’d hesitate to pick out a color based on the color of the curtains on my monitor anyway (since that can vary a lot) and the lighting in your house can totally change how a paint swatch reads in your house as opposed to mine anyway. Hope it helps! Oh and use those little sample pots of paint if you’re still caught between one or two choices so you’re sure to pick the best option!
xo,
s
Kayla says
Here’s a random question… I remember you saying that when you first brought Clara home from the hospital you skipped the basinette but simply had her in her crib from day one – which was easy since your bedroom was just a few steps away! Obviously she is a lot older now but I was just curious how you all are adjusting to having your bedroom significantly farther away from Clara’s than in the old house? :) Tahnk you so much for taking the time to answer all the questions on here!
I love your blog so much and my husband thinks I’m hilarious since I’m always mentioning tips and tricks and ideas from you guys. We were talking about getting a dog the other day and he mentioned how some dogs don’t get along well with babies and I said, “Well Burger and Clara get along fine!” and he was like, “Who are Burger and Clara???” lol
YoungHouseLove says
She’s doing great! She sleeps like a champ and we hear every breath she takes through the monitor so we love the location of her bedroom and ours (we never have to worry that she’ll wake up if we talk anymore).
xo,
s
Jenna says
Wow! Never would I ever have thought that a little detail (or lack thereof) would make such a big furniture-like difference. And I like it! Thanks for sharing.
Jade says
Thanks so much! Sage advice. I’ll let you know how I get on :)
Andrea | HomageStyle.com says
OK, so I didn’t read through all 8 pages of comments, so if this was already asked & answered, I’ll go back & do some reading…
I would LOVE to do this with my bathroom backsplash, but the water seems to puddle around the faucet (almost as if counter top may not be level, which I suppose I should check), and I’m concerned that it will damage the drywall over time.
Was this a concern at your last house & if so, how did you address it?
YoungHouseLove says
Hey Andrea,
We didn’t have that issue, but it would probably worry us. I think what we’d try would be to level the counter somehow (maybe pop it off and use shims to level it out?). Theoretically, if you use waterproof caulk to seal the space between the counter and the wall and use semi-gloss paint you should have a pretty impenetrable seal for the most part but I guess you never know. Good luck with whatever you decide to do!
xo,
s
Cora says
Looks great! I don’t know that I would have ever even thought to remove the backsplash, did the idea just come to you or did you have an inspiration?
YoungHouseLove says
Hey Cora,
We didn’t have a backsplash in either of our old bathrooms so I think that planted the seed, and when we were unsure how it would look it was easy enough to google around for stone-topped dressers and vanities (that were freestanding, and therefore backsplashless) so we could be sure we liked the effect.
xo,
s
Katie says
I can’t wait to see what you do with this bathroom! My husband and I bought our first house just over a year ago and have spent all our time, money, etc., on the kitchen and a variety of other projects…leaving our 1970s untouched bathroom, well, untouched. It has a very similar layout to yours (sink and vanity in the middle, walk-in closet to the left, and bathroom to the right. We’d love to completely overhaul everything, but that’s not possible right now. I’d love to know what your “other great plans” for this area are because I’m looking for some ideas that I could maybe implement in steps. Anyway, love your blog. Thanks.
Heather says
LOve your ideas! I know that this would be a more time intensive/expensive project, but I have just been dreaming of a retrofitted dresser/cabinet/desk in the place of the vanity. That way it would look more like a furniture piece and also center the sink under the mirror. Have you guys thought of doing something like that in the future?
YoungHouseLove says
Hey Heather,
We definitely want to work with what we have for now, but who knows what we’ll end up with down the line!
xo,
s
Jessica says
So I was scrolling through past posts to try and find something and I noticed that the pictures in your “buh bye bifolds” already showed those pieces of backsplash taken down. Was there just a little delay in posting or did you just change out the old pics? Haha I hope this doesn’t sound creepy, but once I noticed it, I felt like I had to ask!
YoungHouseLove says
Good eye! I actually started the project a while back but then stopped short of finishing it (puttying and caulking it) until the post. We’re all over the place these days!
xo,
s
Stephanie says
So you put white caulking around the countertop to prevent leaks. When you painted, did you paint the caulk the same wall color or stop just before the caulking and leave it white?
YoungHouseLove says
I got paintable caulk so I cold make it blend into the wall so it wouldn’t be noticeable! When it was white it just stuck out a lot.
xo,
s
Kelli says
Thank you so much for showing this to us! You gave me the confidence I needed to start taking off our granite backsplash in the kitchen to make way for a tile backsplash (all while the husband was sleeping!) I’m so happy that I’ll now have the look I want. Worked perfectly for us!
YoungHouseLove says
So glad! Congrats girl!
xo,
s
Meg says
Hello – I found this post while searching for a solution to a painting project of my own, and I am despirately hoping you have some helpful hints… the previous owners of my home sealed the threshold between the kitchen counter and the painted wall with clear silicone caulking – similar to the joint you had originally between your back-splash and the wall). I assume in the process of removing the excess caulk with their finger, the previous owner applied a thin layer on about 1/4-1/2 inch section at the base of the wall. I have cut out and scraped away all of the caulking I can with a razor blade but the new paint still won’t take to the area of the wall, leaving me with a stripe of wall in the old color behind the stubborn silicone… does the DAP spackle adhere to silicone caulk and take care of this problem? Please help!
YoungHouseLove says
Ooh I would get paintable caulk and put that on top of the silicone and wait for that to dry and then paint over it for a hopefully seamless look. Hope it helps!
xo
s
aimee says
Hi Sherry and John,
not sure if you answer questions about your old posts, but I am considering going backsplashless in my bathrooms and I’m wondering how you found that to be. Practical for cleaning? Did your wall get wet, or grimy or messy?
Thanks!
Aimee
YoungHouseLove says
As long as you caulk the crack so water doesn’t get behind it I think you’ll be great! Ours held up really well with the semi-gloss paint on the wall.
xo
s