Hope you guys had an awesome Labor Day. We split time between family and house projects which is pretty much our sweet spot. This week is going to be especially hairy thanks to having book stuff nearly every day, but we did manage to eke out a few things to share and hope to be back to normal next week (might not be as on top of comments until then either).
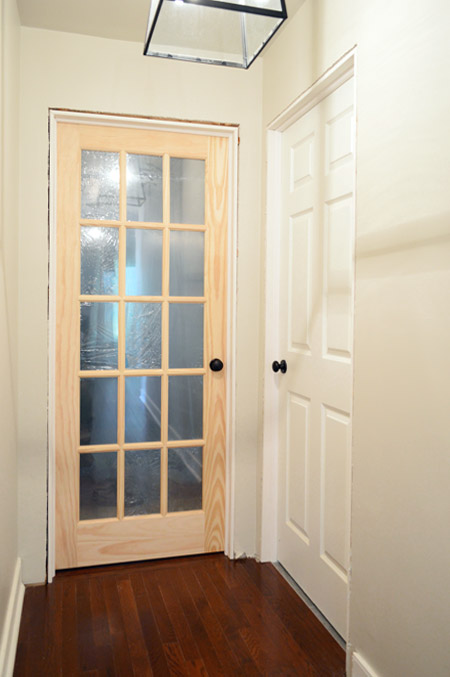
But back to my jamb. Or should I say my jambs? They don’t have casings yet, the leftover doorknobs will be upgraded to these backplated-versions, and one door still needs to be painted like whoa – but boy does it feel good to have two doors hanging on this side of the hallway. And because a bunch of you requested the full play-by-play, here’s how we added jambs and hung both doors – complete with details on carving out a spot for hinges and a doorknob.
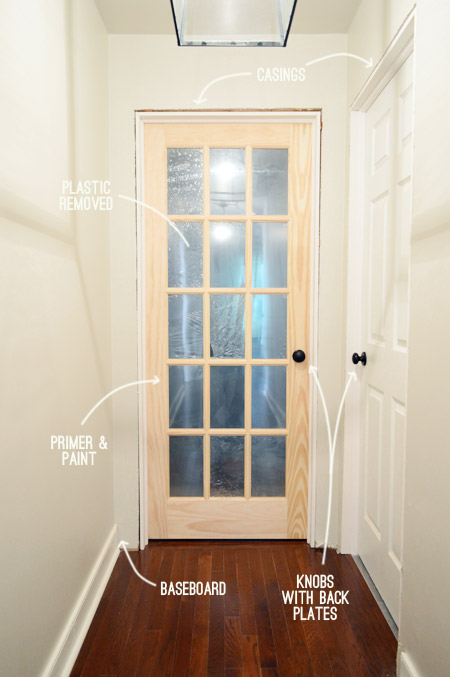
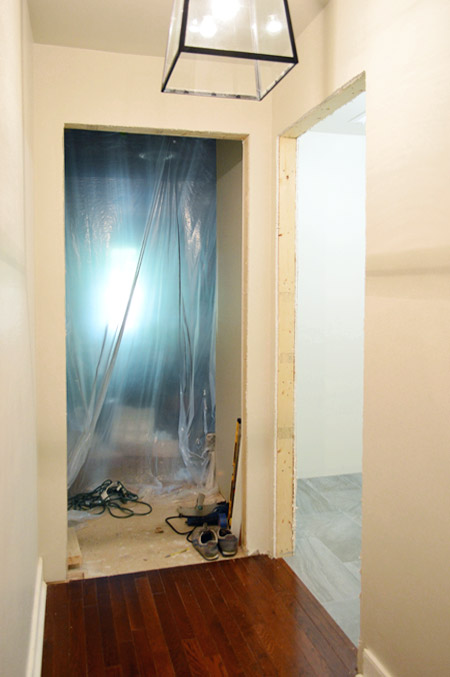
Until last week, things have looked like this. The door-less laundry room wasn’t a big deal, since it actually made working in there easier. But the plastic drop cloth closing off the storage room was less than pretty and less than convenient.
Installing these two puppies gave me a whole new respect for doors. They’re a relatively complex operation, at least considering how much I took them for granted.
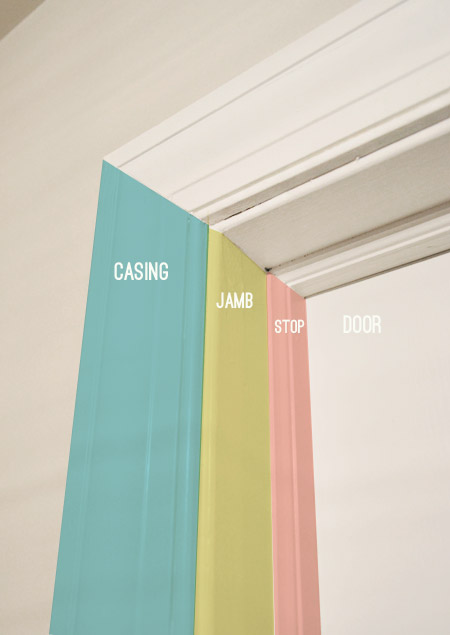
On top of the hardware (hinges, dooknob, strike plate) the doorway itself was made up of three separate trim pieces. All of which we’d be installing.
We debated purchasing a pre-hung door for the laundry room (one that comes already placed in a jamb, which saves you from having to carve out spots for the hinges and knob) but we had trouble finding one that matched the style we wanted for the storage room door, plus it was hard to beat the price on the slab (aka: not pre-hung) version. And since the laundry room door was an existing door that we’re reusing (it used to lead to the storage room), I’d be stuck making a jamb for that one anyway. So we decided to attempt making a jamb for that already-owned door first and if all went well (or at least okay) we’d proceed with hanging the other door from scratch too.
Well, not totally from scratch since Home Depot sells these $19 jamb kits for doors up to 36″ wide (ours are 32″).
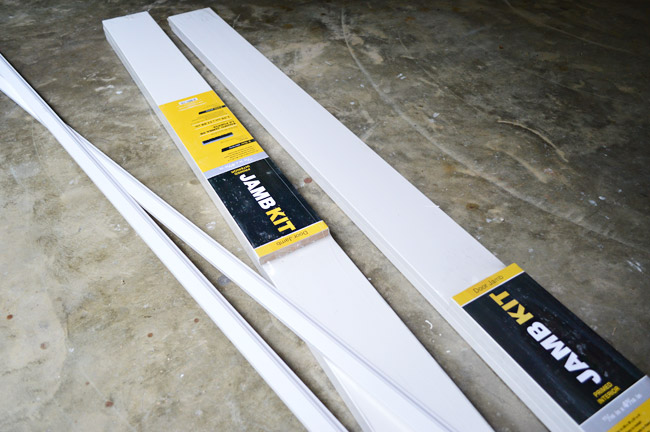
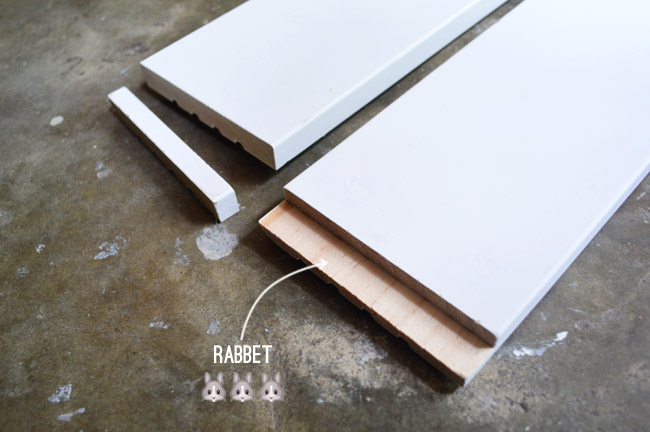
Besides coming in three pre-cut pieces (two sides, one top) the nice thing about the kit is that the two side pieces already have a rabbet joint cut on one end so that the top piece can sit nicely across the two. Ours needed a slight trim to fit into the framed doorway, so I was just careful to cut it off the non-rabbeted end.
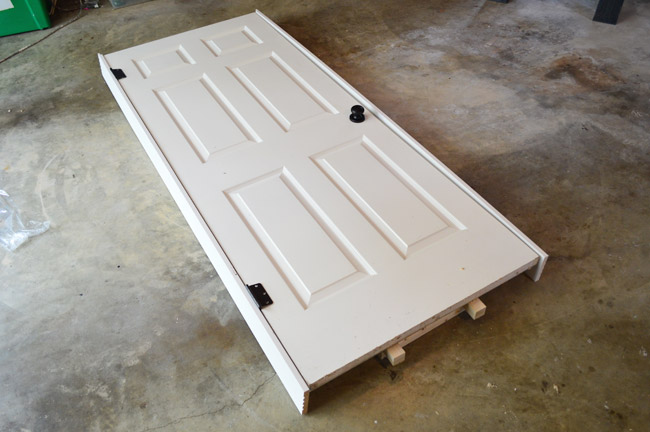
We propped up the door on the ground using some scrap wood so I could construct my jamb with gravity on my side. I leaned the side pieces in place, but couldn’t place the top piece until it was cut down a little bit.
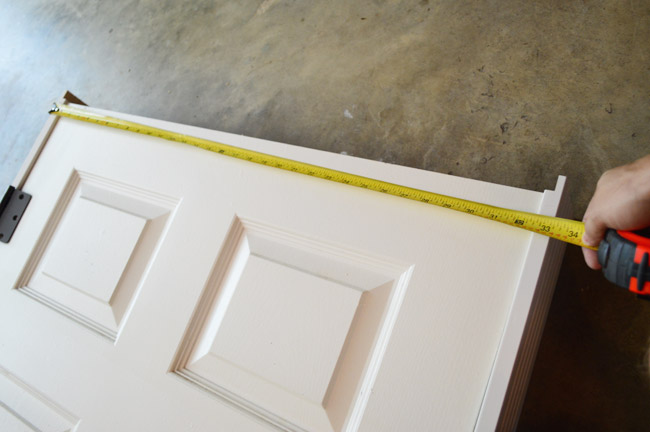
I measured the width from jamb-edge to jamb-edge, but had to account for both the fact that it was sitting in the rabbet joints (so it’d need to be a little shorter than my measurement) and that I wanted to give it about 1/8″ of breathing room around the door too.
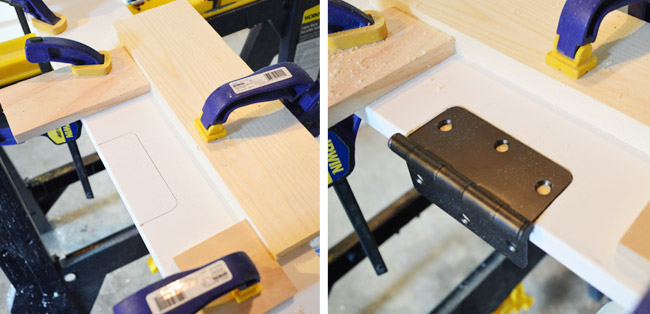
Once that was cut, I started the process of mortising/routing out the spots for the hinges on the jamb – since they need to be recessed into the wood to work. Since they were already attached to our door, I marked where the hinges should go on the jamb based on their door placement.
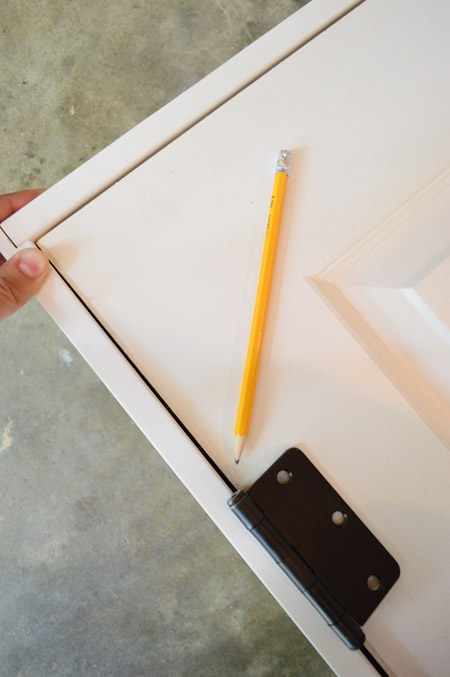
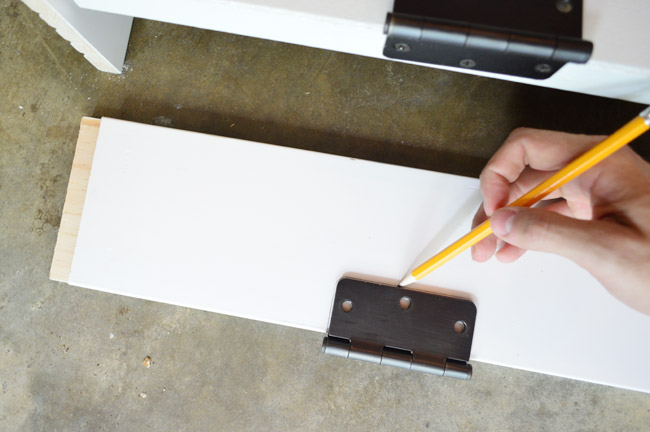
Once I had marked where on the jamb each one should go, I used a spare hinge to trace out the shape that needed to be routed out.
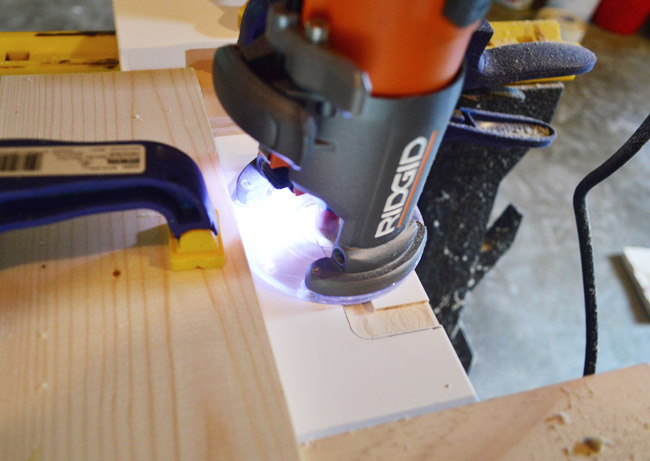
I purchased a compact router for $99 at Home Depot (it’s called a Rigid 1-1/2 HP Compact Router) and an $18 bit meant for work like this. I had done some of this work by hand before and it wasn’t super fast or super precise, so I decided it’d be worth the investment this time around.
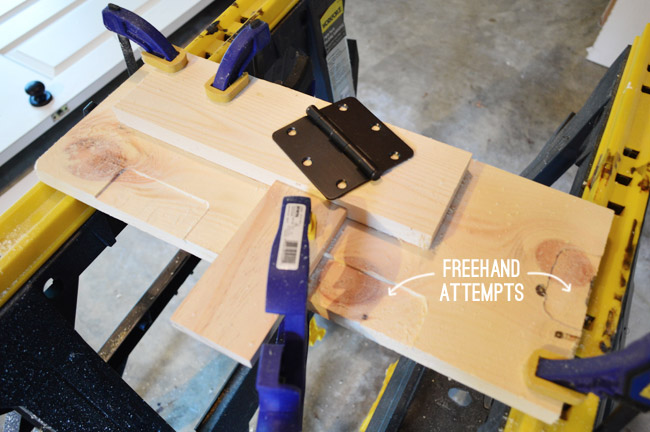
Before taking my new router for a spin on the jamb, I practiced on a scrap board first. My freehand attempts weren’t great, so I started clamping some other wood scraps as sort of a guide. You can see how that worked out for me on the routed hinge spot on the far left of the board below. Muuuch cleaner.
When the time came to make my official first cut on the jamb, it came out awesome (if I do say so myself).
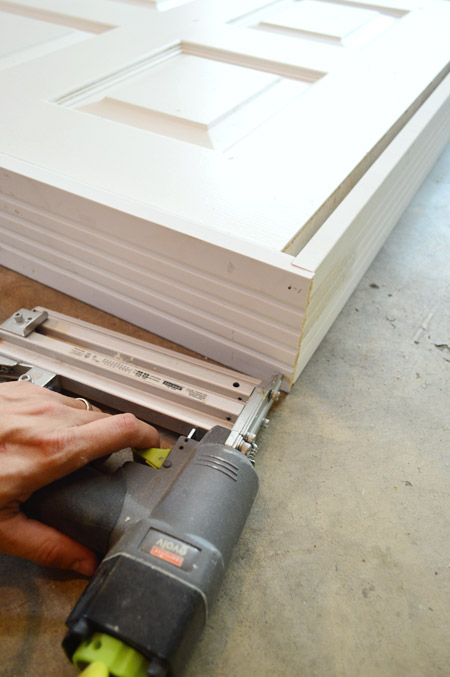
With both spots for the hinges cut, I could nail my three jamb pieces together. I used a 2″ nail through the side pieces into the top.
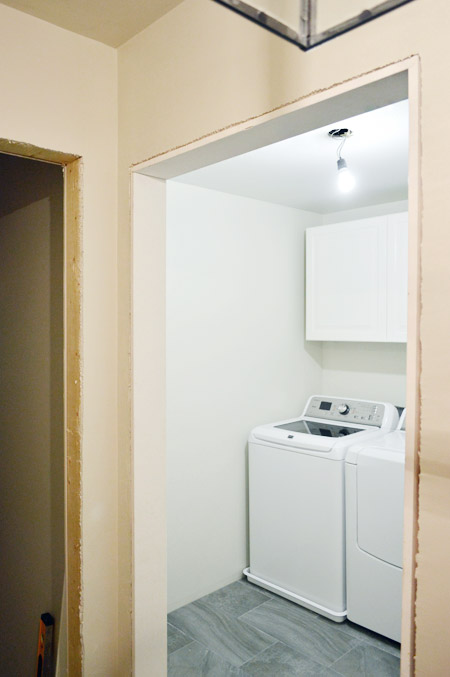
Here’s the jamb that Sherry and I pushed loosely in place within the framed door to the laundry room. You can see that we started the process of hanging this door before we did any of the backsplash (took us a while longer to tackle the glass one).
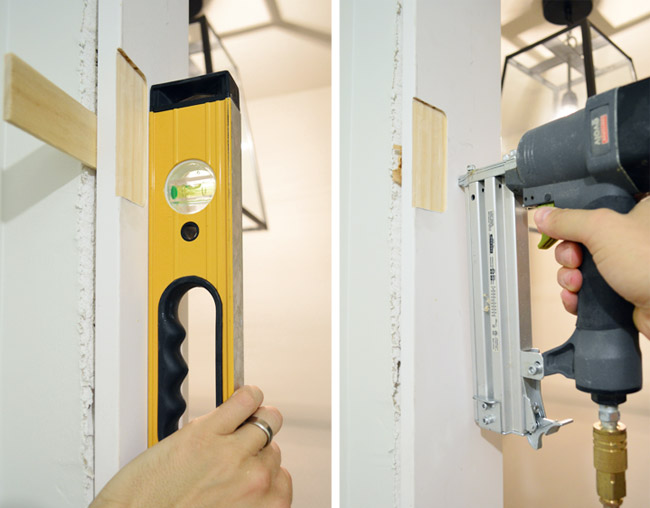
The next part is the most persnickety: getting every side of the jamb level and plumb. We did our best, adding shims – especially under the hinges – to help us adjust things where needed. Once we were satisfied, I nailed the jamb into the door frame on all sides.
I lost Sherry to Teddy at that point, but thanks to some shims under the door I could hang it myself by screwing the hinge into the jamb. Here was the moment of truth.
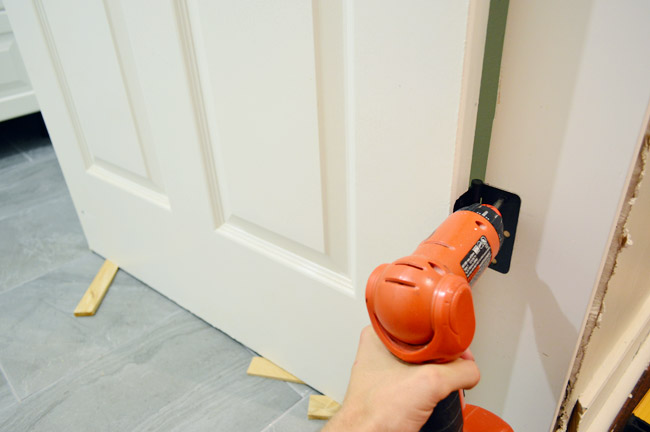
The moment was a bit of a whomp whomp because it didn’t work. Sad trombone. It was a little tight on the top corner.
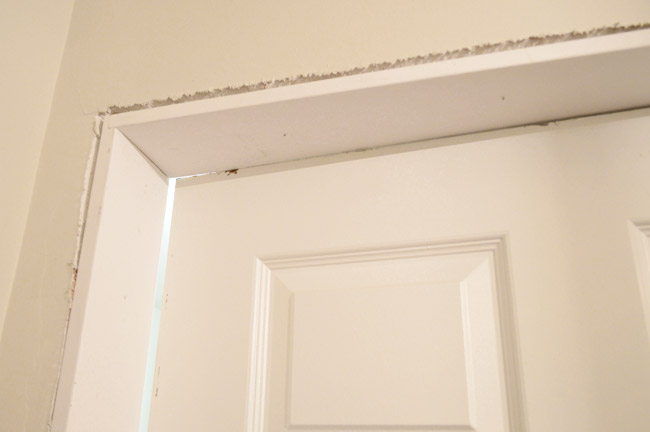
I checked all my levels again, and it turns out that the top corner had slipped out of plumb when we turned our attention to the bottom. So I shoved a couple more shims in there to correct it and things were back in working order. Now that the door closed well, I could attach the strike plate (where the door latches), and nail in the stop molding around the jamb.
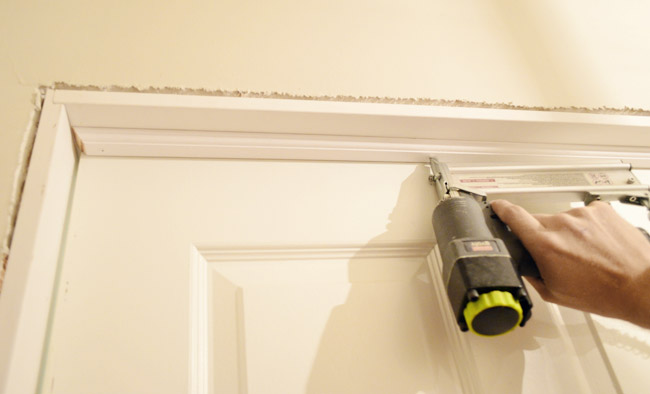
I was pretty darn happy with how it turned out, though it was definitely not speedy.
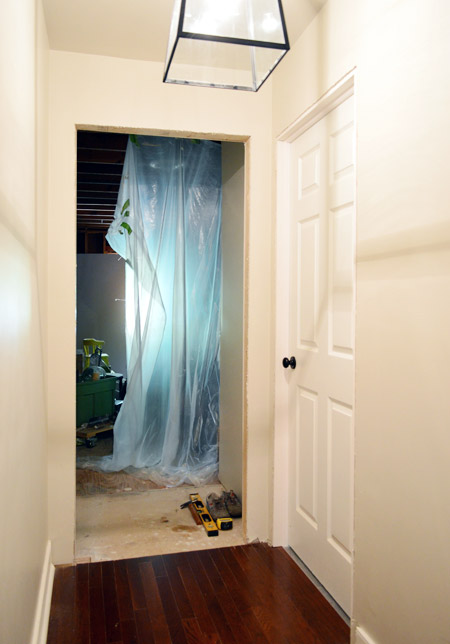
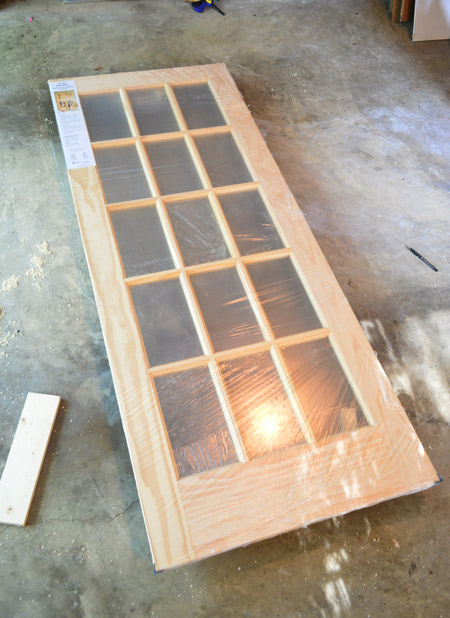
A little while later (we finished up the backsplash and the counter in between these two doors) it was time to wrestle this puppy into place (the glass isn’t frosted, it’s just covered in protective plastic).
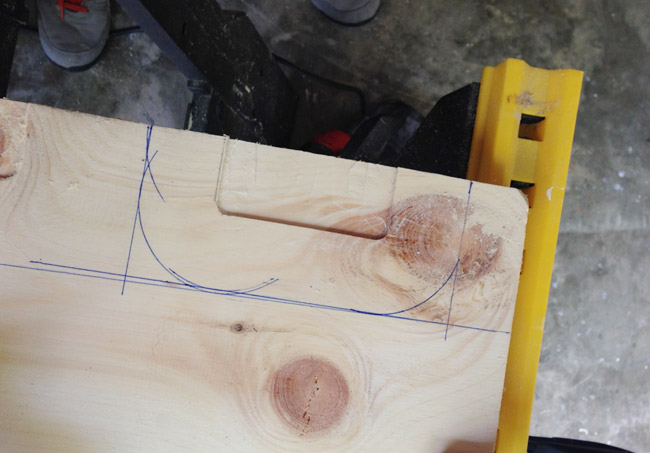
Since the door didn’t have any hinges, I’d have to route out spots for them on both the door and the jamb this time. And since it’s a heavier door, I was adding three hinges. Instead of carefully clamping scrap wood each time around to guide my cut, I decided to make a template out of my practice board. Here’s where I marked where I needed to cut (using my jigsaw).
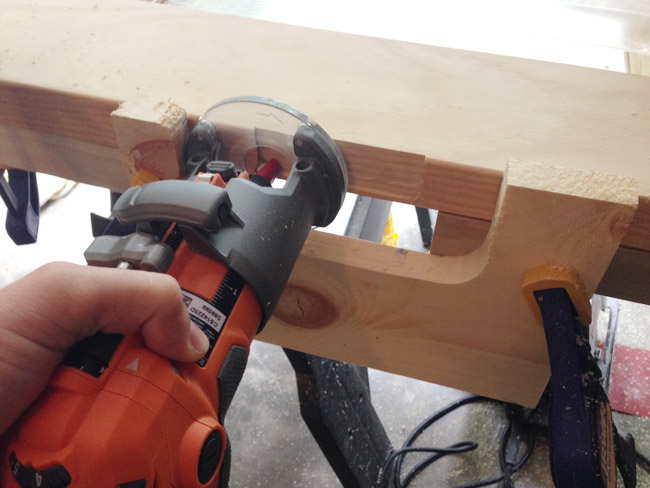
Here’s my wooden guide in action on the door, as I routed out the spot for the first hinge.
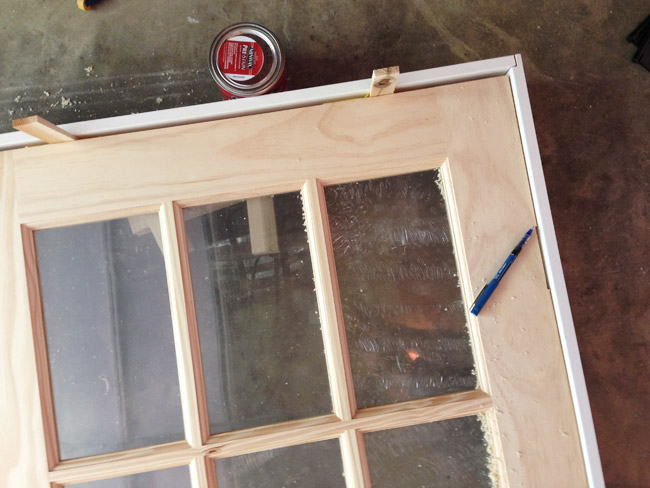
Once I had the three hinge mortises made on the door, I propped it up and loosely held the jamb pieces in place so I could mark the hinge placement on the side jamb piece. I also put some shims up top to ensure that I didn’t run into the same problem we had last time (having a tight fit up top).
With the hinges traced out on the jamb and my wooden template at hand, it was pretty quick work to route out the spots on the jamb.
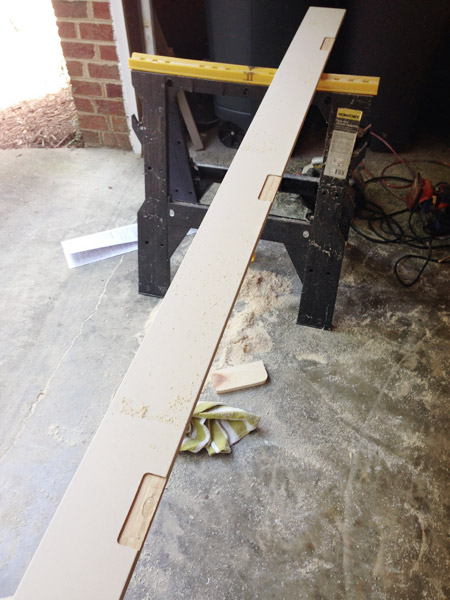
I’ll fast forward a bit, since the process was the same from here the second time around – we nailed together the jamb pieces, brought them into the space, and then leveled, shimmed, and nailed everything in place. With Sherry’s help I got the door hung much faster this second time around… and it worked great! We were relieved. There were high fives and a fair amount of bad moon-walking.
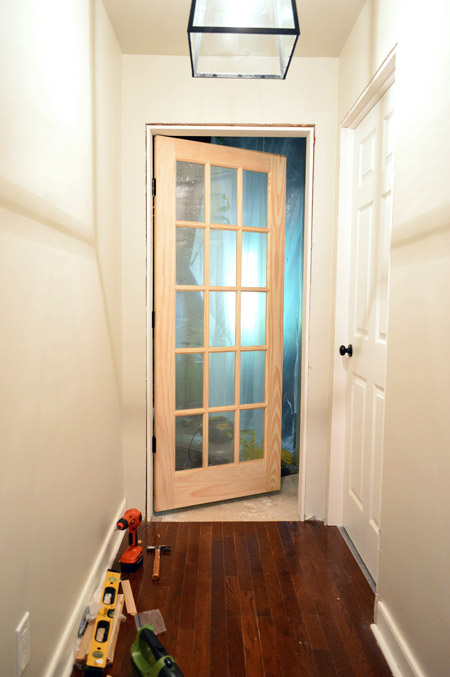
Our dancing was cut short because this door still needed a knob. I bought this $19 kit to help drill the holes for the doorknob precisely. It wasn’t the sturdiest thing in the world, but it was worth the money just to have some instructions to follow – and the right size drill bits handy.
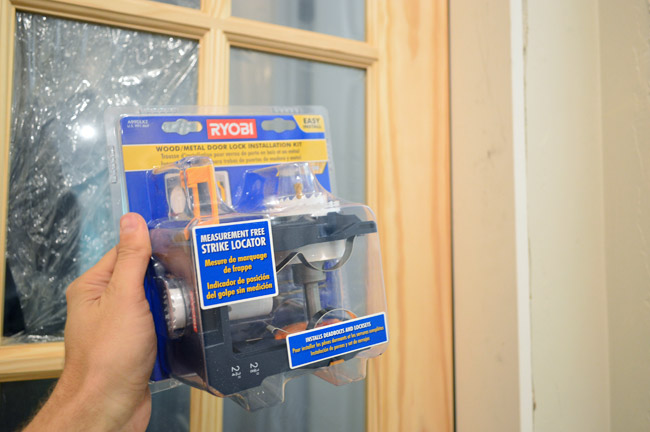
Basically, it clips onto the door, using the strike plate as the guide for where it should go (of course, I had to add the strike plate first).
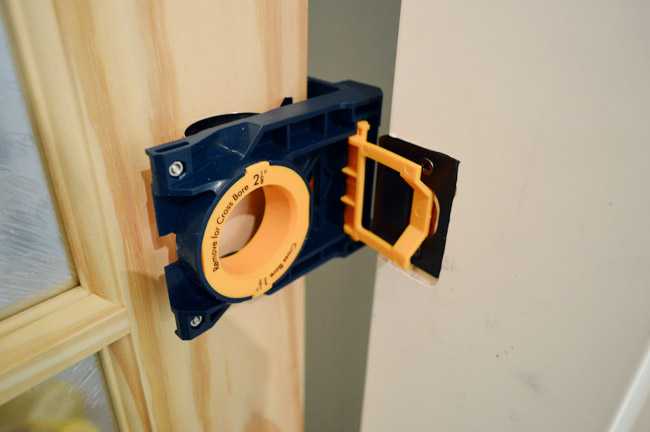
Then using one of two cross bore bits (depending on the one your knob requires) you drill a big honkin’ hole through the door, per the instructions.
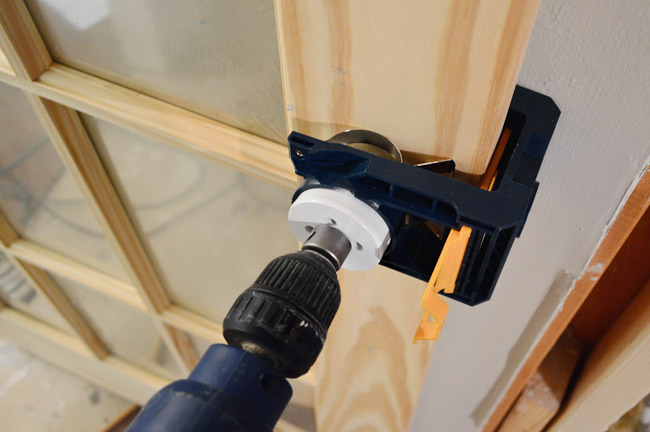
Then you use the other bit to bore through where the latch will go.
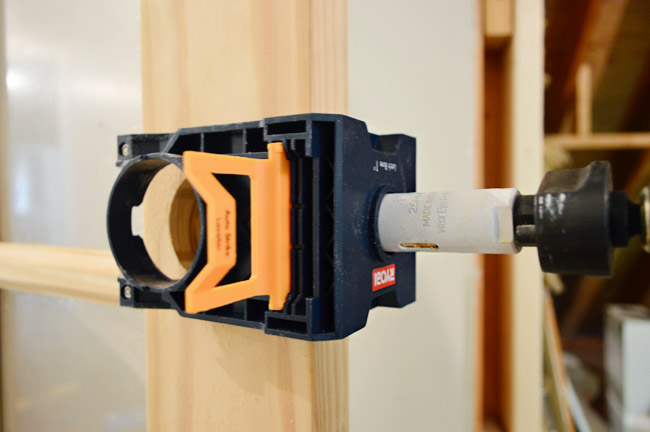
If all goes well, you end up with something that looks like this.
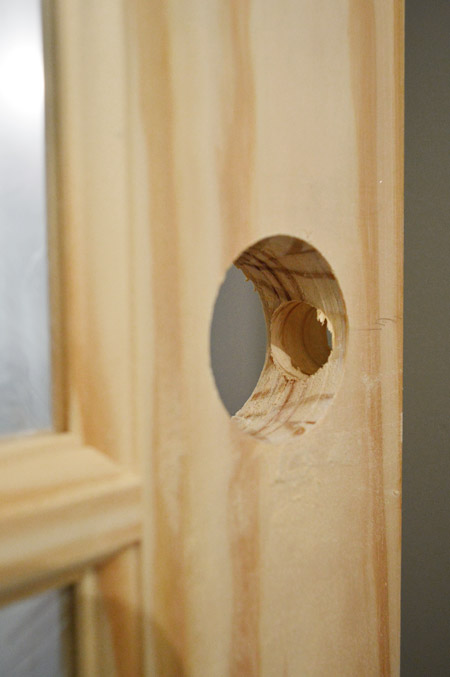
The part it didn’t cover – and maybe this is just specific to the knobs we own – was routing out a spot on the end for the latch to recess into. I used my router freehand, so it didn’t come out perfectly but it does the trick just fine (we can smooth things out with caulk or wood putty before we prime/paint).
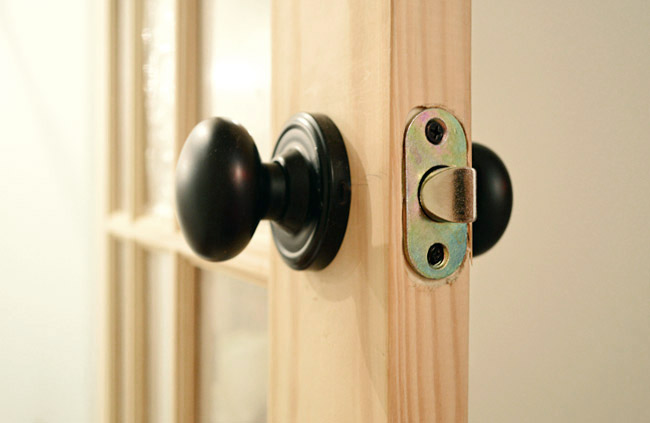
The victory was that it was hung, it closed securely, it stayed open when you opened it (some doors that aren’t hung level slowly close themselves when open), and it looked pretty – even in its unpainted film-covered state.

Since the wood floor was a little short of extending all the way to the door, I nailed in a couple of extra hardwood pieces to create a little horizontal threshold. We actually really like how it looks, so we hope it works with whatever flooring we end up with in the storage room. I do wish I had extended the wood flooring just an inch further into the laundry room so the tile didn’t peek through (d’oh) but I’ve been comforted by noting how many other thresholds/floor changes don’t align perfectly with the doors that I never really noticed before this project – so maybe nobody else will notice either? Until I pointed it out on the internet.
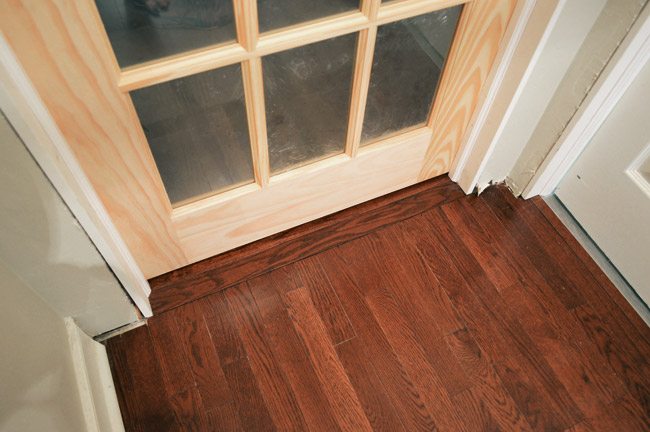
We plan to paint it when we spray all of the molding, and obviously the casings and such will go in when we do the rest of the room. We also ordered two more door knobs with the decorative back plates that we need, so they’ll match the other rooms off of this hallway.

We did tons of laundry last week for the first time since the laundry room door went up and it was AWESOME to be able to close the door. It really does make the laundry substantially quieter. But what we’re really loving is not having to wrestle that plastic drop cloth every time we go into the storage room. Life is good when the drop cloths come down.
It’s pretty exciting to stare down the barrel of close-to-done when it comes to this little addition of ours (if you can call the laundry room that, since it used to be unfinished space). On one hand it feels like it has taken us a while to get this far, and on the other hand it’s pretty amazing that this room wasn’t even drywalled a month ago – especially since our first and second houses’ kitchen renovations took us over four months each (and those were already finished rooms to start with). In the words of Dory: just keep swimming.

Jenn says
I’m replacing bifold doors in all my closets with regular doors, so I am having to rout out spaces for hinges on my new doors as well as the pre-existing jambs. Can you be more specific about the router bit you used? Also, Any tips for using that router on jambs that are already in place?
Thanks so much! Things are really looking great.
YoungHouseLove says
The router bit that came with the one I purchased was meant for rounding edges, like around a cabinet door. I didn’t realize this until I got home so I had to go back out for a new bit, which specifically showed it was for hinge mortises. I don’t have the packaging to tell you the specific name, unfortunately – but it was clearly labeled in the store (I got mine at Home Depot). And my main tip would be try to use/buy/make a guide if possible when working on the jambs in place. I didn’t have any trouble using mine on the vertical surface of the jamb when I routed for the strike plate and knob latch, but I freehanded them and they weren’t as pretty looking as I would’ve liked. Good luck!
-John
Heather MacFeather says
Wow, I hung doors this past weekend too. My process was quite different, maybe because I am in Canada. We have door jam lumber that comes all in once piece (one side isn’t as thick and measures the right depth for the door) so although I had to rabbit it, the measurements worked out such that the width of the top horizontal jamb is exactly the width you want the opening to be. That means less math for me. On the downside, I couldn’t assemble on the floor and install like a pre-hung door. But that does mean I can paint before putting hardware on which is a plus.
The space is coming together and I am so happy that I get to follow along.
Take care,
Heather
YoungHouseLove says
That’s awesome Heather! Good luck!
xo
s
Rosie says
Hi Sherry and John!
The door looks fab!
Growing up, I would visit a friend’s house that had those windowed doors everywhere. They hung fabric on the inside for privacy and it was really pretty. Plus…you could you switch up the fabric depending on the season! I know how much you love a quick craft Sherry, so I thought I’d suggest it!!
Rosie
YoungHouseLove says
So pretty, I love that!
xo
s
Evelyn W says
It looks incredible. Always amazed by the growing skill set you guys possess.
Maybe a matching wood threshold to put over the tile so it doesn’t peek out into the hallway? We’ve done that in the past, stained a wood threshold to match and nailed/glued it in place.
Evelyn W says
To continue my previous comment about adding a threshold, you would have to trim the door a bit to make sure it gets clearance over the threshold since it would be raised.
YoungHouseLove says
That could work I think!
xo
s
Alyssa says
Looks amazing! I love that door:) And I might have to show this post to my husband. We are in the process of hanging doors in our basement and because the pre-hung ones are so darn expensive, we buy one here and there and it seems like it’s taking forever. Maybe this route is the way to go!
Susie says
Good job on hanging a door and still being married and/or alive. My husband and I attempted to hang a door once. The mission was aborted when I wanted to “gut” him. (note: I did not want to kill or divorce him. I specifically wanted to GUT him!)
Looking good! You’re in the home stretch now! :-)
Cathie says
Love the new doors, but please, please be careful with little ones anywhere near the glass paned door. We had a friend whose young daughter’ s arm went through a door like that and sustained major, very scary damage to her wrist and arm up to the elbow. My husband and I no longer have young children in our house, but we have replaced glass door panes that low with plexiglass. Not as pretty and it can scratch easily, but a small price to pay for piece of mind as my Golden Retriever gallops through the house. We’ve even replaced the glass on some of our curio cabinets.
YoungHouseLove says
Thanks Cathie!
xo
s
Annie says
Why did you decide to use window stop for the door instead of the normal rectangular profile (S4S)?
YoungHouseLove says
That molding is labeled as “door & window stop molding” at Home Depot, and we chose it because it’s the style that’s used on the rest of our house’s doors and we wanted it all to match.
-John
Kelly says
I am really digging this entire laundry room project. If we ever need to hang a non-pre-hung door, I am using this post as a guide. Thanks guys! Love you!
Emily @ Life on Food says
I am still in love with how the tile floor came out in the laundry room. The little glimpses from these photos look great.
YoungHouseLove says
Thanks Emily!
xo
s
Connie says
Have you considered putting a barn door or some kind of door on railings for the laundry room? That way when you have a laundry day you can open it and leave it. No door in the way.
YoungHouseLove says
Thanks Connie! We definitely considered that but opted to keep the laundry door the same as the other 5 doors in that upstairs hallway so it felt like it had always been there. That way the glass door at the end of the hall can be the star without competing with a barn door next to it.
xo
s
Christi says
You guys should check out Going Deep with David Rees… How to Open a Door (on National Geographic channel). You will appreciate it after all your hard work!
YoungHouseLove says
Thanks Christi!
xo
s
Sarah L. says
Will the washer dryer stay in place with being used? I’ve considered doing a shelf similar to yours but I’m worried that it will get messed up during the spin cycle of a heavy load of laundry. Any tips/advise for building shelf while taking this into consideration?
YoungHouseLove says
We worried about that so we set the shelf a bit higher than the washer & dryer on those brackets (it doesn’t rest against them). So far we’ve done a bunch of laundry and nothing bangs or vibrates against the shelf. The realization that we could just build up our shelves a little bit on those brackets if we had an issue (like with small wood blocks that would be hidden, but raise it slightly) comforted us, but so far we haven’t needed to do that. Good luck Sarah!
xo
s
Lisa S says
I love that you moonwalked when you got the door up. This is helpful to me because I am debating changing all of our hollow core flat doors to something thicker and more sound proof. I was curious as to how I might accomplish that DIY or what kind of work is involved if I hired a pro. Even if I do not do it myself, I am happy to know what essentially is happening so I don’t get ripped off.
Hats off to you guys. I started reading the blog from the beginning and you two have become solo amazingly handy. John could work as a carpenter/renovator/contractor/flipper if the blog or advertising no longer worked for you guys anymore. Sherry could also work as a renovator/designer/seamstress/flipper if this blog was no longer exciting.
What I love most is your abilities to make something out of nothing. You just kind of get into the space of “Wouldn’t it be nice if…” and then just frickin figure it out and do it. You MADE A WHOLE ROOM WHERE THERE IS NONE. AND, it is BEAUTIFUL!!!! I can’t believe I was checking your blog all weekend waiting for the next pictures. It’s like an instructional show with the suspense of a soap opera. (You guys have no drama, I just can’t wait to see the next pictures.)
So, this was obviously baby steps to 1) drywalling that whole bonus space 2) installing your own cabinets…
I can’t wait to see what you decide to do
YoungHouseLove says
Aw thanks Lisa! You’re so sweet!
xo
s
erin t says
so, i have a question about that doorknob driller setup. do you think it would work on a door that already has a smaller hole in it? when we bought our house, we came to realize that we didn’t have a key to the front door. the previous owner came and went through the back door always and had at some point (she was in her mid-90’s) misplaced the front door key. when we moved in, i bought a great looking front door knob/deadbolt set up only to find when i went to install it that it wouldn’t work because our house is so old that the holes for the deadbolt and doorknob are smaller and not standard sized. we have been at a stalemate with the stupid front door because we don’t know how to easily drill out a larger sized hole without royally screwing up our front door which would essentially mean having to buy a new front door. i saw this set up at a hardware store recently and was debating getting it. do you think it would work to enlarge a hole?
YoungHouseLove says
You probably could. The drill works off of a center bit (which usually goes into wood, not air, and helps keep it straight and stable) but with a steady hand (and maybe clamping or holding the guide to the door) you most likely could make that hole larger.
-John
Sara says
Erin, we actually had that same issue in our house, not having keys to all the doors, and the old doorknob holes being too small for modern door knob/deadbolts. We bought the same kit that John used and easily drilled the holes to the correct size on all three external doors.
YoungHouseLove says
So glad to hear that Sara!
xo
s
Pat says
Slightly off topic question here….have you had the occasion to wash the tile floor in the laundry room yet. I had actually chosen 12×24 tile similar to yours for my bathroom redo (in Madison Silver). A friend is trying to warn me off it’s slight irregular finish, saying the floor will neeeever dry, and water will collect in the lower spots. Have you had this happen, or are you concerned about it? Thanks
YoungHouseLove says
Strange! We have wiped ours down (throughout the grouting process, etc) and it seems to dry really well. Anyone else have advice for Pat?
xo
s
ashley jensen says
We have the exact same doors (your laundry one) throughout our house. We actually had to remove the laundry room door and need to get a replacement. After seeing what is entailed in prepping one for hanging we will definitely get a pre-hung one! I can’t wait to see a long shot of the hallway with the paned door letting light through!
Becky says
Where did you go to learn how to hang your doors? Do you have specific tutorials you followed? We have been replacing our doors with pre-hung doors and are having a super hard time because nothing seems to be plumb or level in our old house. Just wondering if you have some more tips for us because it sounds like you had a much easier time than we have. Good job though, they look great!
YoungHouseLove says
Thanks Becky! I think one thing that was working for us is that these doorways were just framed, so they were level and plumb for the most part (no settling over time, etc). I did search around on youtube for some door hanging videos and also read a few articles that came up under the search for “how to hang a door” but we didn’t follow any one tutorial too closely, just sort of took tips from a few and tried to implement whatever we could as we went. By no means was it fast (the first door took forever) but the second one went more quickly once we had all of our tools on hand and more of a system.
-John
Stacy {Woodsy Weddings} says
This is looking fantastic, love the use of space. We are looking at doing a similar project so it’s nice to see we *may* be able to wrangle it.
Megan says
Is it just me, or does “jamb kit” sound vaguely dirty?
YoungHouseLove says
Ha! I thought it sounded like “jam kit” – like a kit that helps you make jellies and marmalades.
xo
s
qs777 says
I have some serious door/laundry room envy right now.
Re: the tile peeking through – I would put a wood threshold like you did for the glass door. Even though the other doors don’t have it, I think you could get away with it since both doors kind of signal a different area of the house vs. bedrooms.
YoungHouseLove says
Love that idea!
xo
s
Lisa says
Wow! That project seemed like a lot if work. Did you save a lot of $ buying everything separately? Would you do it again? I’d love to see a price breakdown and comparison.- just curious.
YoungHouseLove says
I definitely would do it again. It went a lot smoother on the second one, and now we own all the tools to make it easier. Since we already had the laundry door and knew we’d need to make a jamb for that one, it seemed to make sense to attempt one for the glass door if that one worked. We’ll have to do a cost breakdown soon. We couldn’t find a pre-hung interior 15 light glass door that was 32″ wide and swung open the right way except for one online that was around $200 for the door and $300 for the shipping (!!!) so it was definitely cheaper to make the jamb and hang it ourselves in that case.
-John
heyruthie says
John, I love these “nuts and bolts” posts. Thanks for getting into the nitty-gritty. One of the reason I really like these is that sometimes you let me see that a specific job is over my head. I need a new doorway in one part of my house right now, and I was considering tackling this very same project (without getting a pre-hung door.) And this post is JUST what I needed to see that it’s out of my league. So, please don’t be shy about posting stuff like this–even if it doesn’t get thousands of comments. Its these kinds of posts that help guide me in my own DIY pursuits: the ones that let me see, “Hey, that wasn’t so hard! I can do that!” and also the ones that show me, “No. I don’t have the time or tools to tackle that right now. I’ll choose another option.” Thanks–both types of posts are equally helpful.
YoungHouseLove says
Thanks HeyRuthie!
-John
Rashada says
I’ll be honest. I totally noticed that strip of tile peeking out under the laundry room door. It doesn’t look bad, but I was aware of it.
Otherwise, holy cow. I am really impressed with how this project is going! My laundry is in a former linen closet similar to your old one, but we actually had to take the bifold doors off because we couldn’t open the washer door all the way because of them.
Ever since you first posted about your laundry room I’ve been trying to figure out how I can make mine a more functional space. It’s only deep enough for the machines and the dryer vent is in the ceiling and above the washer instead of the dryer for some reason. So we have a shelf above the machines with a hole cut for the vent to pass through.
I’m thinking though that some cabinets would look much better then the wire shelving, and still be easy enough to cut a hole for the vent to still pass right through. And hide a bunch of mess at the same time.
Mmm.. sorry for the wall of text as I think through my own space!
Pat says
Love the laundry room door. It’s an idea I had not thought of, but plan to steal when we do our kitchen/dining nook/laundry remodel…hopefully sooner than later. My project now is a new single French rear entry door. It’s unpainted and our living area is covered in redish/golden oak stained picture frame paneling. I’m used to matching my door paint to my door frame paint. In this case the door frame is stained. My thought is to try to match a paint to the frame stain as closely as possible. Any suggestions?
YoungHouseLove says
Yes, that sounds amazing! I would test a few out if you can (maybe on a piece of wood that’s similar in tone) and hopefully you’ll find a match!
xo
s
erin says
i totally feel ya when it comes to the wood floor and tile! we had that same problem with the wood floor in the hallway and the tile. we didn’t lay out the wood floor long enough (if we had gone an inch, we would’ve been golden with the transition piece we already had).
since the transition piece from wood to tile was about 3 1/2 inches and it was about 3/4 inches height difference…took us about a month before we found the right piece and we still haven’t drilled it in. HAH. it’s been 3 months, at least but it’s in place!
Tammy says
Love this. I have so many damaged doors and can’t seem to find budget friendly, pretty ones. Thank you for sharing!
Kelly says
You really should paint the storage room door navy blue. I can see it looking absolutely amazing. Just a thought. Awesome job, so far!!
Rita Crane says
AWEsome job! It’s coming along and looking great! Looking forward to seeing it finished! :)
Laura from Denver says
Once again, thanks for showing step by step how you did this. Too many people gloss over the details.
sean says
hey, lookin great.
just wanted to mention that ryobi makes a door hinge template for your router. must come from the same series as your ryobi knob hole template– it’s the same blue and yellow plastic. i used one when i hung all new doors inside my house & i’d recommend it.
Devlin says
Hi, John & Sherry!
I am a little late to the “door hanging” party, but I wanted to pass along a little tid bit that the big boys at the pool hall taught me (actually the guys at Woodcraft). When I was hanging a ton of doors, they recommended using a self centering hinge bit to drill all the pilot holes for the hinge screws (they come in different sizes so you can use them for cabinet doors or regular door doors). These bits keep your pilot holes perfectly centered so no wonky screws or slightly misalligned hinges (you can also use these on drawer guides). They are SO worth the investment.
Anyway, just wanted to pass that along. Please excuse if this has been mentioned earlier. I love the blog!
Best,
Devlin
Daniel S. says
Great article John, the doors look great. The only thing I would add is that 1/8″ may be a little tight for the top piece of the door jamb. I would suggest a 1/4″ inch to adjust for paint build up and moisture in the air.