It’s no mystery that a lot of work went into our now completed bathroom renovation (check out the big reveal and all the cost details right here).
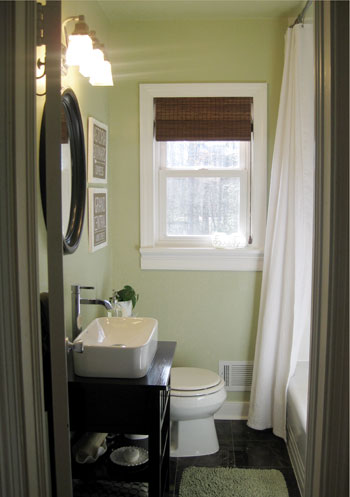
After all, you guys got to read the play-by-play of nearly everything that happened. Yes, I said nearly everything. In the spirit of reminding us all that every big project has its fair share of little hiccups, here are five behind-the-scenes challenges that our bathroom threw our way. Luckily none of them were that hard to overcome in the end. Dear bathroom, thanks for keeping us on our toes.
Speedbump #1: What’s that honking noise coming from the ceiling?
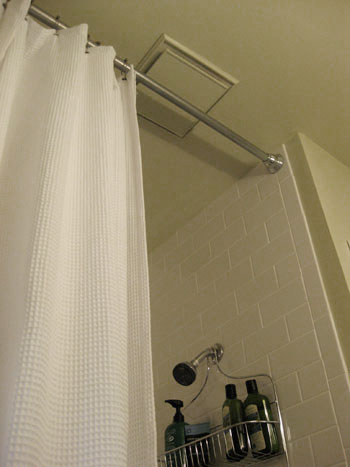
As the bathroom was coming back together, we flipped on our exhaust fan at one point to discover it was making a terrible screeching whine (not to mention it wasn’t drawing in much air). Who knows exactly what happened to cause the malfunction, but we think it might have something to do with the fan getting accidentally turned on (the switch sits right above the bathroom’s light switch) while the whole thing was taped over with a plastic bag to prevent demo dust from getting sucked in. Somewhere along the way it sounded like the motor broke and we’d found ourselves in need of a new exhaust fan. Sigh.
The fateful evening that “replace exhaust fan” made it to the top of our list, I decided to make one last ditch attempt to fix the broken one before going through the hassle of installing something new (since the existing one was so old and not a standard size, putting in a new model would most likely have involved some drywall patching). Since I have about zero knowledge of motor-repair, my tactic was to clean out as much dust and debris that I could and let WD-40 do the rest (isn’t that how you always fix squeaky screechy stuff?). Lucky for us, it worked like a charm. After two or three rounds of cleaning, shaking, and wiping down the motor (with the power off of course) we sprayed on some WD-40 and the whiny noise was gone. We also noticed an amazing increase in intake so not only were we back to being 100% operational, our little “tune up” probably left us in better shape than we were going into the reno. Insert big sigh of relief here.
Speedbump #2: Why does that pipe feel wet?
We mentioned during the vanity installation post that we like to employ a highly technical “put a paper towel under freshly installed pipes to see if any water droplets appear” technique to ensure that our plumbing works sans any spillage. Well, what we didn’t really detail in that vanity-building breakdown was that one of our pipes didn’t pass the paper towel test on the first try. The leak was actually right next to the wall where two old pipes had be welded together (meaning we never took them apart in the first place and just taped over them during demo). But something about jostling them around when we removed the old vanity and cleared out the rest of the room must have made for a slow leak. Boo.
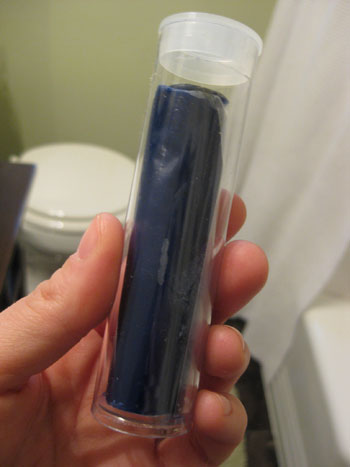
Our usual tighten-things-or-use-plumber’s-tape tricks weren’t possible in this instance (since the pipes were fused so they couldn’t be disconnected or screwed more securely together). We debated replacing the whole thing, but that meant dismantling the rest of the newly installed vanity piping (which was otherwise working great). So since the leak was suuuuuper slow (we’re talking one drop per ten minutes of running water) we did a bit of research and opted to pick up some “Loctite” putty from the home improvement store. It reminded me a bit of that Might Putty that Billy Mays used to hawk, only this kind was blue. I was skeptical, but the guy at the store said it’d do the trick. And… drumroll please… it did. It took just a few minutes to press the putty around the leaky joint (a process that turns it from blue to white) and another few to let it dry. Just to be safe we actually didn’t run the water until the next morning and we’ve been enjoying leak free sink-usage ever since. Note: we would not recommend this method for anything other than a painfully slow oozing leak as it would probably not work long term for anything that drips more quickly or consistently.
Speedbump #3: Is this seriously the shortest towel bar that Target sells?
We knew we wanted to install a towel bar to the left of the sink for easy hand-drying. So we picked up the shortest towel bar Target had in stock (20 inches, in the style that matched our new toilet paper holder). Annoyingly enough, we came home to discover that it was too long for the space. Way too long (we needed something in the 15″ range). Oh well. We headed back to Target to return it thinking “they must have a smaller version” but they didn’t. Darn. Guess it was time to improvise.
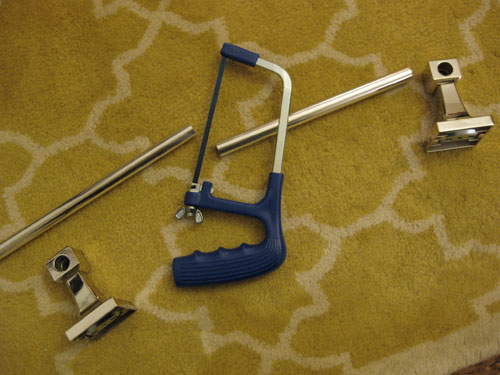
Since the bar is actually three pieces (two ends and a hollow metal rod held in between them) we realized we could easily cut the rod to whatever length we wanted. So I broke out our handy dandy hacksaw and was through the sucker in a matter of seconds, giving us the “custom” sized towel bar we apparently needed. And it still looked completely finished since the cut rod slips into the two end thingies so no one will ever be the wiser that we shaved off a few inches. Except that we told the world right here.
Speedbump #4: Well, I guess we’re gonna need a new threshold.
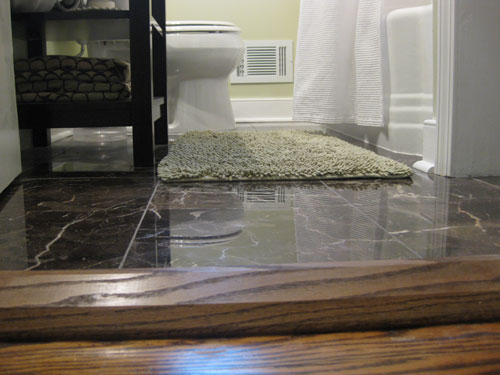
Just as I had attempted (in vain) to save as much trim during demo as possible (total trim saved = none) we also tried desperately to salvage and reuse the original wooden threshold at the bathroom door. Sadly it was nailed and glued so thoroughly that it couldn’t be done (read: it took almost an hour to pry it out and it was in over 10 pieces by the time we finally got it removed). The missing piece not only exposed some less than attractive hardwood under it, but also called attention to the slightly unfinished edge of tile AND the fact that our bathroom floor was about 1/2″ inch taller than the rest of the house (not ideal, obviously – but it’s how the old floor was and we couldn’t solve it this time around for reasons I won’t bore you with).
To replace it we just picked up a simple unfinished oak threshold at Lowe’s (they sell a bunch of options in various sizes). Then we used a circular saw to cut it to fit perfectly into our threshold (it ended up being just under 24″ wide). Once we confirmed that it fit nice and snugly, it was time to take it outside and stain it. Knowing that matching the custom color of our refinished floors wasn’t possible, we just picked a standard stain color (Dark Walnut) that was closest to the threshold scrap that we brought with us. After staining we applied two thin coats of polyurethane to seal it (and left it outside to dry so the house wouldn’t be all fumey). The next morning the new piece was easily nailed into place with the same finishing nails that we used on all of the trim– and it actually looked like it had been there all along.
Speedbump #5: What happened to all the screws for the light fixture?
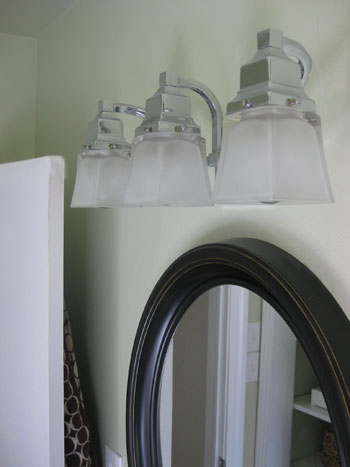
Before demo started, we removed all three of the glass covers on our light fixture to ensure that none of them broke while I was swinging and knocking things down. And you know those little flat screws that hold those types of covers in place? Well, I brilliantly decided to leave them in the fixture so they wouldn’t get lost. I say “brilliant” because I neglected to foresee that all of that shaking and banging during demo would somehow manage to slowly and stealthily unscrew 7 of the 12 screws out of the light fixture and into my pile of rubble (and therefore into the trash without my knowledge). So when it came time to simply reinstall the glass covers, we barely had enough screws to hold even one of them in place. Oops.
Sherry was confident that the home improvement store would sell replacement screws. I, playing Debbie Downer in the moment, was certain we’d be replacing the entire light fixture. Ho hum. Fortunately, my wife is often right (how many points do I get for that public admission?) and we were able to pick up two packs of replacement screws in the lighting section for under $3. Disaster averted. Now those glass shades are held securely in place and I’ll know better next time (removing them all and storing them in a ziploc bag or taping them to the side of the glass covers themselves would be the smarter way to go).
So those were five of the little curveballs that the bathroom project pitched our way. What about you guys? Have you ever dealt with any of these little issues? Have you experienced any other minor hiccups during a recent project? In the scheme of things these little hiccups are often forgotten but we wanted to share ours, if for no reason other than to remind ourselves what we did in case they happen again in our next DIY undertaking.
Wanna read each detailed post about the big bathroom makeover? Check out Chapter One (Planning), Chapter Two (Demo), Chapter Three (Wall Reconstruction), a little teaser post, Chapter Four (Tiling), Chapter Five (Grouting), Chapter Six (Trim), Chapter Seven (Building The Vanity) and the big reveal right here.

Heyruthie says
John, thanks for sharing things like this and “keepin’ it real.” it makes me feel better, in light of the fact that ALL my DIY projects end up having at least 1-2 unexpected “snags.” Kudos to you for not letting that stuff get you down. My hubby doesn’t handle surprises well, and therefore isn’t the DIY type. i think ingenuity and flexibilty are musts, in such things. we have 4 small children, so I barely have time for laundry & dinner, mucless home improvement, but when the kids are a little older, I’ll be the DIY’er around here again because these kind of challenges make me want to rise to the occasion. good job! i think the whole bathroom looks great.
heyruthie says
PS. I’m pretty sure your new threshold is oak (like your floors) and not pine. i was wondering about it, since you didn’t show any shots of it in the original bathroom reveal!
YoungHouseLove says
You’re right! It is oak. Our mistake. Off to fix the post…
xo,
s
Theresa S. says
I love it. Now I have hope for my bathroom:-)
stacey says
John,
thanks for the tidbit on the threshold. You guys have inspired me to tile my bathroom floor and I’ve been wondering about the odds of me salvaging my threshold. Weirdly enough the threshold is beautiful white marble…but the tile is cheap, white and terrible. Any suggestions on prying the threshold up without damaging it?
Thanks for your inspiring me!
YoungHouseLove says
I’m afraid there’s no silver bullet system for getting up a threshold with the most success. Obviously we would suggest going slow and trying to use a metal chisel or even a thin screwdriver to get as far under it as you can before trying to pry it up (to avoid cracking off just the edge of it) but it all really depends how it’s laid. The good news is that those pretty white marble thresholds are actually really affordable so if you can’t get it all up it won’t be the end of the world. We’re crossing our fingers for you though. Good luck!
-John
Amanda says
I especially like #3. Sometimes problems have the simplest solutions!
Meredith says
Our biggest problem is usually not having the right tools when we start a project. My husband tryies to use other things thinking that they will work and then they don’t. He gets mad, storms off to the hardware store and comes home with all kinds of new things!! Good times!!! I think we have all the power tools we need now!!!
Magchunk says
I totally have done that screw thing before, with those tiny screws that go with lightswitch plates. I too learned to put them ALL together, and in a ziploc sounds like the safest option! Funny how those tiny pieces always seem to disappear.
Christina says
See, this is why you guys are great. You come right out and say renovating can have hiccups… and then you go through them. Your blog is fantastic and inspire me to keep at my own place!
Jessica @ How Sweet says
This makes me feel ‘real’! I screw up all the time!
robyn says
Did you notice the trim clearance bin at Lowe’s? Every few days they throw in new pieces with tiny scratches on them. A $35 piece of trim is marked down to $9.99 and you just fill in the scratch with a stain marker.
YoungHouseLove says
Um, awesome! We’ve never seen it but now we’ll have to keep an eye out!
xo,
s
Brittany S says
Love your bathroom mirror – we have the same one hanging above our wine console. Too bad I wasn’t patient and didn’t wait for it to go on clearance at Target like you did. Oh well – still a great deal at full price!
Laurie Jones says
Love hearing about the speedbumps, because anyone whose ever done a remodeling project knows your going to run across them along the way, I find that my designs usually never turn out like how I exactly plan them but actually a little better because I had to come up with a new and clever idea! Your bathroom really looks amazing!
Carole says
thanks for sharing–our list for our bathroom reno was MUCH longer, but it helps to hear that we aren’t alone!
When we redid our shower surround, we installed new cement backer board. For the last piece, we had to remove the shower fixtures, but my husband was *convinced* we didn’t have to turn off the water first–big mistake! water was rocketing out of the pipe all over our new backerboard!
turns out, we had no separate shutoff for the bathroom, so we had to turn off the water to the entire house. Needless to say, we were up all night fixing and finishing the installation so that we could have water the next day.
Natalie says
Thanks for being so real with us! It makes me feel a little less intimidated to do more home improvement projects when I find out that even the “youngsters” make mistakes! :p
Natalie says
P.S. Do you guys use semi-gloss, flat, or eggshell finish on your walls? I just switched to eggshell and LOVE the rich texture.
YoungHouseLove says
Hey Natalie,
We consistently use flat paint throughout our entire house (it’s great for hiding imperfections) except for in the kitchen and the bathroom (where we use super wipable semi-gloss). But your glowing review of eggshell makes us wonder if it’s a good idea for the nursery were there might be slightly more wiping necessary. Definitely something to consider! Thanks for the suggestion!
xo,
s
Barbara says
Man, is it good to hear I’m not the only one who has lost the bitty screws to light fixtures. Thank God for replacements!!
I learn so much from this blog – and Robyn’s hint was great -I’ve never noticed the “trim bin” at Lowe’s, but I’ll be looking this weekend!!
I’m thisclose to tearing up my bathroom. One question – the “demolition hammer”…was that like a jackhammer for the floor?
___
Barbara
http://ifididnthaveasenseofhumor.blogspot.com
YoungHouseLove says
Yup, it’s just like a mini-jackhammer for the floor. You can read more about John’s experience with it here: https://www.younghouselove.com/page/tackling-the-bathroom-chapter-two/
Hope it helps!
xo,
s
sally says
Is it wrong to love the hiccups section more than the real reno? I’m sad you had them, but I loved to read about it. It was very funny. You guys have a fun writing style.
Gin says
I love that you guys keep it real and show us the things that don’t always go perfect. It makes things seem much more doable for the rest of us.
Tamisha says
Oh renovation hiccups, how I loathe thee! We just finished redoing our terrace for the second time! Argh. The first time, guy did it very poorly and we continued to have water leaking into the house. After a dozen phone calls and no luck getting it fixed, we hired a second roofer. He starts pulling all the old stuff off and what do we discover but tons of rot. ARGH! Now, we had to bring in a structural engineer to look at it. A framing carpenter had to demo the whole thing and rebuild the entire terrace, repitch it away from the house, and then the roofer could come back, reroof it, and build a deck over it. ARGH! Too much time and expense. Wish it had been done right the first time.
Melissa says
Re: flat v. eggshell…I’m a huge fan of eggshell. Seriously, once you add a child to your household, you want every surface possible to be wipeable. You Youngsters have a ranch, so it’s not a big issue, but anyone with stairs and kids has probably dealt with the dirty hand prints all along the stairwell wall (I fear I should volunteer to repaint my parents’ stairwell after they hosted their 5 grandchildren for a couple weeks). Let’s not forget any wall reachable from the high chair. In fact, my kids can’t seem to move from one room to the next without dragging their hands along the walls the entire way.
Let’s just say that eggshell paint in the ENTIRE HOUSE has saved me from a lot of repainting!
YoungHouseLove says
Thanks for the tip Melissa and Katie! It’s definitely something we’re considering!
xo,
s
Katie says
Chiming in to say that we have flat paint on some of our walls (left over from the builder) and repainted most of the rest of the house with eggshell, and I think the eggshell is SO much better. Any time we even brush against the flat paint walls with something, it leaves a scuff mark. It comes off easily with a magic eraser, but our eggshell paint has yet to be scuffed. I want to repaint the flat, but I haven’t talked myself into it yet!
Jennifer says
You are brilliant. We are making some changes to our powder room and I haven’t been able to find the right length (and inexpensive) towel bars in a a decent style. I’ve been to Target, and while I like some of the styles, they are all too looooong. I am headed there right now and will have my dear husband cut one of the longer ones down to size. Thank you, thank you, thank you.
Carrie says
Love the post and your finished bathroom! The only trouble I ran into while renovating my bathroom was the amount of glue used on the old linoleum. We ended up putting underlayment on top of it and got to work! On the plus side, the previous owners left gorgeous 8″ trim from the bedroom renos and what do you know…just enough for the bathroom!
Kathleen says
For some reason I keep on getting these horrible visions of you guys slipping on that beautiful tile! Be careful! The renovations look great, small annoyances aside. Good job, y’all!
YoungHouseLove says
Not to worry Kathleen! We sealed the tiles with something that gives them a bit of grip (although they still look super glossy) and with that big mat on the floor of such a small room slipping really isn’t an issue at all! Hope it helps!
xo,
s
Handy Man, Crafty Woman says
I DEFINATELY 2nd the recommendation about using an eggshell finish for a nursery or child’s room! :-)
We also use ziploc bags to keep track of screws and tiny pieces that would otherwise get lost during a project.
We also have (slightly) uneven floor heights in a couple areas of our home. To fix it, in many cases, would be a HUGE, HUGE, expensive and time-consuming job, so I really don’t blame you for not addressing it now…you did a great job w/ the new threshold.
Do you think (even way in the future?) you guys will ever get around to fixing the differing floor heights? Even though I can be a perfectionist, when we think about the work needed to fix said problem, even I go: “naaaaaah.”
YoungHouseLove says
Never in a million years. It would involve removing all the hardwoods in the entire house and raising them up a half inch (since the bathroom floor is as low as our home’s subfloor allows). We actually don’t mind the half-inch difference because with a threshold in place it’s barely perceivable at all. Hope it helps!
xo,
s
courtney says
hello…hacksaw to the towel bar? i can’t believe i haven’t ever thought about that. i feel like a whole new world of bathroom accessories has just been opened up. i need to go home and take a look at all of my bathrooms….yeow!
julie @ duet letterpress says
i’m so happy you posted about your shower curtain. we’ve been on the hunt for a long one and this one is perfect! and surprisingly inexpensive!
Tana says
Thanks for sharing the hiccups! They’re great to learn from. My sister redid her bathroom about a year ago and I told her to expect to go to Lowes/Home Depot pretty much every single day, sometimes even twice in a day. You think you have everything you need and you’re all set, but inevitably, something comes up necessitating the daily trip to the hardware store. We redid two bathrooms, a kitchen, painted every single room in our 2500 sq.foot house (some twice), and recarpeted, so I’ve been there done that.
cassie says
This bath is fabulous….of course it is, you guys did it! We hired painters for our current house) bc the entire place needed new paint before we could move in and we have small kids), and they gave us a great tip: Paint all your intake and output vents the same color as the wall or ceiling they’re on so they “disappear.” It makes a huge difference in keeping clean lines.
Just thought I’d pass that along!
YoungHouseLove says
Thanks Cassie! We went back and forth about whether to paint the white vent near the tub. It’s actually a heavily debated topic (check out this old burning question for varying arguments for and against painting “wall warts” like vents). I guess time will tell if we whip out the ol’ paint brush and give it a once over!
xo,
s
Laura@JourneyChic says
Nothing ever goes as smoothly as planned, does it? I’m so impressed by how it all turned out! I’ve been dying to replace our master bath light fixture and really like yours. I’m guessing it’s from HD or Lowes?
YoungHouseLove says
Yup, Home Depot actually. We grabbed it a few years ago so we’re not sure if they still have the exact same one, but we liked the clean lines and the almost Restoration Hardware look of it. Hope it helps!
xo,
s
cassie says
Wow, that topic was heavily debated! :) Thanks for the link. Most of my outlets are white, except for really dominate switchplates that I decoupaged with torn scraps of old maps and stamps just for a little interest.
But the vents seem different. Our house has two rooms with pitched ceilings that we had painted the same color as the walls for a seamless effect…before the vent was painted though, instead of seeing the beautiful ceiling, all you saw was the white vent. And since the vents are metal, I haven’t had any problems with the paint not sticking.
jessica says
I LOVE your new bathroom-so jealous! :) We actually had to do the exact same thing in our bathroom(we only have one & it’s 25 sq feet-TINY) to make the towel rod fit! We opted for a double one, since there’s two of us, but found the same problem. So my engineering husband took it to work, & came back with the perfect length. Yay for ingenuity! He’s also done it twice with the twist apart shower rods..:)
lana says
Love the transformation! I had a questions about your floor choice. You seem to always use light colors, was there a reason for the dark selection this time?
Thanks!
Lana
http://www.joeyandlana.com
YoungHouseLove says
Hey Lana,
You can read more about the planning/mood board process for our bathroom right here, but we actually opted for mocha floor tiles because the rest of our house has mocha hardwoods so we wanted a seamless and open look (as opposed to a bright white floor which would be light and airy but would really “define” the bounds of our tiny bathroom instead of helping it blend into the rest of the floor plan more organically). Hope it helps!
xo,
s
xo,
s
Camara says
Your bathroom looks great John, and it’s a good thing that you were able to fix your exhaust fan. I can’t understand people who shower without using their exhaust fan or even opening a window. That is one sure way to end up with mold.
Dan Puroclean says
Wonderful bathroom – great job John
Ann says
I love your new bath, very classy.
Seems like everything we’ve attempted has had hiccups. We removed wallpaper in a few rooms and there wasn’t one layer but four layers to remove, and no primer on the walls so some of the walls came down with the paper. Another time, we took up carpet to reveal the wood floors underneath and there some black stuff which appeared to be tar. That was fun removing.
Thanks for sharing your obstacles, nothing ever goes smoothly in my opinion when it comes to renovating.
Barbara says
Thanks for the info on the demo hammer. I’ve never seen one, so I just assumed it was a jackhammery type thing.
What “stuff” did you put on the tiles to make them not slippery?
Rebecca Foxworth says
Just a question…regarding the towel rods: is “end thingies” a technical term? Like, could I use that on my non-handy friends or does using it require some sort of schooling or apprenticeship?
(Good natured teasing here. I’m non-handy. Drives my DH bats that I refer to everything as “that fireplace-turner-thingie” or “that wood-cap-end-thingie”!)
YoungHouseLove says
Barbara- Darn, we returned it to John’s dad (who was the actual owner, he lent it to us to wrap up the project) but it was a granite and marble sealant sold by The Tile Shop and it was primarily meant to seal grout and marble/granite stone but also added subtle grip to decrease slips and falls. Hope it helps!
Rebecca- Oh yeah, it’s totally in the dictionary! Well, if it’s not it should be.
xo,
s
Jessica Z says
Thank you for this–it’s really nice to read about the behind-the-scenes drama (because it’s encouraging to know it’s not just projects here at my house that are beset by annoyances).
For the screws, I always use masking tape and tape ’em to whatever they go to (I tape the screws to the switch plate covers, too) so that they don’t get swept up in clean up. Since it seems like I always have masking tape at hand… it’s an easy fix. Zip lock baggies are a great idea, too, but we’d probably wind up accidentally tossing the bag… So glad they sold replacements and you didn’t have to figure out a new fixture–that one looks great (as does the whole project!).
Barbara says
Hey, as long as I know what to look for, that helps! Thank you!!
Kathy says
It’s so refreshing to hear about the realities of your renovations. After following your blog for some time now, I’d say that your best quality as a DIY couple is your patience. This will come in handy when you’re parents. Congrats on your cute new bathroom and the soon-to-be lucky baby!
Jen says
Ahhh, this post makes me feel so much better! I’ve been doing what feels like a LOT (to me) of improvements around the house, prepping it for sale, and there are just so many hiccups! I thought maybe I just sucked. :) And I feel like a superstar since I do the ziploc thing, too. I even label them and it’s all very official.
Jessica says
As brand new homeowners and naive about home DIY projects, my husband and I had the bright idea to remodeled a 1/2 bath by ourselves. As we were removing the mirror from the wall, the glue on the back of the mirror (which looked like poo) ripped the sheetrock. The 80’s wallpaper that we were having to remove also caused tears in the wallpaper. Multiple tears in wallpaper = spackling! So we set off to applying spackle. Unfortunately, my husband and I got too happy with the spackle. We put waaaay to much and couldn’t get it sanded down with a hand sander. So, back to home depot! We bought a power sander and back to work (he) went! Small bathroom + lots of sanding = snow storm!! Thank God for mask or we would still be coughing up dust!! My husband felt so manly with his first power tool, that he sanded down way to far!! Our sheetrock ended up fuzzy!! In the end, we had to tile the wall to cover all of our mess! But, it turned out great. But, certainly a hard lesson learned!
meryl rose says
Our whole HOUSE is an unexpected snag: like when we were replacing a window and had to replace a hole corner of the house because it was completely rotten, or when we were going to replace a door and had to replace nearly a hole wall (also because of dry rot), or when we took down the popcorn ceiling only to have to fix and repair the entire ceiling that was found underneath it…..I just wish ONE project was without it’s snafu’s
Dana Miller says
I think your fan was just jealous it was getting the shaft, like “Hey, woo-hoo, um, I think you’re forgetting lil’ ol’ me up here could use some TLC too!”
kristin says
Oh goodness yes. Many speedbumps on my mini bathroom redo — I am such a DIY rookie:
To get the toilet tank off the toilet, my dad had to saw off the bolts. (I wanted to “do it right” and paint behind the tank.) Then he had to search for the part to put the tank back on the 1948 no-brand toilet, he finally got it at a specialty plumbing store. What a hassle. Lesson learned: Should have replaced the entire toilet with a new water saving one.
The paint was bubbled and peeling down to the plaster walls. I spent many hours scrapping and peeling yet it was a losing battle. I finally called in a plaster guy and paid him $600 to prep and skim coat the walls. Lesson learned: Should have called in a pro sooner.
A friend helped me install a new sink, faucet and vanity. He left town and I could not get the new drain pipe pieces to fit. After a lot of frustration, I finally grabbed the old drain pipe piece that goes into the wall and banged it into place, then the new drain pipe pieces fit. Lesson learned: Don’t throw away the old pieces until the project is done and sometimes you gotta muscle a project into submission.
While painting, I knocked a small piece from the lighting fixture into the hole in the wall where the old medicine cabinet had been. Like John, I freaked. I emailed the lighting company about my situ and they sent me a few replacement pieces, free. Lesson learned: Be careful with those small but important parts.
It looks pretty good now, and I feel proud of what I accomplished, especially given my limited skill set.
Megan says
Love your bathroom and I’ve really enjoyed reading all of the “chapters” :)
Miranda says
Ahhh! The joys of owning a home. :) Are the walls and ceilings the same color in the bathroom? The bathroom is gorgeous–especially love the vanity. Kudos!
YoungHouseLove says
Yup, we went with the same exact color to keep things undefined and open since it’s such a light and neutral tone (Benjamin Moore’s Dune Grass color matched to Olympic’s No-VOC paint). Hope it helps!
xo,
s
sherrie says
Great post idea. We’ve had many hiccups; I’m sure my husband would remember more since he has been more “hands-on” with the renovation projects. Particularly in the over 100-year-old project, the previous owners had made some updates, which for appearance sake is usually fine, but sometimes when getting into projects, you realize previous remodelers do not always do things right, or the way you would have yourself. We much prefer untouched houses for this reason.
One somewhat recent example related to a bathroom would be when we meant to simply change out a toilet base, but retain the tank. My husband was pulling off the tank, underestimated the weight, it slipped a little hitting the base, broke, and water spilled everywhere. Fun. So we just decided then to buy a whole new toilet, which we really like, so it worked out.
Then there are little things to take note of for future reference, such as the difficulty and amount of time it takes to drill screws into Hardi Backer board when prepping to lay ceramic tile. In this respect, sharing your hiccups can almost be more helpful to other DIYers b/c there are usually plenty of tutorials for completing the typical projects especially, but those little helpful hints are often left out.
sherrie says
Oh, thought of a rather important lesson learned. Perhaps others would think before they do this so it’s not worth sharing, but just in case…
My husband was painting the ceiling of our entryway closet. It’s relatively small, so he just thought he’d leave the energy saver lightbulb in while painting. He was nearly finished, when his head knocked the bulb and it broke/shattered. What a mess. Besides the glass, the energy savers, while efficient, are quite hazardous in that they contain mercury, which is very toxic. So that was an ordeal letting the gas dissipate and then cleaning up the glass. Simple timesavers (like your keeping the screws in the fixture) are sometimes more time saving when taking the extra time to be cautious just in case.
YoungHouseLove says
So true Sherrie! Thanks for sharing the bulb-removal tip. Definitely worthwhile!
xo,
s