The stain on our kitchen cabinets was too orange and dated-looking. We loved the wood grain, but just wanted a darker, more contemporary color. We just didn’t love the idea of sanding or stripping off the old finish. Luckily, we found a product that would let us skip that messy and tiring step while still giving us the end results we wanted.
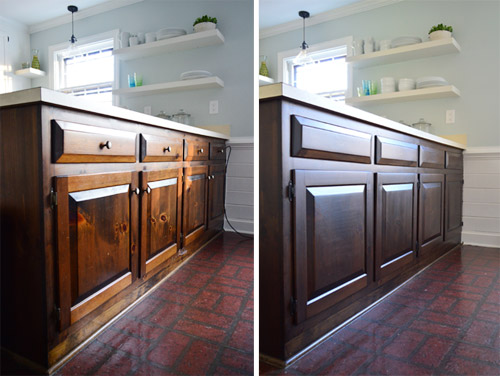
You can see our results above, and read below for how we got there!
What Stain Product Did You Use?
We used Minwax Polyshades for this project, which is similar to a gel stain. Unlike traditional wood stains, which have to soak into the wood to work, a PolyShades coat or gel stain product sits on top of the existing stain, much like a paint application would. Like paint, you need to take a bit more care when applying PolyShades to avoid drips or brushstrokes – but we’ll cover that in more detail below (even on video)!
These products come in lots of colors, but we chose one called Tudor in a satin finish. We had previously used a darker PolyShades color on our bathroom vanity (Espresso) but wanted something slightly lighter in the kitchen. Keep in mind that your final color will be impacted by the color you are staining over, so you may want to test a few colors in an inconspicuous spot (like the back of a door) before starting. And you should always go darker – so from light to medium, or medium to dark.
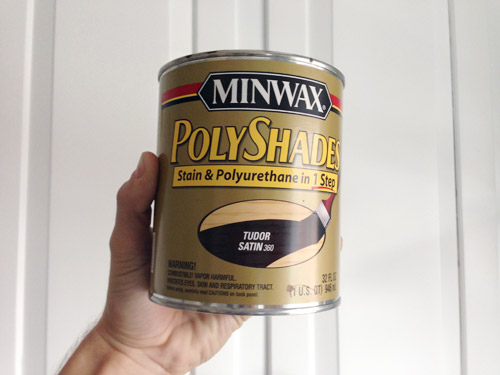
These products are also oil-based, which means you can skip the usual last step of sealing the stained surface with a coat of polyurethane sealer (like you have to do with water-based stains).
Can You Stain Your Cabinets Darker Without Sanding?
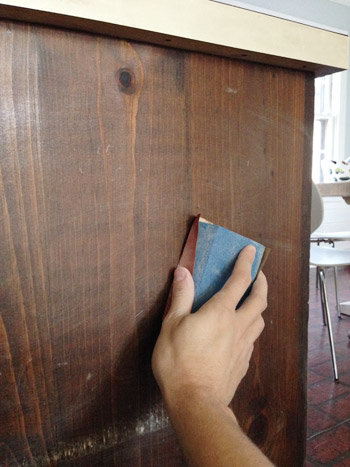
While yes, you can avoid completely sanding and stripping an old stain finish off of your kitchen cabinets, you will need to do some light sanding as part of this project. So be wary of any tutorials that suggest otherwise. But don’t fret – this is the type of sanding you can easily do by hand with a simple sanding block or sheet of sandpaper. Lightly roughing up the surface will help your new stain adhere for longer-lasting results.
What Materials Do You Need?
The best part of this project is probably what you DON’T need. You don’t need any polyurethane sealers or varnish. You also don’t need any chemical strippers, power sanders, or other heavy-duty products to get your already stained cabinets down to their raw wood. Still, you will want to have these supplies on hand:
- Minwax PolyShades or similar gel stain product (we only needed 1 quart for two coats)
- 2 or 3 stain-grade paint brushes (small enough to fit in mouth of stain can)
- 220-grit sandpaper or sanding block
- Extra fine steel wool (#000 grade)
- Screwdriver or drill
- Dropcloth or old cardboard
- Nitrile gloves (optional)
- Wood filler & putty knife (optional)
- Painter stands (optional)
- Degreaser or liquid deglosser (optional)
You will also need a space – like a garage or maybe a basement – to lay out your cabinet doors while staining and drying.
How Long Does It Take To Stain Your Cabinets Darker?
The process is very straightforward as DIY projects go (if you can paint a room, you can do this) but it does take a bit of time, mainly due to the drying process. Ours took about five days total, but yours may vary depending on the size of your kitchen or the amount of cabinetry you’re staining (we were only doing our lowers).
- Prep day
- First staining day
- Second staining day
- Drying & curing
- Reassembly
Step 1: Remove Cabinet Doors & Hardware
Before beginning, you’ll want use your screwdriver to remove your door, drawers, and any hardware (knobs, pulls, hinges, etc) so you’ll have unobstructed surfaces to apply stain too. You also want to spread out your doors and drawers apart from the cabinet frames so that those two surfaces don’t accidentally come in contact during the process (which could make things stick together).
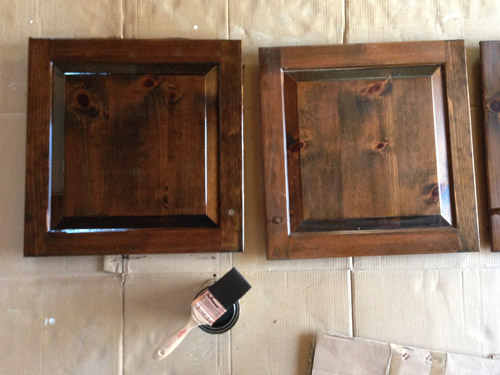
We propped all of our doors up on old paint sample cans, but you could also use a set of painter tripods if you’re fancier than us.
Step 2: Patch Any Hardware Holes
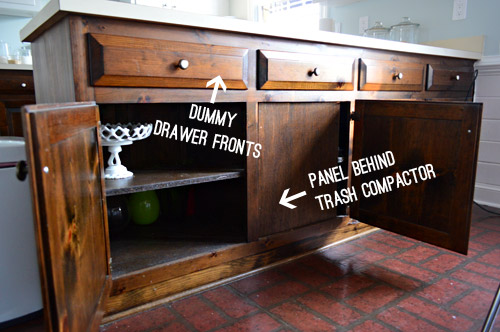
If you are changing any hardware (like using a different pull size or hinge style) you’ll want to fill any useless hardware holes now. We chose to eliminate all of the knobs on the backside of our kitchen peninsula for a cleaner look. The drawers were just dummies anyways (they pulled out on the other side) and doors were just secondary/less used access points to the front cabinets.
So Sherry wood puttied the holes, let them dry, sanded, and repeated. We always like two coats of wood putty on big holes like this to account for any shrinking or dips. In retrospect, we should’ve used a darker wood filler that was closer to the original cabinet color.
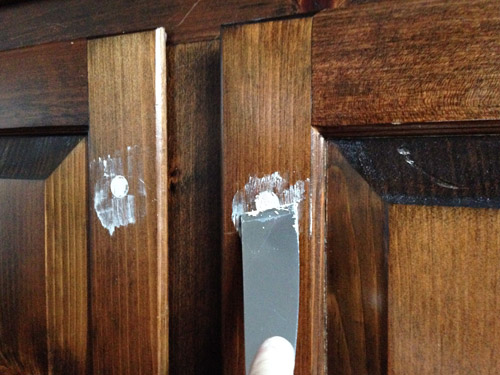
This lighter wood filler is what we had on hand and we made it work by dabbing a little more stain on the puttied parts with each coat of PolyShades.
Step 3: Give Your Cabinets A Light Sand
To prepare for staining, you’ll want to sand everything – drawer, doors, and frames – lightly with a high grit sanding block. Again, you’re not trying to remove the old stain. You just want to rough up the surface slightly so that the new stain can adhere.

After sanding, be sure to wipe everything down with a damp rag or paper towel to remove any sanding dust or dirt. Also, if you have any spots that are coated with grease or grime, you may need to use a spray degreaser to make sure the surface is fully clean. We wiped everything down with a liquid deglosser just to be safe before beginning.
Step 4: Apply Your First Coat of Stain
PolyShades is best applied with a paintbrush and you’ll want to systematically do your frames, drawer fronts, and both sides of any cabinet doors. We actually chose to not stain the backs of our cabinet doors (shhh!) but if you do, be sure to not flip them over until your stain is fully dry.
Also, don’t be alarmed if your first coat doesn’t look much darker going on. It will dry darker and you can always do additional coats until it’s dark enough for you. We ultimately did two coats.
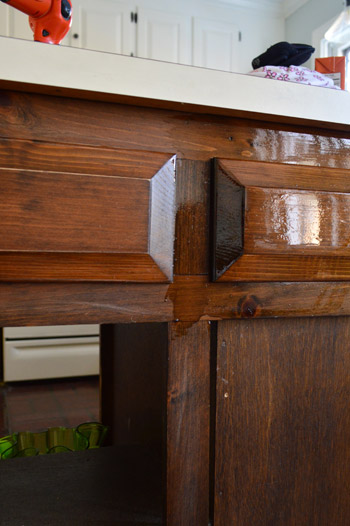
Note: These are dummy drawer fronts that are screwed in place, which is why we didn’t remove them.
Tip: Applying PolyShades For A Smooth Finish
We had learned from our first project using PolyShades that applying it is pretty straightforward, but it can be a little challenging to keep it from looking drippy or streaky. We came up with a simple method of dragging the brush along everything after it’s applied to smooth it out. I filmed this quick video of myself putting one coat on a door so you could see it in action:
Note: You can also view this video on YouTube
In case you can’t watch the video, here’s the gist:
- The stain goes on pretty thick, which is exciting if you’re going for a darker color. Resist the urge to leave it thick because that excess stain will create drips.
- Don’t worry too much about brush marks at first. Focus first on covering the area that you’re working on.
- Once you’ve got the whole area covered, go back over the whole surface with long, even strokes. This will thin everything out and make your brush lines more even.
Although do as I show in the video (not in the pics below – oops) and brush in the direction of the wood grain. This will help any lingering brush lines blend with the wood grain better.
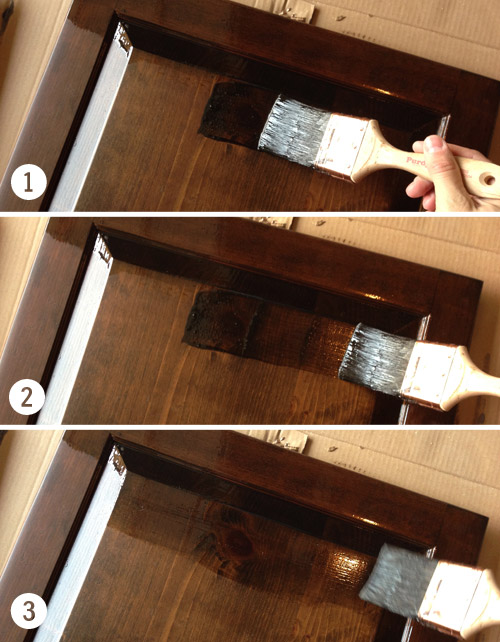
Step 5: Let Dry, Buff, & Recoat
After our first coat fully dried (we gave it 24 hours) it was substantially darker than it looked when wet – phew! If you’re happy with the color, you can be done here. We wanted our slightly darker so we chose to apply a second coat of PolyShades.
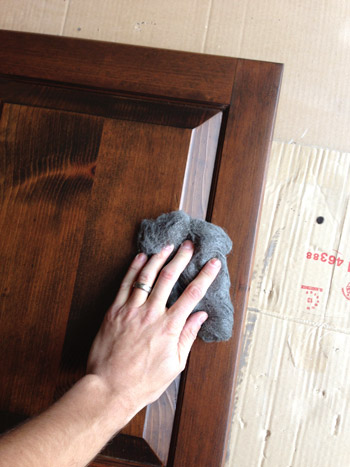
Before beginning the second coat, we followed the manufacturer’s instructions and buffed the first coat with some very fine steel wood (000 grade). This doesn’t visibly damage the finish, it just roughs it up enough for the second coat to hold nice and firmly.
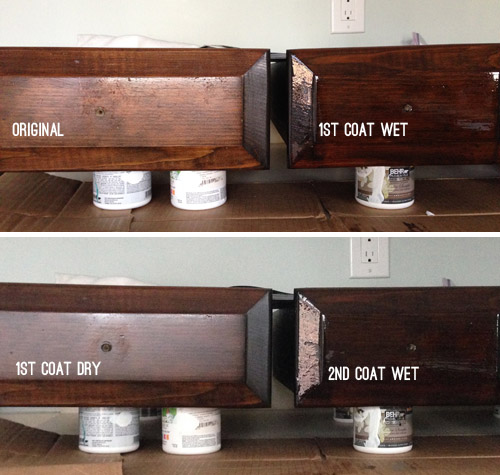
You can see below how these coats “build” and gradually get darker. Also, you can tell how the “wet look” wasn’t a good predictor of how it’d dry.
Step 6: Let Second Coat Dry
The next day, as our second coat was almost fully dry, we could finally see the results of our efforts (thanks to not staining the backs of the cabinet doors!). You can see in the side-by-side below that we definitely achieved the darker and more contemporary, less orange and dated look we were hoping for. And we loved that you could still the wood grain coming through!
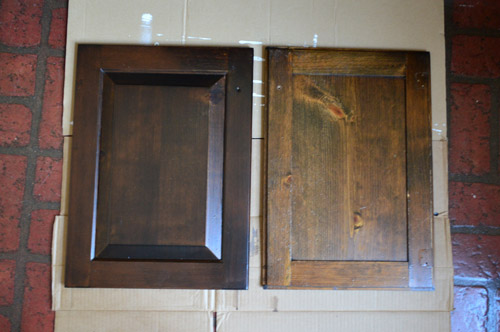
Again, this is the part with a traditional stain you would need to seal your wood cabinets with varnish or polyurethane. But since PolyShades is an oil-based stain and poly in one, you can skip it!
Step 7: Reassemble Your Kitchen
With everything done, you can reattach your drawers, doors, and hardware. If you’re installing new hardware, we’ve got a fully tutorial on how to easily (and quickly!) make new holes for cabinet knobs and pulls. For us, we just used the existing holes and added darker knobs that almost disappeared against the dark stain. So here’s our final look!
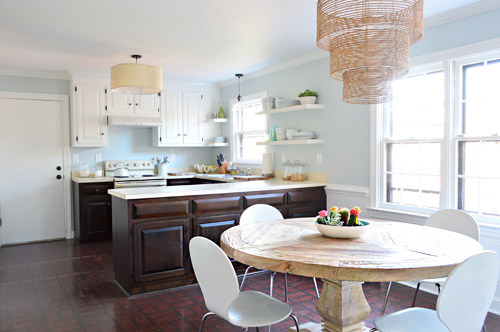
As a reminder, this is where we were last week with those redder and more knotty lowers. Although, this is after we had painted the upper cabinets white.
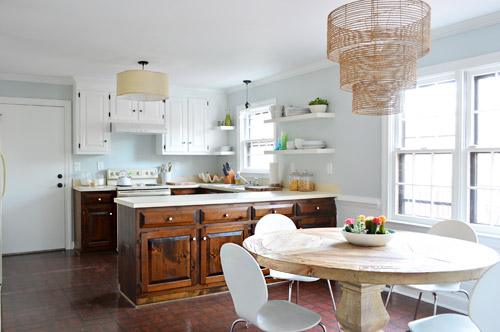
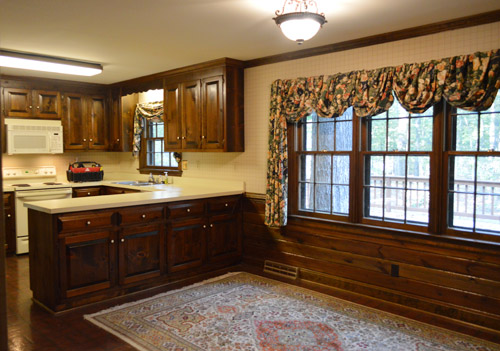
And it’s a far cry from where we started when we bought the house!
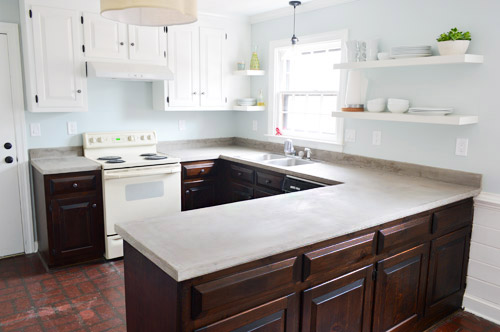
UPDATE: Since originally completing this project in 2014 we soon updated the laminate countertops by applying a faux concrete finish to them using Ardex.
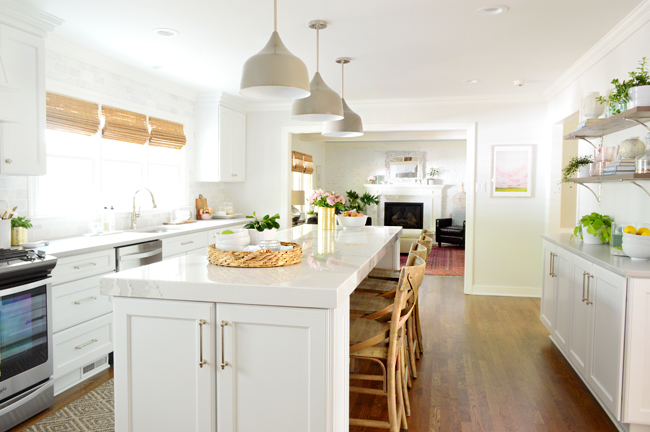
And two years later, we fully remodeled this kitchen with a completely new layout. But the old cabinets held up great for two years while we waited to begin the remodel. You can read all about that in these posts:
- Choosing A New Layout
- Gutting & Rebuilding
- The Big Reveal <– You can find all of the sources for the room right here!
- A Video Tour Of How We Organized Our Cabinets & Drawers
*This post contains affiliate links*
PS: Wanna know where we got something in our house or what paint colors we used? Just click on this button:


Marissa C says
On the off chance you see this…what poly finish (wipe on would be best!) do you use while you are pregnant. I’m 34 weeks and want to refinish a dresser this weekend, but I’m not sure what is safe
YoungHouseLove says
Safecoat Acrylacq (gotta order it online but it’s non-toxic).
xo
s
Ginger says
The kitchen looks fab so far!!
So I have a question: did you stain the inside of the cabinets? I’m guessing that you didn’t since they are already dark. If the cabinets were a light honey color, would you stain the inside then? (I’m getting ready to make a move on my honey cabinets in my bathroom this week!)
YoungHouseLove says
We didn’t we just left the inside as-is (whether we painted or stained the outside).
xo
s
Maria says
Love how the kitchen is coming along!!!
While I haven’t used appliance paint, I’ve had electrostatic paint done several times in corporate kitchens/breakrooms. It was so fantastic in that they could come spray in place — all the overspray is charged so it sticks to the appliance only. So cool and not a lot of money. Great for the quick turnaround I needed for little to no down time.
I’m leaning with your floor idea because I think you mentioned the floor was dinged up – paint will show those flaws. Also, the one color vs. mottled color will show less dirt. Another thought is the DIY paper faux wood/slate look. Basically decoupage for your floor. I saw it online, sent it to a friend who did her bathroom floor with a faux slate look and it was great – very low cost as well. If you didn’t have vinyl to remove I’d say stain the subfloor – I’ve seen it and it looks better than you’d think, but all that glue…no bueno. Oh and BTW, your feet will thank you for having a crawlspace vs. slab in the kitchen. Just sayin’.
For CL resale if you want to ever upgrade the fridge I’d keep it a standard color. If you want chalkboard, you’ve got a good spot in the wall next to the fridge. You could do a chair rail on both of those walls that are the entry to the next room and do chalkboard below instead of the board/batten like in the last house. Cute — and out from underfoot in the kitchen workzone.
YoungHouseLove says
Thanks for the tips Maria!
xo
s
Rachel says
I love the color you choose for the cabinets. The Tudor tone is much better than the previous “orangey” tone. It looks modern, new and more luxurious than before. Congrats on an awesome job!!
Aron says
Looks fantastic. Love that you went with a dark stain vs. paint. PS I do not suggest appliance spray paint on the whole stove. We did it on just the stovetop to give it a fresh coat. It comes back off. It is impossible to clean without spray paint stained sponges and towels :(
Rebecca_Lynn says
Do you by chance have a close-up of what the putty-filled holes look like after being poly/stained? I’m in the middle of updating my kitchen cabinets and after the first coat, the holes I filled still stick out. I’m hoping it’ll get better as I add more coats (I’m using a combination of Antique and Royal Walnut, so it’s a bit lighter than yours), but I’m a little skeptical.
YoungHouseLove says
So sorry, we don’t have a shot of that for you, but they were a few shades lighter, so we just spot applied a few more coats of the PolyShades right onto them with a small brush to make up the difference.
xo
s
Penny Smith says
I am sure you answered this on a post… but since I don’t remember, I’ll be annoying and ask here…
Are you planing on stainless in the future. I always buy appliances on craigslist. Won’t buy new again. Too many people buying houses and having extras. LOL!
And (probably said this too) those floors have to go… what is your phase 1 plan for those?? (I hate asking something you probably covered-the the floors are REALLY standing out now, huh? :)
YoungHouseLove says
Oh yes, those floors are killing us! We’re either planning to try to paint them using some durable technique or to peel & stick over them for the meantime. As for appliances, we’re looking at a few fun new options (like “ice white” or other more modern finished that involve glass or a steel-like look without fingerprints) so we’ll have to keep you posted!
xo
s
Kasey says
Did you stain the insides of the doors and drawers? I know you haven’t painted them in past projects, but I’m sitting here sanding my bathroom drawers and wondering if I should stain the backs of the drawers. The old stain is worn on them, but I know it’s not a very visible area. What do you recommend? Thanks!
YoungHouseLove says
Nah, we just left the insides unpainted and unstained so they’d all be the same finish on the inside. It’s nice because dishes and pans won’t stick to the bottoms or scratch anything off the walls, etc.
xo
s
Kelly says
Hi! I’m amazed at your creativity!
Not sure if you’ve answered this question (too many comments to look through), but what paint color is used for your kitchen walls? I can’t tell, but is the top half a different color from the bottom?
Looks amazing!
Kelly
YoungHouseLove says
Thanks Kelly! It’s Nelson Blue by Benjamin Moore on the walls (the bottom part is wood paneling, which we painted white like the trim).
xo
s
Melissa says
About the floor…apparently you CAN paint them and they turn out quite durable. Kelly over at View Along The Way had great success with her laundry room…and if it’s a temp fix until phase 2, you could probably do something really graphic and interesting!
http://www.viewalongtheway.com/2013/01/how-to-paint-vinyl-or-laminate-flooring/
YoungHouseLove says
Yes, I’ve seen that post and love it – just wonder if her floors are in better shape (ours flake/peel/scratch when a chair leg goes over them or we pull out the fridge, so we worry even if they’re painted they’ll continue to flake/peel/scratch in the same way. Might build up the courage to give it a try though!
xo
s
Summer says
I really love you guys! I’ve been following your blog for a couple of years, and I really need you now! We are buying a house that needs a total kitchen remodel. The cabinets can’t be salvaged, and I don’t know what to do. We’ve looked at box stores, and thought about Ikea, but I would like to know what other RTA options are out there. It’s a sketchy nightmare of companies not coming through. I’m sure there has to be a reliable RTA cabinet company out there, but who? I’m anxiously awaiting what you will do to see if you will explore that option. Do you have any recommendations yet? Thank you for your posts. I love following you everyday, and my husband is calling our new house ABQhouselove to poke fun at me. (We are in Albuquerque.)
YoungHouseLove says
We have heard amazing things about Ikea so we are definitely considering those (we used Kraftmaid cabinets by Home Depot in the past and loved them but they were pretty pricey. I’d check out Pinterest and see if there are awesome kitchens pinned with info about the cabinet makers. Some of the Ikea kitchens I’m seeing today look so crazy-expensive I can’t believe it.
xo
s
Johanna says
What liquid deglosser did you use?
YoungHouseLove says
We have an old bottle of Next from Home Depot which is VOC free and biodegradable but they no longer sell it. Maybe just look for the least fumey stuff they sell now?
xo
s
Marie Mayer says
I found this entry today and read that you want to make your countertops concrete. I very recently attempted to make a countertop with Kara’s recipe and thought you might benefit from reading about it (although I suspect you may have better luck than I since I’m about 6 years behind you :) ): http://lifebeyondsilicon.wordpress.com/2014/02/19/concrete-bathroom-countertop-fail/
Anyway, good luck!
YoungHouseLove says
Oh man, thanks for the tip Marie! We’ve been reading as many posts about using it as we can to hopefully learn what goes right and what goes wrong. Still skeered though, haha!
xo
s
Marie says
You’re welcome! I really wish I could say for sure what I did wrong – I know you guys will figure out how to do it right!
YoungHouseLove says
I don’t know… we do have some epic fails! Will keep you posted!
xo
s
Marie says
You know, I’ve thought about this more, and I think that the Feather Finish is softer than I expected for it to withstand daily wear and tear. The Feather Finish was SUPER sandable. Cement used for floors (like a garage at least) is NOT sandable with a little hand sander. I proved this when we were trying to clean gross carpet glue off our garage floor (the previous owners had glued carpet squares to the whole garage to use it as a lounge…ah, California). To sand that cement (and the glue with it), we had to use a diamond-tipped grinder and it just barely touched the cement. While the feather finish was easy to use and looked good, I’m really skeptical that it is durable enough for counter tops – at least how I use them.
YoungHouseLove says
Really interesting! Would love to hear how they hold up. Anyone else have info? We know a few bloggers (like Kara Paslay) who have used it for a few years and seem to love it, but other reviews would be helpful!
xo
s
Marie says
Actually, the Feather finish countertops held up so badly during the production stage that we didn’t even install them. We had the advantage of building our own plywood counter so we could choose not to use it (as opposed to if we have finished over a preexisting counter). I can dent it just with a fingernail or screwdriver. http://lifebeyondsilicon.wordpress.com/2014/02/19/concrete-bathroom-countertop-fail/
We left it outside for a couple weeks in the rain (unsealed, since we had abandoned it by then) and it totally cracked and shattered. I know it’s not intended for unsealed or even any outdoor use, but as a materials engineer (disclaimer: I’m not focused on concrete in particular), I find this extremely disconcerting to use on a counter that would receive a lot of wear and tear and water. Kara is how I found the recipe, and I love their blog so I was surprised that this worked out so terribly for me. She mentions that it sands well too – maybe they are just kinder to countertops than me?
YoungHouseLove says
Hmm, could it have been the mix? Maybe too much water could have made it more brittle or something? I would think how it sands might have to do with how it sets and how dense it gets, and that might have to do with the consistency of the mix? I have no idea. Still scared to see how it works out, but definitely planning to try it and share the details- good, bad, or ugly!
xo
s
Marie (again) says
Wow, thanks for responding to all of my comments. It’s fun to have a conversation on opposite coasts! I definitely still think you should try it! It may very well be that I used too much water. Kara said to aim for pancake batter, so I did, which is definitely more water than the bag suggested. She does mention that her mix sands well too. I do think that sand-ability is inversely proportional to the durability in most (all?) material systems, including this one. Anyway, since you’ve been so very responsive, I thought I would let you know what I did instead of my horrible concrete experiment: http://lifebeyondsilicon.wordpress.com/2014/03/18/hardwood-bathroom-countertop/
YoungHouseLove says
That looks awesome Marie!!
xo
s
Kristi says
Did you have to put a sealant over the stain? We are going to stain unfinished cabinets for our bar and don’t know if we should finish it with a varnish or sealant. Any advice? Thanks!
YoungHouseLove says
This type of stain doesn’t call for a sealant, but if your can/package says to I’d follow the directions to the letter!
xo
s
Kayla says
I was curious how these are holding up? Do you have any trouble with the finish chipping off at all?
YoungHouseLove says
So far, so good! Not a chip or mark to be seen – even on the door we turned into our pull-out garbage (that one gets tons of action).
xo
s
Lisa says
I know this post is old but I’ve just stumbled upon your blog (I’m in love) and I’m in a predicament I’m hoping someone can help me with. A PP mentioned a similar problem.
I am planning on staining my bottom cabinets dark and painting the top ones white… but we have a surround/built in around our fridge. Above the fridge is a set of cupboards/cabinets. I CANNOT figure out what colour to go with for this surround. My instinct says dark because it is visible from the living area. But I’m worried it will look odd with a line of dark around the fridge/top cabinets.
Thoughts?
YoungHouseLove says
Can you take a photo of it, print it out, and literally use crayons (or cut paper laid on top of it) to picture it both ways? Might be a way to figure out what you like best!
xo
s
Lisa says
you’re a genius. so simple, yet i never would have thought of it! i was imagining apps for uploading photos & photoshop and all sorts of other things. sherry for the win! thank you :)
KellyK says
I’m doing this for my current maple colored master bathroom cabinets. And now I just realized that the side of the cabinet is the fake wood or film that matches the front of the cabinets. Can I stain this too? Also, when you initially sanded it, did you course or medium grit? I just got back from Sears and my head is about to pop off on decisions! =)
YoungHouseLove says
I don’t know if this would work on fake wood since it’s meant for real wood. As for sanding we used around 150 grit I think.
xo
s
Jessica says
Just found your site and I love, love, LOVE the paint color on the walls of your kitchen! Would you mind sharing the brand/color?
YoungHouseLove says
Thanks Jessica! It’s Nelson Blue.
xo
s
lindsay u says
Love it! Were wanting to do the same thing to our cabinets. However I hear the bad thing about polyshades with the stain and poly in 1 is that u don’t have the protective too coat that you normally would have, doing the stain first and then the Polly. So, if u scratch it, both the stain and Polly come off, rather than if it was stain then a coat of Polly, you’d scratch the top coat of Polly off, leaving the stain there, if that makes sense? Have u guys experienced this at all? Do you have any experience using general finishes gel stain? Thanks!!
YoungHouseLove says
We haven’t had anything like that happen. Hope it helps!
xo
s
Audra says
How has the poly shade held up? Any scratches or dings with noticeable color differences? I’m thinking of trying this on my lower kitchen cabinets as well. Thanks!