That’s right. I broke out the word dastardly. And I know we should be hard at work on our office cabinets, but that’s a big job (aka: a weekend job – maybe even a two-weekend job) and I have been giving this rocker the stink eye since November (yes, even before we moved). For anyone who can’t even remember that far back (me), here’s a recap: I originally picked it up off of Craigslist for $25 because I really liked the simple lines of it. Then it sat untouched for over nine months until this weekend.
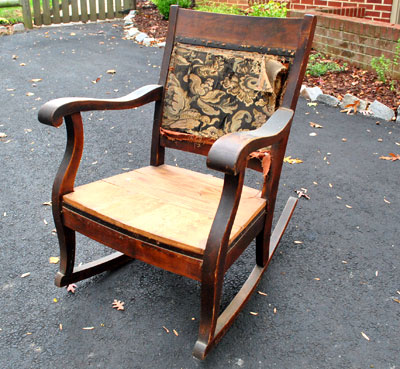
Why? Well, no sooner had I gotten it home than I realized I had no earthly idea how to reupholster it. At all. I mean I knew how to do the bottom (I’ve redone seats before) but the hole at the top completely confounded me because it had to look finished on both sides. Le yikes.
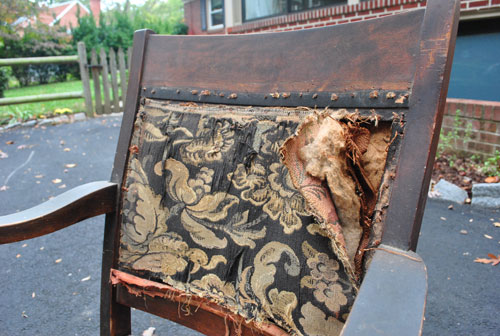
But I posted this call for help a while back and a bunch of you guys were awesome! I definitely learned that there were probably about ten ways to skin that cat (gross expression, sorry – but it was comforting to hear that even some very experienced folks described many different ways I could “go”). So it gave me the confidence to tackle it right away put it off for nine months and begrudgingly give it the old college try over the last few days.
I will disclaimer this entire process much like when aliens took over my body and I made a quilt for Clara, which is to say: I went rogue. I took in all the advice from you guys along with some google tips and some suggestions from a reupholstering-fiend friend of mine… and just played it by ear and did what seemed to work as I went along. So with that out of the way, allow me to share the madness that is Me vs. Rocker. Which is not to be confused with Man vs. Wild (Bear Grylls I’m not).
Oh and because this process was so involved, it actually took me a few days of work. Which meant it was a multi-phase thing involving lots o’ pics. So I broke it right down the middle for ya (since 40 pics in one long rambling post = madness that even we can’t endorse). So here’s the first half. And the second half is in the hopper for tomorrow (still have to snap some after pics for ya, but it’s almost all set).
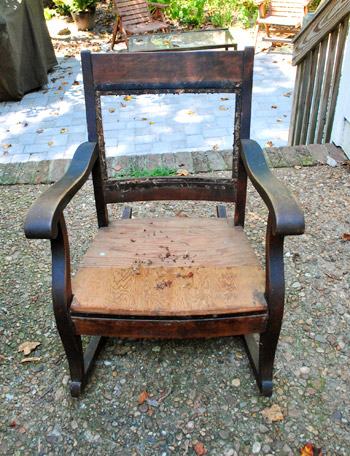
Anyway, here’s how it all went down: First I gave my rocker the stink eye one last time. You know for old time’s sake. Then I got to work pulling staples and nails out of the frame along with the ratty old upholstery to see what I was dealing with.
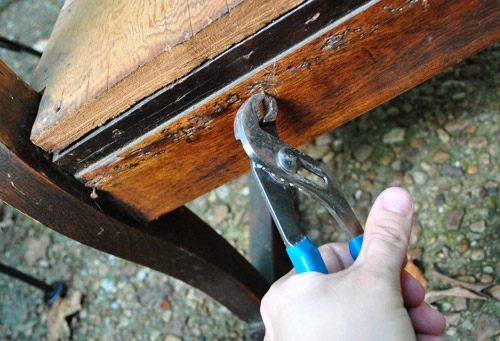
Oh and my tip would be to use a small channel lock pliers to pull things out. It was much easier than the back of a hammer or a needle-nosed pliers for me (although I still had to pull like crazy, this gripped better so I didn’t go flying backwards after tool slippage).
After about an hour I had a nice little pile going on. But I was only about 30% done.
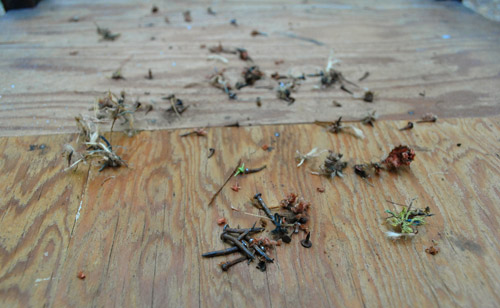
So I kept pulling old nails and tacks for a few more hours, and then removed the two wood seat slats and was left with this:
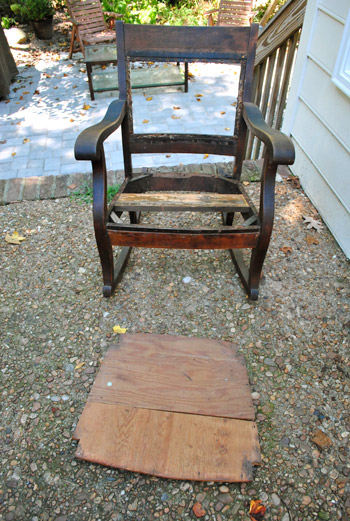
It was a pretty ugly sight for three-ish hours of work. And I knew I had some serious wood puttying and sanding to do when it came to the frame (to get it ready for some rich dark stain). But I was tired. So I decided to move onto a less strenuous step that I figured I couldn’t mess up. Upholstering the weird little two-pieces-of-wood seat. First I decided to tape them together so I could upholster it as all one thing (as opposed to two with a weird little seam). I just used some delicate surface painting tape because it didn’t need to be super heavy duty stuff (like sticky duct tape) because I knew once the batting and fabric were in place they’d hold it together for the long haul.
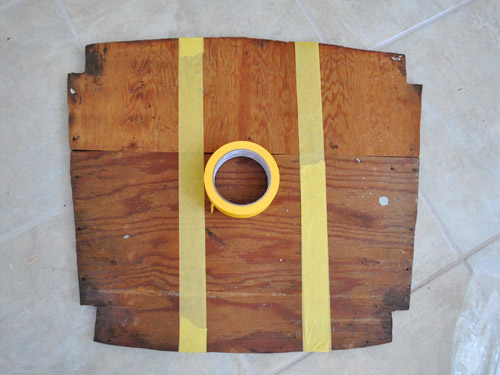
Then it was time for a bunch of layers of extra-loft batting. I used “Soft N Crafty” from JoAnn, which I purchased back in November when I thought I was going to tackle my chair (kind of embarrassing that I then just packed it up and moved it and it continued to sit around untouched for 8+ months, but whatever). I knew I could have used a big piece of foam for the seat, but I actually prefer wood seated rockers like this (John’s mom has the most comfortable one ever) so I decided I didn’t want too much cushion goin’ on. But I also knew that staple gunning one layer of extra loft batting around the back wasn’t going to do much…
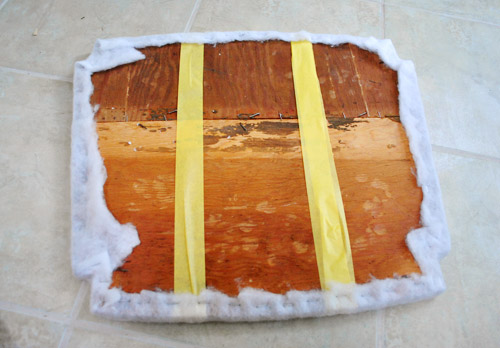
… so I applied a second layer…
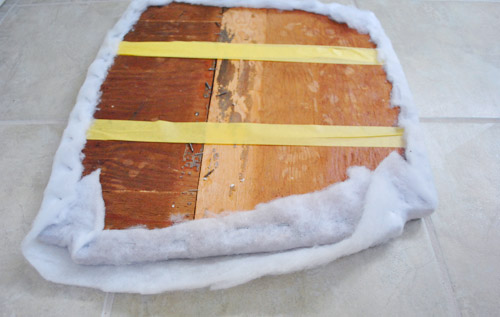
… and then a third, fourth, and fifth. By the end it was plush without being super sink-in squishy, which I liked. Nice and firm with a bit of softness.
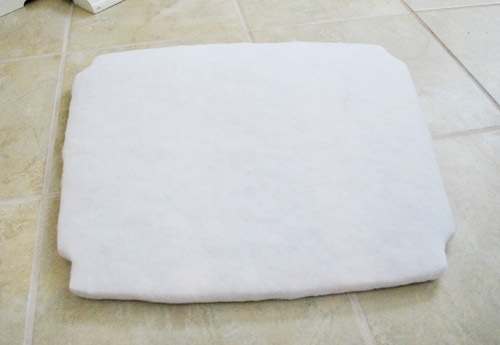
Here’s the point where I wanted to throw everything out the window. Yup, after five layers of batting applied staple by staple, I realized that the seat needed to be able to bend to fit past the arms and legs and actually lay flat on the base.
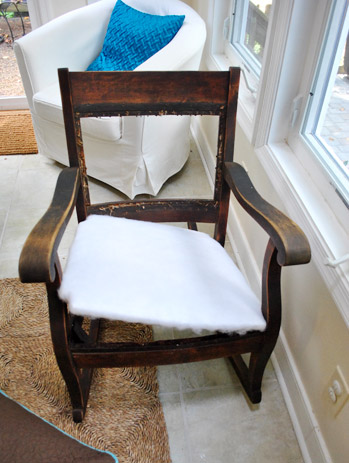
So I nearly broke down with visions of having to restaple five layers o’ batting after separating the two pieces of wood so they could hinge forward for just a second to be slid into place. Thankfully my sweet husband (who I always describe as the brains of this operation) pointed out that I didn’t have to unstaple anything and could just turn the seat over and cut the yellow tape that was running across the back and the batting should be flexible enough to fold forward (it wasn’t like I was trying to stretch it backwards or anything).
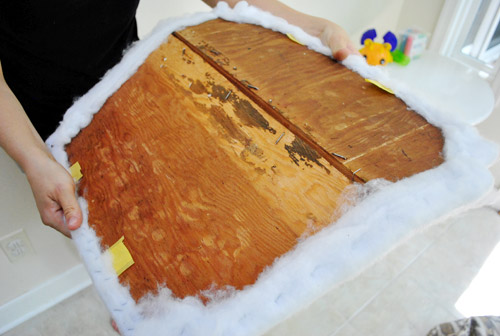
Worked like a charm. And apparently I was so excited I took this completely crooked picture in celebration:
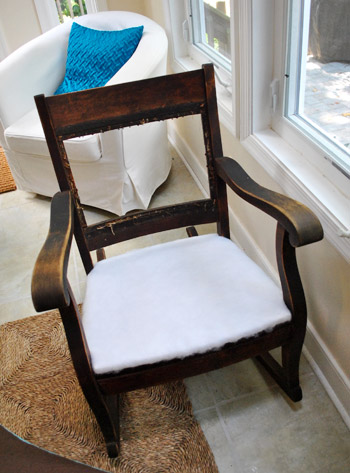
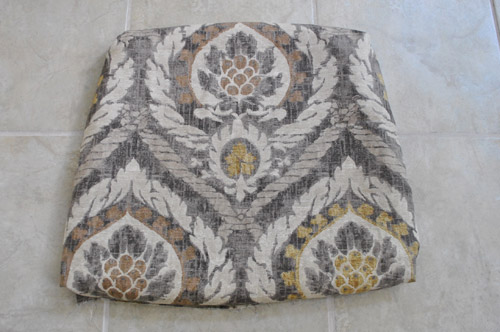
Then it was time to reupholster my seat. I was super excited about the “Kravet Design” remnant fabric that I found on clearance at JoAnn for… wait for it… $2 a yard (I got two yards for $4). At the time that I grabbed it I had no idea what I’d use it for, but after woefully glancing up at my biggest failure (Mr Rocker, sitting untouched in the sunroom for nearly a year) I realized that the fabric would look really pretty on it (with some rich dark stain to set it off). The pattern of my fabric meant that I would have to take the time to center it before stapling anything, so here I am roughly folding it around the seat to try to find a center line and see how it might look in place:
Then I flipped everything over and just shot one staple into the top middle and one staple into the bottom middle (while pulling things tight). This way I could flip it back over and ensure that I was indeed still centered (and if I wasn’t I just had two staples to pop out with a flat head screwdriver.
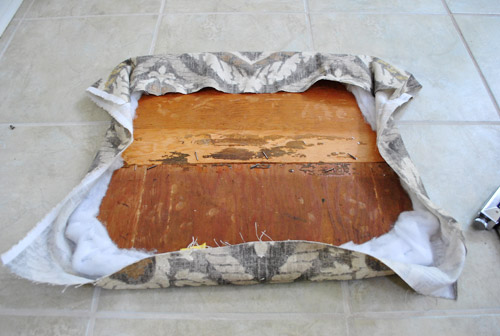
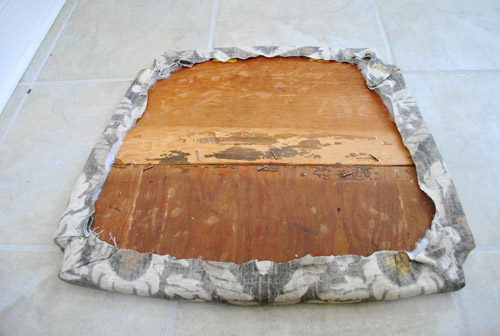
Happily, I was right on track, so I pulled things tight and shot another staple through the middle of each side of the seat, just so it was being held firmly at the noon, three o’ clock, six o’ clock, and nine o’ clock positions. Then I kept the fabric firmly pulled and continued to staple all around the rest of the perimeter. When it came to the carved-out corners, I just folded the fabric like I was wrapping a present – again being sure to pull things taut and use a few staples to hold my folds in place (so it would look nice and smooth from the front).
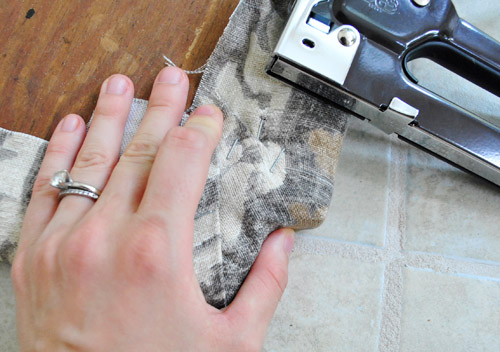
Here’s what it looked like from the back when I was all done with my staple job:
And here’s what it looked like from the front. Purty, right?
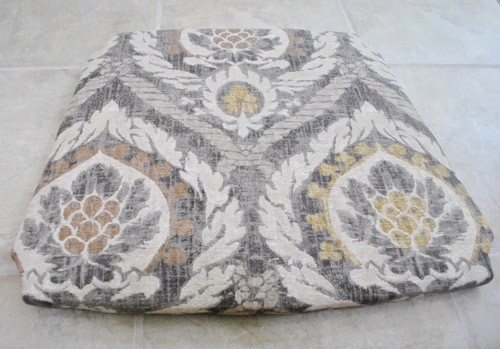
Then I shoved it back into the seat to make sure the batting and fabric still allowed the seat to hinge forward a little bit to squeeze in. Whew, it still worked. And in the distance I heard angels singing.
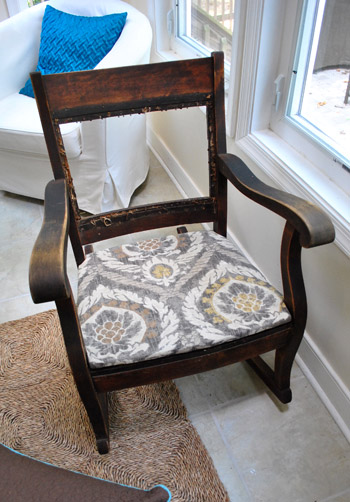
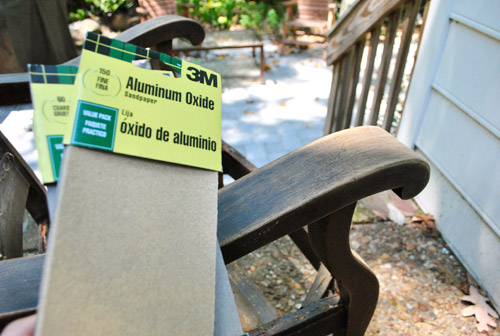
Then it was time for the strenuous frame-readying step. I used wood putty to fill some of the holes that might be visible (like the ones under the seat along the front of the chair’s framing) and sanded everything to rough it up and ready it for some rich dark stain. Since I had some liquid deglosser on hand I gently swiped that over the entire chair after some rigorous sanding (I used low grit paper followed by higher grit paper to smooth everything out).
This is when I was forced to face the music: stain, even dark stain, wouldn’t make this chair look as flawless and something opaque like a rich deep coat of paint. Because even after all that putty, sanding, and deglossing, it was looking so inconsistent in certain areas that I knew it wouldn’t soak up stain evenly. Boo. And although some folks wouldn’t dream of painting wood, we’re definitely ok with it (especially since this is just a $25 cragislist find and not a family heirloom). So I threw my rich dark stain idea out the window and ran to the arms of an old friend. You guessed it: ORB.
I’m telling you, my name is Sherry and I’m addicted to oil-rubbed bronze spray paint. But thanks to having a nice built-in primer and applying three very thin and even coats, it actually took on the look of a rich dark wood (and had more dimension than plain old chocolate paint thanks to the subtle metallic quality of the finish). Here’s a picture that I snapped after two coats (you can see that it’s not completely seamless and even yet- but the third coat did the trick).
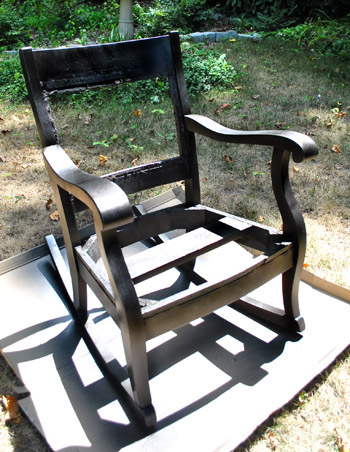
Oh and you can find more general spray painting tips here (lightly misting it while keeping your arm moving all the time is key).
And because I hate to end on that poorly shot, blown out, two-coats-out-of-three spray painting pic, I thought I’d fast forward a little to give you a glance at Part Two of The Glee Project The Rocker Project. Here she is (not completely finished, but getting there). I’ll be back with more details of that whole shebang (and some final after shots) for ya tomorrow.
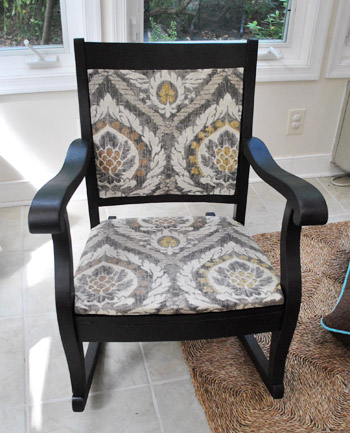
Update: A sweet commenter (thanks Laura!) just told us that our chair fabric was actually on the cover of the Ballard Designs catalog, so we hopped over there and learned they actually sell a chair that’s upholstered in exactly the same fabric for $600-800 (depending on the finish of the chair) and the fabric is being sold on its own for $32 a yard!
What about you guys. Do you have any projects that you’ve put off for an epically long time? Is there something that intimidates you, like two-sided upholstery does to me? Are you completely unsurprised that I basically try to solve every problem in my life with ORB? Can you believe that darn seat wouldn’t fit on the chair after five layers of batting-stapling? At that point I truly wanted to set the entire thing on fire.
Reference: https://www.productexpert.com/best-ergonomic-office-chairs/.

Carla says
P.S. Have you thought about softly aging the new paint with some light sanding? That would look lovely with the fabric. Also, do you sand after you spray paint? I find that sanding with a fine grit sandpaper really smooths down the paint and makes it look gently loved.
YoungHouseLove says
That could definitely look sweet for folks who prefer the aged look! I think we like the contrast of the old lines and the new finish/fabric- but it’s definitely one of those personal preference things! As for sanding after we spray in general, we don’t do that just because I mist the paint on so lightly that it lays nice an smooth so there aren’t any drips or bumps to sand down (I also have an irrational fear of “scratching up” my finish, haha).
xo,
s
laxsupermom says
The rocker looks amazing! Love that fabric – what a steal! I have about a million and a half unfinished projects laying around the house. I’m too ADD to work on any one project at once, so right now projects are slow to show up on my blog, but I figure there’ll be some point during the winter where I’ll look like I’m a project completing dynamo. At least that’s what I keep telling myself. ;-)
Jessica Matthews says
This is amazing!!!!
Jaimie says
Love it! Looks fabulous. The fabric was a very nice choice.
Sandy says
With constant interuptions all day long (my boss …shhhh) I finally finished listening to your radio interview. You did great! One thing that caught my attention was how you said quite a few times “we were just lucky”. Nope! Not lucky Sherry. It’s called “Blessed”! You both were and are very blessed. No more using the “lucky” word.
Oh and btw, the chair looks awesome. :)
YoungHouseLove says
Aw thanks Sandy! I think I tossed in a few “we were just fortunate” things too. Haha. Most of all I noticed that I said legit or legitimate like a million times. D’oh!
xo,
s
Sayre says
I inherited my grandmother’s bedroom chair and ottoman. At the moment, the geriatric dachsund has claimed it as her own, but once she dies, I’m going to reupholster it. Right now it’s orange (which sounds awful, but really is kind of nice) but the fabric is so old that it’s shredding.
Kristin H. says
Is there any system in particular that you guys use for fabric/craft storage/organization (like Clara’s weekly fabrics, sewing stuff, art supplies..)? I swear if I bought 2yds of a fabric not knowing what I’d use it for I know I’d loose it within a month!! You guys always seem to have that stuff so organized and ready to go.
YoungHouseLove says
I just take it off the bolt (if it’s on it, some cases it’s not at all, and is just a yard or two) and fold it. I have two deep square baskets at the top of the playroom closet full of all my fabric! I have to dig through all of it to find something, but it’s not too bad!
xo,
s
Karen says
I think I am in love. That fabric and the bones of that chair are awesome!
Jessica says
I really thought we were about to get a photoshopped version of bear grylls with sherry’s face on it!
YoungHouseLove says
About a minute after publishing the post I wondered if I should add a little photoshopped Me + Bear action, but I restrained myself. Haha.
xo,
s
Lisa says
It’s turning out so great! Way to get “the look for less”. You are sure on a roll with that!
I have a hutch that has been in on my “to do” list for, oh, almost two years. We are about to move for the third time in those two years, across the country again, but I really am going to do it or let it go when we get to our next location!
Teri says
Gorgeous!
nic says
Amazing!
HELP –
I CANNOT find ORB Rustoleum anywhere I have looked in Canada – does anyone know where I can get some????
YoungHouseLove says
Oh no! Here it’s carried in Home Depot and Lowe’s. Anyone know about Canada?
xo,
s
Pamela says
I found it at Wal Mart! And if the Grande Prairie one hfas it, they ALL have it :)
Emily Yee says
Seriously, I am just speechless! I wouldn’t have touched that rocking chair with a 10 ft pole and to see what you have done with it..wow wow wow! Maybe I should give shabby things a chance! Haha…gotta channel some YHL diy!!
Liz says
Love it! My coworker and I are wondering how you finished the backside though?? The seat part could be left as you showed it (stapled underneath and done) – but we’re anxious to see how it looks from the back. Great work!
YoungHouseLove says
We’ll go into a ton of those details in tomorrow’s Part Two post!
xo,
s
Liz @ the cabbage patch says
LOVE IT! BTW, I’m pretty sure we have the exact same rocker. It used to belong to my grandmother. I love the silly thing. :)
PS: Do you realize that you used two different pronouns to describe your chair? Mr. Rocker and “Here she is?” I just found it amusing :)
YoungHouseLove says
Oh yeah, for some strange reason I’m undecided on him/her. The curves = lady. But the dapper-factor = guy. I’m so confused. Haha.
xo,
s
Maria @ Orchard Bloom says
Amazing transformation. I love that fabric
Jenny says
Looking good! I have my own took-way-too-long-to-start project I’m doing this weekend. I have two milk cans that have sat in the shed for 6 years begging for a new coat of paint but I didn’t want them white again so….wait for it….they will be getting a coat of ORB!! Hi, my name is Jenny and I’m addicted to oil rubbed bronze.
Kristin F says
I’m sorry, I had to leave the post midway due to hysteria. I had just gotten to the point where you mention that you had to fess up that a stain just wasn’t going to cut it. Out loud, to my self, I said “Don’t tell me you ORB’d it”…..3 sentences later, what do I find??????
BTW: There has to be some kind of 10 step program or support group for ORB addicts. ORBA?
ps: I have to admit, we’re kinda hooked on it in our house too.
YoungHouseLove says
Haha, it’s addictive!
xo,
s
Michelle says
I have owned my fixer-upper for over a year now and still haven’t painted and re-hung the bathroom door. I guess it is a good thing I live alone or I would be accused of living in the Real World house.
Martha says
Our whole life is consumed with trying to finish projects we started months (sometimes years) ago!
Your cabinet post inspired a trip to Re-Store where we purchased a fantastic hand-thrown, hand-painted clay sink making today the beginning of what is sure to be a very long process.
Heather says
Hey Sherry, great post! I mentioned in my own blog from yesterday that I too was going to be reupholstering some dining room chair seats and got my fabric from JoAnn’s on sale as well! When you made note of how you were advised your fabric was also seen in the Ballard Designs catalog and provided the link I clicked to see what else they were pairing with their wood finishes and found my fabric on their site too! -Delray Azure Easy Care Mediterranean tile motif they called it
Well done on your chair project though! I always enjoy seeing what you and John are up to and it inspires me to do more on my own :)
YoungHouseLove says
That’s so funny! What a small world!
xo,
s
Michelle Lepak says
Did it have a musty old smell to it? I bought some old duncan phyfe chairs that I am going to be replacing the fabric on the seats and there is major odor…even after sitting outside for a week. Any recommendations?
Also, the fabric…is it actually Kravet Design or another manufacturer…I can’t find it except for Ballard.
YoungHouseLove says
Ours didn’t have any odor (possibly because it sat out in the garage for about a month at our first house), but a few folks commented with lots of awesome tips right on this post (vinegar, baking powder, etc). Good luck!
xo,
s
katiedid says
I DO have a project that I am going to try and do this weekend. I have a console made from sticks all nailed together that was done by an artist in New Mexico. Each stick is painted a different color. We have loved it, but have decided that something simpler would work better in our house. I have been torn about painting this since it is a piece of art after all. But it has been covered with a burlap table skirt for a very long time.
I LOVE the rocker results! So….you rock!
Robin says
Love seeing this project. I really like the rocker and the fabric you chose. I’m wondering if you hadn’t gone ORB would you have brush painted or spray painted? I have 2 chairs primed (by brush)and ready for paint. I was thinking of using a brush but I’m wondering if a spray would give me a better finish.
YoungHouseLove says
Here’s the thing, I love spray paint (with primer built in or with the use of spray primer first like Kilz) for smaller things (lamps, metal fireplace screens, even iron outdoor furniture), but for most wood furnishings I actually recommend using primer and paint applied with a brush or small foam roller to all beginners (since spray paint is surprisingly hard to get even, and not drippy, if you’re new at it). So had it been three years ago when I was a novice painter/spray painter, I would have used a brush or small foam roller for more control, but since I’ve been painting things a while, I have confidence in my spray painting abilities. But that being said, I still wouldn’t spray cabinetry or large pieces of furniture with drawers (like a dresser or armoire) just because I still like the control of a brush or small foam roller (and don’t want to end up with anything less than seamless looking). So I leave the spraying large wooden objects thing to the experts (like professional cabinet refinishers) and happily use my little roller and brush. Haha. Hope it helps!
xo,
s
Kelly says
I love your chair!!! The fabric and ORB look fantastic together! I am in the middle of reupholstering an old chair I found at a garage sale (my very first time to even think about reupholstering!). It is much more difficult than it looks! I have only taken about 75% of the staples out and have bruises and cuts all over! I am going to have to try those pliers you mentioned! Thanks for sharing!
Rosi says
You guys inspire me so much with all of your DIY projects… I re-did my hope chest with fabric i got 1.50$ a yard (on sale from 7$ a yard!) but recently I have been wanting to ORB it and give it another new life with some different fabric. It also needs to be fixed with some wood glue, hopefully I can do that soon!
The chair looks great!! :D
jessie says
no lie, my husband and i are tearing apart two wingback chairs from his great-grand-mother that have been passed down to us through three generations. we have documented it just like you – hours of pulling and piles of nails! though these are fully upholstered, not just inlaid. it’s good to see there is an end in sight :)
YoungHouseLove says
Whew- that must be insane! Good luck and god speed!
xo,
s
Anne says
Ya’ll are just awesome! :)
This is a crazy awesome transformation. That chair is going to get so much use now – such a wonderful way to show an old chair some love. <3
Anna says
on the plus side, at least you had unpacked all the stuff you needed to do the project! We are 8 months into our new home and not quite unpacked all the boxes yet (granted, most of it for a reason – why unpack all our boxes of books before we buy our bookshelves etc).
It looks great, am looking forward to the next installment as I have been avoiding doing our dining chairs for the exact same reason.
orchidlanedecor.com says
That fabric is stunning. Great job! I love an old piece given a new lease on life. Sometimes it best to paint. Much better to repaint than let it be trashed. I recently redid an old chair with zebra print and black paint, if you’re interested, you can view it here
http://www.orchidlanedecor.com/2011/07/before-and-after-zebra-recliner-chair.html
Suzy xxx
YoungHouseLove says
What an awesome job! Love the glossy black!
xo,
s
Jamie says
I’ve never ever gotten a Ballard Designs catalog & what should be in my mailbox today but that exact catalog with the fabric of your chair on the cover! What freaky timing! I think your rocker looks waaaay better than the chair they were reupholstering though. Kudos :) It looks a-maxing!
YoungHouseLove says
That’s such a crazy coincidence! We have only seen it online (after someone else tipped us off) but maybe it’ll end up in our mailbox tomorrow! Haha.
xo,
s
Jessie says
It’s amazing to me…every time I read about your projects I am inspired to finish my own! You are always one step ahead :) I am totally a Craigslist hoarder with several re-finishing and re-upholstering projects waiting to be completed. Thanks for the inspiration to finish; I am an ORB virign but may give it a try!
{hooked on hickory} says
that fabric is to die for!
ashley
Suzanne Collins says
Ugh. So jealous of your fabric find right now. I’ve been watching that EXACT fabric at Ballard Design for a while now. Definitely not $2 a yard though. :o( http://www.ballarddesigns.com/scandicci-gray-fabric-by-the-yard/fabric-by-the-yard/patterns/43344
YoungHouseLove says
Woah!!! I would stalk JoAnn and see if any more remnants come up! It was in the clearance aisle still on a bolt (a very skinny bolt since it was only two yards). Hope it helps!
xo,
s
Sib says
Love the fabric. When I received a Ballard Design magazine today they had a chair with the same fabric on it on the cover, ironic. Nice work
YoungHouseLove says
Isn’t that so crazy?! We just heard about that this morning. Such a small world!
xo,
s
Whitney says
Yeeeahhh, about that ORB spray paint. I bought it thinking ok I’ll try it out. Next thing you know my husband comes around the corner and I have about 5 different things that color. He was in shock. Lets just say anything I say I like he knows that it will either get painted white or with ORB. I feel your addictions! We could start our own group. “ORB Anonymous” :)
Rachel C says
I just got the new Ballard Designs catelog and your fabric is all over it – chairs, curtains, pillows. Everything! But it certainly doesn’t cost $2 a yard.
YoungHouseLove says
Isn’t that so funny? Someone tipped us off about that this morning- what a crazy coincidence!
xo,
s
Barbara says
It does look very nice, but I’m confused about something…there are five layers of staples and then the cover fabric stapled too? That’s six layers of staples in the same area? Didn’t you staple over the top of staples? I don’t get how you can staple so much in one area.
YoungHouseLove says
I just sort of very gradually work my way inward from the back edge of the seat if that makes sense. Meaning my first row of staples are about a half inch from the edge and my second ones are about 3/4ths of an inch from the edge, etc. Hope that makes sense!
xo,
s
Maggie says
I’m just finishing up chair that I’ve had for 4 years. After pulling off the fabric and pulling out the nails I let it sit in my parents garage for a year or two. Then I sanded it and stained it; and then let it sit in my parents garage for another year. I then brought it to my apartment…and let it sit for a year in closet. I’m so close to being done, it now sits out in the open reminding me to finish up! …maybe next weekend…
Kate says
Sherry you are a genius. This is one amazing chair. I am bemoaning (again) the complete lack of ORB paint (or anything ORB for that matter) and gorgeous $2/yard fabric in Australia. Why world, why!!??? I’m moving. I LOVE it.
YoungHouseLove says
Haha, come on over to the states! I’ll welcome you with a big ol’ can of ORB!
xo,
s
sara says
I thought you guys did 2 posts a day? Do you have a “schedule” you follow or just when the mood strikes? (just so I know when to check back!!!)
YoungHouseLove says
We usually do eight posts in a five day span (two on Mon, two on Tues, one on Wed, two on Thurs, one on Friday). Sometimes we do two on Friday and even toss in a random weekend one to make nine. We like to keep it a little flexible since that’s more fun! Hope it helps!
xo,
s
Marynn says
LOVE the rocker! Double-sided reupholstery does not scare me BUT my patio furniture cushions that need recovering DO! I have been sewing since not long after I learned to read and I still have put off recovering the cushions for about 15 months because structured cushions + outdoor fabric + piping = LONG, tedious and frustrating sewing project. By the way, I think it’s hilarious how much you love ORB…I HAVE to try it on something because it looks so great on everything you do!
Jess says
It took me three years of on/off work to fully strip the paint from my mom’s ornately carved English oak chair. I have spent so many hours with a wire brush scrubbing the grain clean! It was worth it though–I finally finished it last weekend and it looks wonderful without the white paint on it. I love how your chair looks–I’m really not a fan of paint on wood for the most part, but in this case it works, especially with the fabric!
Susan says
That is one rockin rocker! I love the fabric and the chair! Great job!
Susan
Jen @ The Decor Scene says
ok Sherry I just sat down to drool through Ballard Designs new catalog that just came in the mail and their was your fabric that you used on the rocker, on a dark stained chair, on the front cover. Too funny to see it on the cover. Great minds think a like I guess. ;) Gotta check out the new catalog, there are some gorgeous ideas in there for your office….if your interested of course. :)
YoungHouseLove says
That’s so crazy! A few others have mentioned that and we can’t wait to check it out! Maybe ours will come tomorrow…
xo,
s
kathy says
I’ve always loved transforming old furniture, etc. with paint, but your project inspires me to want to do it for a living!! So fun and rewarding to renew and reuse things like this! Love it!
sara says
Thanks Sherry….
Since we’re on the topic of posts… Id love to see another “day in the life” post… Like, do you answer comments on a laptop while watching Clara play? or when you guys watch a movie? Who cooks? How has blogging and DIYing changed now tht you have a baby who wont sit still!? haha… Thanks guys! Looking forward to tomorrows posts!
YoungHouseLove says
We have another one of those on the list for our upcoming blogiversary! Should be full of details! In the meantime, I’ll answer a few mysteries: John cooks. I burn stuff. Haha. And I answer comments all the time (right now we’re watching TV and I’m here answering you, haha). And now that the baby won’t sit still it’s a whole new ballgame! Only one of us can work at a time unless she’s napping or in bed for the night! Otherwise somene’s on Clara duty. Haha.
xo,
s
Pamela says
Love it!
I’m in the middle of my first recovering project too, a 50 year old chrome high chair. I got all the rust off it (it was living in the garage when we bought our house) and am now waiting on the fabric to finish it! I can’t wait to see how both our chairs turn out!
Michelle Nichols says
This is absolutely nothing to do with home improvement but I had to share this amazing photography with you guys.
Enjoy!
From to You
http://fromme-toyou.tumblr.com/
Michelle Nichols says
Opps…
From Me to You.
Michelle Nichols says
http://fromme-toyou.tumblr.com/tagged/gif
Double oops..wrong link
YoungHouseLove says
Awesome! Love it so much.
xo
s
Mel says
The chair looks amazing. I am impressed by your mad skills.
By the way, I saw that can of ORB coming from a mile away.