Ok I’m back with part two of the madness that is Me vs. Rocker. But remember my disclaimer from yesterday’s post that this entire process was much like when aliens took over my body and I made a quilt for Clara, which is to say: I went rogue. I took in all the advice from you guys along with some google tips and some suggestions from a reupholstering-fiend friend of mine… and just played it by ear and did what seemed to work as I went along. I mean, it’s not a family heirloom, it’s a $25 craigslist find. But enough chatter, heeeeere we go.
Although there was a sneak peek pic of the almost-finished product at the end of the last post, we were actually here when it came to the play-by-play:
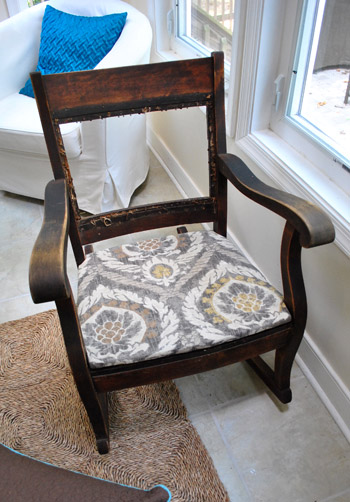
No wait, we had finished that seat and were here after redoing the frame:
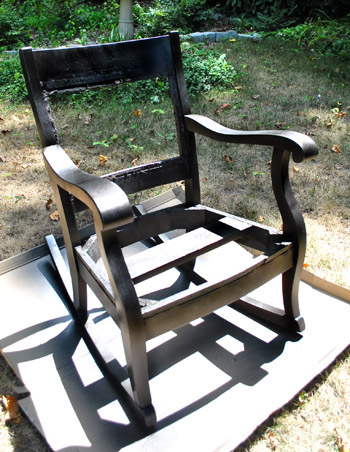
Finishing the seat upholstery and the frame meant I could no longer avoid the most intimidating part of this project: that opening at the top part of the chair that would have to look finished from both sides. And yes, I was skeered. But after reading through a ton of recommendations on this original how-do-I-do-it post from nine months ago (and chatting to a reupholstering-fiend friend of mine) I opted to use one of the more surprising yet most commonly recommended methods: heavy duty cardboard. Doesn’t that sound like a terrible idea? I know, it sounds completely wrong. Like bad dollhouse furniture that would be uncomfortable and make weird cardboard sounds when you lean back on it. But I guess a lot of upholstery experts use it and my friend had gorgeously redone an entire dining set with double-sided upholstery just like my rocker using that method. So I went for it. And in the words of Madonna: I’m not sorry (it’s huuuuman naaaature). It actually worked out awesomely. Let’s get into it, shall we?
First I used four pieces of cardstock to make a template for the opening (to see just how wide and long it needed to be to cover some of the gross hole-riddled parts of the frame that the original upholstery had once obscured):
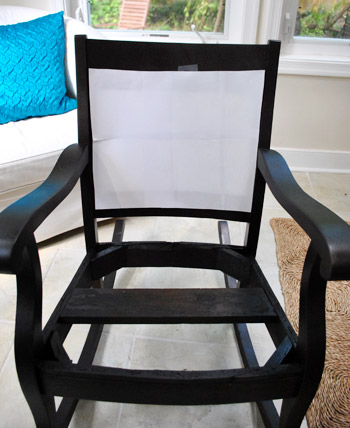
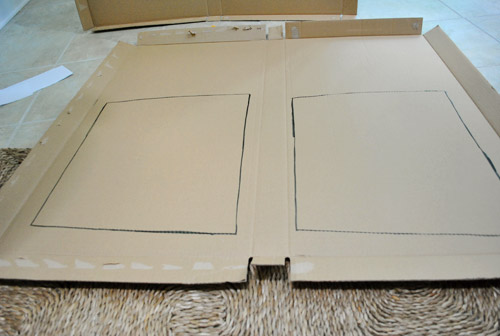
Then I placed that template on the back side of the chair to be sure another upholstered panel of that exact size would work nicely in the back (and cover all the rough areas of the frame that aren’t meant to be seen back there). It worked in the back too, so I laid my handy little cardstock template down on some heavy duty cardboard (leftover from our Ikea file cabinet packaging) and traced the shape of the template onto the cardboard.
Next I cut each cardboard panel out and used more extra-loft batting and fabric, which I secured from behind to upholster it just like I did to the seat in the first part of this tutorial. Oh and you’ll notice I did my best to center the fabric again and pull it nice and taut around the back perimeter. This time I just used one layer of batting underneath it (instead of five like the seat) since people don’t sit on the chair back (they just lean on it). I don’t mind all wood rockers like this, so I wasn’t looking for a ton of top-of-your-back plushness anyway. I just wanted the batting and fabric to give the heavy duty cardboard even more strength and durability. It was actually surprisingly legit looking when I was done. And since I worried that staples would poke through the front of my fabric from behind as I secured the batting and fabric, I used duct tape to hold it in place from behind instead – just until I could staple through everything to attach the panel to the chair (which I knew would hold a lot more firmly over time than tape). I don’t think anyone would have guessed it was cardboard and duct tape under there from the front. And the great thing about it was that it wasn’t completely unbendable…
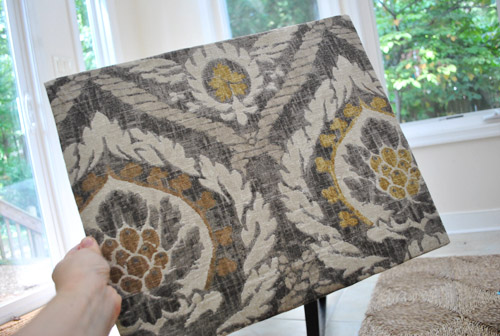
… but once it was stapled (with my regular old staple gun) to the chair about a quarter of an inch from the edge (through the panel and into the frame) it was completely unbendable and appropriately strong.
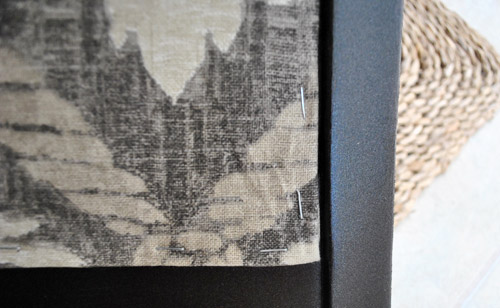
I don’t think a kid could stab an umbrella through it actually. It’s that strong. See, it gets really nice and rigid once the outside is reinforced with all of those staples around the chair’s wooden frame. And it was nice that it wasn’t completely rigid (aka: unbendable) before the stapling step because if I used anything more unbendy (like a piece of metal flashing) I worried it would have been really hard to attach. Why? Well, whatever I chose for the panel had to have some flex so it could follow the slight curve of the frame without buckling or folding. In short: cardboard sounds crazy, but the thick stuff that’s reinforced with batting and fabric = smooth and completely professional looking. I don’t think anyone could thump their hand against it (hard, it can take it) and guess that it was cardboard. And it’s completely comfortable to lean on, rock in, etc.
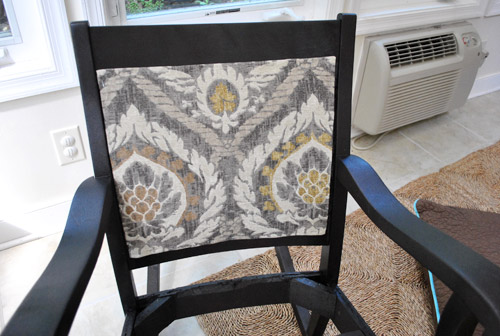
But just stapling the panel around the exterior left me with this dilemma: ugly little visible staples around the perimeter. At first I thought I’d find some sort of trim or burlap ribbon to glue over it (they sell upholstery glue meant for adding trim like that) but the more I looked at options, the more I didn’t like the idea of adding more contrasting fabric or trim. Nothing seemed to go with my base fabric, and I didn’t want it to look cheap or peel off due to constant use (we work our furniture hard in this house).

So I did what any novice chair upholstering gal would do, and completely ignored the problem for the time being. Instead I just moved on to making the second panel for the back (again using the one layer of batting + one layer of taut fabric method to cover the panel – secured from the back with duct tape and then stapled to the chair frame to hold everything in place for the long haul).
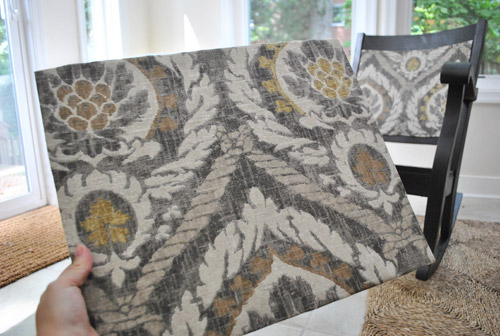
Here’s a better shot where you can see how the frame curves a bit, so creating a panel that’s not too rigid to follow that curve was key.
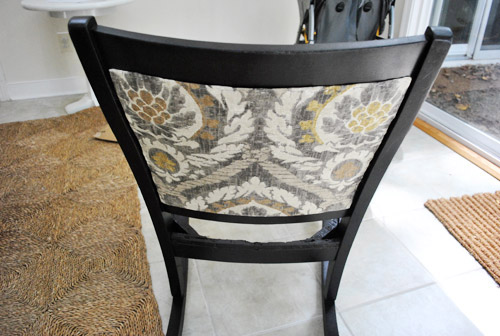
From afar she was looking miiightly fine (this is actually the sneak peek pic I included in yesterday’s post)…
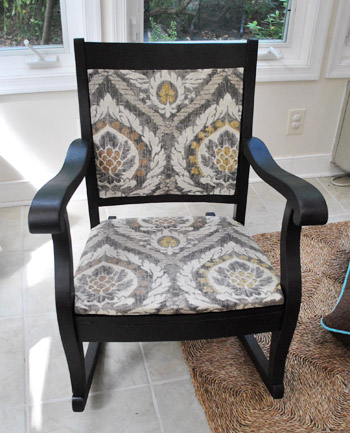
… but up close there was still the visible staple issue around the edge of each panel. So I decided after looking at all of my trimming options at JoAnn that maybe it was a job for nail heads (sold in packs of 24 for $1.50 each). After all I love the gorgeous detailing they can add to things (our living room ottoman has them going on, and I am totally picking up what it’s putting down). So I very slowly pried out the staples as I added nail heads down the line instead (the staples could be easily popped out with a flat head screwdriver, and then I just used a small hammer to bang in my nail heads, which basically look like heavy duty thumb tacks).
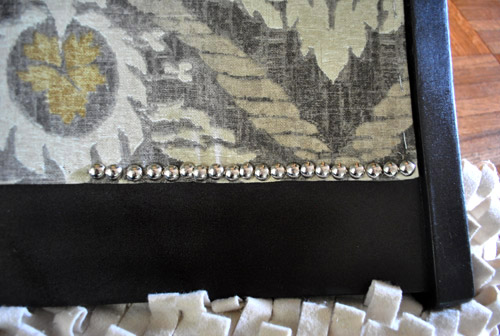
But after a whole bunch of chihuahua-scaring hammering, I stepped back and hated the lumpy bumpy result. They were just far too ganked up on each other and no matter how hard I tried to hammer them in straight, there was a slight wiggled effect and it just wasn’t working for me. I had looked for one of those long rows of nail heads that they sell pre-lined-up on a spool (which probably would have been a lot easier) but I couldn’t find them at JoAnn (hence purchasing individual nail heads instead). But it was definitely time to figure something else out. So I decided to try to space my nail heads a little further out (sort of the same distance as my staples) instead of trying to make a long dense line…
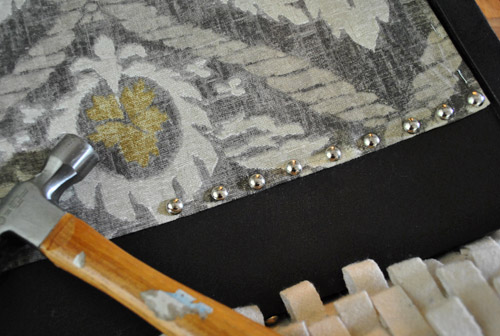
It was soooo much better. I could breathe again. If one was slightly higher or lower than another one it was a lot less obvious this way. And it felt more airy and not as on-top-of-itself crowded.
Oh and just to be clear, I would remove each staple with the flat head screwdriver as I went along and replace it with a nail head. So it wouldn’t be smart to remove all of your staples at once or nothing would hold your panel in place on the chair. Moving around the chair and popping one staple out and one nail head in did the trick. And using a small piece of paper or cardboard as a spacer between the nail heads can help you keep them nice and equidistant. Booyah, Dad. I just used equidistant on the ol’ blog (he’s a math teacher, so that should thrill him to no end).
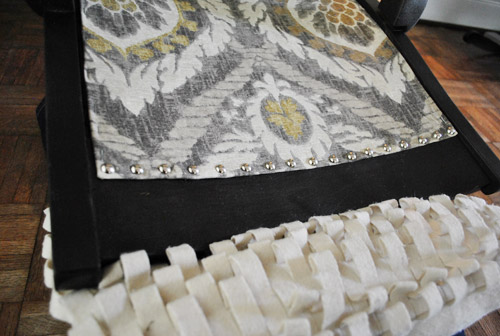
Oh and see that ruffled cream thing at the bottom of the pic above and below? That’s just a pillow from the sofa because I was banging the chair pretty hard, so I didn’t want it rubbing against the floor with every hit. Poor pillow. I’m happy to say that he made it through. And here’s what I had going on after doing three out of four sides of the front panel:
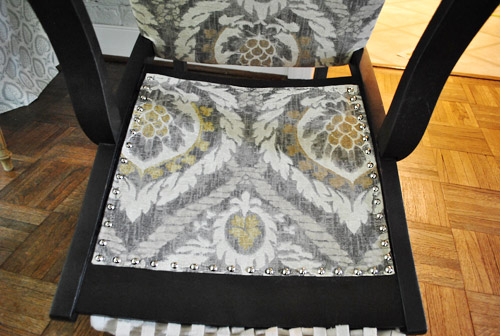
Not bad, right? It was nice because it made the whole chair feel kind of special and expensive in a way that I feared glued cording or trim couldn’t. But I’m not gonna lie. This is the hardest step by far, physically. You get sweaty and gross from all that extra-hard hammering and it’s just downright tiring. It’s also super frustrating every once in a while when your nail head inexplicably bends as you hammer it in, which means it is rendered completely useless (and results in a bunch of annoying waste in the end). Just look at this pile of “brokens”:
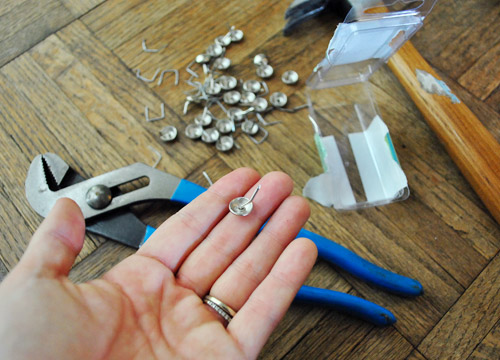
I even tried to straighten them with a pliers in the hopes of reusing them, but once they’re bent they’re just too compromised to go in straight and look right (and often just break entirely). Bummer.
But in the end (after about an hour and a half spent studding the front panel) I loved the look so much that I even added studs along the wood trim part under the seat on the sides and front. Just to add some balance and bring some of that detailing to the bottom of the rocker along with the top panels. It’s hard to tell in the pics, but the studding on the upper panel of upholstery is nice and shiny, so adding some shine along the wooden bottom edge of the chair made it feel more not-top-heavy, so it’s more balanced looking in person.
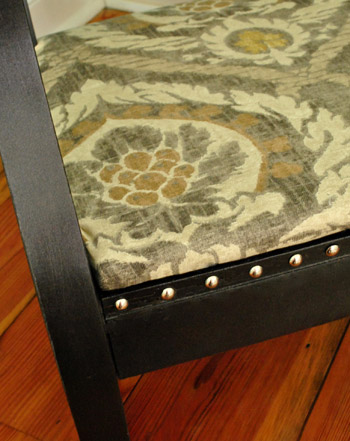
Secret: I haven’t nail-headed the back panel yet, so I have a bit more hammering to do. Maybe next week when my arms recover. Hah. For now I’ll just keep my chair facing forward and nobody will be the wiser. Except for the fact that I just told everyone. Because I’m smooth like that.
Either way, from the front and the side… I think I’m in love:
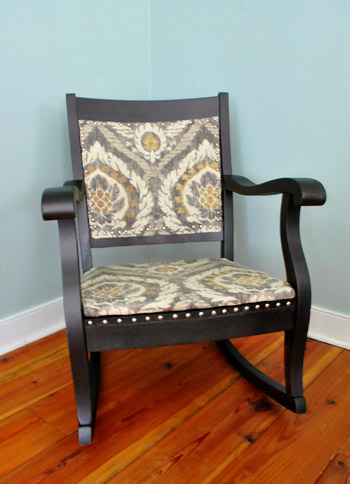
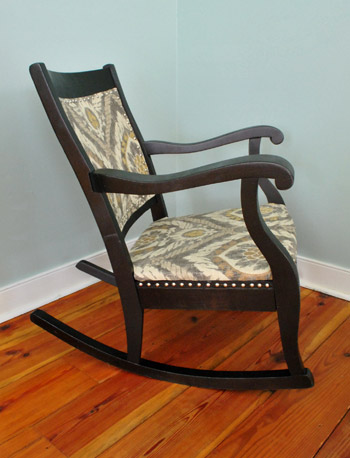
Isn’t she sexy? Wait, I mean he. The studs and the curves give me mixed signals. Speaking of the studs, for some reason the nail head row on the bottom (that wraps around the wood rail under the seat) reads as a little “medieval” in these pics, but I promise it’s not at all reminiscent of Knights Of The Round Table in person, I think the camera just caught them differently than they read in real life.
But back to those nail heads, my advice to you would be this: buy waaaaay more boxes of nail heads than you think you’ll need. They’re only $1.50 a box (at least at our JoAnn) and you can always use coupons on top of that. It’s just waaay more annoying to run out of them and have to treck back out to the store all sweaty and frustrated than to have extra boxes that you can return at the end if you don’t need them. To give you an idea of how many boxes I went through, I actually needed five of them (due to all the annoying bent ones that messed with my mojo). I probably could have done it in three if none of them inexplicably bent on me.
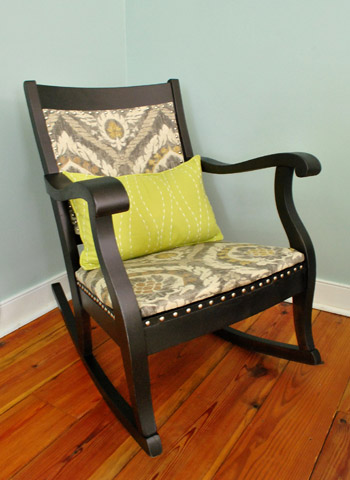
To celebrate fiiiinally finishing (well being 95% done, since I still have to stud the back panel) I decided to have a pillow fashion show. Because I’m weird like that. Here’s Mr Dapper himself, rocking (har-har) a random green HomeGoods pillow that I have in my embarrassingly extensive pillow collection:
And here he is with a little Anthropologie-ish spin thanks to a fun patterned yellow pillow going on (originally from Target, borrowed from the guest room):
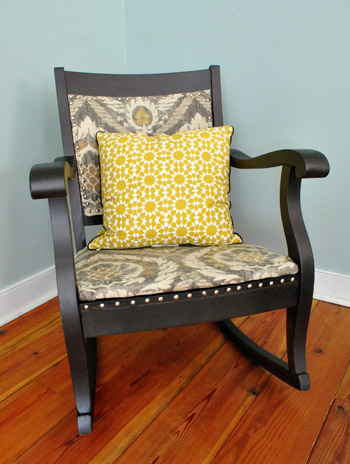
Today he’s “wearing” the little green pillow in the corner of our bedroom, but the patterned yellow one was fun for a hot minute too. We’re thinking our rocker might eventually end up in the office, which would be really nice since we spend lots of Clara-reading time in there (and decided our big green sofa doesn’t really work with the floor plan that we’re working towards). We’ll definitely share some pics when we pin down a permanent home for the guy.
And just for kicks, here’s a look back at our $25 craigslist rocker before I worked up the took-nine-months-to-cultivate energy to get ‘er done. Ah memories.
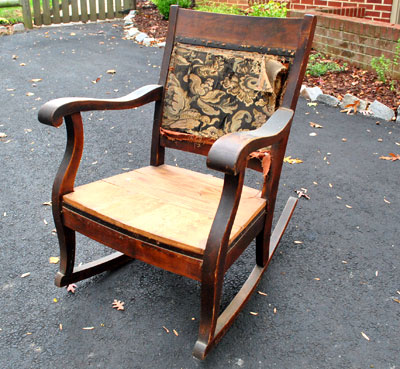
You’ve come a long way Rocky. Here’s the budget breakdown:
- Rocker (from craigslist): $25
- Extra-loft batting (from JoAnn): $6 (with 50% off coupon)
- Staple gun: $0 (already owned – but it’ll run you $19-ish bucks from Home Depot if you need one)
- Oil-rubbed bronze spray paint (from Home Depot): $7
- Heavy duty cardboard: $0 (leftover from our Ikea file cabinet packaging)
- Kravet fabric (found as a clearance remnant at JoAnn): $4 (for two yards)
- Nail heads (from JoAnn): $6 (they were $1.50 a box & I needed 5 boxes, but used 2 coupons)
- Total: $48
Possibly the most exciting thing? We just learned that Ballard Designs is selling the same exact Kravet fabric that we found as a clearance remnant at JoAnn for $4 (for two yards) for a whopping $32 a yard (which adds up to $64 for two)! So the fabric that we used on our project alone could have cost more than our entire $48 rocker makeover. Definitely makes the whole roller-coaster upholstery adventure feel like time and money well spent. Although I’m still mad that some of my nail heads bent so I had to buy a few extra packs. Oh well, there’s no crying in baseball upholstery.
So there you have it. A what-worked-for-me rundown with 44 photos between the this post and part one (hence the two part split). As for how it feels to rock in that guy, in a word: niiiiiice. It’s all very comfy and smooth (with nice rock-ability going on). And best of all, there’s not an inkling of “is this thing made of cardboard?”- for which I’m eternally grateful. Has anyone else out there tried the cardboard panel trick for chair backing (or some other upholstery task)? Is anyone bravely embarking on an even more involved chair makeover (the idea of a wingback makes me shake in my boots)? Good luck and godspeed!
Psst- We announced this weeks giveaway winners. Click here to see if you’re one of them.

Sabrina says
Beautiful! The studs really make it!! Looks like an $800 chair!
Liz says
I definitely think she’s a girl. Look at those curves and the bling! A guy can’t carry that off, even if he is ORB :)
Martina says
Looks fantastic! Even if you went rogue, it’s like you have an inner furniture guru just waiting to come out and spread awesomeness. :)
Amber says
Way to go Sherry! It looks like it cost more than $48.00. I can’t wait to see where it ends up.
Ariana says
It looks great! You guys never cease to amaze me!!
Elisa @ What the Vita says
I really just love this makeover. Rockers are so sweet and the colors and design of this one is just perfect. I want one! Great job, especially when it was looking so old and sad before.
Skye @ Neathering Our Fest says
Awesome – I love the entire thing! I think the nailhead trim was a brilliant solution and I definitely like the equidistant aspect. :)
Katie @ Epistle says
Oh, I love it! It makes me want to buy a chair and reupholster it…
Maureen@This (Kinda) Old House says
This came out great! Worth the work.
heather says
I absolutely love this. I always wondered about the back panel, which has made me pretty much stay away from reupholstering all together. Half way through I thought “Why not use those fancy nail heads” and the next sentence was just that. One of my favorite projects I’ve read on here, and I’m in the troop that feels it would look awesome in the office. Do you have any fabric? Maybe you could find a small table or ottoman and cover the top of it?
YoungHouseLove says
Always a possibility! We definitely can’t wait to try it out in the office!
xo,
s
Wsquared says
I think you’ve done a beautiful job, Sherry! I’m especially grateful that you’ve laid it all out for us. …but I was wondering: won’t the top look a bit more consistent with the seat if you added a bit of black trim along the edges of the back? We have a lot of old reupholstered furniture, chairs especially, in our house that I would love to refinish. And one thing I am noticing is that there is trim, but it’s held in place by the studs/nail heads.
YoungHouseLove says
I think some items have trim under nail heads and some have them right on top of the fabric. In fact a lot of headboards and ottomans are just studded directly over the fabric itself, which is a look we love!
xo,
s
Amy says
That was absolutely brilliant of you to add the nail head trim along the front and sides of the bottom! It PERFECTLY ties the top and bottom together in a way I wouldn’t have thought of – Well done Sherry! :)
dani says
Fantastic job, the cardboard was is such a great idea. I have been putting off re-doing some chairs now for a year, mostly because they are my husband’s family heirlooms and I have yet to conquer my fear of ruining them!
One tip that helped me when I was upholstering my slipper chairs was to use an upholstery hammer for the tacks. The hammer is small and is magnetic so it holds the tack in place while you hammer…
YoungHouseLove says
Ooh the magnetic thing would have really helped! Thanks so much for the tip!
xo,
s
Cathy says
Seriously?!?! A custom upholstered chair with nailhead for under $50?!? My jaw dropped to my desk! It’s seriously beautiful. I even posted today about how I’m looking for a beat up chair to bring back to life. I’ll have to link back to your posts as well. This is the last kick I need to go out and refinish a chair.
Gina says
Awesome transformation! I am so impressed! You really have the touch of DIY. Or is it a DIY gene? The chair looks so beautiful now. Hard to imagine what it looked like when you bought it. Just fabulous!
Where are you going to put it?
YoungHouseLove says
We’re thinking the corner of the office (once we master the built-ins) since we do a lot of Clara reading in there.
xo,
s
Dusa says
When I tore this chair down, the back of it was cardboard stapled to the wood uprights! From the manufacturer!I was astounded. But wrapping some batting around it and adding the fabric made everything “more better” and comfy!http://cattyscorner.blogspot.com/2011_01_01_archive.html
Theresa says
nice job $herdog, that rocker looks awesome!!! i happened to be reading through your archives recently and saw the original post when you got the chair and wondered what happened to it…glad you were able to give it this lovely makeover!
Lindsay says
LOVE the chair! I think the studs really help classy it up.
Rutuja says
Amazing!!! I want to buy a nice rocker now.
Christine Schwalm Design says
Wow! Really impressive. Definitely looks like something you spent several hundred dollars on.
KimberlyJ says
GREAT JOB!!!! I love the shape of the chair and what you did with it.
Wom-mom Ethne says
Very nice. I stripped pea green paint off an oak rocker when I was in jr. high. We were able to stain it nicely and honestly, the green paint over the oak was a sin. (Your ORB looks nice.) Mom still has it. Might be fun to re-upholster it, just to change things up a bit (only a seat needed cuz it has rungs on the back). Always good inspiration from you two!
Staci @ My Friend Staci says
“I don’t think a kid could stab an umbrella through it actually.” This struck me as absurd and totally random! Funny!
Amanda J. says
I am in LOVE. You’ve somehow managed to avoid all of the pitfalls of current DIY trends of spray painting an ugly piece of furniture a bright color and calling it quits. (I HATE that. I truly do.)
The chair is beautiful and sophisticated without being…pompous? Can a chair be pompous? The fabric is lovely and has a soft feel to it – I love that you chose a more neutral pattern (that will be SO MUCH MORE FLEXIBLE) instead of a bright floral from Ikea. Instead, it looks like you salvaged a piece of an old-world tapestry. Sumptuous and sleek – I honestly think that a chair like this will NEVER go out of style.
A thousand internets to you for this project!
Yancey says
Congratulations! After 9 months you have “given birth” to a beautifully upholstered rocker! It looks great and I ADORE the fabric.
Julia @ Chris loves Julia says
Stunning transformation. And from one mama to another–all the best things take 9 months to make, right?!
P.s. We were at Ross this weekend and I strolled over to the pillow section and my husband asked, “Jules, how many pillows do we HAVE?!” He looked terrified at the thought of another throw pillow. Is there such a thing as too many options?
YoungHouseLove says
Haha it’s true! Nine months = so worth the trouble. And one can never have too many pillows.
xo,
s
Rachel says
Looks great! I think I need to search my local CL for a rocker now!:)
John says
Looks great! Although something about this post makes me think you’ve owned more than one Bedazzler at some point…
YoungHouseLove says
Haha- guilty as charged!
xo,
s
Change of Scenery says
Hey Sherry,
I have an ORB obsession too! So far I’ve sprayed two of my lamps with it and I’m getting ready to spray some handles, maybe a table and have offered it up to my friends as a solution at least a dozen times.
I mean, what’s not to love?!
Chair looks great btw and I’m really loving the fabric choice. All in all, you definitely nailed this refinishing job.
Relevant Notes says
Wow, this turned out so good! What an awesome project! And love the pillow fashion show ;)
Rebekka says
What a great result! I love how you guys show us what worked and didn’t work in your projects! :)
I’m about to tackle an upholstery project on a $15 armchair I found at a thrift store! I’m nervous! But my mother is my wing-man on this one, and I have high hopes for it! Your post is keeping me motivated! :)
Reenie says
LOVE IT!!! Great job Sherry. I like the lil green pillow with it ;)
Micha says
That rocker (and especially the fabric!) rock my boat! Fantastic job!
Micha says
That rocker (and especially the fabric!) really rocks my boat! Fantastic job!
fd says
You did a great job, I just love the fabric you picked too. If only I had the patience to do these kinds of projects…
krissy says
holy cannoli! What a beautiful rocker from such an ugly beast. You gals/guy always amaze me with your ability to see the potential in something and then deliver an awesome finished product. I admit the I was skeptical of your ORB choice but you made it work, so lovely!
Jen @ The Decor Scene says
I love the way it turned out with the nail heads. Gorgeous!!!
Did you get your Ballard Design catalog yet? I looked at my hubby last night and said “this chair has the same fabric that YHL used on their chair”. Then I showed him your post from yesterday. He loved your work too. :)
Here is the link to the online catalog. It’s not the same as looking at the catalog in person, but you can see the cover and the chair. :)
YoungHouseLove says
Isn’t that so crazy? We didn’t get it yet but can’t wait to see it!!
xo,
s
Jen @ The Decor Scene says
Completely crazy! But so cool too. I actually like how you centered yours better then they did. ;)
Ooops, I didn’t even put the link in to the catalog. It’s been a week. LOL!
http://www.ballarddesignscatalogs.com/WebProject.asp?CodeId=7.4.3.8&cm_sp=AS11-_-OnlineCatalog-_-Lighting%20Event
YoungHouseLove says
Love it!!
xo,
s
Liz S. says
Looks great!
If you ever have to do something of this kind again there’s an amazing tool, a nail spacer, that has saved my sanity (and my finger tips) on many occasions, it’s a plastic spacer with little slots for the nails, you put 5 or so halfway in, pull the spacer out and then hammer them the rest of the way.
Also a pair of diagonal pliers or end nips works great for pulling staples, you can twist them, getting leverage against the wood(with a notecard or something to protect the wood if needed) and it take a lot less force to pull the staples out!
Can’t do nothin’ about the tired hammer arm though!
YoungHouseLove says
That sounds awesome! Thanks so much for the tips!
xo,
s
Bethany says
I absolutely love it! Isn’t it incredible how we can transform something so (well there’s no other words but…) ugly and turn it into something absolutely gorgeous! This seems to be such a great reflection of your style and I love it. I can only imagine approaching this project in the same rogue-ness, seems to be how I tackle a lot of my projects!
elaine says
Looks wonderful Sherry. Great work!
Karen says
It looks really nice! I am scrolling through the post and comments, and don’t think I’ve yet seen this question addressed, so I’m going to ask away. (Disclaimer: Maybe I’m just being really paraonoid, lol…) How secure are the nail heads into the fabric and the wood? I am only thinking of this because I have a small dog that loves to get into *everything* and I would be afraid to leave him alone around the chair if they could easily be picked/eaten off. I know your family has little ones running around, too, so you’ve probably addressed it, but I was just wondering… Thanks!!
YoungHouseLove says
With a small dog and a baby I’m equally paranoid about that! The tacks have to be driven into wood (the ones through the perimeter of the back panel go straight into wood and not just into batting/fabric) so they’re super super secure. You hit them incredibly hard to drive them in, so you’d need some sort of long metal tool (like a flat head screwdriver) to get them out. Hope it helps!
xo,
s
Jessica G. says
Totally fantastic! You should be really proud of this one. Now I want a rocking chair! We had one in the living room growing up, and thinking about it zooms me straight back to my childhood.
Alison says
That looks great!!! I love it! Is the seat just sitting on the bottom of the chair or is it fastened to the chair somehow?
YoungHouseLove says
It’s screwed in from beneath.
xo,
s
Amanda says
I have a gorgeous old rocking chair – very similar to yours – just thicker wood on the arms (a little less feminine than your chair) that is sitting in the shed waiting for it’s big make-over. Currently it’s got a dingy yellow seat and a smokin-not-hot royal blue pleather back. It’s fabulously hideous. I ordered some beautiful beige fabrics (different for top and back but still complimentary) and I can’t wait to give the chair some love – unfortunately we’re in the middle of a big remodel so I was told it had to wait until I finished all of my other projects. Your chair inspires me to finish everything else up so I can get started on the chair. :)
Jill says
Amazeballs!!! You are my hero…. my nail head hero!! muahaha. :)
Laurie says
LOVE it! I used that fabric for pillows on a sofa and I adore it! Huge repeat was troublesome for me with the pillows. What Joann’s did you get it at? I found it at a local fabric store on clearance but it was $15 per yard. It is also sold at Ballard Designs online – but I think the price is either $30 or $40 a yard there. Good job on the rocking chair. It’s a keeper!
YoungHouseLove says
It was the one out by the movie theatres (at Westchester Commons). It was in the large remnant bolt section (on clearance). Hope it helps!
xo,
s
Briel K. says
I love me a good rocking chair! Rocking chairs and swings are my weakness. :) Your chair turned out great!
Kim at Yellow Brick Home says
Sherry, next time you do nailhead trim, you MUST get a trim kit! I just finished up an ottoman and used a trim kit for the first time. It CHANGED MY LIFE. You only need to nail in a head every 5 tacks, because the other 4 tacks are sort of fake. Not sure if that made sense. Here’s where I bought mine:
http://www.beaconfabric.com/vindex.html?cat148.htm
It’s almost to the bottom of the page; I got french natural. I know you’ll love it.
Anyway, the chair is perfect!
YoungHouseLove says
Oh man, you’re getting me so excited to try it! Gorgeous!
xo,
s
jackie g. photog says
beautiful!! now, if it were me, i would have left the staples and covered them with those fake nail heads that come in a strip! (you just glue them on!)
YoungHouseLove says
Oh yeah- I looked for those but couldn’t find them! Definitely another awesome way to go!
xo,
s
harmony says
Love, love, love it!!!!!!!