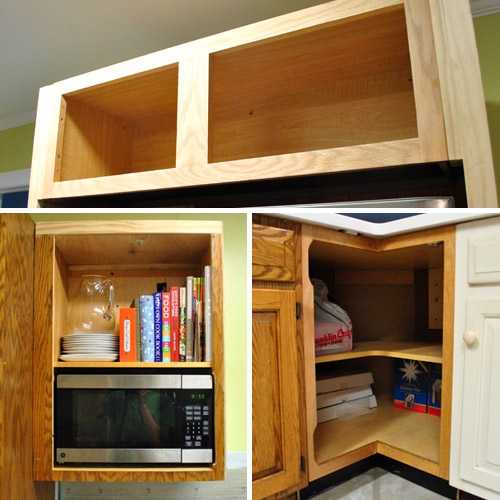
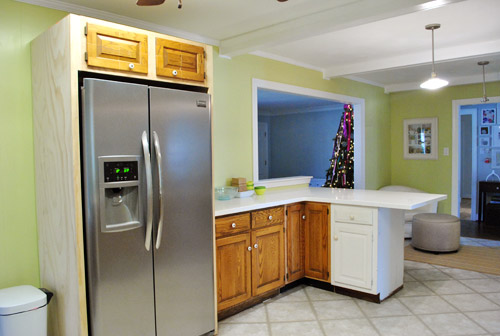
We knew from the moment that we decided to add new (secondhand) cabinets to our kitchen that the doors could be a challenge. Even though we only ended up with 5 missing doors, it was important that we get those to match with the rest of the kitchen for a seamless look (aka: so no one would look around and guess we had some mismatched thrift store cabinets among us). Here are the five doorless cabinets that we had to address:
We knew we had a few options to result in a kitchen full of matching doors, so one of them was bound to work. Here they are (in order of expense from most to least):
- Getting all new doors and drawer faces for the entire kitchen
- Ordering custom-made matching doors for just the few cabinets missing them
- Try to cut-down/repurpose leftover doors from the old cabinets that we’re no longer using (remember we took a bunch down here)
We actually investigated Option #1 first, because we do love a shaker style door (like the ones we chose for our last kitchen below):
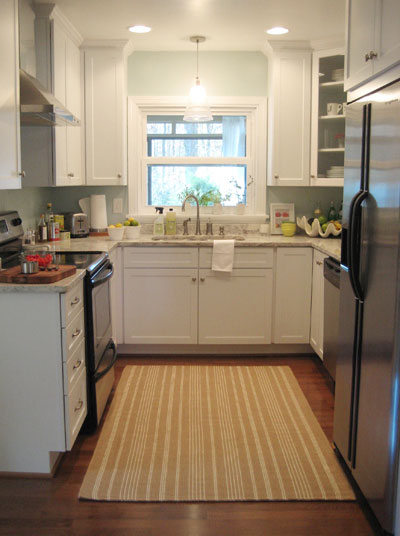
But as we started adding up the cost (best on a few different sources, from Home Depot to online door-making warehouses) and it started to look like it’d be upward of $2,000-3,000. So yeah…. next option?
Happily, option #2 was substantially less expensive. Our challenge here is that we have a very specific cabinet style. They’re extremely solid well-built custom oak cabinets and doors (which is nice – and we’re happy to have them)… but being custom means they’re a bit unusual (aka: haaard to find). They’re actually framed cabinets (i.e. there’s a small lip on the front of the cabinet box) and are partial inset doors (meaning part of them sit within the frame, part sit on top of the frame). This makes for an awesome seal that fits together amazingly (like one big puzzle) but it also makes hoping to somehow “find” matching doors in our custom style/size/depth virtually impossible.
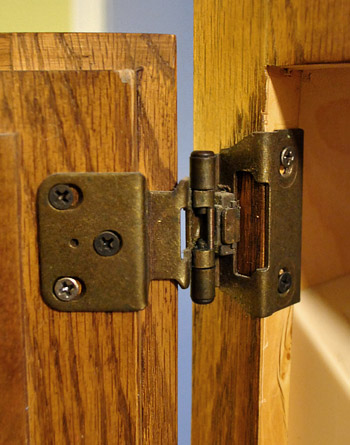
As for buying new ones “to order” in specific sizes that we request, no one that we dropped in on sold partial inset doors with the same detailing on the front (and we couldn’t use non-partial-inset doors because those would stick out about a half-inch more from the cabinet when closed, so they’d be really obvious and weird looking among the rest).
So next we called up the original manufacturer of the cabinets (a private company out of Pennsylvania called “Quaker Made” who specializes in custom cabinetry). They patched me through to an independent repair guy who makes new doors, so I gave him rough measurements and he quoted me about $800 to make new doors. Not bad, but a bit more than we were hoping to spend… especially when we had so many extra doors laying around. Including these five that were perfect candidates for being re-fitted.
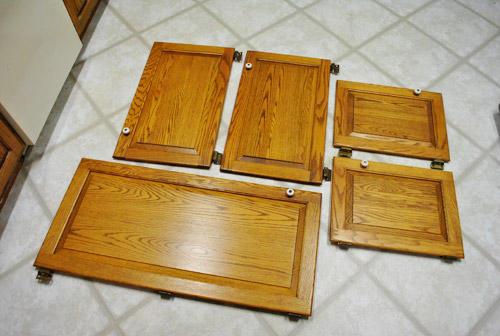
It kinda seemed stupid of us not to at least try to make these work first. If our attempt failed, we could always go to Option #2 as a back-up. And you know we like to work with what we have. So yeah, cue the power tools.
All of the doors were too big for their new cabinet-y homes, so we knew we had to cut them down. Cutting them down wasn’t going to be as straightforward as just slicing off the extra inches since I needed to maintain the raised border and the raised inner panel on each door (along with the inset edge around the perimeter). That meant I need to shave off the extra inches from the middle of the doors. Yikes.
To get super straight cuts, I used my table saw. For anyone wondering, our table saw of choice is this Skil one for $150, which we really like… maybe a little too much).
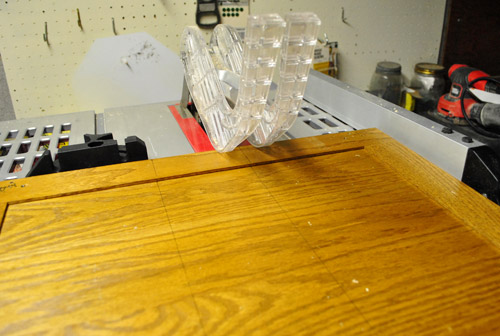
Two cuts later, I had removed a section from the middle and was left with two halves that would create the perfect door length.
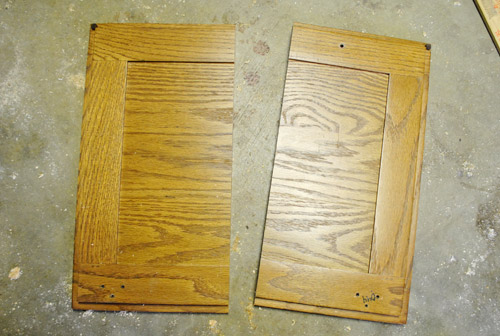
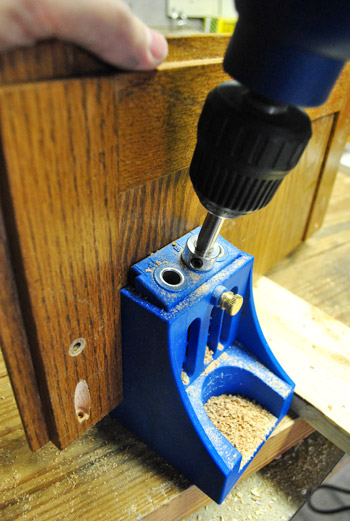
To secure the halves together, I made some pocket holes with one of my other BFF tools (my Kreg jig)…
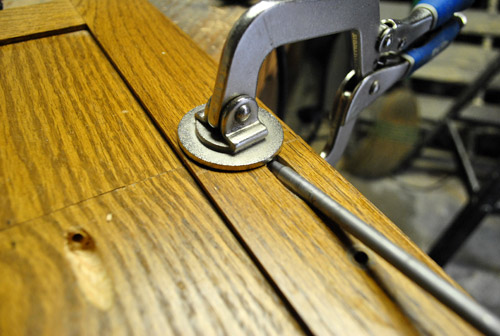
…then I carefully clamped them together before screwing everything tightly to secure them. I also use wood glue for the strongest possible hold, but I wipe the excess right away with a rag to keep things looking neat, which is why you don’t see it gushing out from the seam in this pic:
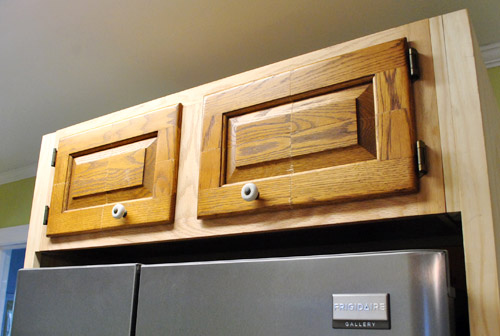
Now, for the doors above the fridge I had to repeat this cut-jig-screw step the other direction too, since the spare door was both too tall and too wide. Yup, I totally Frankensteined those babies.
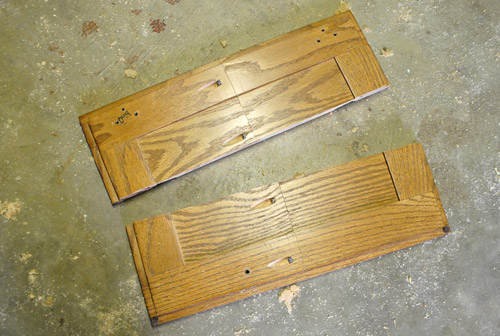
But once it was all screwed together again (and the hinges were reattached), things were actually fitting together much better than I expected (full disclosure: I completely thought this method would flop, but it was still worth a try just in case it ended up saving us $800).
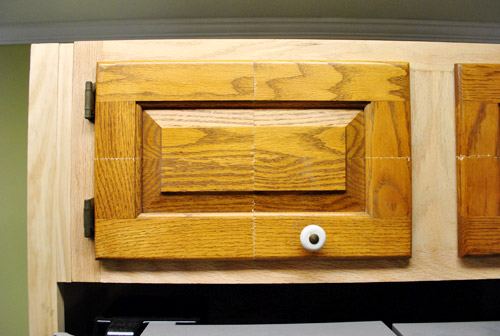
Now I know what some of you are thinking – because I was thinking the same thing: this isn’t looking so hot. But I reminded myself that once we add in some wood putty and sand those babies ’til they’re seamless we should be in ok shape. And once we use nice thick self leveling primer and paint, even things like the wood grain – and hopefully those hairline cracks should be undetectable (we used self leveling paint on the oak office cabinets that we painted and the wood grain doesn’t show through at all). Oh yeah, and we’re definitely moving the knob to a less awkward place (replacing it with new hardware actually)….
…and we’ll use wood putty to fill the screw holes in the back (it’s looking pretty treacherous back there).
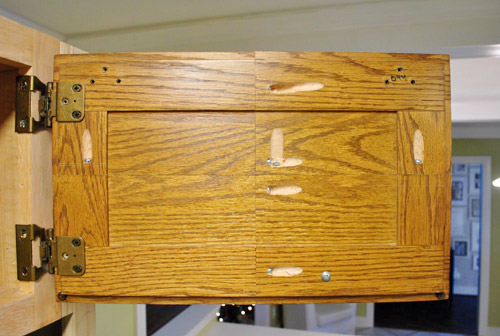
I probably made this process seem faster and easier than it really was. It took me all morning to do these two doors (and a third test door that I messed around with first to see what worked and what didn’t before moving on to a door that matters). And there weren’t just two cuts per door – there were definitely a few trims and recuts along the way to make sure things fit snugly, but not too snugly thanks to that inset-back edge.
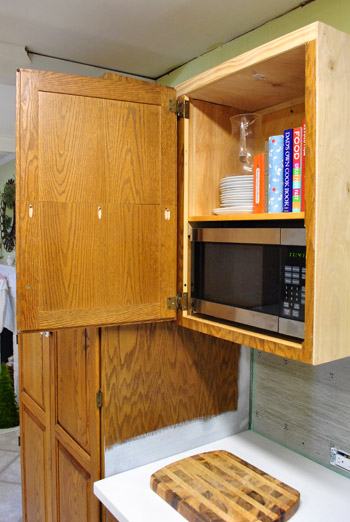
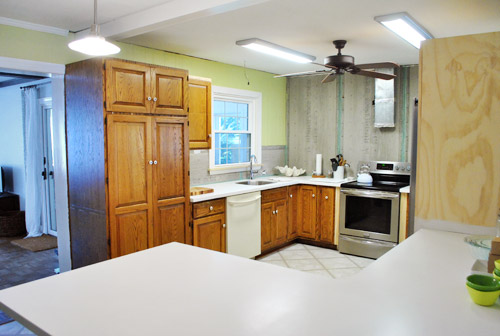
The microwave cabinet door was easier, since I was reusing the door that originally went on that once-taller cabinet. So it just took cutting a few inches out of the middle to make this door work.
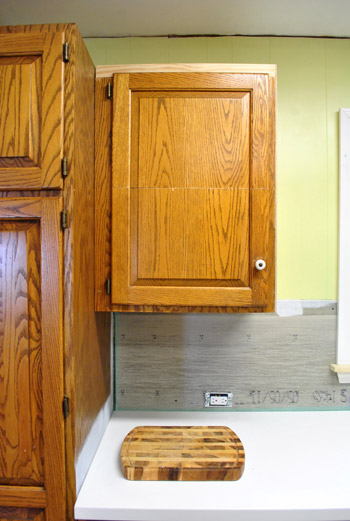
This one only took me an hour-ish to do. Progress! The reason even one cut takes so long is that I measure and remeasure and very nervously make my cuts on the conservative side (since you can always shave more off but it’s a lot harder to add stuff back in).
That progress got derailed a bit when I faced the corner cabinet. This secondhand cabinet came with bi-fold doors, but those hidden hinges wouldn’t work for our partial inset doors (which meant if we tried to use them those doors would stick out at least a half-inch more from the frame than the rest of the doors in our kitchen – which would look terrible). So we debated installing a pie-cut lazy susan and just affixing the doors directly to that (kinda like the one in our other corner cabinet across the way), but nixed that idea because after a bit of thought we decided one base cabinet with a lazy susan was enough for us – and we were actually enjoying all of the wide open space for bigger items (which would be lost if we sliced things up by adding a lazy susan).
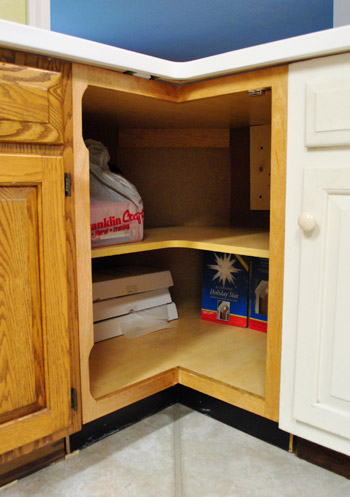
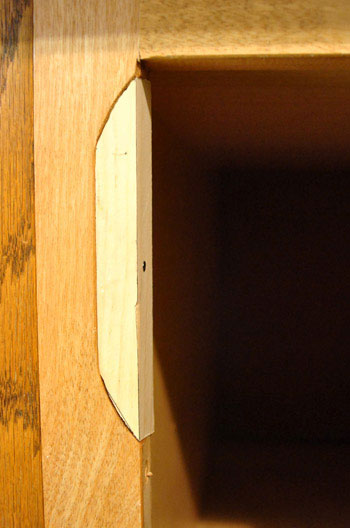
But before I could even start dealing with the doors, I had to fix these notches that were cut out of the frame to accommodate the old hinges.
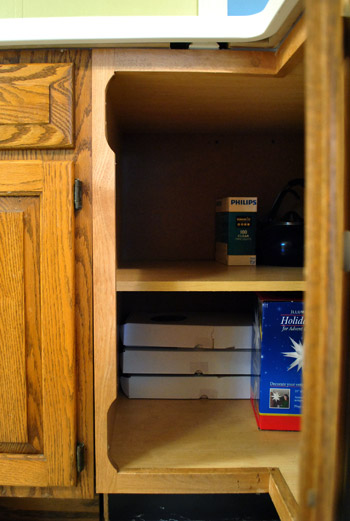
After a few tries, I finally was able to jigsaw a couple of pieces that fit into the notches (not perfectly, but wood putty thankfully covers a multitude of sins when you’re painting your cabinets). I just screwed them into place and was happy to finally have a place to attach my hinges (which will all be removed again for our wood-puttying and sanding step down the road – and most likely sprayed a new color to match our new hardware).
What we ended up doing with the door was the simplest solution that we could come up with using what we had: two separate doors, hinged on opposite sides.
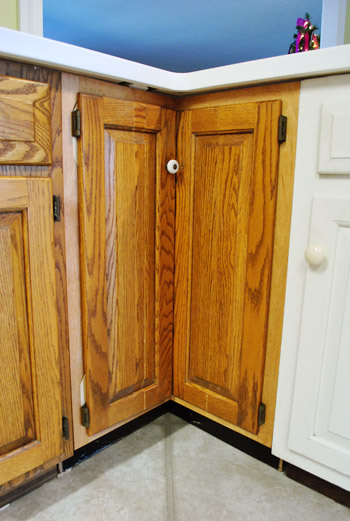
It took me the rest of the afternoon (plus part of the next morning) to get these to finally fit right, but you can see how they open below. The left door has a knob (that’s very awkwardly placed – which we’ll move) to open that side first. And once that door is open we can easily pull the other one open afterwards. We love that they still give us complete access to the wide shelves inside. Makes us very happy we didn’t go the lazy susan route since we already have one of those in another corner.
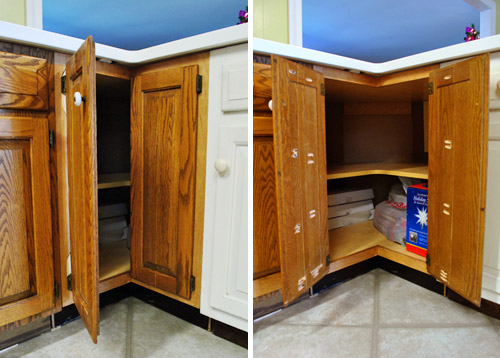
In the end, it definitely took longer than I hoped it would (mostly because of lots of noodling and trimming) but I think it came out pretty good. Everything fits. Everything closes nicely. And, once it’s all wood puttied / sanded / primed / painted, everything should look pretty much as good as new.
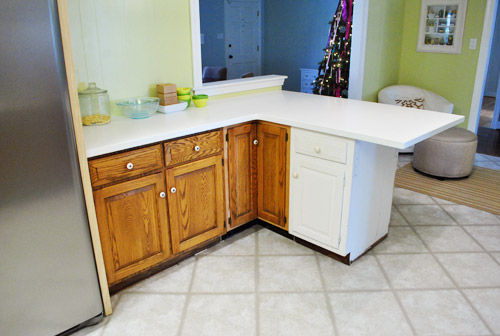
And, of course, if we don’t like how they look once they’re painted we can always call up the guy who’ll make us new doors for 800 beans if we have to (it’s not worth having a semi-ugly door situation to feast our eyes on every day in our new kitchen to save $800, so if it comes to that we’ll get ‘er done).
As for durability, joining solid oak doors with nails or glue alone would be a recipe for disaster – but making pocket holes and using heavy duty metal screws meant for the job along with wood glue is the permanent, strong, professional way to go (I like to do my research so things don’t fall apart later, which only adds up to more work for us). So there’s zero flex in the newly joined doors – they don’t close oddly or feel wiggly. They’re solid – and should function exactly the same way that our other solid oak doors do for the long haul.
As you can imagine, now we’re even more excited to get these suckers painted. Especially now that I’ve got all these ugly cuts that I want to hide going on. If only I didn’t have to do stuff like add toe-kick molding and other miscellaneous trim first. Although I did already add a new window sill and window trim (more on that later).
If we’re being realistic, it’s unlikely that we’ll get a painted cabinet update to you before Christmas in ten days (puttying and sanding and drying times for primer/paint would make that kinda impossible). But maybe we’ll recruit Santa to help us sand and prime when he drops down that chimney in 10 days. Sigh. If only these things could happen while we slept. Can you imagine how sweet that would be?

Gina says
Wow!! Very ambitious and great job. I have to say though I kinda liked the microwave cabinet without the door.
Hannah says
Wow! Good job, John! I was wondering how you would jury rig the doors and it seems to have worked. That Kreg jig (and John, of course)works wonders! I was wondering if the doors feel sturdy after all those cuts. I know I accidentally let my cabinets slam shut sometimes, and I wondered if you did that if the doors feel solid or kind of wobbley, especially the ones above the fridge that are cut both vertically and horizontally.
YoungHouseLove says
Oh yes, those pocket holes that the Jig makes take heavy duty metal screws. So it’s super rigid like one plank of wood. There’s not any give or any wiggling!
xo,
s
Melody says
Wow! That was genius, good job!
LauraC says
Way, way, WAY impressed here! GREAT job John!!!!
Keely says
Doing it that way would never have occurred to me. I bet it’ll be satisfying to take a sander to those to get the tiny ridges all flush.
Maybe you guys should start putting Clara to work! :) She can sand while you’re sleeping, right?
YoungHouseLove says
Seriously. And what is Burger doing? He sleeps all day- does he really need to sleep all night too?
xo,
s
Meagain says
The doors above the fridge seem to small in comparison to the large cabinet right in front. Should there not be less contour and more door? Just my opinion…
YoungHouseLove says
Yes, since we built out the wood walls to cover the fridge on either side of the cabinet, that would happen no matter what doors are added. We think once paint is added it won’t be noticeable since it’ll all be the same color/value – but if it looks bad we’ll definitely course correct as we go! 99.9% of our method is trial and error. Haha.
xo,
s
Courtney says
I’m not sure if it’s just the lighting in the picture, but it looks like the microwave cabinet door is a little crooked (slightly lower on the right than the left). Is that how it looks in person, or am I seeing things? :)
Courtney says
Also, they look great, and I can’t wait to see them painted–my previous comment is just me being anal!
YoungHouseLove says
Haha- no worries! In the end we’re anal too – so if we step back and the whole room looks amazing and one things looks baaaad, we’ll definitely make it right!
xo,
s
YoungHouseLove says
Haha, it’s just the angle/pic I think! I just stood in front of it and “in person” it looks level. Just got the level. Yup, level!
xo,
s
Nicole says
Wow, so resourceful!! I’m seriously impressed!!
erin says
John, it’s hard for me to believe you were once an ad guy.
You’ve found your true calling as a carpenter.
Emily says
Talk about a Tim Gunn, “Make it Work” Moment! Good job, guys!
Katy B says
That is one of the craziest ideas I have ever seen! I can’t believe it worked. I am sure it would only work with solid wood cabinet doors. I would think sad particle board would eventually spilt.
Crazy, crazy! You should be patting yourself on the back for that for a looong time. Well done!
Skye @ Neathering Our Fest says
Sounds to me like you need to hire an army of Elves on the Shelves to paint your kitchen while you guys catch up on sleep! :) I’m super impressed (but not at all surprised) at your handy man-handling of the current doors! I am getting more and more inspired to get to painting my kitchen an totally redoing it! YAY! :)
YoungHouseLove says
Haha- we do need those Elves! Stat.
xo,
s
Sami says
I like the “handy man-handling” comment. Made me laugh :)
bobbi says
wow. you are a magician :)
seriously sassy mama says
That was impressive!
debbie c says
Definitely worth a shot using whatcha got!! Once painted I think they will look fine…
I am considering painting my oak cabinets but my dear husband thinks the oak grain will be to visible. Does the self leveling primer really hide the grain well????
YoungHouseLove says
I would do a test on the inside of a door to see (or pick up a similar oak door from a secondhand store). In our office, after sanding and priming and painting with a self leveling paint there is zero grain showing. But we have heard of it coming through in texture (not color) in some instances so it probably varies and depends on what you use and what sort of oak cabs you start with!
xo,
s
Lauren says
This post is exactly why I follow your blog! I get a warm fuzzy feeling when things work out for you guys.. almost like they are working out for me. Except I’m in a rental. Boo
YoungHouseLove says
Aw thanks Lauren! We get the warm fuzzies from comments like yours. Not lying- you guys keep us going when all we want to do is never pick up a paint brush or a drill again! Haha.
xo,
s
Krysta @ Domestic for Dummies says
Your projects stress me out! But somehow you manage to have them come out looking great day after day! Can’t wait to see everything painted!
Maureen @This (Kinda) Old House says
Once again, I am amazed at you guys. These will look great once they are primed. I love, love, love how many great ideas/tips you offer. Seeing the cabinets primed will be almost as awesome as seeing them painted. :)
Emily Anne says
Awesome job!! What about hinging the two doors together on that weird corner cabinet so you only have to open one door?!
YoungHouseLove says
It’s really hard to explain but our doors can’t take those corner hinges (they need to be routed in and ours are too thin so they would splinter). Wish we could!
xo,
s
Emily Anne says
Bummer! We redid our kitchen cabinet doors also, so I can appreciate how difficult it can be. You guys did a fantastic job! It is going to look great!
Samma says
Our corner cabinet has that double-hinge door and I hate it. It’s like a pull-swing-pull motion is needed to open it and it always feels a little jerky. I may take your opposite hinge idea home and see if that would work for us instead.
And as long as I’m commenting anyway, WOW! frickin’ AWESOME work on those doors.
YoungHouseLove says
Aw thanks Samma! Hope it works for ya!
xo,
s
Danielle says
Wow! I’m seriously impressed! I figured it would be near impossible to make them look decent – based on all the cabinet detail – but they look amazing! Kudos all around!
Sarah @ The Strength of Faith says
How “real time” have you been able to keep all of these updates? Do you pretty much blog as you go?
YoungHouseLove says
Yup, we’re usually within anywhere from a few hours to a few days of something occurring (sometimes it takes a while to upload pics and write long posts with tons of details). For example, we had a few of these doors leaning up around the kitchen (sort of partially fitted) but only recently attached them with hinges and adjusted them to be sure they were 100% perfect before calling it “done” and blogging about it! There’s usually lots of stuff in progress and once we call it “done” it hits the blog (or we just share that process in pieces as we go, like upholstering a chair in two parts for example).
xo,
s
Sarah says
very impressed! great job!
Diana @ Boy + Girl says
Amazing! This is great! I’m trying to convince my other half that we can salvage our cabinets and I have all of your posts on stand by for when he tells me it won’t work. Thanks for the back up!
-Diana
Kevin J says
Awesome job, guys! About wood putty — any tricks to making sure it stays in place rather than popping out?
YoungHouseLove says
Hmm, anyone else have tips? I would say giving it ample drying time and then priming and painting it after you sand it sort of “seals it in” so it can’t really go anywhere.
xo,
s
Jennifer says
“If only these things could happen while we slept. Can you imagine how sweet that would be?”
Hah! Then you would be Clara…
YoungHouseLove says
Seriously!
xo,
s
Milly says
Hi!
I love what you have done with the kitchen in such a short period of time and that window looks really pretty already!
One of your pictures shows the white counter top with the white “newish” spare cabinet you found last month. Do you still like the look of the white on white or is too much? I personally love it but I know you mentioned not having decided just yet on the cabinet color.
Either way it will look fab!!
YoungHouseLove says
We’re still going back and forth! Promise to share when we’re sure!
xo,
s
Mari says
It doesn’t seem like your free white cabinet at the end of the peninsula is a perfect match. There seems to be too much space (compared to your existing cabinets) between the drawer and door. It this correct? Are you just going to live with the difference?
And for that white cabinet specifically, it seems also that its bottom (before the recessed kick plate) is too low. How are you going to address that?
YoungHouseLove says
Once we paint everything we’re going to look at that cabinet! If anything bothers us we’ll make a change! We’re 99.9% trial and error over here, but we’re willing to bet once it’s all painted with the same hardware and stools and backsplash and new lighting and all the other stuff that will layer in it will be totally undetectable. As for the bottom of the cabinets, we’re building them all to the same height with trim and then will add toe-kicks to further “connect” everything.
xo,
s
Scott says
I am always amazed at what you come up with–great solution on the doors. BTW, the placement of the knobs on the doors above the fridge make the “eyes” look really freaky!
YoungHouseLove says
Seriously! Can’t wait to get rid of them.
xo,
s
Momlady says
Yowzer!
John…Mad Skilz Dude!
my honest answer says
You guys, we love the kitchen updates, don’t get me wrong. But don’t ruin your Christmas trying to paint the cabinets! Because 1) That would be kind of unfair on you, you work soooo hard already and 2) it will end up being like Ross and Rachel on Friends. You want them to get together so much. And then they do, and actually, the tension is gone, and it’s kinda disappointing. Please drag this kitchen project out for as long as you can stand!
YoungHouseLove says
Haha- we definitely have family, hosting stuff, and kitchen stuff to juggle for the next few weeks! So it’ll be busy but hopefully festive and fun too!
xo,
s
Missy G. says
Haha, the Ross and Rachel analogy literally made me laugh out loud here!
Shreya says
WOW! If I wasn’t impressed enough already then this just did it!
Erin says
Looks great. Awesome work, John. I am super impressed.
I always wonder how much more I could get done if I could survive with only getting a couple hours of sleep a night. Well, I guess I could survive but the people around me would all leave.
Looking forward to seeing them primed and painted but don’t kill yourself. Enjoy the holidays with your family.
Gabbi says
I can’t believe that you guys were able to take on such a tricky project!! Beyond great job!
And puttying, sanding, priming and painting cabinets takes forever {as you well know haha}. I honestly thought we’d have ours done by now, but we are about 80% of the way there. I was up until midnight painting the frames two nights ago, and my Mom was spray painting our old hinges. We still have to do all the drawers, but things have been put on hold because our floors are being done right now.
It’s starting to look much better already though!
http://retroranchrenovation.blogspot.com/2011/12/cmon-man.html
YoungHouseLove says
Wahooo! SO much going in! Love it.
xo,
s
Kiran @ KiranTarun.com says
Aaahhh.. you guys rock! I can’t wait to see the finish product. I bet if we were in your shoes, we would’ve immediately ordered the new cabinets. Wouldn’t dare such DIY. But you all always make it work. Magic? :D
Missing Clara :)
Ashley@AttemptsAtDomestication says
That was such an awesome idea! I really hope it works out! You guys are such a DIY inspiration! We’re in the process of buying a house and every house we tour I tell my husband “On YHL they did this, or that.” http://www.attemptsatdomestication.com/lets-go-exploring/
Oh! And we’re from RVA and looking at houses on southside (in Chesterfield) so if we need kitchen reno help I may bribe you guys for help! Haha ;)
YoungHouseLove says
Haha- sounds good! We’ll be right over! Haha.
Happy house hunting!
xo,
s
Rosemary M. says
So not to be negative Nelly at all bc I love your work and I think you’re both so amazing that I almost feel bad about saying this.. I have to say/ask it.
It seems like the whole kitchen is made up of bits and pieces from here and there. Will this make the life of the kitchen remodel shorter just because the cabinets aren’t of the best quality? I mean they may be of great quality but after they’ve been cut, sanded, kreg jigged (made up my own word) and screwed back in do you think they might not hold up as well as a new one piece cabinet door would or a peninsula built from the same pieces would? Kitchens do take a beating with everyday use so i’m wondering how great it will hold up throughout the years.
This is just curiosity not negative criticism :)
YoungHouseLove says
We have been sure to use all oak cabinets, although some are secondhand and some are existing. This helps when it comes to durability (some fiberboard cabinets and doors aren’t as long-lasting). As for the doors, joining solid oak doors with nails would be a recipe for disaster, but making pocket holes and using heavy duty screws and wood glue to join things is the permanent, strong, professional way to go! There is zero flex in the newly joined doors – they don’t fold or close oddly or feel wiggly. They’re solid – and will stay that way since kreg screws won’t pull out like nails could! We definitely value long-lasting function over quick flash-in-the-pan style, so whenever we make material choices, we go for heavy duty screws and solid oak so things will be long-lasting. Even the corian counters can be sanded down and refinished, so we hear from folks who have had them for 30 or even 40 years!
xo,
s
Eva says
I have been anxiously awaiting your kitchen updates and today’s post was jaw dropping. You guys are amazing and have great skills. Merry Christmas and I can’t wait to see the final kitchen.
Karen L. says
Impressive imagination and skills! Love the Frankenstein line, too, which makes it fun to read. Love what you’re doing…….it will look wonderful later on and you won’t even remember what they used to look like. Great job, carpenter man.
Allison says
Ok. Seriously. I feel like John’s mom right now. I’m just bursting with pride over here! What an accomplishment!!
YoungHouseLove says
Me too! My chest is all swelly.
xo,
s
Wom Mom Ethne says
Impressive. Will there be ORB hardware?
YoungHouseLove says
We’re still on the fence about hardware! Details soon when we decide!
xo,
s
Claire says
I am completely impressed. Well done, John! I do not envy your filling and cabinet painting ahead though…
Miranda @boucksy says
Forgive me if this has been asked before, I try to read through comments before asking things like this…
do you plan to paint the cabinets after the wall o beautiful penny tile is installed or before? I know that you were waiting to paint them until after the countertops were installed (great idea) but just didn’t know how that played out with the tile since you’re going to have a lot of height going on, on the wall with the stove.
LOVE everything you’ve done and I would have NEVER thought about cutting cabinet doors like that. GENIUS! And thanks to you, a Kreg has been put on my Christmas list this year :)
YoungHouseLove says
We’ll be painting the cabinets before the tile goes in (since paint can stain grout, and it’s a lot easier to dropcloth counters than a vertical surface like the wall). Hope it helps!
xo,
s
Kate Battle says
Great job on the cabinet doors! You guys are getting me all pumped up to paint my kitchen cabinets after the holidays!
Laura says
This is a great idea. I too have difficulty getting seamless results with wood putty – even with thorough sanding and smoothing the finish still looks different than the original wood when painted (and I’m using the good self-leveling paint, too!). Looking forward to hearing about your process and the products you use.
Jen says
Great. Now I want a table saw, too. Thanks a lot John.
I’ve been anxiously awaiting this post due to a similar dilemma and this is seriously genius. I can’t wait to give it a try myself!
Now I’m off to purloin a table saw…
YoungHouseLove says
Haha, I love the word purloin. I don’t use it nearly enough!
xo,
s
Natalie @ Queen of Whirled says
That is seriously impressive Dr. Frankenjohn…Frankensik? I can’t choose. But you’ve got skillz.
YoungHouseLove says
Bwahahaha. Comment of the day! I will now refer to my husband as Dr. Frankensik.
xo,
s
Ms. Stork says
This morning I saw a Home Depot commercial and thought of you! I think you are the only people that can tackle major home improvement projects around holidays and not freak out like the rest of us would. I would love to hear how you are managing your daily lives, the major kitchen renovation, taking care of a child and christmas shopping? Are you like super human or something? LOL!
Great job… I would have never thought about cutting through the middle of the door! Clever!
YoungHouseLove says
Haha- check out my p.s. at the end of yesterday’s post with a link to another post all about that! Let’s just say things like showering and me-time have gone by the wayside, so I’m a terribly example of balance. We just put our heads down and try to get through stuff! Here’s hoping we can conquer the whole balance thing in 2012!
xo,
s
jess says
HA! Nice job! Love to see the end product!
Todd says
Hey John, nice work! You mentioned installing toe kicks. Are you doing this before you put down the new floor?
YoungHouseLove says
Yup, we’ll do everything but the quarter round, which will go on after the floor goes in!
-John
Todd says
I know quarter round can hide uneven ends, but I’d consider waiting on the toe kicks, too. It’ll save you some time with measurements. (Though, as I type this, I realized you won’t be laying floor under the cabinets as you would had you removed all of the cabinets, so you’d end up having to rip down the toe kicks. So never mind?!)
Also, I noticed that you took the time to jig saw around your baseboard where your peninsula meets the wall. Why not just pop off the baseboard, cut it to length, and leave yourself with a flush edge against the cabinet?
YoungHouseLove says
Haha, you’re funny. I like how you changed your mind mid suggestion! As for popping that baseboard off, we had just re-installed it (and caulked the top for a seamless look) when we drywalled/trimmed out the new opening and I literally told John “I’ll kill you if you rip that baseboard off and I have to recaulk and paint paneling again” – so that was a husband’s sweet solution (we figure it took a little time, but so would painting and caulking that baseboard once it’s back in place).
xo,
s
Todd says
You frequently talk about seamless looks, that’s why I was surprised about the jig saw move. ;)
YoungHouseLove says
Haha, I do say that a lot, huh? You should see me work a spackle knife. Wood putty princess, in da house.
xo,
s
JoJo says
Re: the baseboard and peninsula- Are you planning to run new baseboard along the plywood of the peninsula? If so you might run into trouble with that jigsawed edge as you really should have mitred that corner. You may end up popping it off after all!
YoungHouseLove says
Haha, I know! We’re not sure how we’re going to treat that (might do some decorative panels or something) but I think at that moment I just wasn’t ready to pop it off yet. Working up to it… haha.
xo,
s
Emily D says
That is some serious talent! I probably would have gone doorless until I could replace them all. Great job! It looks fantastic!